EVE SPIRAL 2B User manual

Gas cooktop
user manual
Model:
SPIRAL 2B

Preface
Thank you for choosing our gas cooktop.
To use this appliance correctly and prevent any potential risk, read these instructions before
using the appliance.
Keep these instructions in a place where you can find them easily.
If you are unsure of any of the information contained in these instructions, please contact our
customer care centre
The manufacturer shall not be responsible for any damages to persons or property caused by
incorrect installation or use of the appliance.
The appliance has been certified for use in countries other than those marked on the appliance.
The manufacturer also reserves the right to make any modifications to the products as may
be considered necessary or useful, also in the interests of the user, without jeopardising the
main functional and safety features of the products themselves.
The appliance is designed for a domestic environment and not a commercial one.
These instructions are only valid if the country symbol appears on the appliance.
If the symbol does not appear on the appliance, it is necessary to refer to the technical
instructions which will provide the necessary instructions concerning modification of the
appliance to the conditions of use of the country.
.
Prior to installation, ensure that the local distribution conditions (nature of the gas and gas
pressure) and the adjustment of the appliance are compatible.
The adjustment conditions for this appliance are stated on the label (or data plate);
This appliance is not connected to a combustion products evacuation device. It shall be
installed and connected in accordance with current installation regulations.
Particular attention shall be given to the relevant requirements regarding ventilation.
1

contents
Preface
Safety Warning
Safety Instructions
3
Installation
4
Child and People Safety
5
During Use
Cleaning and Service
8
Environmental Information
Instructions for use and maintenance
Description of the appliance
9
How to Use the appliance
1
Safety and Energy saving advice
1
Cleaning and Maintenance
Using instructions
Positioning
Installing the appliance
Gas Connection
Electrical Connection
Gas Conversion
Troubleshooting
Technical instructions
6
8
16
1
17
2
2
2
1
2
1
2
3
6
19
0
0
1

Danger/Warning Neglect of this mark may result in severe personal
injury or death.
Caution Neglect of this mark may result in minor personal
injury or property damage.
Caution No Access
No Fire Tool Must Do
Danger
- Do not turn on the light.
- Do not switch on/off any electrical appliance and do not touch any electric plug.
- Do not use a telephone.
1 Stop using the product and close the middle valve.
2 Open the window to ventilate.
3 Contact our service centre by using a phone outside.
are u in the Instruction Manual
Please take the time to read this Instruction Manual before infstalling or using the appliance.
This appliance can be used by children aged from 8 years and above and persons with
reduced physical, sensory or mental capabilities or lack of experience and knowledge if they
have been given supervision or instrucion concerning use of the appliance in a safe way
and understand the hazards involved. Children shall not play with the appliance. Cleaning
and user maintenance shall not be made by children without supervision.
If the supply cord is damaged, it must be replaced by the manufacturer, its service agent or
similarly qualified persons in order to avoid a hazard.
This instruction booklet must be kept with the appliance for any future reference. lf the
appliance is sold or transferred to another person, ensure the booklet is passed on to the
new user.
The manufacturer declines any liability should these safety measures not be observed.
The following marks are made to be easily understood so that you can prevent any accident
caused by misuse in advance, and use the appliance more conveniently.
Read the following contents thoroughly and ensure you understand them.
sed
cilrag
nettor fo llems( kael sag eht llems nac uoy taht os ,natpacrem sniatnoc sag leuf ehT *
or egg) even where only 1/1000 of the gas is in the air.
safety instructions
3

installation
Warning
■ This appliance shall be installed in
accordance with regulations in force
and only used in a well ventilated
space.
■ Prior to installation, ensure that the
gas and electrical supply complies
with the type stated on the rating
plate.
■ Where this appliance is installed in
marine craft or in caravans, it should not
be used as a space heater.
■ The gas pipe and electrical cable
must be installed in such a way that
they do not touch any parts or the
appliance.
■ This appliance should be installed by a qualified technician or installer.
■ The adjustment conditions for this appliance are stated on the label or data plate.
■ Remove all packaging before using the appliance.
■
After unpacking the appliance, make sure the product is not damaged and that the
connection cord is in perfect condition. Otherwise, contact the dealer before installing
the appliance.
■
The adjacent furniture and all materials used in the installation must be able to
withstand a minimum temperature of 85˚C above the ambient temperature of the
room it is located in, whilst in use.
■
In the event of burner flames being accidentally extinguished, turn off the burner
control and do not attempt to re-ignite the burner for at least one minute.
■
The use of a gas cooking appliance results in the production of heat and moisture in the
room in which it is installed. Ensure that the kitchen is well ventilated: keep natural
ventilation holes open or install a mechanical ventilation device (mechanical extractor hood).
■ Prolonged intensive use of the appliance may call for additional ventilation, for
example opening of a window, or more effective ventilation, for example increasing
the level of mechanical ventilation where present.
Caution
4
child and people safety
■ Do not allow children to play near or with the appliance.
The appliance gets hot when it is in use.
Children should be kept away until it has cooled.
■ This appliance is designed to be operated by adults.
■
Children can also injure themselves by pulling pans or pots off the appliance.
■ This appliance is not intended for use by children or other persons whose physical,
sensory or mental capabilities or lack of experience and knowledge prevents them
from using the appliance safety without supervision or instruction by a responsible
person to ensure that they can use the appliance safety.
Warning
Caution
5

during use
■ Only use the appliance for preparing
food.
Warning
■
The use of a gas cooking appliance results
in the production of heat and moisture in
the room in which it is installed. Ensure
that the kitchen is well ventilated : keep
natural ventilation holes open or install a
mechanical ventilation device
(mechanical
extractor hood).
■ The heating and cooking surfaces of
the appliance become hot when they
are in use, take all due precautions.
■ Never leave the appliance unattended
when cooking.
■ Do not modify this appliance.
■ Do not use this appliance if it
in contact with water. Do not operate
this appliance with wet hands.
■ Do not use large cloths, tea towels or
similar as the ends could touch the
flames and catch fire.
■ Unstable or misshapen pans should
not be used on the appliance as they
can cause an accident by tipping or
spillage.
comes
Burner
panel is not designed to operate
from an external timer or separate
remote control system.
■
Do not use or store flammable
materials in the storage drawer
near this appliance.
■ Perishable food, plastic items and
aerosols may be affected by heat and
should not stored above or below the
appliance.
6
during use
■ Do not spray aerosols in the vicinity of
this appliance while it is in operaiton.
■
Prolonged intensive use of the appliance may call for additional ventilation, for example
opening of a window, or increasing the level of mechanical ventilation where present.
■ Use heat-resistant pot holders or gloves when handling hot pots and pans.
■ Do not let pot holders come near open flames when lifting cookware.
■
Take care not to let pot holders or gloves get damp or wet, as this causes heat to transfer
through the material quicker with the risk of burning yourself.
■
Only ever use the burners after placing pots and pans on them. Do not heat up any empty
pots or pans.
■
Never use plastic or aluminium foil dishes on the appliance.
■ When using other electrical appliances, ensure the cable does not come into contact with
the appliance surfaces of the cooking appliance.
■ If you have any mechanical parts eg. an artifical heart in your body, consult a doctor before
using the appliance.
■
. Such cloths can catch fire
on a hot burner.
■ When using glass cookware, make sure it is designed for top plate cooking.
■ To minimise the possibility of burns, ignition of flammable materials and spillage, turn
cookware handles toward the side or center of the top plate without extending over
adjacent burners.
■ Always turn burner controls off before removing cookware.
■ Carefully watch foods being fried at a high flame setting.
■ Always heat fat slowly and watch as it heats.
■ Foods for frying should be as dry as possible. Frost on frozen foods or moisture on fresh
foods can cuase hot fat to bubble up and over the sides of the pan.
Never try to move a pan of hot fat especially a deep fat fryer. Wait until the fat is
completely cool.
In case of hotplate glass breakage:
- shut immediately off all burners and any electrical heating element and isolate the
appliance from the power supply.
- do not touch the appliance surface,
- do not use the appliance.
Hob guards cannot be used. Inappropriate hob guards can cause accidents.
■ Ensure the control knobs are in the
‘ ’ position when not in use.
Caution
Do not use a tea towel or similar materials in place of a pot holder
Do not use a tea towel or similar materials in place of a pot holder
■
If the surface
is made of glass-cracked, switch off the appliance to avoid defeat electr cutiono.
■
■
■
■
Avoid using cooking vessels on the hotplate that overlap its edges.
7
cleaning and service
environmental information
■ After installation, please dispose of the packaging
with due regard to safety and the environment.
■ When disposing of an old appliance, make it
unusable, by cutting off the cable.
&RUUHFW'LVSRVDORI7KLV3URGXFW
:DVWH(OHFWULFDO(OHFWURQLF(TXLSPHQW
■ This marking shown on the product or its literature, indicates that it should not be
disposed with other household wastes at the end of its working life. To prevent
possible harm to the environment or human health from uncontrolled waste disposal,
please separate this from other types of wastes and recycle it responsibly to promote
the sustainable reuse of material resources.
■ Household users should contact either the retailer where they purchased this product,
or their local government office, for details of where and how they can take this item
for environmentally safe recycling.
■ Business users should contact their supplier and check the terms and conditions of
the purchase contract. This product should not be mixed with other commercial
wastes for disposal.
■ Never use abrasive or caustic
cleaning agents.
Warning
■ Before attempting to clean the appliance, it should be disconnected from the mains
and cooled.
■ You should not use a steam jet or any other high pressure cleaning equipment to
clean the appliance.
■ This appliance should only be
repaired or serviced by an authorised
Service Engineer and only genuine
approved spare parts should
be used.
Caution
8
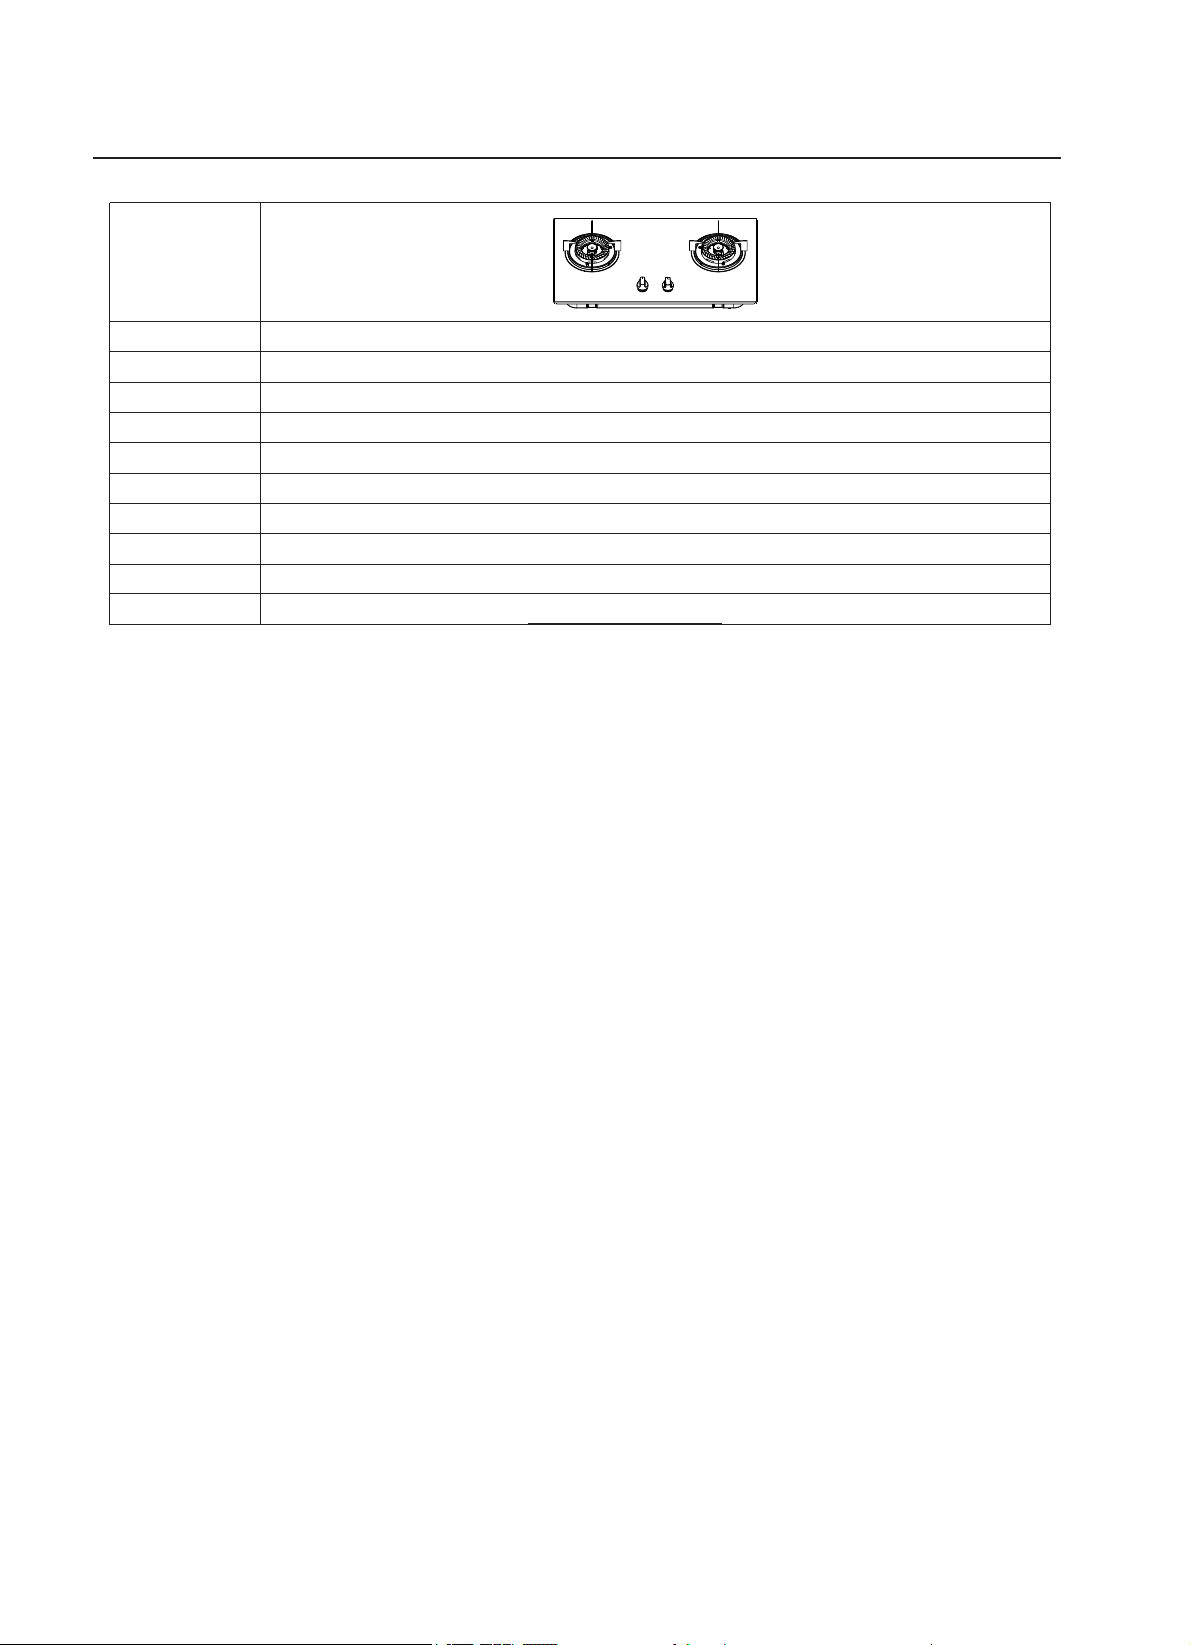
description of the appliance
Built-in gas hob
Glass
Continuous I gnition Type
Hose
Burner Feature
ΣQn
D battery,1.5V
Wok burner (2)
10.0kW
720*420*140mm
5.0kW(364g/h)
Enamel
Electric supply
Gas Connection
Ignition device
Dimension(W*D*H)
Top Plate
Pan Support
Tupe of gas hob
Model
9
SPIRAL 2B
description of the appliance
Gas type
Category I3B/P
29/37 mbar
Burner
10.0
Rated Flow(g/h) 728
Injector
Diameter(mm) 0.92+0.57
Rated
Power(kW)
If you want to process gas conversion, all work must be carried out by a
qualified technician.
All injectors replacement should be operated according to the table
above.
After gas conversion, it is strongly suggested to place new label on the
product for clarfication.
For operation detail, please refer to Chapter GAS CONVERSION.
G30/G31
10
SPIRAL 2B
description of the appliance
Auxiliary pan support (1)
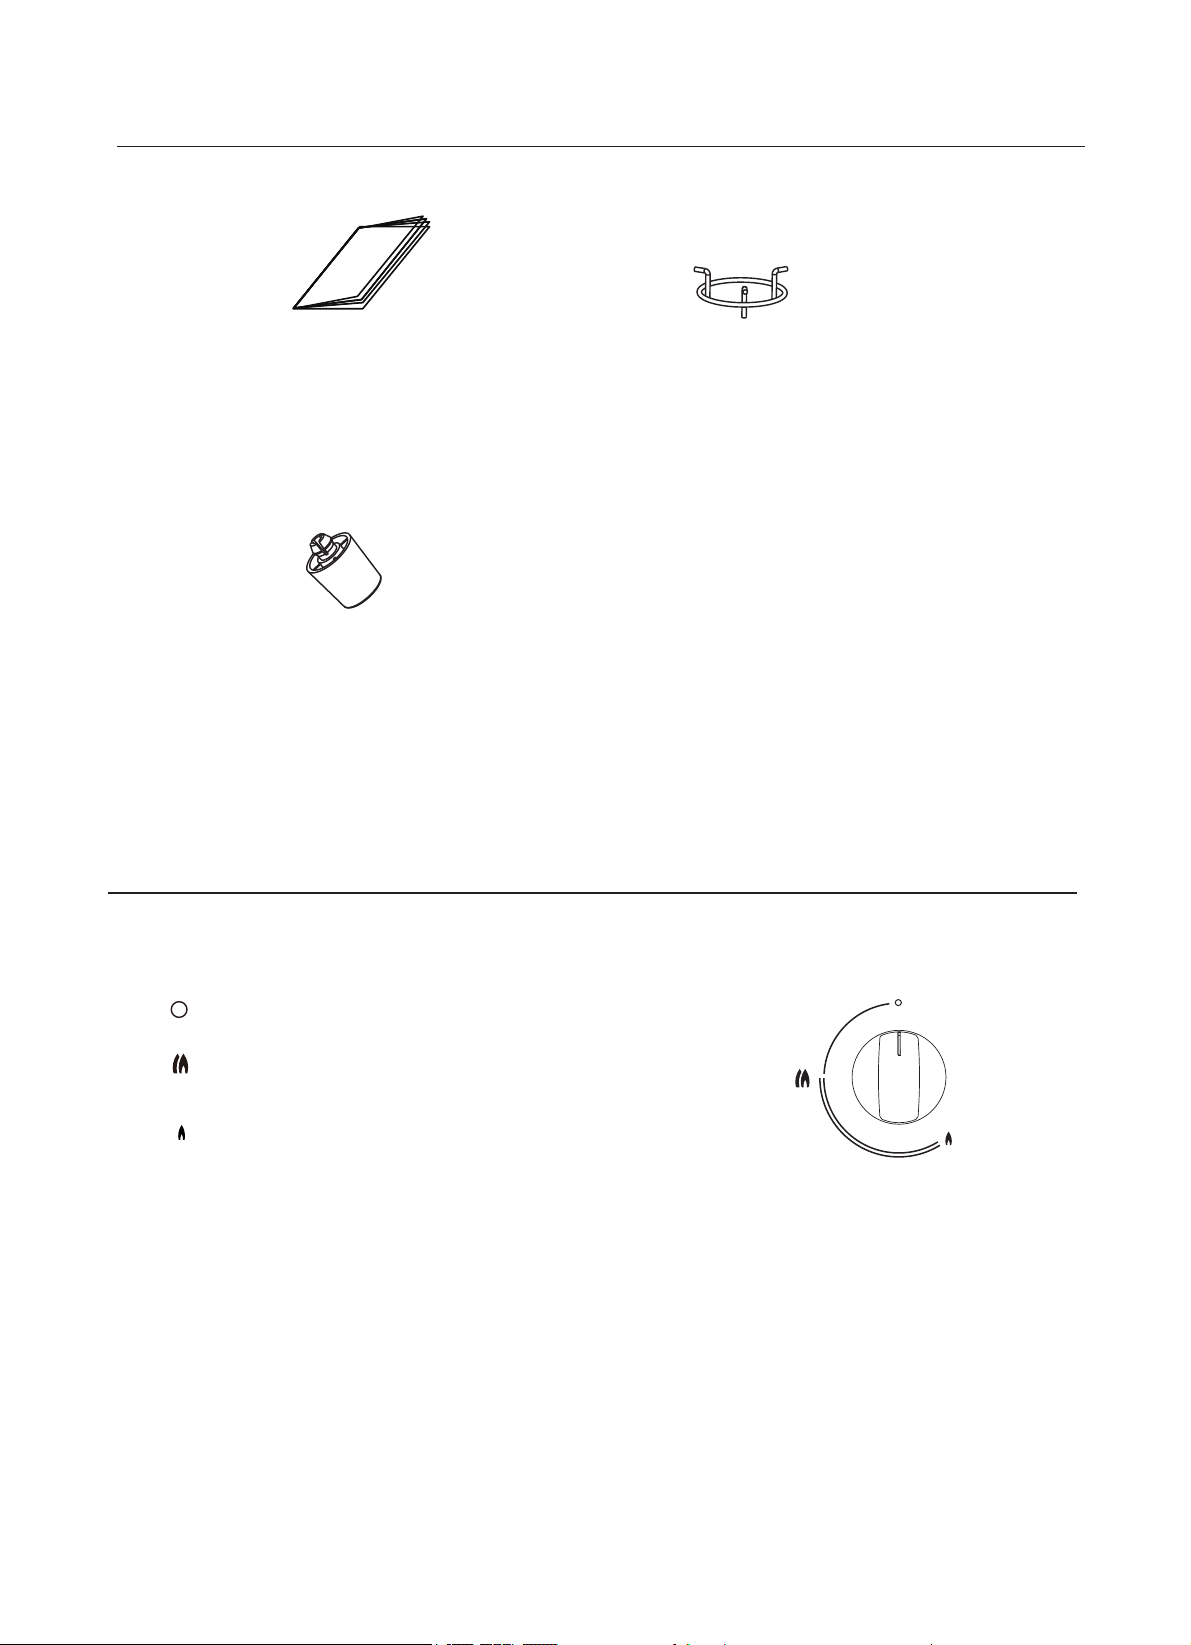
Instruction Manual (1)
how to use the appliance
The following symbols will appear on the control panel, next to each control handle :
Ŷ7KHPLQLPXPVHWWLQJLVDWWKHHQGRIWKHDQWLFORFNZLVHURWDWLRQRIWKHFRQWUROKDQGOH
Ŷ$OORSHUDWLRQSRVLWLRQVPXVWEHVHOHFWHGEHWZHHQWKHPD[LPXPDQGPLQLPXPSRVLWLRQ
Ŷ7KHV\PERORQWKHFRQWUROSDQHOQH[WWRWKHFRQWUROKDQGOHZLOOLQGLFDWHZKLFKEXUQHULWRSHUDWHV
Black circle: gas off
Large flame: maximum setting
Small flame: minimum setting
Automatic ignition with flame failure safety device
The appliance is fitted with a flame failure safety device on each burner, which is
designed to stop the flow of gas to the burner head in the event of the flame
going out.
11
Rubber foot (4)
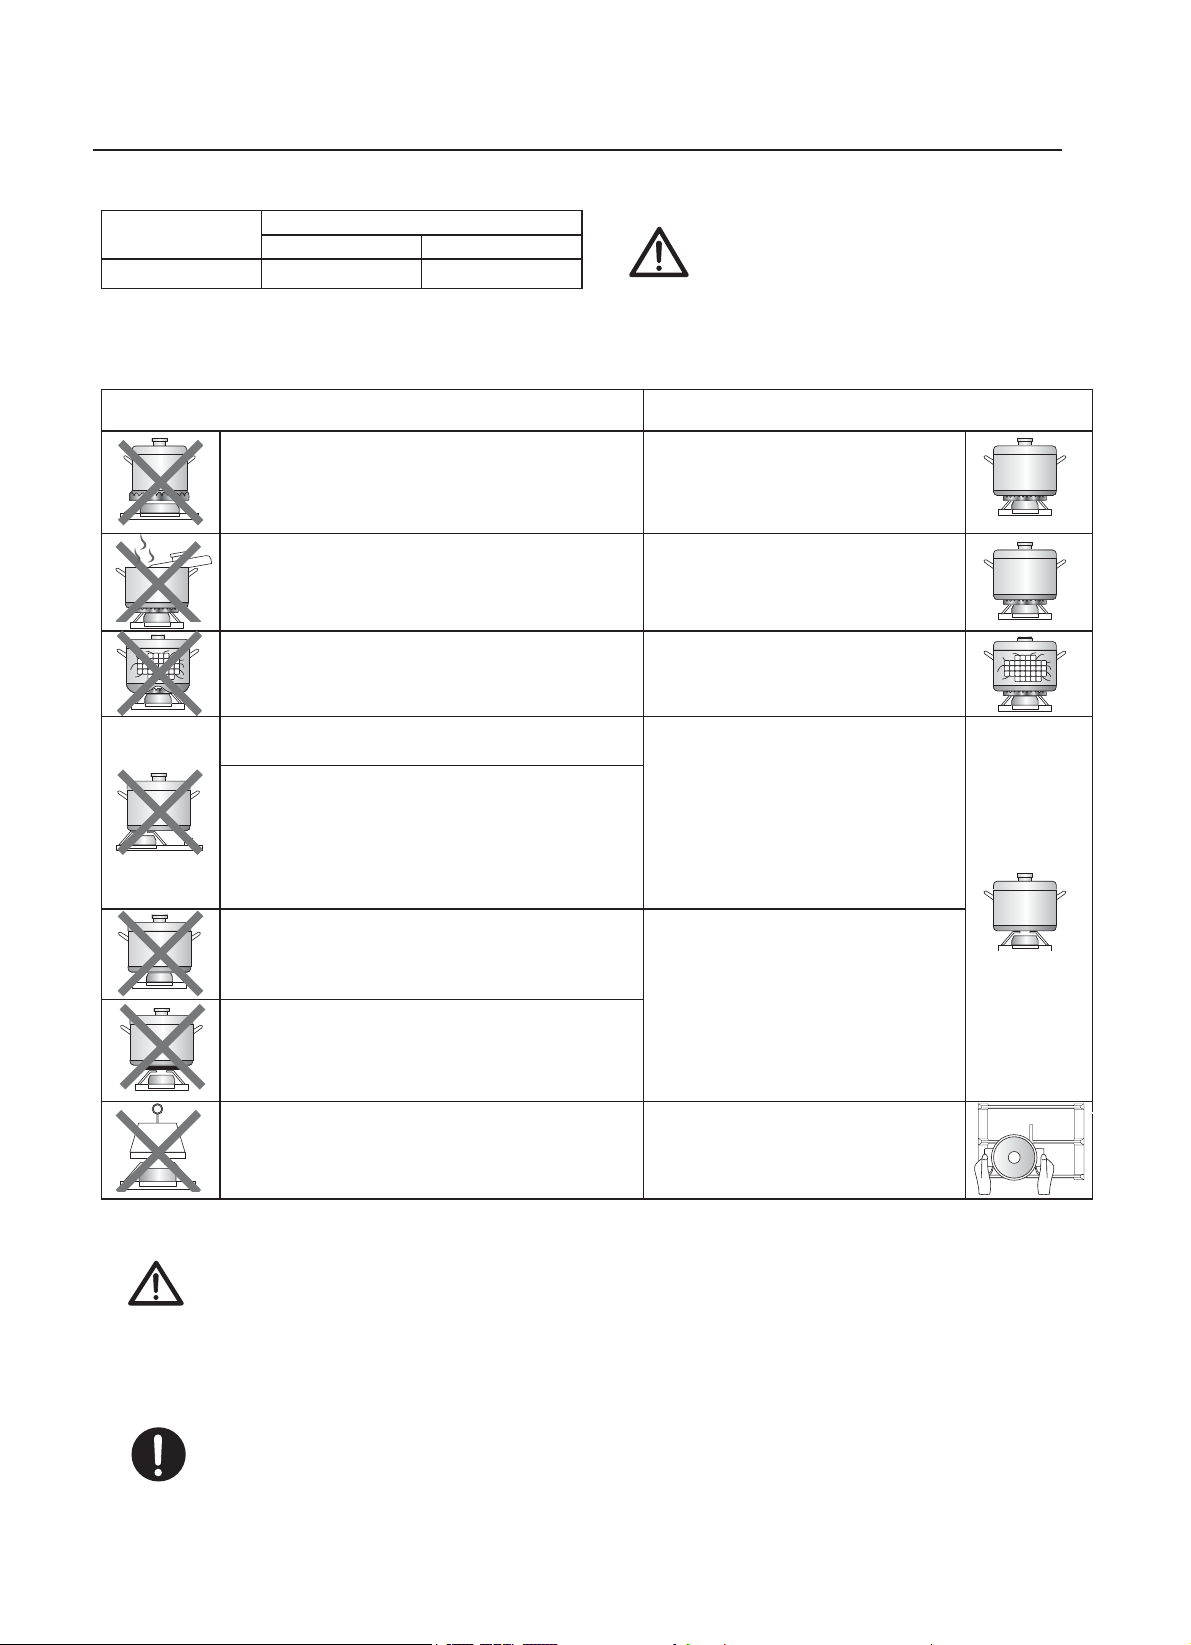
safety and energy saving advice
- The diameter of the bottom of the pan should correspond to that of the burner.
BURNERS 3$16
PLQ PD[
220mm 300mm
NO YES
'RQRWXVHVPDOOGLDPHWHUFRRNZDUHRQ
ODUJHEXUQHUV
7KHÀDPHVKRXOGQHYHUFRPHXSWKH
VLGHVRIWKHFRRNZDUH
$OZD\VXVHFRRNZDUHWKDW
VXLWDEOHIRUHDFKEXUQHU
WR
DYRLGZDVWLQJJDVDQG
GLVFRORXULQJWKHFRRNZDUH
$YRLGFRRNLQJZLWKRXWDOLGRUZLWKWKH
lid half off
DVWKLVZDVWHVHQHUJ\
ODFH OLGRQWKHFRRNZDUH
'RQRWXVHDSDQZLWKDFRQYH[RU
FRQFDYHERWWRP
2QO\XVHSRWVVDXFHSDQVDQG
IU\LQJSDQVZLWKDWKLFNÀDW
ERWWRP
'RQRWSODFHFRRNZDUHRQRQHVLGHRID
EXUQHUDVLWFRXOGWLSRYHU $OZD\VSODFHWKHFRRNZDUH
ULJKWRYHUWKHEXUQHUVQRWWR
one side.
'RQRWXVHFRRNZDUHZLWKDODUJHGLDPHWHU
RQWKHEXUQHUVQHDUWKHFRQWUROVZKLFK
ZKHQSODFHGRQWKHPLGGOHRIWKHEXUQHU
PD\WRXFKWKHFRQWUROVRUEHVRFORVHWR
them that they increase the temperature in
this area and may cause damage.
1HYHUSODFHFRRNZDUHGLUHFWO\RQWRSRI
WKHEXUQHU
3ODFHWKHFRRNZDUHRQWRSRI
the trivet.
'RQRWSODFHDQ\WKLQJHJÀDPHWDPHU
DVEHVWRVPDWEHWZHHQSDQDQGSDQ
support as serious damage to the
appliance may result.
'RQRWXVHH[FHVVLYHZHLJKWDQGGRQRW
KLWWKH ZLWK KHDY\ REMHFWV
+DQGOHFRRNZDUHFDUHIXOO\
ZKHQWKH\DUHRQWKHEXUQHU
Ŷ'RQRWXVHFRRNZDUH
WKDW
RYHUODSVWKHHGJH
is
3D
cooktop
Ŷ,WLVQRW WRXVH URDVWLQJSDQVIU\LQJ SDQVRU JULOO VWRQHV
KHDWHG
VLPXOWDQHRXVO\ VHYHUDO EXUQHUV EHFDXVH WKH UHVXOWLQJ KHDW
EXLOGXS PD\
GDPDJHWKH DSSOLDQFH
Ŷ
Ŷ$VVRRQDVDOLTXLGVWDUWVERLOLQJWXUQGRZQWKHÀDPHVRWKDWLWZLOO
EDUHO\NHHSWKHOLTXLGVLPPHULQJ
recommended
on
Do not touch the top plate and trivet whilst in use for a certain period after
use.
of the
burner.
Wok burner
12

cleaning and maintenance
■ Take off the Pan support.
■ Clean these and the control handles with a damp cloth, washing up liquid and warm
water. For stubbon soiling, soak beforehand.
■ Dry everything with a clean soft cloth.
Ŷ&OHDQLQJRSHUDWLRQVPXVWRQO\EHFDUULHGRXWZKHQWKHDSSOLDQFH
LV FRRO
Ŷ7KHDSSOLDQFHVKRXOGEHGLVFRQQHFWHGIURP\RXUPDLQVVXSSO\EHIRUH
FRPPHQFLQJDQ\FOHDQLQJSURFHVV
Ŷ&OHDQWKHDSSOLDQFHUHJXODUO\SUHIHUDEO\DIWHUHDFKXVH
Ŷ$EUDVLYHFOHDQHUVRUVKDUSREMHFWVZLOOGDPDJHWKHDSSOLDQFHVXUIDFH
\RXVKRXOGFOHDQLWXVLQJZDWHUDQGDOLWWOHZDVKLQJXSOLTXLG
3DQVXSSRUW&RQWUROKDQGOHV
■ Regularly wipe over the top plate using a soft cloth well in warm water to
which a little washing up liquid has been added.
■ Dry the top plate thoroughly after cleaning.
■ Thoroughly remove salty foods or liquids from the hob as soon as possible to avoid
the risk of corrosion.
■ Stainless steel parts of the appliance may become discoloured over time. This is
normal because of the high temperatures. Each time the appliance is used these
parts should be cleaned with a product that is suitable for stainless steel.
7RSSODWH
8VDEOH 8QXVDEOH
Metal Brush
(GLEOH2LO $FLGLF$ONDOL
Detergent
$EUDVLYH 7KLQQHU%HQ]HQH
7K
M
UDVLYH
Soft cloth
Neutral Detergent
Nylon Brush
wrung-out
completely
13
cleaning and maintenance
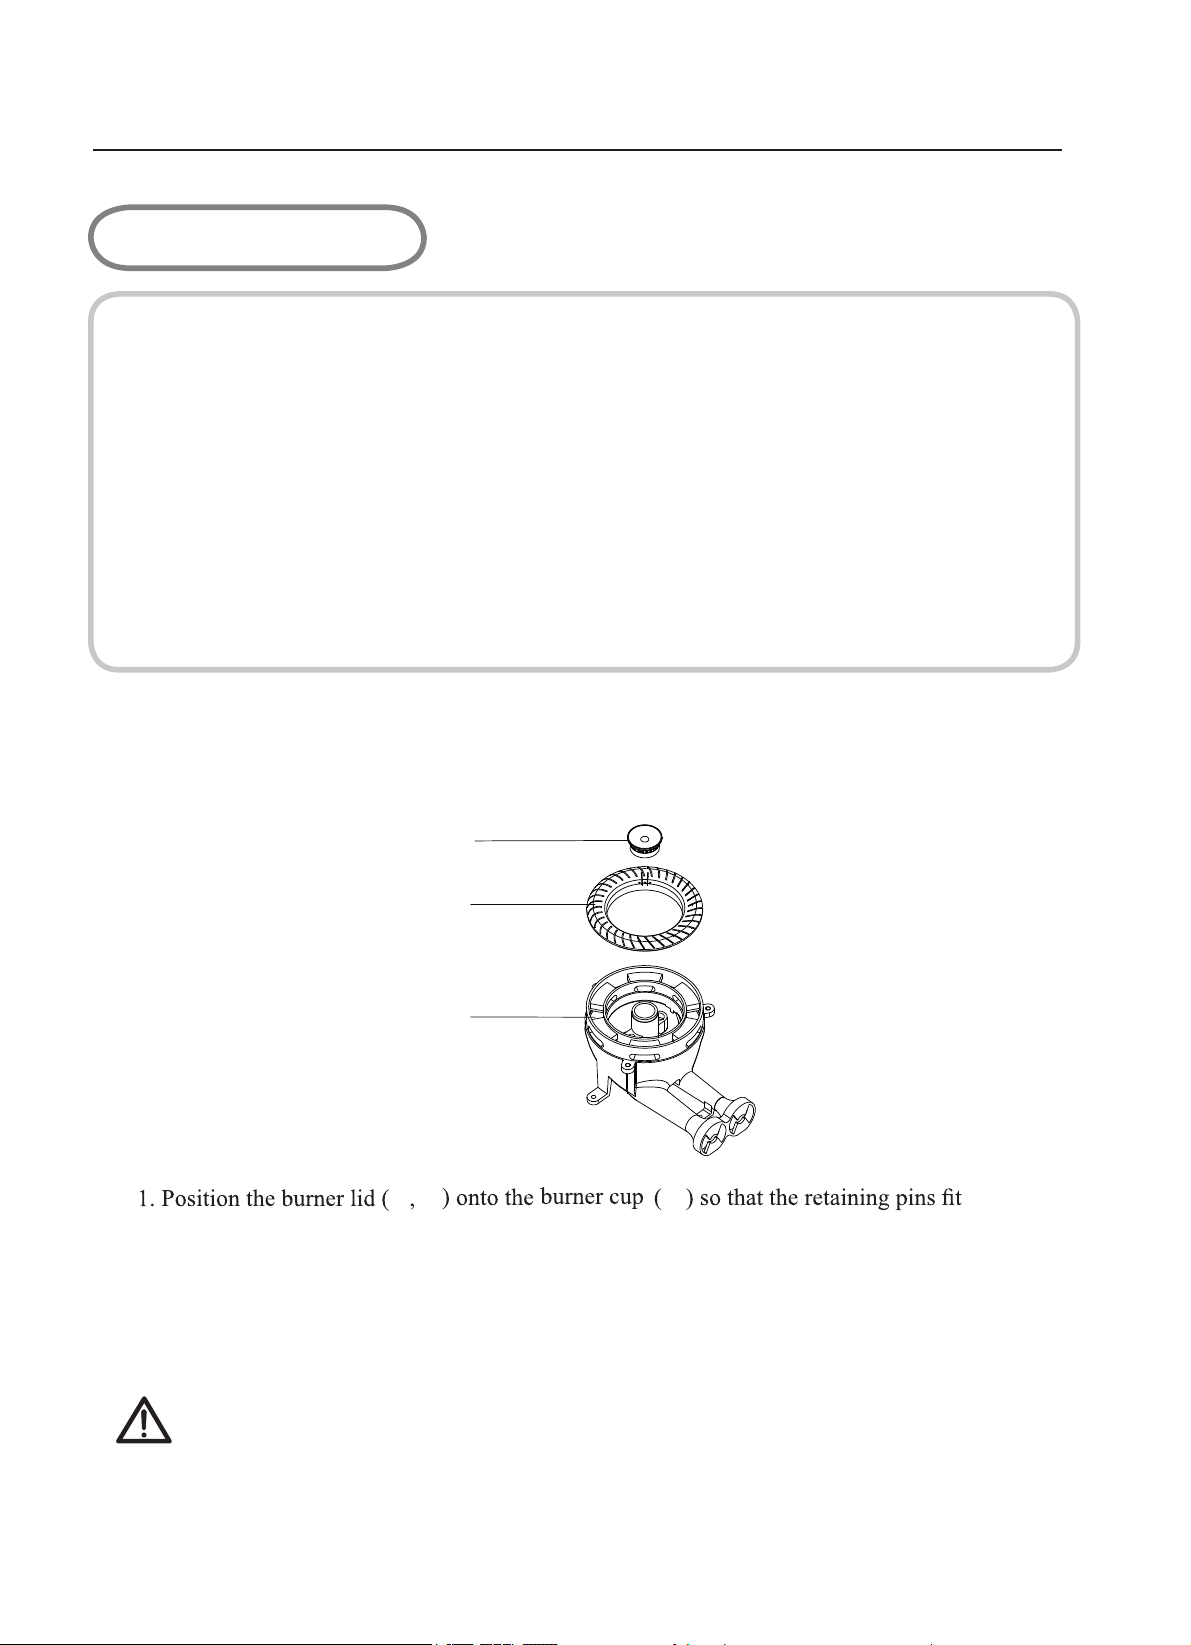
ʄ5HDVVHPEOHWKH
7ULSOH&URZQEXUQHUVDVIROORZV
■ Remove the burner lids and Flame Spreaders by pulling them upwards and away
from the top plate.
■ Soak them in hot water and a little .
■ After cleaning and washing them, wipe and dry them carefully. Make sure that the
flame holes are clean and completely dry.
■ Wipe the fixed parts of the burner cup with a damp cloth and dry afterwards.
■ Gently wipe the gnition device and flame supervision device with a well wrung-out
cloth and wipe dry with a clean cloth.
■ Before placing the burners back on the top plate, make sure that the injector is not
blocked.
%851(56
5HSODFHSDUWVLQWKHFRUUHFWRUGHUDIWHUFOHDQLQJ
'RQRWPL[XSWKHWRSDQGERWWRP
7KHORFDWLQJSLQVPXVW¿WH[DFWO\LQWRWKHQRWFKHV
i
washing up liquiddetergent or
12into their
respective recesses.
14
1
2
3
3

Warnings
using instructions
Ŷ'RQRWPRGLI\WKLVDSSOLDQFH
Ŷ7KLVDSSOLDQFHPXVWEHLQVWDOOHGE\DQDXWKRULVHGWHFKQLFLDQRU
LQVWDOOHU
Ŷ3ULRUWRLQVWDOODWLRQHQVXUHWKDWWKHORFDOGLVWULEXWLRQFRQGLWLRQV
QDWXUHRIWKHJDVDQGJDVSUHVVXUHDQGWKHDGMXVWPHQWRIWKH
DSSOLDQFHDUHFRPSDWLEOH
Ŷ7KHDGMXVWPHQWFRQGLWLRQVIRUWKLVDSSOLDQFHDUHVWDWHGRQWKHODEHO
RUGDWDSODWH
Ŷ7KLVDSSOLDQFHLVQRWFRQQHFWHGWRDFRPEXVWLRQSURGXFWVHYDFXDWLRQ
GHYLFH,W
EHLQVWDOOHGDQGFRQQHFWHGLQDFFRUGDQFHZLWKFXUUHQW
LQVWDOODWLRQUHJXODWLRQV3DUWLFXODUDWWHQWLRQ EH JLYHQ WRWKH
UHOHYDQWUHTXLUHPHQWVUHJDUGLQJYHQWLODWRQ
Ŷ%HIRUHLQVWDOOLQJWXUQRIIWKHJDVDQGHOHFWULFLW\VXSSO\WRWKH
DSSOLDQFH
Ŷ$OODSSOLDQFHVFRQWDLQLQJDQ\HOHFWULFDOFRPSRQHQWVPXVWEHHDUWKHG
Ŷ(QVXUHWKDWWKHJDVSLSHDQGHOHFWULFDOFDEOHDUHLQVWDOOHGLQVXFKD
ZD\WKDWWKH\GRQRWWRXFKDQ\SDUWVRIWKHDSSOLDFQHZKLFK
EHFRPH KRW
Ŷ*DVSLSHRUFRQQHFWRUVKRXOGQ¶WEHEHQWRUEORFNHGE\DQ\RWKHU
DSSOLDQFHV
Ŷ&KHFNWKHGLPHQVLRQVRIWKHDSSOLDQFHDVZHOODVWKHGLPHQVLRQVRI
WKHJDSWREHFXWLQWKHNLWFKHQXQLW
Ŷ7KHSDQHOVORFDWHGDERYHWKHZRUNVXUIDFHGLUHFWO\QH[WWRWKH
DSSOLDQFHPXVWEHPDGHRIQRQÀDPPDEOHPDWHULDO%RWKWKHVWUDWL
¿HGVXUIDFLQJDQGWKHJOXHXVHGWRVHFXUHLWVKRXOGEHKHDWUHVLVWDQW
WRSUHYHQWGHWHULRUDWLRQ
Ŷ7XUQRQDSSOLDQFHWDSDQGOLJKWHDFKEXUQHUV
&KHFNIRUDFOHDUEOXHÀDPHZLWKRXW\HOORZWLSSLQJ
,IEXUQHUVVKRZVDQ\DEQRUPDO WLHVFKHFNWKHIROORZLQJ
%XUQHUOLGRQFRUUHFWO\
)ODPHVSUHDGHUSRVLWLRQHGFRUUHFWO\
%XUQHUYHUWLFDOO\DOLJQHGZLWKLQMHFWRUQLSSOH
Ŷ$IXOORSHUDWLRQDOWHVWDQGDWHVWIRUSRVVLEOHOHDNDJHVPXVWEHFDUULHG
RXWE\WKH¿WWHUDIWHULQVWDOODLRQ
Ŷ7KHÀH[LEOHKRVHVKDOOEH¿WWHGLQVXFKDZD\WKDWLWFDQQRWFRPHLQWR
FRQWDFWZLWKDPRYHDEOHSDUWRIWKHKRXVLQJXQLWDQGGRHVQRWSDVV
WKURXJKDQ\VSDFHVXVFHSWLEOHRIEHFRPLQJFRQJHVWHG
VKRXOG
VKRXOG
may
L
Grease cranes produced at the factory to meet the requirement of all
life hob.
Ŷ
15

positioning
400mm
645
mm
34
0
mm
400mm
700mm
0mm
Min.
&/($5$1&(65(48,5('
:+(1),77,1*7+(+2%
:,7+$&22.(5+22'$%29(
150mm
20
16
Ŷ7KLVDSSOLDQFHLVWREHEXLOWLQWRDNLWFKHQXQLWRU600 PPZRUNWRSSURYLGLQJ
the IROORZLQJPLQLPXPGLVWDQFHVDUHDOORZHG
oThe edges of the hob must be a minimum distance of 65mm from rear wall
and 200mm from side wall
o700 mm between the highest point of the hob surface (including the burners)
and the underside of any horizontal surface directly above it.
o400 mm between the hob surfaces, providing that the underside of the
horizontal surface is in line with the outer edge of the hob. If the underside of
the horizontal surface is lower than 400 mm, then it must be at least 50 mm
away from the outer edges of the hob.
o50 mm clearance around the appliance and between the hob surface and any
combustible materials.
45 mm
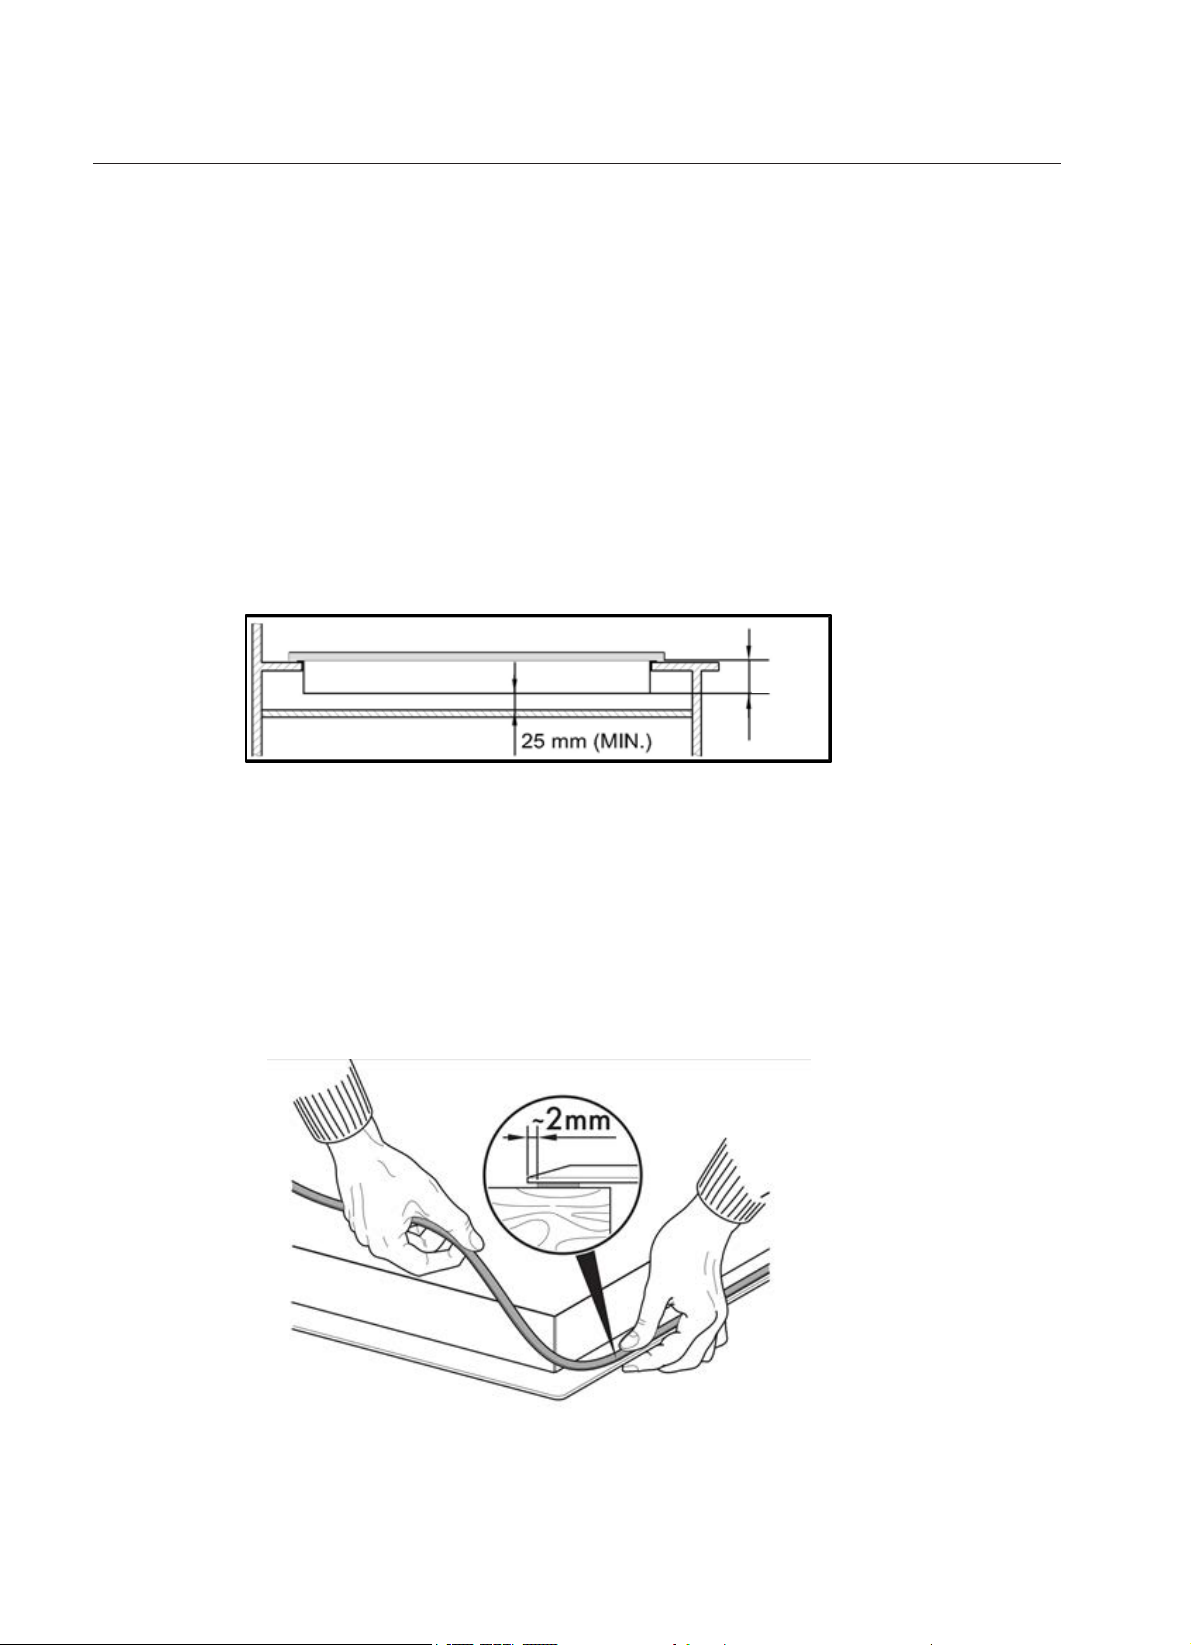
oYou must have a gap of at least 25 mm and at most 74 mm between the
underneath of the appliance and any surface that is below it.
installing the appliance
With Glass hob
To prevent leakage of liquid between the frame of the hob and the countertop,
place the adhesive seal provided along the entire outer edge of the hob
before assembly.
17
installing the appliance
With Steel hob
To prevent leakage of liquid between the frame of the
hob and the work surface, put the insulating seal
provided in position before assembly.
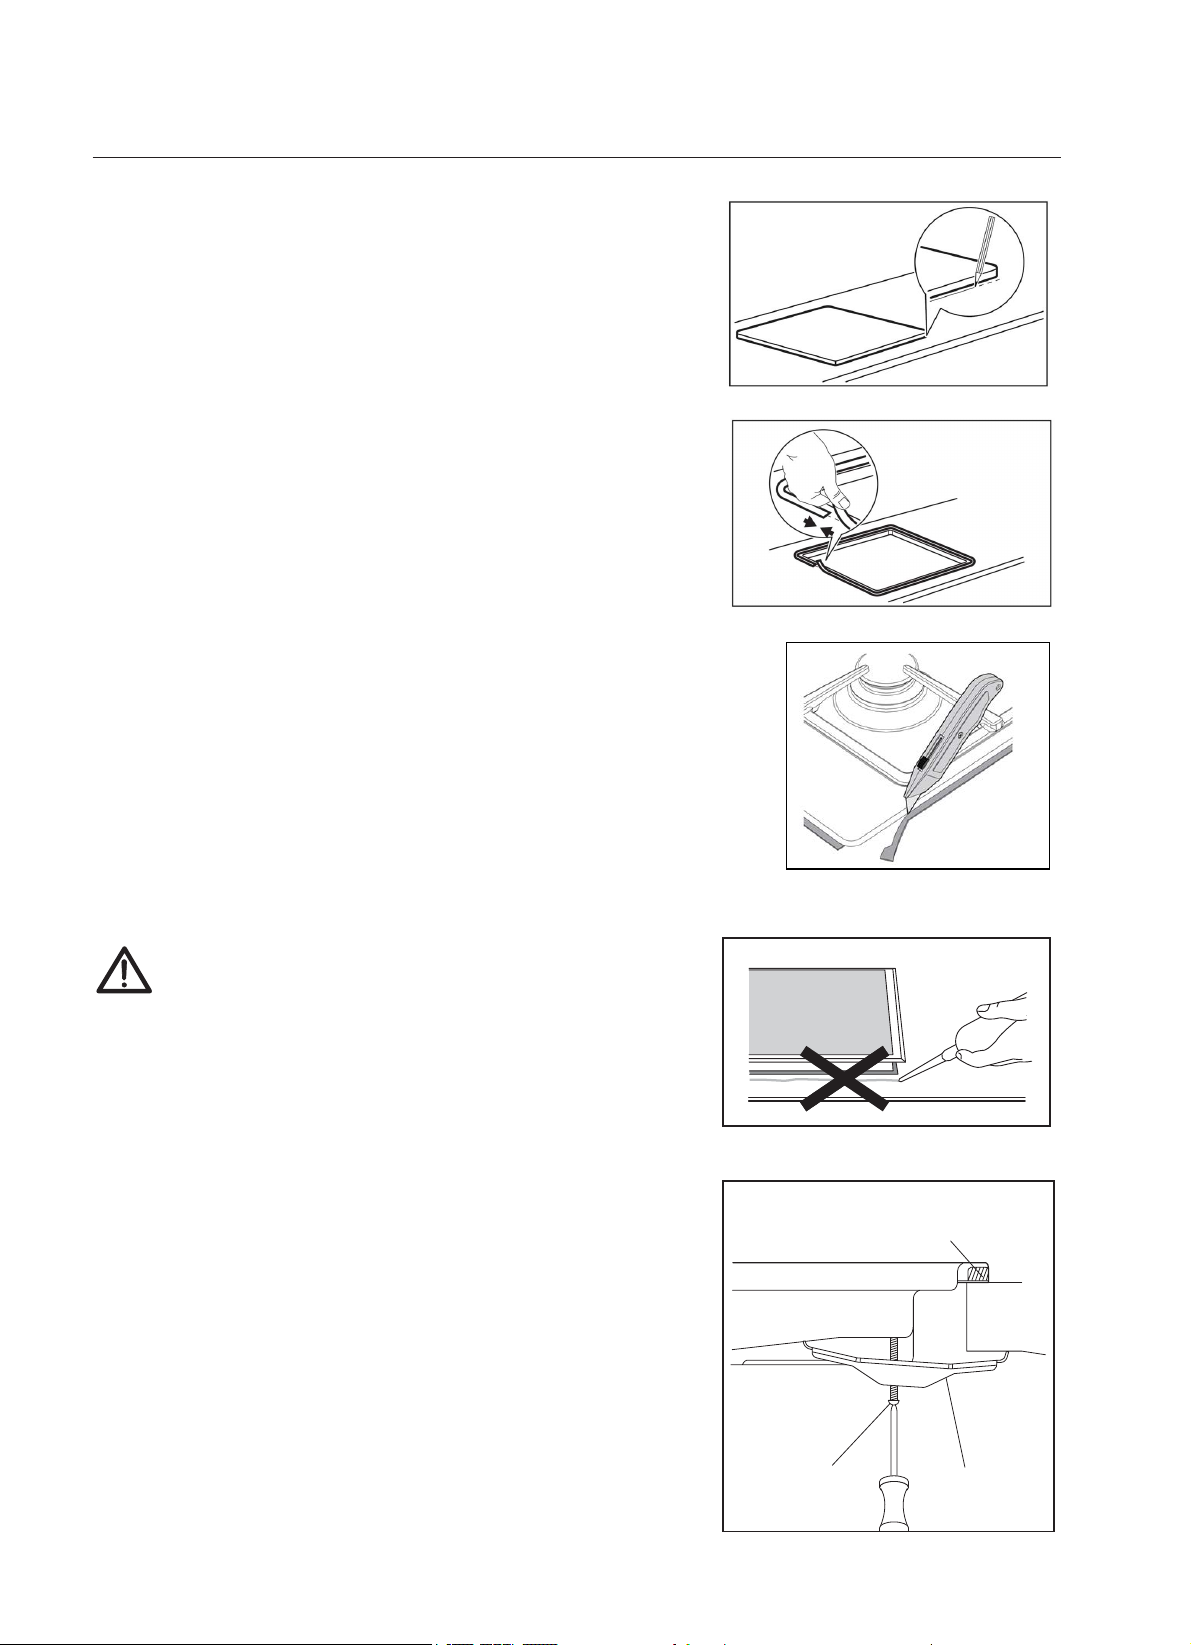
1. Install the product into countertop and use a pencil
to draw a line along the product outer edges.
2. Take out the product and place the adhesive seal
provided along the line you draw by step 1. Use light
pressure to make the seal stick to the worktop.
3. Install the product again, Use light pressure to
make the seal stick to product edge.
4. Carefully trim the surplus edge away from the seal.
5. Cleaning.
(A) SEALING STRIP
(C) SCREW (B) BRACKET
'RQRWXVHDVLOLFRQVHDODQWWRVHDOWKH
DSSOLDQFHDJDLQVWWKHDSHUWXUH
7KLVZLOOPDNHLWGLI¿FXOWWRUHPRYHWKH
DSSOLDQFHIURPWKHDSHUWXUHLQIXWXUH
SDUWLFXODUO\LILWQHHGVWREHVHUYLFHG
1. Place the bracket (B) over the holes that match the
size of the screws. There are one set of screw holes
in each corner of the hob(H).
Slightly tighten a screw (C) through the bracket (B)
so that the bracket is attached to the hob, but so that
you can still adjust the position .
2. Carefully turn the hob back over and then gently
lower it into the aperture hole that you have cut out.
On the underneath of the hob, adjust the brackets
into a position that is suitable for your worktop.
Then fully tighten the screws(C) to secure the hob
into position.
3.
18

gas connection
Make sure NO gas leakage
Tips-Simple method to check gas leakage
Spray soap-suds onto connection position, switch on gas pressure regulator,
if bubbles emerge , that means gas leakage.
Switch off gas pressure regulator, re-fasten connection, try again till no
bubbles emerge.
Then gas hob can be used.
oIt is the law that all gas appliances are installed by competent persons in accordance
with the current edition of the Gas Safety Installation and Use Regulations.
oIt is in your interest and that of safety to ensure compliance with the law.
Figure is only for reference
A. Use rubber hose
Insert inlet elbow into hose, the
red line needs to be covered.
Connect gas hose to gas pressure
regulator.
Fix the gas hose with the clip to
avoid gas leakage.
Gas inlet elbow
Clip
Rubber hose
Red Line
19
Table of contents


