Eventide NexLog 840 User manual

Do not delete
Communications Division
NexLog Recorder User Manual
Models NexLog 740 and NexLog 840
NexLog Recorder Software v2.2.0 or later
[NOTE: Information on title page comes from variables at top of document. Do not directly edit
or delete the text produced by these fields. Instead, reveal hidden text & change the variable. ]
[< DO NOT DELETE this draft information paragraph or anything in it, even if it is blank. Set it
using the d_DraftInfo variable. To remove for publication, change it to a blank space.]
[DO NOT DELETE THIS ANCHORING PARAGRAPH FOR Title_PNdate FRAME.>]
Part Number: 141214–04
Published: March 18, 2013

ii NexLog Recorder User Manual v2.2.0
© 2004 –2013 Eventide Inc. ALL RIGHTS RESERVED.
Every effort has been made to make this guide as complete and accurate as possible, but Eventide
Inc. DISCLAIMS ANY WARRANTY OF MERCHANTABILITY OR FITNESS FOR A PARTICULAR
PURPOSE. The information provided is on an “as-is”basis and is subject to change without notice or
obligation. Eventide Inc. has neither liability nor responsibility to any person or entity with respect to
loss or damages arising from the information contained in this guide.
Notice: This computer program and its documentation are protected by copyright law and
international treaties. Any unauthorized copying or distribution of this program, its documentation, or
any portion thereof may result in severe civil and criminal penalties.
The software installed in accordance with this documentation is copyrighted and licensed by Eventide
Inc. under separate license agreement. The software may only be used pursuant to the terms and
conditions of such license agreement. Any other use may be a violation of law.
Eventide is a registered trademark of Eventide Inc.
* Other names and brands may be claimed as the property of others.
Publication Date: March 18, 2013
Document Number: 141214-04
Publisher: Eventide Inc., Communications Division, 1 Alsan Way, Little Ferry, NJ 07643,
telephone: 201-641-1200
Communications Division Product Information: Visit the Eventide website at:
www.eventide.com.
Communications Division Product Service and Technical Support:
Users: Contact your local authorized Eventide Dealer.
Authorized Dealers: Visit the Eventide website or email support@eventide.com.

NexLog Recorder User Manual v2.2.0 Contents iii
Contents
Tables............................................................................................................................................vii
Figures ..........................................................................................................................................vii
Revision History .............................................................................................................................1
About This Publication...................................................................................................................3
Purpose and Applicability............................................................................................................3
How to Use This Publication .......................................................................................................3
Documentation Conventions.......................................................................................................4
Important or Critical Information..........................................................................................4
Typographical Conventions and Symbols...........................................................................4
Related Information.....................................................................................................................5
1. Introduction................................................................................................................................6
1.1. Welcome.............................................................................................................................6
1.2. Customer Support Information ............................................................................................6
Release Numbers...............................................................................................................6
2. Recorder Setup..........................................................................................................................8
2.1. Unpacking the Recorder......................................................................................................8
2.2. General Specifications ........................................................................................................8
2.2.1. NexLog 740 and NexLog 840...................................................................................8
2.2.2. Front Panel Details: NexLog 740 and NexLog 840..................................................10
2.2.3. Rear Panel Details: NexLog 740............................................................................12
2.2.4. Rear Panel Details: NexLog 840............................................................................13
2.2.5. NexLog 740 and NexLog 840 Blank Front Panel Units...........................................13
2.3. Bench Test........................................................................................................................15
Info screen........................................................................................................................16
Replay screen...................................................................................................................17
Setup screen.....................................................................................................................17
Login screen.....................................................................................................................17
2.4. Installation.........................................................................................................................17
2.4.1. General..................................................................................................................17
2.4.2. Operating Limits.....................................................................................................18
2.4.3. Location Considerations.........................................................................................18
2.4.4. Mounting Options...................................................................................................19
2.4.5. Other Considerations .............................................................................................20
2.4.6. Connecting AC Power and UPS (Uninterruptible Power Supply)............................20
2.4.7. Before You Connect Audio Signals to the Recorder...............................................21
2.4.8. Connecting Telephone, Radio, and Other Analog Audio Signals to the Recorder ..22

iv Contents NexLog Recorder User Manual v2.2.0
2.4.9. The Optional Quick Install Kit.................................................................................22
2.4.10. Connecting Digital PBX Stations that are to be Tapped........................................24
2.4.11. Connecting to an Ethernet Network......................................................................25
2.4.12. Connecting a Keyboard........................................................................................25
2.4.13. Connecting Headphones......................................................................................25
2.4.14. Connecting Line-Level Equipment........................................................................26
3. The Front Panel User Interface...............................................................................................27
3.1 Front Panel Step by Step Quick Guide................................................................................27
3.2 Setup Screen.....................................................................................................................35
3.3 Info Screen.........................................................................................................................36
3.4 Archiving Controls...............................................................................................................37
3.5 Information Bar ...................................................................................................................39
3.6 Alarm Status .......................................................................................................................39
3.7 Replay Screen (Detailed Information).................................................................................40
4. Recorder Configuration and Administration..........................................................................48
4.1. The Welcome To NexLog Screen .....................................................................................48
4.1.1. MediaWorks Express .............................................................................................49
4.2. SETUP: NexLog Configuration Manager...........................................................................49
4.3. SETUP: System................................................................................................................50
4.3.1. System Info............................................................................................................50
4.3.2. Date and Time .......................................................................................................51
4.3.3. License Keys..........................................................................................................53
4.3.4. Storage Devices.....................................................................................................54
4.3.5. Configuration Files.................................................................................................56
4.3.6. Power Off...............................................................................................................57
4.4. SETUP: Reports................................................................................................................57
4.4.1. Recorder Reports...................................................................................................57
4.4.2. Quality Factor Reports ...........................................................................................59
4.5. SETUP: Networking ..........................................................................................................59
4.5.1. System Identification..............................................................................................59
4.5.2. Network Interfaces.................................................................................................60
4.5.3. VNC Settings .........................................................................................................62
4.5.4. VPN Settings..........................................................................................................63
4.5.5. SNMP Settings.......................................................................................................63
4.5.6. Packet Capture......................................................................................................63
4.6. SETUP: Recording............................................................................................................64
4.6.1. Boards and Channels.............................................................................................64
4.6.2. Replace Board.......................................................................................................78
4.6.3. Retention Settings..................................................................................................78
4.6.4. Resource Groups...................................................................................................79
4.6.5. Custom Fields........................................................................................................85
4.6.6. Call Suppression....................................................................................................87
4.6.7. NG911 ...................................................................................................................88
4.7. SETUP: Archiving .............................................................................................................88
4.7.1. Archives.................................................................................................................88
4.7.2. Archive Configuration.............................................................................................91
4.7.3. Media Selection .....................................................................................................94
4.7.4. Sequential and Parallel Modes...............................................................................95
4.7.5. Network Archive Storage Configuration(NAS)........................................................95

NexLog Recorder User Manual v2.2.0 Contents v
4.7.6. Archive Media History ............................................................................................96
4.8. SETUP: Alerts and logs.....................................................................................................98
4.8.1. Active Alarms.........................................................................................................98
4.8.2. Alert History ...........................................................................................................99
4.8.3. Alert Codes............................................................................................................99
4.8.4. Internal Logging ...................................................................................................100
4.8.5. Email....................................................................................................................101
4.8.6. Audit History.........................................................................................................101
4.8.7. Client Activity .......................................................................................................104
4.9. SETUP: Users and Security............................................................................................105
4.9.1. Users ...................................................................................................................105
4.9.2. System Security...................................................................................................109
4.9.3. SSL......................................................................................................................111
4.9.4. User Groups.........................................................................................................112
4.9.5. Permissions .........................................................................................................113
4.10. SETUP: Utilities.............................................................................................................114
4.10.1. Schedules..........................................................................................................114
4.10.2. Upload Recorder Patch......................................................................................117
4.10.3. Network Utilities .................................................................................................118
4.11. SETUP: Quality Factor Software...................................................................................118
4.11.1. Agent Mapping...................................................................................................118
4.12. SETUP: Change Password...........................................................................................118
5. Recorder Operation...............................................................................................................119
5.1. Starting and Shutting Down.............................................................................................119
6. The Client-Based NexLog Recorder Software .....................................................................120
6.1. Introduction.....................................................................................................................120
6.1.1. What is the Client-Based NexLog Recorder Software?........................................120
6.1.2. Do You Need to Install the Client Software at all?................................................120
Appendix A: Recorder Software Installation and Upgrade......................................................122
Why Re-installation May Be Necessary ..................................................................................122
Why Upgrades May Be Necessary or Desirable......................................................................122
The Software Upgrade/Installation Process ............................................................................123
Some Details, Especially About Installation.............................................................................125
Restoring Archives When Installing New Software..................................................................125
Potential Issues.......................................................................................................................126
Appendix B: Optional General Purpose Input/Output (GPIO) Boards.....................................128
National Instruments PCI-6503 Board (24-Channel) ...............................................................128
Appendix C: NIST Time Servers ................................................................................................130
Appendix D: Channel Wiring for Eventide Analog Input Boards.............................................131
Appendix E: Alert Codes............................................................................................................133
Appendix F: Recording VoIP or RoIP Calls...............................................................................144
Introduction.............................................................................................................................144
What is VoIP?.................................................................................................................144
The Advantages VoIP Provides ......................................................................................144

vi Contents NexLog Recorder User Manual v2.2.0
Technical Considerations................................................................................................145
Network Requirements............................................................................................................146
Local VoIP and RoIP...............................................................................................................147
Local VoIP and RTP Templates..............................................................................................147
Cisco Local VoIP Template.....................................................................................................149
SIP Local VoIP Template........................................................................................................149
Local VoIP and RTP Channel configuration............................................................................150
Advanced Local VoIP Recorder configuration.........................................................................152
Device Information..........................................................................................................153
Eventide VoIP Gateway configuration.....................................................................................159
Eventide VoIP Gateway Topology...................................................................................159
VoIP Gateway Installation and Configuration..................................................................160
Other Considerations for Using an Eventide VoIP Gateway............................................164
VoIP Gateway Software Upgrade ...................................................................................164
Limited Warranty ........................................................................................................................166
Who is covered under the warranty.........................................................................................167
When the warranty becomes effective ....................................................................................167
Who performs warranty work ..................................................................................................168
Shipping within the 50 United States.......................................................................................168
Shipping outside the 50 United States ....................................................................................168
Software License........................................................................................................................170
Product License and Usage Agreement..................................................................................170
GNU GENERAL PUBLIC LICENSE................................................................................173
Preamble........................................................................................................................173
TERMS AND CONDITIONS FOR COPYING, DISTRIBUTION AND MODIFICATION....174
END OF TERMS AND CONDITIONS.............................................................................178
How to Apply These Terms to Your New Programs........................................................178
Index............................................................................................................................................181

NexLog Recorder User Manual v2.2.0 Contents vii
Tables
Table 1—Specification Summary for NexLog 740 and NexLog 840 with touch-screen Front Panel..9
Table 2—Specification Summary for NexLog 740 and NexLog 840 (Blank Panel)..........................13
Table 3—Operating Limits..............................................................................................................18
Table 4—INFO Screen Messages ..................................................................................................36
Table 5—Archive dialog information ...............................................................................................38
Table 6—Replay Mode information.................................................................................................41
Table 7—Sample Net Mask and Subnet Settings ...........................................................................61
Table 8—Default Security Group Privileges..................................................................................105
Table 9—Eventide Analog Board Standard Pin-Outs (8-, 16-, and 24-Channel Boards)...............132
Table 10—Eventide Analog Board Reverse Pin-Outs (8- and 16-Channel Boards) ......................132
Table 11—Alert Severity Levels....................................................................................................133
Table 12—Alert Messages............................................................................................................133
Figures
Figure 1—NexLog 740 with Touch Screen (Door Closed)...............................................................10
Figure 2—NexLog 740 with Touch Screen (Door Open).................................................................10
Figure 3—Touch Screen (Close-Up)...............................................................................................11
Figure 4—Typical NexLog 740 Rear Panel.....................................................................................12
Figure 5—Typical NexLog 840 Rear Panel.....................................................................................13
Figure 6—Front Panel Info Screen.................................................................................................15
Figure 7—Front Panel Archives and Drives....................................................................................16
Figure 8—Quick Install Kit Components .........................................................................................23
Figure 9—Front Panel Info Screen..................................................................................................27
Figure 10—Front Panel Replay Screen ..........................................................................................28
Figure 11—Calendar Mode.............................................................................................................29
Figure 12—Replay Transport..........................................................................................................30
Figure 13—Incident ........................................................................................................................31
Figure 14—Selected Calls in Replay Screen ..................................................................................32
Figure 15—Working Incident...........................................................................................................33
Figure 16—Create Audio CD..........................................................................................................34
Figure 17—Setup Screen ...............................................................................................................35
Figure 18—Info Screen...................................................................................................................36
Figure 19—Archives and Drives Display.........................................................................................38
Figure 20—Information Bar.............................................................................................................39

viii Contents NexLog Recorder User Manual v2.2.0
Figure 21—Alarm Status.................................................................................................................39
Figure 22—Replay Screen..............................................................................................................41
Figure 23—Calendar Mode Search.................................................................................................42
Figure 24—Calendar ......................................................................................................................43
Figure 25—Date Mode....................................................................................................................43
Figure 26—Relative Mode..............................................................................................................44
Figure 27—Replay Mode Menu......................................................................................................45
Figure 28—Selected Calls in Replay Screen ..................................................................................46
Figure 29—Front Panel Set-Up top level menus.............................................................................48
Figure 30—Web Browser Welcome Page.......................................................................................49
Figure 31—Web browser System Info ............................................................................................50
Figure 32—Example license display with a Primary key and one Add-on license ...........................54
Figure 33—Hardware RAID 1 storage devices ...............................................................................55
Figure 34—Configuration files.........................................................................................................56
Figure 35—Example report for Month at a glance...........................................................................58
Figure 36—System Identification ....................................................................................................60
Figure 37—Packet Capture.............................................................................................................64
Figure 38—Boards and Channels page view by board ...................................................................66
Figure 39—Boards and Channels page view by Channels as seen locally on the Front Panel .......68
Figure 40—Boards and Channels Detail level graph as seen in the Chrome browser.....................69
Figure 41—Editing the channel name inline....................................................................................71
Figure 42—Editing the channel by clicking on the gear...................................................................72
Figure 43—Resource groups..........................................................................................................81
Figure 44—Resource Group Filters and Resource Filters...............................................................81
Figure 45—Resource Group Rules Status......................................................................................82
Figure 46—Resource Group Edit: Permission Group View.............................................................82
Figure 47—Resource Group: Empty Group....................................................................................83
Figure 48—Resource Groups: Right Mouse Button Menu ..............................................................83
Figure 49—User Group Edit............................................................................................................84
Figure 50—Custom fields for NG911 event logging ........................................................................86
Figure 51—Archive display in web Configuration Manager.............................................................89
Figure 52—Archive Configuration...................................................................................................91
Figure 53—NAS configuration ........................................................................................................96
Figure 54—User configuration......................................................................................................105
Figure 55—Editing a user.............................................................................................................107
Figure 56—User Groups...............................................................................................................112
Figure 57—Network Utilities..........................................................................................................118
Figure 58—GPIO Board Pin Assignments (NI PCI-6503)..............................................................129
Figure 59—Connectors with Standard and Reverse Pin-Outs.......................................................131
Figure 60—Adding a Local IP Board, Templates Menu.................................................................147
Figure 61—Telex/Vega Console Template Example.....................................................................148
Figure 62—Local IP EFJohnson Template Example.....................................................................148
Figure 63—Cisco Callmanager “Skinny” Protocol Template..........................................................149
Figure 64—SIP Phones Template................................................................................................149
Figure 65—Top Half of Local IP Channel RTP Tab.......................................................................150
Figure 66—Bottom Half of Local IP Channel RTP Tab..................................................................151
Figure 67—Local IP Channel Diagnostics Example......................................................................151
Figure 68—Eventide VoIP Gateway Topology Example ...............................................................160

NexLog Recorder User Manual v2.2.0 1
Revision History
This section summarizes significant changes, corrections, and additions to the document. The
history appears in chronological order with the most recent document listed first. Documents
are identified by part number and applicable software (SW) version.This section tracks
documentation changes. For a description of new software features and improvements
introduced in a particular release, see the product release notes on the Eventide company
website.
March 18, 2013
Part Number
SW
Description
141214–04
v2.2.0
NexLog Recorder Series Server v2.2.0 User Manual.
Resource Groups
Network Utility
Upload Recorder Patch Utility
Alert Updates
April 30, 2012
Part Number
SW
Description
141214–03
v2.1.0
NexLog Recorder Series Server v2.1.0 User Manual.
Updated screen shots.
VoIP clarifications.
Updates related to MediaWorks Express option.
Updates related to Quality Factor Software option.
August 30, 2011
Part Number
SW
Description
141214–02
v2.0.1
NexLog Recorder Series Server v2.0.1 User Manual.
Updated screen shots.
Alert clarifications.
Permission clarifications.
AGC clarification.

2NexLog Recorder User Manual v2.2.0
July 10, 2011
Part Number
SW
Description
141214–01
v2.0.0
NexLog Recorder Series Server v2.0.0 User Manual.
Initial Release, July 28, 2011

NexLog Recorder User Manual v2.2.0 3
About This Publication
The following topics provide information about this publication:
Purpose and Applicability
How to Use This Publication
Documentation Conventions
Related Information
Purpose and Applicability
This publication provides information for users of the Eventide®NexLog™
Recorders.
This information applies to NexLog Recorder Software 2.1.0 for the NexLog 740
and NexLog 840 recorders. It may also apply to later versions except when
superseded by a more recent publication.
How to Use This Publication
The content is organized as follows:
About This Publication
Describes the content of this publication and how to use it.
Chapter: 1. Introduction
Provides a brief introduction and customer support information.
Chapter: 2. Recorder Setup
Provides information on unpacking the product, performing a bench test,
installing the product, and a short description of how to use the front panel.
Chapter: 4. Recorder Configuration and Administration
Provides information on configuring the recorder and administrative tasks
using the web-based Setup utility.
Chapter: 5. Recorder Operation
Provides information on basic operating tasks, such as start-up and shutdown,
additional information about locating and playing recordings, archiving
recordings, and live monitoring.

4NexLog Recorder User Manual v2.2.0
Chapter: 6. The Client-Based NexLog Recorder Software
Provides introductory information about client software that can be used for
instant recall, incident playback, and more. Note: Detailed information about
the client-based NexLog software is provided in Eventide’s MediaWorks and
MediaAgent manuals.
Appendices
Provide related information.
Documentation Conventions
Important or Critical Information
The following labels are used to emphasize important or critical information. To
ensure safety and prevent damage, you must read and follow the instructions in
these statements.
Personal Hazard Information
CAUTION This warns of a potential hazard that could result in minor or moderate injury if
not avoided, or it warns of an unsafe practice.
WARNING This warns of a potential hazard that could result in death or serious injury if
not avoided.
DANGER This warns of an imminent hazard that will result in death or serious injury if
not avoided.
Useful Information
Important! This provides important information, mainly alerting readers to situations that
may cause undesirable results or system harm. If there is more than one item,
they will appear in a numbered list.
Note: This draws the reader’s attention to useful information. If there is more than one
item, they will appear in a numbered list.
Typographical Conventions and Symbols
The following information describes the meaning assigned to various text
formatting and symbols.
Courier font
Represents messages, prompts, code, or other text
displayed or generated by the computer.
Courier bold font
Represents user input or entries typed on keyboard or
other input device, such as through the front panel.
Bold italic text
Represents computer buttons or keys, either hardware-
based (e.g., on the front panel) or software-based (e.g.,
soft-keys on front panel display or PC display).

NexLog Recorder User Manual v2.2.0 5
Blue text
(PDF version only) Represents a hyperlink in the
electronic document. Click on the link in the PDF to jump
to the referenced item. This format is often applied to
cross-references within the document, such as to
chapters, sections, tables, and figures.
Parameter
Parameter names are typically given in bold type.
<name>
Refers to an item of information of the named type, which
may vary from case to case and so is identified
generically. A user would substitute specific information
if instructed to enter this information.
Related Information
Eventide Documentation
MediaWorks User Manual (part number 141114 version 01 or later)
MediaWorks Express User Manual (part number 141217 version 01 or later)
MediaAgent User Manual (part number 141115 version 01 or later)
Eventide Quality Factor Software User Manual (part number 141216)
NexLog Screen Recording Guide (part number 142218 version 01 or later)
Note: Although documented in this publication, screen recording features
are not intended for production use and general availability (they are
available only for manufacturer-coordinated customer trials).
Eventide Products and Services
For product information, visit the Eventide website at www.eventide.com.
For technical support, email Eventide at su[email protected].
Note: Eventide offers advanced professional services. If you are interested in obtaining
specialized services or Customer Engineering work, contact Eventide through
one of the means listed above.

6NexLog Recorder User Manual v2.2.0
1. Introduction
1.1. Welcome
Welcome and congratulations on your purchase of an Eventide®NexLog™
Recorder.
Eventide invented the digital communications recorder in 1989. With thousands
of communications recorders in service in such diverse applications as corporate
call centers, NORAD, nuclear submarines, NASA, maximum security prisons, air
traffic control, and 911 call centers throughout the world, Eventide continues its
tradition of combining unmatched ease-of-use with mission-critical reliability.
This manual will help you maximize the use of your purchase. It includes:
A quick-start bench test, for those who want to quickly familiarize
themselves with some basic operations
Guidance on installing your recorder
Step-by-step instructions on how to set up and operate your recorder
Descriptions of all of the controls and menu items on the front panel user
interface
To help us reach you with information on updates and upcoming new features,
please send us your warranty card. Eventide does not provide your information
to marketers or any other outside organizations.
1.2. Customer Support Information
Eventide is committed to your satisfaction. If, after using this manual, you still
have questions about the operation of your recorder, contact Technical Support
The Eventide web site has additional information that may be helpful. Go to
www.eventide.com.
Release Numbers
You may need to identify the software version and serial number for the
following products/components:

NexLog Recorder User Manual v2.2.0 7
NexLog Recorder Software: On the touch screen front panel or with a monitor
and mouse attached (while the recorder is running), do the following to
display the version information:
Select the menu icon on the lower left indicated by an “e” icon.
Select Setup.
Select System.
Select the sub menu System Info.
The Recorder Serial Number and Current Firmware Version should
be displayed.
Alternatively, you can get the version and serial number remotely via the Web-
based NexLog Configuration Manager:
Log into the recorder via a web browser and navigate to the recorder’s
address (example: http://192.168.2.100). Note that the default logon
credentials for the recorder (before they are changed by the
administrator) are User Name: Eventide / Password: 12345.
Click Configuration Manager.
In the NexLog Configuration Manager’s navigation menu on the left,
select the System menu.
In the sub navigation menu select System Info.
The Recorder Serial Number and Current Firmware Version should
be displayed.
Eventide MediaWorks or Eventide MediaAgent: On the Help menu, select About
to display the version information.
Eventide® VoIP Gateway: Attach a monitor, mouse, and keyboard to the
gateway, and login (the default user is Eventide with password 12345). To
identify the software version of the gateway, open the following text file on
the gateway:
C:\VOIP\version.txt

8NexLog Recorder User Manual v2.2.0
2. Recorder Setup
2.1. Unpacking the Recorder
CAUTION Use care and assistance when lifting and handling the recorder. The NexLog 740
weighs approximately 50 pounds (23 kg). The NexLog 840 can weigh as much as
95 pounds (43 kg)!
Check the box for damage. A crushed box, holes, or water damage, for example,
could indicate that the recorder has been damaged. Open the box and inspect
the recorder and associated accessories. If the equipment appears damaged
contact Eventide right away and save the damaged box and packaging!
Check that the unit is delivered with the expected configuration and accessories.
The packing slip states the contents. In addition, the box will include:
A configuration sheet indicating installed audio input boards and other I/O
boards
A warranty registration card
One archive medium per removable archive drive
One power line cord per power supply module
One server software DVD disk labeled “Eventide NexLog Software”
This document
Other accessories may be included, depending on your order. For example, you
may receive client disks and additional documentation for the client software.
2.2. General Specifications
2.2.1. NexLog 740 and NexLog 840
All Eventide NexLog Recorders are based on identical server (recorder) software
and client (PC user) software. The primary differences among different units in
the product line are physical, e.g., size, power, storage configuration, etc. The
following table highlights the differences among the products. This is a
summary only and does not replace the individual unit specifications.

NexLog Recorder User Manual v2.2.0 9
Table 1—Specification Summary for NexLog 740 and NexLog 840 with touch-screen Front Panel
Product view
NexLog 740
NexLog 840
Front Panel
GUI
Available 800 x 600 Touch screen Display (or use an external SVGA 800x600 display)
Front Panel
I/O
USB jack, 1/8-inch line level output, 1/8-inch headphone output
Remote
software
Web browser based NexLog Configuration Manager
Windows-based remote playback clients (optional)
Operating
System
Linux (embedded)
Call Record
Database
Internal relational database with programmable retention
Channel
Inputs
Compression Rates (Kbits/s): 13.3, 16, 32, 64 Mu-law
Frequency Response: 200 to 3400 Hz
Signal to Noise: -50dB
Crosstalk: -60dB
AGC: 24dB Boost
Impedance: >10 K ohm
Network
Ethernet 1,000 Mbps (Qty. 2)
Height
5 1/2 inches (3 rack units)
7 inches (4 rack units)
Depth
24 inches
27 inches
Power
350 watts
400 watts
Power
supplies
Dual hot-swap
Dual hot-swap
Weight
50-80 pounds
65-95 pounds
Analog
channels
8-96
8-240
Digital PBX
channels
8-96
8-240
T1/E1/ISDN
PRI channels
24-192
24-240
ISDN BRI
channels
4-48
4- 120
VoIP
channels
8-255
8-255
Maximum
hard disk
capacity
2 or 4 drives, RAID 1, RAID 5, or RAID 10
2 or 4 drives, RAID 1, RAID 5, or RAID 10
Standard
archive drive
1 X Multi-Drive for DVD-RAM Archiving (for bare
DVD-RAM media, 4.7GB per side)
1 X Multi-Drive for DVD-RAM Archiving (for bare
DVD-RAM media, 4.7GB per side)
10 NexLog Recorder User Manual v2.2.0
Standard
hard disk
storage
2 X 1 TB fixed-mount, software RAID1
2 X 1 TB fixed-mount, software RAID1
Optional
storage
Removable hard drives
Removable hard drives
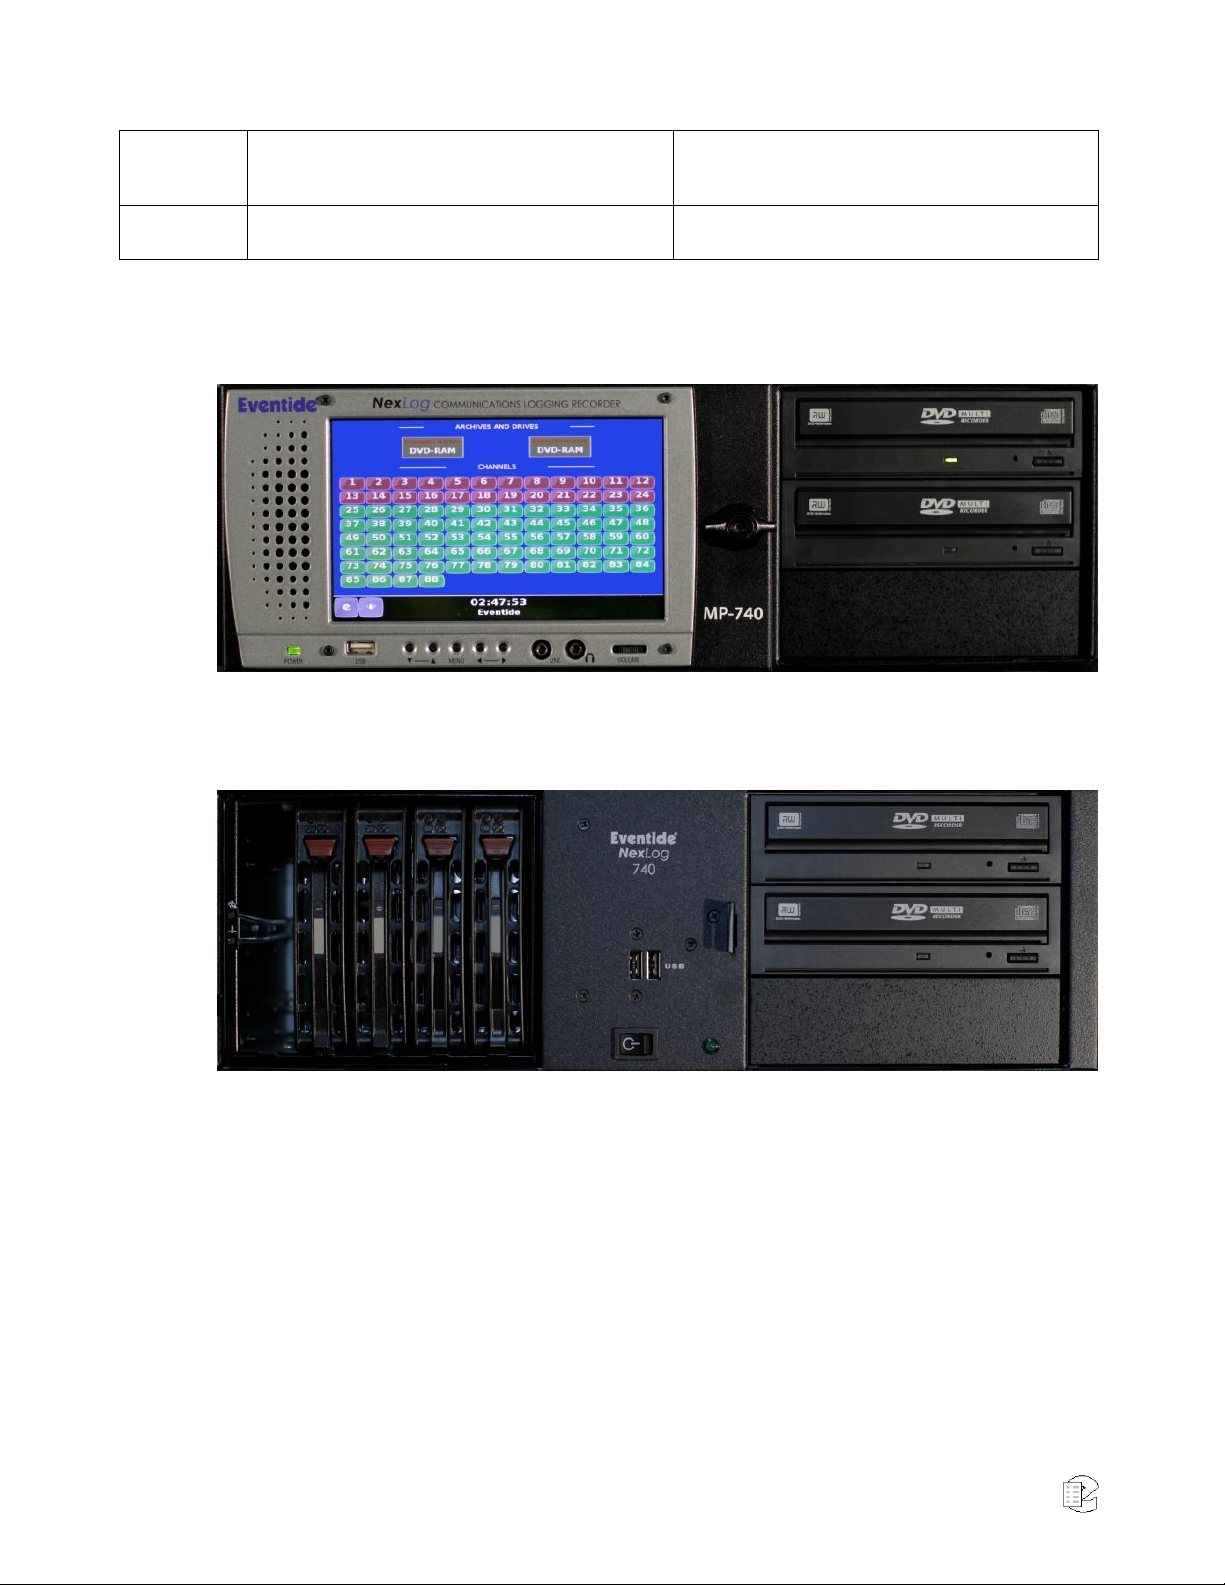
2.2.2. Front Panel Details: NexLog 740 and NexLog 840
Figure 1—NexLog 740 with Touch Screen (Door Closed)
The touch screen display is on a locking door that protects the power switch and
optional hot-swap RAID array.
Figure 2—NexLog 740 with Touch Screen (Door Open)
The NexLog 740 with the touch screen door open, showing the optional hot-
swap RAID hard drives.
The NexLog 740 and NexLog 840 employ touch screen displays for control, and
don’t require a mouse or keyboard. All functions can be accessed from this
panel. When necessary, an alphanumeric keyboard appears on the screen so
that alphanumeric data such as channel names can be entered. The RAID disk
array (up to 6 TB of storage) can be accessed and disks can be replaced while
the recorder is operating by opening the monitor door (hot-swap hard drive
option required). One DVD-RAM multi-drive is standard for archiving on the
NexLog 740 and NexLog 840.
Newer NexLog 740 and NexLog 840 systems ship with DVD-RAM drives made by
LG that are for cartridge-less DVD-RAM use only, while earlier models had
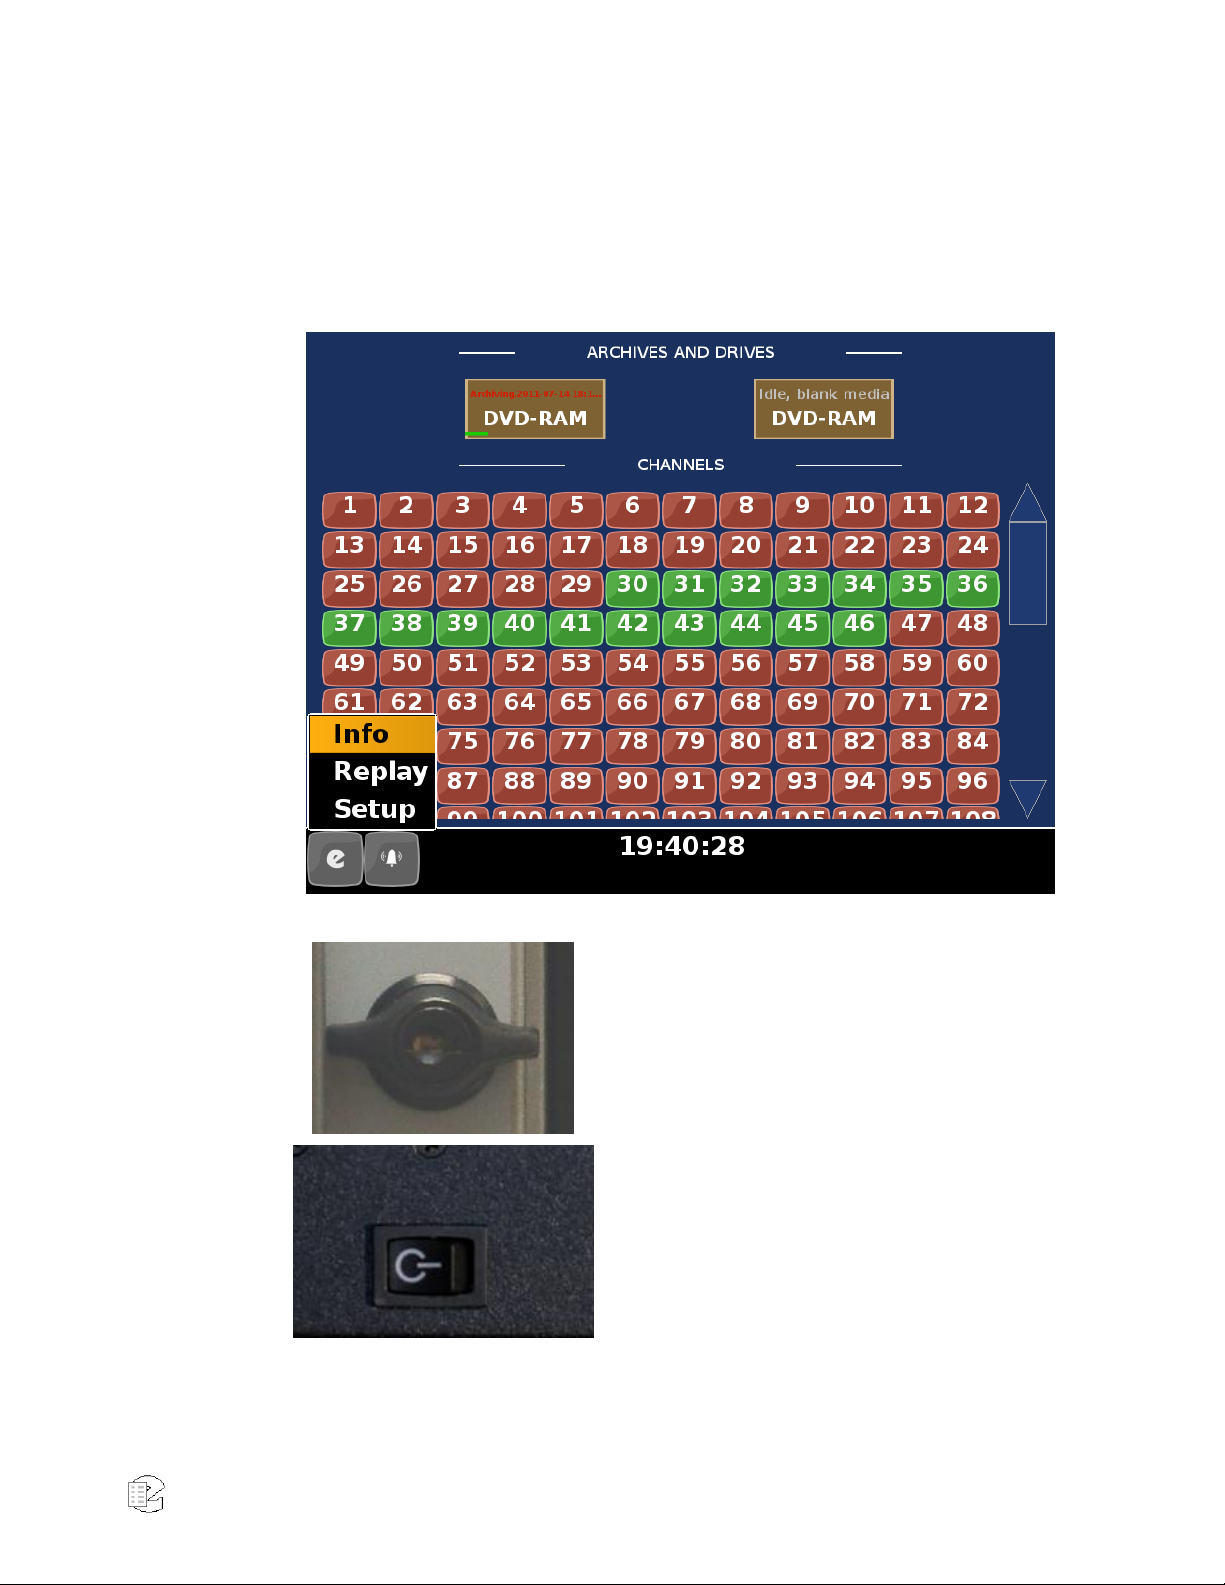
NexLog Recorder User Manual v2.2.0 11
cartridge based Panasonic drives, which accepted Type 4 cartridge DVD-RAM
media or cartridge-less DVD-RAM discs.
Audio monitoring/playback is accomplished with an integral amplifier/speaker
unit (left) with headphone jack, line-level output, and volume control below the
LCD screen.
Figure 3—Touch Screen (Close-Up)
The door lock can be opened to access the
recorder power switch and the hot-swap
RAID disk array. Two keys are supplied.
The recorder power switch is behind the
locked door. Note: Avoid using this switch
to power down the unit. Use it to power
up only.
12 NexLog Recorder User Manual v2.2.0
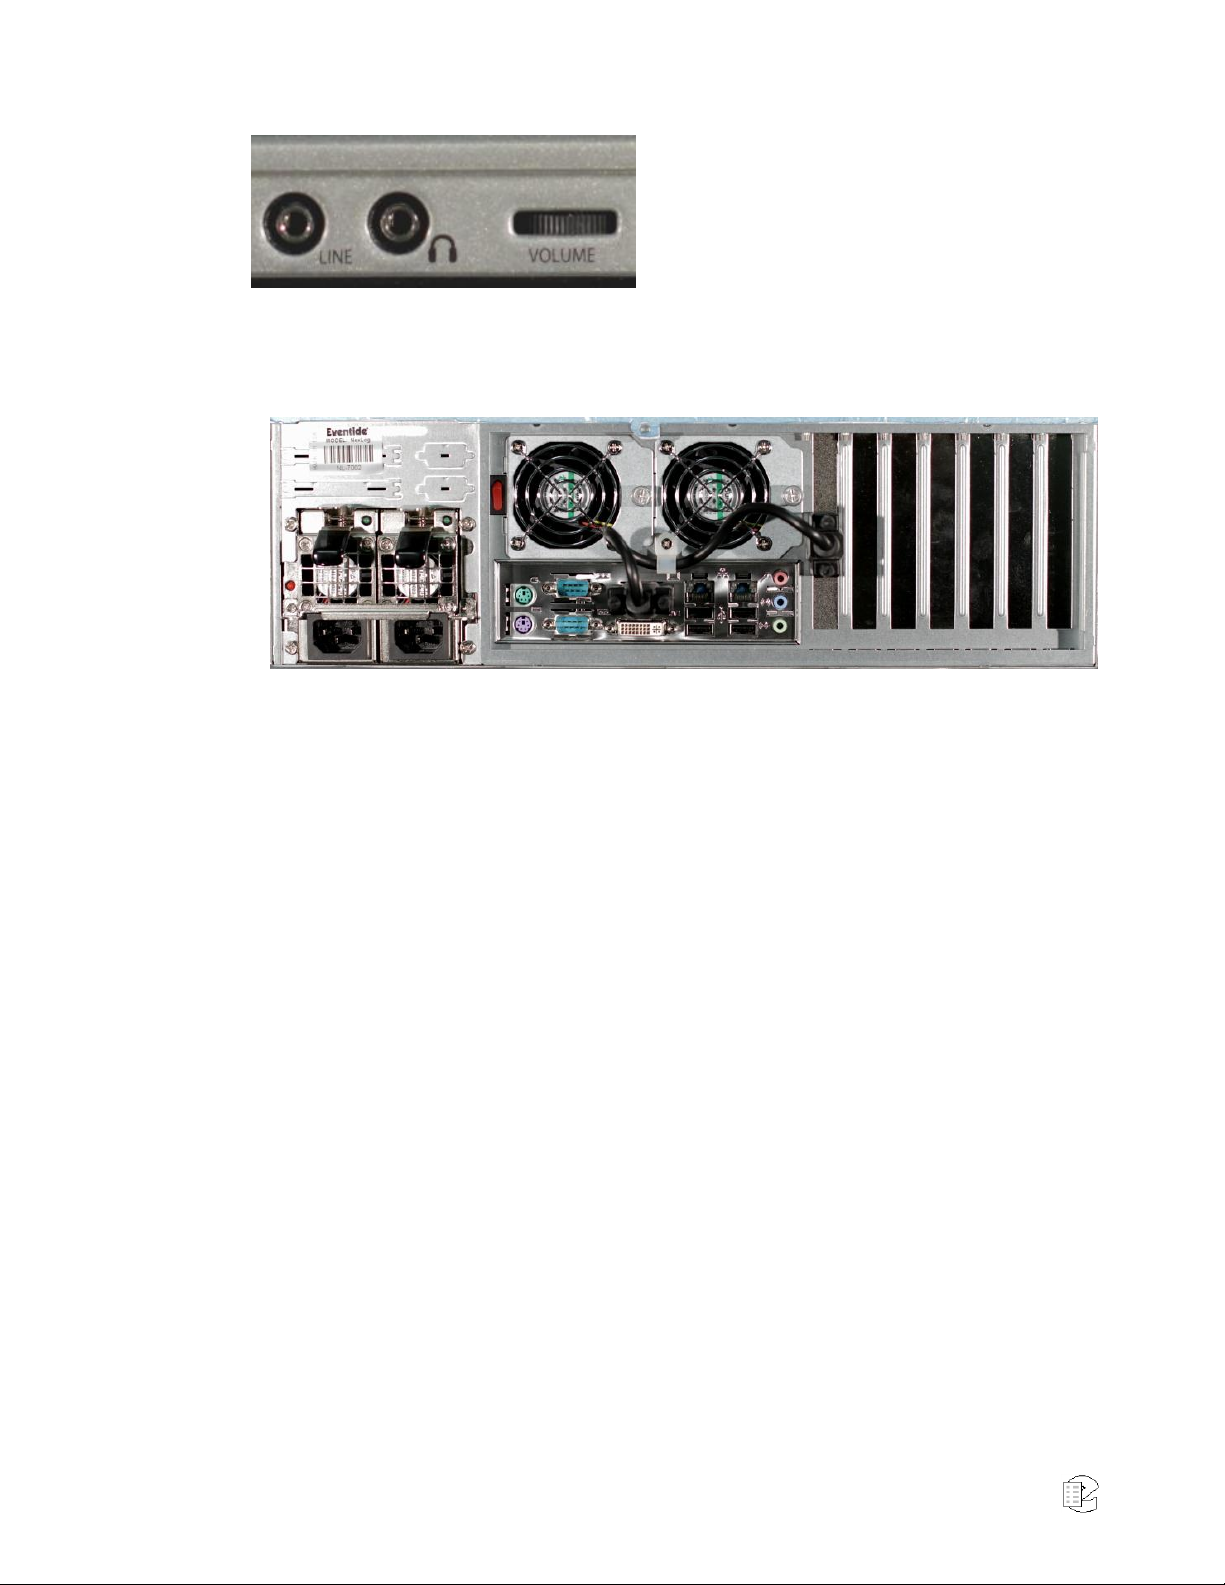
The audio section provides a 1/8-inch
headphone jack and a 1/8 inch constant
level Line Out jack for convenient re-
recording. The volume control adjusts
speaker and headphone volume.
2.2.3. Rear Panel Details: NexLog 740
Figure 4—Typical NexLog 740 Rear Panel
Card Slot Numbering: 6 5 4 3 2 1
The rear panel of this NexLog 740 shows (from left to right): Dual Hot-Swap
power supplies, connector panel for PS/2 mouse and keyboard, two RS-232
ports for serial ANI/ALI and SMDR feeds or serial time sync, DVI (not used), two
Ethernet ports, four USB ports, and audio in/out (unused- use the front audio
connectors instead). On the right side of the unit are spaces for four telephony
boards, 2 (second from far right) through 5. Slot one is reserved for certain half-
size option cards. The sixth slot is reserved for the optional hardware RAID
controller.
The preceding figures show the full front panels for the NexLog 740 and the
NexLog 840. The NexLog 840 in its standard configuration has one DVD-RAM
multi-drive for archive usage.The NexLog 740 in its standard configuration also
has one DVD-RAM multi-drive for archive usage. Other archive drive options are
available, including a second DVD-RAM drive, and/or removable 500 GB hard
drive(s). Refer to the Eventide NexLog Price list for each model’s Archive array
options.
This manual suits for next models
1
Table of contents


