Everdure DWF125PS Guide


To review the section on Troubleshooting Tips
will help you to solve some common problems
by yourself and not need to ask for the help of
professional technicians.
NOTE:
Dear Customer,
Please read this User Information carefully and keep it
to refer to at a later date.
Pass it on to any subsequent owner of the appliance
Carefully reading it before using the dishwasher as it
will help you to use and maintain the dishwasher properly.
The manufacturer, following a policy of constant
development and up-dating of the product, may
make modifications without giving prior notice.
2) Safety Information ..........................................2
3) Operating Instructions....................................3
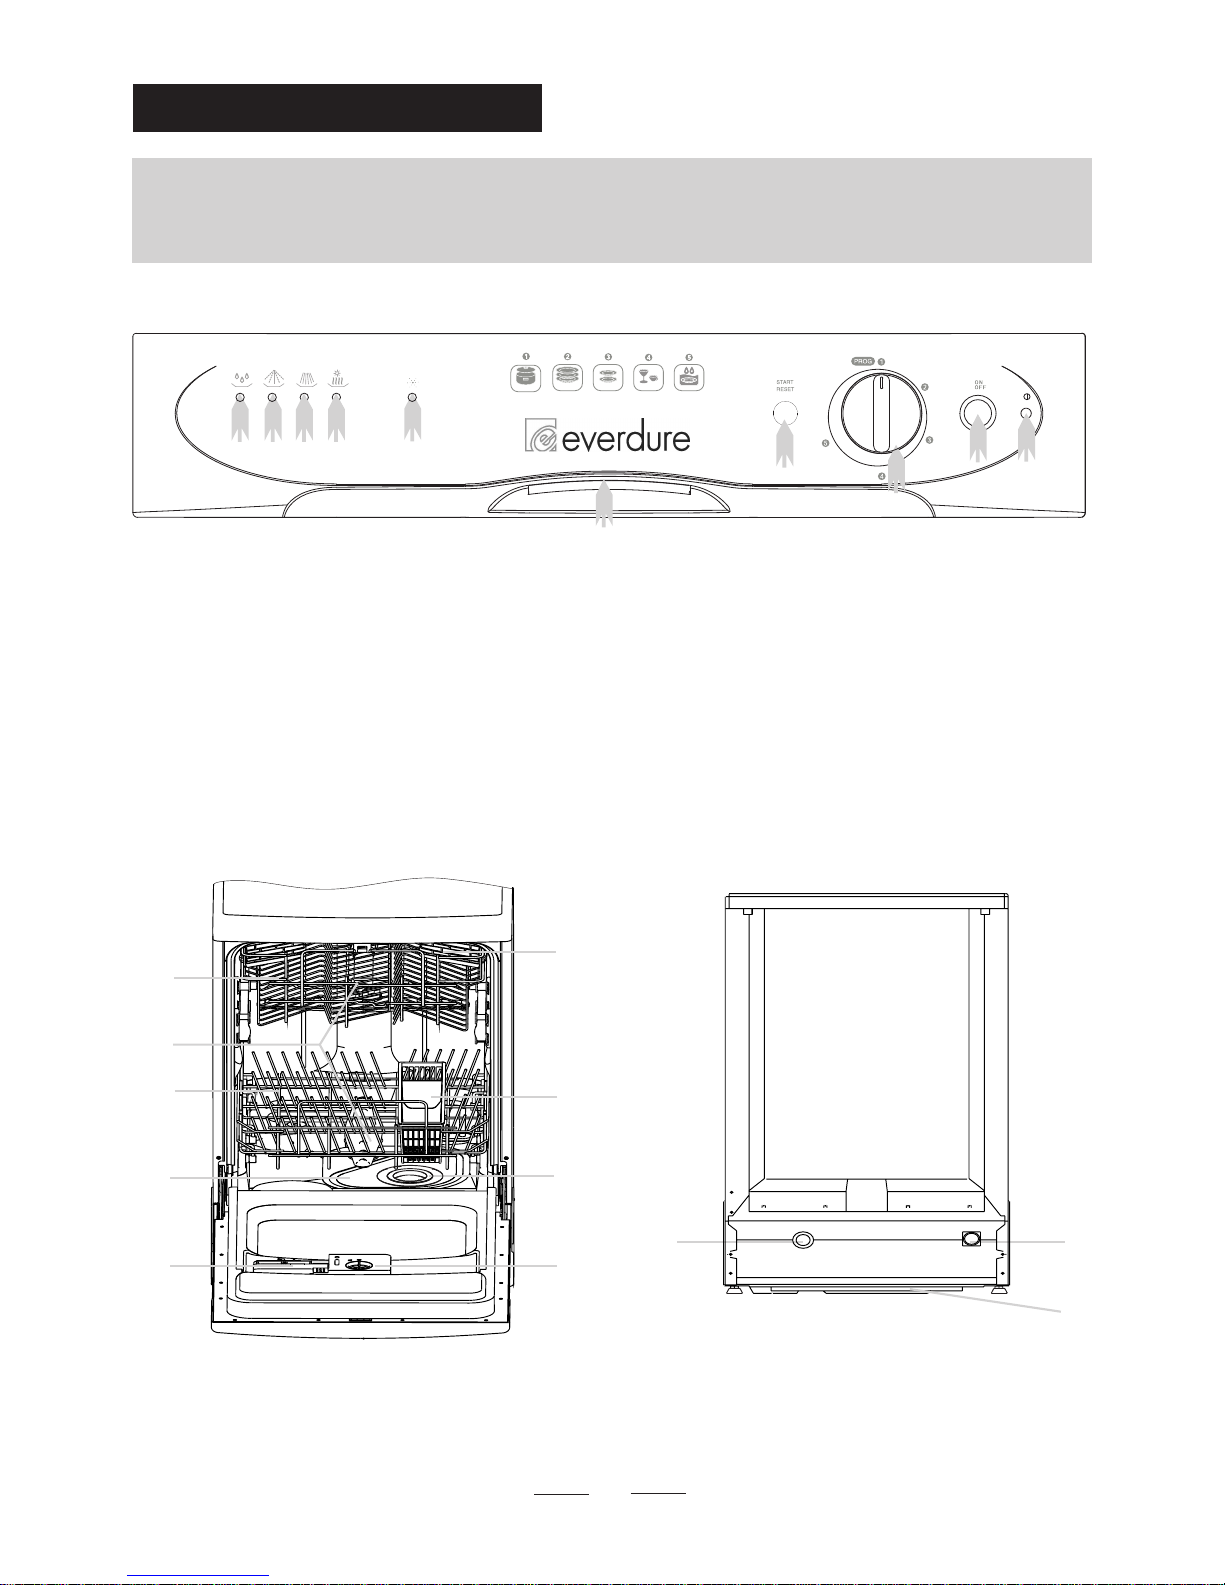
Control Panel....................................................3
Dishwasher Features.........................................3
5) Prior using for the first time.........................7
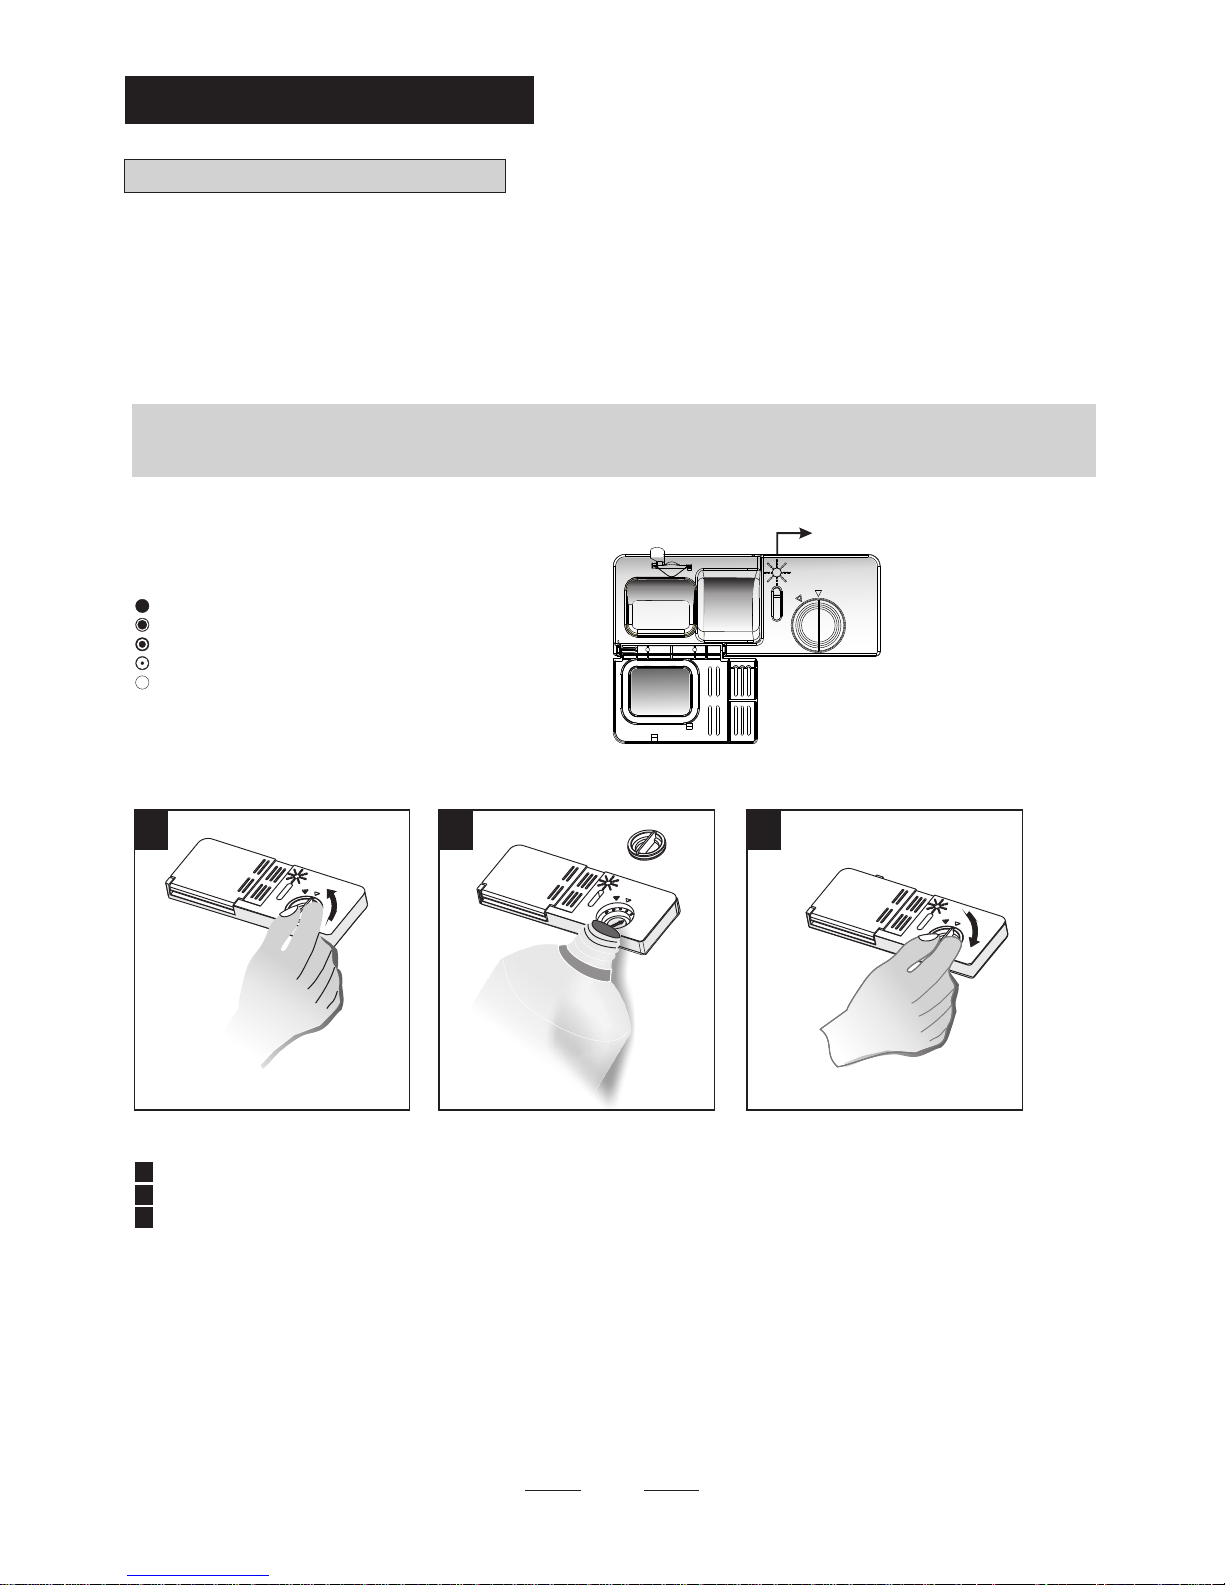
RINSE AID DISPENSER...................................7
Detergent.........................................................9
6) Loading the Dishwasher Rack .........................10
Attention before or after loading the Dishwasher
Racks.............................................................10
Removing the Dishes.......................................10
7) Starting a washing programme .......................14
Wash Cycle Table............................................14
Turning on the Appliance.................................15
Change the Programme.............. ............ ..15..... .
8) Maintenance and cleaning .............................16
Filtering System..............................................16
Caring for the Dishwasher...............................17
Before Calling for Service
Read this Manual
A. Fill the Rinse Aid Dispenser........................7
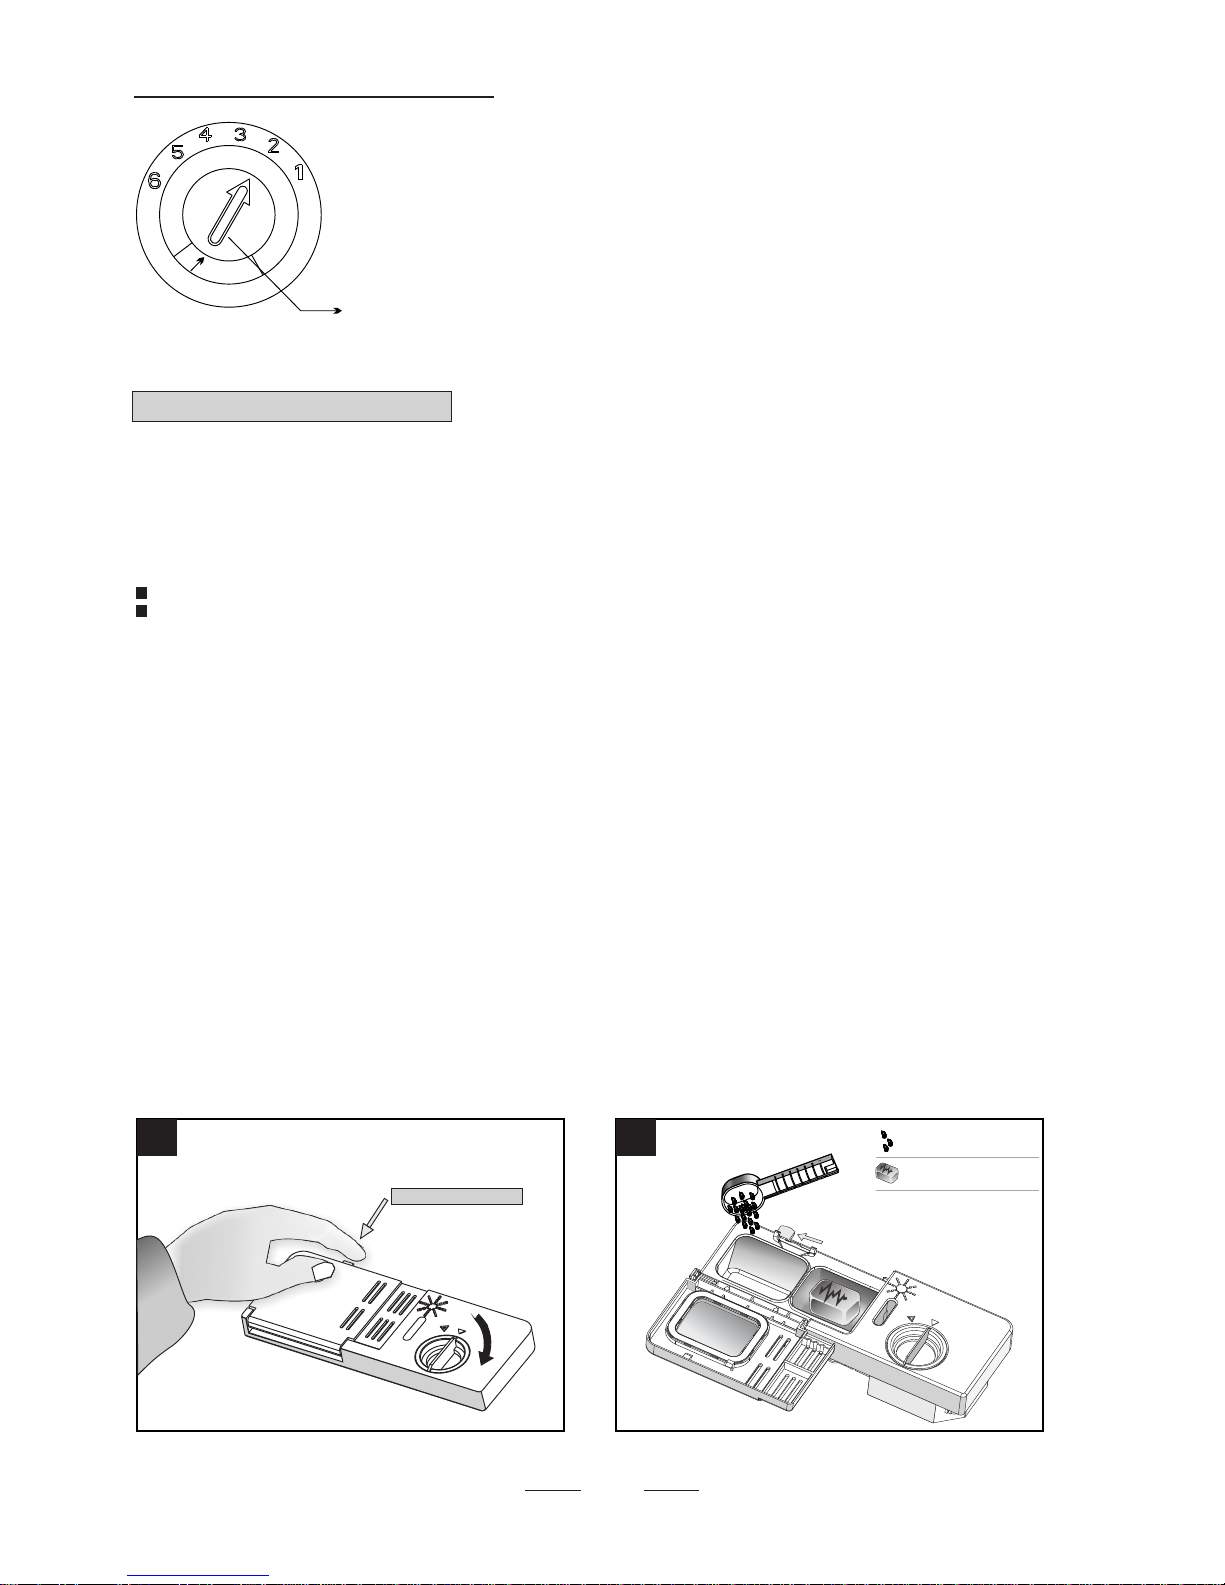
Adjusting Rinse Aid Dispenser...........................8
B. Function of Detergent.................................8
Concentrated Detergent....................................8
Detergent Tablets.............................................8
Detergent Dispenser.........................................8
Amount of Detergent to Use..............................8
Fill in Detergent................................................9
Loading the upper Rack....................................10
Adjusting the upper Rack..................................10
Loading the Lower Rack...................................11
Folding spikes.................................................11
Silverware Basket...........................................12
Attention!.......................................................13
Possible causes:.............................................13
Suggested remedy...........................................13
At the End of the Wash Cycle............................13
Cleaning Filters..............................................16
Filter assembly...............................................17
Cleaning the Spray Arms.................................17
Protect Against Freezing.................................17
Cleaning the Door...........................................18
............18How to Keep Your Dishwasher in Shape
9) Troubleshooting Tips....................................19
Before calling for service.................................20
Error codes....................................................20
1)Technical information...................................1
This manual contains sections of Safety Instructions,
Operating Instructions, Installation Instructions and
Troubleshooting Tips, etc.
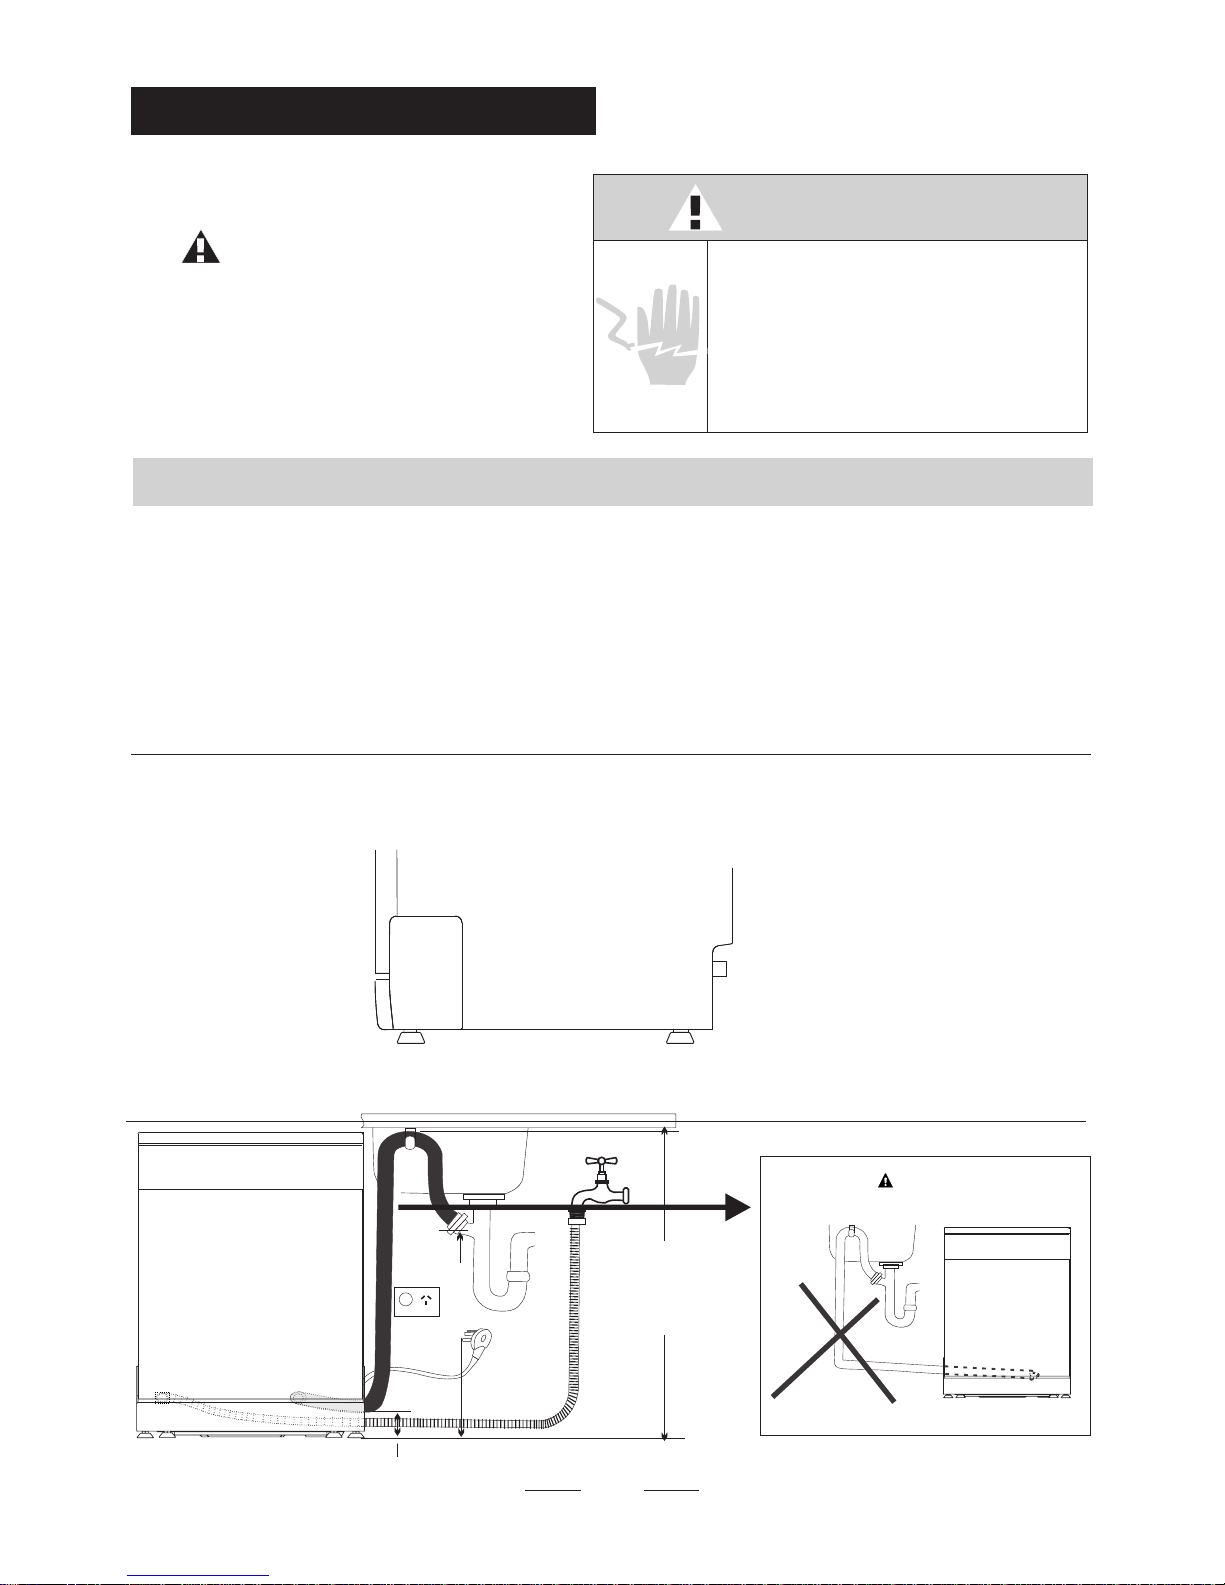
4) Installation instruction....................................4
Installation preparation.....................................4
Electricity.........................................................5
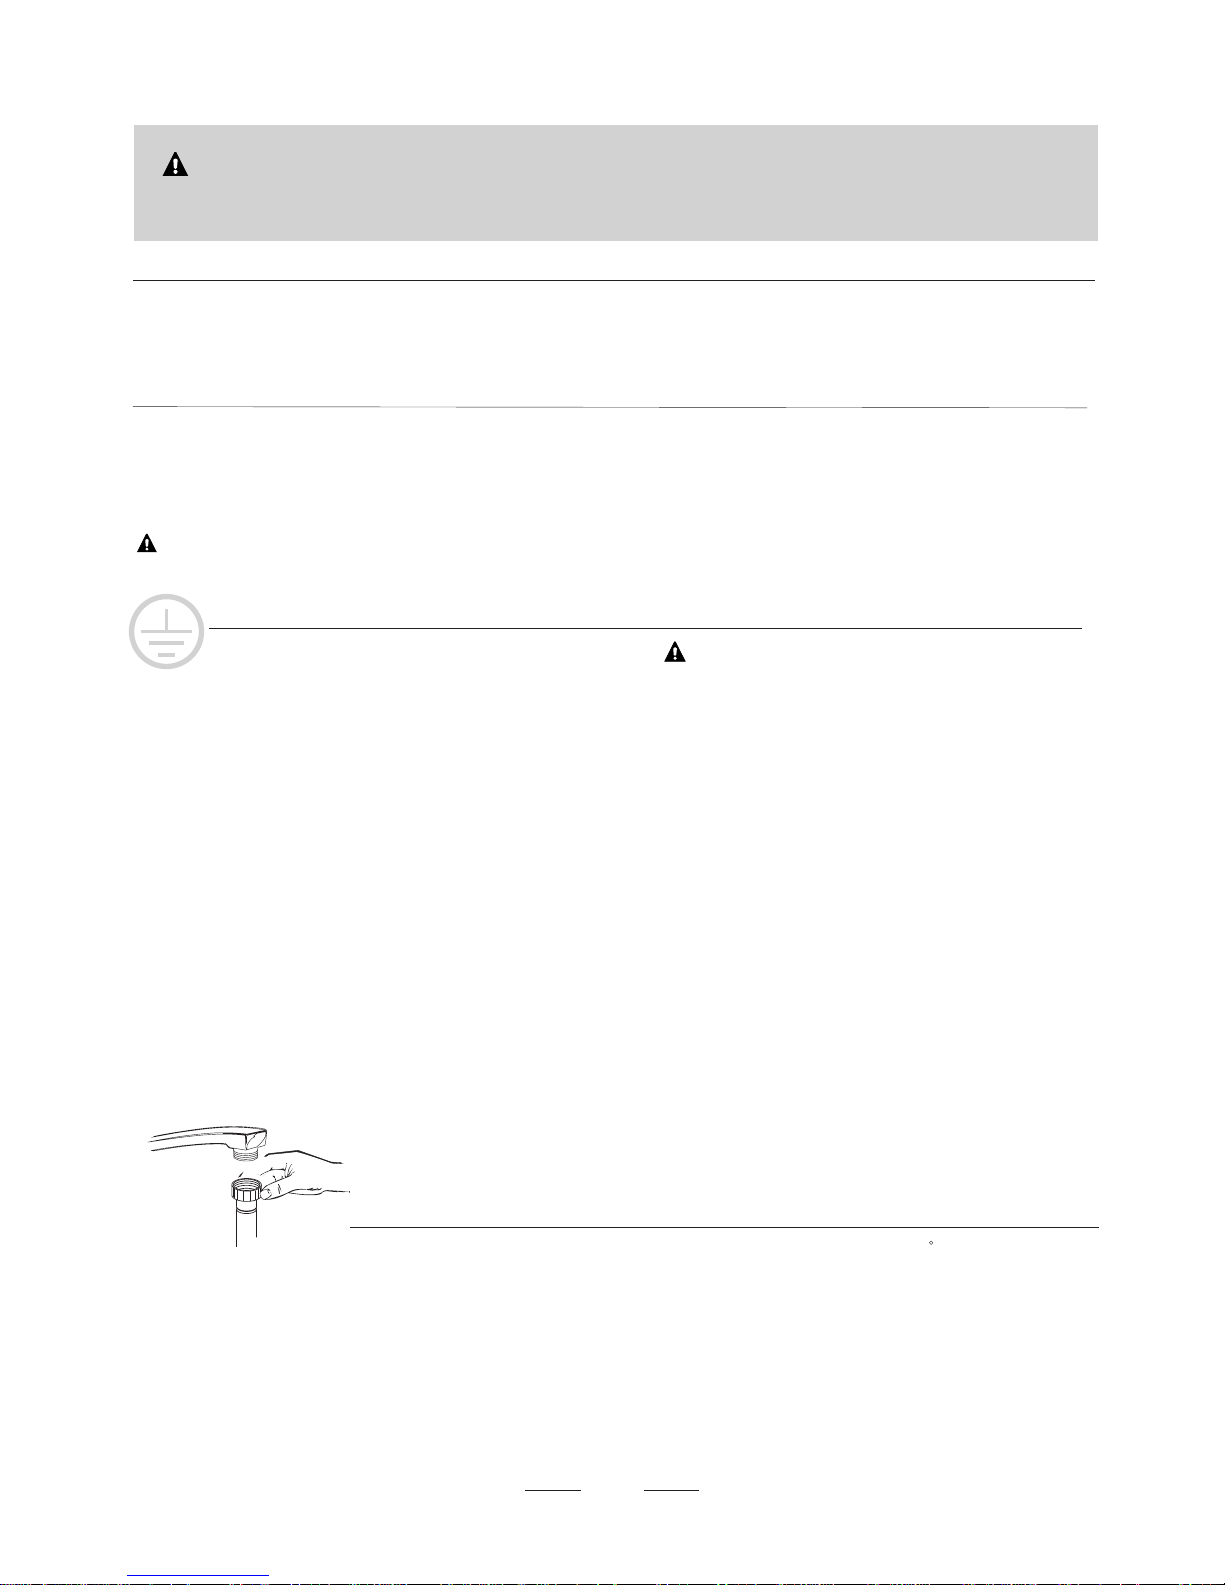
Water Connection.............................................5
Start of dishwasher..........................................6
Levelling the Appliance ....................................4
Drain pipe connection.................. ...................4..

850
600
580
1145
Height : 850mm
Width : 600mm
Depth : 580mm
Voltage connected Load : see rating label
Water pressure: 0.04-1.0MPa
Hot water connection : max 60 °
Power supply: see rating label
Capacity: 12 Place settings
1
1. Technical Information

SAVE THESE INSTRUCTIONS
READ AND FOLLOW THIS SAFETY INFORMATION CAREFULLY
WARNING! PROPER USE
2.IMPORTANT SAFETY INFORMATION
READ ALL INSTRUCTIONS BEFORE USING
WARNING!
WARNING! HYDROGEN GAS IS EXPLOSIVE
Under certain conditions, Hydrogen gas may be produced in a hot-water system that has not been used
for two weeks or more. HYDROGEN GAS IS EXPLOSIVE. If the hot-water system has not been used
for such a period, before using the dishwasher turn on all hot-water faucets and let the water flow from
each for several minutes. This will release any accumulated hydrogen gas. As the gas is flammable,
do not smoke or use an open flame during this time.
When using your dishwasher, follow the below basic precautions including the following:
· Do not abuse, sit on, or stand on the door or dish rack of the dishwasher.
· Do not operate your dishwasher unless all enclosure panels are properly in place. Ensure you press the
“START / RESET” button prior to opening the Dishwasher whilst it is operating to avoid water spray.
Please also ensure all care is taken whilst opening the door as hot steam may also be present.
· Do not place any heavy objects or stand on the door when it is open as this could overturn the
dishwasher.
· When loading items in to the dishwasher:
o Locate sharp items so that they are not likely to damage the door seal;
o Warning: knives and other utensils with sharp points must be loaded in the basket with their points down
or placed in a horizontal position.
· Do not wash plastic items unless they are marked dishwasher safe or the equivalent. Please check the
manufacturer’s recommendations for items that are not marked such as plastic, ceramic or pots.
· Use only detergent and rinse additives designed for an automatic dishwasher. Never use soap, laundry
detergent, or hand washing detergent in your dishwasher.
· Other means for disconnection from the supply must be incorporated in the fixed wiring with at least 3mm
contact separation in all poles.
• This Dishwasher is intended for single family domestic use only.
· The appliance is not intended for use by young children or infirm persons without supervision.
Ensure the dishwasher door is not open in full when unused to avoid potential tripping hazards.
· Warning: Dishwasher detergents can be extremely dangerous if swallowed as they are high in alkaline.
Avoid contact with skin and eyes and ensure children are not present when opening the door of the
dishwasher. Also check that the detergent receptacle is empty after completion of the wash cycle.
· If the supply cord is damaged, it must be replaced by the manufacturer or its service centre or a
similarly qualified person in order to avoid a hazard.
· Please dispose of the packing materials appropriately.
· Use the dishwasher only for its intended function.
· During installation, the power cord must not be excessively or dangerously bent or flattened.
· Do not tamper with controls.
· The appliance is to be connected to the water mains using the new hose set supplied. Do not reuse old
or existing hose sets.
2

Control Panel
To get the best performance from your dishwasher, read all operating instructions before using
it for the first time.
Dishwasher Features
IMPORTANT!
3
3.Operation Instruction
11
12
Back View
Main Filter
5Detergent Dispenser
6Cup Shelf
7Silverware Basket
Coarse Filter
9Rinse Aid Dispenser
10 Inlet pipe connector
12
Drain pipe connector
11
Lower rack
3
Spray Arms
2
Upper rack
1
4Base Tray Cover
10
Front view
6 Start / Reset Button: Press this button to start or pause the
dishwasher, the light will come on when starting.
9 Power Light : To come on when the ON/OFF Button is
pressed.
1 Pre-wash light: To come on when pre-wash.
2 Wash light: To come on when washing.
3 Rinse light: To come on when rinsing.
4 Drying light: To come on when drying.
5 Door Handle: Pull it to open the door.
7 Washing Program Selector: Turn the knob clockwise to
select wash cycles.
8 ON/OFF Button: To turn the power on and off.
12 4 4
10
5
67
89
RAPIDINTENSIVE HEAVY NORMAL SOAK
10 Rinse aid warning light: To come on when dispenser
needs to be refilled
3
8
1
2
3
4
5
6
7
8
9
SCALE 1.000

The installation of the pipes
and electrical equipment
should be performed by a
professional.
Warning
Electrical Shock Hazard
Disconnect electrical power
before installing dishwasher.
Failure to do so can result in death
or electrical shock.
Attention:
The installation position of the dishwasher should be near the existing inlet, drain hose
and power cord.
One side of the cabinet sink should be chosen to facilitate the connection of the drain
hose on the dishwasher.
Installation preparation
Note:
supply hose)
please check the accompanying installation accessories(hook for drain hose, water
4.Installation instruction
Once the appliance is positioned,adjust the feet (screwing them in or out) to adjust the
height of the dishwasher, making it level (In any case, the appliance should not be inclined
more than 2 DEGREES TO ENSURE CORRECT OPERATION)
Levelling the Appliance
Drain pipe connection
Max 1000mm
Min 400mm
FRONT VIEW
Inlet pipe connectorDrain pipe connector
POWER OUTLET
SINK
DISHWASHER
Min 100mm
WARNING!
DO NOT BEND IN ANY WAY !
4

5
Electrical Requirements
Electrical Connection
DO NOT USE EXTENSION LEAD OR AN ADAPTOR PLUG WITH THIS APPLIANCE.
DO NOT, UNDER ANY CIRCUMSTANCES, CUT OR REMOVE THE THIRD GROUNDING PRONG FROM THE POWER
CORD.
CAUTION,
for personal safety:
Electricity
After making sure that the voltage and the frequency values for the current in the home correspond to those on the
rating plate and that the electrical system is sized for the maximum voltage on the rating plate, insert the plug into
an electrical socket which is earthed properly. Do not use adaptors to manipulate incompatible sockets.
Please see the rating label to identify the rating voltage and connect the dishwasher to appropriate power supply,
Please use the required fuse 12 amp. Fused electrical supply is required - copper wire only. Time delay fuse or circuit
breaker recommended and provide separate circuit serving specifically for this appliance. The Outlet should be placed
in an adjacent cabinet.
Ensure appropriate ground is evident prior to use
GROUNDING INSTRUCTIONS
This appliance must be grounded. In the event
of a malfunction or breakdown, grounding will
reduce the risk of electric shock by providing a
path of least resistance of electric current. This
appliance is equipped with a cord having an
equipment-grounding conductor and a grounding
plug. The plug must be plugged into an appropriate
outlet that is installed and grounded in accordance
with all local codes and ordinances.
WARNING!
Improper connection of the equipment-
grounding conductor can result in a risk
of electric shock. Check with a qualified
electrician or service representative if you
are in doubt whether the appliance is
properly grounded. Do not modify the plug
provided with the appliance; If it is not fit for
the outlet. Have a proper outlet installed by a
qualified electrician.
nn
Cold Water Connection
Connect the cold water supply hose to the inlet connector and make sure that it is fastened
tightly in place. If the water pipes are new or have not been used for an extended period of
time, let the water run to make sure that the water is clear and free of impurities. If this
precaution is not taken, there is a risk that the water inlet can get blocked and damage the
appliance.
Hot Water Connection
The water supply to the appliance can also be connected to the house hot water line
(centralized system, heating system),as long as it does not exceed a temperature of 60° C.
In this case, the wash cycle time will be shortened by about 15 minutes and the wash
efficiency slightly reduced. The connection must be made to the hot water line following the
same procedures as those for the connection to the cold water line.
Positioning the Appliance
Position the appliance in the desired location. The back should rest against the wall behind it,
and the sides, along the adjacent cabinets or wall. The dishwasher is equipped with water supply
and drain hoses that can be positioned to the right or the left to facilitate proper installation.

6
How to Drain Excess Water From Hoses
If the sink is 1000mm above the floor, the excess water in hoses cannot be drained directly
into the sink. It will be necessary to drain excess water from hoses into a bowl or suitable
container that is held outside and lower than the sink.
Water Outlet
Connect the water drain hose. The drain hose must be correctly fitted to avoid water leaks.
Ensure that the water inlet hose is not kinked or squashed.
Extension Hose
If you need a drain hose extension, observe to use a similar drain hose.
It must be no longer than 4 metres; otherwise the cleaning effect of the dishwasher could be reduced.
Syphon Connection
The waste connection must be at a height of between 40 cm (minimum) and 100 cm (maximum)
from the bottom of the dish. The water drain hose should be fixed by a hose clip.
Before starting the dishwasher
The following should be checked before starting the dishwasher.
1 Whether the dishwasher is level and fixed into position.
2 Whether the inlet water valve is opened.
3 Drain hose connected has the plug in waste tee been opened for drainage.
4 Whether there is leakage at the hose conections.
5 Whether the power cord is connected and power switched on.
6 Whether the inlet and drain hoses are kinked (as per page 4).
7 All packing materials and printings should be taken out from the dishwasher.
8 Can the spray arms rotate freely.

RINSE AID DISPENSER
To open the dispenser, turn the cap to the "open" (left) arrow and lift it out.
Pour the rinse aid into the dispenser, being careful not to overfill.
Replace the cap by inserting it aligned with "open" arrow and turning it to the closed (right) arrow.
The rinse aid is released during the final rinse to prevent water from forming droplets on your dishes
that can leave spots and streaks. It also improves drying by allowing water to sheet off the dishes.
Your dishwashers is designed to use liquid rinse aids. The rinse aid dispenser is located inside the
door next to the detergent dispenser. To fill the dispenser, open the cap and pour the rinse aid into
the dispenser until the level indicator turns completely black. The volume of the rinse aid container
is about 140ml.
Be careful not to overfill the dispenser, because this could cause over sudsing. Wipe away any spills
with a damp cloth. Don't forget to replace the cap before you close dishwasher door.
Attention!
Clean any excess rinse aid split whilst filling with an absorbent cloth to avoid excess foaming
during the next wash.
7
1
2
3
As the rinse aid diminishes, the size of the black dot on
the rinse aid level indicator changes, as illustrated below.
Full
3 / 4 full
1 / 2 full
1 / 4 full - Should refill to eliminate spotting
Empty
Additionally to the rinse-aid warning light, you can judge the amount of rinse-aid by the colour of the optical level
indicator "D" located next to the cap. When the rinse-aid container is full, the whole indicator will be dark. As the
rinse-aid diminishes, the size of the dark dot will decrease. You should never let the rinse aid get below 1 / 4 full.
5.Prior using for the first time
A. Fill the Rinse Aid Dispenser
Function of Rinse Aid
Rinse aid is automatically added in the final rinse, ensuring thorough rinsing, and spot
and streak free drying.
Attention!
Only use branded rinse aid for the dishwasher. Never fill the rinse aid dispenser with any
other substances (e.g. dishwasher cleaning agent, liquid detergent) as this will damage
the appliance.
When to Refill the Rinse Aid Dispenser
D (Rinse-Aid indicator)
1 2 3

Based on their chemical composition, the dishwasher detergents can be split in two basic types:
conventional, alkaline detergents with caustic components
low alkaline concentrated detergents with natural enzymes
The use of the” normal” washing program in conjunction with concentrated detergents
is specifically designed to dissolve the enzymes within the concentrated detergent to
help reduce the intensiveness of your wash. A “normal” wash with concentrated
detergent will give you the same result as an “intensive” wash with normal detergent.
Detergent tablets of different brands dissolve at different speeds. During shorter programs,
it is recommended that you use powder or liquid to ensure the detergent will dissolve and
perform as required. Tablets will often perform ideally during longer programs and higher
temperatures e.g. heavy or intensive cycles.
The dispenser must be refilled before the start of each wash cycle following the instructions
provided in the Wash Cycle Table. Generally, only one tablespoon of detergent is required for
a normal wash load. More heavily soiled items require more detergent. Always add the
detergent just before starting the dishwasher, otherwise it could get damp and will not dissolve
properly.
Amount of Detergent to Use
8
Concentrated Detergent
Detergent Tablets
Detergent Dispenser
B. Function of Detergent
Detergents with its chemical ingredients are necessary to remove dirt, crush dirt and
transport it out of the dishwasher. Most of the commercial quality detergents are suitable
for this purpose.
Adjusting Rinse Aid Dispenser
The rinse aid dispenser has six settings. Always start with the dispenser set on “2".
If spots and poor drying are problems, increase the amount of rinse aid dispensed
by removing the dispenser lid and rotating the dial to “3". If the dishes still are not
drying properly or are spotted, adjust the dial to the next higher number until your
dishes are spot-free. We suggest you to set on “4" (Factory setting is “4").
NOTE:
Increase the dose if there are drops of water or lime spots on the dishes after
washing. Reduce it if there are sticky whitish streaks on the dishes or a bluish film
on glassware or knife blades.
Adjust lever
(Rinse)
MAX
Push latch to open
1 2
Detergent tablet
Detergent powder

The marking indicates the dosing levels , as
illustrated on right:
Main wash cycle detergent
Pre-wash cycle detergent
Close the lid and press until it locks in place.
If the dishes are heavily soiled, place an additional detergent dose in the pre-wash detergent
chamber. This detergent will take effect during the pre-wash phase. Please observe the
manufacturers dosing and storage recommendations as stated on the detergent packaging.
A
B
Filling the detergent dispenser
9
NOTE:
Always add the detergent just before starting each wash cycle.
Only use branded detergent for dishwasher.
If the lid is closed: press release button. The lid will spring open.
WARNING!
Dishwasher detergent is corrosive! Take care to keep it out of reach of children.
Proper Use of Detergent
Use only detergent specifically made for use in dishwashers. Keep your detergent fresh
and dry. Do not add powder detergent into the dispenser until you're ready to wash dishes.
1
2
AB

10
6.Loading the Dishwasher Racks
3
1
1
2
2
2
1
2
1
22
1
22
1Cups
2Glasses
Saucers
3
IN
Fo r best performance of the dishwasher please follow these loading guidelines. Features and
appearance of racks and silverware baskets may vary your model.with
Attention before or after Loading the Dishwasher Racks
Sc rape off any large amounts of leftover food. It is not necessary to rinse the dishes under running water. Place dishes
dishwasher in following :in the manner
1. Items such as cups, glasses, pots/pans, etc are placed upside down
.2 Curve items, or those with recesses, should be at a slant so that water can run off them.
are stacked securely and can not tip ove3. Ensure the dishes r.
hey do not prevent the spray arms from rotating while washing takes pla4. Ensure t impede or ce.
Very small items should not be washed in the dishwasher as they could easily fall out of the racks.
Removing the Dishes
To prevent water dripping from the upper rack into the lower rack we recommend that you empty the lower rack first
upper rack.and then the
Loading the Upper Rack
The upper rack is designed to hold more delicate and lighter dishware such as glass cups. coffee and tea cup and
saucers, as well as plates, small bowls and shallow pans (as long as they are not overly spoiled).
Position the dishes and cookware so that they cannot be moved by the spray of water.
Adjusting the Upper Rack
If required, the height of the upper rack can be adjusted in order to create more space for large utensils either in the
upper rack or lower rack. The upper rack can be adjusted for height by putting wheels of different height into the rails.
Long items, serving cutlery, salad servers or knives should be placed on the shelf so that they do not obstruct the
rotation of the spray arms. The shelf can be folded back or removed when not required for use.
In

Loading the Lower Rack
We recommend that you place large items which are most difficult to clean into the lower rack:
pots, pans, lids, serving dishes and bowls, as shown in the figure below.
It is preferable to place serving dishes and lids on the side of the racks in order to avoid blocking
the rotation of the top spray arm.
Pots, serving bowls, etc. must always be placed top down.
Deep pots should be slanted to allow water to flow out.
The bottom rack features folding spikes so that larger or more pots and pans can be loaded.
Folding spikes
To improve stacking of pots and pans, the spikes can be folded down
11
Dessert dishes
4
5
Dinner plates
6
Soup plates
7Silverware basket
IN
Saucers
3
6
7
5
4
3
5
44

Silverware Basket
Silverware should be placed in the silverware basket with handles at the bottom: If the rack
has side baskets, spoons should be loaded individually into the appropriate slots and
especially long utensils should be placed in the horizontal position at the front of the
upper rack.
Cutlery with wooden, horn china or
mother-of-pearl handles
Plastic items that are not heat resistant
Older cutlery with glued parts that is not
temperature resistant
Bonded cutlery items or dishes
Pewter or copper items
Lead crystal glass
Steel items subject to rusting
Wooden platters
Items made from synthetic fibres
Do not add dishes that are soiled with
cigarette ash, candle wax, lacquer or
paint. Please ensure new dishes are
suitable for dishwasher prior to purchase.
For effective results, do not load more than the standard 12 place
settings your dishwasher is designed to handle.
Some types of glasses can become
dull after a large number of washes
Silver and aluminium parts have a
tendency to discolour during washing
Glazed patterns may fade if machine
washed frequently
12
NOTE:
Not suitable Limited suitability
When loading the dishes and cutlery, please remember the following:
Dishes and cutlery must not impede the rotation of the spray arms.
Load hollow items such as cups, glasses, pans etc. with the opening downwards so that
water cannot collect in the container or a deep base.
Ensure that no item extends through bottom.
WARNING!
Teaspoons
4
Soup spoons
2Forks
1
Knife
5
3Dessert spoons
4
432
4
4
4
5
4
4
4
4
1
1
1
1
1
1
1
1
1
4
4
4
1
1
1
5
5
5
5
5
5
5
5
5
5
5
2
2
2
2
2
2
2
2
2
2
2
3
3
3
3
3
3
3
3
3
3
3
4
IN

13
Di
To
T
shes and items of cutlery must not lie inside one another, or cover each other
avoid damage to glasses, they must not touch
Load large items which are most difficult to clean into the lower rack
he upper rack is designed to hold more delicate and lighter dishware such as glasses, coffee
and tea cups
Possible causes:
Type of glass or manufacturing process. Chemical composition of detergent.
Water temperature and duration of dishwasher programme.
Suggested remedy:
Use glassware or porcelain dishes that have been marked dishwasher-proof by the
manufacturer
Use a mild detergent that is described as kind to dishes. If necessary, seek further
information from detergent manufacturers.
Select a programme that operates at a lower temperature.
To prevent damage, take glass and cutlery out of the dishwasher as soon as possible
after the programme has ended.
At the End of the Wash Cycle
When the working cycle has finished, the buzzer of dishwasher will sound for 8 seconds,
then stop. Turn off the appliance using the ON/OFF button, and open the door of the
dishwasher so that it is slightly ajar. Wait a few minutes before unloading the dishwasher to
avoid handling the dishes and utensils while they are still hot and more susceptible to
breakage. They will also dry better.
Damage to glassware and other dishes
Attention!!

7.Starting a washing programme
14
WASH CYCLE TABLE
Cycle Selection
Information
Description
of Cycle Rinse
Aid
Detergent
pre/main
wash-Pre
Wash (50 ¡)
Rinse
Rinse (70 ¡)
Drying
To rinse dishes that you
plan to wash later that day.
20 g
A shorter wash for lightly
soiled loads that do not
need drying.
Program
Soak
5/25 g
5/25 g
30 g
Pre (
Wash (65 ¡)
Rinse
Rinse (65 ¡)
Drying
-wash(45¡
Pre-wash
Cycle
Rapid
Intensive
Heavy
Normal
(AS/NZS 2007.1 )
For heavy soiled loads,
such as pots, plates,glasses
and lightly soiled pans.
Standard daily cycle.
For the heaviest soiled loads,
such as pots,pans,casserole
dishes and dishes that have
been sitting with dried food
on them for a while.
For normal soiled loads,such
as plates,glasses,bowls and
lightly soiled pans.
Running
time(min)
Energy
(Kwh)
Water
(l)
Wash (60 ¡)
Rinse
Rinse
Rinse(50¡)
Drying
44
159
152
115
8
Wash (40 ¡)
Rinse(50¡)
Drying
0.6
1.55
1.25
0.9
0.01
9.9
17.7
17.4
12.0
3.7
Note: We recommend you open the door slightly 50mm to assist in drying
dishes after every wash.of the

If some of the left four program lights are blinking fast, your dishwasher is indicating that it is out of order
("Error code), please turn off the main power and water supply before calling for a service.
15
NOTE:
Forget to Add a Dish?
A forgotten dish can be added any time before the detergent cap opens.
Press the “START / RESET” button to pause the dishwasher.
Wait 10 seconds for the spray arm to stop spraying then
open the door.
Add forgotten dishes.
Close the door , the
dishwasher will continue to run after 10 seconds.
Pause button/and press the Start
4
3
2
1
The program lights indicate the state of the dishwasher:
ll of the program lights off
) Some of the left four program lights blinking fast -->error
a) A --> stand by
b) One of the program lights on --> pause
c) One of the program lights blinking slowly --> run
d
TURNING ON THE APPLIANCE
Change the Programme
Please press the Start/Reset button and hold for more
than three seconds, this will cancel the current
programme; or turn off the appliance by pressing the
on/off button to cancel the current programme.
Turn the programme knob to select the desired
programme.
Press the Start/Pause button to begin the wash.
1
2
3
Premise: A cycle that is underway can only
it has been running for a short time. Otherwise, the
detergent may have already been released, and the
appliance may have already drained the wash water. If this
is the case, the detergent dispenser must be refilled (see
the paragraph entitled “Loading the Detergent”).
be modified if
NOTE: If you open the door when washing, the machine
will pause. When you close the door and press the
Start/Pause button, the machine will continue to work
after 10 seconds.
Starting a wash cycle. . .
3
4
5
6
7
8
1Draw out the lower and upper rack, load the dishes and
push them back in. It is recommended to load the lower
rack first, then the upper one (see the section entitled
“Loading the Dishwasher”)
Pour in the detergent (see the section entitled,
Detergent and Rinse Aid”).
Press the ON/OFF button
Turn the knob located on the right of the control panel in
a clockwise direction until it reaches the number or the
symbol for the cycle selected.
Press the Start/Reset button to start the washing.
When the washing is over, you can shut off the unit by
pressing the on/off button.
To ensure the door is properly closed.
2
Ensure there is power to the dishwasher and Make
sure that the water supply is turned on to full pressure.
It is dangerous to open the door when washing as the hot water and steam may scald you.
WARNING!
Open the door carefully. Hot steam may escape when the door is opened!
Hot dishes are sensitive to knocks. The dishes should therefore be allowed to cool down around
15 minutes before removing from the appliance.
Open the dishwasher's door, leave it ajar and wait a few minutes before removing the dishes.
This will ensure they will cool down and assist with the drying.
It is normal that the dishwasher is wet inside.
Empty the lower rack first and than the upper one. This will avoid water dripping from the
upper rack onto the dishes in the lower one.
NOTE: A click should be heard when the door is
closed correctly.
Unloading the dishwasher

8.Maintenance and Cleaning
16
The filters prevents larger remnants of food or other objects from getting into the pump. This residue can
occasionally clog up the filters.
The filter system consists of a coarse filter ,a (Main) filter, and flat
a microfilter (Fine filter).
Main filter
Food and soil particles trapped by this filter are pulverized by a
special jet on the lower spray arm and washed down the
drain.
Coarse filter
Larger items, such as pieces of bone or glass, that could clog
the drain are trapped in the coarse filter. To remove an item
caught in this filter, gently squeeze the tabs on the top of this
filter and lift it out.
Fine filter
This filter holds soil and food residue in the sump area and
prevents it from being redeposit on the dishes during a cycle.
- Inspect the filters for obstructions every time the dishwasher has been used.
- By unscrewing the coarse filter, you can remove the filter system. Remove any food remnants and clean
filters under running water.the
2
3
1
2
3
Filtering System
1
To re-install the filters, simply follow the above steps in reverse from step 3 to step 1.
NOTE:
Cleaning the Filters

17
Caring for the Dishwasher
To clean the control panel use a lightly dampened cloth then dry thoroughly. To clean the exterior
use a good appliance cleaner.
Never use sharp objects, scouring pads or harsh cleaners on any part of the dishwasher.
Protect Against Freezing
If your dishwasher is left in an unheated place during the winter in areas where temperatures drop below freezing, ask a
service technician to:
1.Cut off electrical power to the dishwasher.
2.Turn off the water supply and disconnect the water inlet pipe.
3.Drain water from the inlet pipe and water valve. (Use a pan to catch the water)
4.Reconnect the water inlet pipe to the water valve.
5.Remove the filter in the tub the and use a sponge to soak up water in sump.
Filter assembly
For the best performance and results, the filter assembly must be cleaned. The filter efficiently
removes food particles from the wash water, allowing it to be recirculated during the cycle. For
this reason, it is a good idea to remove the larger food particles trapped in the filter after each
wash cycle by rinsing the semicircular filter and cup under running water. To remove the filter
assembly, pull on the cup handle in the upward direction. The entire filter assembly should be
cleaned once a week.
To clean the coarse filter and the fine filter, use a cleaning brush. Then, reassemble the filter
parts as shown in the figures below and reinsert the entire assembly in the dishwasher, positioning it
in its seat and pressing downward.
The dishwasher must never be used without the filters. Improper replacement of the filter may
reduce the performance level of the appliance and damage dishes and utensils.
Never run the dishwasher without the filters in place.
WARNING!
Cleaning the Spray Arms
screw the nut clockwise, To remove the upper spray arm until off and
then remove the arm.

How to Keep Your Dishwasher in Shape
After Every Wash
After every wash, turn off the water supply to the
appliance and leave the door slightly ajar so that
moisture and odors are not trapped inside.
Remove the Plug
Before cleaning or performing maintenance, always
remove the plug from the socket.
No Solvents or Abrasive Cleaning
To clean the exterior and rubber parts of the dishwasher,
do not use solvents or abrasive cleaning products.
Rather, use only a cloth and warm soapy water.
To remove spots or stains from the surface of the
interior, use a cloth dampened with water and a little
white vinegar, or a cleaning product made specifically
for dishwashers.
When You Go on Holiday or are Away
for Extended Periods
When you go on holiday, it is recommended that you run
a wash cycle with the dishwasher empty and then
remove the plug from the socket, turn off the water
supply and leave the door of the appliance slightly ajar.
This will help the seals last longer and prevent odours
from forming within the appliance.
Moving the Appliance
If the appliance must be moved, try to keep it in the
vertical position. If absolutely necessary, it can be
positioned on its back.
Seals
One of the factors that cause odors to form in the
dishwasher is food that remains trapped in the seals.
Periodic cleaning with a damp sponge will prevent this
from occurring.
Cleaning the Door
To clean the edge around the door, you should use only a soft damp cloth. To
prevent penetration of water into the door lock and electrical components, do not use a
spray cleaner of any kind.
Also, never use abrasive cleaners or scouring pads on the outer surfaces because they
will scratch the finish. Some paper towels can also scratch or leave marks on the
surface.
SCALE 1.000
18
This manual suits for next models
1
Table of contents
Other Everdure Dishwasher manuals