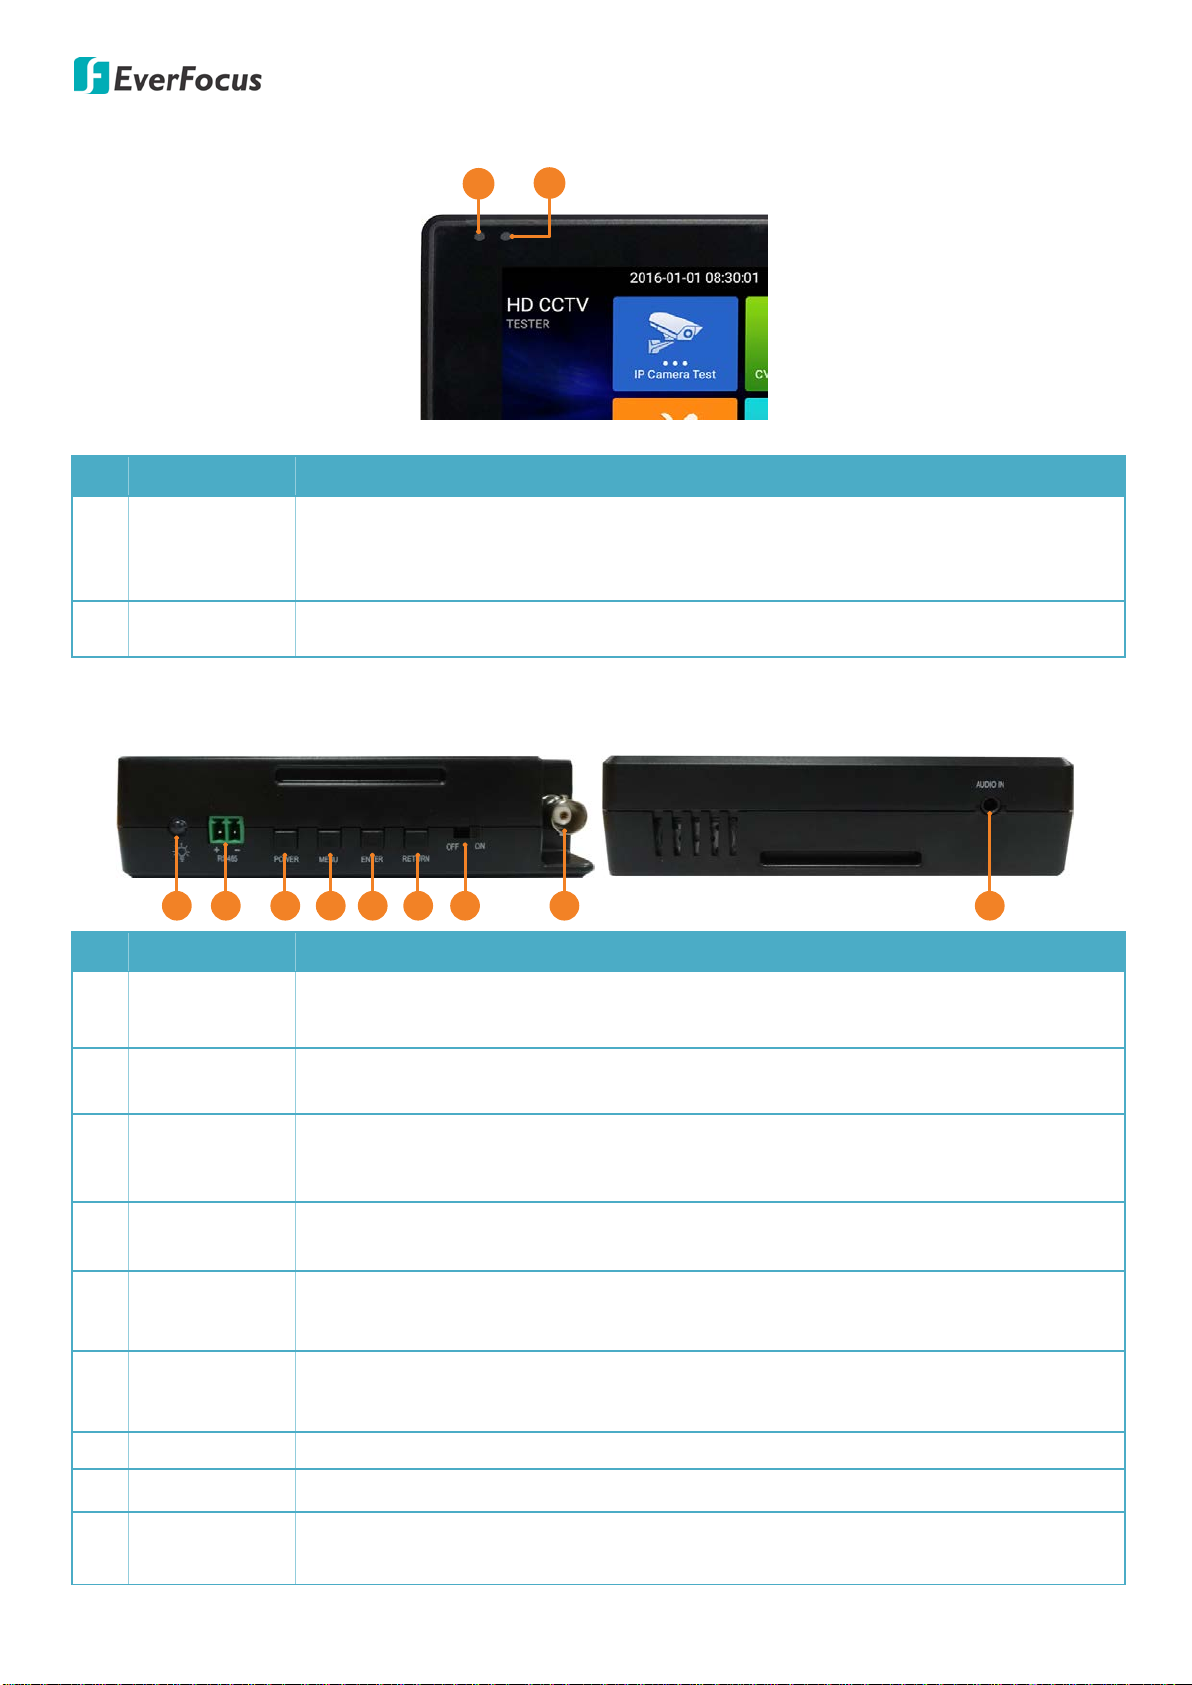
EverFocus EN310 User manual

EN310
4” Touch Screen Test Monitor
User’s Manual
Copyright © EverFocus Electronics Corp.
Release Date: November, 2018
All the images including product pictures or screen shots in this document are for example only. The
images may vary depending on the product and software version. Information contained in this document
is subject to change without notice.
This User’s Manual can also be downloaded from EverFocus‘ Website (http://www.everfocus.com.tw ).
Please go to the EN310 product page and then click the Download tab to download the User’s Manual.

Safety Warnings
• The device is intended to use in compliance with the local rules of the electrical usage and avoid to
apply at the places which are inapplicable for the use of electrics such as hospital, gas station etc.
• To prevent the functional decline or failure, the product should not be sprinkled or damped.
• The exposed part of the device should not be touched by the dust and liquid.
• During transportation and use, it is highly recommended to avoid the violent collision and vibration of
the device, lest damaging components and causing failure.
• Don’t leave the device alone while charging and recharging. If the battery is found severely hot, the
device should be powered off from the electric source at once. It’s recommended to charge the battery
within 8 hours. Do not charge the battery over 12 hours.
• Don’t use the device where the humidity is high. Once the device is damp, power off immediately and
move away other connected cables.
• The device should not be used in the environment with the flammable gas.
• Do not disassemble the instrument since no component inside can be repaired by the user. If the
disassembly is necessary indeed, please contact the technical support team ts@everfocus.com.tw
• The instrument should not be used under the environment with strong electromagnetic interference.
• Don’t touch the device with wet hands or waterish things.
• Don’t use the detergent to clean and the dry cloth is suggested to use. If the dirt is not easy to remove,
the soft cloth with water or neutral detergent can be used. But the cloth should be tweaked sufficiently.
WEEE
FCC
ATTENTION! This is a class A product which may cause radio interference in a domestic environment; in this
case, the user may be urged to take adequate measures.
This device complies with Part 15 of the FCC Rules. Operation is subject to the following two conditions: (1)
this device may not cause harmful interference, and (2) this device must accept any interference received,
including interference that may cause undesired operation.
NOTE: This equipment has been tested and found to comply with the limits for a Class B digital device,
pursuant to Part 15 of the FCC Rules. These limits are designed to provide reasonable protection against
harmful interference in a residential installation. This equipment generation, uses and can radiate radio
frequency energy and, if not installed and used in accordance with the instructions, may cause harmful
interference to radio communications. However, there is no guarantee that interference will not occur in a
particular installation. If this equipment does cause harmful interference to radio or television reception,
which can be determined by turning the equipment off and on, the user is encouraged to try to correct the
interference by one or more of the following measures:
• Reorient or relocate the receiving antenna.
• Increase the separation between the equipment and receiver.
• Connect the equipment to an outlet on a circuit different from that to which the receiver is connected.
• Consult the dealer or an experienced radio/TV technician for help.
Your EverFocus product is designed and
manufactured with high quality materials and
components which can be recycled and reused.
This symbol means that electrical and electronic
equipment, at their end-of-life, should be disposed of
separately from your household waste.
Please, dispose of this equipment at your local
community waste collection/recycling centre.
In the European Union there are separate collection
systems for used electrical and electronic product.
Please, help us to conserve the environment we live
in!
Ihr EverFocus Produkt wurde entwickelt und
hergestellt mit qualitativ hochwertigen Materialien
und Komponenten, die recycelt und wieder
verwendet werden können.
Dieses Symbol bedeutet, dass elektrische und
elektronische Geräte am Ende ihrer Nutzungsdauer
vom Hausmüll getrennt entsorgt werden sollen.
Bitte entsorgen Sie dieses Gerät bei Ihrer örtlichen
kommunalen Sammelstelle oder im Recycling
Centre.
Helfen Sie uns bitte, die Umwelt zu erhalten, in der
wir leben!

Content
1. Introduction .................................................................................................................................1
1.1 Package Contents...............................................................................................................................1
1.2 Dimensions.........................................................................................................................................1
2. Physical Description .....................................................................................................................2
3. General Operation........................................................................................................................3
3.1 Battery Charging ................................................................................................................................3
3.2 IP Camera Directly Connection ..........................................................................................................4
3.3 Analog / CVI / TVI / AHD Camera Connection ...................................................................................4
3.4 General Screen Operation .................................................................................................................5
3.4.1 Arranging Sub-menu Icons........................................................................................................5
3.4.2 Dropdown Menu.......................................................................................................................6
3.4.3 Screen Capture..........................................................................................................................8
3.4.4 Exporting Files to PC .................................................................................................................9
4. Main Page ..................................................................................................................................12
4.1 IP Camera Test .................................................................................................................................12
4.1.1 PoE Power Output...................................................................................................................12
4.1.2 IP Discovery.............................................................................................................................13
4.1.3 ONVIF ......................................................................................................................................14
4.1.4 IP Camera Test ........................................................................................................................18
4.1.5 Network Tool ..........................................................................................................................20
4.1.5.1 PING IP ......................................................................................................................20
4.1.5.2 Scan...........................................................................................................................21
4.1.5.3 Network Test ............................................................................................................22
4.1.5.4 Port Flashing .............................................................................................................23
4.1.5.5 DHCP .........................................................................................................................24
4.1.5.6 Trace Route...............................................................................................................24
4.1.5.7 Link Monitor .............................................................................................................25
4.1.6 HIK...........................................................................................................................................26
4.1.7 DH Test Tool............................................................................................................................27
4.1.8 Chrome....................................................................................................................................27
4.2 CVBS & HD Camera ..........................................................................................................................28
4.2.1 Analog / CVI / TVI / AHD Camera Test ....................................................................................28
4.3 Tools.................................................................................................................................................31
4.3.1 DroiNotes ................................................................................................................................31
4.3.2 Data Monitor...........................................................................................................................32
4.3.3 Flashlight .................................................................................................................................33
4.3.4 Calculator ................................................................................................................................34
4.3.5 Settings....................................................................................................................................34
4.3.5.1 Language & Input......................................................................................................34
4.3.5.2 Date/Time.................................................................................................................35
4.3.5.3 IP Settings .................................................................................................................35
4.3.5.4 WLAN Net .................................................................................................................35
4.3.5.5 Brightness .................................................................................................................36
4.3.5.6 Volume......................................................................................................................36
4.3.5.7 SD Card .....................................................................................................................36
4.3.5.8 FTP Server .................................................................................................................37
4.3.5.9 Version Information..................................................................................................38
4.3.5.10 Screen Rotation ......................................................................................................38

4.3.5.11 PTZ Address Scan....................................................................................................39
4.3.5.12 Contact....................................................................................................................39
4.3.5.13 Lock Screen .............................................................................................................39
4.3.5.14 TesterPlay ...............................................................................................................40
4.3.5.15 Factory Default .......................................................................................................42
4.3.5.16 Power Off................................................................................................................42
4.3.6 Theme .....................................................................................................................................43
4.3.6.1 Theme.......................................................................................................................43
4.3.6.2 Background...............................................................................................................44
4.3.7 Quick Office.............................................................................................................................45
4.4 My APPS ...........................................................................................................................................46
4.4.1 Manual ....................................................................................................................................46
4.4.2 Application Update .................................................................................................................46
4.4.2.1 Creating a Directory in SD Card ................................................................................47
4.4.2.2 Importing Files to the SD Card..................................................................................48
4.4.3 File Explorer ............................................................................................................................48
4.4.3.1 Browse ......................................................................................................................48
4.4.3.2 File.............................................................................................................................49
4.4.3.3 FTP ............................................................................................................................49
4.4.4 Rapid Video.............................................................................................................................50
4.4.5 Rapid IP Discovery...................................................................................................................51
4.4.6 VLC ..........................................................................................................................................51
4.4.7 MobileFocus............................................................................................................................52
4.5 More.................................................................................................................................................52
4.5.1 Audio Recorder .......................................................................................................................53
4.5.2 Audio Player............................................................................................................................53
4.5.3 Video Player ............................................................................................................................54
4.5.4 RTSP Player .............................................................................................................................55
5. Specifications .............................................................................................................................56

EN310 4“ Touch Screen Test Monitor
1
1. Introduction
EverFocus’ EN310 4-inch test monitor comes with a touch panel and is designed for maintenance and
installation of IP cameras, analog cameras, TVI, CVI AHD cameras, as well as testing 4K H.264 / 4K H.265
camera with mainstream. The 800 x 480 screen resolution enables it to display network HD cameras and
analog cameras in high resolution. The device supports various ONVIF PTZ and analog PTZ control. The
combination of touch screen and key buttons make the device extremely user- friendly.
Except for the test function, the device can be used as a tool for Ethernet network testing. Other functions
like providing 24W PoE power to your camera, PING and IP address searching, LED flashlight, 12VDC 3A
power output are also supported.
1.1 Package Contents
• 4-inch test monitor x 1
• 12VDC 1A power adapter x 1
• BNC cable x 1
• RS-485 cable x 1
•
Power output cable x 1
• Audio cable x 1
• Wristband x 1
• Screen protector x 1
• Tool bag x 1
Note: Please unpack the monitor with care, and verify that all parts listed above are included. If any
parts are missing, please contact your local distributor. Please save the packing box for possible
future return for service.
1.2 Dimensions
126mm/4.96"
33mm/1.3"
83mm/3.27"

EN310 4“ Touch Screen Test Monitor
2
2. Physical Description
12
No. Name Description
1 Charger LED
When the device battery is being charged, the LED notification light will stay red.
When the battery is fully charged, the ligt will be off automatically. Please refer to
3.1 Battery Charging.
2 RS-485 LED When RS-485 data is being transmitted, the LED notification light will light in red.
Top Bottom
123 4 567 8 9
No. Name Description
1 LED Flashlight To turn on / off the LED flashlight, go to Tools > Flashlight. Please refer to 4.3.3
Flashlight for more details.
2 RS-485 Use the supplied RS-485 cable to connect to a PTZ camera, DVR or a Control
Keyboard.
3 Power
Press the Power key for 2 sedonds to turn on or off the device.
Quick press the Power key once can turn on or off the sleep mode.
Long press the Power key can Power off or Reboot the device.
4 Menu Function switching key. Tap to select between icons or functions, and then press
the Enter key to enter.
5 Enter Confirm key. You can also use this key to capture screenshot by long press on it
(please refer to 3.4.3 Screen Capture).
6 Return Press the key to return to the previous page. You can also press the key to close or
decrese the aperture.
7 Power Switch Switch the device power on or off.
8 Video Input BNC video input for Analog / AHD / CVI / TVI cameras.
9 Audio Input Use the supplied audio cable to connect to an audio input device to record audio
for testing. Please refer to 4.5.1 Audio Recorder.

EN310 4“ Touch Screen Test Monitor
3
Left Right
1234
No. Name Description
1 SD Card Slot Insert an external micro SD card. The external micro SD card can be used to
backup files from the internal SD card. Up to 32GB micro SD card is supported.
2 Power Input Use the supplied 12VDC 1A power adapter to power on (charge) the device.
3 PoE / LAN PoE power supply output or LAN test port. Use it to test PoE or non-PoE IP camera.
The PoE supports 48V, 24W.
4 Power Output
12VDC 3A power output to power up the connected camera.
Note that if the camera’s input power is over 3A, the tester will automatically
enter the protection mode. Please disconnect all the connections to the tester,
connect the terster with power adaptor to resume the tester. Ensure the tester’s
power is sufficient, otherwise, the tester will not be able to supply power.
3. General Operation
3.1 Battery Charging
The device is built-in with a rechargeable polymer lithium-ion battery (7.4VDC 2400mAh). You can refer to
the Battery Icon on the top-right corner of the screen to see the power capacity.
You can use the supplied 12VDC 1A power adapter to power on (charge) the device. When the battery is
being charged, the Charger LED notification light will stay red and the Battery Icon will display with
charging status . When the battery is fully charged, the Charger LED will be off automatically.
Note: Do not leave the device alone while charging and recharging. If the battery is found severely hot,
the device should be powered off from the electric source at once. It’s recommended to charge the
battery within 8 hours. Do not charge the battery over 12 hours.
Battery IconCharger LED
Connect the
supplied Power
Adapter

EN310 4“ Touch Screen Test Monitor
4
3.2 IP Camera Directly Connection
LAN
If your IP camera requires an independent power supply,
connect the LAN cable of the IP camera to the LAN port
of the device and then power up the IP camera with your
power supply. Check whether the LED indicators of the
LAN port are on:
• When the green LED is on, there is
10/100/100Mbps traffic
• When the orange LED is blinking, data is being
transferred
If your IP camera requires PoE power, connect the PoE
cable to the LAN port of the device and then turn on the
PoE power output function (IP Camera Test > POE power
output). Please refer to 4.1.1 PoE Power Output.
3.3 Analog / CVI / TVI / AHD Camera Connection
The way to connect the Analog / CVI / TVI / AHD cameras are the same, here we use the CVI camera as an
example.
Connect the camera's video output to the Video Input of the device using the supplied BNC cable. Tap the
CVI icon (see Note below) and then you can see the camera streams.
You can also use the supplied RS-485 cable to connect the camera to the RS-485 port of the device to
control the camera.
BNC Cable
RS485 Cable
Red Wire (+)
Black Wire (-)

EN310 4“ Touch Screen Test Monitor
5
Note: After connecting the camera to the Video Input port of the device, you will have to tap the
following icon to get the camera streams. On the Main page, tap CVBS & HD Camera to enter this page.
For CVI cameras: tap the CVI icon.
For TVI cameras: tap the TVI icon.
For AHD cameras: tap the AHD icon.
For Analog cameras: tap the HD CVBS icon.
3.4 General Screen Operation
After switching the Power Switch on and then press the Power key for 2 seconds, the Main Page appears.
You can operate the general functions described as below.
3.4.1 Arranging Sub-menu Icons
In the sub-menu, you can arrange the icon order or move the icons to other Main Page folders.
To arrange icon order:
1. On the Main Page, tap on an icon to enter a sub-menu. Here we tap on IP Camera Test for example.
2. Tap and hold a sub-menu icon (long press), the icon will change to a “Selected Status”. Drag and
drop the icon to a new location. As you move in an icon, other icons move out of the way.

EN310 4“ Touch Screen Test Monitor
6
To move icons to other Main Page folders:
1. On the Main Page, tap on an icon to enter a sub-menu. Tap the finger icon in the lower-right corner,
the icon color will change from white to orange.
2. Tap and hold a sub-menu icon (long press), the icon will be moved to the Main Page. Drop the icon in
any folder on the Main Page.
3.4.2 Dropdown Menu
Swipe down from top of the screen twice can bring up the Dropdown Menu. The dropdown menu can be
regarded as a shortcut to access 5 function pages: Settings, CVBS, LAN Info, Power Output and IP.
Swipe Down Twice
Settings: Tap the Settings icon to enter the Settings page. To close the page, tap the icon.

EN310 4“ Touch Screen Test Monitor
7
CVBS: Tap to enter the HD CVBS page. To close the page, tap the icon.
LAN Info: Tap to display the network info window. To close the window, tap the icon.
Power Output: Tap to turn on the PoE power output, a“PoE 48V ON”info will be displayed on the
top-left of the screen. Tap again to turn off the PoE power. This function can be used to power up
PoE IP devices.
IP: Tap to enter the IP Settings page. To close the page, tap the icon.

EN310 4“ Touch Screen Test Monitor
8
3.4.3 Screen Capture
You can capture screen and save it to the internal SD card using the Enter key.
To capture screen image:
1. Press and hold the Enter key on the top of the device, the screen image will be captured. By default,
the captured screen images will be saved in the internal SD card (/sdcard/screenshots).
2. To view the captured images, go to My APPS > File Explorer . Tap the Browse tab and then tap Pics,
the images will be displayed.
3. Tap on the image to display it. You can also tap and use the Edit, Set picture as and Print functions.
4. You can optionally export captured screen images to PC. Please refer to 3.4.4 Exporting Files to PC.

EN310 4“ Touch Screen Test Monitor
9
3.4.4 Exporting Files to PC
The files stored in the SD card, such as snapshot images, recordings, test reports and etc., can be
exported to your PC. There are two ways to export files to PC: 1) Use external SD card 2) Use FTP server.
Please follow the instructions below:
A. Use external SD card:
1. Ensure the external SD card has been inserted to the SD card slot of the tester.
2. Copy and paste the files from the internal SD card to the external SD card.
(Note: By default, all the files like recordings or images are stored in the internal SD card. To backup
files to the external SD card, copy and paste the files from internal SD card to external SD card.)
a. Go to SD card setting page (Tools > Settings > SD Card). Enable the “The use of external SD card”.
This will create an “extsd”folder in the SD card for exporting purpose.
b. Find the files in the internal SD card. Go to My APPS > File Explorer . In the File tab, tap sdcard
to enter the internal SD card folder and then find the file(s) you required.
c. Copy the files to the extsd folder. Here we take screenshot images for example:
i) Select the images and then tap the Copy button.

EN310 4“ Touch Screen Test Monitor
10
ii) Tap the Return button twice to find the extsd folder.
iii) Tap extsd to enter the extsd folder and then tap the Paste button. The images will be pasted to
the extsd folder.
3. Remove the SD card from the tester and insert the SD card to your PC. And then you can see the
images in the SD card.
B. Use FTP Server:
1. Enable the FTP Server function of the tester.
a. Go to My APPS > File Explorer and then tap the FTP tab.
b. Enable Anonymous login and I need to use FTP client functions. Select Internal SD or external SD
and then tap the Start Service button. The FTP server address of the tester will be displayed. For
more details on this page, please refer to 4.4.3.3 FTP.
Note: Select Internal SD will allow users to access only the internal SD card; select external SD will
allow users to access only the external SD card.

EN310 4“ Touch Screen Test Monitor
11
2. On your PC, open a folder and then type in the FTP server address (ftp://xxx.xxx.xxx.xxx:xxxx). Press
the Enter key and then you should now access the internal/external SD card of the tester.
3. Now you can copy the files from the internal/external SD card to your PC. You can also create folder in
the SD card or edit folder or file names in the SD card.

EN310 4“ Touch Screen Test Monitor
12
4. Main Page
After switching the Power Switch on and then press the Power key for 2 seconds, the Main Page appears.
There are 5 folder icons on the Main Page, including IP Camera Test, CVBS & HD Camera, Tools, My APPS
and More. You can tap on each folder to enter its sub-menu.
4.1 IP Camera Test
Please note that since users can move the function icons from foders to folders, therefore, the functions
described in the chapter are based on the default icon arrangement .
4.1.1 PoE Power Output
If you want to power on the connected IP camera through PoE, you have to turn on the PoE power
output function.

EN310 4“ Touch Screen Test Monitor
13
To enable the PoE power output function:
1. Ensure the power of the tester is full or more than 80% charged, otherwise, the tester will show “low
power” and “not able to supply power”.
2. Ensure the IP camera is PoE supported and has been connected to the LAN port on the tester (refer to
3.2 IP Camera Directly Connection).
3. Go to IP Camera Test > PoE power output to enter the PoE power output page. Tap the PoE
icon to turn on the PoE power output function. A PoE 48V ON info will be displayed on the top-left
corner. The tester’s PoE maximum power output is 24W.
4. To turn off the PoE power output function, tap the PoE icon again.
4.1.2 IP Discovery
Tap IP Camera Test > IP Discovery to enter the IP Discovery app. You can use this app to
automatically search for the IP cameras. With the IP Discovery app, you don’t need to know the first two
digits of camera’s IP address. The tester can auto-scan the whole network segment IP, and auto-modify
tester’s IP address.
Local IP: Displays the tester’s IP address. The tester can automatically modify its IP address to the same
network segment of the searched IP cameras.
Discovery IP: Displays the searched IP cameras‘ IP address.

EN310 4“ Touch Screen Test Monitor
14
PING Start: Tap to ping the searched IP cameras‘ IP address.
ONVIF: Tap to enter the Rapid ONVIF Test page. Please refer to 4.1.3 ONVIF.
IPC Test: Tap to enter the IP camera test page. Please refer to 4.1.4 IP Camera Test.
DHCP Server: Tap to enter the DHCP server setup page. Please refer to 4.1.5.5 DHCP.
4.1.3 ONVIF
Tap IP Camera Test > ONVIF to enter the ONVIF app. The ONVIF app can automatically search for
the ONVIF conformant IP cameras with different network segments. The ONVIF app will then
automatically login IP cameras and display IP camera streams if the user name and password of the IP
cameras are both admin. If the login user name and password have been changed, the ONVIF app will
use the modified user name and password to automatically login the searched ONVIF conformant IP
cameras.
Add: To manually add ONVIF conformant IP cameras, tap the Add button to enter the IP address.
Login: Tap to change the user name and password for auto login function.
Setting: Tap to configure the following settings.

EN310 4“ Touch Screen Test Monitor
15
Auto Login: Tap to enable (Open) or disable (Close) the auto login function. By default, the ONVIF app
will automatically login IP cameras with user name/password setup with admin/admin. If the login
user name and password have been changed, the ONVIF app will use the modified user name and
password to automatically login IP cameras.
Video Streaming Transport: Tap to select UTP or TCP protocol.
Photo Storage: Tap to automatically (Auto) or Manually (Manual) store the snapshot images to the
internal SD card in png format. If Auto is selected, the snapshot images will be automatically stored to
the internal SD card with a given file name. If Manual is selected, the snapshot images will be
automatically stored to the internal SD card, however, users will have to manually input a file name
(alphabetic or numeric characters).
Video Storage: Tap to automatically (Auto) or Manually (Manual) store the video recordings to the
internal SD card in mp4 format. If Auto is selected, the recording file will be automatically stored to the
internal SD card with a given file name. If Manual is selected, the recording file will be automatically
stored to the internal SD card, however, users will have to manually input a file name (alphabetic or
numeric characters) before start using the function.
Show Focus Info: Tap to enable (Open) or disable (Close) the show focus info function on the screen.
View Manual: Tap to open manual.
Restore Default Settings: Tap to restore the ONVIF app to default settings.
OK: Tap to save the modified parameters.
Refresh: Tap to refresh the device list.
Device List: Tap any device on the left-side Device List, the IP camera’s streams, resolotion, photo and
focus information will be displayed.
Menu: Tap to open camera setting menu. The Setting menu will display on the left-side of the stream.

EN310 4“ Touch Screen Test Monitor
16
Live Video: Tap to display live video streams.
• You can also use the Live Toolbar on the lower side to operate multiple functions, including
Photo, Snapshot, Manual Record, Audio, Video Player, PTZ and etc.. Please refer to Live Toolbar
below for more details.
• Double-click on the video stream can display it in full screen. Double-click again to exit full
screen.
• If the current camera is a PTZ camera, you can swipe on the video stream to move the direction
to the top, down, left and right; or gesture on the stream to zoom in or out.
Identification: Tap to view the information of the current camera.
Time Set: Tap to change camera time. Tap Time Set and select Set Manually to set up camera time.
Maintenance: Tap to enter the maintenance setup page to Reboot or Load Factory Default of the
current camera.
Network Set: Tap to enter the network setup page of the current camera. Tap OK to save changes.
User Set: Tap to change user name and password of the current camera.
Web Page: Tap to enter the Web interface of the current camera.
Video Set: Tap to enter the encoder and resolution setup page of the current camera. The settings can
only be applied to main stream. Tap OK to save changes.
Imaging Set: Tap to enter the image setup page of the current camera. The settings can only be
applied to main stream. Tap OK to save changes.
Profiles: Tap to enter the main stream and sub stream switching setup page for the current camera.
Tap OK to save changes.
Preview: Tap to enter this page to enable/disable the Auto Refresh and Zoom function.
Live Toolbar: When you enter the Live Video mode, the Live Toolbar will be displayed on the lower
side. You can swipe the toolbar to the left or right to select among functions including Photo, Snapshot,
Manual Record, Audio, Video Player, PTZ, RTSP, Doc and Tool functions.
Table of contents
Popular Test Equipment manuals by other brands

Agilent Technologies
Agilent Technologies N4419B Installation and user guide

Fluke
Fluke 714B user manual

Teledyne Lecroy
Teledyne Lecroy WaveSurfer 3000z Operator's manual

Apollo Ultrasonic
Apollo Ultrasonic Visual quick guide

Retsch
Retsch AT 100 XL manual

Manta
Manta MTS-1700 SERIES Operation and reference manual