EVERSPRING SP818 User manual

SP818
e anual - Manuale utente - ua e uua

1
SP818 Pet Immune PIR Motion Detector
General Introduction
The SP818 PIR Motion Detector is a U-Net device and is fully compatible with other U-Net devices. It
detects motion by monitoring changes in infra-red radiation levels emitted by body heat. Featuring dual
PIR sensor designed with dual lens technology, this detector is immune to presence of pets in the home
allowing your pet to move freely without causing false alarms.
Its great compatibility with our U-Net family security products makes it suitable for smart home cloud
based platforms such as Homesys.
Product Overview
Front Cover
Upper Lens
Lower Lens
Tamper switch
Link button
Battery Compartment
⑦LED indicator (hidden behind lens)
Binding with Homesys
1. Undo and remove the fixing screw from the bottom of the detector. Carefully pull the bottom of the
detector away from the rear cover and then slide down to release the top clips.
2. Prepare a CR123A battery. Do not insert the battery into the unit yet.
3. Log into the Homesys account from a web browser.
4. Select “System” then “Add a Device”.
5. Select “PIR Detector”.
6. The following screen will appear. This means the gateway is entering binding mode.
(rear cover removed)
⑦

2
7. At this point, insert the battery with correct polarity into the unit.
8. The screen below will appear in 10 seconds if the process is successful.
9. Time-out will occur if the binding process was unsuccessful. Please refer to the “Manual binding”
section.
Note: Leave the detector with the rear cover open to prepare for testing.
Manual Binding
1. Repeat steps 3 to 6 of the Binding with Homesys section.
2. With the battery inserted, press and hold the Link button on the PCB for 3 or more seconds, and
the detector LED will start to flash, implying that it has entered ID code learning mode.
3. The LED indicator will stop flashing and turn off within 5 seconds, indicating the learning procedure
is completed. The screen below will appear indicating the process is successful.
4. If after 30 seconds the LED flashes rapidly (with an interval of 0.1 second) for 3 times, it means the
PIR failed the binding process.
Testing
Warm-Up
It will take approximately 1 minute to warm up the Detector after a battery is inserted. During this period
the LED will flash red slowly. When the LED turns red for 5 seconds, it implies warm-up procedure is
complete and the detector is ready for detection.
Testing
1. Go to System, and set it to ARM.
2. Wait for 30 secs then wave your hand in front of the detector.
3. If the test is successful the system will trigger an alarm (alarms are listed in “Events”).
Note: It is necessary that the Homesys gateway is powered and connected to internet.
4. If the test is unsuccessful, please check the troubleshooting section.
Link
button

3
Mounting the SP818
Choosing a location
The detector is suitable for mounting indoor in dry interior locations only.
When considering a location for the detector the following points should be considered:
- Do not locate the detector facing a window or where it is exposed to or facing direct sunlight. PIR
detectors are not suitable for use in conservatories.
- Do not locate the detector where it is exposed to ventilators.
- Do not locate the detector directly above a heat source, (e.g. fire, radiator, boiler, etc).
- Do not locate the detector in a position where it is subject to excessive vibration.
Where possible, mount the detector in the corner of the room so that the logical path of an intruder would
cut across the detection zone. PIR detectors respond more effectively to movement across the detection
area than to movement directly towards the sensor.
More Sensitive Less Sensitive
The detector can be installed on a flat wall or in a corner as shown below.
Flat wall mounting Corner mounting
Mount the PIR detector at height of 2m. At this height, the detector will optimize the detection range of up
to 12m with a field of view of 90°.
This product comes with pet immunity mechanism so that small pets or animals will not trigger the
detector and cause false alarms. For pet immunity to be effective the pet’s height and length must not
exceed 60cm/90cm respectively to avoid triggering the detector.
Note:
If the height of your pet exceeds 60cm, you can mount the PIR detector higher to prevent the PIR from
being triggered by your pet. For example, if your pet is 70cm tall, you can mount the detector at the
height of 2.1m instead of 2m as in regular condition, and the 70cm-tall pet should be able to stroll by
without triggering the PIR. However, the same effect would also apply to human detection. So the PIR
detector should not be mounted too high to affect its regular detection purpose.
Installation
1. Remove the rear cover if it is fixed to the main body (refer to Figure 3). Use the rear cover as a
template to mark the positions of the fixing holes on the wall. Carefully drill the required mounting
holes on the wall.
Good Sensitivity
Bad Sensitivity

4
2. Fix the rear cover to the wall using the supplied screws and wall plugs. Do not over-tighten the fixing
screws as this may distort or damage the cover.
3. Replace the main body to the rear cover and refit the fixing screw in the bottom of the PIR to secure
the main body. Do not over-tighten the fixing screw as this may damage the casing.
Operation
When the detector is mounted on the wall i.e. tamper switch is pressed for more than 10 seconds, it will
enter Normal mode.
- Upon motion being detected, the detector will send an alert signal to the controller and enter
sleep state for a preset period to conserve battery life. It will only be able to detect motion again
when this preset period is up. This preset period is called Retrigger Interval and can be set by the
controller. The default period is 3 minutes.
- Unlike in Test mode, the red indicator LED on the detector will not illuminate when triggered in
order to conserve battery life. However when the battery becomes low the LED will flash
whenever motion is detected to alert the user to replace its battery.
The detector can provide periodic auto report measurement of temperature and humidity to the
controller, or on demand when requested by the controller.
In the event its front cover is removed, the tamper switch will be activated and the detector will send a
Notification command to the controller.
Maintenance
Low Battery: When the battery becomes low, the LED will flash red when motion is detected to indicate
low battery condition to the user. Replace the batteries as soon as possible.
Troubleshooting
The troubleshooting table lists some possible causes and solutions. Please contact your original retailer
or nearest service center if the below solutions cannot solve your problem.
Symptom Cause of Failure Recommendation
LED cannot be displayed 1. Run out of battery power.
2. Check if reverse battery
polarity.
1. Replace a new battery.
2. Refit the battery with correct
polarity.
The detector is not working 1. The PIR detector cannot
communicate with the
gateway HSC04.
2. Check if the detector is out of
order.
1. Place the PIR Detector closer to
the gateway.
2. Send the device in for repair and
do not open it.
After the one-minute warm up is
completed, the detector does not
work and LED flashes on and off
repeatedly at with an interval of 2
seconds
Check if detector has
completed binding with
Homesys Gateway
Remove the battery and follow
the steps for “Manual binding”.
Reset to Factory Settings
1. Press and hold the Link button on the PCB for 3 or more seconds, and the detector LED will start
to flash.
2. Press and hold the Link button for 6 or more seconds within 30 seconds until the LED turns off.
The device is now reset back to factory mode
Specifications
Battery
CR123A Lithium Battery
Operating Temperature
-10°C to 40°C
PIR Warm Up Time
About 1 minute
PIR Detection Coverage
Wall-Mounted:
Up to 12m x 90° (at 2m mounting height & 25°C)
PIR Pet Immunity
Height≦60cm; Length≦90cm
Operating Frequency
868MHz (EU)/ 923MHz (America)
** Specifications are subject to change without notice.
WARNING:
Do not dispose of electrical appliances as unsorted municipal waste, use separate collection facilities.
Contact your local government for information regarding the collection systems available.
If electrical appliances are disposed of in landfills or dumps, hazardous substances can leak into the
groundwater and get into the food chain, damaging your health and well-being.
When replacing old appliances with new ones, the retailer is legally obligated to take back your old
appliance for disposal at least for free of charge.
www.everspring.com
3F., No. 50, Sec 1, Zhonghua Rd., Tucheng Dist.,
New Taipei City 23666, R.O.C

1
SP818 Sensore di movimento immune ad animali
Introduzione
Il sensore di movimento PIR HSP01 è un dispositivo della serie U-Net quindi compatibile
con tutti gli accessori U-Net. Il dispositivo è provvisto di un sensore passivo infrarossi e sensore di
luce per offrire protezione completa al sistema di automazione e allarme. Grazie al doppio
sensore PIR, questo dispositivo ignora il passaggio di animali domestici, che sono quindi liberi
di girare per casa senza causare falsi allarmi.
Il dispositivo funziona nel sistema smart home basato su cloud Homesys.
Descrizione
Pannello frontale
Lente superiore
Lente inferiore
Tasto anti vandalico
Tasto di ricerca
Compartimento batteria
⑦Indicatore LED (nascosto dietro lenti)
Aggiungere ad Homesys
1. Allentare e rimuovere la vite dal lato sottostante del dispositivo. Separare la parte anteriore e
posteriore dal basso.
2. Preparare una batteria CR123A. Per il momento non inserire la
batteria.
3. Accedere al proprio sistema Homesys da web browser.
4. Selezionare“Sistema” quindi“Aggiungi dispositivo”.
5. Selezionare“SensorePIR”.
6. Se appare la seguente schermata. Significa che la centrale IPBOX ha iniziato la ricerca di dispositivi
(Senza coperchio)
⑦

2
7. A questo punto inserire le batterie con la polaritá corretta nel dispositivo.
8. Se il processo ha successo, entro 10 secondi appare la seguente schermata.
9. Se la ricerca non dá esito, dopo un po il tempo scade. Procedere con la procedura di
"Ricerca manuale".
Nota: Lasciare il sensore con il coperchio aperto per effettuare la prova dispositivo.
Ricerca manuale
1. Ripetere i punti dal 3 al 6 della sezione "Aggiungere ad Homesys".
2. Con la batteria inserita, premere e tenere premuto il tasto ricerca per 3 o piu secondi, il LED
inizia a lampeggiare, ció significa che ha iniziato la ricerca della centrale IPBOX.
3. Se dopo 5 secondi l'LED si spegne, significa che la ricerca ha avuto successo. Questa è
la schermata che appare.
4. Se invece, dopo 30 secondi l'LED lampeggia 3 volte veloce (una volta ogni 0.1 secondi),significa che
la ricerca non ha avuto esito.
Accensione e prova dispositivo
Accensione
Servono 2 minuti circa al dispositivo per accendersi dopo aver inserito la batteria.
Durante questo periodo l'LED lampeggia lentamente di rosso.Quando l'LED si accende di rosso
per 5 secondi, significa che il dispositivo si è acceso ed è pronto per l'utilizzo.
Prova
1. Entrare in Sicurezza, e selezionare il modo ARMATO.
2. Aspettare 30 secondi poi muovere la mano davanti al sensore.
3. Se il test è positivo, il sistema attiverà un allarme (tutti gli allarmi sono elencati nella lista
“Eventi”). Nota: E’ necessarioche la centrale IPBOX sia alimentata e collegata ad internet.
4. Se il test non dà risultato, consultare la sezione: Domande frequenti.
Tasto di
ricerca

3
SP818 Installazione
Selezionare la posizione
Il sensore PIR è indicato per utilizzo all'interno e in zone asciutte.
Prima di installare il dispositivo nella suaposizione finale, è bene tenere in considerazione questi punti
per un correttofunzionamento:
- Non orientare il sensore verso finestre ed evitare l’esposizione diretta ai raggi solari. Il sensore
PIR non é adatto all’utilizzo dentro serre.
- Non installare il dispositivo vicino a ventilatori.
- Non installare il dispositivo vicino a fonti di calore(es: fornelli, caloriferi, bollitori).
- Non installare il dispositivo in luoghi soggetti ad eccessive vibrazioni.
Quando è possibile, installare il dispositivo in un angolo, in modo tale il movimento di un eventuale
intruso, passa per tutta la lunghezza l’area di rilevazione movimento. Il sensore PIR rileva piu
facilmente i movimenti trasversali rispetto a quelli diretti verso il sensore,
Maggiore sensibilità Minore sensibilità
Il sensore può essere installato su una parete piatta o in un angolo come mostrato nell’immagine.
Installazione piatta Installazione ad angolo
Installare il sensore PIR ad un altezza di 2m. Da questa altezza, il sensore ha un raggio
di rilevamento ideale a 90°e 12m di distanza.
Questo dispositivo ha un meccanismo immune al passaggio di animali domestici, ignora il
passaggio di animali domestici che potrabbero causare falsi allarmi. Per funzionare correttamente,
l’animale domestico non deve essere piu grande di 60cm altezza/ 90cm lunghezza.
Nota:
Se si possiede un animale che eccede i 60cm di altezza, è possibile installare il sensore oltre i 2 metri
in modo tale da rendere immune il suo passaggio al sensore. Ad esempio se il proprio animale
domestico è alto 70cm, si può montare il sensore a 2.1m invece che a 2m.Tuttavia bisogna
fare attenzione a non montare il sensore PIR troppo in alto o potrebbe non rilevare correttamente
nemmeno le persone.
Installazione
1. Rimuovere la base posteriore (vediFigura 3). Usando la base posteriore come riferimento, segnare
la posizione dei fori sulla parete. Usare un trapano per creare dei fori nei punti segnati in
precendenza.
Good Sensitivity
Bad Sensitivity

4
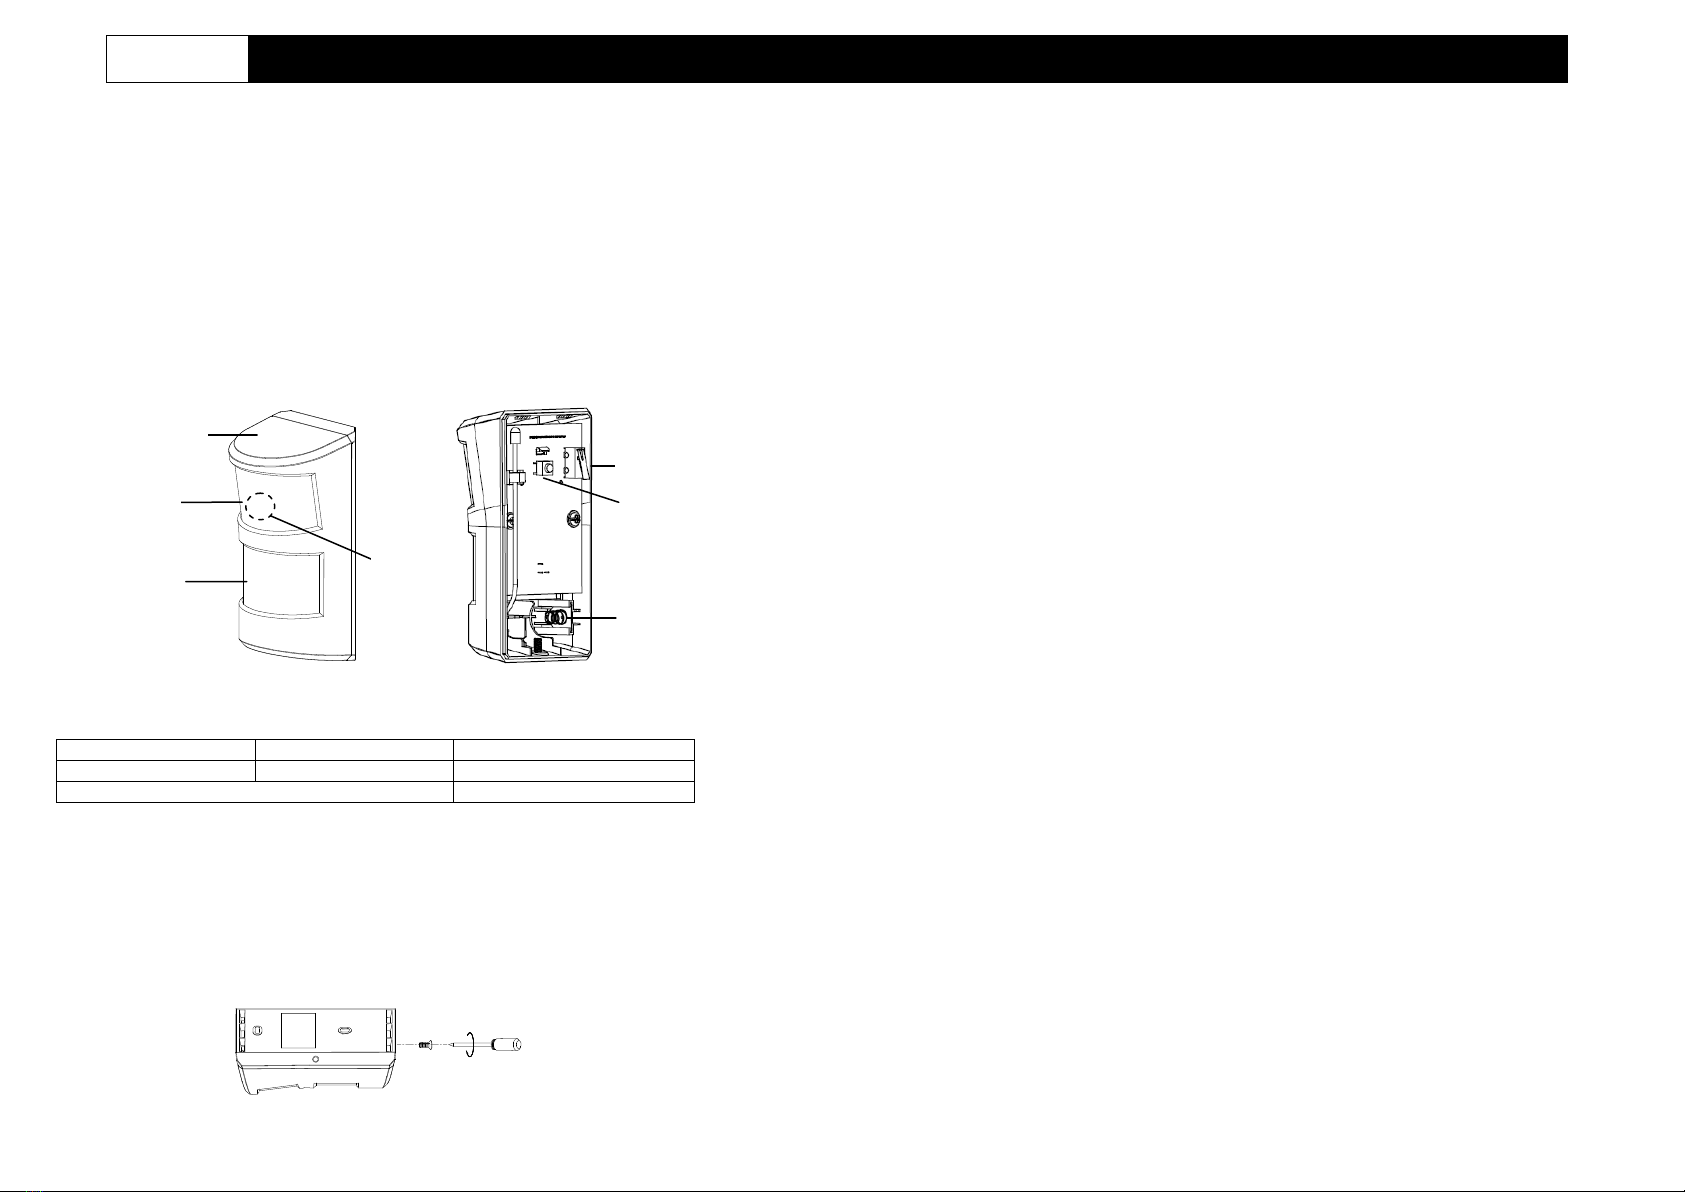
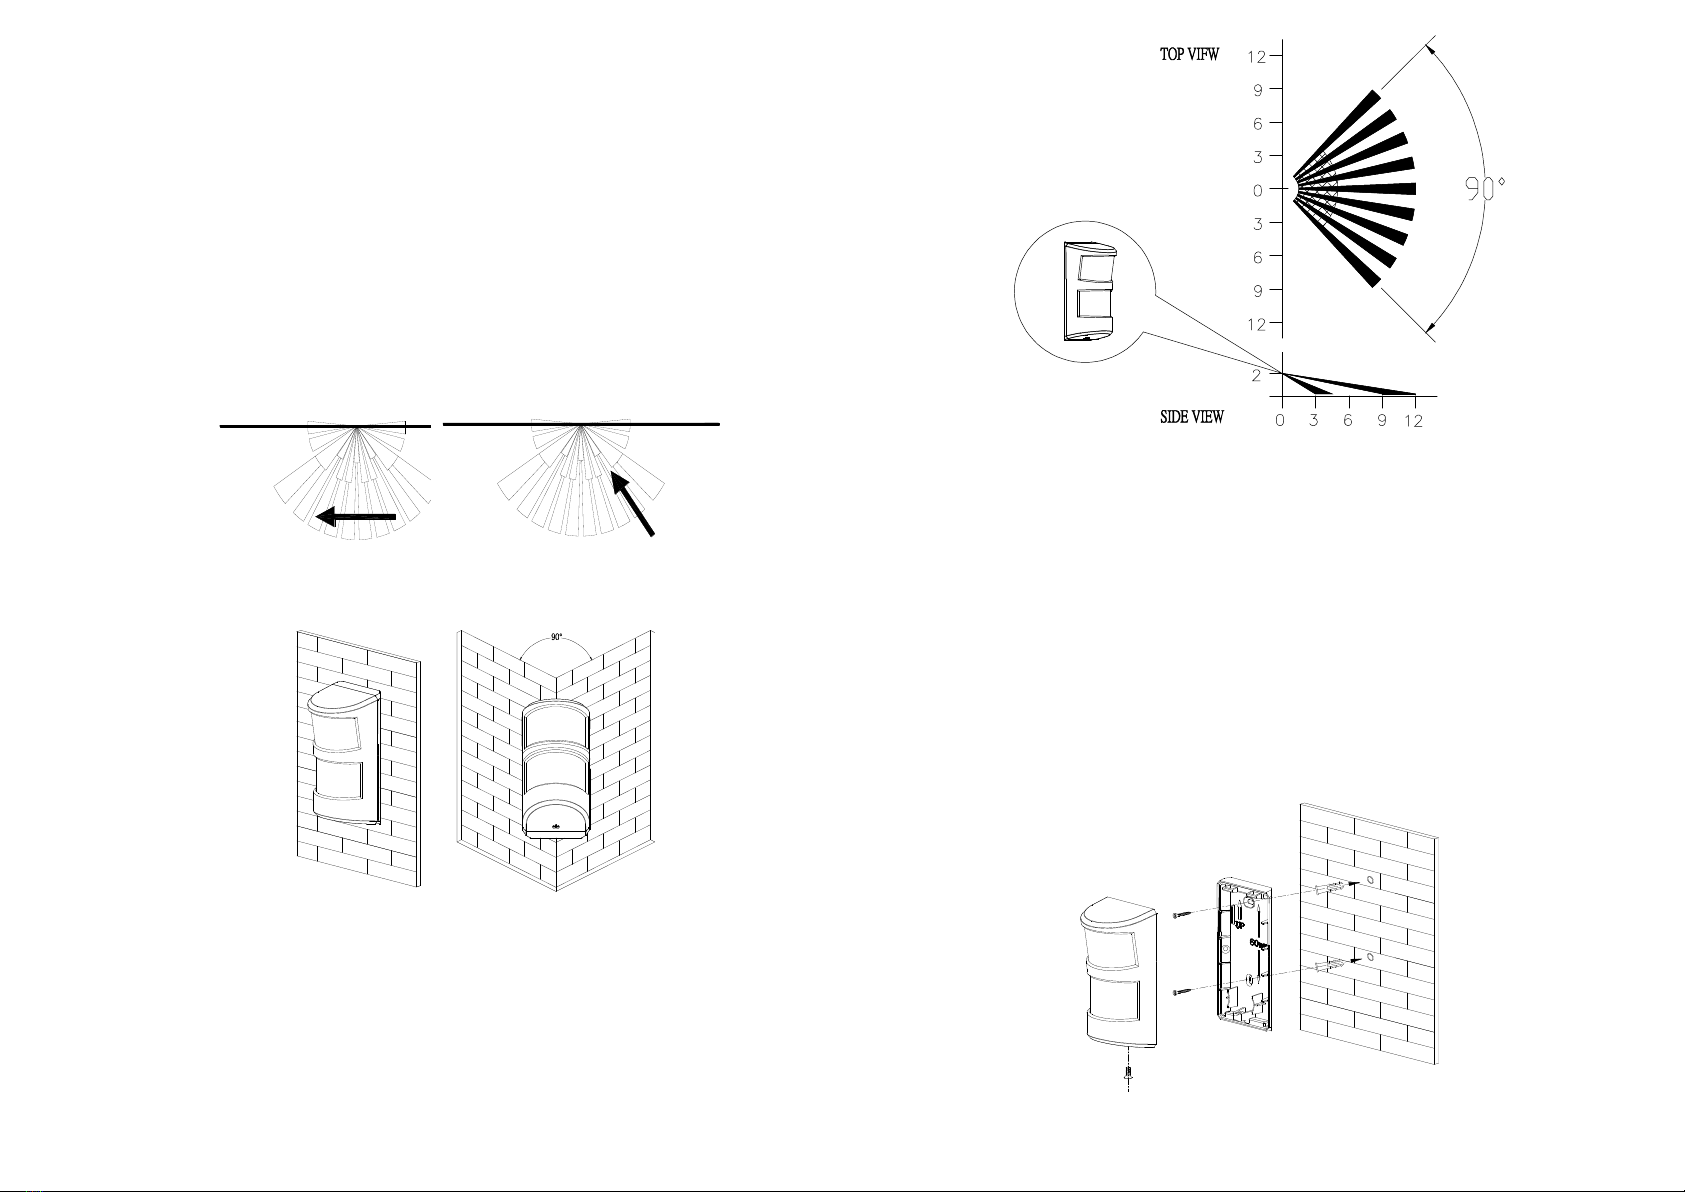
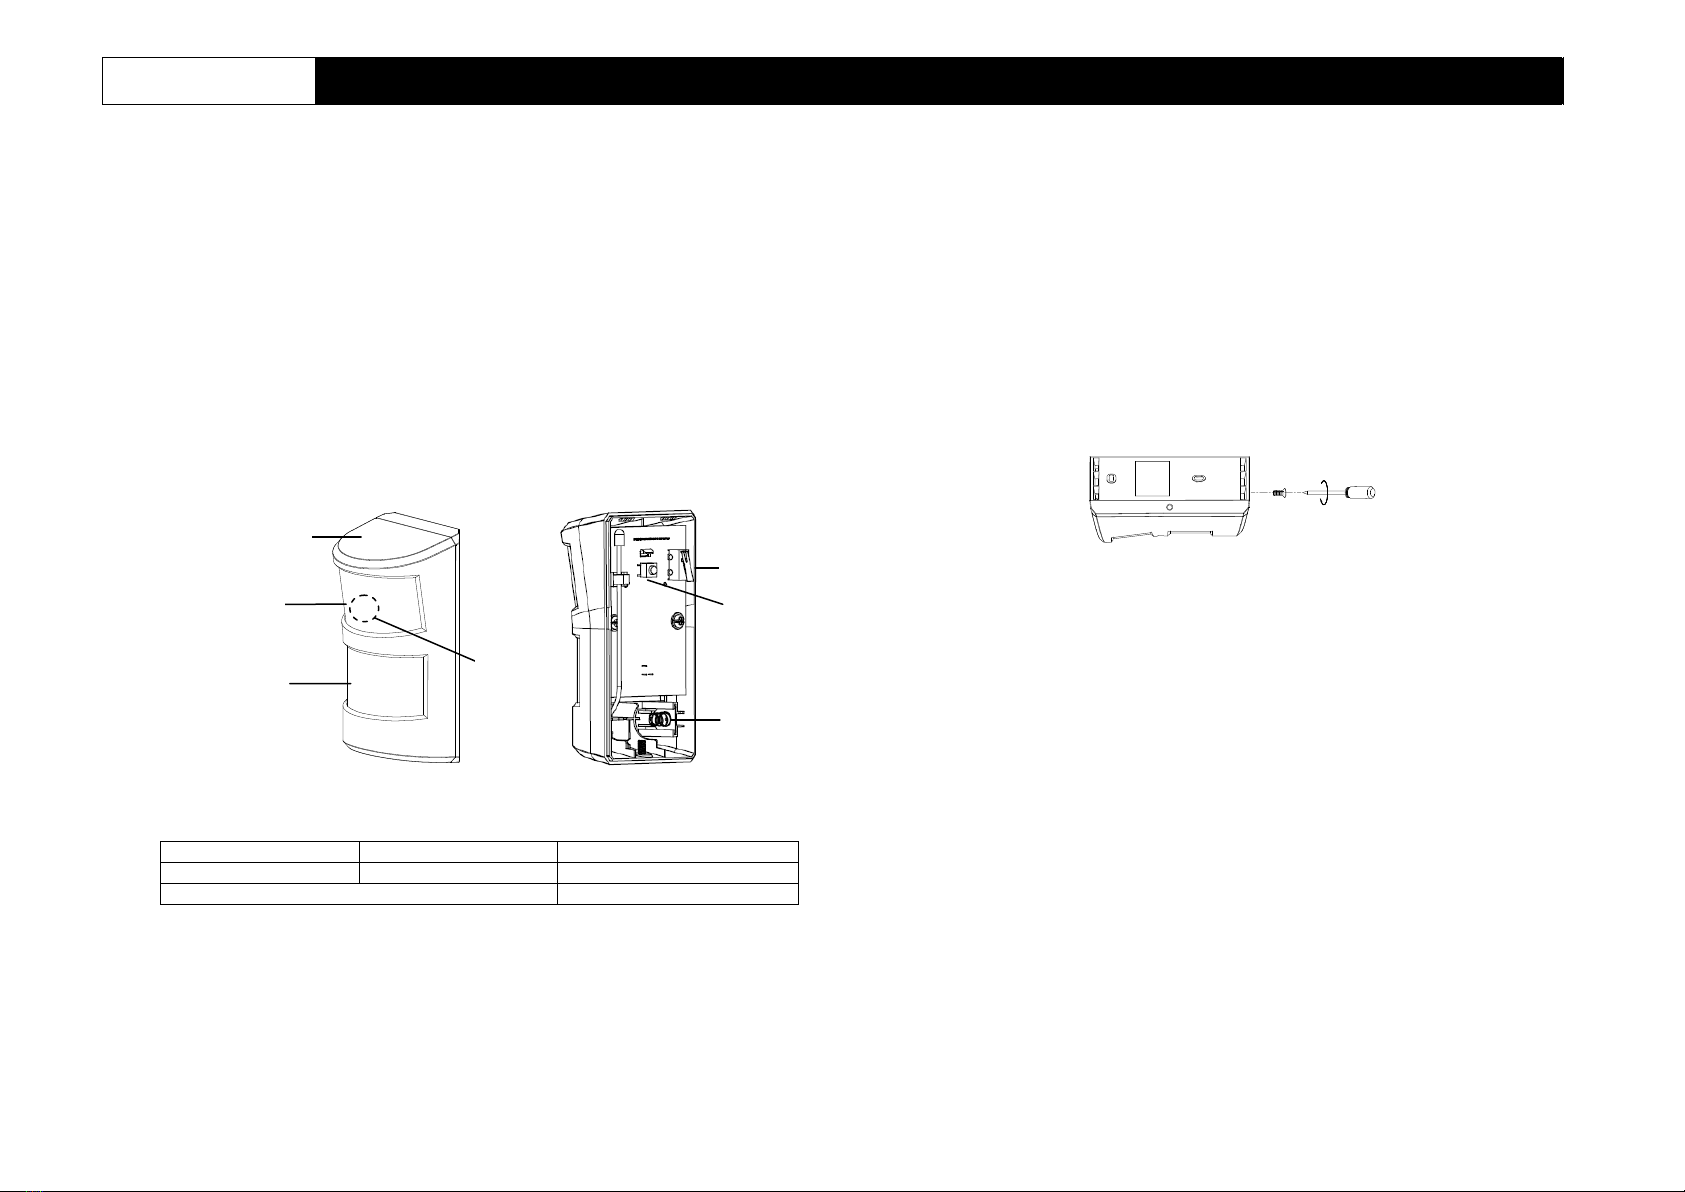
2. Fissare la base posteriore alla parete utilizzando le viti ed i tasselli di plastica inclusi nella
confezione. Non avvitare la base troppo stretta per evitare di romperla.
3. Installare di nuovo la base posteriore unendo prima la parte in alto. Quindi riavvitare la vite sul
fondo per fissare stabilmente il sensore. Non fissare la vite troppo stretta per evitare di
danneggiare il case.
Funzionamento
Una volta che il sensore PIR è installato sulla parete, e il tasto anti vandalico resta premuto per
piu di 10 secondi, il sensore entra in modo operativo normale.
- Una volta rilevato movimento, il sensore invia un allerta alla centrale, successiva mente
entra in modo attesa per risparmiare la batteria. Passato il periodo chiamato intervallo di
riattivazione, sarà di nuovo in grado di rilevare movimento. Il valore di default è
di 3 minuti e può essere modificato dal proprietario.
- Per risparmiare batteria, il LED non siaccende quando il sensore rileva un allarme,
questo per risparmiare la batteria. Tuttavia per segnalare un livello molto basso della
batteria, il LED si accende ogni volta che rileva movimento, in modo da avvertire l’utente della
necessità di sostituire le batterie.
Il sensore può inviare i dati di temperatura e umidità al controllo in modo automatico o dopo
richiesta di quest’ultimo.
Se si rimuove il lato frontale del sensore, il tasto anti vandalico si attiva e invia una notifica alla
centrale.
Manutenzione
Batteria scarica: Quando il livello della batteria diventa troppo basso, il LED lampeggia di rosso
ogni volta che rileva un allerta.
Domande frequenti
La lista con le domande frequenti mostra alcuni problemi ricorrenti, le cause e soluzioni. Se non si
trova una risposta al proprio problema, contattare il proprio fornitore o il servizio assistenza piu vicino
Sintomi Possibili cause Soluzioni
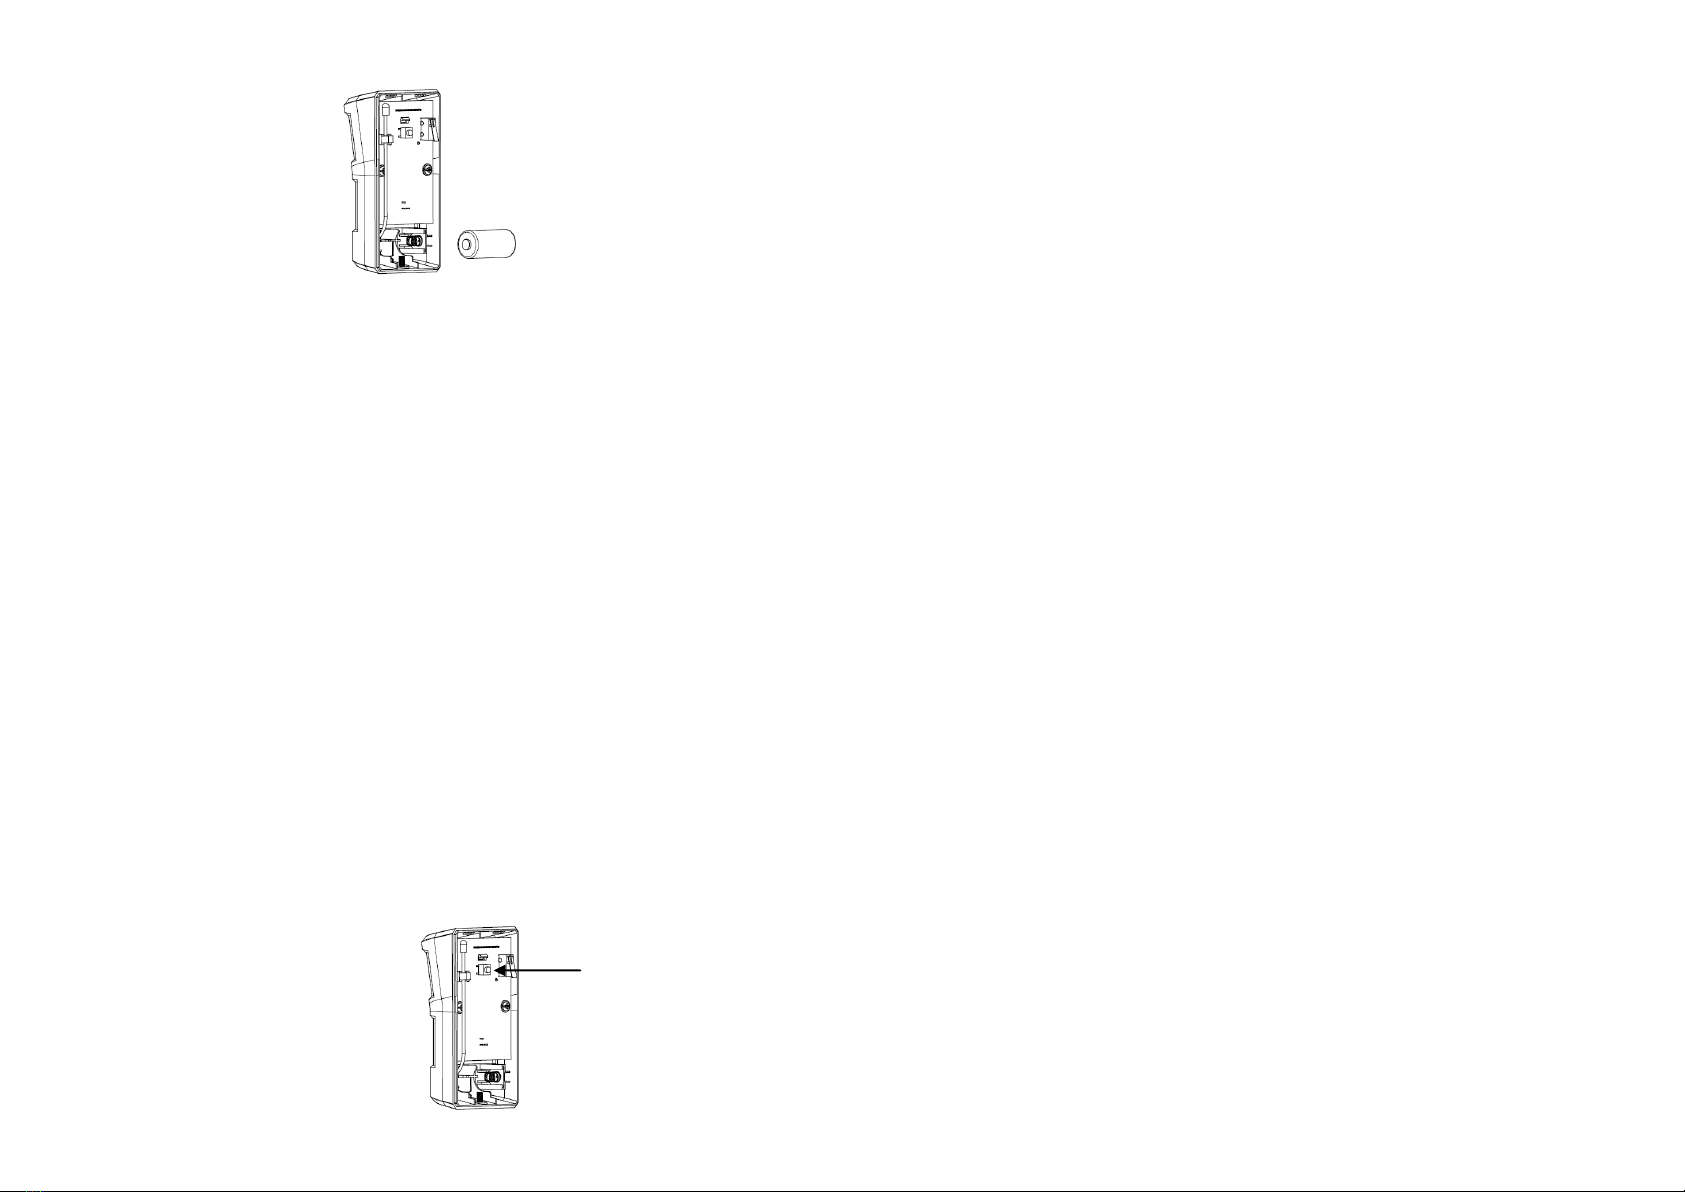
Il LED non si accende 1. Batteria scarica.
2. Batteria inserita al contrario.
1. Sostituire la batteria
2. Inserire correttamente la batteria
Il sensore non rileva movimento 1. Il sensorenon riesce a
comunicare con la centrale
HSC04.
2. Il sensore potrebbe essere
danneggiato.
1. Spostare il sensore piu vicino
alla centrale.
2. Inviare il sensore al centro
riparazioni.
Dopo 2 minuti dall’accensione,
il sensore non funziona e l’
LED lampeggia ad intervalli di 2
secondi
Il sensore non è stato
aggiunto correttamente alla
centrale HSC04.
Reinserire la batteria e provare la
procedura di “Ricerca manuale”.
Resettare il dispositivo
1. Tenere premuto il tasto di ricerca sulla scheda del sensore per 3 o piu secondi, il LED
inizia a lampeggiare.
2. Tenere premuto il tasto di ricerca per 6 o piu secondi (ma meno di 30) fino a quando il LED si
spegne. Il dispositivo ora è stato resettato a valori iniziali.
Specifiche tecniche
Batteria
Batteria al litio CR123A
Temperatura operativa
Tra-10°C a 40°C
Tempo di accensione
1 minuto circa
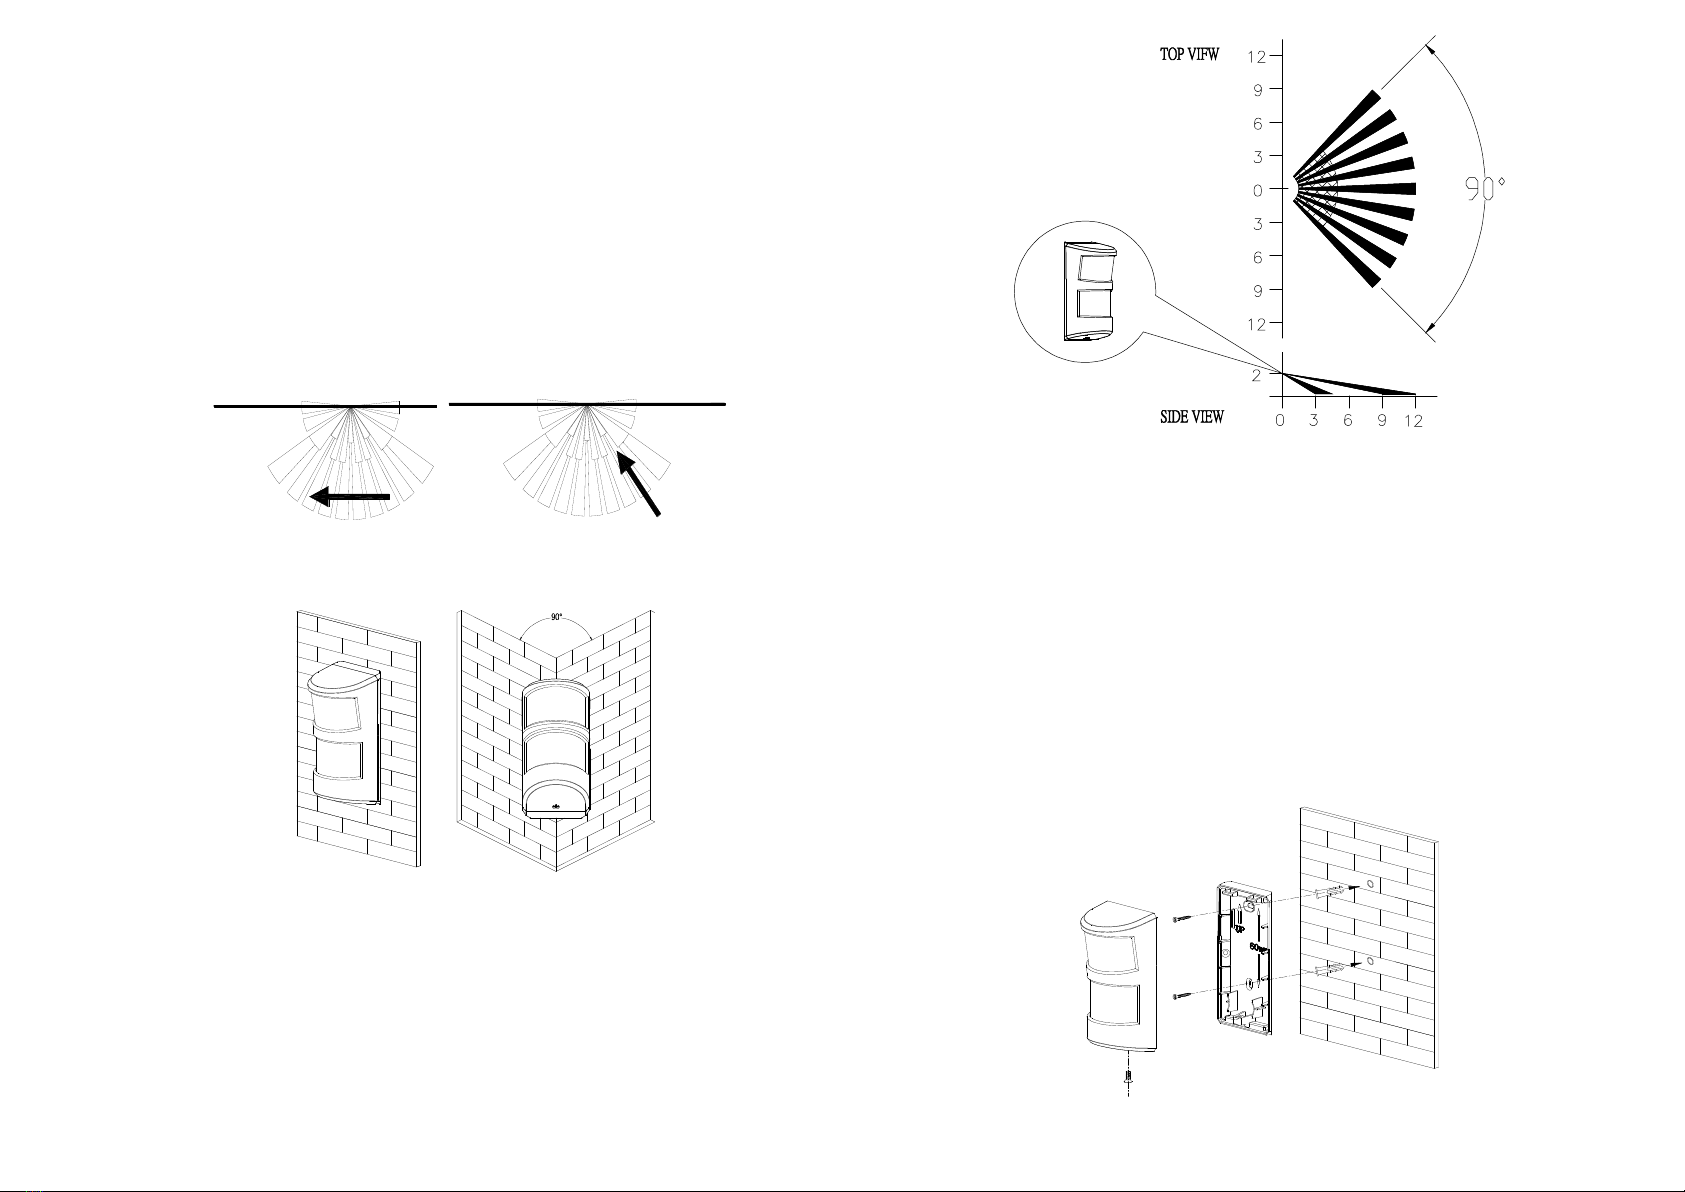
Raggio di rilevamento PIR
Montaggio a parete:
Fino a 12m x 90° (altezza a 2m con 25°C)
Caratteristiche immunità animali
Altezza≦60cm; Lunghezza≦90cm
Frequenza wireless
868MHz (EU)/ 923MHz (America)
** Le specifiche sono soggette a modifiche senza preavviso.
PRECAUZIONI:
Non gettare dispositivi elettronici come normali rifiuti, utilizzare servizi di raccolta differenziata.
Contattare il proprio comune per informazioni sul tipo di raccolta differenziata svolto nella
propria zona.
Dispositivi elettronici che vengono gettati in natura, possono rilasciare nelle falde acquifere
sostanze dannose pericolose per la salute di persone e di altri esseri viventi.
In caso di sostituzione di vecchi dispositivi, il venditore è obbligato a prendere i vecchi
dispositivi e gratuitamente deve farsi carico dello smaltimento.
www.everspring.com
3F., No. 50, Sec 1, Zhonghua Rd., Tucheng Dist.,
New Taipei City 23666, R.O.C

10
SP818Detector de movimiento PIR inmune a animales
Guía de instalación
Introdución
El detector de movimiento SP818 es un accesorio de la serie U-Net, ideal para
sistemas en la nube como Homesys smart home. El detector está compuesto por un
sensor pasivo Infra-rojos (PIR) y un sensor de luz, Detecta movimiento chequeando
los cambios en el nivel de radiaciones infrarrojas. Este accesorios se puede utilizar en
sistemas de seguridad y de automatización.
Descripción
Añadir a Homesys
1. Aflojar y remover el tornillo de abajo. Separar el detector de la
tapa trasera empujando desde el lado del tornillo.
2. Preparar una batería CR123A. De momento no poner la bateria.
3. Ingresar a su cuenta Homesys por navegador web.
4. Seleccionar “Sistema”.
Pannellofrontale Lente superiore Lente inferiore
Tasto anti vandalico Tasto di ricerca Compartimento batteria
⑦Indicatore LED (nascostodietrolenti)
(rear cover removed)
⑦

11
5. Seleccionar “Añadir un nuevo equipo”,luego “Detector PIR”.
6. Esta pantalla significa que la gateway Homesys está buscando dispositivos.
7. Poner la batería con polaridad correcta.
8. Si dentro de 10 segundos el operación tiene éxito aparece la siguiente pantalla.
9. Si el operación de busqueda no tiene éxito. Chequear “preguntas frecuentes”.
Nota: Dejar el detector sin tapa trasera para seguir con la prueba.
Utilización y prueba
Encendido
El dispositivo tarda casi 2 minutos para encenderse despues de poner la batería .
Durante este tiempo el LED parpadea lento color rojo. Cuando el LED queda
encendido (color rojo) por 5 segundos, significa que se ha encendido y puede detectar
movimiento.
Prueba
Se recomienda hacer una prueba antes de elegir el lugar de instalación
Notas: Se debería hacer la prueba en el mismo lugar donde se va a instalar el
detector. Este procedimiento sirve para averiguar que el lugar de instalación no
excede la distancia maxima del señal radio de la gateway Homesys.
En el lado trasero esta el interruptor anti manipulación (tambien sirve para activar la
búsqueda), tener cuidado y no presionarlo varias veces, para no resetear el detector
(LED parpadea rojo lento). Si por error se resetea el detector, chequear “búsqueda
manual”.
(1) Colocar la tapa trasera del detector.
(2) En “seguridad”, armar el sistema.

12
(3) Esperar 30 segundos y mover la mano en frente detector.
(4) Si la prueba tiene éxito el detector PIR va a disparar un alarma (Chequear en
EVENTOS si el alarma fue registrado).
Note: It is necessary that the Homesys gateway is powered and connected to
internet.
(5) If the test is unsuccessful, please check the troubleshooting section.
Busqueda manual
1. Repetir los pasos 3 y 4 de “Añadir a Homesys”.
2. Presionar y detener el botón anti manipulación hasta cuando se apaga el LED.
Soltar en seguida el botón. El LED parpadea color verde.
3. Si dentro de 5 segundos, el LED se apaga, significa que el procedimiento de
agregación a terminado con éxito.
4. Si despues de 30 segundos el LED parpadea rápido 3 veces (cada 0.1 segundo),
significa que la búsqueda no tuvo éxito.
Instalar SP818
El detector PIR solo se puede instalar en lugares secos al interior.
Se recomienda de instalar eldetector en los ángulos y a una altura de 1.8/2m. A esta
altura el detector va a conseguir el máximo alcance: 10m y ángulo de 110°.
Antes de proceder con la instalación chequear estas sugerencias para evitar
problemas durante el utilización:
1. No instalar en frente a ventanas o en lugares con exposición directa a la lux solar.
Los detectores PIR no son apropiados para sótanos.
2. No instalar en lugar con exposición a ventiladores.
3. Si es posible, instalar el detector en los ángulos, para que el intruso pase de través
al sensor. El sensor PIR detecta mejor los movimientos de través que los
movimientos hacia el sensor
Menos Sensitivo Mas Sensitivo

13
El sensor es inmune a los animales domesticos, es decir que se puede dejar sus
animales en casa y no se van a disparar alarmas cuando se mueven. Para que el
sensor funcione correctamente es necesario que los animales no sean mas grande
de 60cm alto/ 90cm largo.
Nota:
Es posible utilizar el sensor PIR tambien con animales mas altos de 60cm, solo hay
que instalar el dispositivo a mas de 2 metros de altura, para que el animal aparezca
mas pequeno. Por ejemplo si el animal es alto 70cm, se va a instalar el dispositivo a
2.1m en lugar de 2m. De todas formas, no se puede instalar el sensor PIR
demasiado arriba, ou tampoco las personas se van a detectar.
Instalación
1. Hacer unos agujeros en la pared utilizando un taladro con punta de 3mm, perforar
2. Utilizar la cobertura trasera del detector para marcar con mas precisión la posición
de los tornillos en la pared.
3. Pegar la cobertura trasera a la pared utilizando 4 tornillos de 18mm y tacos de
25mm (para los tacos se necesita un agujero de 5mm). No apretar demasiado los
tornillos para evitar daños a la cobertura del detector.
4. Chequear que el detector PCB esta en la posición correcta para
detectar movimiento hasta la distancia necesaria. Para cambiar de posición
al PCB, simplemente arrastrarlo hacia arriba o abajo en una de las posiciones
numeradas.
5. Poner otra vez la cobertura trasera, empujar hacia abajo y apretar el tornillo para
fijar el detector a la cobertura. No apretar demasiado el tornillo para evitar daños a
la cobertura del detector.
6. Se aconseja hacer unas pruebas para ver si el dispositivo funciona correctamente.
Armar el sistema y moverse en frente al detector. Si se instaló correctamente el
sistema deberia dar el alarma. El detector dispara un alarma cuando detecta
movimiento, y solo una vez cada 30 segundos.
Manutención
1. Batería agotada: Cuando el nivel de la batería se vuelve demasiado bajo, el LED
parpadea rojo cada vez el sensor PIR detecta movimiento.
Preguntas frecuentes
En la tabla a seguir estan unas soluciónes de preguntas frecuentes. Si no encuentra
una respuesta a su pregunta, chequear su vendedor o el centro de asistencia mas
cercano.
en base al lugar de la instalación (en un rincón o en plano).
Note: Utilizar los agujeros 1st para instalación en un rincón, mientras los agujeros
2nd para instalación en una superficie plana.

14
Síntomas Causa Solución
El LED no se
enciende tampoco
cuando se quita la
tapa trasera.
1. La batería se agotó
2. Chequear si se puso la
batería al reves.
1. Poner una nueva batería
2. Reinstalar la batería con la
polaridad correcta.
El detector no
funciona.
1. Chequear si el unidad
no recibe el señal radio
de la gateway
Homesys.
2. Averiguar si el detector
tiene problemas
internos
1. Posicionar el unidad en otro
lugar o remover el objeto que
crea interferencia.
2. Enviar el dispositivo al centro
de asistencia para la
reparación. En ningun caso
intentar abrilo.
Después de 2
minutos, el detector no
funciona y el LED
parpadea cada 2
segundos
1. Averiguar si se agregò
con éxito el detector a la
Gateway Homesys.
1. Quitar la batería y seguir las
instrucciones para la
búsqueda manual.
The LED parpadea
rojo cuando hay
movimiento.
Nivel de batería bajo. Poner una nueva batería
Restablecimiento a valores de fábrica
1. Presionar y detener el botón anti manipulación hasta cuando se apaga el LED. Y
soltar en seguida el botón. El LED parpadea color verde y el dispositivo está en
modo busqueda por 30 segundos.
2. Antes que pasen los 30 segundos, presionar y detener el botón anti manipulación
por 6 o mas segundos hasta que se apaga el LED y soltar. Cuando el LED
parpadea color rojo el dispositivo ha vuelto a varlores de fábrica.
Especificaciones
Batería CR123A 3.0V 1700mAh Lithium Battery
Distancia señal Minimo 30 m en linea visual
Operating Temperature -10°C ~ 40°C
Encendido Cerca de 2 minutos
Alcance detección PIR En la pared:
Hasta 10m x 110° (a 1.8m de altura y 25°C)
Frecuencia radio 868.3 MHz
** Las especificaciones están sujetas a cambio sin previa notificación.
ATENCION:
Le rogamos que haga caso de la normativa local y no deseche los productos viejos
junto con la basura doméstica.
Unas sustancias contenidas en el equipo electrónico pueden dañar el ambiente y
dañar la salud humana si están mal empleadas o si no se desechan de la manera
correcta.
Devuelva el dispositivo al vendedor al comprar uno nuevo.
Table of contents
Languages:
Other EVERSPRING Accessories manuals