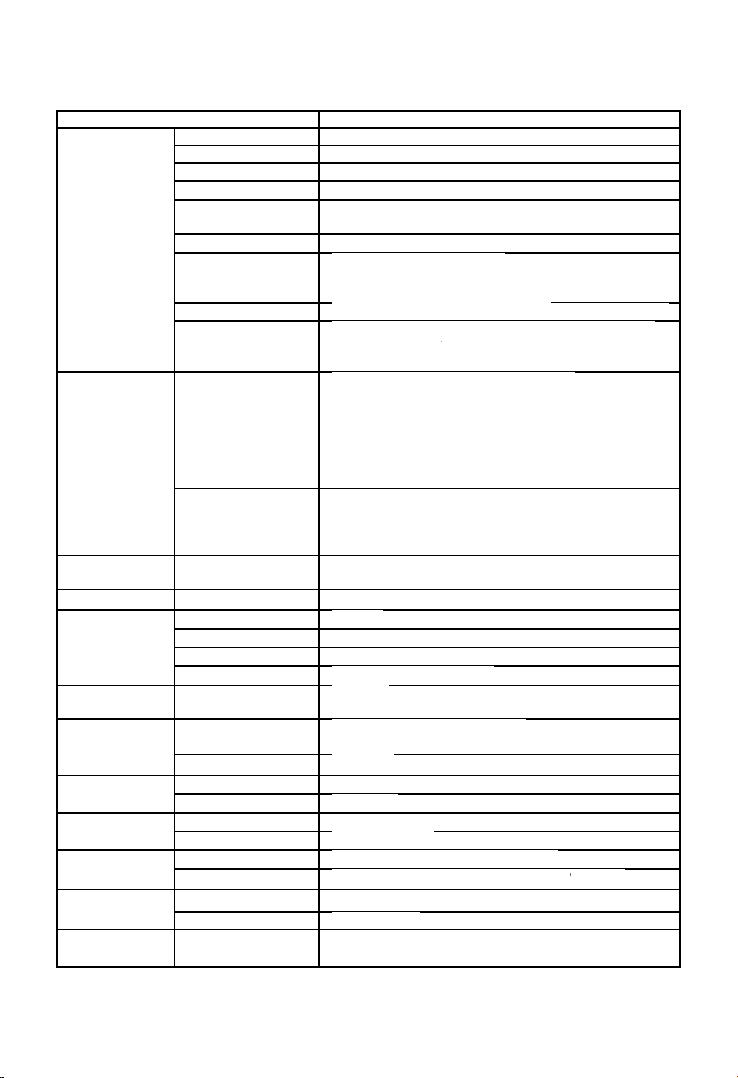
Everycom EC801 User manual

THERMAL RECEIPT PRINTER
EC801
USER MANUAL
Please read this manual carefully before using the printer,
we recommend that you keep this user manual for future reference.

ABOUT THIS USER MANUAL
We thank you for your purchase of Everycom Ec801 Thermal receipt printer.
This user manual will guide you through on how to use this printer. Please
red this user manual carefully before using the printer. We also strongly
recommend that you keep this user manual for future reference and do not
throw it away.
NOTE
Due to our constant efforts to improve and upgrade the product’s function
and performance, Everycom reserves the right to change the hardware
and software specifications in the manual without prior notice.
If you find any errors or omissions in the contents of this manual, please
tell us or our agent, we will take necessary action ASAP.
Without the prior permission of our Everycom, the contents of the relevent
manual provided with the product shall not be revised, reproduced, or
transmitted, transcribed or stored etc.
STATEMENT
This printer is TYPE A product, may cause radio interference in the living
environment, in any such possible case , the user need to take effective
protection measures from protection from interference.
SAFETY TIPS
ŸDo not disassemble the printer personally, for any service related
query please contact Everycom Support.
ŸThe printer should be installed on a flat and solid surface to avoid
vibration or impact damage to the printer.
ŸDo not store or operate printer in harsh environmental conditions such
as high temperature / humidity / pollution.
ŸMake sure power adapter of this printer is connected to a socket with,
proper grounding. Avoid connecting to a power socket which is also
being used by heavy electric product such as heavy duty motor, as it can
lead to voltage fluctuation and possibly can damage the printer.
ŸPlease only use standard power adapter as provided with the printer.

ŸMake sure printer is powered off before you plug or unplug the power
cable.
ŸPlease do not open the paper cover while printer is printing, doing so
may cause unexpected error or may even cause damage to the printer.
ŸTo avoid burn, please do not touch the print head right after the printer
finished printing.
ŸPlease do not use dissoluble substances such as Benzene, Thinner or
Alcohol wipe to clean the printer casing, also please do not let printer in
contact with corrosive chemicals and detergents to avoid damages.
ŸPlease use Everycom approved or recommended factory produced
printing paper, otherwise it may lead to poor quality print quality, and
can even damage the print head.
ŸThermal prints fade away , if you don’t want this to happen, please use
long term thermal paper.
ŸThe printer is only suitable for using below 2000M altitude.
ŸThe printer is only suitable for use in non-tropical reason/climates.
APPLICATION AREA
ŸPoint of Sale ( POS ) at Supermarket, Restaurant, Coffee shop etc
ŸCatering Industry Bill Printing
ŸReceipt printing at Toll Station, Petrol Pump, Hospital, Sport Center etc
ŸToken printing at service station, utility bill payment etc
ŸTax bill printing and much more..

PRODUCT FEATURES
Ÿ300mm/second ultra high speed printing.
ŸExcellent waterproof, Anti-oil, Anti-dust structure design.
ŸWall mountable
ŸAdjustable baffle design, support for both 58mm & 80mm paper size
printing.
ŸSupport 80mm large diameter roll.
ŸSupport Gb18030 big font, easy to print uncommon characters.
ŸCompatible with ESC/POS instruction set
ŸEasy paper loading, simple and convenient to operate
ŸSupport kitchen printing and Internet printing.
ŸSupport printer monitoring function to avoid losing bills.
Ÿ100M Ethernet Card ( Optional ) gives high speed connectivity to printer
and increases efficiency of the printer.
ŸSupport printing Job recovery after network disconnection.
Ÿ2048K Super input buffer memory.
ŸSupport LOGO graphic download and print.
ŸSupport 1D, 2D Barcode printing.
ŸSupport incoming order reminder and error alarm.
ŸSupport black mark orientation and re-print large font.
ŸSupport multi-language printing
ŸRich optional interfaces available, SERIAL COM, Rj45 LAN, WIFI,
BLUETOOTH, GPRS
WHAT’S IN THE BOX
Ÿ1 X Everycom EC801 Thermal Receipt Printer
Ÿ1 X Powe Adapter ( Including Power Cable )
Ÿ1 X USB Data Cable
Ÿ1 X Paper Roll
Ÿ1 X User Manual
Ÿ1 X Driver CD

Item Parameters
Print
Parameters
Printing Method Thermal Line
Printing width 72mm
Resolution 576 Dots/Line or 512 Dots/Line(8dots/mm,203dpi)
Print speed 300mm/Second
Interfaces Ethernet +USB+COM , Ethernet+USB+WIFI, USB+GPRS,
USB+COM, USB+Bluetooth.
Line Spacing 3.75mm(Can adjust line spacing by command)
Line No. Font A : 48 Characters/Lines
Font B : 64 Characters/Lines
Simple/Traditional Chinese-24 lines
Character Standard GB18030 simplified / traditional Chinese Fonts
Character Size ANK character, Font A:1.5×3.0mm(12×24 dots);Font
B:1.1×2.1mm(9×17 dots)
Simplified/Traditional
Chinese3.0×3.0mm(24×24 dots)
Bar code
Character
Extended character
set
PC437/Katakana/PC850/PC860/PC863/
PC865/West Europe/Greek/Hebrew/
East Europe/Iran/WPC1252/PC866/PC852/
PC858/Iran/Latvian/Arabic/PT151,1251/
PC737/WPC/1257/Thai Vietnam/PC864/
PC1001/(Latvian)/(PC1001)/(PT151,1251)/
(WPC1257)/(PC864)/(Vietnam)/(Thai)
Bar code 1D Bar Code:UPC-A/UPC-
E/JAN13(EAN13)/JAN8(EAN8)/CODE39/ITF/CODABAR/
CODE93/CODE128
2D Bar Code : QR CODE
Graphics
printing
Graphics printing Supports bitmap download and print
Cutter Cutter Function Full cut/Half cut
Paper
Type Thermal
Width 79.5±0.5mm
Diameter ≤80mm
Feed method Easy feed (Clamshell feed)
Print
commands
Commands ESC/POS
Power
Power Adaptor Input:AC 100V-240V,50~60Hz
Output:DC 24V/2.5A
Cash Drawer output DC 24V/1A
Buffer Input Buffer 2048K bytes
NV Flash 256K bytes
Physical
Characteristics
Weight 1.2KG
Dimension 186*145*133(MM)
Environment Working Temp:5 ~ 45 ℃, Humidity:10 ~ 80%
Storage Temp:-10 ~ 50 ℃,Humidity:10 ~ 90% (No dew)
Reliability
parameter
Print Head Life 100KM(print density ≤12.5)
Cutter Life 1000,000times
Software Driver Android,IOS,Linux,Win2000,Win2003,WinXP,Win7,Win8,
Win8.1
TECHNICAL SPECIFICATIONS

HOW TO : PRINTER CONNECTION
1. Connect the power adapter cable to the printer power supply interface.
2. Connect the USB data cable to the printer’s USB interface.
3. If you have cash drawer, connect its cable to printer’s RJ11 interface.
1
23
Power Adaptor
Power Cable
12
34
HOW TO : LOAD PAPER
1. Press the cover open button situated on the left side of the printer.
2. Put the paper roll inside the paper holder as shown in the image below.
3. Pull out paper just a little that it comes out of printer.
4. Press the cover down to close it, tear off excess printing paper.
Note : Be careful on the roll
direction, if reverse
direction , printer won’t be
able to print the content.

HOW TO : SET PRINT MODE ( DIP SWITCH )
DIP switch can be used to settings such as change the Auto cutter mode,
enable / disable beep, Printing density, language selection, font size, print
width, print speed etc..
DIP SWITCH SETTINGS

SWITCH, KEY NAME, INDICATOR & FUNCTIONS
1. (POWER) SWITCH
Use this switch to turn on or off the printer.
2. (FEED) KEY
This button is used to feed paper.
3. (PAPER) LIGHT
If paper light is on and stable indicates that printer have paper loaded.
If paper light is on and stable but “Error” light is flashing, this means that
printer is out of paper.
4. (ERROR) LIGHT
If printer is out of paper, print head overheating or if the printer lid is not
closed properly or upon any other similar irregularities this light will be
flashing. Else it will be off.
5. (POWER) LIGHT
Power light on and stable indicates printer is connected to power supply
and is powered on, if this light is off that indicates printer is powered off.
HOW TO : PERFORM SELF TEST
If printer is powered on, kindly power it off using the power switch on the
back panel.
Press the feed key and power on the printer at the same time using the
power switch on the back panel. ( Do not release the feed key yet )
After approximately 2 seconds release the feed key and printer will print
out the current printer status and settings.
HOW TO : HEX NUMBER SYSTEM
If printer is powered on, kindly power it off using the power switch on the
back panel.
Press the feed key and power on the printer at the same time using the
power switch on the back panel. ( Do not release the feed key yet )
After approximately 6 seconds release the feed key and printer will print
out the words “Dump Hexadecimal”.

HOW TO : RESTORE FACTORY DEFAULT SETTINGS
If printer is powered on, kindly power it off using the power switch on the
back panel.
Press the feed key and power on the printer at the same time using the
power switch on the back panel. ( Do not release the feed key yet )
After approximately 10 seconds release the feed key and printer settings
will be restored to factory default.
HOW TO : FIX STUCK AUTO CUTTER
Solution 1 : Restart the printer by turning it off and then turning it back on
using the power button on the back panel.
Solution 2 : Turn off the printer using the power button on the back panel,
Open the front printer cover ( as shown in image below ) rotate the auto
cutter’s cutting knife gear, let the cutter return to its initial position. Once
done close the printer cover and turn on the printer using power button on
the back panel. Resume printing.

HOW TO : INSTALL PRINTER DRIVER
This printer have two driver modes , one uses port for directly drive printing
and another requires to install driver in windows system to print.
1. Direct Drive
In this method driver installation is not required. Only need to output the
characters ( Instructions and data ) directly to a port.
If you use direct drive mode, you need to use the print command set to
control printing. This printer has been integrated within the ESC/POS
instruction set.
1. Install Driver ( Windows )
Insert the driver CD into the CD drive of your computer. Look for windows
driver and double click to initiate the setup, follow the instructions
displayed on the computer and your printer will be ready to use in no time.
HOW TO : REPAIR & MAINTENANCE
1. Printer casing & paper holder cleaning : Use a wet cloth gently wipe the
outer surface and paper holder of the printer.
2. Print core cleaning : Printer core should be cleaned time to time
especially if the printing quality is declining, cleaning method is as follows.
Use clean cotton dipped in anhydrous alcohol and gently wipe the printer
core ceramic part until clean enough.
3. If notice water inside the printer, please immediately disconnect the
power supply of printer and let the printer dry out naturally.
Everycom POS - 80mm Series.exe


Table of contents
Other Everycom Printer manuals