KCAL MODE (CALORIE MODE)
It displays the accumulated calories consumed from the
beginning of the trip onwards.
Note: This accumulated calories display will return to 0
once it has been cleared under the TM MODE.
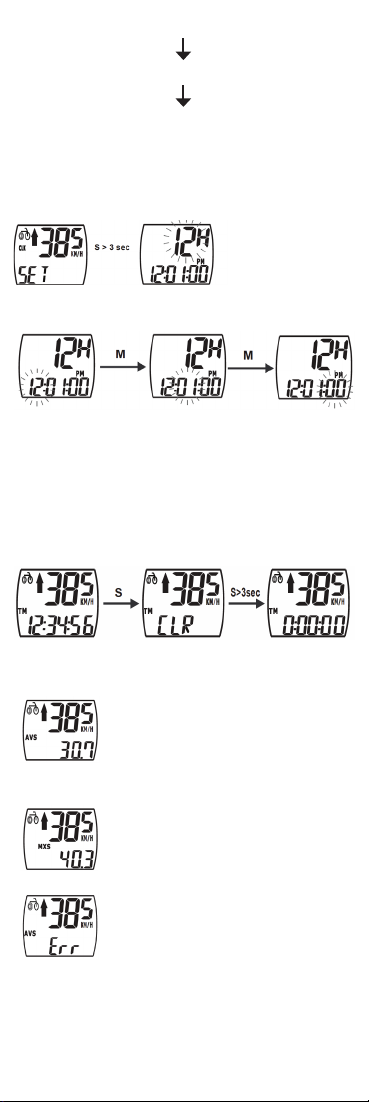
How to input gender, weight scale, and weight:
Press “SET” key for 3 seconds to go to gender setting.
Press “SET” key again to select MALE or FEMALE.
Press “MODE” key to go to kg or lb setting.
Press “SET” key to select kg or lb weight scale.
Then, press “MODE” key to go to weight input.
Press “SET” key to input the actual weight in
kg or lb. Press and hold “MODE” key for 3 seconds to
go back to KCAL Mode.
LOW BATTERY
A low battery warning will appear when the battery is
low and is in need of replacement.
BACK LIGHT (ABACUS 11 ONLY)
Press “SET” key at any time to activate the back light.
The back light will deactivate itself automatically after
4 seconds.
MAINTENANCE
If the display contrast changes and gures become
faint, it’s time to replace the battery. Consider changing
the computer sensor and transmitter batteries at the
same time.
Note: Do not expose the computer to extremely cold
or hot temperatures. Do not leave the unit in direct
sunlight for extended periods of the time.
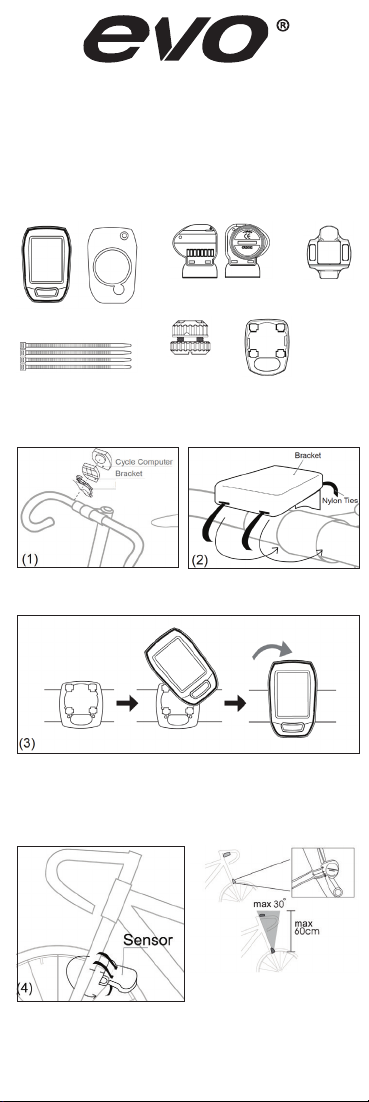
Sensor:
Check the position of the magnet and sensor regularly.
Keep dry and free of dirt to ensure proper function.
Bracket/Magnet/Sensor band:
These items may be cleaned with water and mild soap.
BATTERY REPLACEMENT
Unscrew the back cover. The (+) side should be facing
up. Gently remove the battery and replace it with a new
battery model CR2032.
Sensor:
Unscrew the back cover. The (+) side should be facing
up. Gently remove the battery and replace it with a new
battery model CR2032.
TROUBLESHOOTING
Q1. Display is black or very light:
The battery power may be low. Try a new battery and
make sure the battery is installed correctly.
Q2. Display becomes dark or black:
The unit is too hot. Place the unit in a shaded area and it
will return to normal.
Q3. The unit operates slowly or struggled:
The unit is too cold. Warm the unit and it will return
to normal.
Q4. Data in display varies enormously:
Check the surroundings for electro magnetic or high
energy interference and move away from the source of
interference.
Q5. Data in display shows slowly:
The unit may be aected by low temperature factor,
but it didn’t inuence the function reading. When the
temperature rises, the data reading will be back
to normal.
Q6. Current speed does not appear:
The distance and position between magnet and sensor
needs to be adjusted 2-3mm.
SPECIFICATIONS
Receiver Speed Sensor
Operating
Temperature
0˚C~40˚C 0˚~40˚C
Storage
Temperature
-10˚C~50˚C -10˚C~50˚C
Emitted
Frequency
N/A 122k±5%
Battery 3 volt lithium
2032 cell
3 volt lithium
2032 cell
Weight 30.6 grams 20 grams
Timer Range: 0~29 (hour): 59 (minute): 59 (Second)
Current Speed Range: 0~99.9 KM/ 0~62.4 Mile
Average Speed Range: 0~99.9 KM/ 0~62.4 Mile
MAX Speed Range: 0~99.9 KM/ 0~62.4 Mile
(Trip) Distance Range: 0~999.99 KM/0~624.99 Mile
Odometer Range: 0~99999 KM/ 0~62499 Mile
IMPORTANT HEALTH NOTICE!
Please read over the following information before using
the Cycle Computer.
Never use the cycle computer in combination with other
medical/implanted electronic equipment and device
(especially heart pacemakers, EKF equipment, TENS
equipment, cardiopulmonary machines or pacemakers.)
If you are severely ill or pregnant, please consult your
doctor before using cycle computer.
Keep this device away from children. It contains
batteries, which might be swallowed by children.
As with most electronic receiving devices, there can
sometimes be interference that causes inaccurate
display readouts. Avoid using your cycle computer
near common sources of interference. These include
high voltage power lines, air conditioning motor units,
uorescent lights, wristwatches, mobiles and computer.
WARRANTY
One-Year Warranty EVO warrants new EVO® branded
computers against defects in workmanship and
materials for 1 year. For complete warranty information,
visit evobicycle.com.
USA 1181 South Lake Dr, Lexington, SC 29073
CAN 1000, rue des Riveurs, Lévis, QC, G6Y 9G3
© 2018 EVO Bicycle
WHEEL SIZE CHART
Tire Scale L(mm)
14 x 1.50 1020
14 x 1.75 1055
16 x 1.50 1185
16 x 1.75 1195
18 x 1.50 1340
18 x 1.75 1350
20 x 1.75 1515
20 x 1-3/8 1615
22 x 1-3/8 1770
22 x 1-1/2 1785
24 x 1 1753
24 x 3/4 Tubular 1785
24 x 1-1/8 1795
24 x 1-1/4 1905
24 x 1.75 1890
24 x 2.00 1925
24 x 2.125 1965
26 x 7/8 1920
26 x 1(59) 1913
26 x 1(65) 1952
26 x 1.25 1953
26 x 1-1/8 1970
26 x 1-3/8 2068
26 x 1-1/2 2100
26 x 1.40 2005
26 x 1.50 2010
26 x 1.75 2023
26 x 1.95 2050
Tire Scale L(mm)
26 x 1.75 2023
26 x 1.95 2050
26 x 2.00 2055
26 x 2.10 2068
26 x 2.125 2070
26 x 2.35 2083
26 x 3.00 2170
27 x 1 2145
27 x 1-1/8 2155
27 x 1-1/4 2161
27 x 1-3/8 2169
27.5 x 2.25 2128
29 x 2.10 2288
29 x 2.30 2326
650 x 35A 2090
650 x 38A 2125
650 x 38B 2105
700 x 18C 2070
700 x 19C 2080
700 x 20C 2086
700 x 23C 2096
700 x 25C 2105
700 x 28C 2136
700 x 30C 2146
700 x 32C 2155
700C Tubular 2130
700 x 35C 2168
700 x 38C 2180
700 x 40C 2200
evobicycle.com // 2