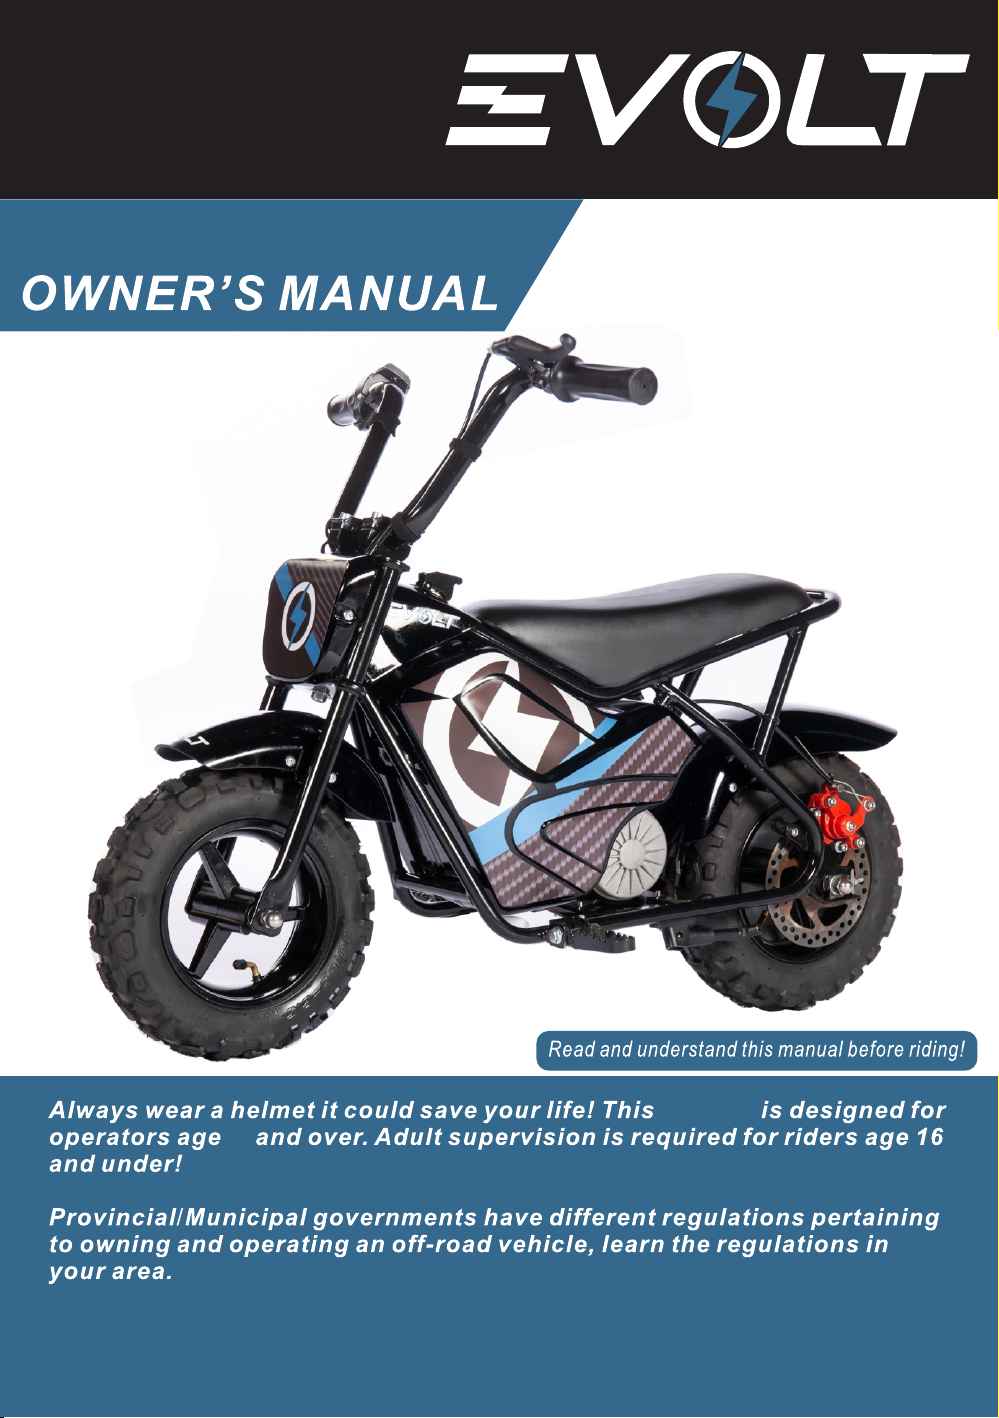
EVOLT ME 250 User manual
www.evoltadventure.com
ME 250
250W MAX POWER
ELECTRIC Mini Bike
8
Mini Bike

This operator's manual contains important safety information and
maintenance information. Read it carefully before using this vehicle.
Failing to follow the warnings contained in this operator's manual could
result in INJURY or DEATH。
Keep this manual in a safe place. It is very important that this
owner's manual be reviewed by any rider and it should remain with the
vehicle when transferred to a new owner.
All information images and specifications contained in this manual
are based on the latest product information available at the time of
publication. Due to improvements or production changes, there could
be discrepancies in this manual. E-Volt reserves the right to make
product changes at any time, without notice and without obligation to
make the same or similar changes to any vehicle previously built or sold
DO NOT OPERARE THIS VEHICLE ON PUBLIC ROADWAYS or
any location where there is vehicular traffic. Doing so would be very
dangerous and could also be in violation of local traffic laws and
restrictions. Always wear a helmet and protective eyewear and clothing.
No part of this owner's manual may be reproduced or copied
without express written permission from E-Volt.

Essential Technical Parameters
1. Vehicle
1.1
1.2
1.3
Dry mass (Net Weight):22kg(48lbs);
Gross mass (Gross Weight):25kg(55lbs);
Maximum load(weight): 45kg (100lbs);
2. Motor
2.1 Type: DC, with brush;
2.2 Rated continuous output power: P=250W;
2.3 Rated speed:2750 士7.5%rpm;
2.4 Rated voltage:24V;
2.5 Rated output torque: 1.21 (N.m)
3. Controls
3.1 Rated input voltage:24V;
3.2 Input voltage range:20~28V;
3.3 Input current without load: ≤115MA,
3.4 Max. output current of the motor: 30 士1A;
3.5 Under-voltage protection(Volt): 20 士0.5V;
3.6 Max. conduction value: ≤95% (with the output current of the
control <2A);
3.7 Starting voltage of handlebars: ≥ 1.4V;
3.8 Protection voltage of the handlebars: ≤1.8V;
4. Charger
4.1 Input: 100-240 VAC, frequency 50/60 Hz, input current: 1.8A Max.,
4.2 Out put: 24V DC 1.5A
5. Batteries
5.1 Size: 151 *65*96(100) mm;
5.2 Type: Lead Acid Battery, 2 X 12V ,9AH

CONTENTS
Names of all structural components……………………..1
Introduction……………………………………………………..2
Safety……………………………………………………………...3-5
Initial Setup……..………………………………………………6-8
Operating Controls………………………………………….9-10
Before You Ride……………………………………………..11-12
Basic Operation……………………………………………..13-14
2-Stage Safety Speed Limiter………………………..15
Maintenance &…………………………………………..…..16-21
Troubleshooting Guide…………………………………..22-23
ME250 Product Registration……… ………..…..24
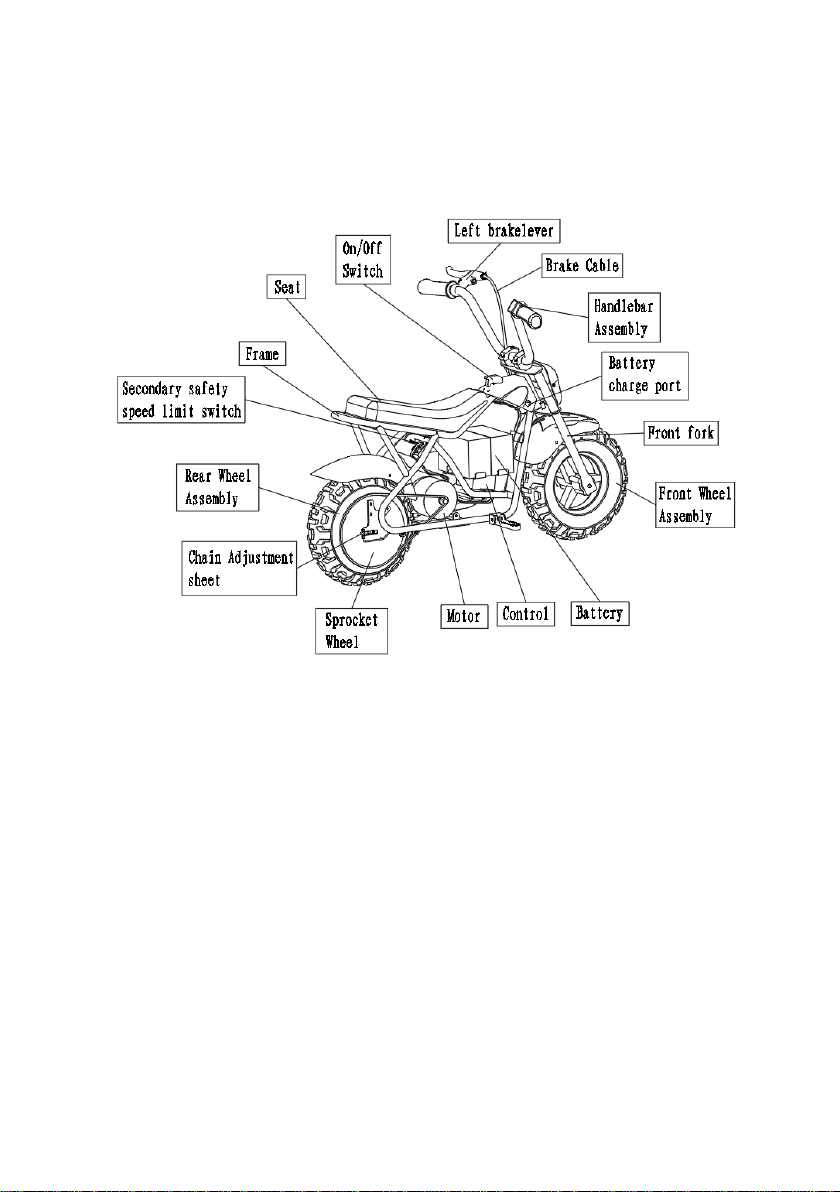
Names of all structural components

Thanks for your choosing the ME250 Electric Powered Mini Bike!
The ME250 mini bike was designed as a recreational vehicle for off-
road use only and by a single rider only. This mini bike is built for
younger riders who are under 100 lbs. with minimal experience
Before riding, please take your time to get acquainted with your
mini bike and how it works. To protect your investment, we urge you to
keep it well maintained. In addition to regular maintenance, it is
important to observe and perform all pre-ride and periodic checks
outlined in this manual, where you will also find helpful safety
information, instructions and helpful tips. Keep the manual well to refer
to later on as questions may come up
As you read through this manual you will find information that is
noted with a NOTICE symbol. This is to point out key bits of information
that will help you avoid damage to your mini bike and property around
you. This manual covers basic maintenance procedures as well
Read the warranty page careful so that you understand your rights
and responsibilities
Whenever you ride, tread lightly by staying on established trails
and in approved areas. Protect the environment and keep off-road
riding areas open for future use.

Your personal safety and the safety of those around you is our
primary concern Operating this mini bike safely is an important
responsibility and should not be taken lightly
We have provided you with safe operating procedures; warning
labels on your mini bike and in this manual. This information will alert
you to potential hazards that could harm you or others.
It is understood that it is not practical or possible to warn you about
all possible hazards associated with off-road riding and maintaining
your mini bike. You must always use your own best judgement.
Safety information is presented in a variety of forms, including:
Safety labels and tags on the mini bike.
Safety messages proceeded by a safety symbol and one of these
three signal words: DANGER, WARNING and CAUTION.
DANGER WARNING CAUTION
Any of the above labels can indicate a danger where you or
someone around you can be KILLED or SERIOUSLY INJURED if the
instructions that it accompanies are not followed carefully.
This manual is filled with important safety information, please read
it carefully and be sure that you understand it.

Safety is our number one priority. There is an inherent level of risk
when using any motorized powersports product and an electric mini
bike is no different. Read the following warnings carefully to understand
how you can avoid injury to yourself, others and your ME250.
RULE NUMBER 1 DANGER
READ THIS BOOK COMPLETELY BEFORE RIDING THE FIRST TIME
There is valuable and important information in this user guide that
will keep you safe and protect your mini bike from becoming damaged
from neglect. Read it carefully and understand the contents. If you have
any questions please call the dealer.
RULE NUMBER 2 DANGER
PARENTAL SUPERVISION REQUIRED.
An electric power sport product is not a toy. A child can not be left
alone to play with this product. Any rider under the age of 8 should not
ride this mini bike and all children must have parental supervision when
riding. The age of 8 is only an estimate as it is affected by weight, height
and riding ability. A parents' decision to allow their child to ride this mini
bike should be based on their child's level of maturity and motor skills
RULE NUMBER 3 DANGER
RIDE AT YOUR OWN RISK AND USE COMMON SENSE.
Any mishap while using a power sports product can result in
serious injury or death Avoid situations where you can't see what is in
front of you or behind you, where other traffic is present and/or where
your speed is too fast for the conditions. Always ride within your own
limitations. Always obey local laws and regulations in your area Do not
ride your mini bike where such vehicles are prohibited
RULE NUMBER 4 DANGER
NEVER RIDE ON PUBLIC ROADWAYS
This minibike is designed for off-road use only. Never ride in
roadways or near any motor vehicles.

RULE NUMBER 5 DANGER
RIDE SMART
Never attempt to carry a passenger. Keep both hands on the
handlebars at all times Never ride while wearing headphones, earbuds,
or while using a cell phone. Keep fingers and other body parts away
from moving parts like the drive chain and sprocket as injuries may
result. Never attempt to jump off of a ramp or near stairs. Never use
near a pool or near spraying water. Always wear proper riding attire
including gloves, knee pads, sturdy shoes, a properly fitting DOT
approved helmet and goggles. Keep loose clothing and shoelaces away
from moving parts like the drive chain and sprockets.
FAILURE TO ADHERE TO THE ABOVE RULES AND CAUTIONS
COULD RESULT IN SERIOUS PERSONAL INJURY OR DEATH. USE
WITH CAUTION, BE AWARE OF YOUR SURROUNDINGS AND
PRACTICE SAFE RIDING TECHNIQUES.
If you have determined that your child is ready to ride please
remember the following points:
•Never let your child ride without a helmet
•Your child's safety is your responsibility. Do not take it lightly
•Never push you child to try things before they are ready
•Always supervise your child when they are riding
•Proper maintenance and upkeep of the mini bike is the key to safe
riding
DANGER PLEASE NOTE:
Any modifications or improper accessories added to the mini bike
with parts that are not manufactured by us can make it unsafe. We
strongly recommend that you do not remove any of the original
equipment or make any modifications that alter the design and/or
operation of the mini bike.

STEP 1. UNPACK YOUR ME250.The contents are as follows:
1. ME250 Electric Mini Bike
2. Tool Pouch with tools
3. Battery Charger
4. Owner's Manual
Once you have located all of these items, move on to step 2
STEP 2. ASSEMBLE THE HANDLEBARS. Your ME250 arrives
almost completely assembled, making it easy to start riding. The only
assembly that is required for your ME250 is to attach the adjustable
handlebars And front trim pieces. All cables and controls are already
hooked up to the bike, so attaching the handlebars is easy
REQUIRED TOOLS
10-13mm open wrench
6mm Allen key
1.Using the
10-13mm open wrench
from your tool kit, Put the
handlebar mounting bolt (M8×25) into the frame mounting hole
and tighten the (M8) nut with a 10-13 open end wrench
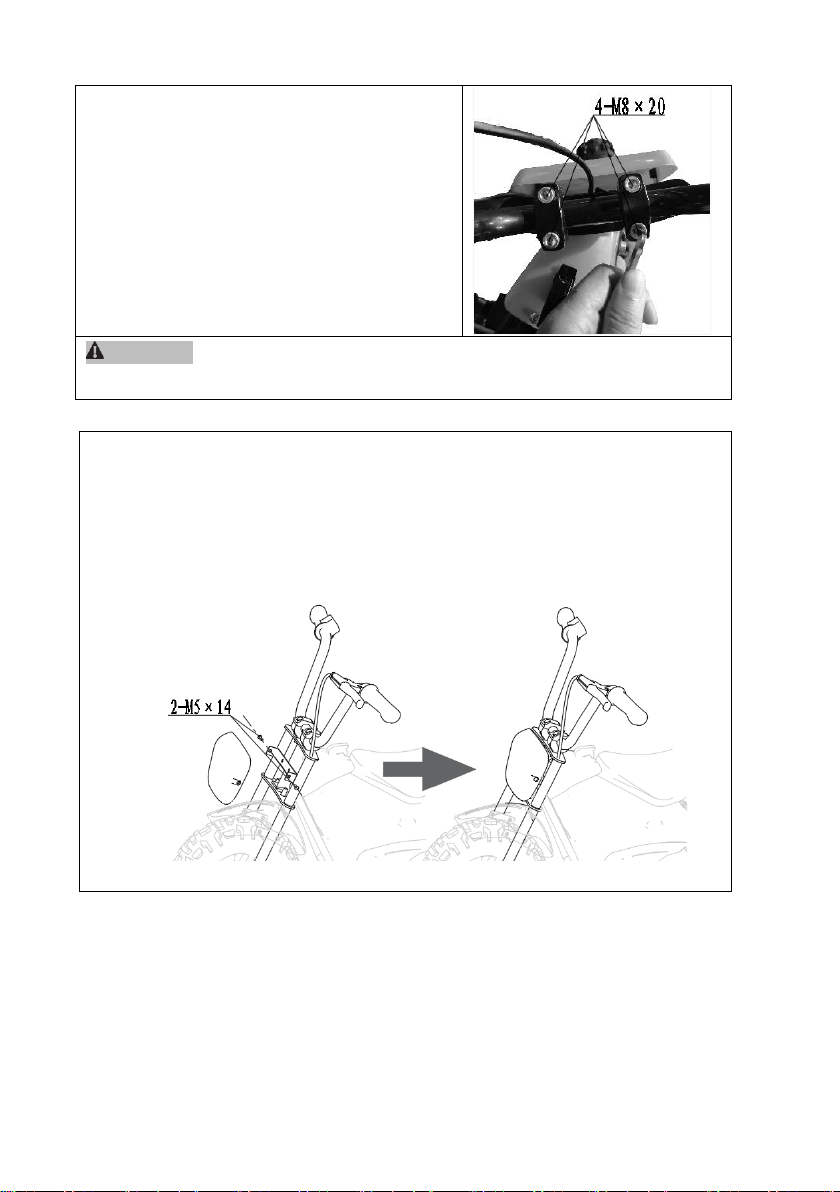
2. The handlebar Angle can be
adjusted. Loosen the 4 M8x20 bolts,
adjust the handlebars to a comfortable
position, keep the handlebars centered
and tighten the bolts.
CAUTION Be careful not to lean the handlebars too far forward or
backward as this will affect the bike's handling and comfort of the ride.
3.Install front trim panel
Install the front trim panel to the front fork assembly with
M5X14 bolts and tighten the bolts with a Phillips screwdriver.

STEP 3 Connect the power
(The ME250 power supply is disconnected
during transit for safety reasons)
1.Plug the fuse into the fuse slot of the
power cord and close the cover
2. Place the power cable with the fuse in
the battery box
First make sure the power switch is off.
The charger interface is located at the
lower right of the power switch (as shown
in the picture). There are three round
contact points in the interface, and the
round head of the charger wire has three
round holes, which just match the charger
interface. Ensure that the charger plug is
firmly inserted into the charger interface
when charging, and please cover the
protective cap when not charging.
Plug the charger into a wall outlet If the
light on the charger does not work, check
the electrical outlet. If necessary, try
different exits
.

To operate your electric mini bike you need to be able to operate the
throttle, brake and other controls without stopping to look at them. Please
study the image below carefully to become familiar with the function and
the location of each control

OPERATING CONTROLS
When operating your ME250, there are some key operating controls and
components that allow you to operate your mini bike
Their location and operation information is shown below
1. On/Off Switch 2. Throttle 3. Brake
The ON/OFF switch is conveniently
located just ahead of the driver and is
equipped with a flip-up cover. The cover,
when closed also shuts off the On/Off
switch. The switch should be left in the off
position whenever the bike is not being
used to protect the charge that is in the
battery.
The throttle provides the power for the car
to move forward, and because of the
rotating throttle structure, the power and
speed are variable.
When giving the throttle
power, twist it slowly at first to avoid
sudden acceleration
The ME250 is equipped with a rear disc
brake. The brake lever is hand operated
and is on the left hand grip mounted to the
handlebars Squeeze the brake carefully
with increasing force to stop the bike
Applying the brakes too
quickly can cause the bike to skid and you
may lose control

BEFORE YOU RIDE
Once your bike has been allowed to charge fully, disconnect the battery
charger from the bike and from the wall plug, and store it in a safe place
Check list before riding
1. Have you completely read and do you thoroughly understand this
owner's manual?
2. Have you found all the safety messages on your mini bike and do
you understand them?
3. Do you understand the location of, and how all the operating controls
on your mini bike work?
4. Are you in good mental and physical condition?
5. Are you drug and alcohol free?
6. Are you wearing a DOT-approved helmet that fits properly?
7. Are you wearing eye protection?
8. Are you wearing sturdy shoes and protective clothing?
Additional suggested protective clothing.
1. Gloves to protect your hands
2. Sturdy riding boots that support your ankles
3. Riding pants with knee and hip pads
4. Riding jersey with elbow pads and chest/shoulder protection
Never let your child ride without a helmet. Helmets
significantly reduce the number and severity of head injuries. An approved
DOT motorcycle helmet is the most important part of your safety gear.
Choose one that fits properly and is snug on your head. Motorcycle dealers
can help in selecting a good quality helmet with proper fit.

You must be certain that you and your mini bike are ready to ride.
Below is the pre-ride checklist. Be sure to review all the topics every time
before riding
1. Check tire pressure with the tire gauge in your ME250 tool kit. Be
sure they are at 15-20 psi.
2. Check rims to make sure they are not bent or damaged.
3. Check the level of charge on the batteries.
4. Check the drive chain to see if it needs to be lubed or tightened.
5. Check the brake to be sure it is working properly.
6. Look over the entire bike for loose nuts and bolts or body parts.
7. Check the throttle to be sure it rotates freely and returns to the low
position on its own when released.
8. Be sure that the handlebars turn freely.
Failure to properly maintain your mini bike can lead to a
crash in which you can be seriously injured or killed. Always perform a
pre-ride inspection on your mini bike and keep it in good condition to get
the most out of your ME250 electric mini bike.

The ME250 has a 250 Watt motor and 24 volts of electrical power. It
Is very important not to underestimate the ME250. Avoid getting injured.
This bike is equipped with a main toggle switch that is within easy
access of the rider This switch cuts off all power to the motor. To tum the
switch on, flip up the toggle cover and push the switch forward, or to the
ON position.
You will see the battery charge indicator lights on the throttle twist grip
light up, indicating how much charge is available
NEVER TURN THE ACCELERATOR TWIST GRIP WHEN
THE UNIT IS ON AND YOU ARE NOT SITTING ON IT. THE MINIBIKE
CAN LURCH FORWARD CREATING A HAZARDOUS SITUATION
To tum the switch off, you can move it backward, to the OFF position.
Or, you will notice that by closing the toggle cover, the switch is
automatically moved to the OFF position.
With the switch in the ON position and sitting on the minibike, put
both hands on the handle grips with both feet on the ground. Very
gradually, tum the inside portion of the right-hand grip downward. You will
feel the bike start to move forward. As you gain speed, you will be able to
put both feet on the foot pegs and ride
This bike is equipped with a rear disc brake. To use the brake, gently
squeeze the brake handle until the brake takes effect. Carefully apply the
brake while moving as jamming on the brakes too quickly can cause you
to go into a skid and lose control.

STEP FOUR: STOPPING AND PARKING
It is always best to park the minibike on a smooth, level surface to
avoid damage from accidental tip-overs. Flip down the kickstand
(located on the bottom of the frame on the left side) to rest the bike on.
Tum the switch to the OFF position and flip down the toggle coyer
NOTE: IT IS VERY IMPORTANT TO STORE YOUR ME250 INSIDE,
OUT OF THE WEATHER. THE ELECTRICAL SYSTEM IS COVERED
BUT SHOULD NOT BE EXPECTED TO BE TOTALLY WATER TIGHT
AND WATER DAMAGE CAN OCCUR IF LEFT OUT IN WEATHER
SHENGQI WILL VOID THE WARRANTY, IF PRODUCT HAS NOT
BEEN PROPERLY STORED
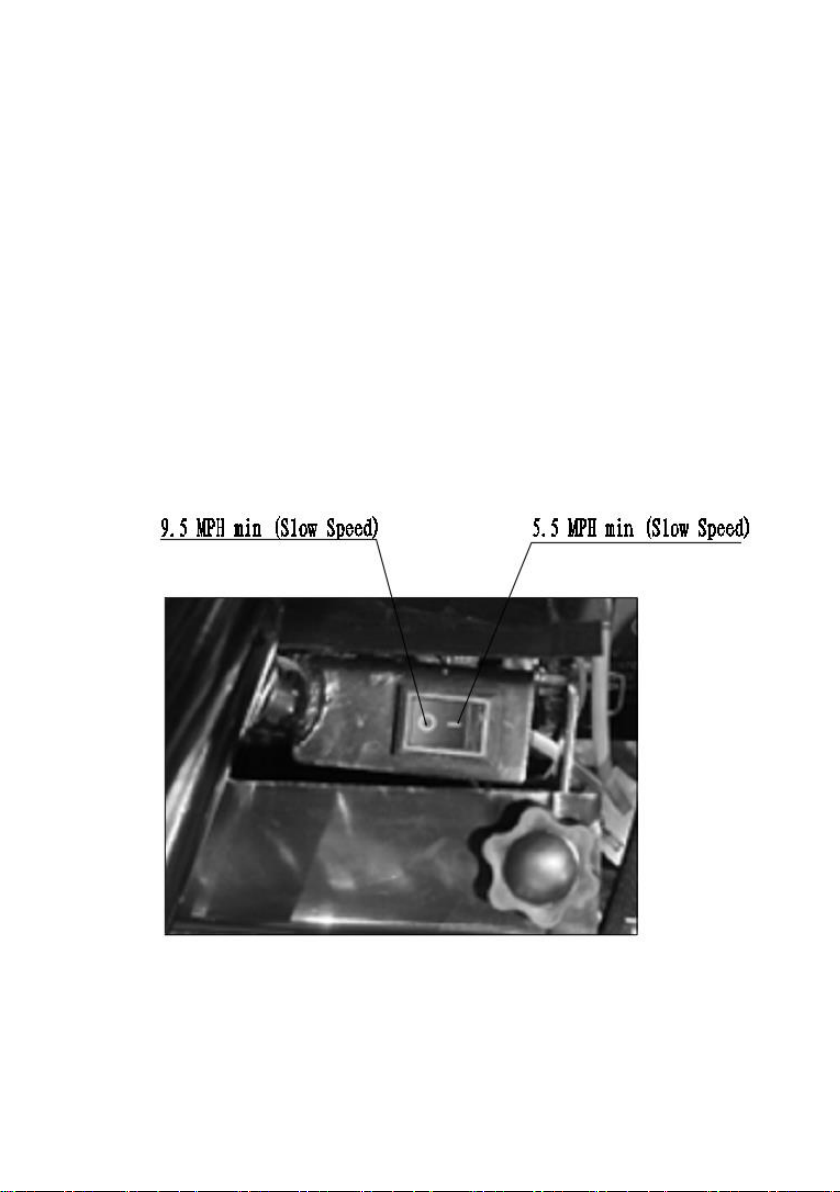
The ME250 electric minibike is equipped with a special switch, Adjust
speed to suit younger, smaller riders. The switch is located in the battery
case under the seat cushion, a hard-to-reach area to restrict access for
curious younger children.
NOTE: THE 2-STAGE SAFETY SPEED LIMITER SWITCH IS SET
AT THE FACTORY TO THE SLOWER SPEED. To switch from slow speed
to regular speed, or vice-versa, follow the steps below
1. Move the switch to your desired position. "O" for regular speed
and "I" for slow speed.
2. The mini bike has a top speed of 9.5mph and a slow speed of
5.5mph
Being an electric-powered vehicle, your ME250 is a relatively low
maintenance machine. However, it is important to properly care for the unit
to keep it operating properly and safely. Below are items that you will need
to care for on a regular basis
STORE INSIDE OUT OF THE WEATHER
WARNING IT IS CRITICALLY IMPORTANT TO ALWAYS STORE YOUR
ME250 INDOORS AND OUT OF THE WEATHER. THE ELECTRICAL
SYSTEM IS COVERED BUT SHOULD NOT BE CONSIDERED SEALED
WATER CAN CAUSE SERIOUS DAMAGE TO THE POWER TRAIN AND
CREATE A DANGEROUS SITUATION. WATER DAMAGE WILL VOID
YOUR WARRANTY
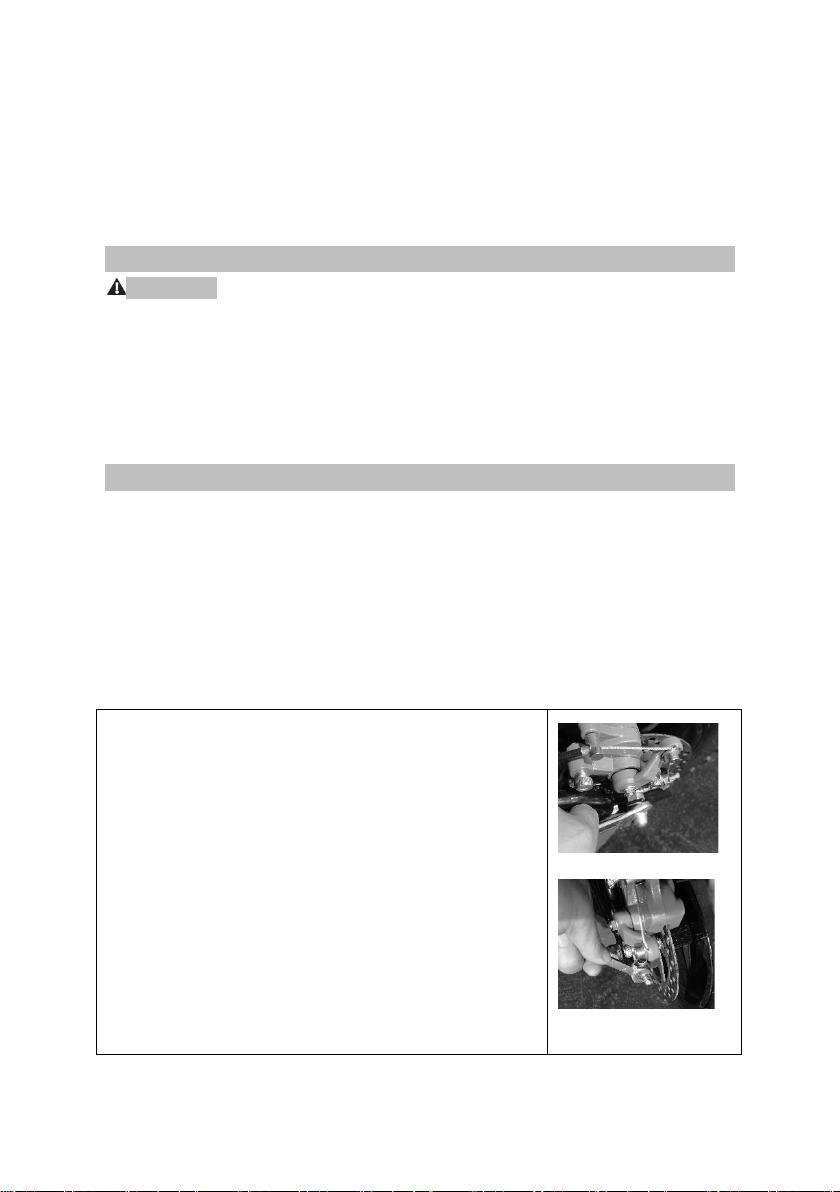
DRIVE CHAIN TENSION
The drive chain transmits power from the motor to the rear wheel. To work
properly it must be lubricated and properly tensioned at all times Check the
tension on the drive chain by moving it up and down approximately halfway
between the sprockets. There should be no more than 1/2"vertical slack in
the chain. If the chain seems too loose, it may be in danger of coming off
while riding
To adjust the chain tension, follow the steps outlined below:
1. Be sure that the minibike is parked on a flat,
level surface and leaning on the kickstand
2. Using a 16mm wrench, loosen the rear wheel
axle nuts on each side.
3. After the axle nuts are loosened, use a 10mm
wrench to turn the sprocket side tensioner bolt
clockwise (to tighten) about one turn, then repeat
this process on the other side tensioner bolt.
4. Check the tension on the chain and see if it
has changed enough. If not, repeat steps 3 & 4
until the proper tension is achieved
Table of contents


