9
www.evolutionpowertools.com
EN
FIG. 5
FLOAT IN RAISED POSITION
FIG. 6
FIG. 7
Your vac contains a blowing feature. It has the capability to blow sawdust and other
debris. It can be used to blow dust and debris out of garages or off patios and
driveways. Follow the steps below to use your vac as a blower.
1. Locate blowing port on your vac.
2. Insert one end of the 1-1/4 in. x 6 ft. hose into the blowing port.
3. Turn vac “ON”.
8
WARNING: To reduce the risk of injury from accidental starting, unplug power
cord before changing
WARNING: To avoid injury to bystanders, keep them clear of blowing debris.
CAUTION: Wear a dust mask if blowing creates dust which might be inhaled.
CAUTION: To reduce the risk of hearing damage, wear ear protectors when
using the vac/blower for extended hours or when using it in a noisy area.
CARE AND MAINTENANCE
FILTER REPLACEMENT
WARNING!
To reduce the risk of injury from accidental starting, unplug power cord before changing
or cleaning filter.Your filter should be cleaned often to maintain peak vacuum
performance.
IMPORTANT
To avoid damage to the blower wheel and motor, always reinstall the reusable dry filter
before using the vacuum for dry pickups and always reinstall the foam filter before
using the vacuum for wet pickups.
IMPORTANT
After cleaning, check the filter for tears or small holes. Do not use a filter with holes or
tears in it. Even a small hole can cause dust to come out of your vacuum.
Replace it immediately.
NOTE
Before installing the filter on the vacuum, clean the area of the lid so that the clamp ring
will seal the bag against the lid and stop small particles from bypassing the filter bag. If
the filter is clean and not damaged, replace it on the filter cage. If it cannot be reused,
place a new filter over the filter cage.
NOTE
Clean the filter in an open area.
BLOWING OPERATION
7
WARNING!
To reduce the risk of injury from accidental starting, unplug power cord before emptying
the dust tank.
1. Remove the power head assembly of the wet/dry vac by pulling outward on the lid
clips located on each side of the vac. Lift off the power head assembly.
2. Dump the tank contents into the proper waste disposal container.
INSTALLING ACCESSORY BRACKET
1.Push the accessory bracket (A) in the recess.
2.Secure in place using the screws (B).
A
B
WET PICK-UP
1. Remove cartridge filter and replace it with foam filter when you do wet pickups.
2. This wet/dry vac is equipped with a float mechanism which will rise automatically
to cut off the airflow when the liquid in the tank reaches a predetermined level. When
this happens, turn off vac, unplug the power cord, and empty the dust tank. You will
know that the float has shut the airflow off because the suction ceases and the motor
noise becomes higher in pitch due to increased motor speed. The liquid capacity may
vary with the rate of pickup.
EMPTY THE TANK
Foam filter
Float in raised position
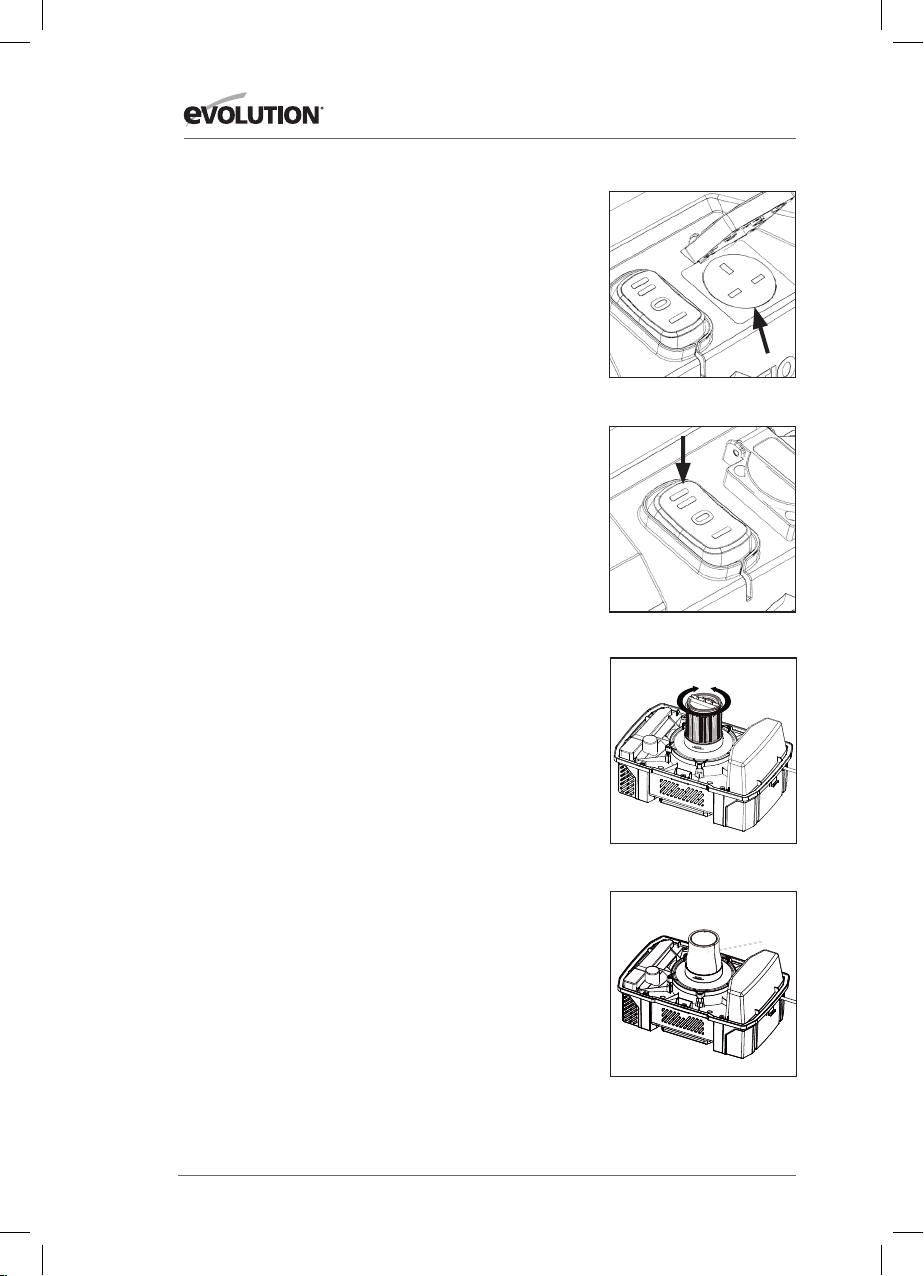
DRY PICK UP
NOTE: If foam filter is in position over filter cage, it must be
removed before installing cartridge filter. The cartridge filter can
be used for wet or dry pick up; installation is the
same for both. When picking up large quantities of liquid please
refer to the wet pick up operation section in this manual. Use the
cartridge filter in position over the filter cage for most general dry
material pick up.
• With the power head in an upside down position, slide the
cartridge filter down over the filter cage, push the filter seals
against the power head.
• Place filter retainer into the top of the cartridge filter, hold
the power head with one hand, turn the handle on the filter
retainer clockwise to tighten, locking the filter into place.
(Fig. 3)
• To remove the cartridge filter for cleaning, again hold the
power head and turn the filter retainer counter-clockwise
to loosen and remove, slide the cartridge filter off the filter
cage.
• To clean the cartridge filter shake or brush off excess dirt or
rinse (from the inside of the filter) with water, dry completely
(approximately 24 hours) and re-install.
WET PICK UP
• Remove cartridge filter and replace it with foam filter when
you do wet pickups. (Fig. 4)
• This wet/dry vac is equipped with a float mechanism which
will rise automatically to cut off the airflow when the liquid in
the tank reaches a predetermined level. When this happens,
turn off the vac, unplug the power cord, and empty the dust
tank. You will know that the float has shut the airflow off
because the suction ceases and the motor noise becomes
higher in pitch due to increased motor speed. The liquid
capacity may vary with the rate of pickup. (Fig. 5)
EMPTYING THE TANK
WARNING: To reduce the risk of injury from accidental starting,
unplug power cord before emptying the dust tank.
• Remove the power head assembly of the wet/dry vac by
pulling outward on the lid clips located on each side of the
vac. Lift off the power head assembly. (Fig. 6)
• Dump the tank contents into the proper waste disposal
container.
BLOWING OPERATION
WARNING: To reduce the risk of injury from accidental starting,
unplug power cord before changing. To avoid injury to bystanders,
keep them clear of blowing debris.
CAUTION: Wear a dust mask if blowing creates dust which
might be inhaled. To reduce the risk of hearing damage, wear ear
protectors when using the vac/blower for extended hours or when
using it in a noisy area.
Your vac contains a blowing feature. It has the capability to blow
sawdust and other debris. It can be used to blow dust and debris
out of garages or off patios and driveways. Follow the steps below
to use your vac as a blower.
• Locate blowing port on your vac.
• Insert one end of the hose into the blowing port. (Fig. 7)
• Turn vac “ON”.