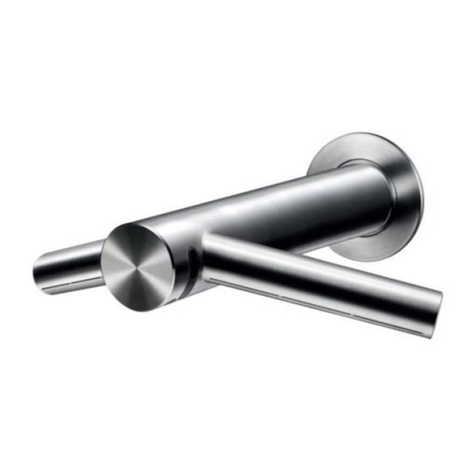
Excel Dryer XLERATORsync Installation instructions

EXCEL DRYER, INC 1.413.525.4531 1.800.255.9235 (US/CN) EXCELDRYER.COM
ADMIN@EXCELDRYER.COM 357 CHESTNUT STREET, EAST LONGMEADOW, MA 01028 5/2020 1
READ AND SAVE THESE INSTRUCTIONS
INSTALLATION AND OWNER’S MANUAL
XLERATORsync®
Serial Number
Date Of Purchase
1 2 3 5
1. Unpack all items from the shipping box.
2. Review items against the following list:
1. Dryer Box Assembly
2. Deck Up Spout Assembly
3. Hose Assembly
4. Z-Bracket
5. Installation and Owner’s Manual
3. Report any missing or damaged items.
4. Locate the Dryer Model Number and Serial Number
on the Dryer nameplate and record the date below.
5. Read and save these instructions.
RECEIVING SHIPMENT
MODEL INFORMATION
IMPORTANT SAFETY INSTRUCTIONS
WARNING: For proper electrical connections,
check your local building codes. Dryer is
intended to be cord connected to power supply,
and must be properly grounded.
• Do not use any power wash equipment for cleaning on or near this
unit.
• Do not use the XLERATORsync dryer for drying hair.
• Do not obstruct air inlets or outlets.
PRE INSTALLATION WIRING SAFETY INSTRUCTIONS
• Install a dedicated 20-amp GFCI outlet no more than 4 feet from
the installation of the dryer box. Make sure the supply corresponds
to that shown on the rating sticker of the unit. If the dryer is
connected to any electrical supply other than that stated on the
rating sticker of the unit, permanent damage or improper, unsafe
operation of the unit may result.
• Make sure to unplug cord from receptacle before installing,
maintaining or cleaning this hand dryer.
GENERAL SAFETY INSTRUCTIONS
• If the supply cord is damaged, it must be replaced by the manufacturer,
its service agent or similarly qualied persons in order to avoid a
hazard.
• To preserve IP11B rating, dryer must be connected to air delivery hose
and connector
• Troubleshooting and internal maintenance must be performed by
qualied service personnel.
EN
WARNING: To reduce risk of re, electric shock
or injury to persons, observe the following:
A Use this unit only in the manner intended by the
manufacturer.
B Before servicing or cleaning unit, unplug cord
from receptacle.
This appliance is designed to be used in commercial areas.
4

EXCEL DRYER, INC 1.413.525.4531 1.800.255.9235 (US/CN) EXCELDRYER.COM
ADMIN@EXCELDRYER.COM 357 CHESTNUT STREET, EAST LONGMEADOW, MA 01028 5/2020 2
READ AND SAVE THESE INSTRUCTIONS
1. Remove the (3) nuts off of the threaded studs.
Attach the spout to the sink deck via the pre-
manufactured holes. Take care in positioning
the optic wire straight and near the front slot as
shown in Figure 1. Do not position optic wire in
front of the threads.
2. Attach the (3) nuts to the studs on the underside
of the sink deck to synch down the spout xture.
Be sure when tightening front nut to move the
sensor cable out of the way so it is not damaged.
Proceed to tighten the nuts enough to securely
snug the xture to the top of the deck without
over-tightening to a point that it could damage
the threads or sink deck. Double-check that the
optic wire is not pinched in-between the sink
deck and spout. The wire should sit in the cavity
on the plastic spout connector (Figure 2).
NOTE:
When tightening the front nut, be sure to move
the sensor cable out of the way so it is not
damaged.
CAUTION: Always make sure to have dryer electrical cord unplugged from outlet before performing any installation or maintenance tasks.
INSTALLATION INSTRUCTIONS
Figure 1
Figure 2
Optic Wire
Front Slot
Optic wire in slot.

EXCEL DRYER, INC 1.413.525.4531 1.800.255.9235 (US/CN) EXCELDRYER.COM
ADMIN@EXCELDRYER.COM 357 CHESTNUT STREET, EAST LONGMEADOW, MA 01028 5/2020 3
READ AND SAVE THESE INSTRUCTIONS
3. If not already installed attach supplied Z Bracket
to sink base per instructions from wash station
manufacturer. Hang dryer with air outlet at the
top over the Z-bracket previously installed.
4. Begin attaching the dryer hose to the spout.
First, make sure that the larger O-ring which was
packaged with the hose is put in place as shown
in Figure 4. Insert the connecter over the spout
by aligning the (2) slots with the (2) spout tabs.
Push the connector all the way on and then twist
about 1/8th of a turn counter-clockwise to snap
into place in direction shown (Figure 4).
NOTE:
Do not over twist, only needs 1/8 turn to lock into
place.
Be careful to not pull down on Sensor Cable.
Figure 3
Figure 4
Wall mounted
Z-Bracket
O-Ring
Spout tab
(1 of 2 shown)
Hose
Connector
Slots
Twist hose
connector
counterclockwise

EXCEL DRYER, INC 1.413.525.4531 1.800.255.9235 (US/CN) EXCELDRYER.COM
ADMIN@EXCELDRYER.COM 357 CHESTNUT STREET, EAST LONGMEADOW, MA 01028 5/2020 4
READ AND SAVE THESE INSTRUCTIONS
5. Similar to step 4, align the slots on the hose
connector with the dryer output tabs. Insert Hose
Connector until it stops, then rotate clockwise
about 1/8th of a turn to snap into place in
direction shown (Figure 5).
NOTE:
Do not over twist, only needs 1/8 turn to lock into
place. Align hose connector tabs with the slots
on the dryer air outlet.
6. Connect the spout optic wire to the dryer box.
Simply align the male and female connector
halves via the (4) pins and then tighten via the
harnesses/connectors threaded section. Neatly
route wire so that it does not dangle under the
sink. Neatly route the power cord. Once all
work is completed, plug power cord into outlet to
check for proper operation (Figure 6).
NOTE:
Gently rotate the cable connector until it
engages with mating connector. Then tighten the
Knurled Nut.
Do not pull down on sensor cable, this may
cause damage to the unit.
Figure 5
Figure 6
Twist hose
connector
clockwise

EXCEL DRYER, INC 1.413.525.4531 1.800.255.9235 (US/CN) EXCELDRYER.COM
ADMIN@EXCELDRYER.COM 357 CHESTNUT STREET, EAST LONGMEADOW, MA 01028 5/2020 5
READ AND SAVE THESE INSTRUCTIONS
Dryer does not turn on
1. Check LED indicator light on the front of the sink box under the sink
Light is out – Check to make sure the unit is plugged in and that the outlet
has power.
If power is conrmed but no light visible, send dryer back for service.
Light is ashing – Check Code Chart for remedy
Light is solid – Place hands under sensor at spout (white light in spout should
go on) at the same time check red LED service indicator light under sink - if still
on, check sensor cable connection at dryer. Check sensor connection at spout.
If all OK then replace sensor.
NOTE: Normal operation of spout LED light when rst powered up is to
ash RED / GREEN / BLUE. After lights go off the light will go on white when
hands are placed under sensor.
WARNING: TO REDUCE THE RISK OF FIRE, ELECTRIC SHOCK OR INJURY TO PERSONS,
OBSERVE THE FOLLOWING:
A. Use this unit only in the manner intended by the manufacturer.
B. Before servicing or cleaning unit, unplug power cord from receptacle.
CLEANING / MAINTENANCE
OUTSIDE Gently wash spout using a soft cloth or sponge and a mild soap or detergent with lukewarm water to loosen dirt and grime. Do not
use an abrasive cleaner.
INSIDE Excel recommends inspecting for lint on the Pre-Filters and HEPA lter.
DO NOT CLEAN THE HEPA FILTER OR ALLOW IT TO COME INTO CONTACT WITH WATER.
TROUBLESHOOTING
READ AND SAVE THESE INSTRUCTIONS
7-YEAR LIMITED WARRANTY (U.S. Only)
1. This product is warranted to be free of manufacturing defects for seven (7) years (one [1] year on HEPA Filter & Pre-Filter) from the date of shipment
from the Manufacturer’s factory at 357 Chestnut St., East Longmeadow, Massachusetts 01028. This warranty explicitly excludes normal wear and
tear on the Filter or Pre-Filter, as well as faulty installation, accident, misuse, or vandalism. In the event of a breach of the warranty described above,
the Owner shall have either one of the following remedies:
a. The Owner shall return the defective product to the Manufacturer, postage prepaid, and the Manufacturer shall repair said product within a
reasonable time and free of charge, provided that said product is returned within the stated period above from the date of original shipment
from the Manufacturer’s factory in East Longmeadow, Massachusetts; and, provided further that said defect is not due to faulty installation,
accident, misuse, or vandalism; or
b. The Owner may notify the Manufacturer by telephone or in writing of the defect and, within a reasonable time, the Manufacturer shall send a
suitable replacement part to remedy said defect, and Owner shall be charged for said part at the current price level. The Owner may return
the defective part to the Manufacturer, postage prepaid, along with the serial number of the defective product and the Manufacturer will then
issue to the Owner a full credit for the repair part, including outgoing postage (within the Continental U.S. only). Said remedy is available only
within the stated period stated above from the date of original shipment of the product from the Manufacturer’s factory in East Longmeadow,
Massachusetts, and provided further that said defect is not due to faulty installation, accident, misuse, or vandalism.
2. Any implied warranties of merchantability or tness for a particular purpose are hereby limited to the duration of the express written warranty
contained in paragraph one (1); namely, seven (7) years (one [1] year on HEPA Filter & Pre-Filter) from the date of shipment from the Manufacturer’s
factory in East Longmeadow, Massachusetts.
3. There are no other warranties and remedies except as contained herein. This warranty shall inure to the benet of the Owners, Successors
and Assigns.
Dryer blows only cold air
1. Check heat setting on Dryer Box.
2. Run dryer for 10 seconds to warm up. If still cold, send dryer back for service.
ADJUSTING THE HEAT OUTPUT, MOTOR SPEED
The dryer is shipped with maximum heat and maximum motor speed.
To adjust, turn the corresponding knob COUNTER-CLOCKWISE to reduce.
H = HEAT M = MOTOR
Dryer has loss of air volume
1. Check motor speed setting on control.
2. Check hose connection under sink.
3. Check HEPA Pre-Filter for lint buildup. Clean by removing Pre-Filter and
rinse in warm water then dry before reinstalling.

EXCEL DRYER, INC 1.413.525.4531 1.800.255.9235 (US/CN) EXCELDRYER.COM
ADMIN@EXCELDRYER.COM 357 CHESTNUT STREET, EAST LONGMEADOW, MA 01028 5/2020 6
READ AND SAVE THESE INSTRUCTIONS
CODE CHART
If problem cannot be resolved with the above, please call the manufacturer at 1-800-255-9235
and one of our trained technicians will be happy to assist you.
SYNC32 DECK UP SPOUT ASSEMBLY
SYNC33 DECK UP SPOUT SENSOR ONLY
SYNC34 O-RING
SYNC35 HOSE ASSEMBLY
SYNC25 HEPA FILTER
SYNC26 HEPA PRE-FILTER
PARTS LIST
Ref. No. Description
(INCLUDES SENSOR)
Codes are displayed by the ashing of the red LED light in the sensor behind air outlet and on the front of the dryer box under the sink.
Normal operation will be indicated by the red LED being on when not drying and off when hands are under the sensor.
TIME TO THROW IN THE TOWEL
®
EXCEL DRYER INC • 1.413.525.4531 • 1.800.255.9235 (US/CN) • EXCELDRYER.COM
2020
MAY
20SYM0898
Dryer Maintenance Codes
1 Short / 1 Long ash Clogged Pre-Filter Remove and clean HEPA Pre-Filter Dryer will still run
1 Short / 2 Long ash Severely Clogged Filter Remove and clean HEPA Pre-Filter Dryer will stop
2 Short / 1 Long ash In lockout mode Remove obstruction or clean
sensor
Dryer stops until obstruction cleared or sensor
cleaned.
Motor Problem Codes
1 Long / 3 Short ashes Motor over current Send back to factory for repair Dryer will stop
1 Long / 4 Short ashes Motor under current Send back to factory for repair Dryer will stop
Heater Problem Codes
2 Long / 3 Short ashes Shorted or incorrect heater Send back to factory for repair Dryer will stop
Contact factory with other codes not listed above.
SYNC34
SYNC33
SYNC35
SYNC26 SYNC25
DRYER BOX ASSEMBLY
SYNC32
Table of contents
Other Excel Dryer Dryer manuals
