excelPTZ PTZ755 User manual

All specifications are approximate. Kovert.com reserves the right to
change any product specifications or features without notice. Whilst
every effort is made to ensure that these instructions are complete
and accurate, kovert.com cannot be held responsible in any way for
any losses, no matter how they arise, from errors or omissions in
these instructions, or the performance or non-performance of the
equipment that these instructions refer to.
Special Tips.
The PTZ755 does not require to know the protocol as it is purely a data combiner that transmits and
receives at a certain baud rate. The PTZ755 combiner sends data at three baud rate speeds. The standard
settings are for 2400 baud rate. This is the slowest speed and will give the furthest controllable distance.
Jumpers on ( A ) and ( B ) = 2400 baud rate
Jumper on just ( B ) = 4800 baud rate
Jumper on just ( A ) = 9600 baud rate.
Always test the combiners before going to site and always connect a monitor to the PTZ.
The t
ransfer of the data is from the keypad or DVR to the PTZ. The combiner at the Keypad/DVR end is
always the transmitter and the combiner at the PTZ end is always the receiver.
If using the PTZ755 for equipment that is not purchased from us, we cannot give any guarantees that the
combiners will work as they are only tested with products supplied by ourselves.
Do not use baluns with these combiners.
Limitations
Note that the PTZ755 combiners should operate at a maximum
distance of 250 metres. Do not exceed this distance. The input
impedance must be 75Ω. The PTZ755 units are very sensitive
and cannot be guaranteed to work successfully with baluns.
Troubleshooting
The green connectors fitted to the PTZ755 can be removed for
ease of fitting cable connections for the RS485 and power
connections. Ensure that these are not incorrectly fitted to the
PTZ755 i.e. power not transposed with RS485 connections.
The Video 1 and Video 2 connections can be fitted either way
round but for ease of problem solving it is recommended that
the diagrams above be followed.
As the PTZ755 transmitter and receiver can only be fitted at a
maximum distance of 250 metres apart, for sending the RS485
data down the RG59 cable, please do not attempt to use them at
distances exceeding this limit.
the excelPTZ range
Installation and Operation Manual
Video and Data Combiner
Models covered
PTZ755
Two units required for each installation
Version 5
For updates to these instructions visit www.excelPTZ.com
Please read this operation manual carefully
before installing and using this unit !!!!
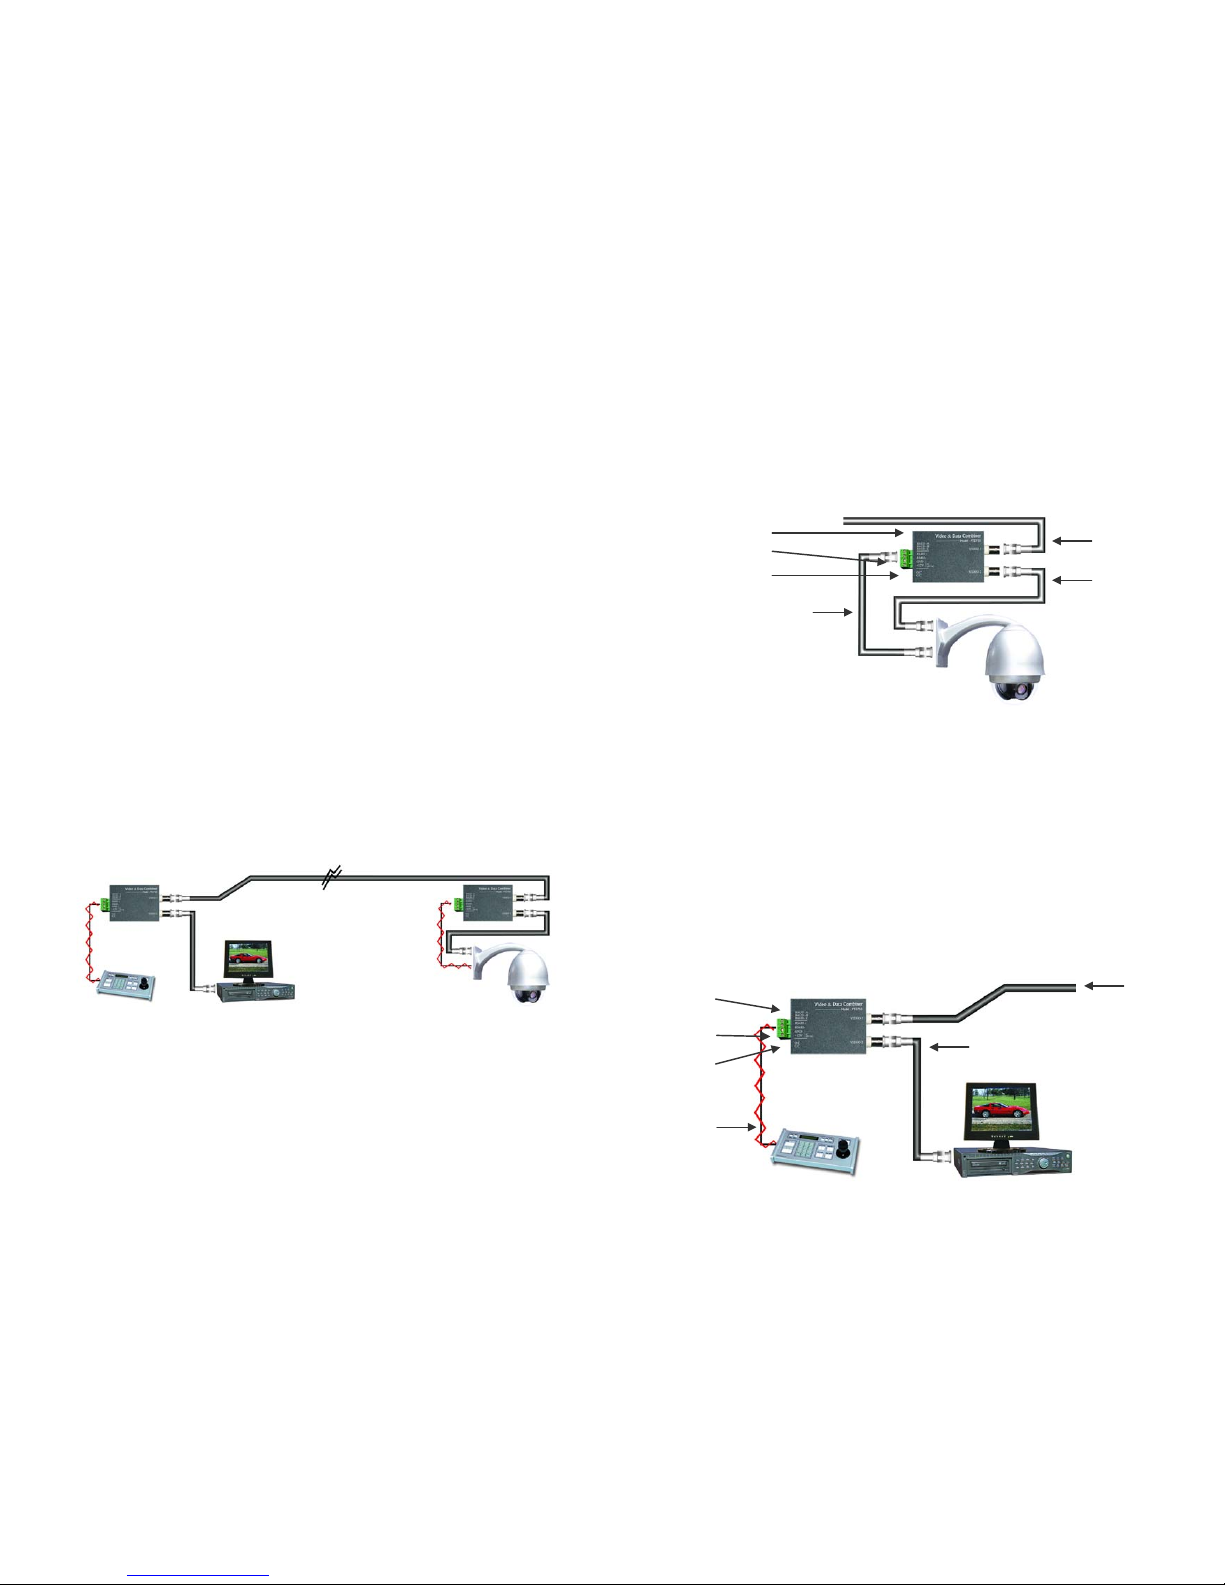
4.
Set the Baud Rate Jumpers so that they are identical in both units. Place a jumper on Baud
A and a jumper on Baud B. Ensure no jumper fitted to Baud C.
5. Now set the C/C Jumper to allow the data and video signals to be combined. Disregard
this step if using the RX model.
6. Connect a PSU to the 12vDC or 24vAC connections but do not switch power on. Only use
a PSU rated at a minimum of 300mA at 12v DC.
7. At the Keypad/DVR end, connect the video line from the PTZ755 receiver into the video 1
connection of the PTZ755 transmitter.
8. Connect the RG59 cable running from the DVR/Monitor to the Video 2 connection.
9. Now connect the RS485 connections from the PTZ755 to the RS485 + and – connections
on the Keypad or DVR. Ensure connections are correctly made.
10. Set the Baud Rate Jumpers so that they are identical in both units. Place a jumper on Baud
A and a jumper on Baud B. Ensure no jumper fitted to Baud C.
11. Now set the O/C Jumper to allow the data and video signals to be separated. Disregard this
step if using the TX model.
12. Connect a PSU to the 12vDC or 24vAC connections and switch power on to all units.
Only use a PSU rated at a minimum of 300mA at 12v DC.
Please read the following:
1. Please read the operation manual carefully before installing and operating the product.
2. The PTZ755 Video and Data Combiner requires either a 12vDC or 24vAC power supply.
3. Do not attempt to disassemble this unit. In order to prevent electric shock, do not remove
screws or covers. There are no user-serviceable parts inside this unit.
4. Always use and adhere to current electrical safety standards to install and use the Video and
Data Combiner. The RS-485 cables should be kept way from high voltage equipment such
as mains cables and especially fluorescent lights. Using an anti-surge protection device is
recommended to prevent damage to this unit from lightning and mains surges. Damage
caused by lightning or mains voltage surges is not covered under the PTZ755’s warranty.
5. Do not operate in areas exceeding the stipulated limitations.
6. Note that the Video & Data Combiner can only be connected to one PTZ dome.
7. Two units are required for each installation and maximum data transmission is 250 metres.
8. When using the PTZ755 do not use baluns or amplifiers.
The excelPTZ range –
Video & Data Combiner
The Video and Data Combiner has the ability to combine the video and data signals down one
RG59 cable. Two units are required, one to combine the video and data and one to revert to
separate video and data.Also ensure that the unit is not exposed to damp or humid conditions. If
there is a need to install one or both units outside then ensure the units are housed in a
waterproof container.
Setup Procedure
PTZ Camera End - PTZ755 (RX) Receiver
1. At the PTZ camera end, connect the PTZ video out to the Video 2 connection on the
PTZ755 Receiver.
2. Connect the RG59 cable running from the DVR or monitor to the Video 1 connection.
3. Now connect the RS485 connections from the PTZ camera end to the RS485 + and –
connections on the PTZ755. Ensure connections are correctly made.
3
4
6
5 1
2
Keypad or DVR End - PTZ755 (TX) Transmitter
7
8
9
10
12
11
Table of contents
Popular Switch manuals by other brands


Atlona
Atlona AT-HDMI-31 Operation manual

Transition Networks
Transition Networks SISPM1040-582-LRT quick start guide

Belkin
Belkin THUMB HUB F5U218-MOB user manual

NSi INDUSTRIES
NSi INDUSTRIES TORK TU40 quick start guide

Gefen
Gefen 2X1 DVI KVM SWITCHER user manual

ABB
ABB 3299E-A22100 Instructions for installation and use