Homefibre OMS 1412 RS-GIG User manual

Homefibre Digital Network GmbH
OMS 1412 RS-GIG
POF 12+4 Port Smart Switch
Installation Manual / Installationsanleitung
Homefibre Digital Network GmbH
Fratresstrasse 20
9800 Spittal a.d. Drau, Austria
www.homefibre.at

OMS 1412 Installation manual
© Homefibre digital network GmbH Änderungen und Druckfehler vorbehalten. Seite 2 von 6
OMS1412RSGIG_Manual_2021-06-29.docx Errors and omissions excepted. Page 2 of 6
Index
Installation manual ................................................................................................................................. 3
scope of delivery ................................................................................................................................. 3
Product exterior .................................................................................................................................. 3
Connect Smart Switch ......................................................................................................................... 3
Configure Smart Switch ....................................................................................................................... 3
LED indicators ...................................................................................................................................... 4
FAQ ...................................................................................................................................................... 4
How do you connect the POF-cables? ............................................................................................ 4
How do you connect the web interface? ........................................................................................ 4
Can I use the console port without RS232 interface on the computer? ........................................ 4
How can I reset the device? ............................................................................................................ 4
Support ................................................................................................................................................ 4
Installationsanleitung .............................................................................................................................. 5
Lieferumfang ....................................................................................................................................... 5
Produktansicht .................................................................................................................................... 5
Anschluss des Smart Switch ................................................................................................................ 5
Konfiguration des Smart Switch .......................................................................................................... 5
LED-Anzeigen ...................................................................................................................................... 6
Häufig gefragt...................................................................................................................................... 6
Wie wird das POF-Kabel angeschlossen?........................................................................................ 6
Wie kann das Webinterface erreicht werden? ............................................................................... 6
Kann ich den Konsolen Port ohne RS232 Anschluss am Computer nutzen? .................................. 6
Wie setzte ich das Gerät zurück? .................................................................................................... 6
Support ................................................................................................................................................ 6

OMS 1412 Installation manual
© Homefibre digital network GmbH Änderungen und Druckfehler vorbehalten. Seite 3 von 6
OMS1412RSGIG_Manual_2021-06-29.docx Errors and omissions excepted. Page 3 of 6
Installation manual
The OMS 1412 RS-GIG is a Gigabit Ethernet Smart Switch with twelve connector less Polymer Optical
Fibre (POF) ports, two RJ45 Gigabit Ethernet and 2 x 10G SFP+ ports. The transmission is carried out
via different connection media (10/100/1000 Base-TX and 100/1000 Base-FX via POF, multiple
1000/10G Base transmissions via SFP+ ports).
scope of delivery
OMS 1412 RS-GIG POF 12+4 Port Switch
power supply and power extension cord
rack mounting set
user manual
Product exterior
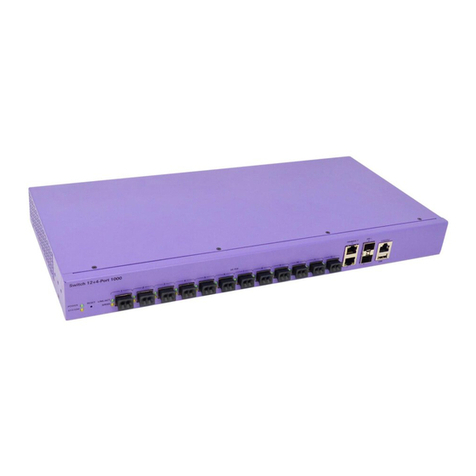
The “Power” LED (green) and “System” LED (amber) are on the left side. The “Reset” button is located
right next to the LED’s.
In the center you have 12 x Gigabit POF ports for 2.2mm POF-cable can be found. On the right side
2 x RJ45 Gigabit Ethernet ports and 2 x SFP ports can be found. Also, the console port and USB-Port
for direct configuration are on the right.
The 12 V DC connector for power supply is located on the backside.
Connect Smart Switch
Connect the switch to your network (any port can be used).
Connect all network devices to the switch.
Connect the switch to the main power (using the power supply included in the delivery).
The switch will boot with default configuration and automatically create the link to the connected
devices.
Configure Smart Switch
Default settings for the switch:
IP-address: 192.168.0.10
USER: admin
Password: admin
If a DHCP Server is connected to the switch, it automatically receives a DHCP address. In this case,
use the IP-address configured by the DHCP Server to enter the configuration for the switch.
Configure the switch as needed for your network. For security reasons, default login data should be
changed to prevent access of non-permitted persons.
Power LED-indicator
System LED-indicator
Reset
Button
12 x GEPOF ports
with Activity / Link LED-indicators
2 x RJ45
Gigabit ports
2 x SFP
Gigabit ports
Console port
USB-port

OMS 1412 Installation manual
© Homefibre digital network GmbH Änderungen und Druckfehler vorbehalten. Seite 4 von 6
OMS1412RSGIG_Manual_2021-06-29.docx Errors and omissions excepted. Page 4 of 6
LED indicators
Power LED: If system is powered, the indicator is illuminated.
System LED: If the internal system is ready for use, the light is on. It is not on during the starting
process.
POF / RJ45 Port LEDs: Green: 100 Mbps link, green and amber: 1 Gbps link.
FAQ
How do you connect the POF-cables?
1. Carefully split the cable down the middle for approx. 30 mm and make sure that
there is no unevenness on the coating which could hinder the inserting of the cable.
2. Insert the cable into the POF-Cutter and cut it by pressing the blade.
3. Make sure that both wires are equally long.
4. Open the POF-terminal by slightly pulling it out and remove the red protection cap.
5. Insert the POF-cable. Make sure that it is pushed all the way up to the stop to
guarantee a safe connection.
6. Close the POF-terminal by pushing it into the opening of the device thus fastening the
cable.
How do you connect the web interface?
1. Make sure that your device is connected to the network and the network
configuration of your device is correct. If the switch has the default configuration,
make sure that your device has an IP-address in the right subnet to enable the
connection (e.g. Switch: 192.168.0.10, your device: 192.168.0.x).
2. Start a web browser and enter the IP Address of the switch. The login for the web
interface of the switch should appear.
Can I use the console port without RS232 interface on the computer?
Yes, for this purpose a RJ45 console cable is available with a USB connector for your device.
Make sure that you are using the correct serial line (com x, 115200 baud) for the connection
process.
How can I reset the device?
For a restart, press the Reset Button for 3 seconds.
For a factory reset press the Reset Button for 10 seconds.
Support
Thank you for selecting Homefibre network products.
For questions or support requests you can contact us using the contact form on our website:
www.homefibre.at
or send us an E-Mail at:

OMS 1412 Installation manual
© Homefibre digital network GmbH Änderungen und Druckfehler vorbehalten. Seite 5 von 6
OMS1412RSGIG_Manual_2021-06-29.docx Errors and omissions excepted. Page 5 of 6
Installationsanleitung
Der OMS 1412 RS-GIG ist ein Gigabit Ethernet Smart Switch mit zwölf steckerlosen POF (Kunststoff
Lichtwellenleiter) Anschlüssen, zwei RJ45 Gigabit Ethernet und 2 x Gigabit SFP Anschlüssen. Die
Übertragung erfolgt über unterschiedliche Netzwerkverbindungsmedien (10/100/1000 Base-TX und
100/1000 Base-FX über POF, diverse 1000 Base Übertragungen über SFP Anschlüsse).
Lieferumfang
OMS 1412 RS GIG POF 12+4 Port Switch
Netzteil
Rack Montage Set
Bedienungsanleitung
Produktansicht
Links befinden sich die grüne Power LED und die orange System LED. Neben den beiden LED-
Anzeigen ist ein Reset Knopf angebracht.
Mittig befinden sich die 12 x Gigabit POF Anschlüsse für 2,2mm POF-Kabel. Rechts daneben befinden
sich 2 x Gigabit RJ45 Schnittstellen und 2 x SFP Schächte. Ganz rechts finden Sie einen Konsole- und
einen USB-Anschluss.
Den 12 V DC Anschluss für die Stromversorgung finden Sie rückseitig.
Anschluss des Smart Switch
Verbinden Sie den Switch mit dem Netzwerk. Es kann ein beliebiger Port genutzt werden.
Verbinden Sie alle Netzwerkgeräte mit dem Switch.
Schließen Sie den Switch mit dem im Lieferumfang enthaltenen Netzteil an die Stromversorgung
an.
Der Switch startet mit Standardkonfiguration und stellt die Verbindung zu allen angeschlossenen
Geräten her.
Konfiguration des Smart Switch
Standardkonfiguration:
IP-Adresse: 192.168.0.10
Benutzer: admin
Passwort: admin
Gibt es einen DHCP Server, der mit dem Switch verbunden ist, erhält der Switch eine IP-Adresse vom
DHCP Server. In diesem Fall nutzen Sie die vom DHCP Server vergebene IP-Adresse zur Konfiguration.
Konfigurieren Sie den Switch nach Ihren Bedürfnissen. Aus Sicherheitsgründen sollten die Standard
Login Informationen geändert werden.
Power LED-Anzeige
System LED-Anzeige
Reset
Knopf
12 x GEPOF Anschluss
mit Aktivität / Verbindung LED-Anzeige
2 x RJ45
Gigabit Anschluss
2 x SFP+
10G Anschluss
Konsolenanschluss
USB-Anschluss

OMS 1412 Installation manual
© Homefibre digital network GmbH Änderungen und Druckfehler vorbehalten. Seite 6 von 6
OMS1412RSGIG_Manual_2021-06-29.docx Errors and omissions excepted. Page 6 of 6
LED-Anzeigen
Power LED: Ist das Gerät mit Strom versorgt, leuchtet die grüne LED.
System LED: Ist das interne System des Gerätes betriebsbereit, leuchtet die orange LED. Sie leuchtet
nicht während dem Startvorgang.
POF / RJ45 Status LEDs: Grün: 100 Mbit/s Verbindung, grün und orange: 1 Gbit/s Verbindung.
Häufig gefragt
Wie wird das POF-Kabel angeschlossen?
1. Trennen Sie die beiden Fasern vorsichtig voneinander auf den ersten 30 mm und stellen Sie
sicher, dass es keine Unebenheiten im Mantel gibt, die das Einführen des Kabels behindern
könnte.
2. Führen Sie das Kabel in den POF-Unicut ein und führen Sie einen sauberen Schnitt durch.
3. Stellen Sie sicher, dass beide Fasern gleich lang sind.
4. Öffnen Sie den POF-Anschluss durch leichtes Ziehen und Entfernen Sie die rote Kappe.
5. Führen Sie das Kabel in den Anschluss ein. Stellen Sie dabei sicher, dass das Kabel bis zum
Anschlag eingeführt ist.
6. Fixieren Sie das Kabel mit etwas Druck auf den Anschluss.
Wie kann das Webinterface erreicht werden?
1. Stellen Sie sicher, dass Ihr Gerät mit dem Netzwerk verbunden ist und die Netzwerk
Konfiguration des Gerätes korrekt ist. Ist der Switch in der Standardkonfiguration, achten Sie
auf die richtige IP-Adresse und Subnetz Einstellung (z.B. Switch: 192.168.0.10; Ihr Gerät:
192.168.0.x).
2. Starten Sie Ihren Webbrowser und geben Sie die Adresse Ihres Switches ein. Es öffnet sich das
Login Fenster für den Switch.
Kann ich den Konsolen Port ohne RS232 Anschluss am Computer nutzen?
Ja, es gibt RJ45 Konsolenkabel mit USB-Anschluss für Ihr Gerät. Achten Sie bei der Nutzung
darauf, die Korrekte „Serial line“ (com x, 115200 baud) für die Verbindung zu verwenden.
Wie setzte ich das Gerät zurück?
Um einen Neustart durchzuführen, drücken Sie den Reset Knopf für 3 Sekunden.
Um das Gerät in den Auslieferungszustand zu versetzen, drücken Sie den Reset Knopf
10 Sekunden lang.
Support
Vielen Dank, dass Sie sich für die Homefibre Netzwerk Produkte entschieden haben.
Für weitere Hilfestellung und Informationen nutzen Sie das Kontaktformular auf:
www.homefibre.at
oder senden Sie uns eine E-Mail an:
Table of contents
Languages:
Other Homefibre Switch manuals

Homefibre
Homefibre OMS 105 User manual

Homefibre
Homefibre OMS 126S-150 User manual

Homefibre
Homefibre OMS 113- 220 User manual

Homefibre
Homefibre OMS 113- 150 User manual

Homefibre
Homefibre OMS 105 User manual

Homefibre
Homefibre OMS 1412 RS-GIG+ User manual

Homefibre
Homefibre OMS 126 RR-DL User manual
Homefibre
Homefibre OMS 1034 FUS-GIG User manual

Homefibre
Homefibre OMS 113-150 User manual