Expert Electronics ColibriNANO User manual

Expert Electronics
© 2018 Expert Electronics
ColibriNANO
USER MANUAL
1.1.0
Opens new radio horizons
Direct Sampling SDR receiver


3
ColibriNANO User Manual © 2018 Expert Electronics
TABLE OF CONTENTS
1. READ IT FIRST 5
1.1 Congratulations .......................................................................................... 5
1.2 Features ...................................................................................................... 5
1.3 Precautions ................................................................................................. 5
1.4 ExpertSDR2 Software License Agreement ................................................ 6
1.5 Copyrights ................................................................................................... 7
1.6 Contacts ...................................................................................................... 7
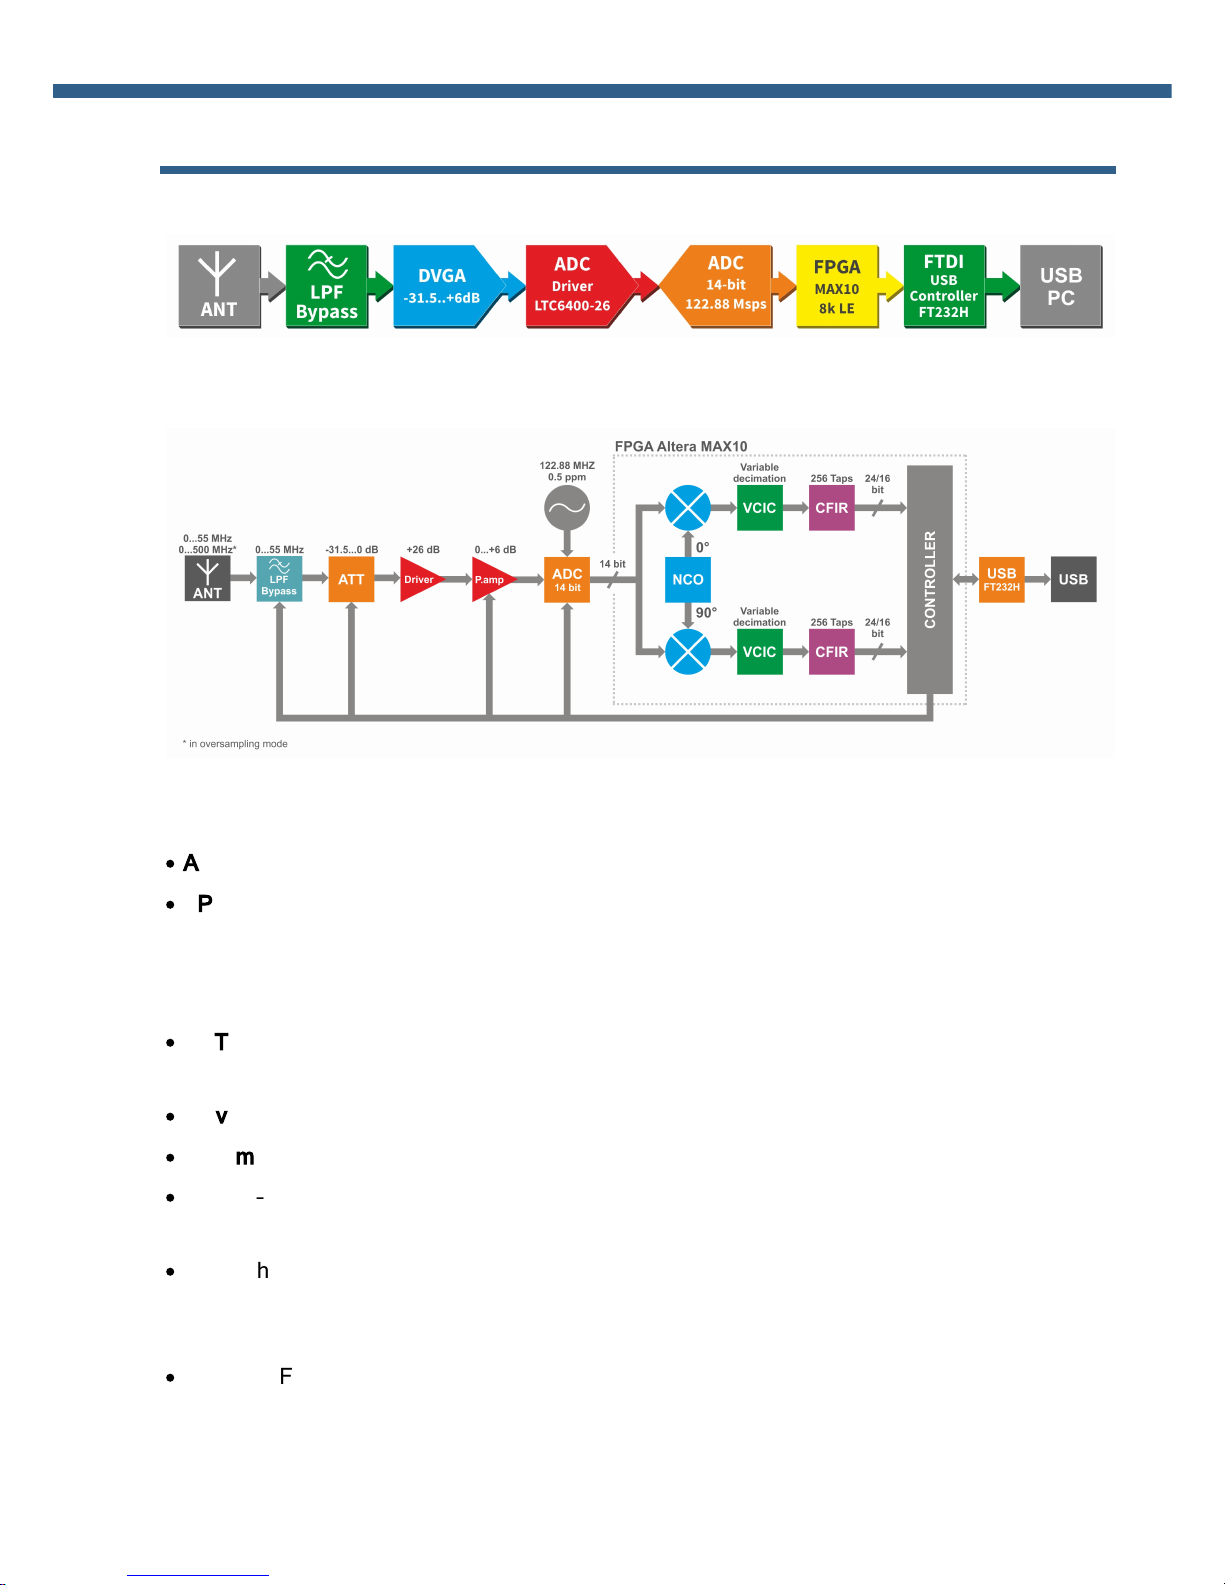
2. HARDWARE DESCRIPTION 8
2.1 Antenna ...................................................................................................... 9
2.2 Grounding ................................................................................................... 9
3. ExpertSDR2 SOFTWARE DESCRIPTION 10
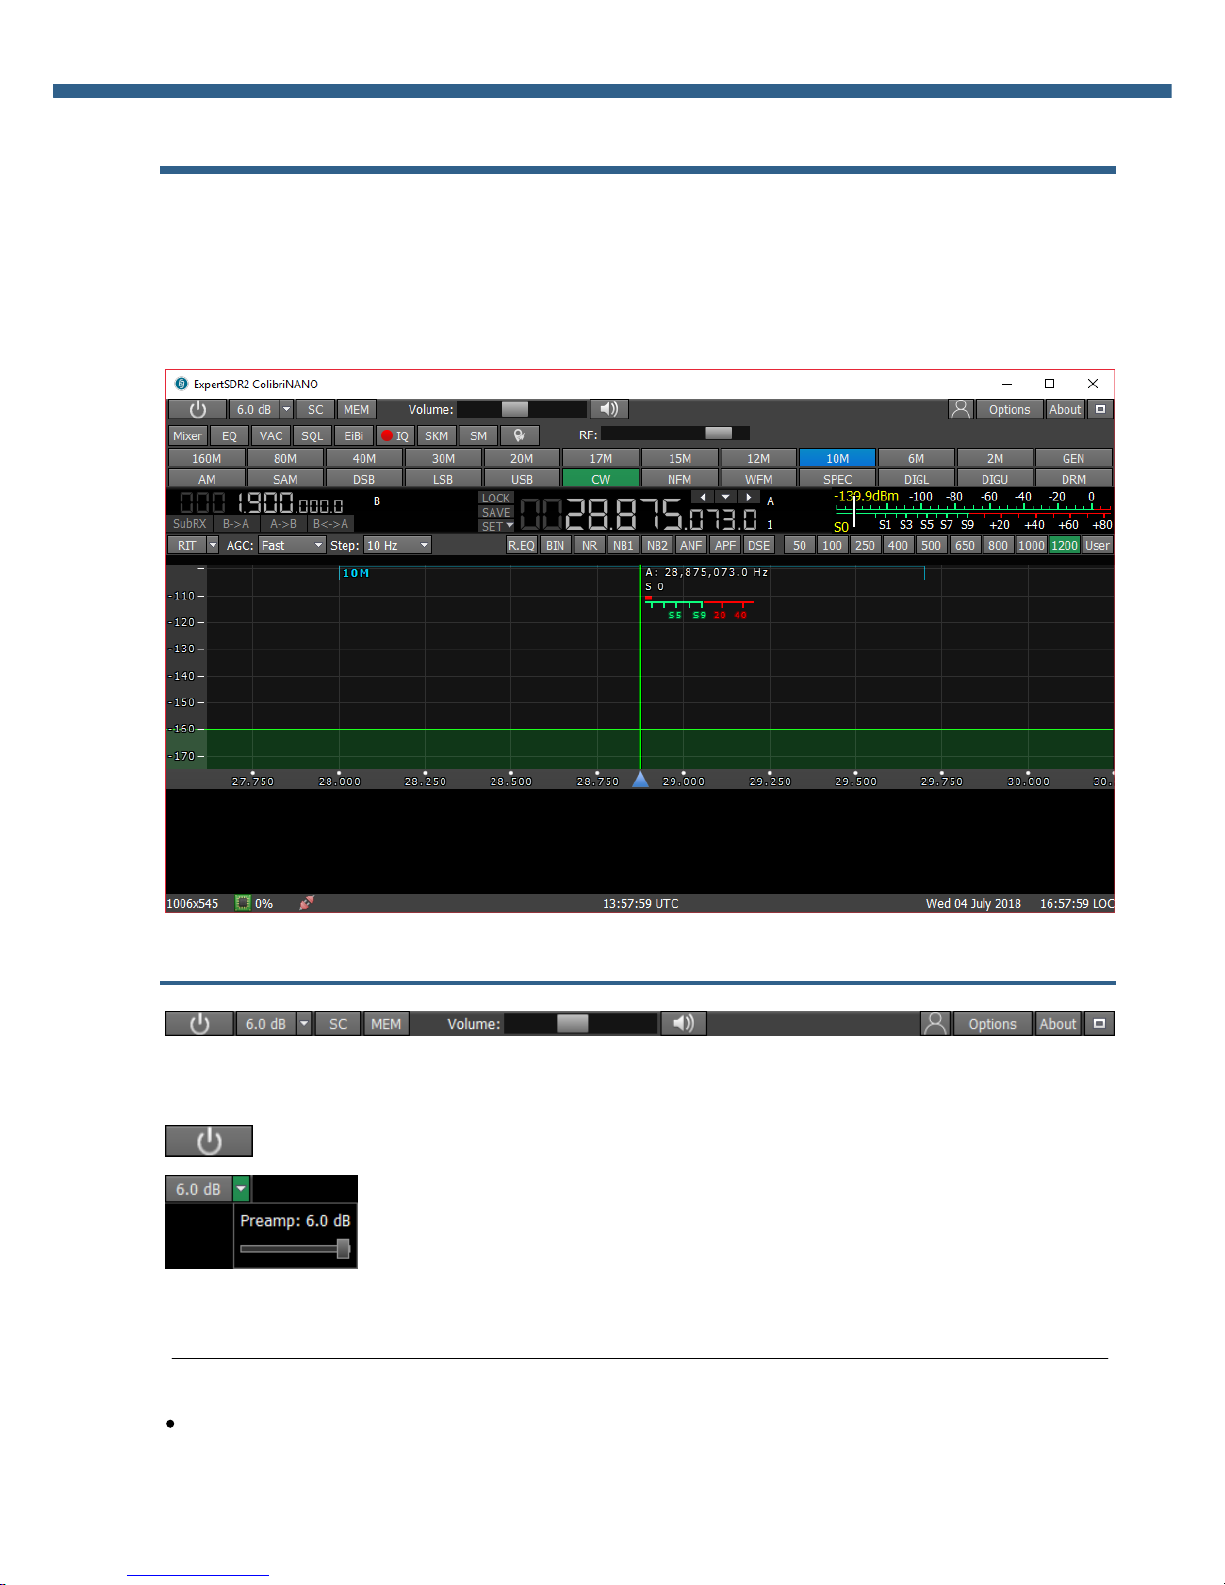
3.1 Global controls panel ................................................................................ 10
3.2 Software receiver settings ....................................................................... 12
3.2.1 Receiver control panel .............................................................................. 12
3.2.2 Frequency and S-meter indicators ............................................................. 15
3.2.3 DSP control panel .................................................................................... 17
3.2.4 Panorama description .............................................................................. 20
3.2.4.1 Spectrum Scope ................................................................................... 20
3.2.4.1.1 Spectrum Scope scaling ...................................................................... 20
3.2.4.2 Waterfall ............................................................................................. 22
3.2.5 Status bar ............................................................................................... 22
3.3 Options ...................................................................................................... 23
3.3.1 Device menu ........................................................................................... 23
3.3.1.1 VAC ................................................................................................... 23
3.3.1.2 DSP ................................................................................................... 24
3.3.1.3 Expert ................................................................................................ 28
3.3.2 Sound card menu .................................................................................... 29
3.3.2.1 Sound card .......................................................................................... 29
3.3.2.2 Line output .......................................................................................... 29
3.3.3 Display menu .......................................................................................... 30
3.3.3.1 Main window ........................................................................................ 31
3.3.3.2 Spectrum ............................................................................................ 32
3.3.3.3 Waterfall ............................................................................................. 34
3.3.3.4 Grid ................................................................................................... 35
3.3.3.5 Filter .................................................................................................. 35
3.3.3.6 Background ......................................................................................... 36
3.3.4 CAT menu .............................................................................................. 38
3.3.4.1 ECATv1 .............................................................................................. 38
3.3.4.2 OmniRig .............................................................................................. 39
3.3.5 Panel menu ............................................................................................ 40
3.3.6 Features menu ........................................................................................ 43
3.3.7 ExpertSync menu .................................................................................... 44
3.3.8 CW Skimmer menu ................................................................................. 45
3.3.9 Shortcuts menu ....................................................................................... 47

4
ColibriNANO User Manual © 2018 Expert Electronics
TABLE OF CONTENTS
3.3.10 IQ Recorder menu ................................................................................... 48
3.3.11 TCI menu ............................................................................................... 49
3.3.12 Spot settings menu .................................................................................. 49
4. TECHNICAL CHARACTERISTICS 51
4.1 Receiver .................................................................................................... 51
4.2 Other ......................................................................................................... 52
5. RECEIVER OPERATIONS 53
5.1 First set up ................................................................................................ 53
5.2 Remote operation .................................................................................... 54
5.3 Frequency Tuning ..................................................................................... 54
5.4 RIT ............................................................................................................ 55
5.5 Digital modes operation ........................................................................... 56

5
ColibriNANO User Manual © 2018 Expert Electronics
READ IT FIRST
1READ IT FIRST
1.1 Congratulations
On behalf of the whole Expert Electronics company, we'd like to thank you for purchasing the
ColibriNANO SDR receiver!
The ColibriNANO receiver is the best receiver in the USB-stick form factor category. It has the
best price/value ratio, which is perfect if you want to set up a remote receiver in a rural area, with
clean air!
1.2 Features
The ColibriNANO opens new horizons for HF band enthusiasts, thanks to its 14-bit ADC, which
provides a ~110 dB BDR and up to 3 MHz sample rate. A 0.5 ppm local oscillator gives the
ColibriNANO a great frequency stability. Using the ColibriNANO remotely, in some rural area will
give you the lowest air noise while won't rob you from any comfort or functionality. The
ColibriNANO can be controlled by the ExpertSDR2 software and compatible with other popular
HAM software such as HDSDR, SDRSharp via the ExtIO library.
Main features and capabilities of the receiver
·
RX path based on DDC (Direct Down-Conversion) architecture
·
Frequency coverage (in undersampling mode) up to 500 MHz
·
Software receiver bandwidth up to 3 MHz + SubRX
·
Automatic ATT/preamp with a 0.5 dB step in a range from -31.5 up to +6
·
ExpertRemote system provides full remote control of the receiver
·
Synchronization with transceivers via CAT interface
·
IQ output via Virtual Audio Cable (VAC)
·
Compatibility with any sound card installed on your PC for the audio output
·
Special interface to control the CW Skimmer
·
TCI interface for seamless connection with third-party software like SDC (with its own
Skimmer), LogHX, SWISSLOG and RUMlog, more are coming
1.3 Precautions
To prevent any damage to the receiver, please read these operating rules carefully
before attempting to operate on the air.
·
Visually inspect the receiver for the absence of mechanical damages before connecting it to
PC

6
ColibriNANO User Manual © 2018 Expert Electronics
READ IT FIRST
·
If the receiver has been stored in abnormal climatic conditions, it is recommended to keep it in
normal operating temperatures for at least 2 hours before connecting to a PC
·
It is forbidden to use the receiver in dusted rooms and expose it to direct sunlight for a long
time
·
DO NOT use the receiver in temperatures lower than -10ºC (14ºF) and higher than +60ºC
(140ºF)
·
Avoid the exposure of the atmospheric downfalls on the receiver and never spill any liquids
(especially aggressive) on it
·
It is forbidden to use the receiver during storms!
·
Always disconnect the antenna from the receiver when not in use, or if there is a danger
of atmospheric electricity
·
Don't open the receiver, it has radio elements, which have high-sensitivity to the static
electricity. This document contains all necessary information about the internal design to
satisfy the Users’ curiosity. To repair the receiver, ask the manufacturer
·
Ensure the receiver and antenna cable is free from the effects of electromagnetic interference
and uncontrolled currents and voltages
·
To avoid damage to the receiver it should only be operated by licensed HAMs
·
Keep the receiver out of the reach of children
·
If the receiver emits an abnormal odor, or smoke, immediately turn it OFF and disconnect
from PC. Contact your closest Expert Electronics dealer for advice
·
Ground the antenna-mast and antenna-feeders to avoid accumulation of atmospheric static
electricity on them
·
Always use ferrite beads on antenna cable, connected to the receiver
1.4 ExpertSDR2 Software License Agreement
ExpertSDR2 software is the proprietary product and intellectual property of Expert Electronics.
It is forbidden to modify, copy or disclose to third parties ExpertSDR2 software distribution.
Official versions of the software are published on the manufacturers website in section
"ColibriNANO receiver / Downloads".
New versions of the ColibriNANO receiver software may have different titles from time to time.
This license agreement applies to all new versions of the software and may be supplemented
and / or amended unilaterally by Expert Electronics.
The manufacturer reserves the right to alter and / or improve the ColibriNANO receiver software,
adding new features and bug fixes. In this regard, the software may be different from the
description herein. Ask your closest dealer on the availability of new, more complete version of
the User Manual, or look for them on the official website of the manufacturer in the section
"ColibriNANO receiver / Documentation".

7
ColibriNANO User Manual © 2018 Expert Electronics
READ IT FIRST
Users of the ColibriNANO receiver can update the software by themselves, by downloading from
the official website of the Expert Electronics company.
The manufacturer is not responsible for the consequences of the user utilizing an unofficial or
modified version of ExpertSDR2 software and/or changes the settings or other files which are
related to the ExpertSDR2 functionality.
The manufacturer assumes no responsibility for the material, moral or any other kind of damage,
whether expressed or implied, caused by using of a third-party software.
The manufacturer assumes no responsibility for the material, moral or any other kind of damage,
whether expressed or implied, caused by using of external devices along with the ColibriNANO
receiver.
1.5 Copyrights
Expert Electronics company holds copyrights for the ColibriNANO receiver, intellectual property:
ExpertSDR2 software and all User Manuals and Instructions for the device and software.
It is forbidden to present this document as your own, sell it or use it in any other commercial
activity.
Expert Electronics company does not guarantee, that the functions and their qualities described
in this manual, and also combinations which were not described in the manual, comply with the
User purposes, if it is not mentioned in the Manual. Expert Electronics company does bear any
responsibility for the material, moral or other kinds of damage expressed or implied by such
actions.
1.6 Contacts
MANUFACTURER
Expert Electronics
Web-site: www.eesdr.com
E-mail: info@sunsdr.com
You can contact us via mentioned above mail address about: your orders, inquiries, technical
support, software support.

8
ColibriNANO User Manual © 2018 Expert Electronics
READ IT FIRST
2HARDWARE DESCRIPTION
Block Diagram
Architecture description
Receive path consists of the following functional units:
·
ANT – antenna connector.
·
LPF – Low Pass Filter with 55 MHz bandwidth. This filter allows you to receive signals in the
first Nyquist zone and eliminates signals from the second Nyquist zone. It switches ON/OFF
automatically according to the panorama center, ON - inside the 0-55 MHz range and OFF –
above 55 MHz.
·
ATT - attenuator -31.5...0 dB with 0.5 dB step, it allows to “weaken” signals to eliminate the
receiver overload while receiving strong signals.
·
Driver – it’s purpose is to amplify the signal and transfer it to the ADC.
·
Preamp – preamplifier 0...+6 dB, it can additionally amplify signals.
·
TCXO – Temperature-Compensated Crystal Oscillator with 122.88 MHz frequency. This is a
high-stability oscillator with temperature instability 0.5 ppm.
·
ADC – high-speed Analog-to-Digital Converter with 14-bit resolution and 122.88 MHz sample
rate. ADC is the heart of the receiver; it is responsible for direct sampling of all signals in the
55 MHz bandwidth.
·
FPGA – Field Programmable Gate Array. It makes all high-speed processing operations.
Inside the FPGA happens the first down conversion of signals. It is similar to the first converter

9
ColibriNANO User Manual © 2018 Expert Electronics
HARDWARE DESCRIPTION
in a classic super-heterodyne, but all operations are processed in a mathematic order with
binary logic.
·
Controller – It controls all ColibriNANO systems and performs the data exchange between
the receiver and the USB controller.
·
USB FT232H – It performs the data exchange between the Controller and a PC.
2.1 Antenna
Before connecting the antenna, check the integrity of the antenna-feeder path.
For best results, the antenna should have an impedance of 50 Ohm to match the 50 Ohm
impedance of the receiver.
The antenna should have an SWR level not worse than 1.5:1. If the SWR is worse than 1.5:1,
match the cable and the antenna to the desired level.
Warning!
i
Always use E-type ferrite beads on antenna and other cables, connected to the
receiver!
2.2 Grounding
To eliminate the risk of electric shock it is essential to use a reliable grounding in the setup with
the ColibriNANO receiver.
Warning!
i
Never use water or gas pipes for grounding!

10
ColibriNANO User Manual © 2018 Expert Electronics
HARDWARE DESCRIPTION
3ExpertSDR2 SOFTWARE DESCRIPTION
Software settings which won't be mentioned or addressed in this manual, are set by default or
provided to the user's self-study and experiments. All the unmentioned settings cannot cause
the fatal damage of the ColibriNANO receiver hardware, so you can safely experiment with them.
You're dealing with the software-defined radio – SDR, the main settings and signal processing is
held in the software.
3.1 Global controls panel
This panel consists of the following buttons:
- the Start button switches on/off the ExpertSDR2 software.
- Attenuator level can be set in the drop down menu with a slider (0.5 dB
step) or by successive presses of the indicator button, which cycles upwards the attenuation
coefficient with 5 db step, from -30dB up to +5 dB.
Note:
·
Attenuator specifics : S-meter values and audio level have program compensation when
you use the attenuator because signal level on the antenna input is always the same and

11
ColibriNANO User Manual © 2018 Expert Electronics
ExpertSDR2 SOFTWARE DESCRIPTION
doesn't depend on the attenuator level. With this solution, a user doesn't need to calculate
real values on his own, every time when the -20-dB attenuator is used. Also, he doesn't need
to adjust AF or RF level every time when the -20-dB attenuator is used, like in most classic
receivers.
·
Attenuator influences only receiving dynamic range, S-meter and audio level stay the same. If
you disconnect antenna you can see how receiver’s noises are changing when you switch the
ATT. Receiver's noise level is lower when you select ATT 0 dB, it means that RX sensitivity is
higher. When you select ATT -20 dB, it means that RX noise level is higher, but RX sensitivity
is worse. It is done in the hardware.
- enable/disable sound output from the PC's sound card (SC).
- enable/disable button of the frequency memory panel (MEM).
- In the Profile manager menu you can:
·
add a new profile, by entering the name of the profile in the “Profile name” field and pressing
Add button.
·
set the settings of the whole program to the default state, by the Default button.
·
Update the settings of the certain profile from the list to the current settings.
·
Remove the certain profile from the list.
Note:
·
All new profiles will be stacked up to the drop-down menu as a new line.

12
ColibriNANO User Manual © 2018 Expert Electronics
ExpertSDR2 SOFTWARE DESCRIPTION
- Options menu described options .
- About button opens the new window with the info about current version of the
ExpertSDR2 software:
- pressing the Fullscreen mode button will unfold the software window on the whole
screen.
- Volume slider. Volume slider. This setting is global, it is not stored
per band, it affects the LF output volume on the PC's sound card. Speaker icon has the mute
function.
3.2 Software receiver settings
These settings are divided into four logical parts, described below.
3.2.1 Receiver control panel
23

13
ColibriNANO User Manual © 2018 Expert Electronics
ExpertSDR2 SOFTWARE DESCRIPTION
- separate volume and balance controls for VFO A and VFO B (Mixer).
- open the 18-band RX equalizer menu (EQ).
- button enables the VAC (data exchange via Virtual Audio Cables).
- button enables the squelch (SQL). Displayed as the vertical yellow needle on the S-
meter. If the air signal – green needle, surpasses the SQL trigger threshold – yellow needle, then
you'll hear the sound of the receiving station on the receiver's LF output. If the signal level is
lower than the trigger threshold, you'll hear nothing.
- button mutes LF signal (Mute).
- show the HF stations markers on the panorama from the EiBi database (EiBi). Hover
with the mouse pointer on the station frequency and you’ll see its name.

14
ColibriNANO User Manual © 2018 Expert Electronics
ExpertSDR2 SOFTWARE DESCRIPTION
- IQ-files recording is required for storing the RX bandwidth panorama (IQ). The file is
saved to the C:\Users\User_Name\ExpertSDR2\wave\.
- turn on the CW Skimmer, more details in CW Skimmer (SKM).
- bigger S-meter button (SM).
- the S-meter window can be separated from
the software window and moved to any place on the screen.
S-meter - Displays the level of the received signals in the receiver filter bandwidth (in units).
- press this button to clear the panorama of all displayed spots.
When you enable the NFM mode, one additional button appear:
- Continuous Tone-Coded Squelch System button. In some cases, it's required
to activate the squelch with the help of the CTCSS tones.
You set the CTCSS level relatively to your voice signal.
1. Set the NFM mode.
2. Set the receiver's tone frequency in the RX Tone input-box.
3. Press the CTCSS button to activate the CTCSS mode.
4. Receive signals with CTCSS tone.
When you enable the WFM mode, one additional button appears:
- when enabled, this function allows the software to automatically detect whether the
station is strong or not and lets you listen to it in stereo mode.
- AGC sensitivity control slider (Automatic Gain Control on classic
transceiver). The adjusted level is saved per band.
A panel of mode buttons:
45

15
ColibriNANO User Manual © 2018 Expert Electronics
ExpertSDR2 SOFTWARE DESCRIPTION
- Amplitude Modulation
- Synchronous Amplitude Modulation
- Double Side Band
- Lower Side Band
- Upper Side Band
- CW mode. It works in CW-U for all bands. It cannot be changed.
- Narrow FM
- Wide FM, supports receiving of the stereo signals
- Spectrum mode. Receive the pure signal without any demodulation (panadapter
bandwidth). The idea is to receive pure signal then pass it out via VAC or PC’s sound-card
- Digital Lower Side Band. Connect a third-party software (is not supplied) to the receiver
software for operating in digital modes
- Digital Upper Side Band. Connect a third-party software (is not supplied) to the receiver
software for operating in digital modes
- Digital Radio Mondiale, 10 kHz filter with 5 kHz IF to work with the external decoder of
the DRM signals. Connect third-party software (is not supplied) to the receiver software for
decoding of the DRM signals
160M - 2M - amateur bands
GEN - if out of the amateur bands
3.2.2 Frequency and S-meter indicators
Mainly, this panel consists of the visual indicators, like the VFO A/B frequencies, the signal level
on the antenna's input (S-meter) and several control buttons.
Displaying elements:
- VFO B frequency indicator (sub-receiver).
Note:
·
You won’t hear the audio from the VFO B if it is out of the panorama bandwidth.

16
ColibriNANO User Manual © 2018 Expert Electronics
ExpertSDR2 SOFTWARE DESCRIPTION
Sub-receiver control unit:
- SubRX – enable sub-receiver. If you want to listen to the VFO A
and VFO B frequencies simultaneously, use the Sub-receiver.
1. Activate the Sub-receiver by pressing the SubRX button.
2. Set the required VFO B frequency.
3. Listen to the VFO A and VFO B frequencies simultaneously.
Note:
·
You can switch the point and click control on the panorama between VFO A and VFO B
receivers, by pressing the middle mouse button. You’ll control the RX with the same color to
the mouse cursor.
·
When you change the band the SubRX is disabled.
B>A –assign the VFO B frequency to VFO A
A>B –assign the VFO A frequency to VFO B
B<>A –swap frequencies between the VFO A and VFO B
- VFO A frequency indicator (main receiver).
Main receiver control unit:
LOCK – lock the VFO A frequency tuning.
SAVE – save the current VFO A frequency and mode type in the memory panel.
SET – manual frequency input for VFO A or VFO B.
- Navigation buttons. The quick memory cells are automatically
stored with the frequencies if the receiver stands still over a second. Then those frequencies
can be selected in order back and forth, as in an internet browser. The total stack contains 16
cells.

17
ColibriNANO User Manual © 2018 Expert Electronics
ExpertSDR2 SOFTWARE DESCRIPTION
- Band Stacking Memories indicator (VFO A only). Each memory slot
has a frequency, mode, and filter settings. Each band has three memory slots associated with it.
Successive presses of a band button will cycle through the stored memory slots. It might be
useful for quick frequency and mode changes within a band. To replace one memory slot:
1. click the required band button you would like to modify.
2. change the frequency (within a selected band), mode, and filter to the required settings.
3. click the band button again to save the values.
- S-meter - by default this scale displays the power
level of the signals in the RX filter bandwidth. The scale has two grade types: in S-units and in
dBm. The signal strength displayed in dBm to mW (yellow figure) in the top left corner of the S-
Meter.
Note:
·
S-Meter in the ExpertSDR2 has two different calibrations for HF (0-30 MHz) and VHF (30-
300 MHz). HF and VHF signals with the same dBm level have different S-scale values.
For example: HF S9 = -73 dBm = 50 uV (50 Ohm), VHF S9 = -93 dBm = 5 uV (50 Ohm). S-
Meter in the ExpertSDR2 corresponds to the IARU recommendations, each device is
calibrated at the manufacturing.
- ADC type displays the power in each quadrature
channel (double scale).
- Show Overload ADC indicator, enable it to track
the ADC status, as soon as ADC overloads, the S-meter will flash with red light.
3.2.3 DSP control panel
-Receive Incremental Tuning.
- In the drop-down menu, you can set the frequency offset in Hz. Reset -
resets the offset value to zero (more details in RIT ).
55

18
ColibriNANO User Manual © 2018 Expert Electronics
ExpertSDR2 SOFTWARE DESCRIPTION
- AGC presets menu. In the drop-down menu, you can select the receiver's
AGC preset:
OFF - AGC is off.
LONG - preset with long AGC reaction (approximately 750 ms). Recommended for phone
modes.
SLOW - preset with slow AGC reaction (approximately 500 ms). Recommended for phone,
digital modes.
MED - preset with medium AGC reaction (approximately 250 ms). Recommended for CW,
digital modes.
FAST - preset with fast AGC reaction (approximately 100 ms). Recommended for CW, digital
modes.
USER - preset with custom AGC reaction (by default the slowest 1000 ms).
Note:
·
AGC settings influence the quality of the received signal. Be careful selecting the AGC preset
or tuning your own preset.
- Step list allows to change the step of the mouse wheel in the range from 0.1
Hz to 100 kHz.
DSP functions:
- enable the RX equalizer (enabled on the picture).
- binaural audio mode (the phasing of the audio signal within the RX filter gives a stereo-
like effect).
- enable the adaptive Noise Reduction to clean the signal from noise interferences.
- enable the First Noise Blanker for impulse interference.
- enable the Second Noise Blanker for impulse interference.
Note:
·
The NB1 and NB2 algorithms are different. Try each of them to reach the best impulse
interference reduction. NB1 and NB2 Noise Blankers can be used simultaneously.

19
ColibriNANO User Manual © 2018 Expert Electronics
ExpertSDR2 SOFTWARE DESCRIPTION
- enable Automatic Notch Filter for adaptive rejection of the narrowband interference in
the receiving band (interference, carrier signals, CW signals, etc.).
Note:
·
If there are no interference, ANF could slightly affect the reception quality of the desired
signal. Disable ANF, if you don't need it.
- enable Analog Pick Filter, it creates the triangle filter's AFC (amplitude-frequency
characteristic) in the filter bandpass.
- enable Digital Surround Effect for CW signals, it provides a space orientation in stereo
phones.
Note:
·
This algorithm provides panorama acoustic of the CW signals in the filter bandwidth,
depending on their position in the filter:
§
if the received CW signal is in the receive filter bandwidth and lower the tuned frequency, it will
be louder in the left phone;
§
if the received CW signal is in the receive filter bandwidth and higher the tuned frequency, it
will be louder in the right phone;
§
if the received CW signal is in the receive filter bandwidth and in the middle of the tuned
frequency, it will be equally loud in both ears.
RX filter bandwidth presets. Presets list depends on the mode type:
- AM, SAM, DSB, NFM modes (3 – 16 kHz);
- LSB, USB, DIGL, DIGU modes (1.8 – 3.5
kHz);
- CW mode (50 – 1200 Hz);
- WFM mode (50 – 310 kHz);
- DRM mode (has one fixed bandwidth 10 kHz);
- user can adjust the RX filter bandwidth by himself (available at any modulation type
except DRM).

20
ColibriNANO User Manual © 2018 Expert Electronics
ExpertSDR2 SOFTWARE DESCRIPTION
3.2.4 Panorama description
The panorama consists of two parts separated by the horizontal scale: 1) Spectrum Scope and
2) Waterfall.
3.2.4.1 Spectrum Scope
In this window you can see the spectrum, with the sample rate from 48 kHz up to 3 MHz
(adjustable by User) and the RX filter to tune and listen to the stations.
There is a vertical scale to the left of the spectrum scope, it indicates the power level of signals
in dBm. Amateur band indicator displayed as the blue line on top of the graph with the name of
the band, it shows the limits of the amateur band.
RX filter position is indicated by the vertical green line. To the right of the line indicated its
precise tuning frequency (can be switched off in Options). Below the frequency you can see the
signal level on the S-Meter scale (can be switched off in Options). RX filter bandwidth displayed
as the translucent gray area around the tuning frequency. You can listen to everything within
this band.
Spectrum is displayed as a line on the spectrum scope, but it also may have a filling color. You
can change spectrum rendering mode, line color, filling color, transparency, etc. in the software
Options (more details in the Spectrum tab ).
3.2.4.1.1 Spectrum Scope scaling
If you move the mouse cursor over the vertical scale a hand will appear. Press and hold the right
mouse button, then move it up/down to change the dBm scaling or press and hold the left
mouse button, then move it up/down to change the spectrum level.
32
Other manuals for ColibriNANO
1
This manual suits for next models
1
Table of contents
Other Expert Electronics Receiver manuals