Explorer Group 2003 Tourers User guide

Owners Handbook
2003 Tourers

Your new Explorer Group caravan has been
designed as a luxury recreational vehicle and is
intended for recreational use only. It is not
intended for business use or for permanent
habitation. The Explorer Group Limited accepts
no liability if the caravan is used for any purpose
other than holiday use.
To ensure the very best quality and reliability the
caravan has been through our extensive design
and testing programme. Therefore the Explorer
Group Limited will accept no liability if the
caravan is altered or modified in such a way
that would adversely affect the reliability.
All the illustrations and descriptive matter in this
guide are intended to give a general idea of the
caravan. Changing market and supply
situations may prevent us from maintaining the
exact specification details in this guide and we
therefore reserve the right to alter specifications
as materials and conditions demand.
Please check current details with your retailer
and inspect the caravan to ensure it is
satisfactory before purchase. Retailers are
independent and have absolutely no authority
to bind The Explorer Group Limited by
any express or implied undertaking or
representation.
Welcome 1
Introduction 2
Security 4
Safety 6
In case of fire 7
VIN 7
Preparing for the Road 8
Towing and Driving 10
Arrival at Site 12
Connecting Services 14
Water 14
Gas 16
Electricity 18
Control Panels 24
Taps 30
Pressurised Water System 33
Water filter system. 35
Equipment. 36
Refrigerator, Oven, 36
Hob and Grill, Smoke Alarm 36
Space Heater 37
Air Conditioning, Omnivent 38
Heki 2 rooflight 39
Blinds and Flyscreens, 40
Alarm System 40
Television and FM radio Aerial 44
Beds and Bunks 45
Doors 46
Windows 46
Care of your caravan 47
Draining down the water system 50
Maintenance of your caravan 52
BPW chassis 60
Servicing 69
Service documents 70
Service records 71
Warranty 73
Specifications 74
CONTENTS

You are now the owner of a quality caravan. It
is strongly recommended that you read the
pages of this guide thoroughly so that you are
fully conversant with all the caravan systems.
The User’s Guide has been prepared for your
guidance to help you derive the greatest
amount of pleasure from the use of your
caravan. If there is anything you wish to know,
which this guide fails to cover, please refer to
additional information contained in your
Owner’s Information Pack. Alternatively, we are
sure that your Approved Retailer will be pleased
to help.
Approved Retailers will be able to supply any
replacement parts for your caravan, should the
need arise, along with any accessories you may
require. Please note that it is not possible to
purchase replacement parts or accessories
direct from the manufacturer.
We are sure you will have many happy times
with your caravan but please remember - a
happy carefree time is based on proper,
thorough and responsible preparation, careful
driving with regard to the “Rules of the Road”,
other road users and above all ensuring your
caravan is in a first class roadworthy condition.
It is a condition of your warranty that your
caravan is serviced by an Approved Retailer or
Service Centre once every twelve months and
that the service record in the back of this guide,
is maintained in accordance with instructions.
SERVICING
(Your caravan must be serviced within 12 months
of purchase date and every 12 months thereafter)
Suitable towing vehicles
The caravan is manufactured for towing
behind normal road cars and is not suitable
for towing behind commercial vehicles other
than passenger car derivatives. If in doubt
please contact your caravan retailer. The
Explorer Group cannot give advice on
individual cars
Your caravan requires servicing at least once a
year for safety, efficiency and to protect the
investment you have made. Whether the
caravan is used for short trips or continental
long range touring, regular servicing is
necessary and will ensure continued enjoyment
of your holiday home.
Your retailer will carry out your annual servicing
using the latest techniques and equipment (a
list of the items to be inspected, tested and
adjusted appears on the Service Vouchers at
the rear of this handbook), and will complete the
service document as proof of regular
maintenance.
As with motor vehicle service documents, not
only will the proof of regular servicing enhance
your caravan resale value, but in the unlikely
event of any defect appearing at some later
date — a properly serviced and documented
caravan history will enable your retailer to
rapidly assess and, where appropriate, carry
out the necessary remedial work. Additionally,
but most importantly, regular service is a
requisite to preserving your rights under the
warranty.
IMPORTANT:
The 17 character VIN of your caravan should be
quoted in all correspondence. This number can
be found etched onto your windows or stamped
on the ‘A’ frame of your caravan chassis. This
number is also shown on the N.C.C. Certificate.
WELCOME
WELCOME TO THE WORLD OF CARAVANS
1

INTRODUCTION
WATER INGRESS
CODE OF PRACTICE
We at The Explorer Group Limited want our
customers to be sure that, in buying one of our
products, you are buying the very best. We
would like you to continue to believe this for a
long time after you have made your purchase.
We are confident that our new products, built
with innovative manufacturing techniques and
tested materials, make water ingress concerns
unnecessary.
In fact, we are so confident of our new products
that we follow a ‘Code of Practice’ which gives
certain guarantees to our customers, both
consumers and retailers, of financial
reimbursement of repair costs should problems
occur.
THE CODE
The code applies to all new Explorer Group
products manufactured after 1st September
1998.
All customers with documentary proof of
annual services by an approved Explorer Group
Limited retailer or service centre, will be paid in
full for the costs of repairs due to water ingress.
This is valid for up to 5 years from the original
date of purchase of a new product.
Customers without a full service history may
receive up to 100% of the costs of repair for
water ingress damage in year 2 of ownership,
up to 75% in year 3, up to 50% in year 4 and up
to 25% in year 5. Each case will be examined
on its own merit. The Explorer Group Limited
will decide the amount of contribution towards
the repair costs.
Customers who bought new caravans between
September 1996 and August 1998 will also be
covered under this code, providing they have
documentary proof of annual services by
approved Explorer Group Limited retailers or
service centres.
Customers exchanging their current Explorer
Group model for a new Explorer Group model
will not have the value of their part exchange
reduced due to potential water ingress issues,
providing that there is documentary evidence
that the caravan has been annually serviced
and that it is less than 5 years old.
CONDITIONS ATTACHED TO THE CODE
• Repairs may only be carried out after
approval by The Explorer Group Limited
(dependent upon individual circumstances).
• The Explorer Group Limited will pay the
costs of repairs, only after approved work
has been carried out.
• The Code is not retrospective. Caravans
traded-in prior to implementation of the
Code are not covered.
• In the case of dispute, The Caravan Club
will agree with The Explorer Group Limited,
the appointment of an independent
arbitrator. The Explorer Group Limited will
pay for the costs of arbitration subject to the
consumer paying a £100 deposit.
• If the arbitrator finds in favour of the
customer, then the deposit will be returned.
If the arbitrator finds in favour of The
Explorer Group Limited, the customer will
lose the deposit.
• Where the arbitrator awards a sum of
money less than an offer made by The
Explorer Group Limited, which has already
been rejected by the customer, then the
deposit is forfeited.
• The arbitrator’s decision is final and both
parties must agree to abide by the decision.
NOTE: The Explorer Group Limited warranties
may be transferred to a second owner for a
small fee.
2

INTRODUCTION
FIRE RETARDANT FOAMS
Under the Condition of the Consumer
Protection Act 1987, the manufacturer has a
responsibility to ensure that their product is as
safe as possible.
With this in mind all caravans are equipped with
either Combustion Modified High Resilient
(C.M.H.R.) foam cushions or sprung
mattresses. These foams are very much safer
from a fire point of view than those previously
used. In addition all upholstery is made of fire
retardant fabric.
3

SECURITY
CARAVAN REGISTRATION AND
IDENTIFICATION SCHEME – VIN
The caravan has been security marked and
recorded under the Caravan Registration and
Identification Scheme that is organised by the
Caravan Industry.
Shortly after purchasing this caravan you
should receive your Touring Caravan
Registration Document. It will be sent by post to
your home address.
Your Touring Caravan Registration Document
will include a 17 character VIN (Vehicle
Identification Number), shown in the top right -
hand corner. This 17 character VIN will be die-
stamped into the caravan drawbar and
chemically etched on up to a maximum of 10
eye level windows.
To protect yourself and your touring caravan,
never leave the Registration Document in the
caravan. For security reasons keep it in a safe
place.
If you sell the caravan please follow the
instructions on the Touring Caravan
Registration Document.
If you do not receive a Touring Caravan
Registration Document, lose it, or any of the
details recorded are incorrect, please contact:
CRIS
Dolphin House
New Street
Salisbury
Wiltshire
SP1 2TB
Telephone: 01722 411430
SECURITY TAG
A security tag containing the individual identity
of your caravan is concealed within the caravan
body and can only be read by using a special
decoder.
Your local police can obtain the use of a
decoder by contacting C.R.I.S. on telephone
no. 01722 411430.
4

The following is a brief description of the main
components used in your caravan. More
comprehensive descriptions can be found in the
equipment manufacturers literature held in the
Owner’s Information Pack.
BPW Chassis
BPW are one of the largest producers of caravan
chassis in Europe. The chassis is galvanised
special steel fitted with neidhart axles and
suspension system. For 2003 models the
Expolorer Group Limited are utilising the new
BPW V-TEC Chassis System.
Note: Holes should not be drilled into
the chassis. When purchasing a
stabiliser, consult your retailer who will
advise on the correct type to fit.
Braking System.
The Braking System comprises a rod-operated
overrunning device with expander mechanism
and adjuster box.
An automatic reversing system with a spring
loaded reverse lever is attached to the adjuster
box. The system also incorporates a link device,
which gives added safety to the handbrake
operation when parking on a reverse slope or
steep hill. Brake adjustment instructions are
given in the maintenance section of this guide.
Body Shell
Caravan bodies are constructed from the highest
quality materials. The floor is constructed from a
W B P plywood sandwich, impregnated with anti-
damp and rot compounds and adhesives.
The walls comprise an insulated foam sandwich
having pre-coated aluminium exterior surface
and vinyl coated plywood interior finish. Wooden
framing is positioned within the sandwich to add
strength.
The very latest ‘state of the art’ presses are
employed to produce the extremely well
insulated, robust, yet lightweight sections.
Windows are all of a double glazed acrylic
construction and the door frames are extruded
aluminium. The gas bottle locker is an integral
moulded glass fibre or acrylic capped ABS
construction for strength and lightness.
Each caravan is fitted, as standard, with an
awning channel as an integral part of the near-
and/or off-side aluminium roof and body side
moulding. If it is found necessary to fit additional
attachments, care must be taken to ensure that
any holes which are drilled in the outside of the
body are correctly sealed.
Awnings which employ rubber sucker
attachments rather than screw fixings are
recommmended.
On NO account should screw threads longer
than 5/8th inch (15mm) be permitted to enter the
shell sandwhich (from inside). Ensure that all
screws are of the self tapping type.
No screw or any other object should be permitted
to enter the ceiling of your new caravan.
5

SAFETY RECOMMENDATIONS
GENERAL SAFETY
In order for you to get the most out of your new
Explorer Group caravan it is necessary for you
to be aware of the following.
1. Do not obstruct ventilators.
2. Inspect the flexible gas hose regularly for
deterioration and renew as necessary, with
approved type, and in any case no later
than the expiry date stated on the hose.
3. It is recommended that you provide a dry
powder fire extinguisher complying with
ISO 7165 of at least 1KG capacity by the
exit door and a fire blanket next to the
cooker. Ensure you read the ‘advice to
occupier label’ fitted to your caravan.
4. Never use portable cooking or heating
equipment inside your caravan. Do not use
your fitted cooking equipment as heating at
any time.
5. Never allow modification to your gas or
electrical system unless qualified persons
carry them out. All modification to the gas
system should be carried out by a CORGI
registered gas fitter. Any modifications
carried out on the electrical system should
be carried out by an electrician on the roll of
the NICEIC or be a member of the ECA.
6. Never exceed your caravans Maximum
Technical Permissible Laden Mass.
7. Never exceed the caravan or your cars
maximum nose weight whichever is the
lower.
8. Care shall be taken against the risk of
falling out when children, especially under 3
years of age, use the upper bunk.
9. Ensure heavy and large items are secured
before towing your new caravan to reduce
the risk of damage being caused while the
caravan is in motion.
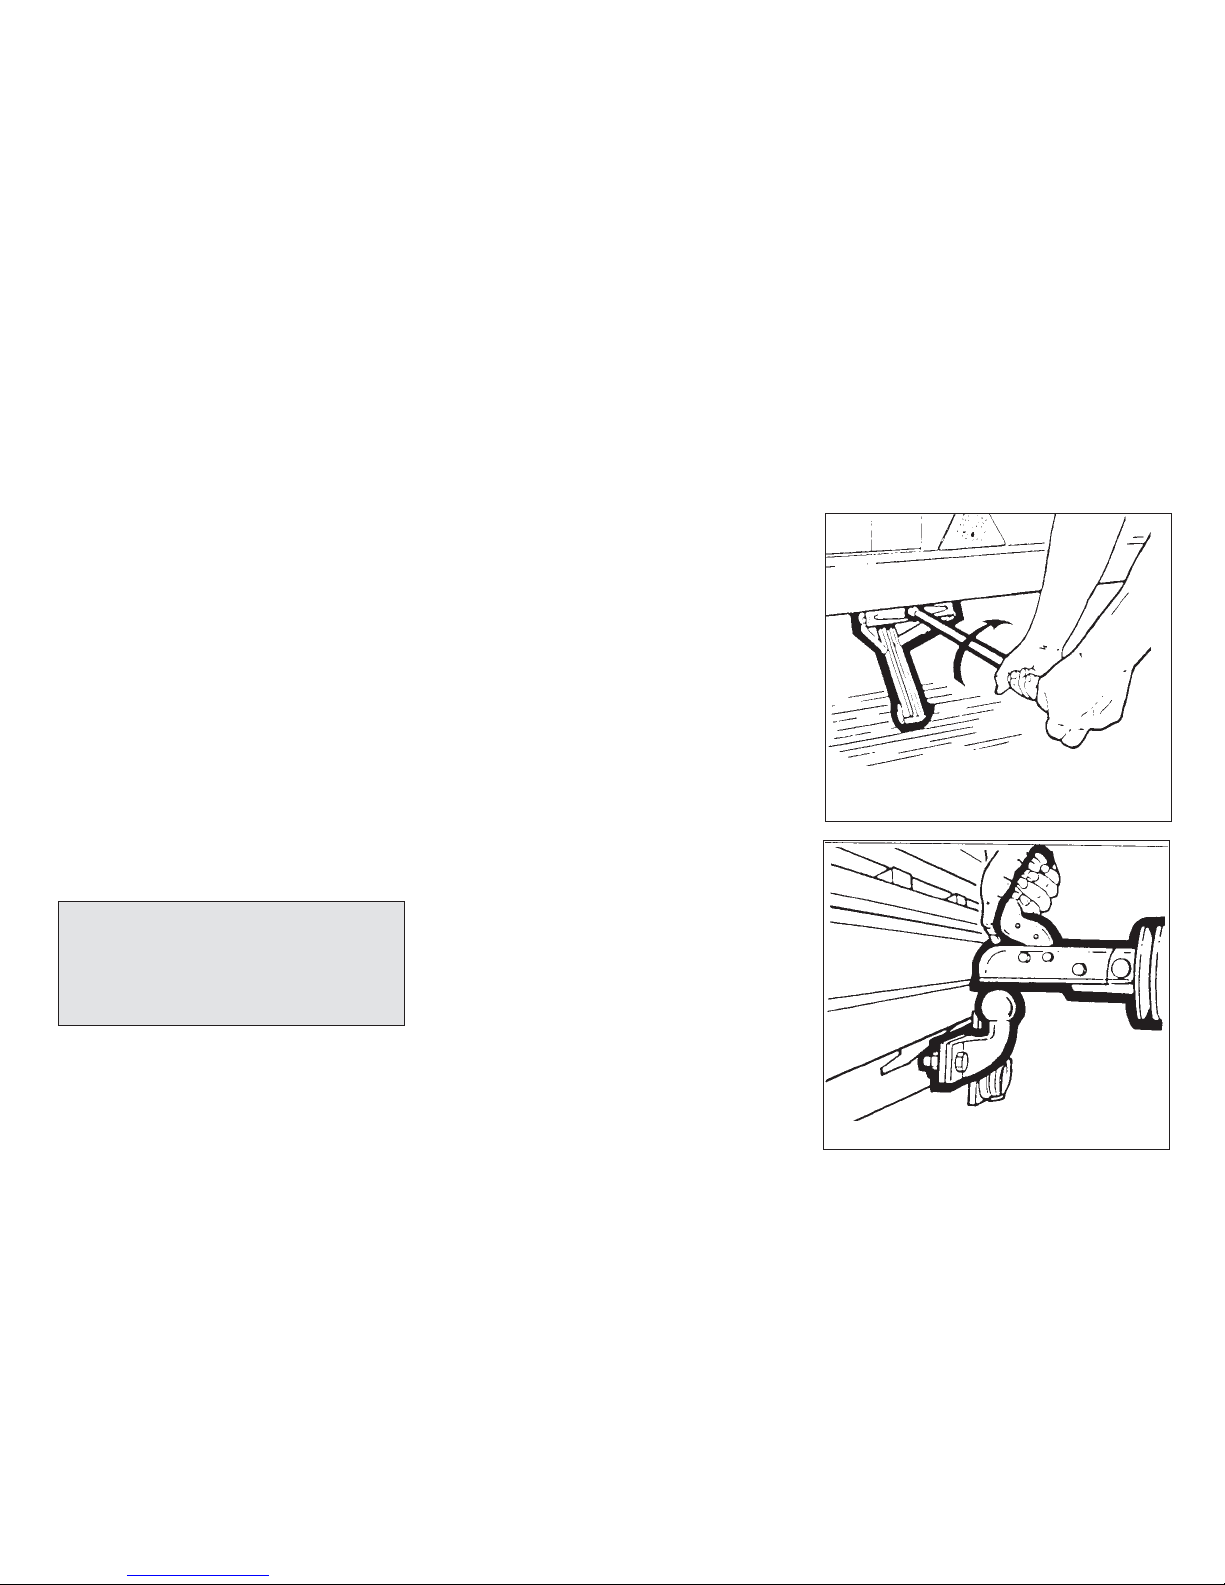
10. Turn off all gas appliances and turn off the
gas supply before towing your caravan.
11. Do not leave children under 14 years of age
unattended in your caravan.
12. When your caravan is connected to your
towing vehicle it should be level or slightly
nose down. An excessive nose down
attitude or a nose up attitude could lead to
instability when towing.
VENTILATION
All caravans manufactured by the Explorer
Group Limited are ventilated at both high and
low level in accordance with BSEN 721 Safety
Ventilation. The fixed ventilation points fitted in
your caravan must not be blocked under any
circumstances as your safety may depend upon
them.
It is advisable that the fixed ventilation points
are checked and cleaned (where necessary) on
a regular basis.
HIGH-LEVEL VENTILATION
This is always provided by fixed ventilation
within the fitted roof skylight. All roof skylights
fitted by Explorer Group provide fixed free area
ventilation. These roof skylights should be
cleaned annually by use of a small brush to
remove any dust that may have accumulated
around the mesh fitted. On some roof skylights
the mesh can be easily removed to aid
cleaning. On fan-assisted roof skylights it is
essential that the roof skylight be switched off
prior to cleaning.
LOW-LEVEL VENTILATION
Low level ventilation is provided under the front
chest of drawers, except in an L-shape layout,
where it can be found either in the nearside or
offside bed box. The exact position can be
identified via the white plastic cover used to
prevent the ventilation from being obstructed. In
order to clean the ventilator, remove the cover
by undoing the two screws and clean using a
small brush. It is essential that the cover is
replaced once cleaning is complete.
SEPARATE BEDROOMS
In caravans with sleeping areas separated via a
solid door, separate ventilation is required and
is provided via a roof skylight at high level and
a ventilator at low level within a bed box.
THERMAL INSULATION AND HEATING
CLASSIFICATION
All caravans manufactured by the Explorer
Group Limited are classified as Grade 2, in
accordance with BSEN 1645 part 1, for thermal
Insulation and heating. This will allow the
Interior temperature to be maintained at 20 ºC
when the exterior ambient temperature is 0 ºC.
6

SAFETY
IMPORTANT: Your attention is drawn to the
notice affixed in the caravan advising on fire
prevention, ventilation and what to do in case of
fire.
CHILDREN
Do not leave children alone in the caravan.
Keep potentially dangerous items, e.g.
matches, drugs, etc, out of reach, as at home.
FIRE EXTINGUISHERS
It is recommended that a 1 kg (2lb) minimum
capacity dry powder fire extinguisher be carried
inside your caravan at all times. A fat pan fire
must not have an extinguisher aimed at it, but
must be smothered with a fire blanket.
IN CASE OF FIRE
1. Get everyone out of the caravan as quickly
as possible using whichever exit is quickest
including windows. Do not stop to collect
any personal items.
2. Raise the alarm. Call the fire brigade.
3. Turn off gas container valve if safe to
do so.
Petrol/Diesel Fumes
The fitting of a tail pipe to your exhaust
will reduce the possibility of fumes
entering your caravan through the front
fixed ventilation points.
SECURITY
VIN
Record your caravan V.I.N. which can be found
stamped on the ‘A’ frame or on one of the eye-
level windows. Make a note of this number in
the space provided at the front of this guide and
make a separate note of the number to keep
safe at home.
CARAVAN THEFT
The theft of a caravan can occur in the most
unlikely circumstances; from a motorway
service area, even from an owner’s driveway.
Secure all windows and doors when your
caravan is unoccupied, even if only for a short
length of time.
ADDITIONAL SECURITY
Consider fitting any device which might deter or
prevent intrusion by thieves. A hitch lock cover
prevents towing of the caravan.
A wheel lock prevents towing of the caravan
and removal of the wheel.
NOTE: Corner steady locking devices are
fitted to some models and owners are advised
to purchase good quality, extended loop
padlocks in order to secure them.
FREE CRIME PREVENTION advice about
securing your caravan, protecting your
valuables, property marking, either at home or
whilst on site, can be obtained from the Crime
Prevention Officer through your local Police
Station.
7

When selecting a towing vehicle it is
recommended that you consult the Caravan
Towing Code, a copy of which is contained in
your user information pack.
Your new caravan has been manufactured for
towing behind a normal motor car; It is not
designed to be towed behind a commercial
vehicle. Provided care is exercised when
towing with a 4x4, and loading limits are strictly
adhered to, no problems should arise. We
would however strongly recommend that all
such 4x4's are fitted with a spring assisted
towball, which can reduce the shock put onto
the chassis by up to 70%.
Please also refer to The Caravan Towing Code,
which is included in your Owner’s Information
Pack.
PRE-TOW CHECKLIST AND HITCH-UP
Caution: Never enter the caravan
without first lowering the four corner
steadies with the brace provided.
Corner steadies should not be used as
a jacking device.
– loose articles must be stowed
securely. Do not stow tins, bottles or
heavy items in overhead lockers prior
to towing.
– all lockers and cupboard doors are
closed and secured.
– all bunks are secure.
– all rooflights are closed and secured.
– main table is stored in its transit
position.
– fridge is on 12v operation and door
lock is set.
– all windows are fully closed and
latched.
– Never tow with windows on night
setting. Leave all curtains and blinds
open to aid rear visibility.
– gas cylinders are correctly
positioned, secured and turned off.
– battery is secure and connecting
cable is disconnected and stowed.
Check Gas Locker, Battery Locker (if fitted) and
Cassette Toilet (if fitted) door/s are secure.
Check wheelnuts, tyre pressures and tyre
conditions.
With the caravan handbrake on, adjust the
jockey wheel so that it is in good contact with
the ground. Wind up the corner steadies to the
fully retracted position.
PREPARE FOR THE ROAD
8

PREPARE FOR THE ROAD
When the hitch is seated securely on the ball,
release the locking catch, ensuring that the
locking mechanism is fully engaged on the
underside of the towing ball.
Wind up the jockey wheel and retract to the
highest position.
Fit and secure stabiliser (if used).
Plug in the electrical connections.
Connect the ‘break-away’ cable.
WARNING: The ‘break-away’ cable must be
secured around the towing bar assembly and
not round the ball-head.
Release caravan handbrake, adjust all mirrors
from driving seat and proceed.
9

TOWING AND DRIVING
Please also refer to The Caravan Towing Code
which is included in your Owner’s Information
Pack.
Reversing
It is advisable to have a second person
available when reversing the caravan. Start
practising by choosing a left-hand bend for
ease. Reverse slowly, turning the wheel,
initially the opposite way to the direction you
want the caravan to go.
Now the front of the caravan is nudged out and
is moving the rear in the intended direction.
Take care not to hit the van with the car!
Midway through the manoeuvre, when the
caravan is correctly angled, slow to crawl and
gradually apply opposite lock. Make the car
follow the caravan round then finally straighten
up.
Proficiency at reversing can only be
achieved with practice.
SPEED LIMITS
Normal road towing: 50mph
Motorways (including dual carriageways):
60mph
Setting Off
Let the clutch in smoothly.
Allow more engine speed to produce the power
to move the additional weight of the caravan.
Avoid wear and tear on clutch and transmission
by taking extra care.
Change gears smoothly.
Try not to jerk the clutch.
Caravan Handling
Allow for the caravan being wider than the car.
Do not bump kerb with caravan wheels.
When passing other vehicles, allow more than
the normal clearance for driving solo.
Allow longer to get up speed to pass.
Allow for the vehicle being twice its normal
length.
Do not suddenly swing out.
Carry out all manoeuvres as smoothly as
possible.
Use nearside wing mirror to check caravan has
cleared when overtaking.
10

11

SITE ARRIVAL
Check Site Regulations
Selecting a Pitch
Carefully select where you wish to place your
caravan. The site should be as level as
possible, preferably not under or near trees,
well drained and away from possible boggy
areas. Consider how you will move the caravan
when it is time to leave the site. On sloping
ground it is better to pitch facing downhill,
especially during wet weather.
Lateral Levelling
On uneven ground lateral levelling is
accomplished by the use of a leveller jack and
a spirit level placed ‘across’ the caravan floor.
Place the leveller jack, folded flat, in front of the
wheel needed to be raised to level the axle.
Tow the caravan onto the leveller jack until the
spirit level shows that the caravan is laterally
level. Apply the caravan handbrake and chock
the caravan wheel if necessary. Lower the
jockey wheel to ground level.
Using the adjustment on the jockey wheel and
holding the latch of the locking device, unhitch
the caravan.
(On upward facing pitches when the
hydraulically damped drawbar of the hitch
becomes fully extended, it will be necessary to
compress the drawbar slightly in order to
achieve a ‘clean’ unhitching). With the caravan
brake on, reverse the towing vehicle about 1
inch (2.54cm) to release hitch lock tension and
using the jockey wheel adjustment, unhitch the
caravan as previously described.
Fore and Aft Levelling
Place the spirit level ‘fore and aft’ and, using the
jockey wheel adjustment, level the caravan
horizontally.
Wind down the corner steadies onto load
spreaders (blocks of wood a minimum of 6
inches (15.25cm) square), taking care not to lift
the caravan wheels.
Caution: Never enter the caravan
without first lowering the four corner
steadies with the brace provided.
Corner steadies should not be used as
a jacking device.
It is important that the caravan is correctly
levelled to ensure the correct working of the
refrigerator, cooker etc.
12

SITE ARRIVAL
Parking on a Reverse–Sloping Site or Steep Hill
For successful parking on a reverse slope or
steep hill, the operator need only apply the
handbrake with one hand while gently but
purposely inching the caravan or trailer a small
distance backwards with the other.
WARNING
If the handbrake is NOT fully applied to the
last tooth (i.e. vertical) and is set to some
lesser position than the full vertical, then
problems will almost certainly arise after the
trailer has been uncoupled from the towing
unit.
13

CONNECTING SERVICES - WATER
WATER
Your caravan will be fitted with either a Carver
Compact or a Carver Crystal 3 water system. To
determine which model you have, please refer
to the equipment chart contained in your
Owner’s Information Pack.
Ensure all taps are in the off position and the
12v water pump switch, located on the electrical
control panel, is off.
Using a water container (not supplied)
For either water system, fill fresh water
container and place in a suitable position. Place
waste water container under main drain valve.
Place the submersible pump into the fresh
water container, ensuring it is fully submerged
before operating the system (see diagram).
Using the Carver Waterline
(direct connection to mains supply unit)
Connect the Carver Waterline hose to the
mains unit on the pitch. (The end without the
valve connects to the mains unit).
Carver Crystal 3 Water System
OPERATION
Raise the crystal filter housing lid (see
diagram). Clean both the water socket and the
power supply terminals for the pump. It is
advisable to lubricate the water inlet using
vegetable oil (this reduces the friction between
the ‘O’ ring and the plastic surface).
Plug the pump assembly into the housing
ensuring that it is pushed fully home .
14

CONNECTING SERVICES - WATER
To remove the pump from the crystal housing,
press the two clips in at either side of the pump
plug and pull.
Do not remove by pulling the electric cable
or the hose.
CHANGING THE FILTER CARTRIDGE
When inserting a new filter cartridge into the
housing, smear vegetable oil on the two ‘O’
rings. (This reduces friction and makes it easier
to remove).
It is recommended that the filter cartridge is
replaced after 30 days of use.
To remove the filter cartridge pull the tab on the
bottom of the filter, which will release the filter
from the housing.
Always ensure that the new filter cartridge is
pushed fully home into the housing.
CARVER COMPACT
Connect the fresh water hose directly to the
Carver Compact inlet.
Finally put the “pump” switch on the control
panel to “on” and turn the cold tap on until water
flows.
Prior to operation of the water heater, ensure
water is flowing from hot tap.
DRAINING DOWN YOUR WATER SYSTEM.
It is essential that you drain down your caravan
water system when it is not in use. This is most
important during winter months to protect
against from frost damage.
1. Disconnect the water pump and switch off
the power supply.
2. Open the safety drain valve on the water
heater located next to the water heater.
3. Open all taps and remove all plugs from
sinks and showers. Lever-operated taps
should have the lever put into the up
position.
4. Where fitted, open the internal drain valves.
5. Open the drain outlets on the outside of
your caravan.
6. If an inboard water tank is fitted, ensure that
the drain tap on the tank is open.
7. Adjust the level of the caravan to ensure
that the drain outlet is at the lowest point of
the caravan. This will aid the flow of water
to ensure that all water is drained off.
8. After 30 minutes, level the caravan and
prepare it for storage if necessary.
15

CONNECTING SERVICES - GAS
GAS
Your caravan is designed to operate using
either propane or butane liquefied petroleum
gas at 30m/bar. Gas can be obtained from your
caravan dealer.
Your caravan is designed to accept a maximum
2 x 7.5kg gas bottles.
TYPES OF GAS
Butane
Butane is supplied in the U.K. in Green or Blue
bottles.
All these have a male left hand thread except
for Camping Gaz, which has a special female
right hand, Calor, 7.5 kg and 15 kg bottles have
a special clip-on connection.
Continental bottles usually have a male left
hand thread which is similar, but not identical, to
UK butane.
Butane is suitable for use at temperatures down
to 2ºC but will not work below that.
Propane
Propane is supplied in red, or partly red bottles
which have a female left hand threaded
connector.
Scandinavian countries use the same
connector.
Germany or Austria supply propane with a male
connection.
Propane will work at temperatures as low as
–40 ºC and is therefore suitable for all winter
caravanning.
CONNECTION
Make sure that heating and cooking appliances
and gas cylinders are switched off.
Ensure that the correct regulator for the gas
chosen has been connected to the gas bottle.
The regulator is a governing device which
adapts the bottle pressure to one that suits the
equipment in the caravan.
It is recommended that the regulator valve
should be fitted with an over-pressure release
valve to 150m/bar.
Note: Regulator valves should always be in
the ‘OFF’ position when towing.
Hoses
Low pressure flexible hoses with a maximum
length of 700mm should be fitted between the
pressure regulator and the rigid pipework.
Hoses should be made from Neoprene, which
is black, and should conform to BS 3212.
Rubber hosing should never be used.
It is strongly recommended that a jubilee clip is
used to secure the hose to the rigid pipework, in
order to prevent accidental removal.
GAS SAFETY ADVICE
Regularly check flexible gas hose, joints and
connections for tightness. Finally, make sure
that each gas appliance is working efficiently to
the recommendations of the appliance
manufacturers.
16

CONNECTING SERVICES - GAS
FACTS ABOUT LPG
LPG is not poisonous.
Bi-products are harmless.
LPG is dangerous if all air and oxygen is
excluded.
(Ventilation holes must be clear at all times).
LPG has been given a smell by the
manufacturers in order to identify leaks.
The gas is heavier than air and therefore sinks
to the lowest point.
WARNING:
Aerosols and highly flammable liquids
must not be stored in the compartment
behind, or adjacent to, any gas
appliance.
Some industrial LPG appliances operate
at high pressure and require a ‘high
pressure’ regulator. This often has an
adjusting handle on it. NEVER use such
a regulator on a caravan.
Awning Spaces and LPG Appliance Exhaust
There is no danger of pollution of an enclosed
awning space from the LPG exhaust from a
refrigerator venting into it.
Space heaters may produce sufficient exhaust
to pollute the awning space, if it is totally
enclosed, from a general comfort, smell and
hygiene point of view. In extreme cases there
could be a build up of carbon dioxide to a
dangerous level.
Caravan owners are advised to allow some
fresh air circulation in the awning space when
such appliances are in use.
Please ensure that, when you fit your awning to
the side where the water heater flue is fitted,
there is sufficient ventilation in the awning to
take account of the exhaust and condensation
created by the flue.
PRECAUTIONS
a) Never look for a leak with a match. Always
use a soap solution or its equivalent when
testing connections. Do not operate any
electrical apparatus whatsoever, especially
light switches. If the leak is not obvious, the
caravan should be evacuated and qualified
personnel consulted.
b) Avoid naked flames when connecting or
changing a cylinder.
c) Check the flexible hose frequently.
Roof-Mounted Flue installations
All flue installations should be inspected for
corrosion throughout their length at least once a
year . Flues should be replaced if any sign of
perforation is found. Ensure that the
replacement is of an approved type.
17

CONNECTING SERVICES - ELECTRICITY
ELECTRICITY
MAINS SUPPLY
Your caravan’s main electrical installation is
designed to run on a 230v 50hz AC supply.
On arrival at caravan site
1. Before connecting the caravan installation
to the mains supply, check that:
(a) the mains supply is suitable for your
installation and appliances, i.e. whether it is
AC or DC and whether it is at the correct
voltage and frequency.
(b) your installation will be properly earthed.
Never accept a supply from a socket outlet
or plug having only two pins, or from a
lighting outlet.
(c) any residual current device (earth leakage
circuit breaker) in the mains supply to the
caravan has been tested within the last
month.
In case of doubt, consult the site owner or their
agent.
2. MAKE SURE THAT THE SWITCH AT THE
SITE SUPPLY POINT IS OFF AND THAT
ALL ELECTRICAL EQUIPMENT IN THE
CARAVAN IS SWITCHED OFF.
3. Remove any cover from the electricity inlet
provided on the caravan, and insert the
connector of the flexible supply cable
obtained from the site owner.
4. Remove any cover from the socket outlet
provided at the site supply point, and
connect the plug at the other end of the
supply flexible cable to this. Switch on the
main switch at the site supply point.
Note: If you wish to use any 12v
appliances, you must turn on the battery
charging unit on the control panel.
IN CASE OF DIFFICULTY, CONSULT AN
APPROVED ELECTRICAL
INSTALLATION CONTRACTOR (WHO
MAY BE THE LOCAL ELECTRICITY
BOARD). IT IS DANGEROUS TO
ATTEMPT MODIFICATIONS AND
ADDITIONS YOURSELF.
LAMPHOLDER-PLUGS (BAYONET- CAP
ADAPTORS) SHOULD NOT BE USED
UNDER ANY CIRCUMSTANCES .
ON LEAVING CARAVAN SITE
5. Reverse the procedure described in
Paragraph 3 and 4 above.
IT IS IMPORTANT THAT THE MAIN
SWITCH AT THE SITE SUPPLY POINT
SHOULD BE SWITCHED OFF, THE
FLEXIBLE SUPPLY CABLE
DISCONNECTED, AND ANY COVER
REPLACED ON THE SOCKET OUTLET
AT THE SITE SUPPLY POINT. IT IS
DANGEROUS TO LEAVE THE SUPPLY
SOCKET OR FLEXIBLE SUPPLY
CABLE LIVE.
18
Table of contents
Other Explorer Group Motorhome manuals