Exsurgo gFlight V2 User manual


Welcome!
Congratulations of your purchase of a gFlight V2,
You have now joined the community of gFlight members who are all
benefiting from the most affordable and accurate jump device on the
market.
At Exsurgo.us we value your feedback, please contact us below with any
questions or concerns you may have regarding the gFlight:
Exsurgo ZenDesk LINK for additional questions & answers

Contents
What’s in the Box? …………………………………...1
Initial Setup …………………………………………...2
Proper Jump Alignment ………………………..........4
Proper Landing Alignment …………………………..5
gFlight App ………………………………………..…..6
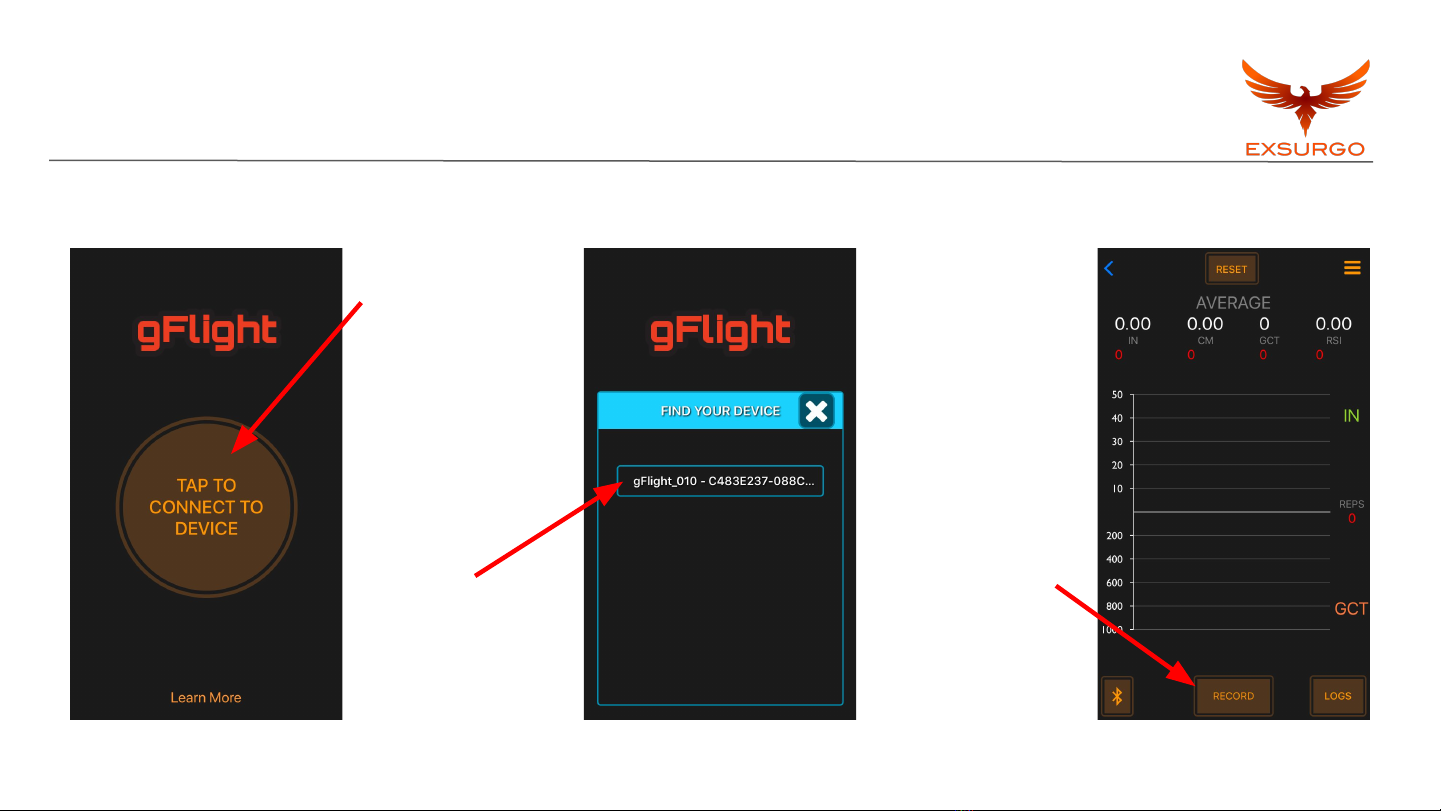
Basic App Guide ………………………………….…..7
Basic App Guide - Storage ………………………….9
Performance Metrics …………………………..…...10
Jump Height …………………………………….…...11
Ground Contact Time ……………………..………..12
Reactive Strength Index …………………..……….13
gFlight Best Practices - Review …………...……...14
Athlete Testing & Tracking ………………...……….15
Third Party Testing ………………………...………..18
Troubleshooting ………………………………..…...20
Frequently Asked Questions……………..………...21
Specifications ………………………..……....……..22
Warranty……………………………………………..23

What’s in the Box?
The gFlight is comprised of two wireless
bluetooth units (white)
Each unit has a silicone protective
sleeve that fits snug around each unit
(red)
Batteries are no longer provided do to
shipping restrictions
1

Picture 2 simply acts as a sensor. As you will
see in the upcoming pages, the sensors are
quite small and proper alignment is key for
best use
Initial Setup
Picture 1 is the display component. This
component has a power switch (on / off),
the display screen for jump metrics and a
sensor
2
Power
switch Power
switch

Initial Setup
The gFlight V2 works by using micro-sensor
technology and laser beams so both units
can talk to one another, making the
gFlight V2 a completely wireless device
Distances of up to 19-feet can be used
with full battery power
3
Max: 19-ft Sensor

Proper Jump Alignment
Line up your pinky toes with the sensors. You may want to take a small hop
before you take your first jump. This will test to make sure the sensors are
lined up properly and the metrics are appearing on the display unit
The gFlight’s sensors need to be free of all obstructions
4

Proper Landing Alignment
Landings need to be consistent. If you land outside of the sensors, the jump
will not register. We have found that a couple of practice jumps or adding
a visual landing marker can help limit the error.
5
Optimal Landing Not Optimal Landing
Foot
Foot
FootFoot
FootFoot

Welcome - gFlight App
First download the “gTechAMS” app in the iTunes App Store
or Google Play Store
iOS download here Android download here
Bluetooth Pairing - make sure the gFlight is within range and
your phone’s bluetooth is turned on, open up the app and
click on “tap to connect device”, the app will begin to
scan for available devices, click your device, once paired
the app will take you to the data recording screen
6

Basic App Guide
7
Click to begin
Choose your
device
Once the
athlete is in
proper position,
click record

Basic App Guide
8
Type in athlete’s
name
Click to save
jumps
Find athlete’s file
under “LOGS”
Metrics for each
jump
Average metrics
for all jumps

Basic App Guide - Storage
9
Here you can store
all of your athlete’s
jumps under “LOGS”

gFlight Performance Metrics
The gFlight will provide you with 4 metrics:
IN = Jump Height in Inches
CM = Jump Height in Centimeters
GCT = Ground Contact Time (ms)
RSI = Reactive Strength Index
Each metric will be explained in depth
on the following pages.
10

Jump Height
The gFlight measures the time the athlete is in air. Time in air is measured in
milliseconds (ms). It is measured from the time the athletes foot leaves the
sensor’s beam to when it comes back into contact with the sensor’s beam
(beam disruption).
Time in air is then used to help calculate
jump height which is then displayed as
inches (IN) or centimeters (CM)
11
*Jump height is most accurate when
takeoffs and landings are consistent in
terms of the athlete’s foot position.

Ground Contact Time (GCT)
GCT is the length of time one’s feet are on the ground preceding the jump.
This metric is typically only useful for continuous movements (i.e depth
jumps, hops, or bounds). GCT will not be useful for a single jump.
12
Drop GCT Jump

Reactive Strength Index (RSI)
RSI is derived from ground contact time (GCT) and jump height. It is a
composite score used to measure the level of “reactive strength”.
Typically a higher RSI will yield a more explosive athlete
It was developed at the Australian Institute
of Sport and more information can be easily found
on the web (link below).
13
RSI = Jump Height / GCT
Read more about it here at Science for Sport

gFlight Best Practices - Review
The gFlight is best used indoors (no sun interference from outside)
The gFlight needs to be lined up properly (sensors facing each other)
The gFlight metrics will be best if landings and takeoffs are controlled.
The gFlight needs 6 AAA batteries, 3 in each unit to function
The gFlight’s sensors need to be free of all obstructions
14

Athlete Testing & Tracking
Vertical Jump Testing- the gFlight can be used as a simple and effective
way to assess an athlete’s vertical jump; daily, weekly, or monthly, you get
to decide
Readiness Testing- daily readiness testing can be done using the gFlight,
simply record the athlete’s jump height or RSI and track trends over time ,
this can tell you if the athlete is in a “ready to train” state, major deviations
from day to day may indicate overreaching or fatigue
15

Athlete Testing & Tracking
Force-Velocity Profile Testing- using the JB Morin Force-Velocity profile
generator (or other FVP generator) you can input jump height into the
data sheet, along with other anthropometric measurements the generator
will tell you if your athlete is force, or velocity deficient to help the coach
build a better, more individualized program
Percent Drop-Offs (Fatigability)- percent drop-offs in jump height can be
assessed using the gFlight, first obtain a baseline jump height for the day,
next have the athlete jump before each set of a given exercise, if their
jump height has significantly decreases this would indicate that the athlete
has fatigued and the exercise should be terminated, or the load
decreased 16

Athlete Testing & Tracking
Power Test- this test is used to determine an athlete’s ability to produce and maintain
power, this can be done via a simple power maintenance calculation
Have the athlete jump 15 consecutive times, record each jump with the gFlight app.
Take the average of the first 5 jumps (J1) and the average of the last 5 jumps (J2)
Power Maintained (PM %) = J2 / J1
This percentage represents the athlete’s ability to maintain power overtime
This test can be modified for any number of jumps. Adjust J1 and J2 accordingly to
be equal sized blocks when calculating each average.
17
Table of contents
Popular Accessories manuals by other brands

Oregon Scientific
Oregon Scientific Wireless Outdoor Temperature and Humidity Sensor THGR 238... user manual

MTS Sensors
MTS Sensors Temposonics T Series Operation manual

Chef's Choice
Chef's Choice Trizor XV user manual

CORNING
CORNING LSE 71L instruction manual

RME Audio
RME Audio Babyface user guide

iHome
iHome Health POWERUVC II iUV3 installation guide