Extor 4100r4 User manual

OPERATION, MAINTENANCE, AND INSTALLATION
EXTOR 410
0
r4 ONLINE

s. 2
TABLE OF CONTENTS
BASIC INFORMATION......................................................................................................................................... 3
EY ‐DECLARATION OF CONFORMITY ................................................................................................................ 4
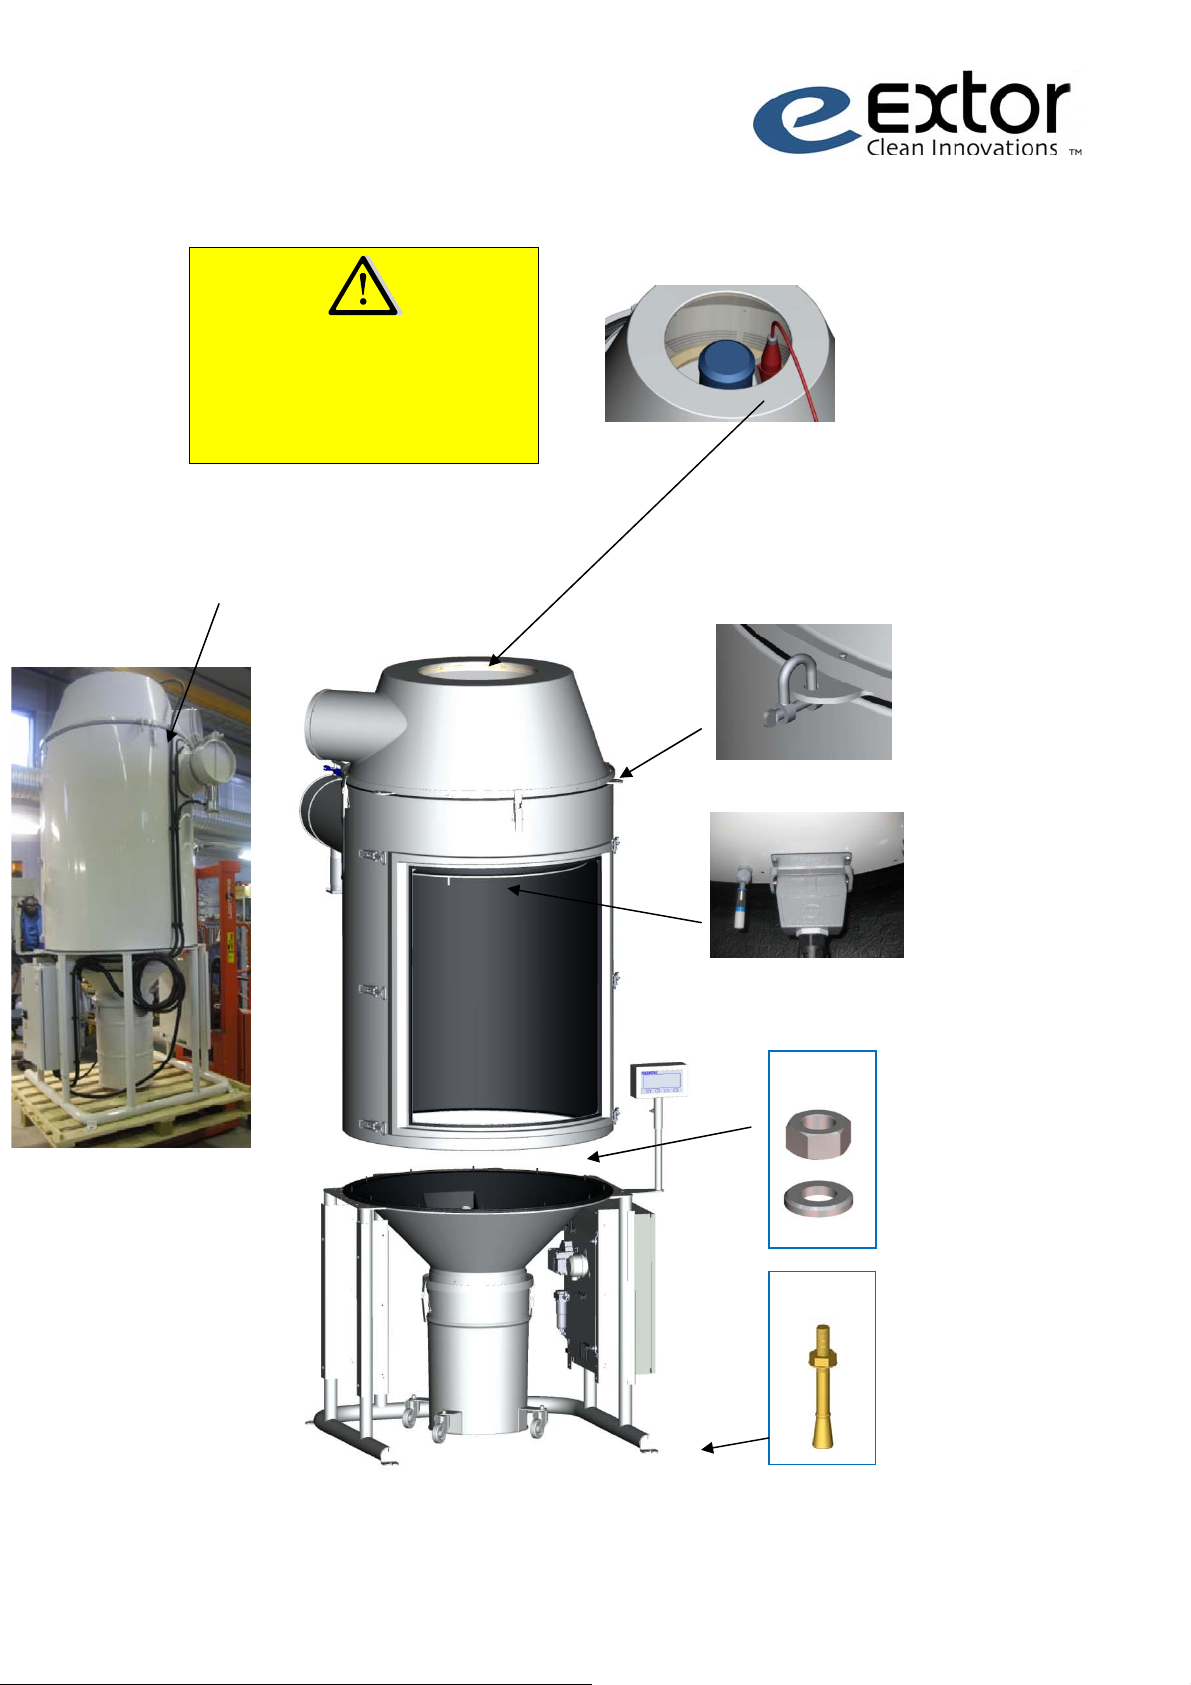
ACCEPTANCE INSPECTION ................................................................................................................................. 5
SAFETY INSTRUCTIONS ...................................................................................................................................... 6
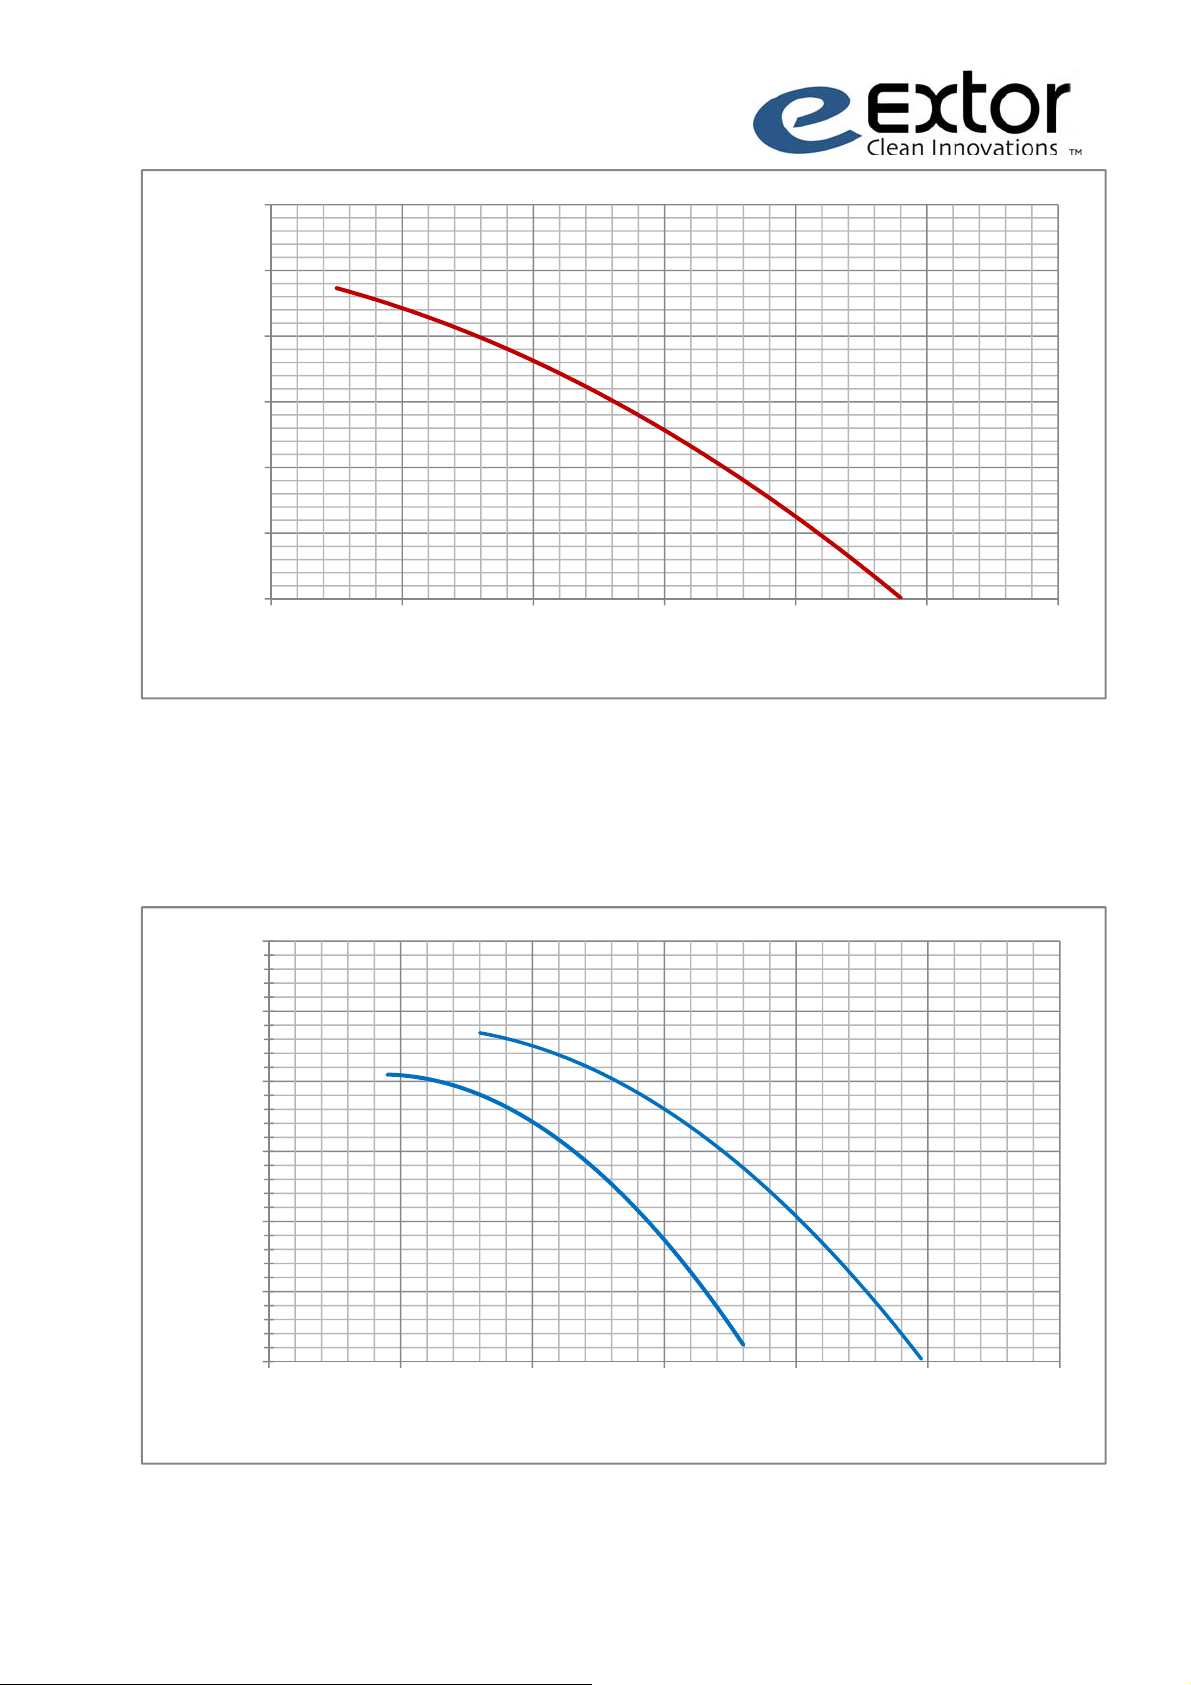
TECHNICAL SPECIFICATIONS.............................................................................................................................. 6
DIMENSIONS...................................................................................................................................................... 8
INSTALLATION.................................................................................................................................................... 8
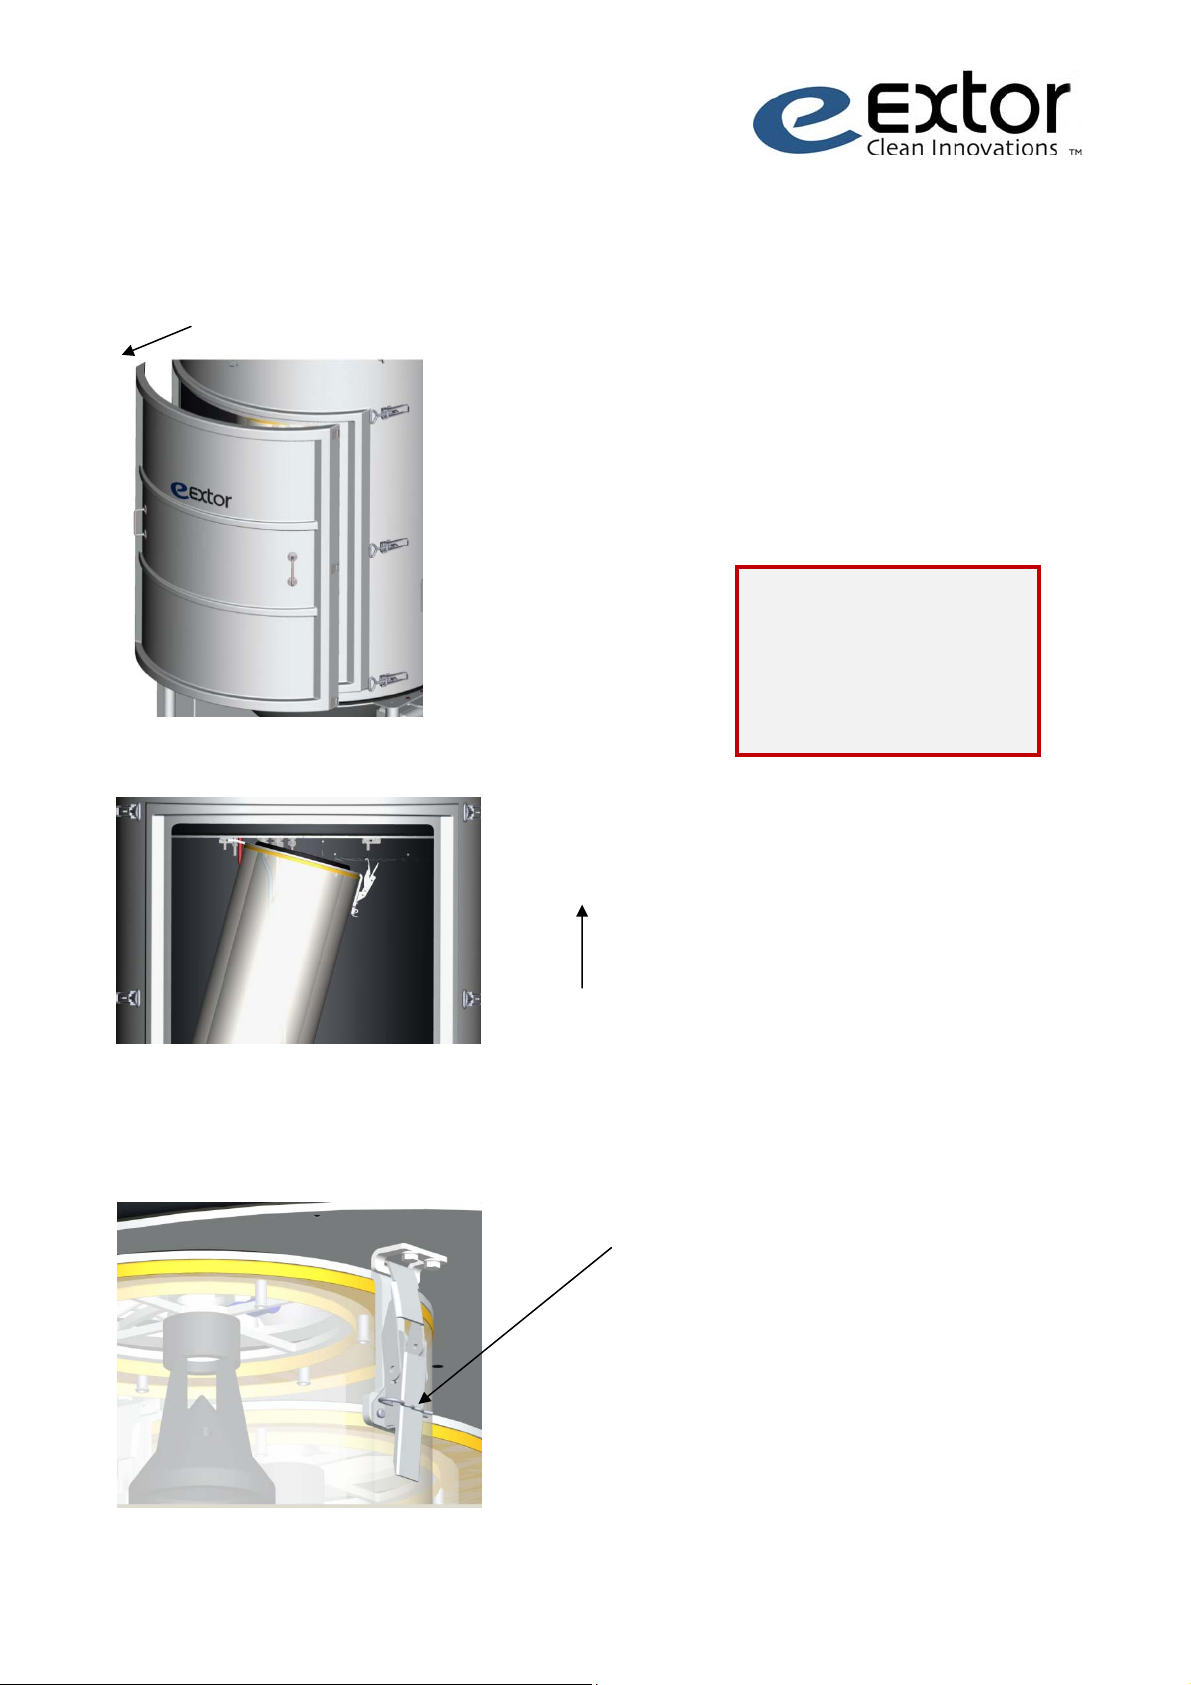
ASSEMBLY.......................................................................................................................................................... 9
INSTALLATION OF THE FILTERS........................................................................................................................ 10
ALIGNMENT OF THE BLOWING OUTLET.......................................................................................................... 11
PRESSURIZED AIR CONNECTION...................................................................................................................... 11
ELECTRICAL CONNECTION ............................................................................................................................... 12
MANUAL CLEANING*....................................................................................................................................... 12
DESCRIPTION OF FUNCTIONALITY................................................................................................................... 13
STARTING AND STOPPING............................................................................................................................... 14
SYSTEM CONTROL SETTINGS ........................................................................................................................... 15
EMPTYING THE COLLECTING BIN (WITH A CLOSING FLAP*) ........................................................................... 17
TESTING OF THE CLEANING SYSTEM ............................................................................................................... 18
REPLACEMENT OF THE FILTERS ....................................................................................................................... 18
REGULAR MAINTENANCE ................................................................................................................................ 19
TROUBLESHOOTING CHART ............................................................................................................................ 20
PART LIST ......................................................................................................................................................... 21
ACCESSORIES ................................................................................................................................................... 22
INSPECTION LIST .............................................................................................................................................. 23

s. 3
Read this instruction manual carefully before you install, operate, or
service the EXTOR 4100 suction equipment. You must follow the
instructions in this manual.
You can ensure that the equipment functions properly by following
the operation and maintenance instructions.
If the equipment has been damaged during transport, report this to
the manufacturer immediately.
The packaging materials (i.e., the wood, cardboard, and plastic, as
well as the binding belts) are non‐toxic and can be burnt safely.
BASIC INFORMATION
This product has been designed and manufactured to comply with
the appropriate requirements of EU directives. In order to retain this
level of quality, competent personnel and original spare parts must
be used during installation, repairs, and maintenance. Extor Oy, the
manufacturer, gives technical assistance and supplies spare parts.

s. 4
EY - DECLARATION OF CONFORMITY
Declaration of conformity
The Extor 4100 – series:
•comply directive (2006/42/EC) on machinery and its
enactment of national directive requirements.
oSFS ‐EN ISO 12100‐1, SFS ‐EN ISO 12100‐2, SFS – EN
1050 (ISO 14121)
•comply low voltage directive (2006/95/EY)
oSFS – EN 60439‐1 + A1:2005, SFS – EN 60439‐3 + A1 +
A2:2001, EN 60204‐1
•comply EMC‐directive (2004/108/EY)
oEN 61000‐6‐1:2007, EN 61000‐6‐2:2005, EN 61000‐6‐
3:2007, EN 61000‐6‐4:2007
Extor Oy
Ruununmaanlaituri
PO.BOX 11
FIN‐48201 KOTKA
FINLAND
Tel. +358 5 2296900
Fax. +358 5 212 066
E‐mail:[email protected]
www.extor.fi
Peter Burman
Type: ____Extor 4100r4_________________________________
Serial number: _XXXX__________________________________
Whenever you deal with the manufacturer, please report the
information listed above.

•
•
•
K
A
CCE
P
Inspect
damag
e
Check t
o
been d
e
If any p
a
been d
a
supplie
r
I
P
TANC
E
the devic
e
.
o
ensure
t
e
livered.
a
rts are
m
a
maged,
p
r
of the d
e
A
O
E
INSPE
C
e for any
t
t
hat all p
a
m
issing or
p
lease co
n
e
vice.
E
J
L
N
M
C
TION
t
ransport
a
rts have
have
n
tact the
J
* =
Part
A. Seal
B. Suct
i
C. Mot
o
D. Con
t
E. Pne
u
F. Filte
r
G. Filte
H. Serv
I. Coll
e
J. Con
t
K. Sucti
L. Pne
u
M. Pre
s
N. Pne
u
O. Ove
r
ACCESSORY
(collecting bin,
i
on unit cover
o
r section 5,5k
W
5,5k
W
t
rol filter
u
matic closing f
r
cleaning unit
r PTFE
ice door
e
cting bin 50L
t
rol centre
on hose d60 L
=
u
matic termina
s
sure gauge
u
matic filter
r
filling sensor*
(SEE PAGE
2
P
50 l)*
E
E
W
50hz
E
W
50/60 hz
E
6
lap 250*
E
E
E
E
E
E
=
10m*
8
l
5
5
5
E
s. 5
2
1)
P
roduct no.
E
08394
E
08480
E
08140
E
08839
6
84161
E
08596
E
08186
E
08498
E
08484
E
08127
E
09113
8
4306033
5
4620
5
8111
5
4593
E
07129
H
D
C
F
B
G

s. 6
NOTE:
This device has been designed for the removal and filtering of non‐explosive, dry dust. The
device should only be used for the purposes described in these instructions. Compliance with
the maintenance instructions in this manual is a prerequisite for the efficient and safe use of
the device.
Frequency [Hz] 50 50/60
Air volume [m3/h] 4800 4100/4800
Vacuum [Pa] 4800 3600/4800
Voltage [V] 400 400
Current [A] 12,3 6,9/12,3
Power [kW] 5,5 5,5
Noise level [dB] 75 70/75
Pressurized air [bar] 4‐5
Consumption of pressurized air [l/m] 120
Pressurized air connection [mm] 8MM
Cleaning of filters pneumatic
Voltage [V] 24
Main filters [m2] 3 x 15
Control filter [m2] 16
Filter material main filters PTFE: 0.3 µm/99.996%
control filter, micro
Weight [kg] 280
SAFETY INSTRUCTIONS
TECHNICAL SPECIFICATIONS

s. 7
0
1000
2000
3000
4000
5000
6000
0 1000 2000 3000 4000 5000 6000
Air volume [m3/h]
Vacuum [Pa]
60 HZ
50 HZ
60 HZ
0
1000
2000
3000
4000
5000
6000
0 1000 2000 3000 4000 5000 6000
Air volume [m3/h]
Vacuum [Pa]
50 HZ

s. 8
Take the following into account when installing
the suction equipment:
‐ensuring that the foundation is even
‐the total weight of the equipment
‐any wind load
‐the need to install the device on a concrete base
or some other foundation that is sufficiently
hard
‐that there must be at least 500 mm of free
space above the suction unit
DIMENSIONS
INSTALLATION

s. 9
x 12
x 4
You must use approved lifting devices
when you lift, assemble, and move
the equipment.
2. Install the upper
section to the
stand. Make sure
that the alignment
is correct.
4. Usually the suction
unit is fastened to the
concrete floor with
expansion bolts. If
necessary, use
adjustment blocks to
ensure levelness of the
3. Connect plug
1. Attach the hoist
lines to the three
lugs. Make sure
that the weight is
distributed evenly.
5. Route cables to cable
clamps
ASSEMBLY
6.Connect the power
plug of the motor.

s. 10
2. Using the slot at the top of the
filter, attach to the holder. Put the
latch in its place and lock it.
3. Lock the latch with a locking pin.
INSTALLATION OF THE FILTERS
1. Remove locks (2x). Open the
latches (6 pcs) and remove
the service door.
NOTE:
Remember to lubricate the
door gaskets with the
silicone stick supplied,
before installation.

A
LIG
N
PRES
S
Make
N
MENT
S
URIZE
D
sure that th
e
360
°
OF TH
E
D
A
IR C
O
e
gasket is i
n
°
Pressur
i
W
a
E
BLOW
I
O
NNEC
T
n
its place
i
zed air
a
ter se
p
arat
o
I
NG
OU
T
T
ION
1.
2.
3.
o
r
•The pr
e
netwo
r
0.5 MP
•Do not
room
w
fall bel
o
•Pressu
r
inferio
r
efficie
n
T
LET
Open the l
o
pcs).
Turn the i
n
direction.
Lock the la
NOTE:
e
ssure in th
e
r
k must be b
e
a (4‐5 bar, 5
install a wa
t
w
here the te
m
o
w 0 °C.
r
ized air tha
t
r
pressure c
a
n
cy of the cl
e
s. 11
o
cking latch
e
n
let in the d
e
tches.
e
pressurize
d
e
tween 0.4
a
8‐72 PSI).
t
er separato
r
m
perature
m
t
is unclean
o
a
n weaken t
h
e
aning syste
m
e
s (4
e
sired
d
air
a
nd
r
in a
m
ay
o
r has
h
e
m
.

s. 12
NOTE:
Check the arrow mark on the motor
to verify that the motor is rotating in
the right direction. If the motor
rotates in the wrong direction, the
suction effect is reduced by more
than 50%.
5x32 A 400V
1.Connect the hose.
2.Start cleaning.
3.Disconnect the hose.
NOTE!
When hose is connected there is no
suction in duct.
ELECTRICAL CONNECTION
MANUAL CLEANING*

s. 13
DESCRIPTION OF FUNCTIONALITY
The suction air is guided
into the filter unit
tangentially.
The clean air can be used
for suction blowing, which
makes the dust removal
significantly more effective.
Some of the clean air is guided
through the control filter back into
the room air.
After the collecting bin is
full, the closing flap is
closed, and the collecting
bin can be emptied while
the suction equipment is
running (option).
Dust particles move on the
rim of the filter unit flange,
and about 80% of the dust
goes directly into the
collecting bin.
You can connect a hose to
the cleaning inlet for
manual vacuuming
(option).
Close off suction from the filter
you want to clean, and then shoot
a pressure impulse into the filter.
The pressure impulse removes
any dust that has accumulated on
the filter surface.

s. 14
STARTING AND STOPPING
3. Turn the main switch to position 1.
Press 'F1', and the
suction machine will
start.
Press 'F2', and the
suction machine will
stop.
If you want to bypass cleaning after
use, press 'F4' after you have
stopped the suction machine.
1. Connect the pressurized air system.
2. Connect the electrical plug

s. 15
SYSTEM CONTROL SETTINGS
CLEANING DURING USE
The filter cleaning system has been designed to be fully automatic. The cleaning round begins
when the pressure loss of the filters is high enough. Cleaning ends when the pressure limit set
has been reached. It is possible to change the pressure limit thresholds for cleaning from the
display device or from the control centre logic display.
Setting pressure limits and cleaning rounds from the control panel:
1. press the 'F4' button and hold for four seconds
2. select the value to be changed by using the arrow keys
3. press the 'ESC' button, holding for two seconds, and then press 'OK'
4. move to the number to be changed by using the arrow keys
5. you can change the numerical value by using the arrow keys
6. if you first depress the 'ESC' key for two seconds and then hold it for one second, you
can go back in the menu and select another value to change
7. press 'F4' when you want to exit the settings
NOTE:
The control logic has two alternatives: factory settings and customized settings. It is not
possible to change the factory settings. In the customized settings, the number of
cleaning rounds and the pressure thresholds for cleaning can be changed. You can move
from factory settings to customized settings by keeping 'F2' and 'F4' pressed
simultaneously for 10 seconds.

s. 16
CLEANING AFTER USE
Cleaning after use begins when you press the 'F2' button to stop the suction machine. The
suction machine continues to operate, with the suction inlet closed, during cleaning. It is
possible to change the number of cleaning rounds from the display device or via the control
centre logic display.
REMOTE START
You can start the suction unit remotely, either by using a separate switch or with a command
given by the machine tool. You must activate remote start with the 'F3' button from the display
device or from the control centre logic control system.

s. 17
WARNING!
•Turn the safety switch to
position “0” before you start
any maintenance work.
•Shut off the supply of
pressurized air and drain the
pressure from the system
before you open the service
door.
•Use safety goggles, a breathing
mask and safety gloves when
you carry out repairs or
maintenance work inside the
device.
•Shut off the supply of
pressurized air and drain the
pressure from the system
before you open the service
door.
6. Mount the
collecting bin.
* = ACCESSORY
EMPTYING THE COLLECTING BIN (WITH A CLOSING FLAP*)
•
All maintenance points must be
inspected regularly to ensure
that the suction unit operates as
planned.
•The amount and composition of
the material filtered contribute
to the need for maintenance.
•Any broken or worn parts must
be replaced with new ones.
1. Open the
fastening
latches of the
tank.
2. Empty the
collecting bin.
3. Remove the
accumulated
dust from the
bottom section
of the cone and
check the
gasket.
4. Make a hole
with a diameter
of approx. 15
mm
5. Place the plastic
bag in the
collecting bin, so
that the hole
comes inside the
collecting bin.
After the collecting bin has become full, an indicator light on top of the display device will come
on. If the suction machine is equipped with a closing device in the collecting bin, the bin can be
emptied during use. After emptying the bin you must confirm the procedure by pressing 'F4' to
open the seal.
It is possible to empty the collecting bin during use even if it is not full. You must first close the
seal of the collecting bin by pressing 'F1' on the display device and holding for four seconds; then
you can detach the collecting bin. After emptying the bin you must confirm the procedure by
pressing 'F4' to open the seal.

s. 18
•Start testing by pressing the 'F3' button for 10 seconds.
•First the system runs the work cycle of the closing flaps of the filters three times, so you
should hear the sounds of opening and closing a total of nine times.
•Then the system tests the impulse valves. The valves give a pressure impulse at 10‐
second intervals. If the interval between the impulses is 20 or 30 seconds, some valve is
defective.
•If you detect a malfunction, please see the troubleshooting guide.
9. Inspect the condition of the
gasket of the filter disc, and make
sure that the gasket is tight. If the
gasket has come loose, you can glue
it with instant adhesive.
TESTING OF THE CLEANING SYSTEM
REPLACEMENT OF THE FILTERS
1. Turn the safety switch to
position “0”.
2. Shut off the supply of
pressurized air.
4. Pull the plastic bag over the filter.
5. Open the filter fastening latch
and remove the filter.
6. Repeat this procedure for all
other filters.
7. Open the hexagon socket head
screws (six pcs) located at the top of
the filter.
8. Detach the fastening section of
the filter, and fasten it to the new
filter.
10. Set the filters in their places. See
the item 'Installation of the filters'.

s. 19
NOTE:
The Teflon filters can be washed with water. The maximum water temperature is 40 °C and the
maximum pressure is 50 bar. Spray the filters from the outside, from a distance of approximately 400
mm. The filters must be COMPLETELY dry before use.
After 2000 operating hours or at 12‐month intervals:
•Check the water separator of the pressurized air system. The water separator is located
beside the pressurized air connection.
•You must replace any filter that has damage to its external surface, or if the suction
effect is weak even after cleaning.
•Check the control filter, and vacuum away any dust that has accumulated on the
external surface. If the filter surface is very dirty, the filter must be replaced with a new
one.
•Check the condition and joints of the wires and pressurized air hoses.
•Make sure that the fastening latches are tight; tighten if necessary.
After 1000 operating hours or at six‐month intervals:
•Make sure that the cleaning system is operating.
•Check and lubricate the gaskets.
REGULAR MAINTENANCE

s. 20
TROUBLESHOOTING CHART
The suction machine will
not start.
Is there any text on the
display of the control
unit?
Check the power to the
control centre. If the
power supply is not
faulty, contact the
manufacturer.
Does the display show a
message about motor
protection?
Contact the manufacturer.
Are you starting the suction
machine remotely?
Make sure that the suction
machine is in remote
operating mode.
Make sure that the suction
machine is in the local
o
p
eration mode.
The suction effect is
weak.
Is the pressure loss
excessive (> 2000 Pa)?
Is the filter cleaning
system operating?
Replace the filters.
Does the motor rotate in the
right direction?
Contact a professional
electrician.
Make sure that any sliding
traps in the channel system
are open and that there are
no obstructions in the
channel system.
Contact the manufacturer.
Table of contents