Eyecon BlackWidow TV1012 User manual


2
PLEASE REGISTER TO ACTIVATE YOUR PRODUCT’S WARRANTY.
Model TV1012
User's Manual
Second Edition, February 2013. Published by BGHA, Inc., Windom, MN.
© 2013 BGHA, Inc. All rights reserved.

3
PLEASE REGISTER TO ACTIVATE YOUR PRODUCT’S WARRANTY.
CAMERA DIAGRAM........................................................4
ITEMS REQUIRED FOR STARTUP ..................................5
BATTERY INSTALLATION...............................................6
MEMORY CARD INSTALLATION....................................7
QUICK SETUP..................................................................8
ADVANCED SETTINGS & FUNCTIONS..........................9
BLACK WIDOW MOUNTING & FIELD SETUP..............12
CAMERA CARE .............................................................13
TROUBLE SHOOTING...................................................14
WARRANTY INFORMATION ........................................16
PRODUCT REGISTRATION CARD ................................17
WARNING!
Prolonged exposure from looking directly into any infrared
light could cause cataracts or permanent retinal damage. Do not look directly
into the camera during test mode! Failure to follow this warning may cause
serious injury or blindness!
WARNING!
Do not expose camera interior components, batteries, or SD
card to rain or water. Make sure camera and hands are completely dry before
handling. Failure to follow this warning may result in serious damage to the
camera and/or its parts, personal electrical shock or death!
WARNING!
Only batteries as designated in this manual should be used.
Failure to follow this warning may result in leaking batteries, serious damage
to the camera, and personal injury or death!

4
PLEASE REGISTER TO ACTIVATE YOUR PRODUCT’S WARRANTY.
Camera Options
Column
Case Door
(Open)
C-Cell Battery
Comparment
C-Cell Battery
Comparment
Plus Arrow
Minus Arrow
Set Button
Case
Door
Latch
Power
On/O
Button
SD Card
Slot
Ambient
Light Sensor
Red Walk
Test

5
PLEASE REGISTER TO ACTIVATE YOUR PRODUCT’S WARRANTY.
ITEMS REQUIRED FOR STARTUP:
• 6C-CellAlkalineBatteries (Sold separately)
• 1 SDHC Storage Card (up to 32GB; 4GB or higher recommended)
(Sold separately)
NOTE: Eyecon™Trail Cameras can accept SD cards up to 32GB, but testing
shows that maximum performance is obtained at 16GB.
• 1ExternalSDmemorycardreader for viewing photos/videos.
(Sold separately)
• OPTIONAL:1ModelTVA100Extenda-Liferechargeablelithiumbattery
pack. (Sold separately)
NOTE: Your BlackWidowTrailCamera is designed with a dual power supply.
The camera will operate using sixCsizealkalinebatteries or the TVA100
Extenda-Lifebatterypack, or a combination of both. If both alkaline and
the Extenda-Lifepack are used together the camera will run on the external
Extenda-Life pack until depleted and then automatically switch to the
internal alkalineCbatteries. It will always run on the external pack rst when
both battery sources are installed in the camera.
To see which battery source the camera is using, look at the batteryindicator.
If there is an Lon the left side of the batteryindicator this means the camera
is running on the TVA100Extenda-LifeLithiumpack. If a Chas replaced the
Lthis means the camera has switched over to the internal alkalineCbatteries
and you should remove the Extenda-Lifepack for recharging.

6
PLEASE REGISTER TO ACTIVATE YOUR PRODUCT’S WARRANTY.
BATTERY INSTALLATION:
IF USING C-CELL BATTERIES
1. Turn batterydoor lock to open position to release door located on the
bottom of the camera.
2. Insert (3) C-cellbatteries, negative (–) side inserted rst into one side.
3. Close the batterydoor and position lock to locked position.
4. Repeat on opposite side.
IF USING EYECON™EXTENDA-LIFE BATTERY PACK
1. Remove plastic plug on the back side of the camera. NOTE: Save this plug
for future use. It should ALWAYS be in position when the Extenda-Life
Battery Pack is not being used.
2. Insert Extenda-LifeBatteryPack by sliding it into position until it “clicks”
into place.

7
PLEASE REGISTER TO ACTIVATE YOUR PRODUCT’S WARRANTY.
MEMORY CARD INSTALLATION:
TO INSTALL THE SD CARD (Sold separately)
1. Open case door.
2. Insert the SDcard face up into the SDCardSlot until you hear it click into
place. Press it once to remove.
NOTE: It is recommended not to use a card that has been previously used in
dierenttrailcameras or one that has previously been used in a Point&
ShootCamera unless it is rst formatted. It is also not recommended to view
pictures in a Point&ShootCamera as read errors may occur. Always format
brand new SDHC cards; a FullFormat is recommended over a quick format.
ALWAYS FORMAT BRAND NEW AND PRIOR USED SDHC CARDS PRIOR
TO USE IN THE TRAIL CAMERA.
PHOTO SIZE
(Resolution)
MEMORY CARD SIZE = NUMBER OF PHOTOS
4GB 8GB 16GB 32GB
1.3 MP 8000 16000 32000 64000
3.0MP 3619 7238 14476 28952
5.0MP 2381 4762 9524 19048
Video(30Sec) 433 866 1733 3466

8
PLEASE REGISTER TO ACTIVATE YOUR PRODUCT’S WARRANTY.
QUICK SETUP:
Your Black Widow Trail Camera will come with the following standard
options already preset so that quality photos may be taken right out of the
box without changing any settings.
MODE: Photo BURST: 3 photo-burst
RESOLUTION: 1.3mp DELAY: 10 sec
If you wish to customize your own settings proceed to AdvancedSettings&
Functions.
Camera
Options
Column
Battery
Indicator
Arrow
Indicates
Selection
UserSetupScreen

9
PLEASE REGISTER TO ACTIVATE YOUR PRODUCT’S WARRANTY.
ADVANCED SETTINGS & FUNCTIONS:
Press and quickly release the powerbutton to activate the camera and view
the usersetupscreen.
Setting the functions is easy; simply use the +or –arrows to select the feature
(blinking) you wish to change and then push the SETbutton. Each feature will
blink and can be changed using the +/–arrows and then push SET to move
to the next feature.
CLOCK: This will set the Time,Date and Year that will be stamped onto the
bottom of your photos.
To set the TIME: Use either the +or –arrows and scroll up until the “Clock”
starts to ash. Press the SETbutton and Clock will stop ashing, and either
“AM” or “PM” will start to ash. Use the arrows to select the correct setting
and press the SETbutton to move on to the “Hour” setting. Use the +or –
arrows again to set the correct Hour, press the SETbutton and move on to
get the “Minutes” to ash. Arrow up or down the correct Minutes and hit
SET to nish setting the time. This will bring you back to the cameraoptions
column, where you’ll notice the “Clock” is ashing again.
To set the MONTH: Use the +or –arrows and scroll down until the “Date”
starts to ash. Press the set button and you will see “MM” start to ash.
Pressing the setbutton again will allow you to select the correct Month. Use
the +or –arrows to change the Month setting.
To set the DAY: Press the setbutton again and you will see “DD” start to ash.
Pressing the setbutton again will allow you to select the correct Day. Use the
+or –arrows to change the Daysetting.
To set the YEAR: Press the setbutton again and you will see “YY” start to
ash. Pressing the setbutton again will allow you to select the correct Year.

10
PLEASE REGISTER TO ACTIVATE YOUR PRODUCT’S WARRANTY.
Use the +or –arrows to change the Year setting.Press the setbutton again
and this will bring you back to the camera options column and you will
notice the “Date” is ashing again.
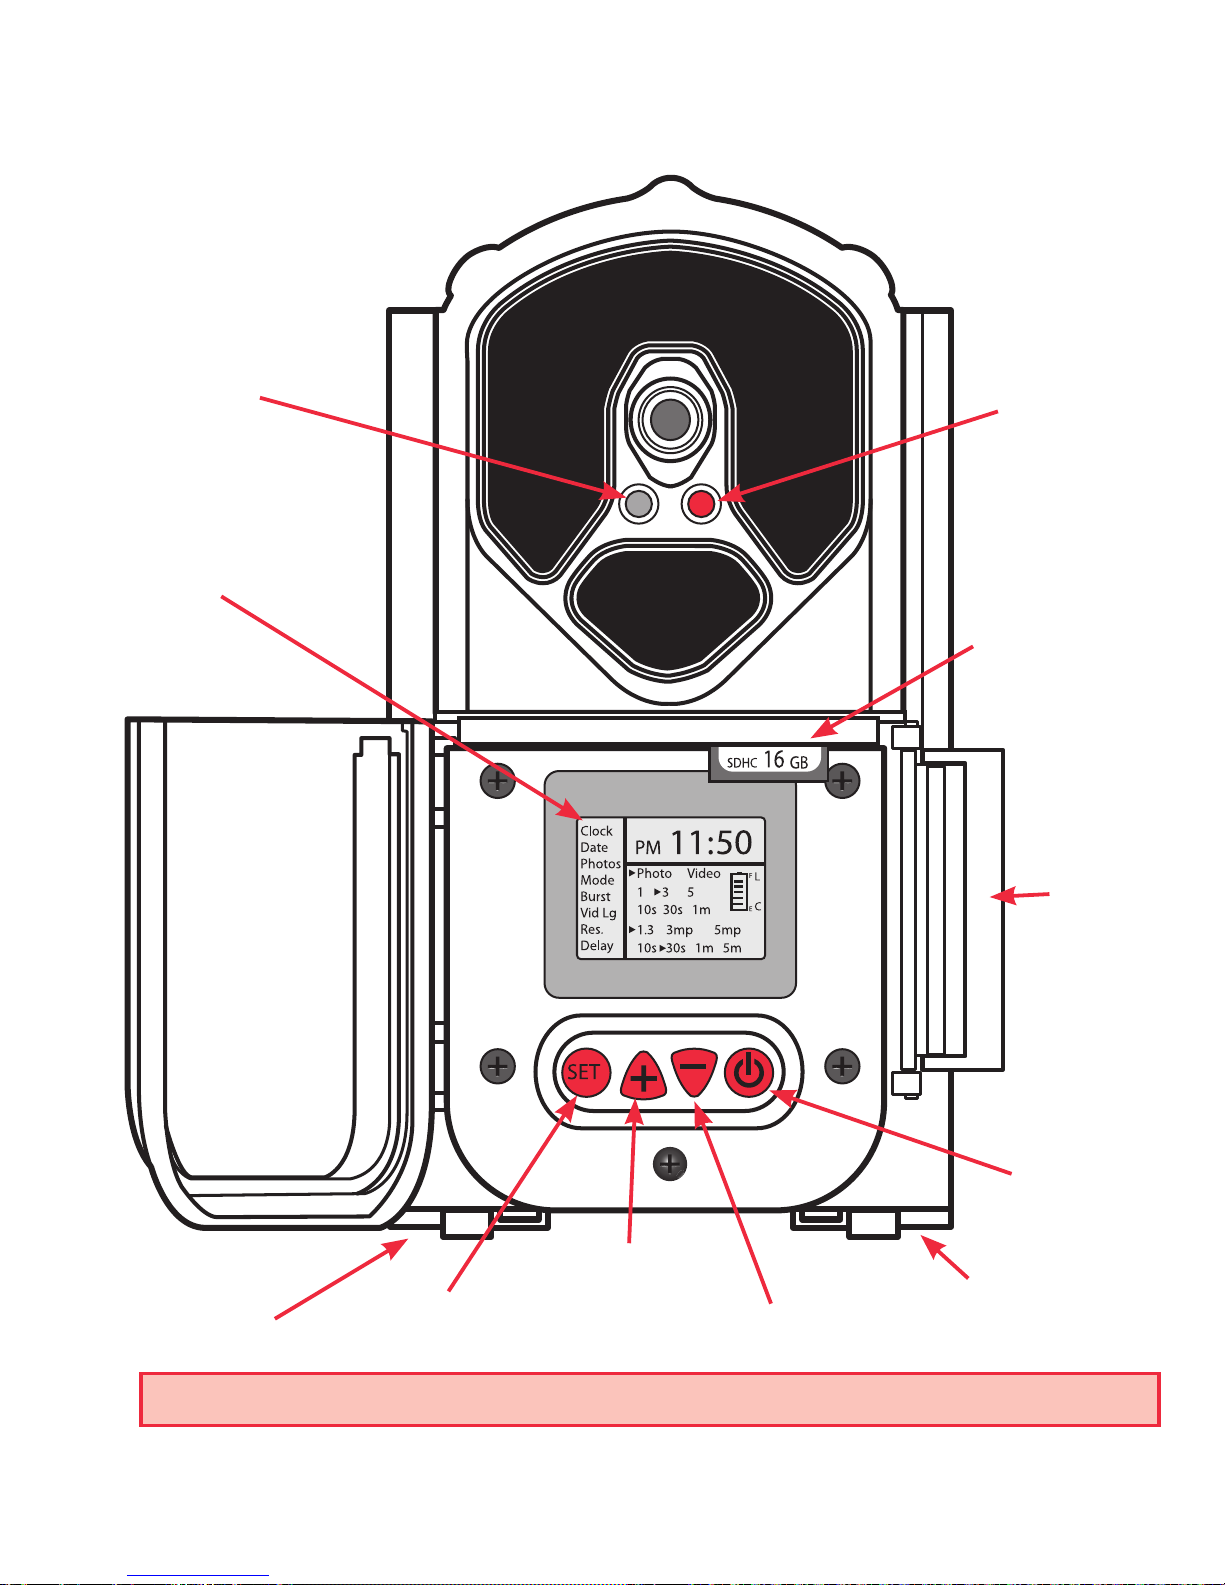
PHOTO: This option will show you how many photos and/or videos the
camera has taken.
To check PHOTOS: Use the +or –arrow to scroll down to “Photos”
MODE: Mode selects whether you would like the camera to take still photos
or take video clips. Options are: Photo (still) or Video.
To set the MODE: Scroll down by pressing either the +or –arrows until the
“Mode” starts to ash. Press the setbutton until an arrow starts to ash by
either Photo or Video, this determines what Modethe camera is in. Press the
+or –arrows to select either the Photo or Video setting. Press the setbutton
again to lock in the setting and exit Mode. You will see “Mode” ashing again
in the cameraoptioncolumn.
BURST: Burst selects how many photo images you would like the camera to
take in a row before set trigger delay kicks in. Options are: 1,3,or5.
To set the BURST: Use the +or – arrows to scroll down until the “Burst”
starts to ash. Press the setbutton until an arrow ashes at one of the Burst
settings. Use the +or – buttons to select the desired Burstsetting. Press the
setbutton again to lock in that setting and exit Burst. You will see “Burst”
ashing again in the cameraoptionscolumn.
VID LG: This setting selects the length you would like each video to be.
Options are: 10seconds,30secondsor 1min.
To set the VIDEO LENGTH: Use the +or –arrows to scroll down until the
“VideoLG” starts to ash. Press the setbutton until an arrow ashes at one

11
PLEASE REGISTER TO ACTIVATE YOUR PRODUCT’S WARRANTY.
of the Video settings. Use the +or –arrows to select the desired Video LG
setting. Press the setbutton again to lock in that the setting and exit Video
LG. You will see “VideoLG” ashing in the cameraoptionscolumn.
RES: This setting selects the resolution at which you would like the camera
to take the pictures. A higher resolution photo requires more storage. Options
are: 1.3MP,3MP,or5MP.
To set the RESOLUTION: Use the +or –arrows to scroll down until the “Res”
starts to ash. Press the setbutton until an arrow ashes at one of the Res
settings. Use the +or –arrows to select the desired Res setting. Press the set
button again to lock in that setting and exit Res. You will see “Res” ashing
again in the cameraoptionscolumn.
DELAY: This setting selects the trigger delay at which you want to run your
camera. This is the amount of time between each trigger or set of photo
bursts. Options are: 10seconds,30seconds,1minuteor5minutes.
To set the DELAY: Use the +or –arrows to scroll down until “Delay” starts to
ash. Press the setbutton until an arrow ashes at one of the Delay settings.
Use the +or –arrows to select the desired Delay setting. Press the setbutton
again to lock in that setting and exit Delay. You will see “Delay” ashing again
in the cameraoptionscolumn.

12
PLEASE REGISTER TO ACTIVATE YOUR PRODUCT’S WARRANTY.
BLACK WIDOW MOUNTING & FIELD SETUP
The BlackWidow comes with a 6 ft nylon mounting strap which allows for
quick and easy mounting. The camera back is unique in that it has 12 vertical
large bark biters and 5 dierent adjustment slots. This allows for several
strap placement options or another strap can be added depending on your
application. Either way, you can be guaranteed that the Black Widow will
mount to just about anything.
a. The ideal mounting height for deer or big game should be waist high or
around 36 to 40 inches from the ground. For shorter game like bear or turkeys
knee high will work better.
b. The motion detection angle of your BlackWidow is about 50 degrees which
also matches the camera (FOV) Field of View. The motion detection distance in
ideal conditions is between 50-70 ft. This can be greatly aected by weather
conditions, animal body size, and speed at which an animal passes through
the detection zone.
ARMING THE CAMERA: There are two dierent ways your Black
Widowcan be armed. The camera will automatically arm itself if the user does
not press any of the camera buttons once powered on, which includes an
automatic 15 sec on screen countdown. Or it can be force armed by pressing
the +and –arrows at the same time until the screen goes blank.
To wake the display simply press the power on button, do NOT hold the
button down or the camera will shut o. Note: if the camera is in the process
of taking still photos or videos it must rst complete the process before it will
wake up.

13
PLEASE REGISTER TO ACTIVATE YOUR PRODUCT’S WARRANTY.
RED WALK TEST: The redwalktestlight on your BlackWidow is
used to help determine that your camera is set at the proper height and is
pointed in the right direction. After 90 seconds the red walk test will shut o
and remain o until one of the user interface buttons is pushed. The redwalk
testlight can only be activated by a combination of heat and motion.
Note: your camera does not wait to start taking pictures until the redwalk
test shuts o. For example if you have the delay set to 10 seconds it will
record pictures within 10 seconds after the screen goes blank.
CAMERA CARE
Moisture,vibration,and extremetemperature can cause severe damage
to your trail camera and should be avoided. Keeping your camera free from
moisture and vibration and using in the correct temperatures will assure you
many years of maintenance free service and operation.
MOISTURE: Although all Eyecon™TrailCameras have a very durable
plastic composite case which also makes them water resistant even under
the most extreme weather conditions, care must be taken to prevent water
damage.
•NEVER mount your trail camera upside down or leave the case open for an
extended period of time.
•NEVER change batteries, camera settings or SD cards in heavy rain.
•
If your camera would happen to get water inside, remove the batteries
immediately and allow the camera to dry out for several days before activating it.

14
PLEASE REGISTER TO ACTIVATE YOUR PRODUCT’S WARRANTY.
VIBRATION: Like any electronic device your Eyecon™TrailCamera is
designed with many small electronic components that are very sensitive to
vibration. Failure to follow careful handling & transport may cause extreme
and irreparable damage to your camera.
•NEVER drop the camera on a hard surface
•ALWAYS transport your camera in a method to avoid bouncing around or
vibration.
TEMPERATURE:
Recommended storage and operating temperature: -10°F to 120°F.
NOTE: Battery life and functions may discontinue or experience shortness in
extreme cold/warm temperatures.
•NEVER store your camera in a vehicle or other contained environment with
extremely high temperatures for an extended period of time!
NOTE: The BlackWidow is designed with a low battery voltage shut down
to ensure maximum camera performance. For example if your camera was in
use for several weeks or months and you push the power button to wake it
up you may notice a FlashingBatteryWarning in the area were the date and
time normally are. The only way to clear the battery warning is to remove and
replace the batteries. It is highly recommended NOT to use the camera until
the batteries have been replaced.
TROUBLE SHOOTING
CAMERA NOT RESPONDING: If your camera at anytime does not respond
when the buttons are pushed or you cannot turn it o, your camera may be
locked up. The best way to resolve this problem is to open one of the battery

15
PLEASE REGISTER TO ACTIVATE YOUR PRODUCT’S WARRANTY.
doors for a period of 10 seconds. This will cut the main power supply to the
camera and will take care of the problem. If you are using both the external
TVA100 Extenda-Life lithium Battery Pack and internal Alkaline supply,
you will need to do the same for both.
BAD SDHC CARD: Over time a SDHC or any storagedevice could become
corrupt. If your camera fails to acknowledge the SDcard we recommend that
you replace the card with a new SDcard or one from a dierent EYECON™
Trail Camera that you know works. This will help determine whether the
problem is the SDcard or the camera. We do NOT recommend using cards
that have been used in cameras from dierent companies and/or dierent
styles of cameras.
NOTE: It is recommended not to use a card that has been previously used in
dierenttrailcameras or one that has previously been used in a Point&
ShootCamera unless it is rst formatted. It is also not recommended to view
pictures in a Point&ShootCamera as read errors may occur. Always format
brand new SDHC cards; a FullFormat is recommended over a quick format.
ALWAYS FORMAT BRAND NEW AND PRIOR USED SDHC CARDS PRIOR
TO USE IN THE TRAIL CAMERA.
IMAGE QUALITY: Your BlackWidowTrailCamera is designed to give you
optimum trigger speed along with great night photo clarity. There may
be some instances where an animal is moving extremely fast or low light
conditions may be bad causing a smearing/blurry object within your image.
This is a natural part of photo taking and may occur from time to time.
FIRMWARE UPDATES: To ensure maximum performance and reliability from
your camera periodically check our website for the most current rmware
updates and installation for your camera at www.eyecontrailcameras.com

16
PLEASE REGISTER TO ACTIVATE YOUR PRODUCT’S WARRANTY.
WARRANTY AND REGISTRATION
EyeconTrailCamera's 1Year LimitedWarranty: For a period of 365 days
after purchase, Big Game® Treestands will, at its discretion, repair or replace
this product for any reason of any defect or malfunction. This warranty is
only valid if the product is used for the purpose intended and has not been
tampered with and/or physically damaged in any way. Products that have
been damaged due to negligence or misuse do not qualify for warranty
replacement.
TO ACTIVATE WARRANTY:
• You MUST register your BlackWidowTrail Camera within 30 days of
purchase to receive any warranty protection!
• You MUST keep a copy of your receipt as Proof of Purchase for any
warranty protection!
TO OBTAIN A WARRANTY CLAIM:
1. You MUST call our customer service department at 800-268-5077
or 507-831-4350 and follow all troubleshooting requests rst.
2. If Warranty Claim is approved, a RANumber will be given to you; keep this
for your records.
3. RemoveyourSDcardandbatteries(any items other than original camera
casing will be destroyed and not returned with new item)
4. Includeacopyofyouroriginalreceipt,yourRA#,andacheckorcredit
cardnumberfor$20.00shipping/handlinginthebox.
5. Shiptheboxprepaidto: Big Game Treestands, Camera Returns, 1905 1st
Avenue N., Windom, MN 56101. MakesuretoputtheRA#inboldletters
ontheoutsideofthebox.

17
PLEASE REGISTER TO ACTIVATE YOUR PRODUCT’S WARRANTY.
To activate your product’s warranty, please mail in your registration
card or submit it online at www.biggametreestands.com
PRODUCT REGISTRATION
Product Purchased
Model Number
Serial Number
Owner’s Name
Street Address
City State Zip Code
E-mail Address Phone
Owners Age (optional) Sex (optional) M F
Date Purchased
Purchased From (Dealer Name)
How did you hear about us: Catalog Webpage Friend
Magazine Other, Please Explain
Are you a: Bow Hunter Gun Hunter Both
Treestand Preference: Fixed Position Climbing Ladderstand

18
PLEASE REGISTER TO ACTIVATE YOUR PRODUCT’S WARRANTY.
Remembertoactivateyourproduct’swarranty?
See warranty information and registration
instructions on page 16 and then complete and
mail in the registration card on page 17
or submit it online at:
www.biggametreestands.com

19
PLEASE REGISTER TO ACTIVATE YOUR PRODUCT’S WARRANTY.
OWNER’S RECORD
Product Name
Model Number
Serial Number
Purchased From
Purchased Date
YOU MUST RETURN THE COMPLETED REGISTRATION CARD ABOVE
WITHIN(30)DAYSOFTHEPURCHASEINORDERTOACTIVATETHELIMITED
WARRANTY COVERAGE. (Make sure to include date purchased on the card!)
NOTES:

POBox382•Windom,MN56101
800-268-5077•507-831-4350
Table of contents
Other Eyecon Scouting Camera manuals