EZ-CHARGE PROCHEM User manual

86037360-D 03/05/07
PRV N0. 980144
EZ-CHARGE
Water Softener
Operating Instructions (ENG)
MODELS: PROCHEM
Read instructions before operating the machine.

86037360 03/05/07 1
Welcome…and congratulations on your purchase of the EZ-Charge Water Softener. This instruction manual
has been designed as a guide for operating and serving you unit.
NOTE: Read this manual completely before installing or operating this unit.
Proper operating and service are essential to the efficient functioning of the unit. When maintained correctly, this
unit will have a long, trouble-free life.
The service methods describe in this manual are explained in such a manner that servicing may be performed
accurately and safely. Proper service varies with the choice of procedure, the skill of the mechanic, and the tools
or parts available. Before attempting any repair, make certain that you are thoroughly familiar with this equipment
and equipped with the proper tools. Any questions pertaining to operating or servicing this unit should be directed
to you nearest dealer.
Make certain that you read all instructions entirely before proceeding with the operation of the unit.
THIS UNIT MUST BE INSTALLED IN ACCORDANCE WITH THE INSTALLATION INSTRUCTIONS
DESCRIBED IN THIS MANUAL.
This operation and service manual is written specifically for EZ-Charge Water Softener which is manufactured by:
Professional Chemicals Corporation
325 South Price Road
Chandler, Arizona 85224
Information in this document is subject to change without notice and does not represent a commitment on the part
of Professional Chemicals Corporation.
All rights reserved. Copyright ©1995 by Professional Chemical Corporation. No part of this work may be
reproduced or used in any form or by means – graphic, electronic, photocopying, taping or electronic retrieval
systems – without the express written permission of Professional Chemicals Corporation.
Published by Professional Chemicals Corporation.

TABLE OF CONTENTS
86037360 03/05/07
2
Welcome ...........................................................1
Table Of Contents.............................................2
HOW TO USE THIS MANUAL
How To Use This Manual..................................1-1
RECEIVING YOUR UNIT
Acceptance Of Shipment ..................................1-1
Equipment List ..................................................1-1
SAFETY
Safety Instructions.............................................2-1
SPECIFICATIONS
Softener Capacity.............................................. 3-1
Water Supply Temperature...............................3-1
Water Hardness Map........................................3-2
INSTALLATION
Positioning The Unit In Vehicle.........................4-1
Dimensional Data..............................................4-2
OPERATION
Theory Of Water Softening ...............................4-3
First Run Operation........................................... 4-4
Checking Water Hardness................................4-4
REGENERATION
Preparing The Brine Tank.................................4-5
Regenerating The Water Softener....................4-5
MAINTENANCE
Troubleshooting ................................................4-7
PARTS LIST
Tank & Tray.......................................................5-1
Filter Assembly..................................................5-3
Brine Tank Assembly ........................................5-5
Warranty............................................................5-8

HOW TO USE THIS MANUAL
86037360 03/05/07 3
This manual contains the following sections:
- HOW TO USE THIS MANUAL
- SAFETY
- OPERATIONS
- MAINTENANCE
- PARTS LIST
The HOW TO USE THIS MANUAL section will tell
you how to find important information for ordering
correct repair parts.
Parts may be ordered from authorized dealers.
The SAFETY section contains important information
regarding hazard or unsafe practices of the
machine. Levels of hazards is identified that could
result in product or personal injury, or severe injury
resulting in death.
The OPERATIONS section is to familiarize the
operator with the operation and function of the
machine.
The MAINTENANCE section contains preventive
maintenance to keep the machine and its
components in good working condition. They are
listed in this general order:
- Regular maintenance
- Troubleshooting
The PARTS LIST section contains assembled parts
illustrations and corresponding parts list. The parts
lists include a number of columns of information:
- REF – column refers to the reference
number on the parts illustration.
- PART NO. – column lists the part
number for the part.
- DESCRIPTION – column is a brief
description of the part.
-NOTES – column for information not
noted by the other columns.
NOTE: If a service or option kit is installed on your
machine, be sure to keep the KIT INSTRUCTIONS
which came with the kit. It contains replacement
parts numbers needed for ordering future parts.
NOTE: The 98# on the lower left corner of the front
cover is the part number for this manual.

RECEIVING YOUR UNIT
86037360 03/05/07
1-1
ACCEPTANCE OF SHIPMENT
Every part of you EZ-Charge Water Softener was carefully checked, tested and inspected, before it left our
manufacturing plant. Upon receiving the unit, make the following acceptance checks.
1. The unit should not show any outward signs of damage. If damage, notify the common carrier immediately.
2. Check you equipment and packing list. The standard EZ-Charge Water Softener should arrive equipped with
the following items (unless otherwise specified) :
EQUIPMENT LIST:
Cation resin softener tank (prefilled)
Mounting base and bracket
Brine tank and brine injector system
Water hose with filter assembly and bracket
Operation and service manual
Installation bolting kit
5 gallon chemical jug with lid
1 roll of hard water test strips
Funnel (used for filling brine tank with salt)
Soft water supply hose adapter

86037360 03/05/07 2-1
IMPORTANT SAFETY INSTRUCTIONS
READ ALL INSTRUCTIONS BEFORE USING THIS EQUIPMENT
READ the operator’s manual before installing or operating this unit. Failure to adhere to instructions can
result in severe injury or could be fatal.
DO NOT damage the vehicle in any manner during installation. Before drilling any mounting holes in the
vehicle floor, make certain that when drilling, you will not do any damage to the fuel tank, fuel lines, or vital
component which might affect the operation or safety of the vehicle.
DO NOT allow water softener to freeze. Freezing may damage the resin tank, valves, hoses, fittings or other
components of the water softener. In addition, freezing will destroy the ion exchange resin in the water softener
tank. The resin must be replace if frozen.
It is not possible to use antifreeze to freeze-protect the unit. The water softener must always be protected from
freezing by either storing the vehicle in above freezing temperatures or by removing the water softener from the
vehicle and storing it in a warm area. NEVER attempt to freeze protect your water softener with antifreeze.
PURGE all air from the water softener system before operation. A newly installed water softener, or a
softener which has been disconnected for a period, may have air in the tank or lines. This air must be purged
slowly from the system before operation or a lose of resin will occur.
These symbols mean WARNING or CAUTION. Failure to follow warnings and
cautions could result in fatality, personal injury to yourself and/or others, or
property damage. Follow these instructions carefully!

SPECIFICATIONS
86037360 03/05/07
3-1
The EZ-Charge Water Softener is specifically designed to use in conjunction with the truck mount extractors. This
compact, light, and yet efficient water softener has the capacity to regenerate over 1,000 gallons of softened
water per softening run (figure is bases on a water hardness of 10 grains).
SOFTENER CAPACITY
There are many factors which determine how long the water softener can operate between regeneration’s:
Water hardness - Water consumption of your truck mount - Volume of water flow - On wand versus two wand
operation - Cleaning procedures - Truck mount scheduling are some of the major factors.
Remember, the harder the water in your area, the more frequent recharging of the system. the chart below gives
the amount of softened water supplied based on the water hardness that enters the system.
Water Hardness
(Grains) Soft Water Capacity
(Gallons) Water Flow in G.P.M.
(Gallons Per Minute)
Model 18 Model 30
5 grains 2,00 gals. 3,000 gals. 5 G.P.M. minimum
10 gains 1,200 gals. 2,000 gals 5 G.P.M. minimum
15 grains 800 gals. 1,330 gals. 5 G.P.M. minimum
20 grains 600 gals. 1,000 gals. 5 G.P.M. minimum
25 grains 480 gals. 800 gals. 5 G.P.M. minimum
30 grains 400 gals. 660 gals. 5 G.P.M. minimum
35 grains 342 gals. 570 gals. 5 G.P.M. minimum
If the output water from the system reaches 5 grains of hardness (filtered drinking water), the system should be
recharged.
WATER SUPPLY TEMPERATURE
The EZ-Charge Water Softener is recommended for use with inlet water temperatures of up to 125° F (52° C).
Temperature above 125° F (52° C) may damage the unit permanently and void warranty.

SPECIFICATIONS
86037360 03/05/07 3-2
Hard water deposits will adversely affect the
plumbing and heat exchange systems of your truck
mount extractor unit.
The map below will give you an idea where areas of
high water hardness may occur. Though any water
supply obtained from a well is almost always hard
water and a water softener will be needed to help
protect you truckmount equipment.
Using a water softener will reduce maintenance and
decrease down time caused by hard water scaling.
It will also allow cleaning chemicals to be more
effective in lower concentrations.
NOTE: Most warranties will not cover equipment
malfunction or component failure caused by hard
water scaling.

INSTALLATION
86037360 03/05/07
4-1
DO NOT damage the
vehicle in any manner
during installation. Before drilling any mounting
holes in vehicle floor, make certain that when
drilling, you will not do any damage to fuel tank, fuel
lines or any vital components which might affect the
operation or safety of the vehicle.
POSITIONING THE UNIT IN VEHICLE
Because vehicles vary in size and openings,
individuals have their own preference as to where
they want their softener installed. The following is a
suggested location that gives you ease of operation
and utilizes all aspects of the EZ-Charge Water
Softener.
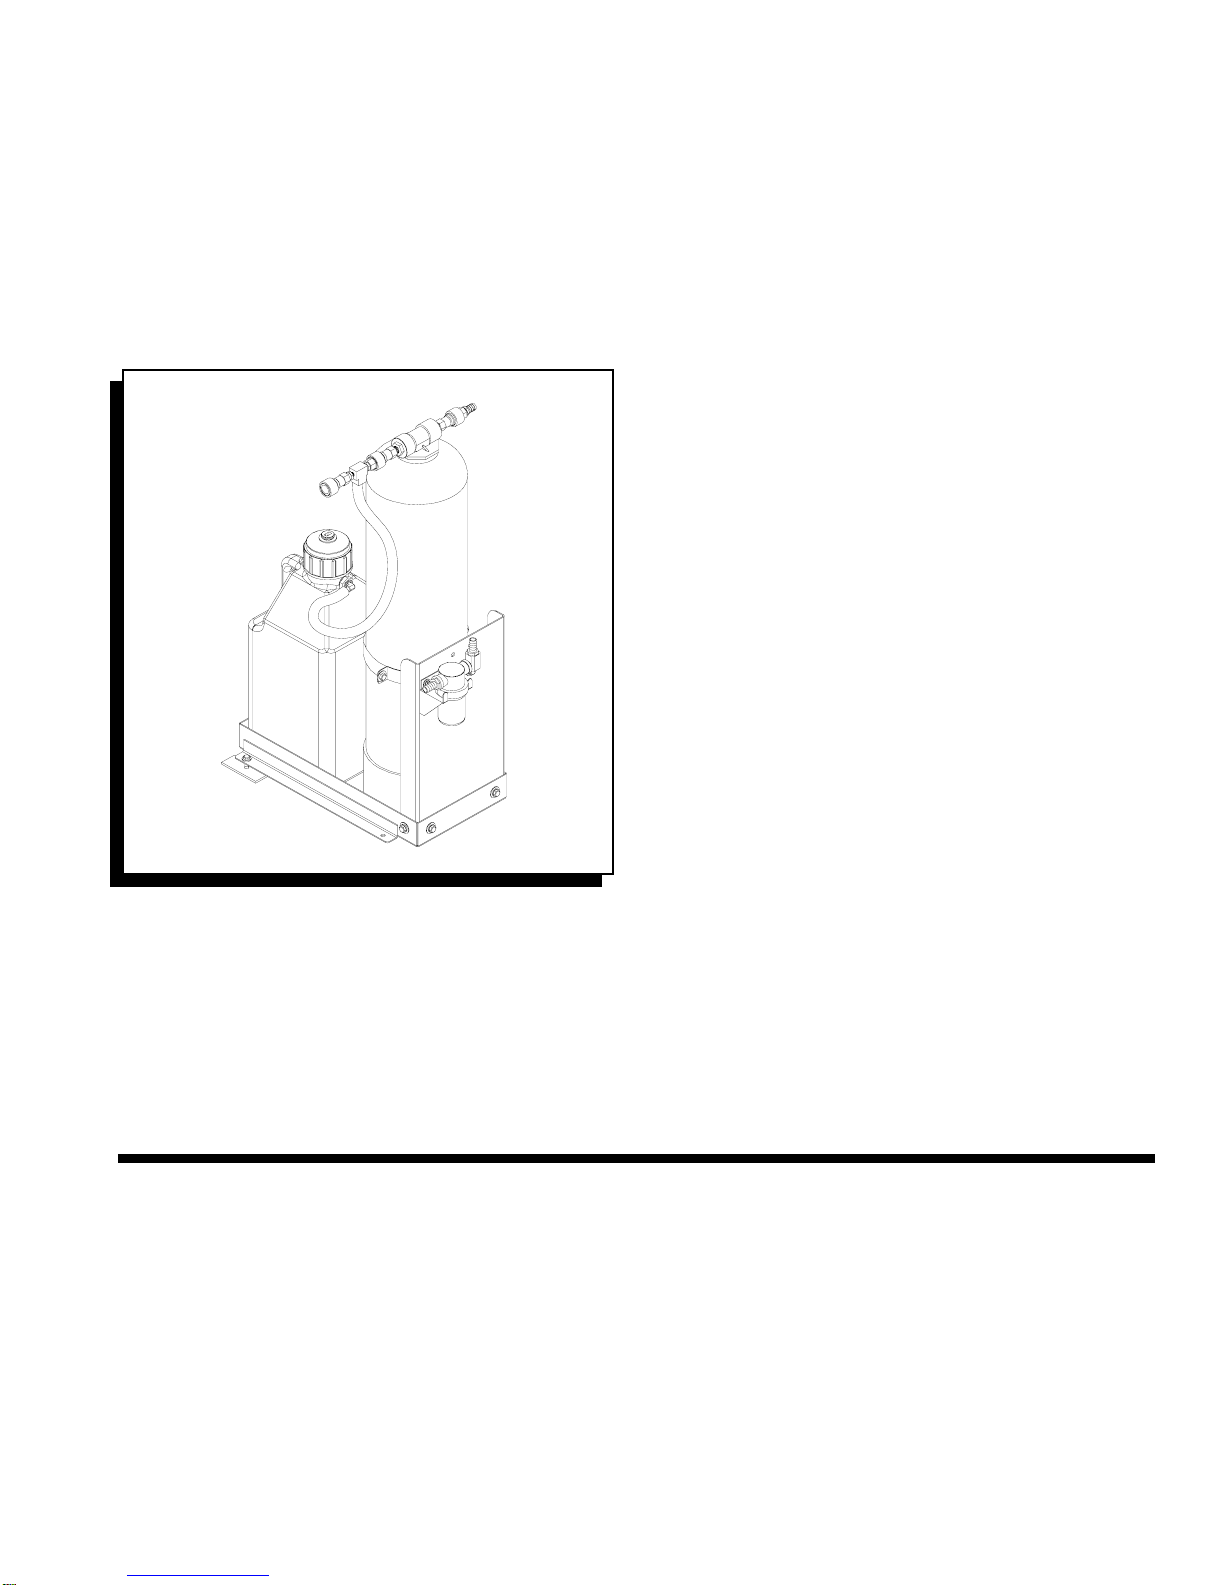
1. Using the illustration below, locate the water
softener nest to the truck mount console where
the chemical draw lines are located. This will
allow you to use the bracket as a chemical jug
holder when the brine tank is not needed during
normal operation.
Be sure NOT to position the softener too close
that when routing hoses they don’t become
kinked or damaged due to rubbing against
abrasive edges.
2. Place the bracket in place you’ve located and
mark the mounting holes. You can also use the
dimensional data below to mark out the
mounting holes.
3. Using a drill with a 3/8” drill bit, drill 4 mounting
holes.
4. Using the hardware provided, bolt the bracket
into place (see mounting detail).
5. After securely bolting the bracket into position,
place the softener cylindrical tank into the
bracket and tighten the clamp around the tank
using the wingnuts provided.
6. Bolt the water filter bracket to the back of the
tank bracket and place the water filter hose
assembly into the filter bracket. Make sure to
route the long hose from the filter towards the
truckmount water inlet disconnect.
7. Connect the short hose from the filter to the
OUTLET disconnect of the water softener.
Connect the long hose from the filter to the
water inlet disconnect on the truckmount unit.
NOTE: The softener has the words “IN” and
“OUT” clearly marked on the tank manifold. The
water filter has a arrow mark on tip indicating
water flow
Your softener is now ready to use.
WATER
SOFTENER
BRACKET
LOCKWASHER
HEX HEAD
CAP SCREW
FLATWASHER
FLATWASHER NUT
VEHICLE
FLOOR

INSTALLATION
86037360 03/05/07 4-2
61
4"
12"
13"
101
2"
16"
12 1
64"
4X Ø13
32
4X Ø13
32
MOUNTING FOR WATER SOFTENERS
WITH TRAY # 86058700 PRV NO. 56-501999
WITH TRAY # 86058730 PRV NO. 56-502273

OPERATION
86037360 03/05/07
4-3
THEORY OF WATER SOFTENING
What is hard water?
Hard water is water containing dissolved limestone,
usually consisting chiefly of calcium and magnesium
minerals, which are sedimentary by nature. Ground
water slowly dissolves limestone and carries it in
solution downstream.
Why does hard water cause problems?
When heat is applied to hard water, such as in your
truckmount unit, the minerals come out of the
solution and slowly deposit inside fittings, check
valves, strainers, pressure hoses, etc. Basically it is
producing rock inside the solution water system of
the truckmount, much the same way as nature does,
by using heat and pressure. Given time the mineral
deposits will be as hard as concrete. In addition,
calcium and magnesium minerals interfere with the
cleaning performance of some detergents.
How does a water softener work?
The EZ-Charge Water Softener is a cation exchange
type system. This specifically made water softener
consists of two (2) tanks: a resin tank and a brine
tank. The resin tank contains a special ion
exchange resin. The brine tank contains a solution
of regular table salt (sodium chloride) processed and
available in pellet form specifically for use in water
softening systems. In order to hold the mineral ions
in, this special resin has to five something in
exchange; sodium from the salt. This resin,
however, can only hold so much diluted limestone
because it has a limited amount of sodium to give in
exchange.
When the resin runs out of sodium, hard water will
flow through the resin in the water softener and into
the truckmount unit. The resin has become
saturated with limestone particles (calcium and
magnesium ions).
To cleanse the resin of the diluted limestone
particles replenish it with sodium, a process called
“Regeneration” is used. Regenerating the
EZ-Charge Water Softener is very easy to do.
Simply run a fresh water salt solution from the brine
tank through the special resin in the resin tank. This
is done automatically once the brine tank is properly
connected. Now the resin will hold the sodium, and
release the limestone minerals back to nature.
Sodium-rich water, free of calcium and magnesium
ions, is what is called “soft-water”. The water
softener is now ready for another run.
Soft water does not adversely affect the solution
system in truckmounted units. In contrast, it virtual
eliminates calcium and magnesium mineral deposit
build-up in the system filters and chemical and
check valves. Soft water also helps do a better
cleaning job with less chemicals and helps keep
carpet fibers soft.

OPERATION
86037360 03/05/07 4-4
Always check hoses for
cuts and abrasions where
leaks may occur and kinks in the lines that may
cause water flow restrictions. Check that the
connections are properly made and disconnects are
connected fully to prevent restrictions.
FIRST RUN OPERATION
NOTE: Before connecting your water hose to the
supply faucet, flush out the faucet until the water
is free of any debris. Flush out any debris which
may be in your water inlet hose.
Before running your softener for the first time, you
need to purge air from the system.
1. Disconnect the soft water supply hose from the
truckmount unit and install the adapter provided
onto the end. Be sure that adapter is connected
or there will be no flow through the system
during purging. Place the end of the hose in a
proper disposal drain.
NEVER dispose of the
waste solution in storm
drains, water ways, or on ground areas. Always
dispose of waste in accordance with Local, State or
Federal law.
2. Connect your water supply hose to the INLET
disconnect on the manifold on the resin tank and
turn on the water supply. During this first time,
you must turn the water supply on SLOWLY to
purge any air that may be present inside the
resin tank. Failure to do so may result in a loss
of softening resin. If a loss of resin does occur,
the softener will not function properly and may
require maintenance.
3. Purge the system until the water being
discharged is clean and free of debris. Shut off
the water supply, remove the adapter from the
soft water supply hose and reconnect hose to
water inlet on truckmount unit.
Your EZ-Charge Water Softener is now ready for its
first run operation.
NOTE: This procedure should also be done if the
system has not been used for a period of time or
if resin has been added or replace in the resin
tank.
CHECKING WATER HARDNESS
Periodically the water hardness of the output water
of you water softener should be checked. Supplied
is a roll of water hardness test strips. Dip a strip of
the water hardness test paper into the output water
from the softener and compare the color of the test
strip to the color chart on the box of output water
reaches a maximum of 5 grains of hardness.

REGENERATION
86037360 03/05/07
4-5
PREPARING THE BRINE TANK
The EZ-Charge Water Softener utilizes a solution of
regular table salt (Sodium Chloride) in pellet form to
recharge the unit. This salt can be purchase at
grocery stores in the swimming pool supplies area.
Use the COARSE type because it dissolves much
faster than the large size pellets.
Put 3 gallons of HOT tap water into the brine tank,
(square blue tank with injector attached), which is
supplied. Then add 10 pounds of the salt into the
brine tank and allow the salt to dissolve for about
two (2) hours.
NOTE: If you are using the water softener
bracket also as a chemical jug holder. You will
need to remove the chemical jug for the next part
of the operation.
REGENERATING THE WATER
SOFTENER
IMPORTANT: During
regeneration the water
flow must be reversed for a proper regeneration.
Failure to follow these instructions will adversely
affect the water softener, decrease the output
efficiency, as well as shorten the life of the softener
resin.
Use the copy of the decal on the following page as
you read through these instructions.
1. This is the normal operating connection for the
water softener. The outlet hose (short hose
from filter) connected to the outlet disconnect
on the manifold and the supply hose (long hose
from filter) connected to the water inlet
disconnect on the truckmount unit.
2. Disconnect the outlet hose from the outlet
disconnect on the manifold.
3. Connect the outlet hose into the inlet disconnect
on the manifold.
4. Place the brine tank with the salt solution into
the water softener bracket. Face the decal on
the brine tank out to use as a guide for
regenerating process.
5. Connect the brine injector assembly on the brine
tank into the OUTLET disconnect on the
manifold.
6. Connect a water supply hose into the disconnect
on the brine injector assembly. Disconnect the
soft water supply hose from the truckmount unit.
7. Connect the adapter supplied to the disconnect
on the water softener supply hose. Be sure the
adapter is connected or there will no flow
through the system during regeneration. Place
the end of the hose in a proper disposal drain
and turn on the water supply. This will back-
flush the waste solution out of the water
softener.
NEVER dispose of the
waste water solution in
storm drains, water ways, or on ground areas.
Always dispose of waste in accordance with Local,
State, or Federal law.
8. After about 15 minutes, turn the water supply off.
Disconnect the water supply hose from the brine
injector assembly.
9. Disconnect the brine injector assembly from the
OUTLET on the manifold and remove the brine
tank from the mounting bracket. Flush out the
brine tank and store until next use. Connect the
water supply hose to the OUTLET on the
manifold and turn on the water supply for about
3 minutes to finish flushing the system.
10. About 3 minutes, turn the water supply off.
Disconnect the water supply hose. Remove the
adapter from the water softener supply hose.
Disconnect the outlet hose from the INLET on
the manifold.
11. Connect he outlet hose into the OUTLET
disconnect on the manifold. Connect the water
softener supply hose into the water inlet
disconnect on the truckmount unit. The system
is now ready for normal operation.

REGENERATION
86037360 03/05/07 4-6

MAINTENANCE
86037360 03/05/07
4-7
The EZ-Charge Water Softener requires very little maintenance. Other than keeping the soft water supply filter
assembly clean and general up-keep of hoses and disconnects, the EZ-Charge Water Softener should last for
many years. The resin should last as long as the unit and only need to be replace if damaged due to freezing.
Given regular maintenance, inspected as needed and regenerated as required, the EZ-Charge Water Softener
will last you for many years.
TROUBLESHOOTING
SPECIFIC PROBLEMS
PROBLEM CAUSE SOLUTION
Water softener needs regenerating. Regenerate water softener.
Leak at distributor tube (extends from
bottom of manifold down into softener
resin tank).
Check tube and o-ring seal, replace if
needed.
Softener delivers hard water
Water softener resin damaged by
freezing. Replace resin. Always protect unit from
freezing.
Loss of resin through water
outlet Cracked or broken distributor tube or
screen. Replace tube or screen.
Loss of water pressure Iron or particulate build-up in softener. Add filter to inlet on water softener
(paper cartridge type, 50 micron max.)
Recharge water softener.
Iron in softened water Fouled resin bed. Check and regenerate system more
frequently.
Insufficient salt in brine tank. Refill brine tank (see “Preparing Brine
Tank” in this manual). Allow the slat to
completely dissolve.
Salt bridging in brine tank (Too much
salt). Refill brine tank (see “Preparing Brine
Tank” in manual.
Brine injector assembly is plugged. Clean injector assembly (disassembly
may be required). Replace if needed.
Softener fails to regenerate
Insufficient regeneration schedule. Period between regeneration too long.
Check and regenerate system more
frequently.
Loss of resin through drain
hose Air in water softener system. (Purged
to fast) Insure unit is properly purged of air (see
“First Run Operation” in this manual.
Water supply pressure is low. Use higher pressure water supply.
Water supply must have a minimum
pressure of 20 psi.
Air leak in brine line. Check brine system for leaks, repair or
replace defective components.
Softener fails to draw brine
Brine injector assembly is plugged. Clean injector assembly (disassembly
may be required). Replace if needed.

NOTES
86037360 03/05/07 4-8

TANK & TRAY
86037360 03/05/07
5-1
1
234
5
6
7
11 12 14 15
13 16
18
21
9
25
10
12
19
23
12 12
20
13
16
16
22
24
23
1
1
29
29
27
17
28
8
26
30A
30B
13
31

TANK & TRAY
86037360 03/05/07 5-2
REF PART NO. PRV NO. DESCRIPTION SERIAL NO.
FROM NOTES:
1 86179710 13-806008 DCS, 3/8F X 3/8FP
2 86188220 11-800368 NIP, 3/8 X CL SST
3 86175880 11-800038 BUSH, 3/4 X 3/8 ALUM
4 86173650 12-800390 ADPT, TNK#50-0271
5 86179650 14-806559 DIST, TOP #41-2514
6 86057920 54-501691 TB, PVC 13/16X27”
7 86177590 14-806558 COLLECTOR, LWR #41-2410
8 86194600 49-876138 TNK, WTR SOFT (30” BLU)
9 86270710 01-000277 NUT, WING 3/8-16
10 86057120 51-503350 STRAP, WTR, SOFT CLAMP
11 86047140 56-501997 CLAMP, TNK WTR SOFT
12 86279510 87171 WASHER, 3/8 FLAT
13 86010790 87163 WASHER, 3/8 SPLIT LOCK
14 86277830 00-000072 SCR, 3/8-16 X 2” HXHD
15 86054050 56-501998 PNL, SOFT MTG-WTR SOFT CIR GRAY
16 86006920 70507 SCR, 3/8-16 X 3/4 HHCS GR5 PLTD
17 86179160 48-941326 DEC, CDNSD REGEN OPER
18 86048330 50-501773 HLDR, FLTR-WTR SOFT
19 86270330 02-000066 FLATWASHER, 1/4
20 86010780 87162 WASHER, 1/4 SPLIT LOCK PLTD
21 86275890 70558 SCR, 1/4-20 X 5/8 HHCS PLTD
22 86005650 57031 NUT, 5/16-18 HEX
23 86278830 02-000143 WASHER, FLAT PLTD
24 86190170 50-500511 PLATE, INSTALL MT
25 86274690 70258 SCR, 5/16-18 X 1.5 HHCS BR5PLT
26 86194660 27-100179 TRIM, FLX 1/16 X 29/64 BLK
27 86182270 27-100225 GSKT, FOAM-WTR SOFT
28 86039730 48-941385 TAG, WARNING START-UP WTR
29 86180210 11-800275 ELL, ST 3/8 BR
30A 86058700 56-501999 TRAY, SOFT-WTR SOFT
30B 86058730 56-502273 TRAY, SOFT-WTR SQUARE
31 86005770 57119 NUT, 3/8-16 HEX NYLOCK

FILTER ASSEMBLY
86037360 03/05/07
5-3
7
2
1
6
5
5
4
10
1
9
2
8
33
3
3

FILTER ASSEMBLY
86037360 03/05/07 5-4
REF PART NO. PRV NO. DESCRIPTION SERIAL NO.
FROM NOTES:
1 86179630 13-806009 DISCONNECT, 3/8M X 3/8FP
2 86181400 12-800345 FTTG, BRB 3/8P X 5/8H BR
3 86177260 03-000111 CLMP, HOS#10 9/16MIN
4 86280140 09-805406 HOSE, WTR 5/8X 30-1/2
5 86181360 12-800269 FTTG, BRB 1/2P X 5/8H BR
6 86180170 11-800041 ELL, STREET 1/2 BR
7 86193510 14-806528 STRNR, IN-LINE 1/2FP BS
8 86280130 09-805382 HOSE, WTR 5/8X 97
9 86180210 11-800275 ELL, ST 3/8 BR
10 86179710 13-806008 DSC, 3/8F X 3/8FP
Table of contents
Popular Water Dispenser manuals by other brands

KENT
KENT MINI Installation operating & maintenance manual

Elkay
Elkay ezH2O LZWSM8 Series Installation, care & use manual

Watermark
Watermark STM1 Installation and operating manual

US Water Systems
US Water Systems Aquatrol 075-AQF-CX owner's manual

IONFILTER
IONFILTER LATT instruction manual

Zass
Zass ZWD 01C operating instructions

Spectrum
Spectrum WTS-SOFT18 Installation, service & operation manual

Hasley Taylor
Hasley Taylor HBW8AQ 1P Series owner's manual

BRIO
BRIO Premiere CBP500 Series user manual

Whirlpool
Whirlpool WHES45 Installation and operation manual

Follett
Follett 110 Series Operating & parts manual

Zeon
Zeon PLAYBOY CE2463PB Instructions for use