manuals.online logo
Brands
  1. Home
  2. •
  3. Brands
  4. •
  5. EZ FLO
  6. •
  7. Plumbing Product
  8. •
  9. EZ FLO Impressions 10190 User manual

EZ FLO Impressions 10190 User manual

10190/10191
Two Handle Laundry Faucet
Grifería Para Lavandería - Doble Manija
These are general installation guidelines ONLY and are by no means comprehensive. Installation should be performed by a professional plumber.
EZ-FLO International Inc. bears no responsibility for the improper installation or misuse of this product. These are only general recommendations.
Estas son guías de instalación SOLAMENTE y por ningún motivo son exhaustivas. La instalación debe ser realizada por un plomero profesional.
EZ-FLO International, Inc. no se responsabiliza por la instalación inadecuada o mal uso de este producto. Estas son solo recomendaciones generales.
© 2016 EZ-FLO INTERNATIONAL, INC.
2750 E. Mission Blvd. - Ontario, California, USA 91761
Impressions
Limited
LIFETIME WARRANTY
Garantía de por vida limitada
1.
2.
3.
Metal Handle/ Manija
Metalica
Putty Plate/
Placa de masilla
4.
5.
6.
7.
8.
Aerator/Aerador
Lift Rod/Varilla de
Elevación
Cartridge Assembly/
Piezas del Cartucho
4
5
6
8
7
Lock Nut Set/
Juego de contratuerca
Pop-up Assembly/
Componentes de Desagüe
5
Hex Wrench/
Tornillo Hexagonal
(H2.5 19 mm L53 mm L)
cross-head
screwdriver
desarmador de
estrella
pipe joint tape
cinta adhesiva
para tubería
10" groove
joint pliers
pinzas de junta
ranurada 10”
clear silicone latex caulk
sellador silicona-latex
transparente
sponge or rag
esponja o trapo
adjustable wrench
llave inglesa
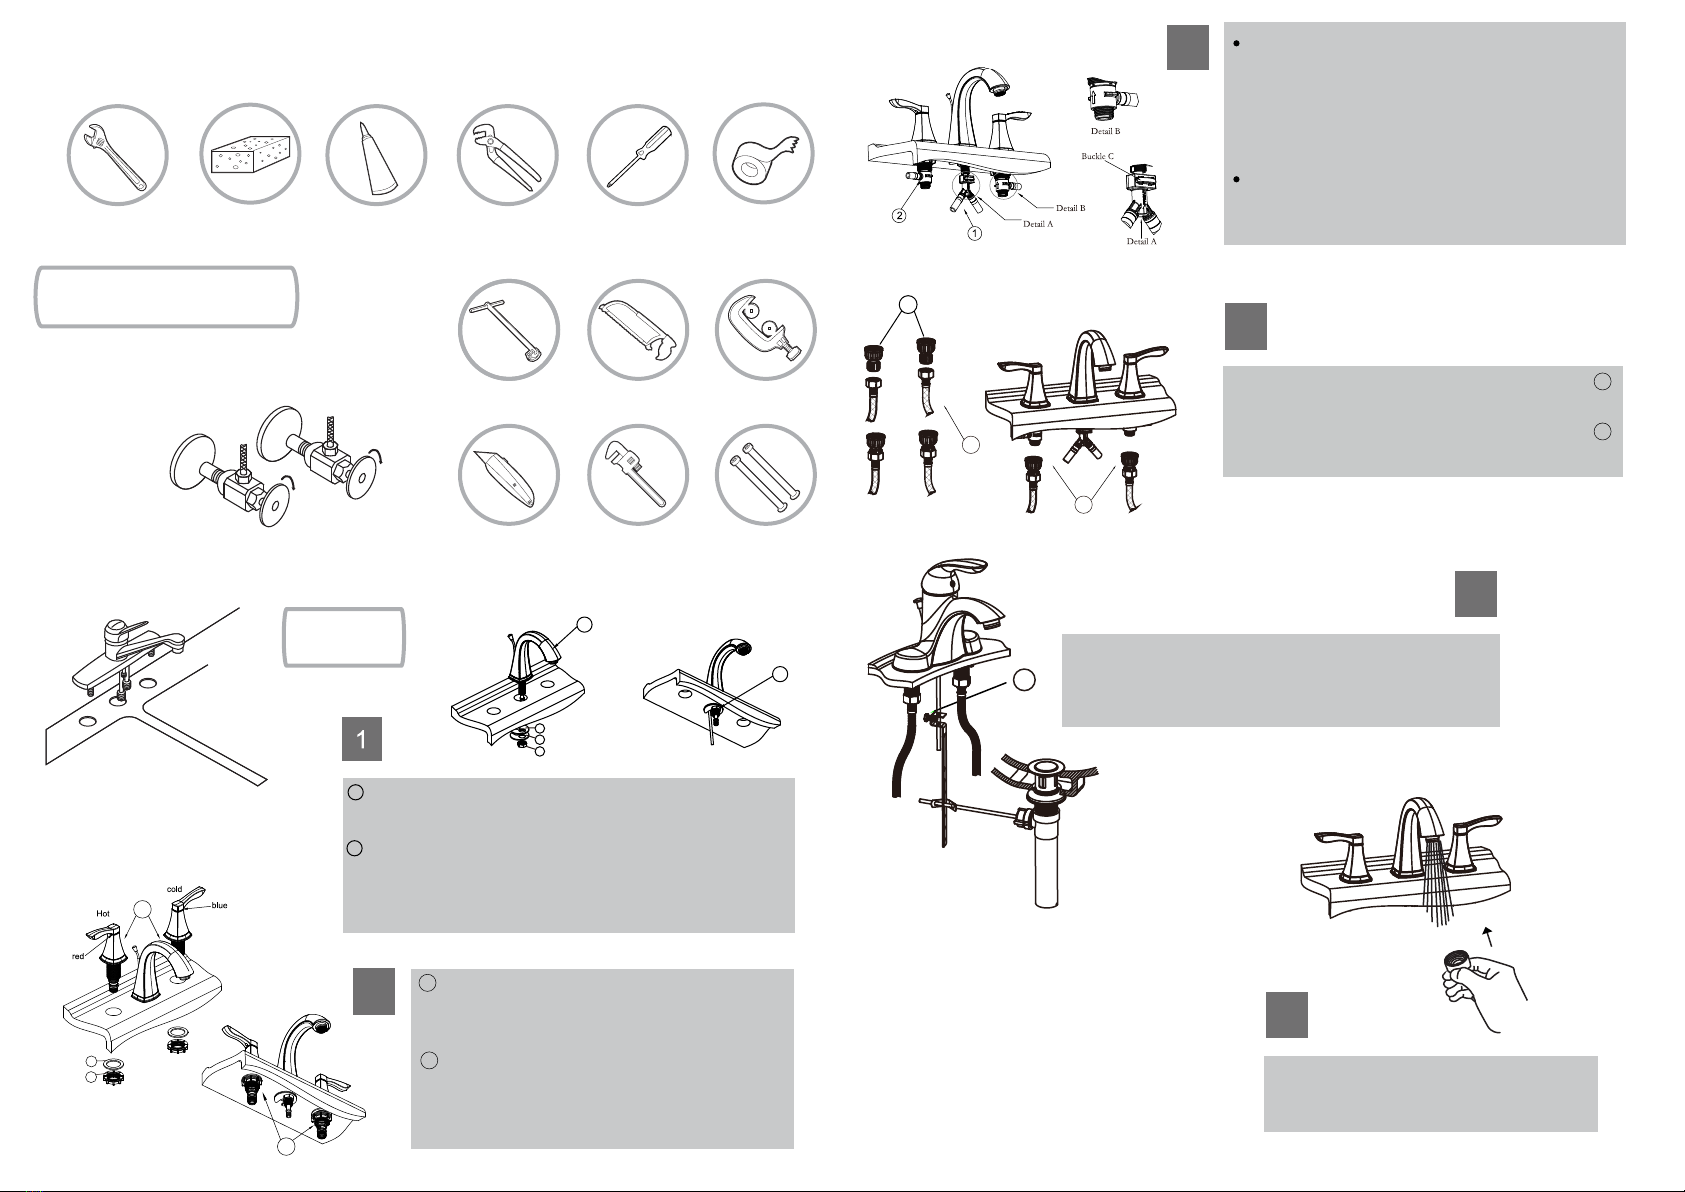
Tools and supplies you will need the following to install your new faucet
Herramientas y provisiones que necesitara para instalar su nuevo grifo
Removing Your Old Faucet
Para Remover Su Grifo Viejo
Close drain to avoid losing small parts.
Cierre el desagüe para evitar perder piezas pequeñas.
basin wrench
llave para lavabo
tube cutter
cortador de tubo
pipe wrench
llave perica
hacksaw
sierra
Before You Begin:
Turn off water supply
Antes de Comenzar:
Cierre el suministro de agua
utility knife
navaja
supply
conectores
Remove old faucet.
Clean sink surface.
Quite el grifo viejo.
Limpie la superficie del
Fregadero
Installation
Instalación
A
B
13
14
15
A
B
6
7
3
4
5
Connect the three-way hose with the spout, please note
detail, the should face the sink. Press the Bluckle when
connecting the three-way hose with the spout, then loosen
the buckle when it is connected.
Connect the three-way hose with the two valves, the
should point up towards the handle.
8
A
B
Connect the Connector Assembly (part 8) with the supply hose.
Connect the supply hose with the cold/hot valves on the faucet.
A
B
Remove aerator. Test hot and cold flow. Replace aerator.
Firmly tighten by hand / Saque el aerador. Pruebe el flujo
de agua fría y caliente. Coloque nuevamente el aerador.
Apriételo firmemente con la mano.
1
Connect the pop-up rod with the extension, and release pop-up knob down
and check all drain connections / Conecte la varilla de desagüe con la
extensión y libere la manivela de desagüe hacia abajo y revise todas las
conexiones del desagüe.
6
2
A
B
A
B
Insert the spout into the hole of the sink or mounting surface.
Inserte el pico en el orificio del lavamanos o de la superficie de montaje.
Slide the rubber & metal washers (parts 13 & 14) up the shank
and secure spout with the brass nut (part 15).
Deslice las arandelas de hule y de metal (piezas 13 y 14) por el tubo
y fije el pico con la tuerca de bronce (pieza 15).
Put the cold handle assembly on the right and the hot
handle assembly on the left.
Slide rubber washer (part 6), onto each shank and
secure with locknut (part 7).
Coloque la manija fría en la derecha y la manija caliente
en la izquierda.
Deslice el empaque de hule (pieza 6), en cada tubo y
asegúrelo con la contratuerca (pieza 7).
Conecte el conector de tres vías al pico, por favor observe el
detalle. La ( ) debe mirar hacia el lavamanos. Presione el
broche cuando conecte el conector de tres vías al pico, después
libere el broche cuando este conectado.
Conecte el conector de tres vías a las dos válvulas, la ( )
debe apuntar hacia arriba hacia la manija.
Conecte las piezas de montaje (parte 8) a los conectores.
Conecte los conectores a las válvulas caliente y fría en el grifo.

This manual suits for next models

1

Other EZ FLO Plumbing Product manuals

EZ FLO 10701 User manual

EZ FLO

EZ FLO 10701 User manual

EZ FLO Prestige 10036LF User manual

EZ FLO

EZ FLO Prestige 10036LF User manual

Popular Plumbing Product manuals by other brands

Schell PURIS 01 360 06 99 Assembly instructions

Schell

Schell PURIS 01 360 06 99 Assembly instructions

Watts 15M2 Series installation manual

Watts

Watts 15M2 Series installation manual

Ancona Le Duo manual

Ancona

Ancona Le Duo manual

BELLOSTA b-uno 7901/4/A/E installation instructions

BELLOSTA

BELLOSTA b-uno 7901/4/A/E installation instructions

Kohler K-1257P Roughing-In Guide

Kohler

Kohler K-1257P Roughing-In Guide

Villeroy & Boch ViFlow installation instructions

Villeroy & Boch

Villeroy & Boch ViFlow installation instructions

Watts 995 Series Installation, maintenance & repair

Watts

Watts 995 Series Installation, maintenance & repair

newform PARK Limited Edition 69789C instructions

newform

newform PARK Limited Edition 69789C instructions

Hans Grohe Raindance Rainfal 28433 Series Instructions for use/assembly instructions

Hans Grohe

Hans Grohe Raindance Rainfal 28433 Series Instructions for use/assembly instructions

Axor 250 1jet 35286 Series Instructions for use/assembly instructions

Axor

Axor 250 1jet 35286 Series Instructions for use/assembly instructions

Franke ATLAS NEO Installation and service manual

Franke

Franke ATLAS NEO Installation and service manual

Hans Grohe 04221 Series Installation instructions / warranty

Hans Grohe

Hans Grohe 04221 Series Installation instructions / warranty

Elkay Starlite ELC2522BQ Specifications

Elkay

Elkay Starlite ELC2522BQ Specifications

Hans Grohe Axor Citterio Showerpipe Instructions for use/assembly instructions

Hans Grohe

Hans Grohe Axor Citterio Showerpipe Instructions for use/assembly instructions

Franke F3 Series Installation and operating instructions

Franke

Franke F3 Series Installation and operating instructions

newform DELUXE 68040C instructions

newform

newform DELUXE 68040C instructions

agape ARUB1031S Installation and maintenance instructions

agape

agape ARUB1031S Installation and maintenance instructions

Franke AQUAMIX AQRM175 Installation and operating instructions

Franke

Franke AQUAMIX AQRM175 Installation and operating instructions

manuals.online logo
manuals.online logoBrands
  • About & Mission
  • Contact us
  • Privacy Policy
  • Terms and Conditions

Copyright 2025 Manuals.Online. All Rights Reserved.