manuals.online logo
Brands
  1. Home
  2. •
  3. Brands
  4. •
  5. EZ FLO
  6. •
  7. Plumbing Product
  8. •
  9. EZ FLO Prestige 10036LF User manual

EZ FLO Prestige 10036LF User manual

10036LF
1.
2.
3.
4.
5.
6.
7.
8.
9.
10.
11.
12 .
13 .
14 .
These are general installation guidelines ONLY and are by no means comprehensive. Installation should be performed by a professional plumber.
EZ-FLO International Inc. bears no responsibility for the improper installation or misuse of this product. These are only general recommendations.
Estas son guías de instalación SOLAMENTE y por ningún motivo son exhaustivas. La instalación debe ser realizada por un plomero profesional.
EZ-FLO International, Inc. no se responsabiliza por la instalación inadecuada o mal uso de este producto. Estas son solo recomendaciones generales.
© 2016 EZ-FLO INTERNATIONAL, INC.
2750 E. Mission Blvd. - Ontario, California, USA 91761
Pull-Out Spout Kitchen Faucet
Tomacorriente Grifo de cocina
Prestige
Limited
LIFETIME WARRANTY
Garantía de por vida limitada
8
9Remove aerator. Test hot and cold flow. Replace aerator. Firmly tighten by hand.
Saque el aerador. Pruebe el flujo de agua fría y caliente. Coloque nuevamente el aerador.
Apriételo firmemente con la mano.
7Apply pipe tape onto threads of the inlet ports. Securely attach
water supply hoses or tubes onto inlet ports. Tighten by hand and
then 1/4 turn with wrench
Aplique cinta para tubería a las roscas de los puertos de entrada.
Conecte firmemente los conectores para agua o tubos a los puertos
de entrada. Apriete con la mano y luego 1/4 de vuelta con llave.
Index Button
/
Botón Indice
Metal Handle
/
Manija Metálica
Dome Nut/Tuerca de cúpula
Cam Assembly/Ensamblaje de la leva
Ball Assembly/Conjunto de bolas
Seat/Spring
Spray/Rociar
Cover Plate/Placa de cubierta
Bottom Plate/Tapa Inferior
Mounting Nut and Stud
/
Tuerca
de montaje y espárrago
Tube
/Tubo
Connector
/
Connector
Inlet Tube
/Tubo de entrada
Shower Hose
/
Manguera de ducha
Apply pipe tape onto threads of the water supply. Attach
the hose onto water supply. Tighten by hand and then
1/4 turn with wrench. Turn on water supply. Check for
leaks and fix, if any.
Aplique cinta para tubería a las roscas del abasto de agua.
Conecte el conector para agua al abasto de agua. Apriete con
la mano y luego 1/4 de vuelta con llave. Abra el suministro de
agua. Revise que no haya fugas y corrijalas en caso de
encontrarlas.
10
2
3
14
6
5
10
7
8
9
11
12
13
14
cross-head
screwdriver
desarmador de
estrella
pipe joint tape
cinta adhesiva
para tubería
10" groove
joint pliers
pinzas de junta
ranurada 10”
clear silicone latex caulk
sellador silicona-latex
transparente
sponge or rag
esponja o trapo
adjustable wrench
llave inglesa
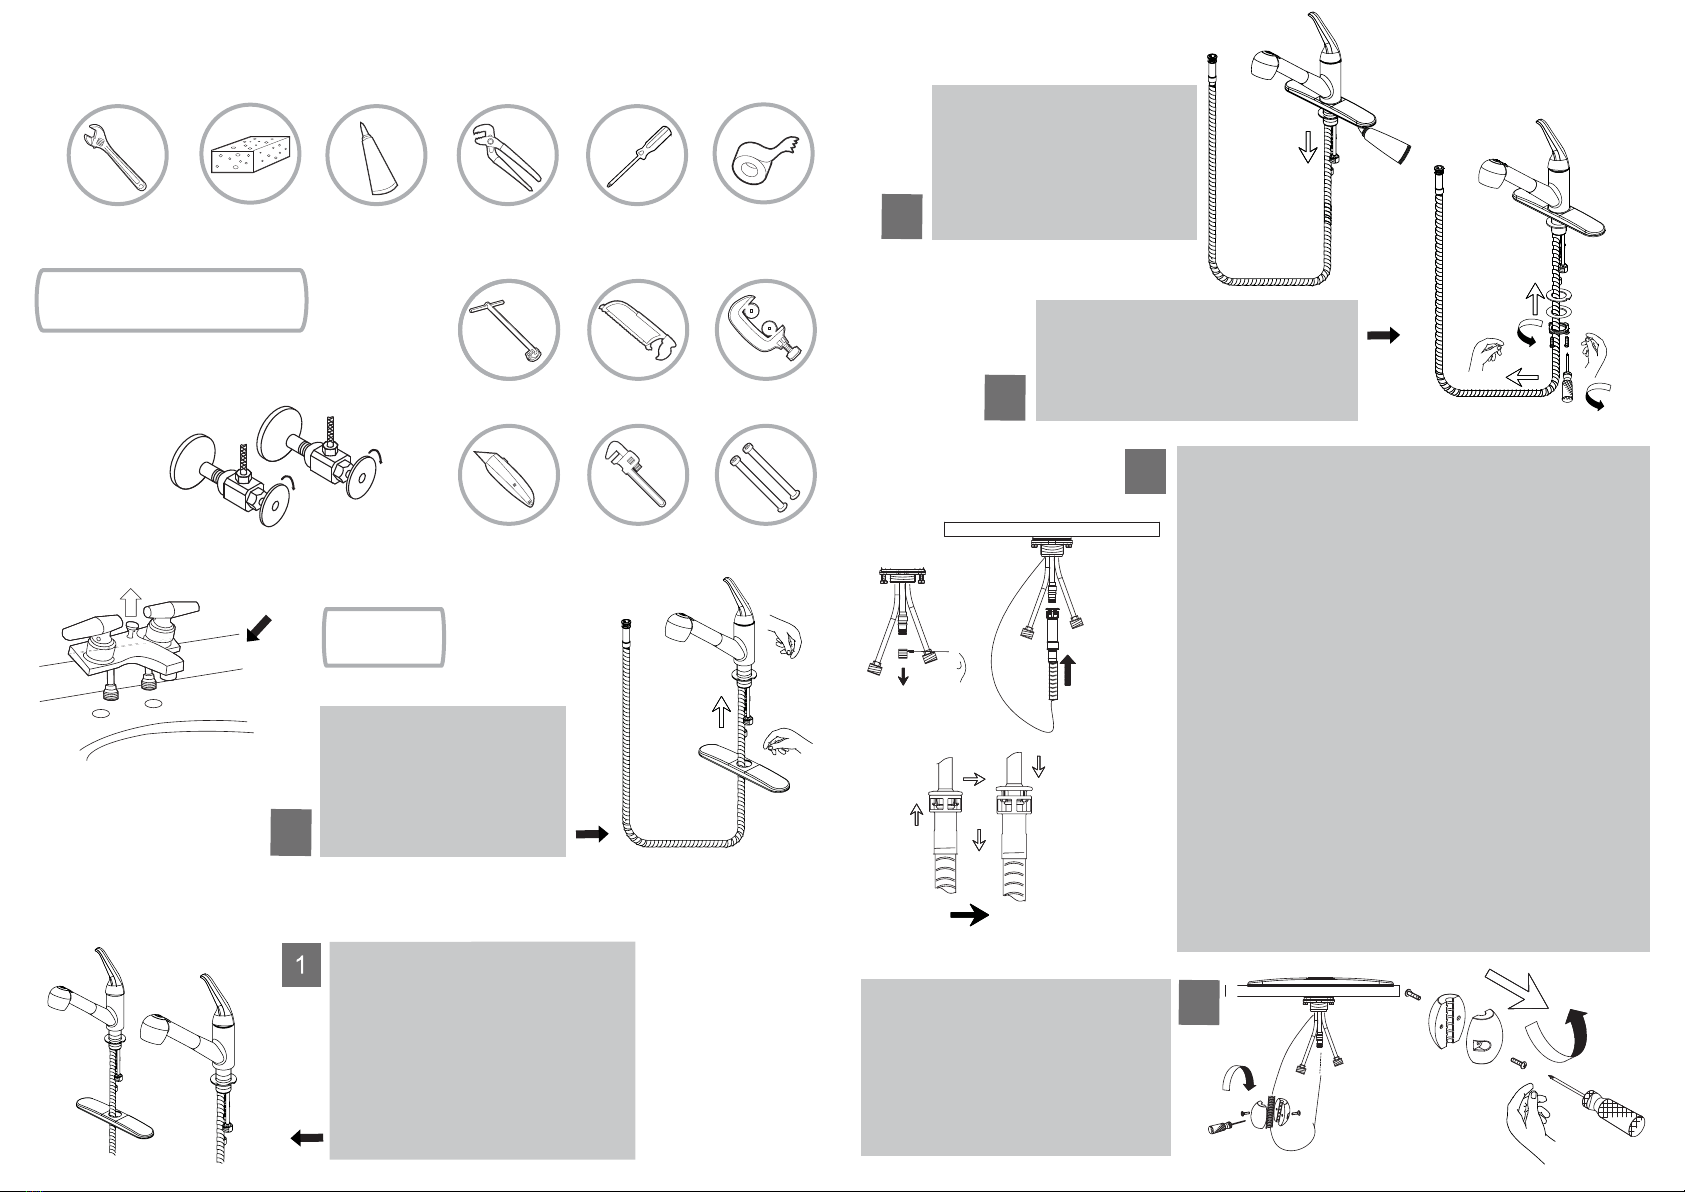
Tools and supplies you will need the following to install your new faucet
Herramientas y provisiones que necesitara para instalar su nuevo grifo
utility knife
navaja
basin wrench
llave para lavabo
supply
mangueras
de abasto
tube cutter
cortador de tubo
pipe wrench
llave perica
hacksaw
sierra
3
6
2
4
4
5
Before You Begin:
Turn off water supply
Antes de Comenzar:
Cierre el suministro de agua
The cover plate is optional, please
determine whether you want to install
or not. For cover plate installation,
please the base ring attached with the
body, then place the cover plate on.
The cover plate is optional, please
determine whether you want to install or
not. For cover plate installation, please
the base ring attached with the body,
then place the cover plate on.
Position new faucet. Screw
and tighten lock nuts onto
faucet.
Coloque el grifo nuevo. Enrosque
y apriete las tuercas de fijación en
el grifo.
Attach rubber washer, metal washer, and
lock nut on mounting body.
Conecte la arandela de hule, la arandela de
metal y la tuerca de fijación al cuerpo.
Plastic Sea lCover
Remove the plastic seal cover from the outlet port prior to pushing the
hose adapter onto the same port.
A. Push quick connect hose assembly firmly upward until unable to push
any further. You will hear a clear "CLICK" sound.
B. Pull down on quick connect hose assembly, if you can not pull off, then
quick connect hose assembly is secure.
C. To remove the quick connect hose assembly, push quick connect hose
assembly upward, then press the clip and housing together to pull down
at the same time.
When installing flexible hose, please note:
1. There should be no torsion or deformation;
2. Do not fold into Shape V or L;
3. Do not use if there is any crack or deformation.
Quite el sello plástico de protección el puerto de salida antes de empujar
el adaptador de la manguera en el mismo puerto.
A. Empuje la manguera de conexión fácil hacia arriba firmemente hasta que tope. Escuchara
un “click”.
B. Jale la manguera de conexión fácil hacia abajo. Si no puede desprenderla, entonces la
conexión esta segura.
C. Para desconectar la manguera de conexión fácil empujela hacia arriba y después
apriete el clip y la jaula juntas para jalar hacia abajo a la vez.
Cuando instale la manguera flexible, por favor fíjese bien:
1. Que no haya torcedura o deformación;
2. No la doble en forma de V o L;
3. No la use si hay alguna grieta o deformación.
Place putty beneath the plastic
gasket and Install faucet through
center hole.
Coloque masilla abajo de la cubierta
inferior e instale el grifo a traves del
orificio central.
Removing Your Old Faucet
Para Remover Su Grifo Viejo
Close drain to avoid losing small parts.
Cierre el desagüe para evitar perder piezas pequeñas.
Remove old faucet.
Clean sink surface.
Quite el grifo viejo.
Limpie la superficie del
Fregadero
Installation
Instalación
Attach metal weight tohose to
prevent hose from twisting. The weight
also returnshose to proper position.
Sujete la pesa metálica a la manguera
para evitar que la manguera se tuerza.
La pesa también hace que la manguera
resgrese a su posición.

Other EZ FLO Plumbing Product manuals

EZ FLO Impressions 10190 User manual

EZ FLO

EZ FLO Impressions 10190 User manual

EZ FLO 10701 User manual

EZ FLO

EZ FLO 10701 User manual

Popular Plumbing Product manuals by other brands

Rubi LEXA RLX32D quick start guide

Rubi

Rubi LEXA RLX32D quick start guide

Bathlife BRUSA 401054024B manual

Bathlife

Bathlife BRUSA 401054024B manual

Abode Ceramic Belfast Sink AX4037 manual

Abode

Abode Ceramic Belfast Sink AX4037 manual

American Standard Amarilis 8871 installation instructions

American Standard

American Standard Amarilis 8871 installation instructions

Geberit HS30 Maintenance manual

Geberit

Geberit HS30 Maintenance manual

fine fixtures VANNES VA1616 installation instructions

fine fixtures

fine fixtures VANNES VA1616 installation instructions

Grohe EUROSMART COSMOPOLITAN E36 416 manual

Grohe

Grohe EUROSMART COSMOPOLITAN E36 416 manual

Gessi INGRANAGGIO 63501 Bath Mixing Program

Gessi

Gessi INGRANAGGIO 63501 Bath Mixing Program

KWC Vesuno K.12.VB.92.700A26 Specification sheet

KWC

KWC Vesuno K.12.VB.92.700A26 Specification sheet

ZACK SCALA 40049 installation instructions

ZACK

ZACK SCALA 40049 installation instructions

Bradley S53-325 Installation

Bradley

Bradley S53-325 Installation

KWC DOMO 10.661.023.000FL Installation and service manual

KWC

KWC DOMO 10.661.023.000FL Installation and service manual

Enlighten Sauna InfraNature Duet Sapphire - 4 Corner user manual

Enlighten Sauna

Enlighten Sauna InfraNature Duet Sapphire - 4 Corner user manual

Hans Grohe Talis'C 33143000 Assembly instructions

Hans Grohe

Hans Grohe Talis'C 33143000 Assembly instructions

abi GOOSENECK 11941 manual

abi

abi GOOSENECK 11941 manual

KWC Systema 10.501.173. Specification sheet

KWC

KWC Systema 10.501.173. Specification sheet

Halsey Taylor 4420BF1UDBFR owner's manual

Halsey Taylor

Halsey Taylor 4420BF1UDBFR owner's manual

Paini SHOWERpower 136 Assembly instructions

Paini

Paini SHOWERpower 136 Assembly instructions

manuals.online logo
manuals.online logoBrands
  • About & Mission
  • Contact us
  • Privacy Policy
  • Terms and Conditions

Copyright 2025 Manuals.Online. All Rights Reserved.