EzCAP ezcap295 HD Capture Pro User manual

HD Video Capture Pro
Quick Start Guide
Thanks for purchasing ezcap295 HD Video Capture Pro. The following guides you how to set up.
Hope this device will bring you nice digital experience.
With this ezcap295 HD Video Capture Pro, you can capture up to 1080P video from HDMI ,Ypbpr
(component) or composite port, such as blue ray, set-top-box, computer, game box, VHS, etc. And
you can playback the record movie directly.
Ezcap295 has record and playback two function in one device, use remote controller to set to
playback mode. You can also set schedule recording, set recording quality, set split recording file or
not.
Features/ports and buttons:
1.PC/DC—DC 5V power supply,or connect to PC.
2. HDMI IN—HDMI input.
3. AV / YPBPR—Ypbpr component or composite input through adapter cable
4. MIC IN—For connect a microphone and record voice comments when play game.
5. LINE OUT—Audio output.
6. HDMI OUT—HDMI output, so can connect to monitor to pass through display the input video.
7. HOST—Plug a USB flash (or USB HDD) to save record video.

8. Record button —Press button to record/stop record.
Remote controller:
1. Press to Power ON/OFF, ezcap295 is set to
default Power On mode, and will memory the
status before power disconnected.
2. Press to capture a still image. (not
effect on
recording video mode.)
3. to
select the source.
4. Mute
5. Microphone mute
6. Set the ratio of output video
7. Start/Stop video recording
8. For menu operation
And volume up/down
Microphone volume
Up/down
9. For the time watermark on recording file
10. Press to enter playback mode, press “EXIT”
or source key (HDMI/YPbPr/AV) to return.
11. Set schedule recording.
12. Operate the playback
“DELETE” can delete the video don’t need anymore.
13. Set the resolution of output / recording video

Connections:
Ezcap295 have 3 input modes: HDMI, component, composite. And it will automatically recognize the
input video source.
Connect with HDMI input source:
1, Connect power with DC adaptor
2, Plug an USB disk.
3, Use HDMI cable to connect HDMI video source, such as game player, set top box, etc.
4, With HDMI cable connect to monitor
5, The “LINE OUT” is for connect to speaker or earphone, it’s not necessary if you don’t need, cause
the HDMI output also with audio output.

6, You can connect your microphone to record your comment when play game, it’s not necessary only
if you need it.
Connect with Ypbpr component video source (such as DVD player, PS3. Etc):
1, Use the adapter cable in the package to connect component (red, blue, green), just don’t mixed the
red with the audio cable (the audio cable red and white will be separated with component)
2, The other connection will total same as HDMI connection above.

Connect with composite video source (such as camera, VHS, V8, Hi8, Etc):
1, Connect the composite (yellow cable and red white audio cable) to your video source with the
adapter cable come with the package.
2, The other connections are all same as HDMI input connections above.
Record:
When power on ezcap295, it will be at default mode—Recording mode, the green LED will be on.
After connection done as above, the monitor should show the input video. The screen will show

“No Signal” if there is no any video input.
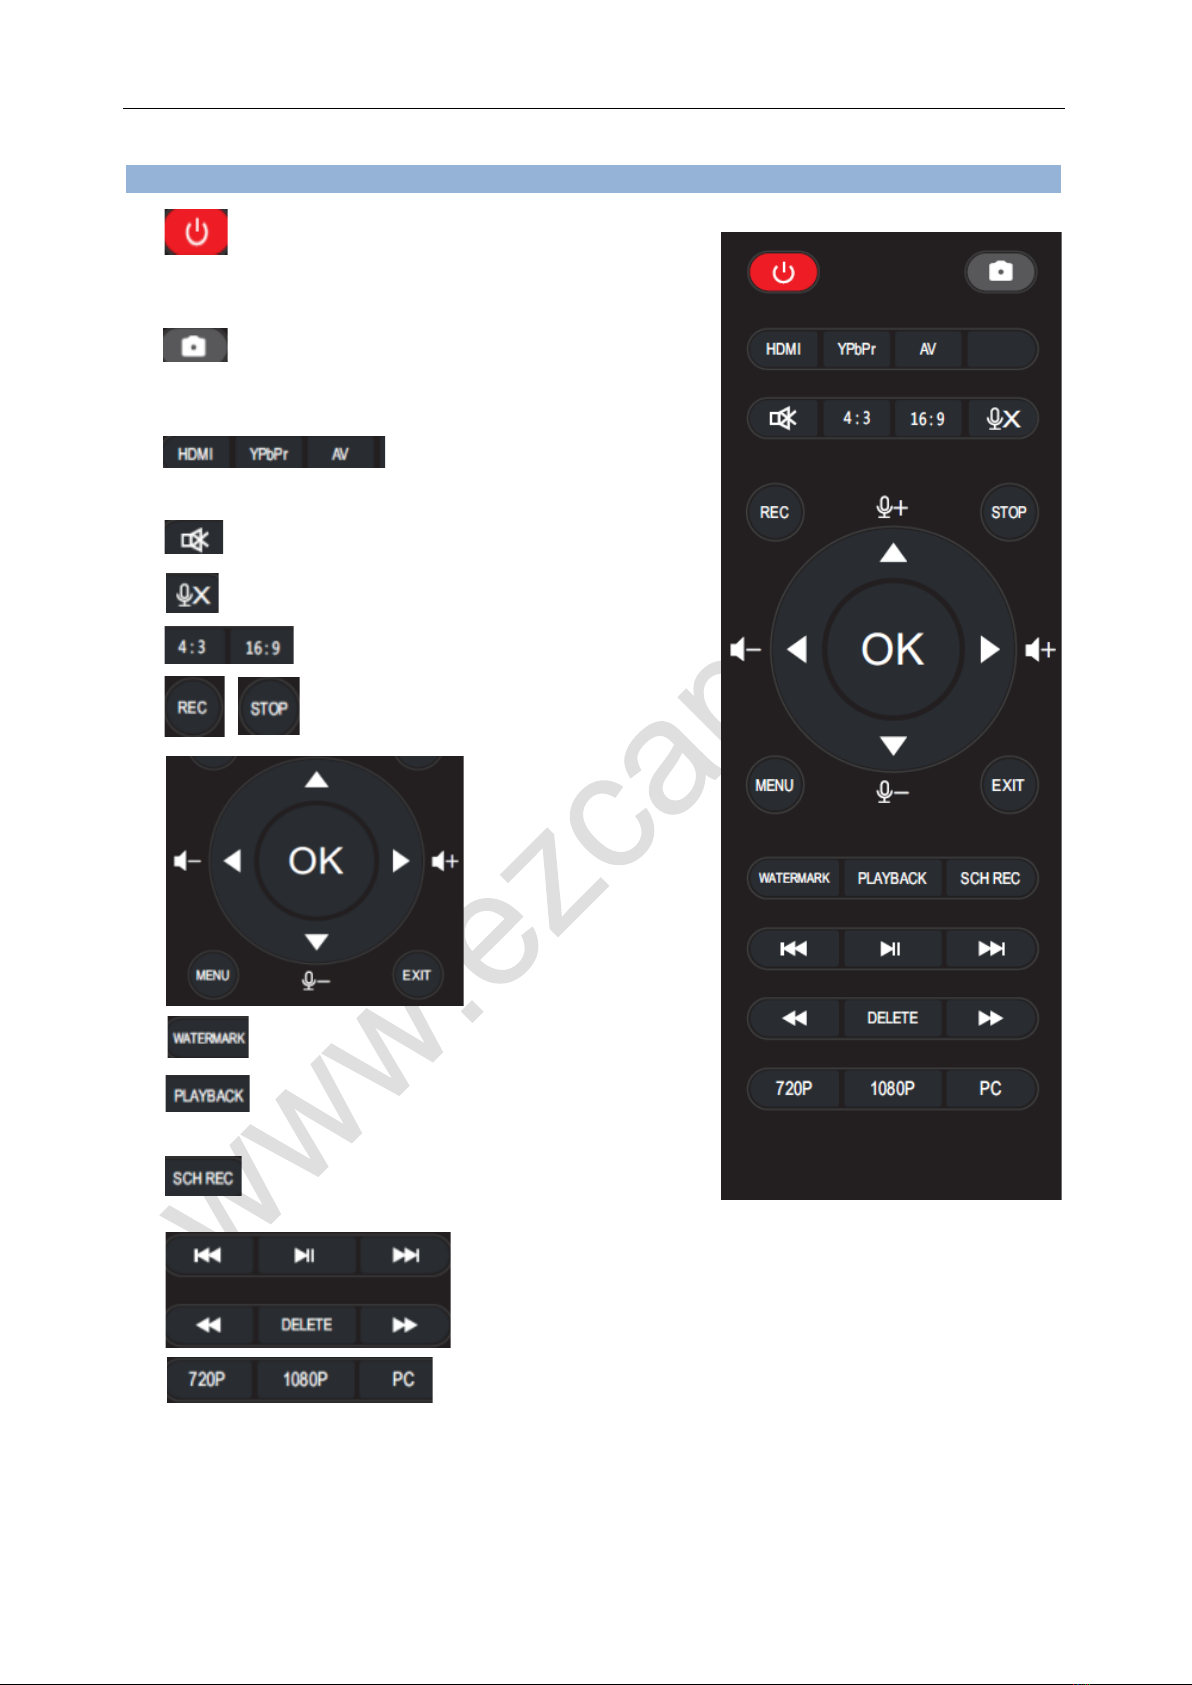
To record video is very simple --- press the REC button (or “REC” on remote controller), then you
will see the indicator turns to red , you can also see “REC ACTIVE” words shows on monitor for a
short time. Press button again (or “STOP’ key on remote controller) to stop recording, the indicator
turns back to green, and “REC stop” words will show on monitor for a short time.use key to
adjust the audio volume
Use button of remote controller, you can get a still image by one press, but it is only
work when NOT recording.
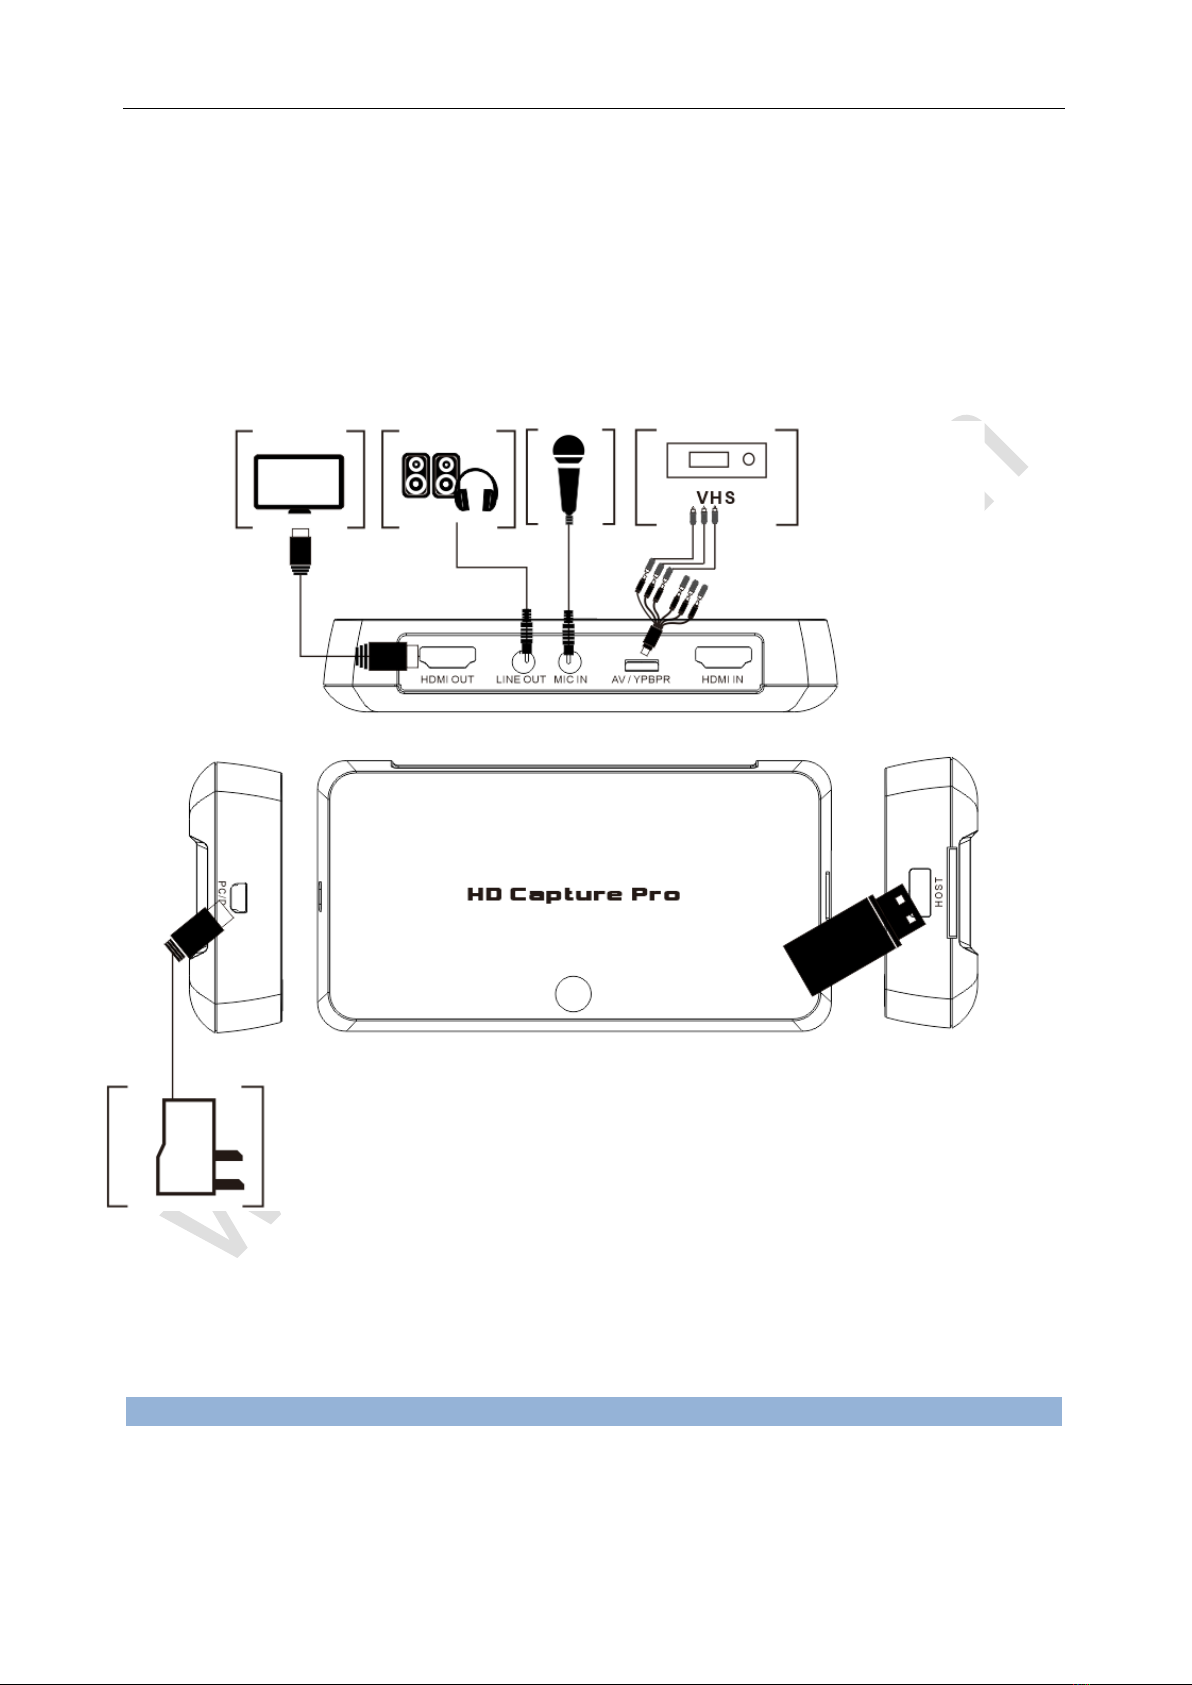
Recording comments during video recording: If you connect a Microphone to MIC port, you can
record comments with video, you can adjust the microphone volume by key of remote
controller.
Use the 720P/1080P/PC keys of remote controller to adjust recording resolution. PC is for 1366 *
768 resolution.
Use the 4:3/16:9 keys of remote controller to adjust video rate.
Use the WATERMARK key of remote controller to add time watermark on display and recording
file. Press again to cancel time watermark.
There are several reasons for no actions when press record button, you may need check:
1, The input video source disconnected.
2, The USB flash is out of memory.
3, The format for USB flash is not suitable, e.g. exFAT. ezcap295 support FAT, FAT32, and NTFS.
4, The USB flash is not connected well.
5, The USB flash is not ready, normally, it will take 4~8 seconds after plug it on.
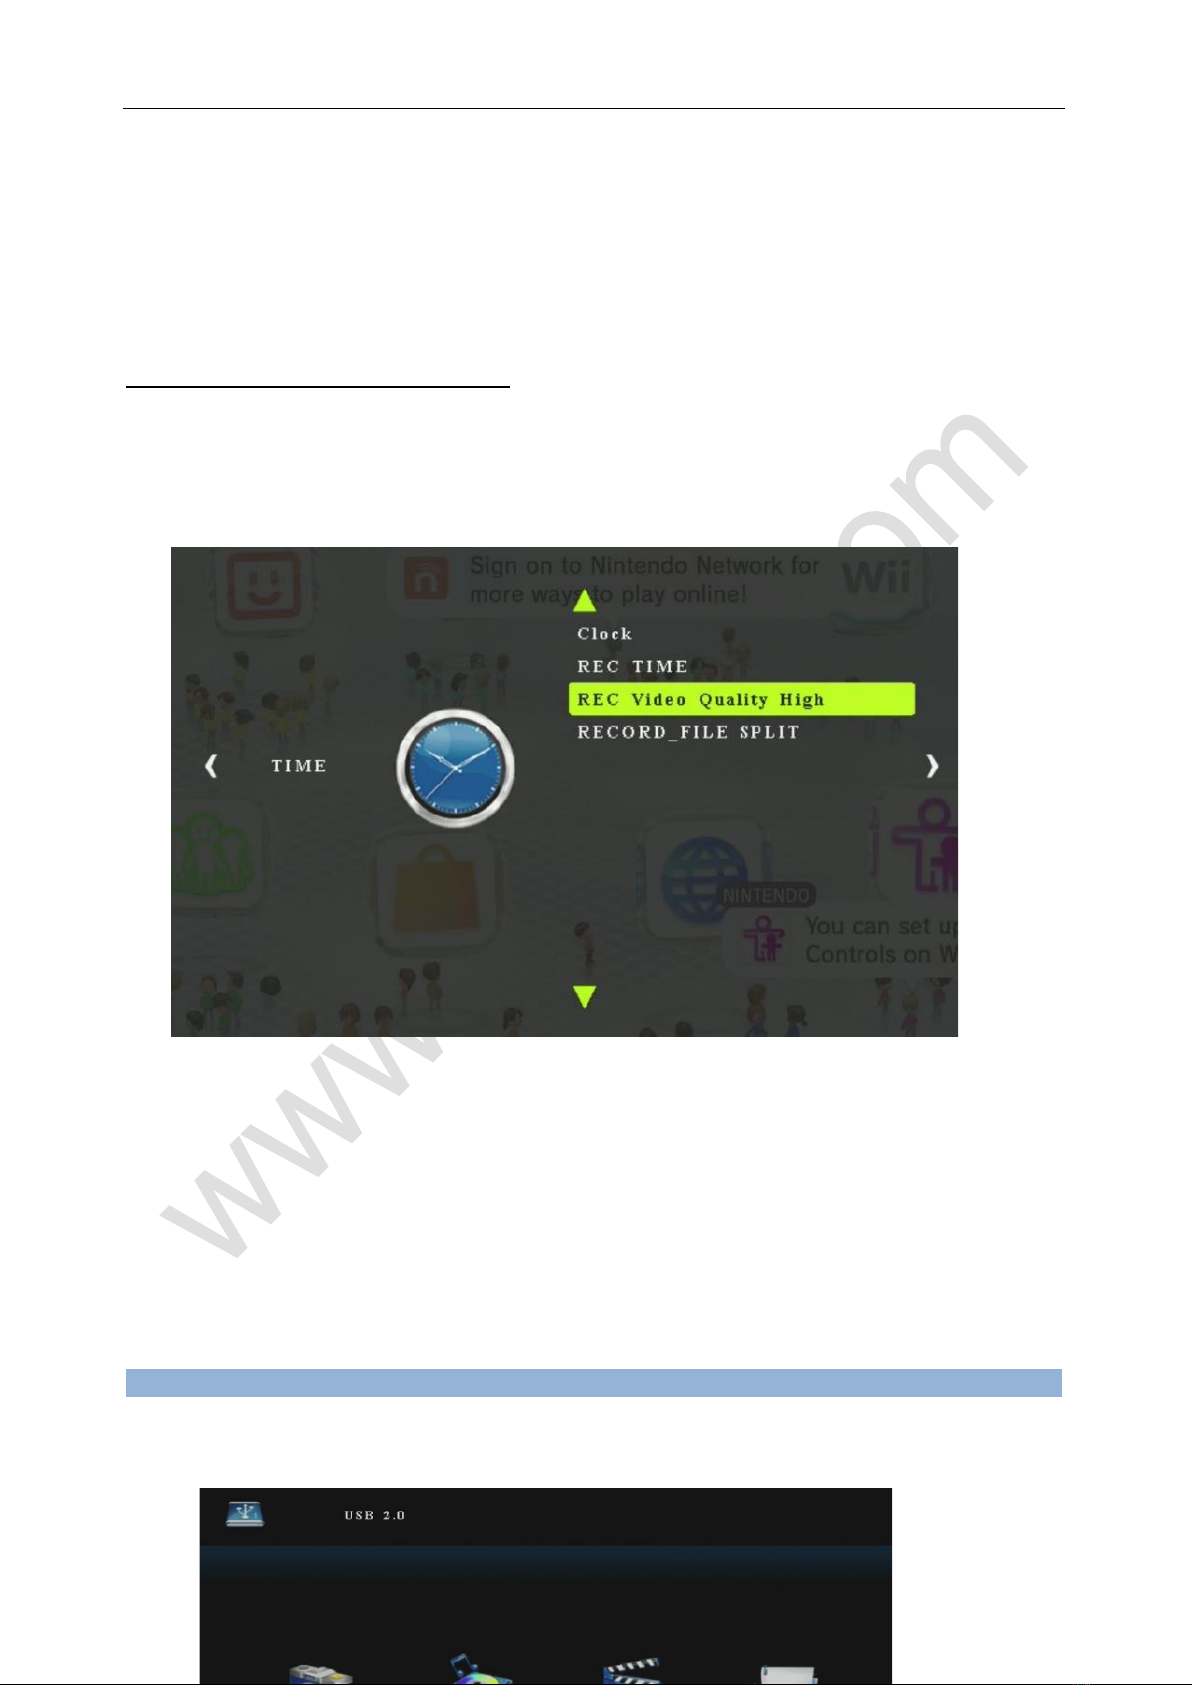
Schedule record:
Please set the SYSTEM TIME to the right local time before you set your schedule recording.
Press “SCH REC” of remote controller, can set the schedule recording:

After set the schedule time, please click “select” to display the task detail in task subject.
Set the recording video quality & split:
Press “MENU” of remote controller, enter to following menu, “clock” to set the time of system, “REC”
is schedule (same function as above), “REC Video Quality” you can set to High, Middle, Low, to set
the recording video bit rate to 16, 10, 4Mps
The “RECORD_FILE” you can set to SPLIT or NO_SPLIT(NTFS), to SPLIT means will cut the record
file to 2GB each both in FAT and NTFS storage. NO_SPLIT(NTFS) means will cut the record file to
2GV each in FAT storage, but will save in one whole file in NTFS storage.
Note: please do not take the memory off when the indicator is flashing. The recording will
automatically stop if the USB flash out of space.
Sometimes you may find that some recorded video with problems, like: skip. It may caused by you
are using a USB flash on NTFS format, and you haven’t click “safety remove” the device when
disconnect from computer (especially for USB HDD, if not safety remove, may caused serious
problem). You can try to format it to FAT32 if that problem keeps happen.
Playback:
After recording, you may want to playback the recorded file. Just press the “PLAYBACK” key of
remote controller, you will see the playback page on your screen:

Choose MOVIE:
Use direction key of remote controller to choose movie then press playback the recorded
video, or photos if you want see the snapshot pictures.
You can press “DELETE” to delete the file you don’t need any more:

You can use to fast backward, fast forward, last,
pause/play, next operation as usual.
Other Settings:
Press “MENU” enter menu operations, press direction keys to choose the settings you need:
To set OSD Language
Picture mode:

Sound mode:
Firmware and others:
Note: The device include two parts----”record part” and “playback part”, to update the firmware for
them separately.
1, Update firmware for “record part”: Copy the firmware file (as jedi.img format) in to USB disk, power

off the device (unplug power jack), plug USB disk to device, power on, the red REC indicator will flash
7~8 seconds, it means the update is finished.
2, Update firmware for “ playback part”: copy the firmware file (as MERGE.bin format) to USB disk,
plug the disk to ezcap295, then press “MENU” of remote controller, use direction key, find following:
choose and press OK and LEFT direction key to update. Please pull power cable and push it to power
on again.
Specifications:
Connections
Interface
USB 2.0 Host
Video Input
Digital: HDMI
Analog: Component Video, Composite Video
Audio Input
Digital: HDMI
Analog: 3.5mm Microphone In. Analog L/R in
Video Output
Digital: HDMI (Pass-through from HDMI or Component or Composite Input)
Audio Output
Digital: HDMI (Pass-through from HDMI or RCA L/R Input)
Analog: 3.5mm Stereo (Pass-through from HDMI or RCA L/R Input)
Applicable Connections with Game Consoles
HDMI
Industry HD camera, HD Medical endoscope, TV, gameplay, etc

Component
TV, gameplay, etc
Composite
Industry camera, Medical endoscope, TV, gameplay, etc
Hardware Extra
Codec
Hardware H.264 encoder
User Interface
Record button, mode switch button.
LED indicator for working status.
infrared receiver
Dimensions
142(L) ×73(W) ×26(H) mm.
Weight
110g
Package Contents
Device
ezcap295 HD Video Capture Pro
Others
DC adaptor, remote controller, AV cable, Manual
Standards
Storage Media
USB Flash Disk, Portable Hard Disk
Max Capacity: USB / 2T
Note: The exFAT format is not supported.
Resolution
Input / Pass-through:
720 x 480 (60p), 720 x 576 (50p), 1280 x 720p (50p), 1280 x 720p(60p), 1920 x 1080
(50i), 1920 x 1080 (60i), 1920 x 1080 (24p), 1920 x 1080 (25p), 1920 x 1080 (30p),
1920 x 1080 (50p), 1920 x 1080 (60p)
Capture:
1280 x 720p(60p), 1366*768 (60p), 1920 x 1080 (30p)

Record Format
Video: MP4, Audio: AAC Stereo
Record Quality
Max: 16Mbps@1080P 30fps
Record File
Max: 2GB / Per File, With RTC (Real Time Clock)
Record Place
Max: 140MB / Minute, 8.4GB / Hour
Power Supply
USB DC 5V / 2A
高清视频采集专业版
使用说明
非常感谢您购买 ezcap295 高清视频采集专业版, 下述说明让你参考如何设定和使用该产品,并希望
该产品能够带给你良好体验。
拥有 ezcap295 高清视频采集专业版, 你可以从各种设备录制各种视频源-HDMI、色差和 AV,并高达
1080P分辨率, 像蓝光 DVD、高清机顶盒、电脑、游戏机、VHS 等, 同时 ezcap295 高清视频采集
专业版还可以直接回放录制的视频。
Ezcap295 是录制和回放功能一体化的,使用专配的遥控器即可使用回放功能。 你还可以使用遥控器
设定预约录影、视频质量和录制文件是否分段等新颖功能。
产品外观、按键和接口:

1. PC/DC—5V 直流电源供电接口,还可以连接到电脑 USB接
口通过软件采集视频。
2. HDMI IN—HDMI 输入。
3. AV / YPBPR—通过配备的转接线输入色差分量或 AV 视频信
号。
4. MIC IN—麦克风输入接口,实现麦克风与视频同时录制。
5. LINE OUT—音频线路输出接口,可连接耳机或音响系统等。
6. HDMI OUT—HDMI 输出,连接大屏幕电视机或显示器等来
显示输入视频影像。
7. HOST—插入 U盘或 USB 移动硬盘,用于保存录制的视频文
件。
8. Record button —录制/停止按键,按下按键开始录制
或停止录制。
遥控器:
1. 开关键。 设备默认为电源开模式,在关闭电源并
重新启动后,设备会记忆关电之前的所有设定。
2. 抓图键,只有在不录制的状态下有效。
3. 选择输入视频源。

4 静音。
5. 麦克风静音。
6. 设定输出视频比例。
7. 开始录制和停止录制视频。
8. 菜单导航确认键,
左右键调节音量
上下键调节麦克风音量
MENU为菜单键和返回
功能
EXIT为退出功能
9. 按下显示当前时间水印并被记录于录制视频文 件,再次按下则没有时间水印。
10. 按下进入回放模式,按 EXIT 按键或任意视频源按键 (HDMI/YPbPr/AV) 则返回预览模式。
11. 设定预约影。
12. 回放模式下的功能键。
“DELETE”可以删除选中
的文件。
13. 设定输出和录制的视频分辨率。
连接:
Ezcap295 有三种视频输入模式: HDMI, 色差分量和 AV(CVBS),设备可以自动识别输入的视频源。不
建议同时连接两种或三种视频源。
连接 HDMI 输入视频源:

1, 连接配备的电源至 PC/DC 接口。
2, 插入 U盘或 USB 移动硬盘至 HOST 接口。
3, 用HDMI 线连接 HDMI 视频源和设备的 HDMI IN 接口,比如游戏机、机顶盒等,HDMI 线材需自行
购买。
4, 用HDMI 线连接设备的 HDMI OUT 接口和电视机或显示器的 HDMI 输入接口,同样 HDMI 线材需自
行购买。
5, “LINE OUT” 音频线路输出接口可以连接耳机或音响系统,如果没有必要则无需连接,因为设备的
HDMI OUT 连接至电视机同样有音频输出。
6, 如果你需要录制麦克风与视频一起,则将麦克风连接至”MIC IN”接口,如果没有不要则无需连接。
连接色差分量视频源 (比如 DVD、PS3 等):

1, 用包装内专配的视频转接线(红、蓝、绿为色差分量视频,一起的红白为音频左右声道)连接设备的
AV IN 接口和视频源的色差分量输出接口。
2,别的连接同上述 HDMI 视频源连接。

连接 AV 视频源(比如摄像机、VHS、V8 等):
1, 用包装内专配的视频转接线(黄色为 AV 视频,一起的红白为音频左右声道)连接设备的 AV IN 接口和
视频源的 AV(CVBS)输出接口。
2, 别的连接同上述 HDMI 视频源连接。
录制采集:
ezcap295 高清视频采集专业版接上电源,设备会默认预览模式(录制模式),绿灯常亮。
完成上述所有的连接后,显示器一定会显示输入的视频影像,如果显示屏显示“No Signal” 则表示
没有视频源输入。
录制视频非常简单 – 按下设备上的录制按键或遥控器上的录制按键,你将会看到指示灯变红,同
时显示屏左上角会出现一下红色的录制图标然后会消失,则表示设备在录制视频中。再次按下设备的录
制按键或遥控器的停止按键,则设备会停止录制,指示灯会闪烁几下并变为绿色常亮。
使用遥控器上 抓图按键, 你可以实现抓图功能,但是这个功能仅仅在不录制期间有效。

使用遥控器 左右键来调节音量大小。
如果你连接了麦克风来录制评论,你还可以使用遥控器 上下键来调节麦克风音量大小。
使用遥控器的 720P/1080P/PC 键来切换输出和录制的视频分辨率。 PC 对应的分辨率为 1366 *
768。
使用遥控器的 4:3/16:9 键切换视频比例。
使用遥控器的 WATERMARK 键增加时间水印,录制文件左上方则会显示时间水印,再次按下则
时间水印会消失。
因为一些原因可能会导致无法录制,你可以确认一下这些情形:
1, 没有连接好输入视频源。
2, U 盘没有足够容量。
3, U 盘格式不符合,比如 exFAT。 ezcap295 支持 FAT、FAT32 和 NTFS。
4, U 盘没有连接好。
5, U 盘还没有准备好,通常插上 U盘需要等待 4~8 秒时间。
预约录影:
按下遥控器 “SCH REC” 键,可以设置预约录影。
设定好时间后,需要点击“select”来完成设置。
设定录制视频质量和是否分段:
按下遥控器的 “MENU” 菜单键进入如下菜单界面,按上下导航键选择需要设定的子菜单。
“Clock” 用于设定系统时间。
“REC SCHEDULE” 用于设定预约录影 (与之前预约录影的描述一致)。
“REC Video Quality” 用于设定录制视频质量,高表示 16Mbps, 中表示 10Mbps,低表示 4Mbps。
“RECORD_FILE” 用于设定录制的文件是否分割为每 1.95G 一个文件, 或者不分段仅仅一个文件。
SPLIT 表示录制文件会被分割,而 NO_SPLIT(NTFS) 表示不分段,不分段仅仅会 NTFS 格式的 U盘

或移动硬盘有效。
注意
: 录制期间,或停止录制后但是指示灯还在闪烁时,请勿拔出 U盘,否则可能会会损坏或丢失录制
文件。
一些时候你可能会发现一些录制文件有问题,那可能是因为你使用 NTFS 格式的 U盘造成的。其主要
原因在于你从电脑上拔出 U盘前没有使用安全退出后拔出 U盘,而是直接将 U盘拔出。 因此请使用
安全模式退出电脑,或将 U盘格式为 FAT32 使用。
回放:
录制后你或许想确认录制文件,请使用设备的回放功能。按下遥控器的“PLAYBACK” 键进入回放模式,
你将会在显示屏上看到如下回放页面。
导航键选择 PHOTO 并按 OK 确认以播放抓图的图片文件,或选择 MOVIE 并按 OK 确认以播放录制
的视频文件:
Table of contents
Other EzCAP PCI Card manuals
Popular PCI Card manuals by other brands

Digitus
Digitus DS-30221-1 user manual

König Electronic
König Electronic CMP-SATAPCI30 manual

IXXAT
IXXAT PC-I 04/PCI user manual

SKY BLUE
SKY BLUE Kaya KY-Chameleon Hardware Reference and Installation Guide

National Instruments
National Instruments PCIe-6593 Getting started guide

Protac
Protac PRoX-2622 user manual