EzCAP ezcap289 User manual

Lecture Capture with Built-in Microphone
Quick Start Guide
Thanks for purchasing ezcap289 Lecture Capture with Built-in Microphone. The following guides you
how to set up the device. Hope this device will bring you nice digital experience.
With ezcap289 Lecture Capture, just press one button to record digital lesson contents or meeting
presentations. with integrated microphone, recording HD lecture combined with voice. It is plug & Play,
standalone working no need PC.
Features/ports and buttons:
1. DC—DC 5V power supply.
2. HOST—For plugging USB
flash drive or USB HDD to
save recorded files.
3. LINE IN—Connect line
audio so mixed with video.
4. LINE OUT—By pass from
line in (not output from HDMI)
5. HDMI OUTPUT—Pass
through from HDMI input or
VGA input.
6. HDMI INPUT
7. VGA INPUT
8. VGA OUTPUT—Loop
through display video from
VGA input only.
9. MUTE —Button for
microphone on or mute。See
below “Mute key, and microphone volume”
10. MIC+-—Button for switching microphone gain. See below “Mute key, and microphone value”.
11. REC—Press to start recording, red REC LED will turn on, press again to stop recording, LED will
flash few seconds, then turns off. HDMI LED on means record from HDMI input, VGA LED on means
record from VGAinput. If no video input, both HDMI and VGA LEDs will turn off, but still can record
voice with black screen.

12. 720/1080—When input video is 1920*1080, press this button to set the resolution of record video
between 720 and 1080, 720 LED on means record 720, 1080 LED on means record 1080. Before you
press this button to set recording video quality, 1080 green LED keeps on when input 1080 resolution
video or no video source input, and 720 green LED keeps on when input 720 or less than 720
resolution video.
13. ON/OFF—Short press to power on, and MUTE green LED will turn on. Long press 3 seconds
again to power off, green LED will turn off. It’s no effect during recording.
How to play:
1, Connect DC port with DC power adapter included package. MIC+- LED will turn red, then turn off
and turn on slowly. Short press ON/OFF button to power on.
2, Connect video source (e.g. Computer) to HDMI INPUT or VGAINPUT, the picture shows from VGA
video source, it will be the same if connect from HDMI.
3, Connect HDMI OUTPUT or VGA OUTPUT to Projector or monitor.
-You should connect HDMI OUTPUT to Projector or monitor if you connect video source to HDMI
INPUT, VGA OUTPUT port has no signal output at this moment.
4, Plug an USB flash drive or USB HDD into HOST port.

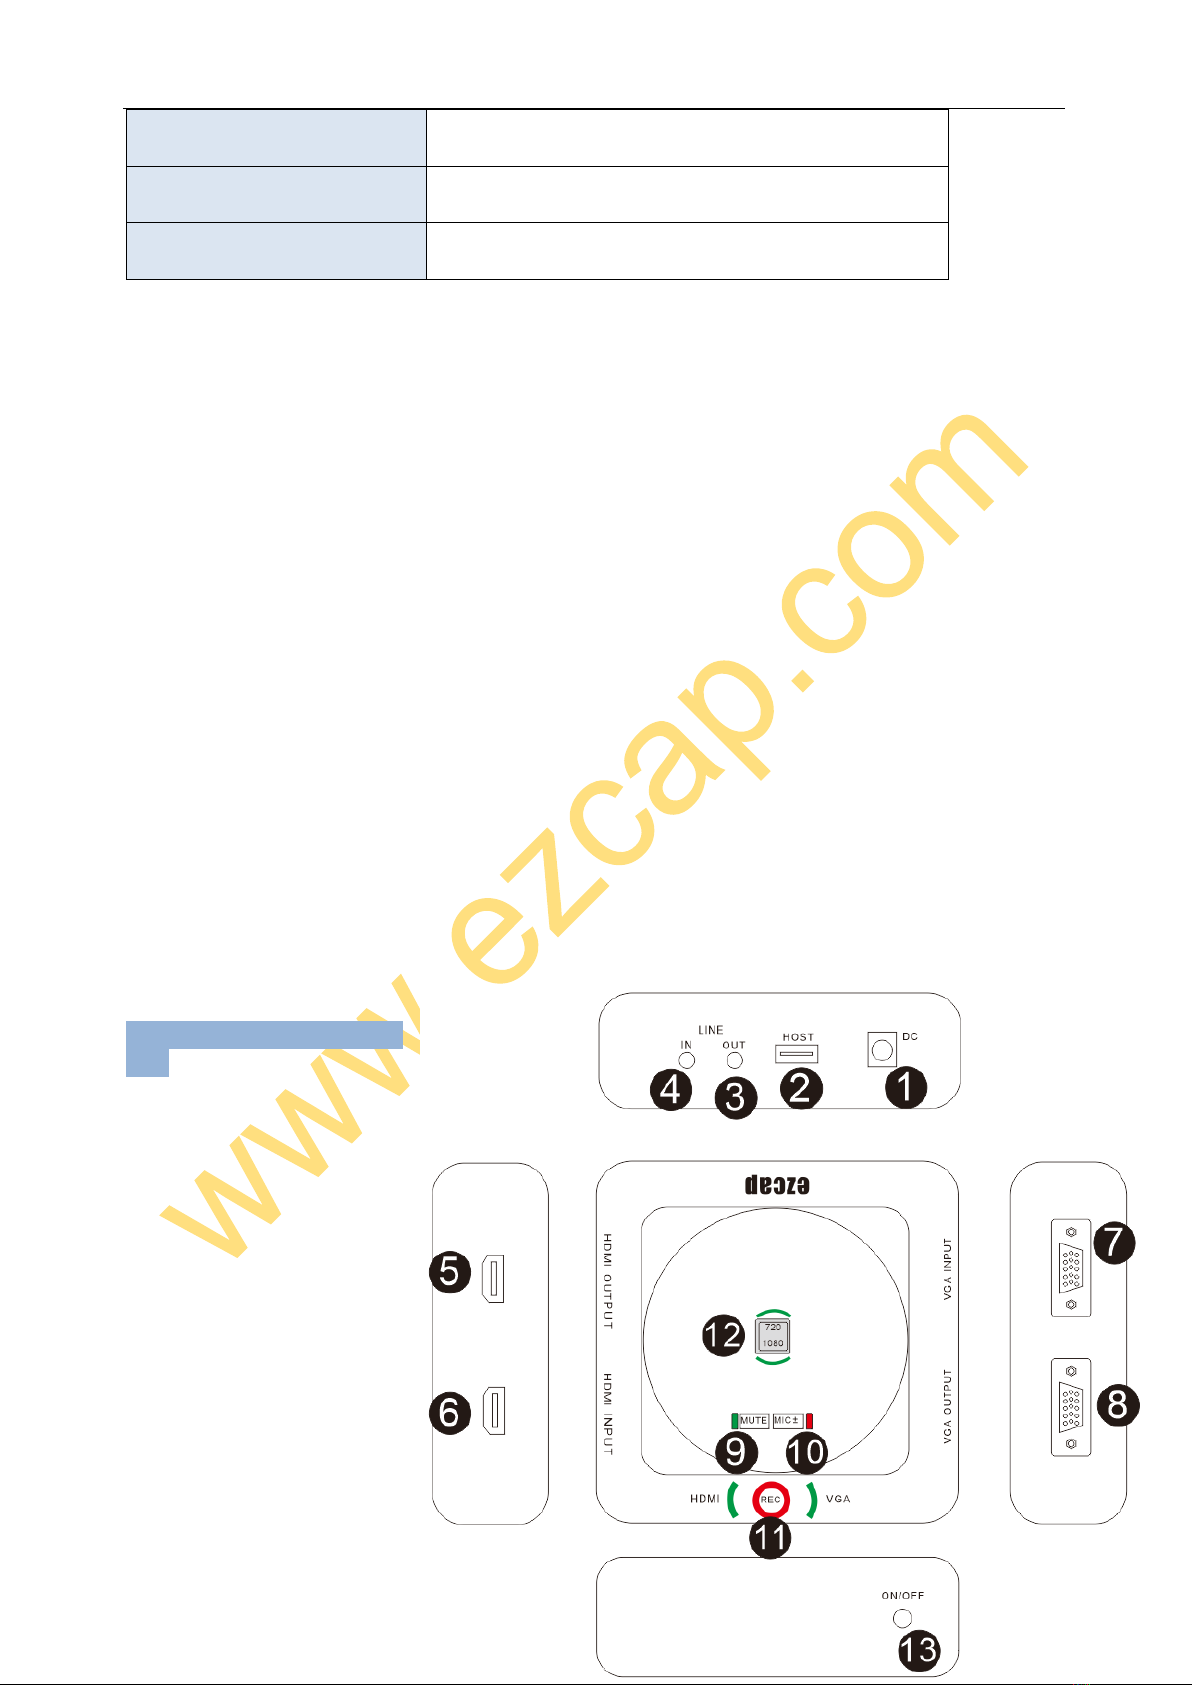
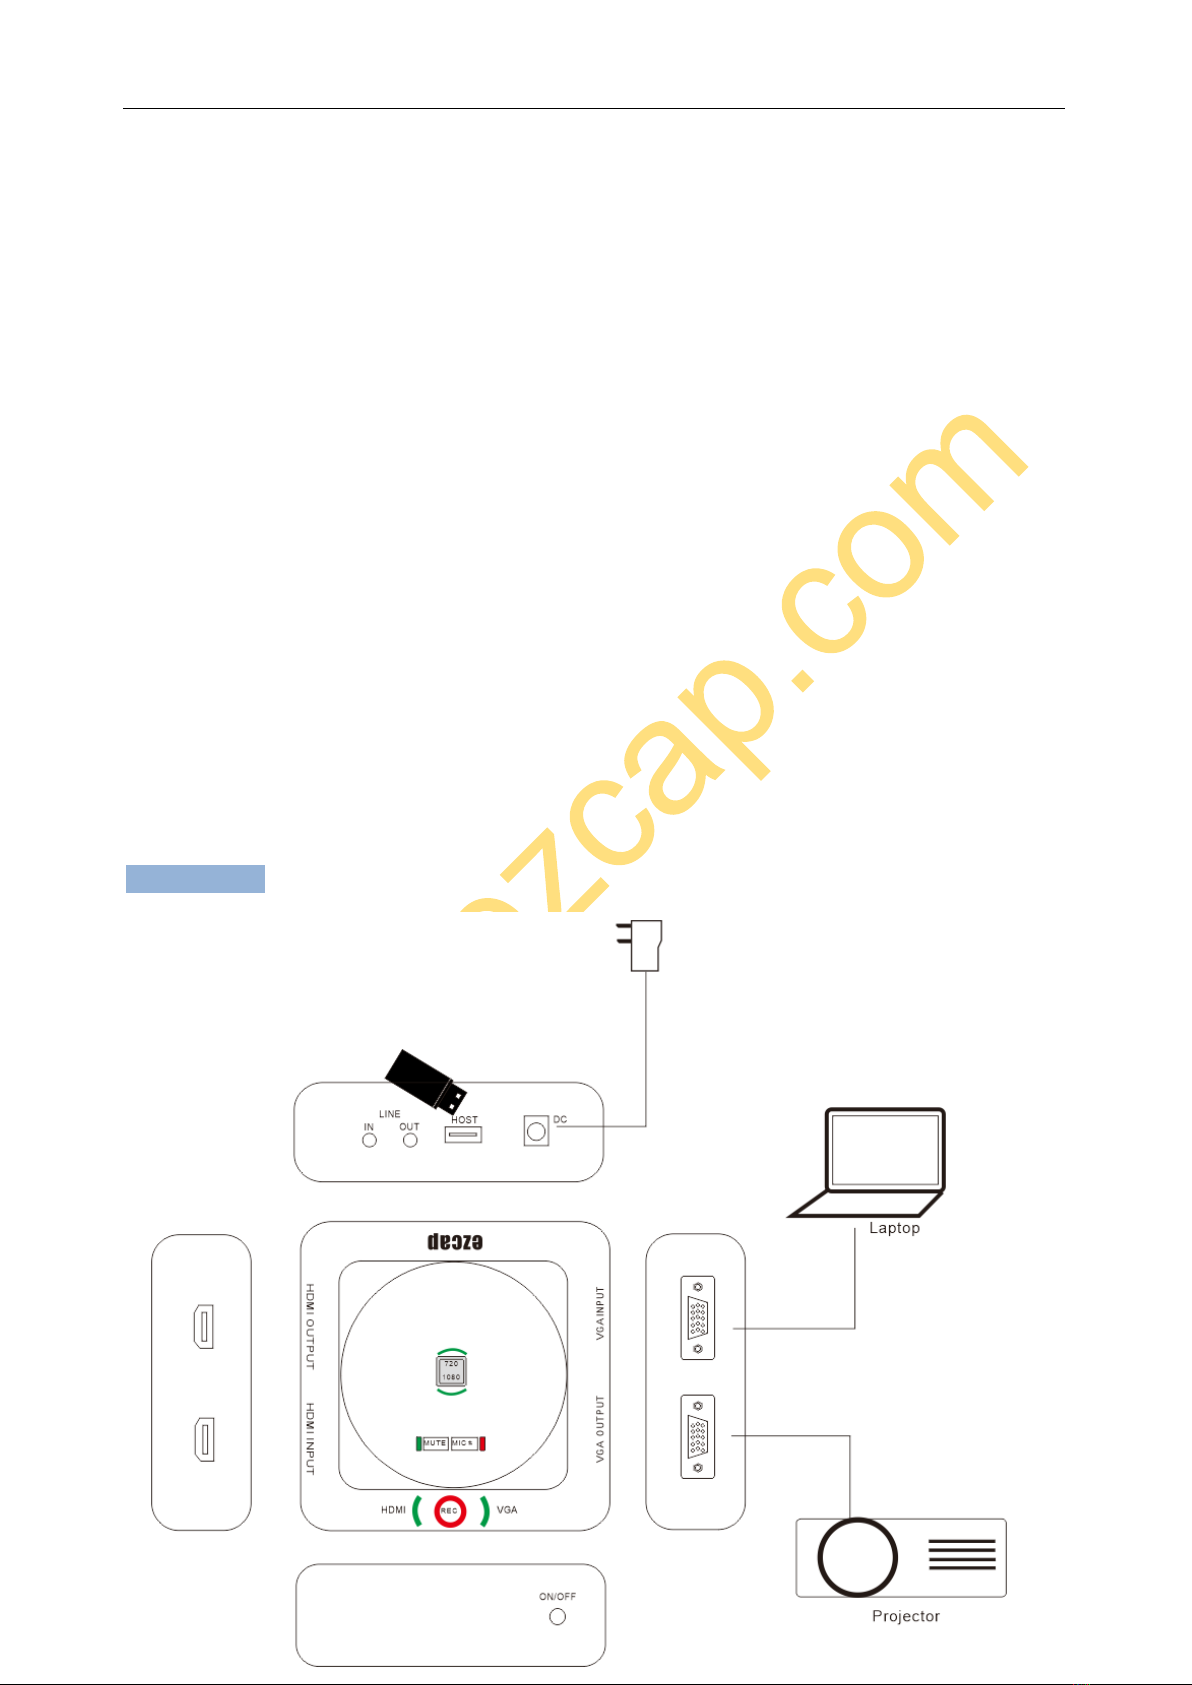
5, Press REC button to record the playing video, you will see the red LED indicator turn on. Press
REC button again to stop recording, will see LED indicator flash few seconds then turn off.
6, VGA LED on or HDMI LED on, that means which video source is recording. If you connect VGA
and HDMI source same time, device will record VGAsource only. If you don’t connect VGAand HDMI
video source, both two LED go off, but you still can record black screen with voice from microphone,
or audio from line in, this design for you only need record voice of conference, or you can cut off the
video source during recording, the recording will be continue. (Record black screen and voice)
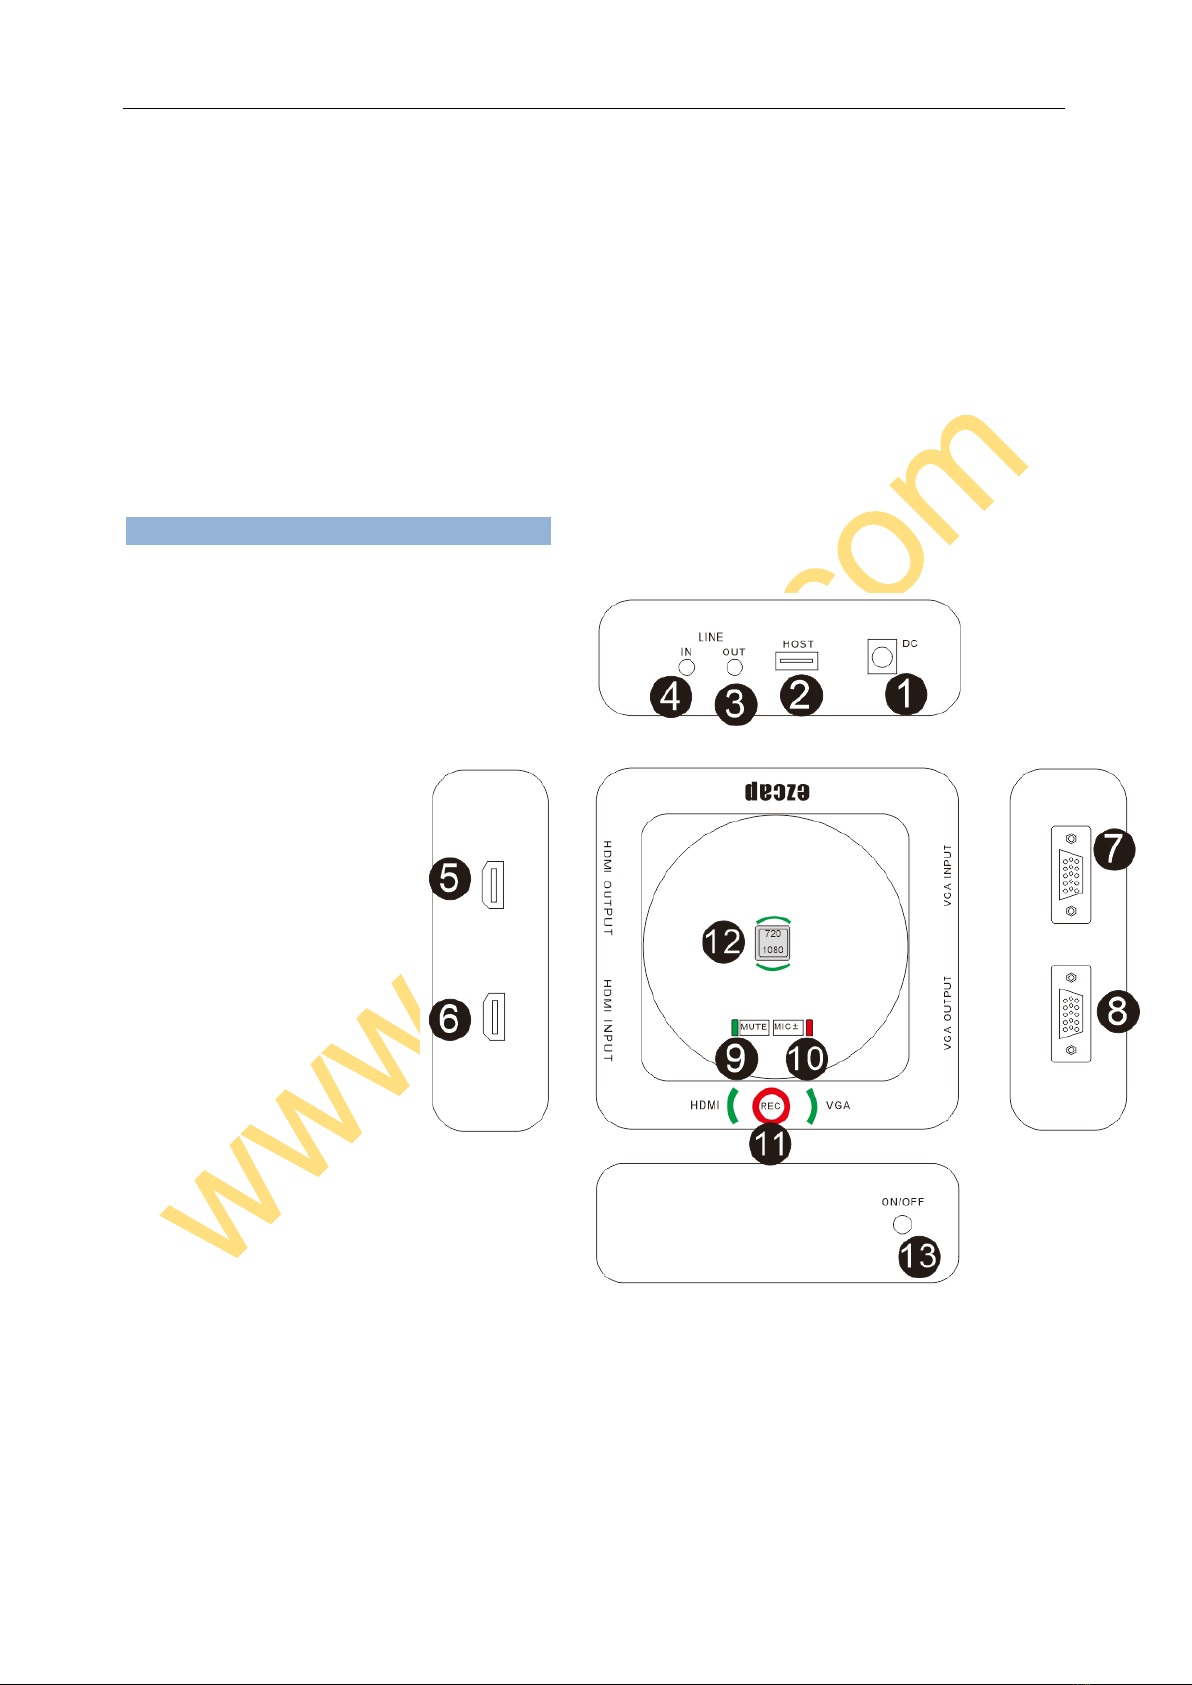
7, Mute and Microphone volume
Normally, the microphone MUTE LED keeps green on, it means microphone is working.And short
press MUTE button, the LED turns off, it means the microphone doesn’t work. Now, you only record
video without voice from microphone. Short press again, set microphone on, enable to record
microphone voice again.
MIC+- button is for set microphone gain. You short press this button, MIC+- red LED flashes 1 or 2, or
3 times. It means the 3 different gain for microphone, 1 is small, 2 is middle, 3 is big, you can set it
according to the size of the meeting room. Set to 3 if you have big room, otherwise to 1 or 2.
8, After you stop recording, connect the USB flash to computer, will see the recorded files:
201704201609_59 (named with time: year, month, day and time)
The max size per file will be around 1.95GB (around 15 minutes for 1080p video), when you record a
video more than 1.95GB(15 minutes), ezcap289 will partition it in more than 1 file, for example: if you
record a 45 minutes 1080p video by one click recording, you will see 3 files: 201704201609_59,
201704201609_59_1, 201704201609_59_2…and so on
The recording will be stopped automatically if the USB memory is full.
If you like use a media player to playback the recorded video, make sure it support MPEG4 video
and AAC audio decode.
9, Update firmware: you may need update firmware for this device for some reason. Copy the
firmware file into USB flash drive, power off the device (unplug power jack), plug USB disk to device,
power on, the indicator will flash 7~8 seconds, then the update is finished.
Note:
Use “safety remove”option to remove your USB flash or HDD after format from computer, DO NOT
just plug out without click “safety remove”option, otherwise you will cause problem during recording.
If you use USB HDD, and there is more than 1 partition, then the video only saved on first partition,
when the first partition memory is full, the recording will be stopped. So, please check and set up your
USB HDD firstly according to your demand.
Please set the resolution of your computer according to INPUT RESOLUTION in STANDARDS part
of manual. Otherwise, you maybe a different resolution recorded file.

Edit/Convert recorded files:
The ezcap289 comes with a video edit software—Arcsoft ShowBiz 3.5, you can edit your video file
with it.
After install it on computer, and run it.
You can combine two or more video in one, just drag them into Showbiz:

2, You can cut a video to two or more:
3, Click “Produce” after editing, you can create DVD or upload video to YouTube:
4, Please click “Create file”
to create MUTEiple files for
different devices, such as
apple, PSP, mobile phone,
etc:

Please click the “?”key on the software panel to get the more information and help.
Specifications:
Connections
Interface
USB 2.0 Host
Video Input
HDMI,VGA
Audio Input
HDMI,LINE IN, Microphone inside
Video Output
HDMI (Pass-through from HDMI, VGA), VGA (loop from VGA)
Audio Output
HDMI (Pass-through from HDMI), Line out(Pass-through from
LINE IN only)
Package Contents
Device
ezcap289 Lecture Capture
Others
5V/2A DC adapter, Software CD, User Manual
Hardware Extra
Codec
Hardware H.264 encoder
User Interface
Record button, 720p/1080p button, gain set button, mute button,
ON/OFF button
LED indicator for working status
Dimensions
115*115*28.3 MM

Net Weight
185g
Standards
Storage Media
USB Flash Drive, USB HDD
Note: The exFAT format is not supported.
Resolution
Input / Pass-through:
720 x 480 (60p), 720 x 576 (50p), 1280 x 720p (50p), 1280 x
720p(60p), 1920 x 1080 (50i), 1920 x 1080 (60i), 1920 x 1080 (24p),
1920 x 1080 (25p), 1920 x 1080 (30p), 1920 x 1080 (50p), 1920 x 1080
(60p)
Capture:
720 x 480 (60p), 720 x 576 (50p), 1280 x 720p (50p), 1280 x
720p(60p), 1920 x 1080 (50i), 1920 x 1080 (60i), 1920 x 1080 (24p),
1920 x 1080 (25p), 1920 x 1080 (30p), 1920 x 1080 (25p), 1920 x 1080
(30p)
Note: Up scaling is not supported.
Record Format
Video: MPEG4, Audio: AAC
Record Quality
Max: 18Mbps@1080P 30fps
Record File
Max: 1.95GB / Per File
Record Place
Max: 140MB / Minute, 8GB / Hour
Power Supply
DC 5V / 2A
Applications
Software
Arcsoft Showbiz
Video Editing
Timeline / Storyboard edit, Split / Divide Scenes, MUTEi Trim
Scenes …
Video Export
Upload to YouTube
Portable Device: iPod, iPhone, iPod Touch, Apple TV, PSP, PS3, Xbox
File: MPEG 1 / 2 / 4, WMV HD, QuickTime (MOV) …
Operating System
Windows 8 (32 / 64 bit), Windows 7 (32 / 64 bit), Windows Vista (32 /
64 bit)

CPU
Intel Core 2 Duo 2.8GHz, AMD Athlon 64X2 Dual Core 3.0GHz
Memory
4 GB RAM
Graphics Card
VGA card with support for DirectX 10.0c or above
课件录影盒
使用说明
非常感谢您购买 ezcap289 课件录影盒, 下述说明让你参考如何设定和使用该产品,并希望该产品能
够带给你良好体验。
拥有 ezcap289 课件录影盒,你仅需按下按钮即可轻松录制数字教程内容或会议记录,内置高灵敏度
一体化麦克风,将课程解说或会议讨论内容与高清视频完美结合,制作精美教程轻松自如。ezcap289 课
件录影盒即插即用,无需安装任何驱动软件。
产品外观、按键、接
口:
1. DC—5V/2A 直流电源供电
接口
2. HOST—用于插入 U盘或
USB 移动硬盘盒以存储录制
文件
3. LINE IN—音频线路输入接
口
4. LINE OUT—仅仅为线路输
入的分路输出 (没有 HDMI 输
入包含的音频信息)
5. HDMI OUTPUT—HDMI 输
入或 VGA 输入的环出,连接电

视机或显示器
12. HDMI INPUT—HDMI 输入
13. VGA INPUT—VGA 输入
14. VGA OUTPUT—仅仅为 VGA 输入的分路输出,HDMI 输入时没有 VGA 输出
15. MUTE —静音按键,用于切换麦克风工作或静音。详情见“静音按键及麦克风音量设定”章节。
16. MIC+-—麦克风增益调节按键,用于在不同尺寸的空间内设定麦克风增益,以确保可以录制得到合
适音量之文件资料。详情见“静音按键及麦克风音量设定”章节。
17. REC—录制按键,按下开始录制,按键本体内红色 LED 亮起,再次按下停止录制,LED 闪烁几秒
后熄灭。左边的 HDMI 绿灯常亮表示录制从 HDMI 接口输入的视频源,右边的 VGA 绿灯常亮表示录制
从VGA 接口输入的视频源。如果没有接入任何视频源,则两个 LED 都不亮,但机器仍然可以录制,录
制下来的文件为黑屏有麦克风声音的视频文件。
12. 720/1080—720/1080 录制质量切换按键,当输入 1920*1080 视频源时,, 按下该按键可以设定录
制视频文件分辨率为 720P 或1080。720 绿灯常亮则表示录制 720 分辨率,1080 绿灯常亮则表示录
制1080 分辨率。设定前,输入信号为 1080 分辨率,则 1080 绿灯常亮,输入信号为 720 或低于 720
分辨率,则 720 绿灯常亮。
13. ON/OFF—开关机按键,短按开机,MUTE 绿灯常亮,长按 3秒关机,绿灯熄灭。 录制期间开关
机按键无效。
如何使用:

1, 将包装配备的 5伏2安电源一端连接市电插座一端连接机器的 DC 插孔,MIC+-麦克风增益调节红
色LED 亮起,然后慢慢熄灭慢慢亮起,周而复始,进入待机模式。按下 ON/OFF 开关机按键,MUTE
麦克风静音绿灯亮起,表示机器进入工作状态。
2, 将视频源(比如电脑) 连接至 HDMI 输入接口或 VGA 输入接口,上图以 VGA 输入接口为例。 HDMI
输入接口连接方式相同。 如果需要额外的 HDMI 线材或 VGA 线材请另行购买。此时机器的 HDMI 绿
灯或 VGA 绿灯应该常亮,否则表示机器没有识别到信号接入。
3, 连接 HDMI 输出接口或 VGA 输出接口到投影仪或显示设备。
-如果是视频源连接的是 HDMI 输入接口,则你只能够使用 HDMI 输出接口去连接投影仪或显示设备,
因为此时 VGA 输出接口没有视频信号输出。
4, 插一个 U盘或移动硬盘到 HOST 接口,并静候几秒以让机器读取信息。
5, 按下录制按键开始录制视频,录制红灯常亮,再次按下录制按键停止录制,红灯闪烁几秒后熄灭,
此时你方可移除 U盘或移动硬盘以确认录制文件。
6, VGA 绿灯亮或 HDMI 绿灯亮, 表示对应的视频源接入机器。如果同时接入 VGA 和HDMI 信号,机
器将会默认 VGA 信号输入。 如果 VGA 和HDMI 都没有接入机器, 两个绿灯都熄灭,但是你仍然可
以录制有麦克风语音或线路输入音频的黑屏视频格式文件。 这个设计主要用于一些时候仅仅需要录制
会议讨论语音,或者在录制期间切断视频但是仍然继续录制语音信息等。
7, 静音按键及麦克风音量设定
正常情况下,麦克风绿灯保持常亮,表示麦克风在工作中。 短按 MUTE 静音按键,绿灯熄灭,表示进
入静音状态,此时麦克风不工作,你录制下来的文件不会有麦克风的语音信息。再次按下 MUTE 静音
按键,则绿灯亮起,麦克风恢复工作状态,录制的视频文件包含麦克风语音信息。
-静音按键仅仅对麦克风语音有效,对于通过 HDMI 输入端口或线路输入端口输入的音频信息无效。
MIC+- 麦克风增益调节按键用于设定麦克风增益。你每次按下按键麦克风增益红灯会依着闪烁一次、
两次、三次循环。闪烁次数表示不同的麦克风增益,一次表示增益较小,两次表示增益较强,三次表示
增益最强。 你可以依据会议室大小和语音源与机器的距离而设定不同的增益,会议室越大距离越大,
则需要设定越强的麦克风增益。最好的办法是依照实际的情况用不同的增益来尝试录制语音,然后通过
确认录制文件情况选取音量最佳的增益设定即可。
8, 将存有录制文件的 U盘或移动硬盘与电脑连接,你将会看到视频录制文件:201704201609_59 (以
录制时间命名的文件名:年、月、日、时、分、秒,此文件名表示 2017 年4月20 日16 时9分59 秒
录制)
每一个文件最大约为 1.95GB (1080p 视频文件约 15 分钟),当你录制视频超过 1.95GB,ezcap289
课件录影盒会自动保存为一个文件,并继续录制。 举例:当你按一次录制键并准备录制 50 分钟左右
的1080P 的视频,那你将会得到四个文件:201704201609_59, 201704201609_59_1,
201704201609_59_2, 201704201609_59_3。前三个文件分别为约 1.95GB,时长分别约 15 分钟,
而第四个文件时长约 5分钟。
当存储器容量存满了文件,机器会自动停止录制。

如果你想使用媒体播放器播放录制的视频文件,请确保该媒体播放器支持解码 MPEG4视频格式和 AAC
音频。
9, 程序升级:因为一些原因你或许需要升级程序。 请将新的程序文件拷贝到 U盘内,将课件录影盒电
源拔掉,插上 U盘,再接上电源,并按下开关键,这时录制指示灯将会闪烁七八秒后熄灭,这时表示
软件升级成功。
提示
:
当使用电脑格式化 U盘或者移动硬盘,退出程序时请使用”安全退出”选项,不可直接拔出 U盘或移动
硬盘, 否则可能会在录制期间发生问题。
如果你使用的 USB 移动硬盘有多个分区,则课件录影盒会将录制的视频文件仅仅保存于第一个分区,
当该分区空间存满,将会自动停止录制。因此,请根据您的需求来设定 USB 移动硬盘。
请参照说明书中标准部分的输入分辨率来设置电脑显示分辨率,否则你可能得到的录制文件分辨率与电
脑分辨率有差异。
编辑转换录制文件:
ezcap289 课件录影盒配送了一个强大的视频编辑软件—Arcsoft ShowBiz 3.5, 您可以使用它来编辑您
所录制的视频文件。
使用软件光盘安装好软件后打开软件:
将需要编辑的视频拖入编辑框,比如将两段视频拖入合并为一个视频文件:

也可以把一段视频分割为两段:
编辑后点击 produce(发布)可以将视频创建为
DVD 或发布到 YouTube:

也可以创建为文件以转换为各种媒体格式,如 Apple 的格式,PSP 格式等等。
请点击软件面板右上角的”?”图标来获得更多软件使用信息和帮助。
参数:
接口界面
接口
USB 2.0 HOST
视频输入
HDMI,VGA
音频输入
HDMI,线路输入, 内置麦克风
视频输出
HDMI (从HDMI 或VGA 输入获得), VGA (VGA 输入获得)
音频输出
HDMI (从HDMI 输入获得), 线路输出(从线路输入分路获得)
包装内容

设备
ezcap289 课件录影盒
配件
5伏2安直流电源, 软件光盘, 使用说明书
硬件规格
编码器
H.264 硬件编码
操作界面
录制按键, 720/1080 切换按键, 麦克风静音按键, 麦克风增益调节按键, 开
关机按键
LED 工作状态指示灯
尺寸
115(长)*115(宽)*28.3(高) 毫米
净重
185 克
标准
存储介质
U盘, 移动硬盘
注: 不支持 exFAT 格式.
分辨率
输入 / 输出:
720 x 480 (60p), 720 x 576 (50p), 1280 x 720p (50p), 1280 x 720p(60p),
1920 x 1080 (50i), 1920 x 1080 (60i), 1920 x 1080 (24p), 1920 x 1080
(25p), 1920 x 1080 (30p), 1920 x 1080 (50p), 1920 x 1080 (60p)
录制:
720 x 480 (60p), 720 x 576 (50p), 1280 x 720p (50p), 1280 x 720p(60p),
1920 x 1080 (50i), 1920 x 1080 (60i), 1920 x 1080 (24p), 1920 x 1080
(25p), 1920 x 1080 (30p), 1920 x 1080 (25p), 1920 x 1080 (30p)
注: 输出和录制分辨率与输入信号一致,不支持提升分辨率.
录制格式
视频: MP4, 音频: AAC Stereo
录制质量
最大: 18Mbps@1080P 30fps
录制文件
最大: 1.95GB / 文件
录制空间
最大: 140MB / 分钟, 8GB / 小时
电源适配器
直流 5V / 2A

应用软件
软件
ArcSoft Showbiz
视频编辑
时间轴 …
视频输出
便携设备: iPod, iPhone, iPod Touch, Apple TV, PSP, PS3, Xbox
文件: MPEG 1 / 2 / 4, WMV HD, QuickTime (MOV) …
操作系统
Windows 8 (32 / 64 bit), Windows 7 (32 / 64 bit), Windows Vista (32 / 64 bit)
CPU
Intel Core 2 Duo 2.8GHz, AMD Athlon 64X2 Dual Core 3.0GHz
内存
4 GB RAM
显卡
支持 DirectX 10.0c 以上之显卡
Table of contents
Other EzCAP Recording Equipment manuals