Ezquest Boa K16766 User manual

EZ-DVD COPY
Stand Alone & USB 2.0
Duplicator
User's Manual
Attention:
It takes over 5 seconds to
power on after shutdown
otherwise the system may
operate abnorrmally.
Ver: 1.0

Table of Contents
Copyright and Trademark................................... 2
Chapter 1 Installing Software ...........................3
Chapter 2 Switching to USB Mode ..................
Chapter 3 Using ImageManager ...................... 5
Chapter 4 Using Buttons & LCD ..................... 6
Chapter 5 Functions ........................................12
Chapter 6 Troubleshooting ............................ 55
Warranty & Tech Support ................................. 64
Appendix 2 LCD Messages .............................. 60
Appendix 1 List of Functions ........................... 58
4

Copyright and Trademark
The information in this manual is subject to change without prior notice and does
not represent a commitment on the part of vendor, who assumes no liability or re-
sponsibility for any errors that may appear in this manual.
This manual contains materials protected under International Copyright Laws. All
rights reserved. No part of this manual may be reproduced, transmitted or tran-
scribed without the expressed written permission of the manufacturer and author of
this manual.
The EZQuest EZ-DVD COPY USB 2.0 Duplicator is merely used for copying and
editing personal audio and video data. Violating Copy Right is a criminal act.
ACARD's ImageManager only supports legal backup operation.
EZQuest Inc.. is not responsible for the user"s illegal actions.
Page 2

Chapter 1 Installing Software
Installing Easy Media Creator
1. Insert the Easy Media Creator Software disc
2. Click YES in the Install dialog box
3. Select Language and Click on OK, Windows install will open
4. Click NEXT to instal program
5. Click on I ACCEPT to accept license agreement, click NEXT
6. Enter customer information and click NEXT
7. Click NEXT for complete installation
8. Click INSTALL
9. After completion click on FINISH
Installing ImageManager Software
1. Insert the ImageManager Software disc
2. Open the Imagtool Folder
3. Double Click on Setup.exe Icon
4. Click on Next button
5. Click on Yes to accept license agreement
6. Click next to install program to default directory
7. Installation wizard will install program
8. Click on Finish button to complete installation
.
Page 3

Page 4
Chapter 2 Switch to USB Mode
To Switch the Duplicator from
Standalone Mode to USB Mode:
1. Hit the ESC button to bring up
12-01 Adv Setup
2. Use the down arrow to go to
12-13 Adv Setup
Switch USB Mode
3. Hit ENT button
4. Screen should show
USB L.H. Mode
.

Chapter 3 Image Manager
Install the software Image Manager that is in the application CD, and then follow the
steps below to use it.
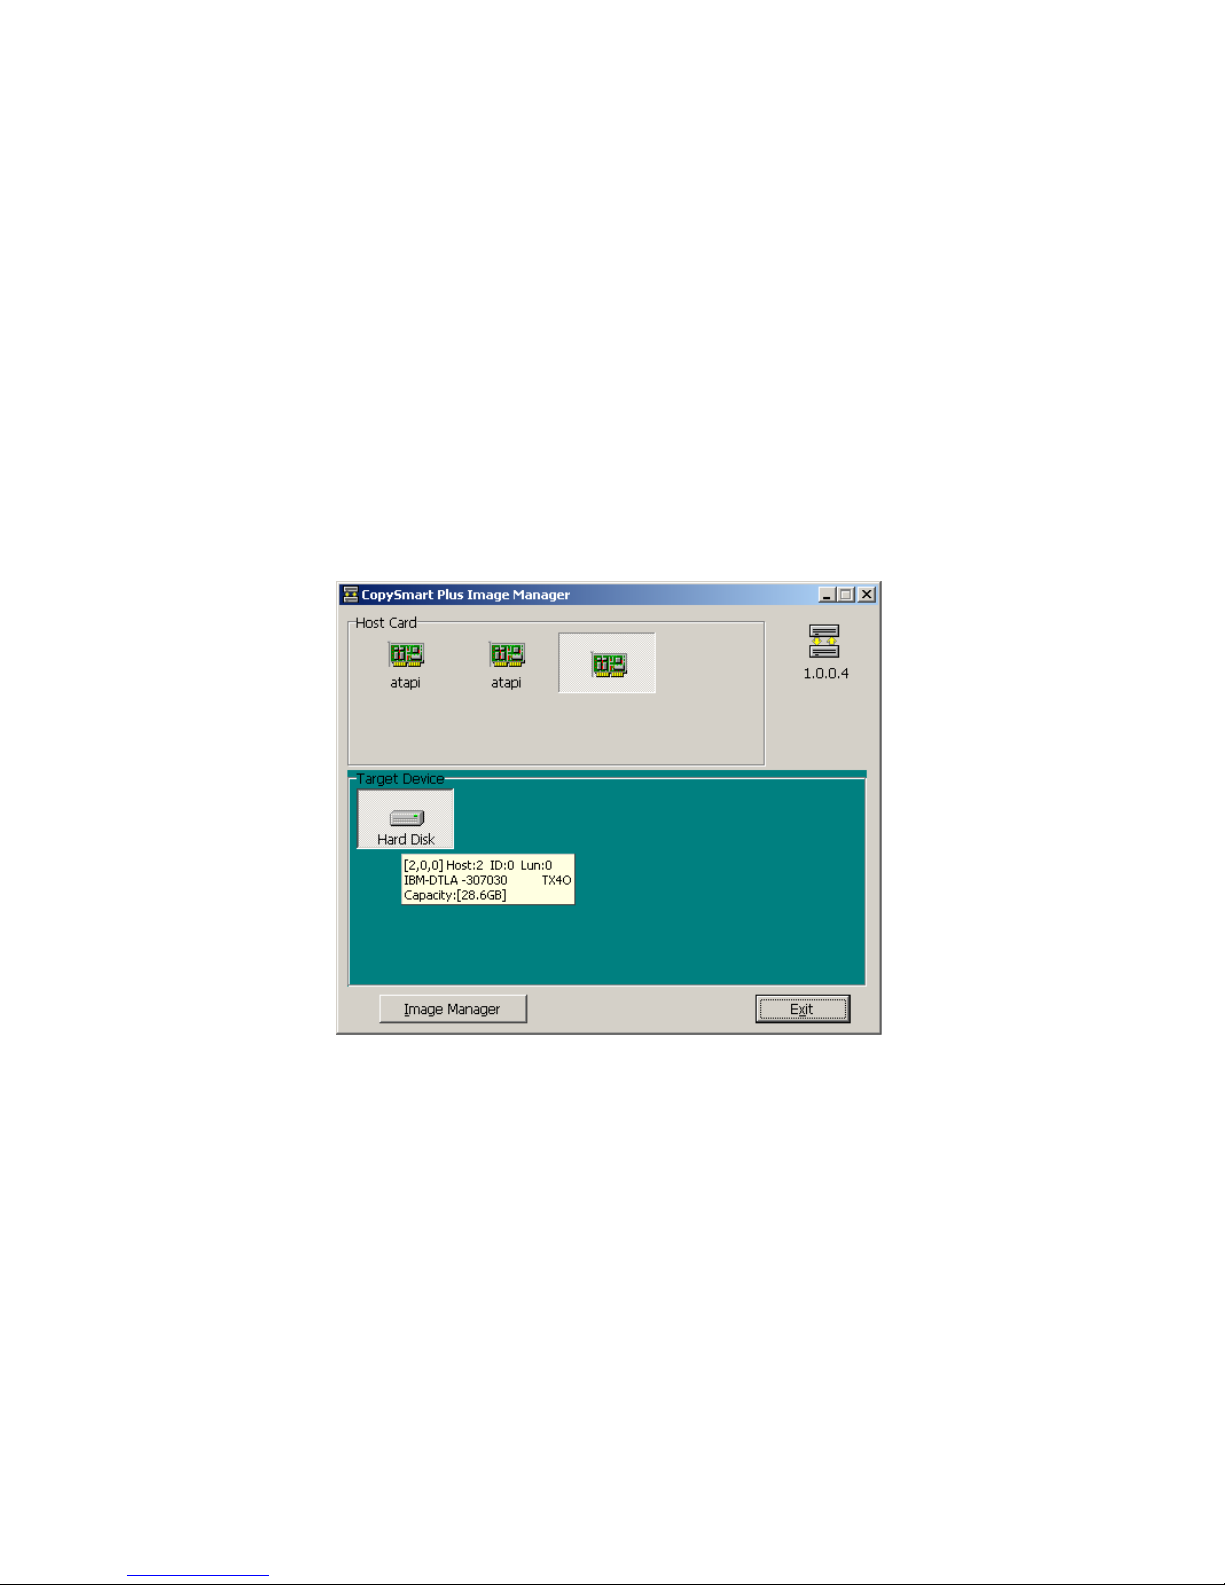
(1) Click the icon of the last host card to see the newly connected hard drive after
entering Image Manager. The last host card has no title, but it represents AEC-
4420P.
Figure 3-1
(2) On the above figure move the cursor to the hard drive to see its capacity and so
on. Now click [Image Manager] to enter the next figure.
Page 5

Page 6
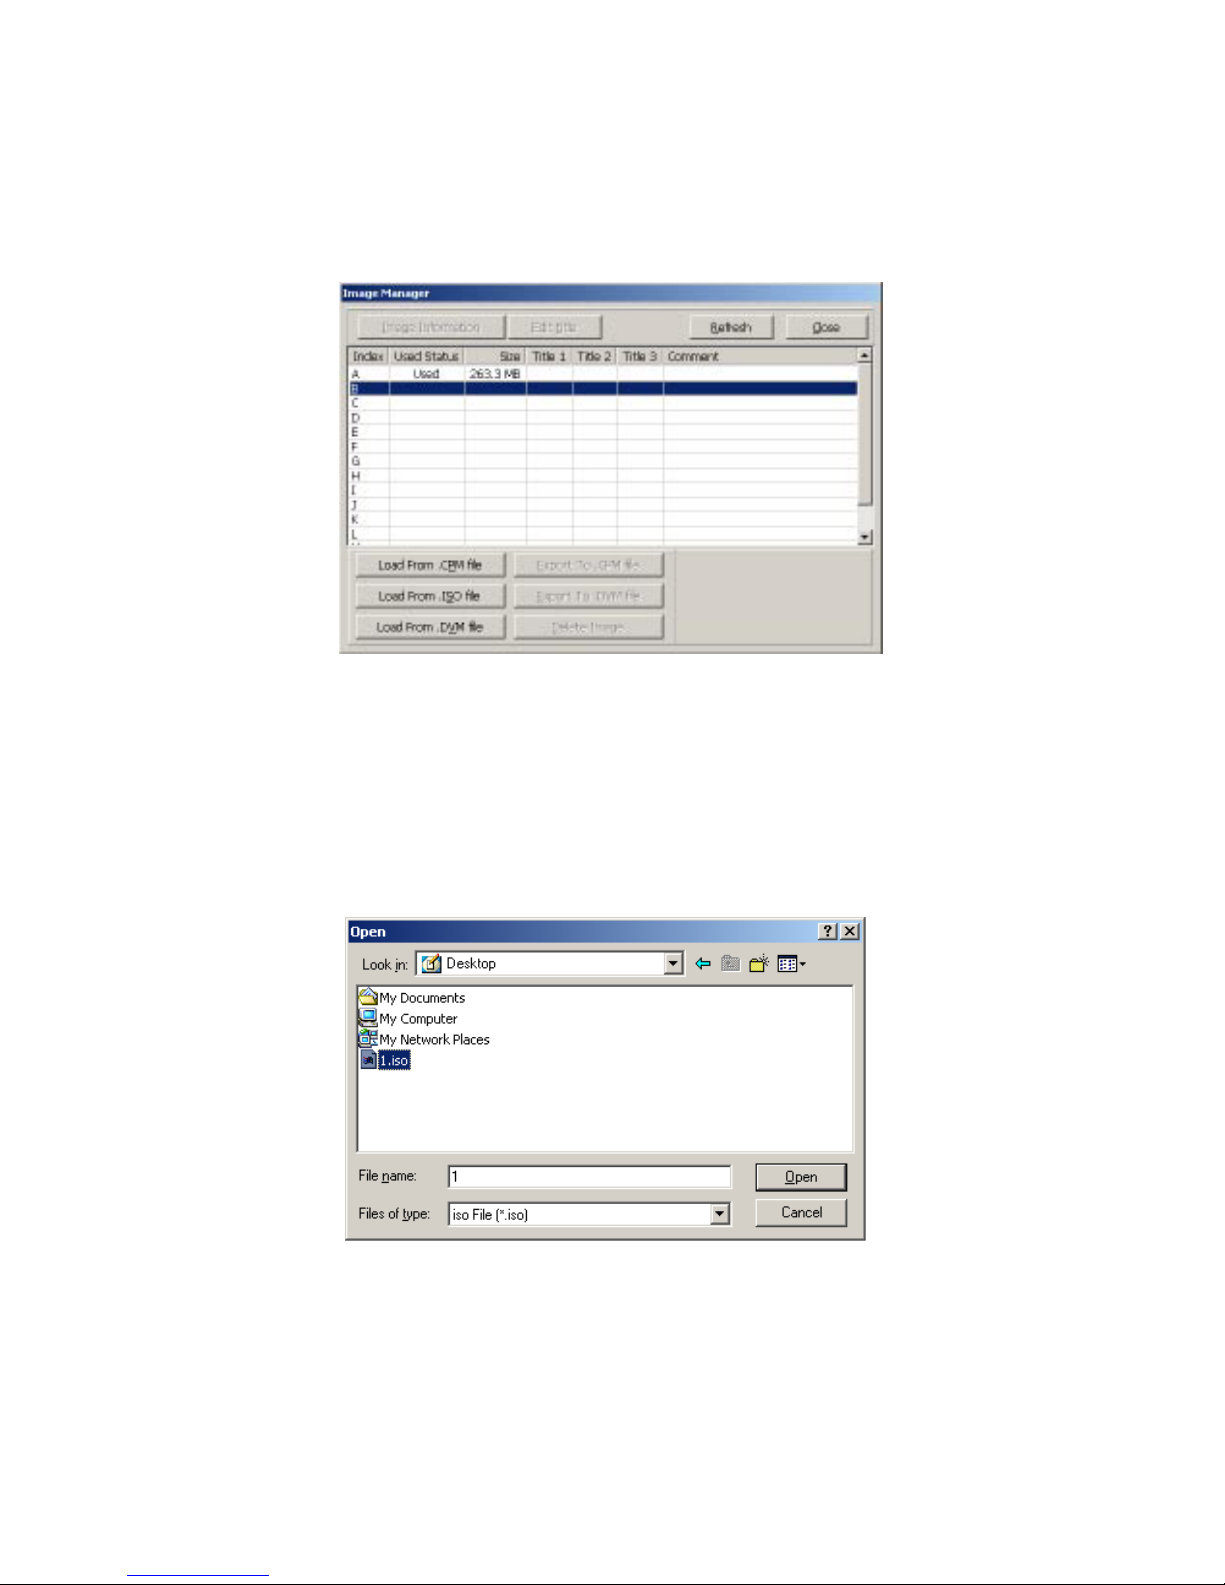
(3) On the above figure choose a partition of the hard drive like B where you want
to put the image file transmitted from the systemís hard drive. And also choose
the form of the file such as .CPM, .ISO or .DVM.
(4) Now suppose you want to choose an image file of 1.ISO and click [Open].
Figure 3-2
Figure 3-3

Page 7
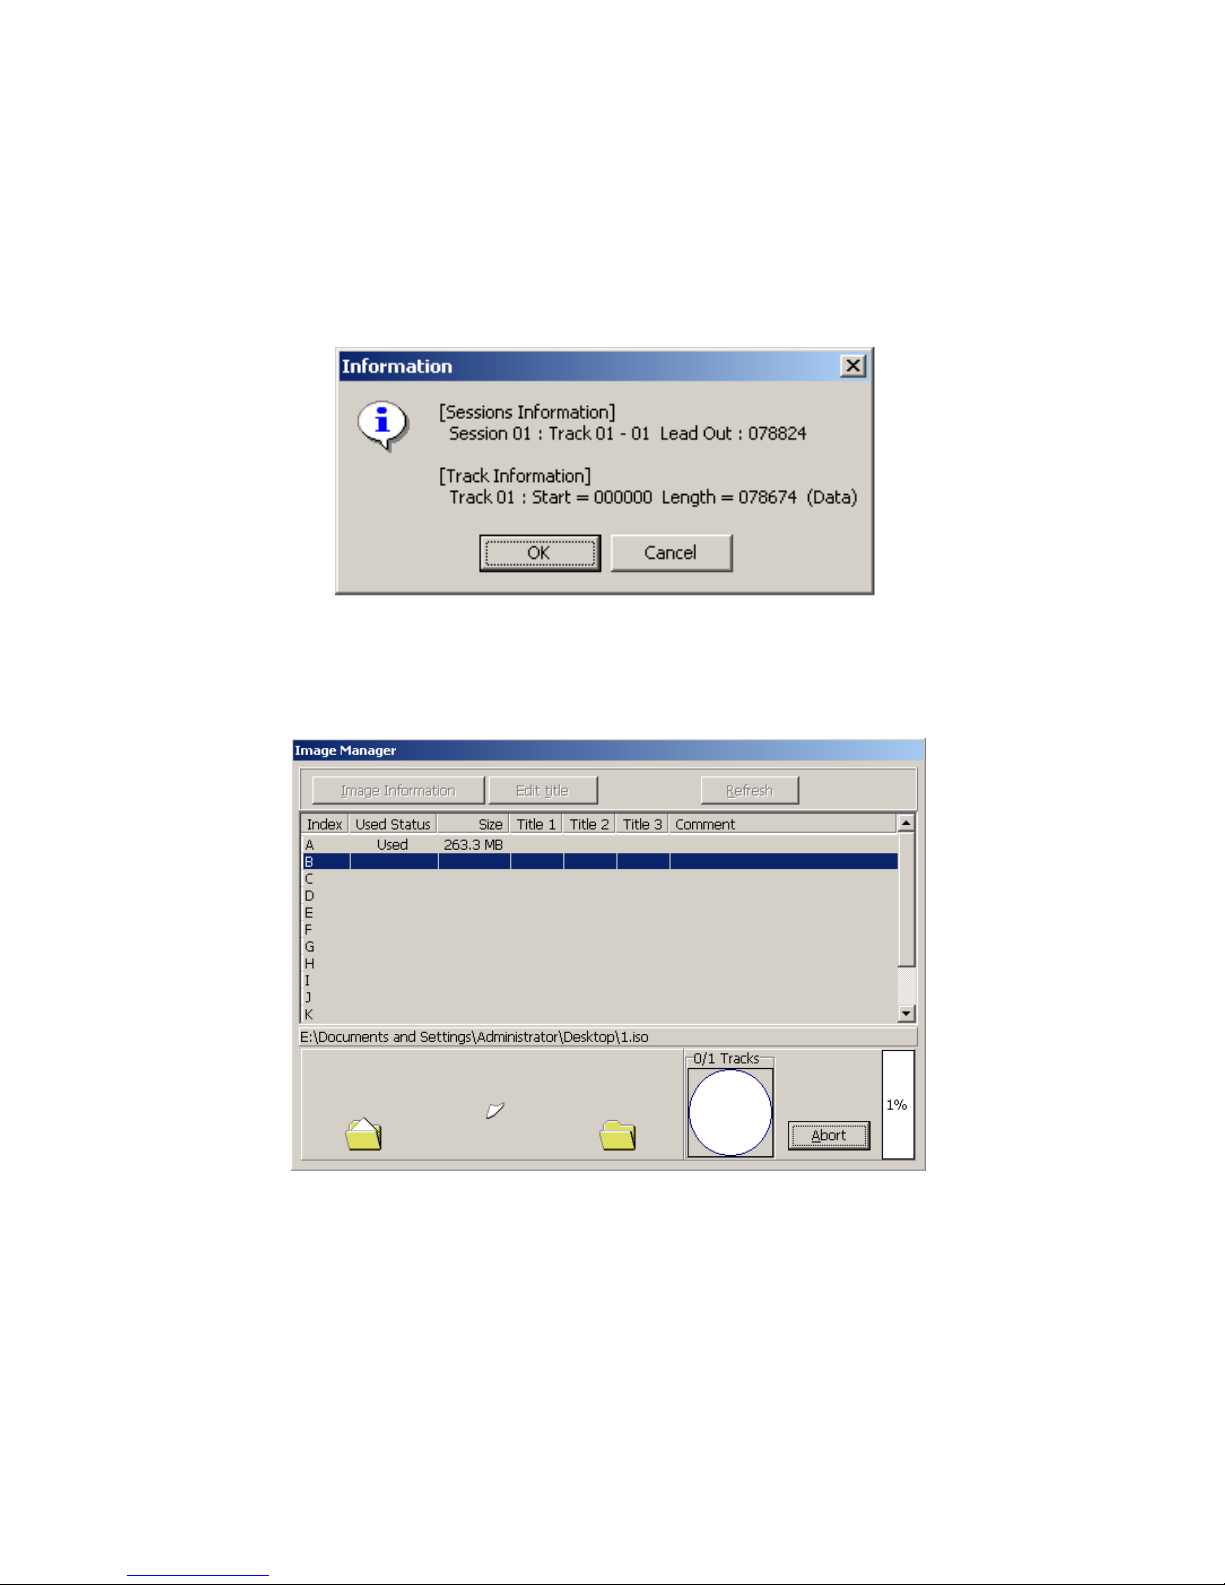
(5) After opening the file, you will enter the next figure and see the information.
Figure 3-4
(6) Click [OK] to transmit the image file as the next figure shows.
Figure 3-5

Page 8
(7) After transmission, if it is successful, there will be a message appearing.
Figure 3-6
(8) Now you can see the newly transmitted file appear in partition B as the following
figure shows.
Figure 3-7

Page 9
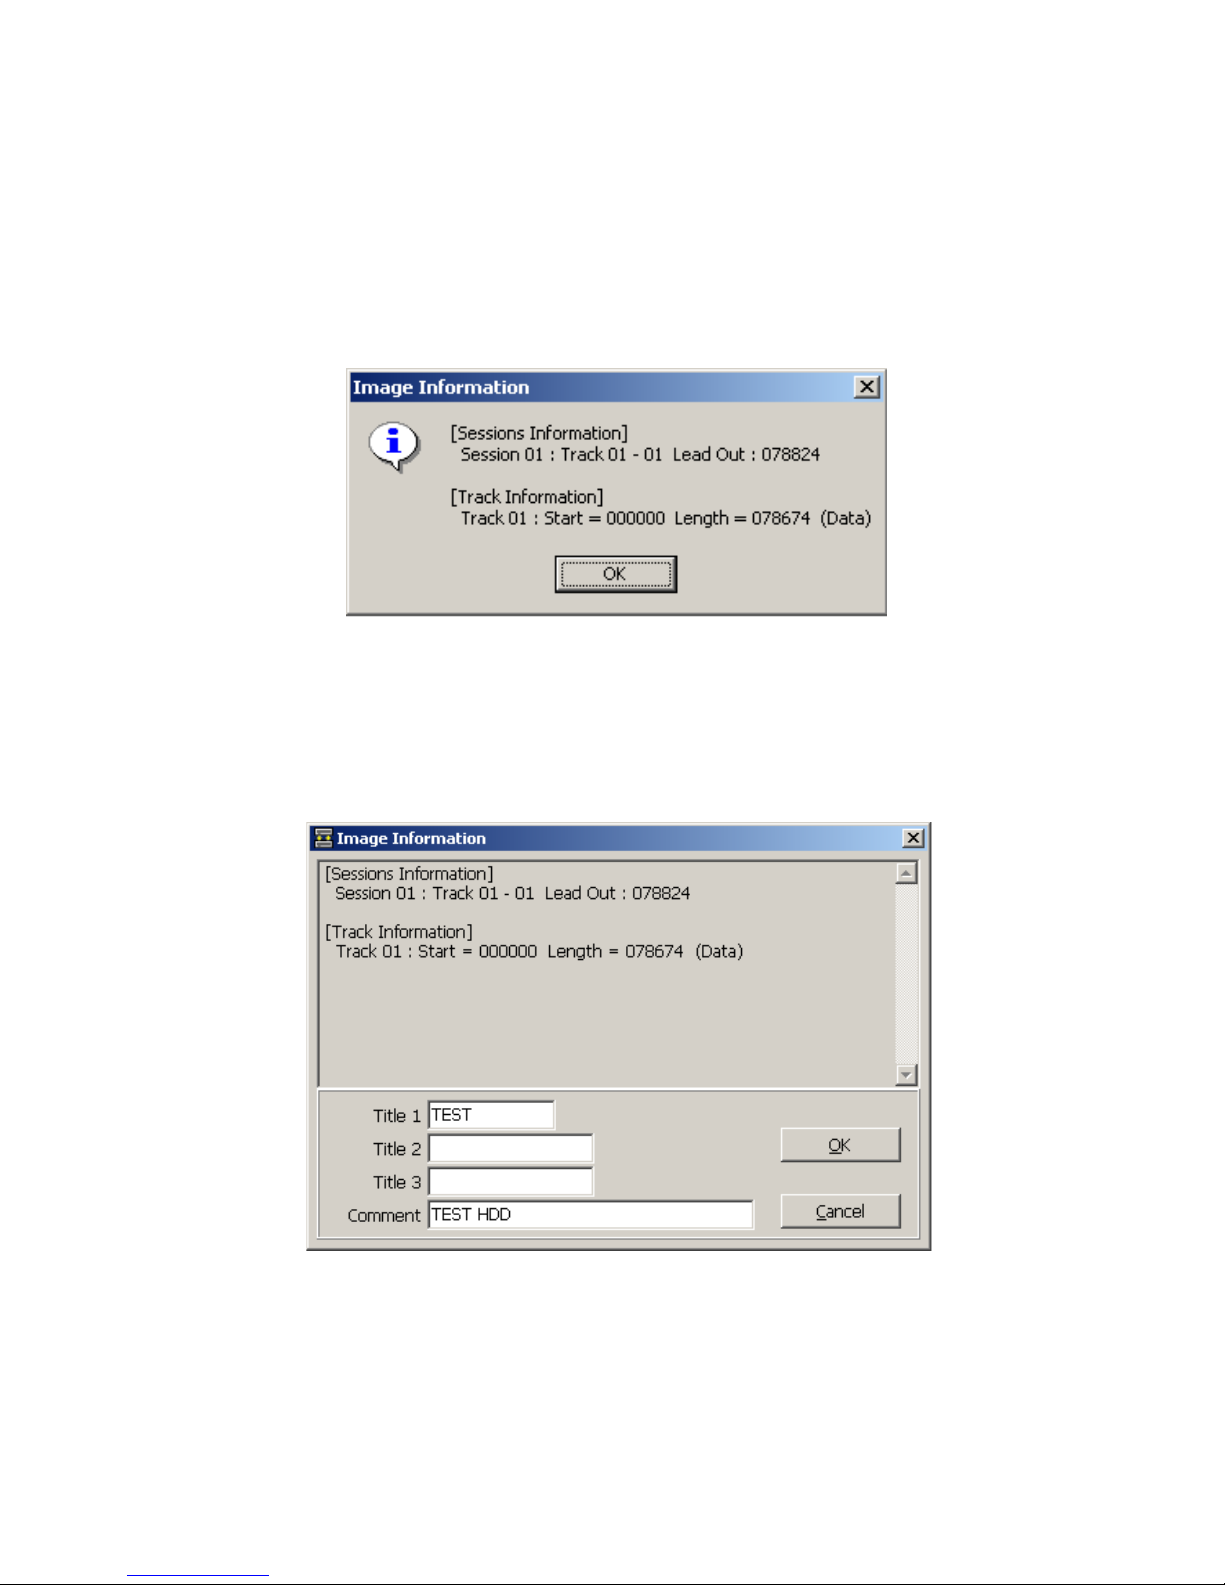
(9) On the above figure click [Image Information] to see the fileís information as the
following figure shows.
Figure 3-8
(10) On the above figure click [OK] to return to Figure 3-7. Then click [Edit title] to
edit the title of the file. You can edit three titles at most, and decide to give a
comment or not.
Figure 3-9

Page 10
(11)After editing and clicking [OK], you will enter the following figure.
Figure 3-10
(12)Close the small green icon of Image Manager at the right down corner by
right-clicking. The purpose is letting PC detect the connected hard drive
again when you want to transmit an image file next time.
Now press on the copy controllers panel and see Back to SA-Mode? Yes
display on the LCD. Press ENT to return to standalone mode. After turning on the
copy controller again, please choose 8. Select Source and then HDD. Then, follow
the manual of copy controller to operate.

There are four buttons and an LCD on the panel of the copy smart plus. They are
described as follows.
1 2 4
3 5
1. It shows all functions and messages.
2. It is used to scroll up through functions or menus.
3. It is used to scroll down through functions or menus.
4. It is used to execute a selected function.
5. It is used to cancel a selected function.
After you power on,and the King Boa detects installed hardware like DVD-
ROM, DVD writers, it will execute a self-test for seconds. When the self-test finishes,
LCD will show the messages as follows.
1. 2.
DVD Duplicator
1-3 ver: 2.03K
Initialize SDRAM
Page 11
EZQu
EZQuest
Chapter 4 Buttons and LCD

3. 4.
Detect Drives 1. Copy
There are 12 functions for you to use. Function 1 is Copy. You can press t to select
other functions.
lPlace a source DVD into DVD-ROM.
lSwitch to function 1 Copy by pressing s .Place blank DVD disks into the
DVD writers, and press ENT to start copying.
lWhen copying comes to an end, the passed DVDs will eject automatically.
The default is eject automatically, but you can change it.
lThe failed DVDs will remain in the writers. The default is keeping failed
DVDs in the writers, but you can change it. To take the failed DVDs you
need to press the ìejectî buttons on the writers.
Page 12

There are 12 functions: Copy, Test, Test & Copy, Verify, Compare, Prescan, Disc
Info, Select Source, Image, Edit Track, Setup and Advanced Setup. Among the 12
functions, Edit Track is designed exclusively for editing a collection of favorite
songs from CDs. During operation if you do not understand an LCD message, you
can see Appendix 2.
5.1 Copy
Function 1 Copy is to copy data from a source DVD directly into blank DVD disks.
Before copying be sure that the source DVD is placed onto DVD-ROM, or there are
data in a certain HDD partition if you have installed a hard disk. If you are not so
sure of real copying, you can use Function 2 Test to simulate first.
1.Copy
Select function 1. Put a source DVD onto DVD-ROM and blank DVD disks onto
the DVD writers. DVD rewriteable disks containing old data are usable, too.
After the DVD-ROM and DVD writers detect DVDs, press ENT to start copying.
LCD will show the copying information as follows.
Copying- DVD 0%
4213.4MB d:20:15
Page 13
Chapter 5 Functions

When copying is in progress, MB and time will decrease whereas the percentage of
completion increase.
When copying comes to an end, LCD will show the results as follows. The passed
DVDs will eject automatically.
1.Copy
OK: 03
5.2 Test
Function 2 Test is to simulate the copying progress. When simulation finishes, there
will be no data really written into DVD disks.
Select function 2. Put a source DVD onto DVD-ROM and blank DVD disks onto
the DVD writers.
2.Test
Press ENT to start simulation. If you use DVD rewriteable discs that contain data,
the old data will be quickly erased before simulation as shown below.
Erasing disc
Page 14

LCD will show the testing information as follows.
Testing- DVD 0%
4213.4MB d:20:15
When the test comes to an end, LCD will show the results as follows.
2.Test
OK: 03
Stopping the test halfway does not affect the DVD disks, but if the DVD-rewriteable
disks contain important data, they may be destroyed.
5.3 Test & Copy
Select function 3. Put a source DVD onto DVD-ROM and blank DVD disks onto
the DVD writers.
3.Test & Copy
Press ENT to start simulation. LCD will show the testing information as follows.
Testing- DVD 0%
4213.4MB d:20:15
Function 3 Test & Copy is to test first and then copy actually.
Page 15

When the test finishes, actual copying will begin as shown below.
Copying- DVD 0%
4213.4MB d:20:15
When the whole process finishes, LCD will show the results as follows.
3.Test & Copy
OK: 03
5.4 Verify
Function 4 Verify is to examine if the target DVDs can be read correctly after copying.
Select function 4.
4.Verify
Press ENT to verify. LCD will show the verification information as follows.
Verify- DVD 0%
4213.4MB 2:29:14
Page 16

When verification comes to an end, LCD will show the results as follows.
4.Verify
OK: 03
5.5 Compare
Function 5 Compare is to make a comparison between the source DVD and the
target DVDs after copying.
Select function 5. Put the source DVD onto DVD-ROM and the target DVDs onto
DVD writers.
5.Compare
Press ENT to compare.LCD will show the comparison information as follows.
Compare- DVD 0%
4213.4MB 1:05:06
When comparison comes to an end, LCD will show the results as follows.
Compare OK: 3
Fail: 0 Diff: 0
Page 17

Press ENT to see the details of source 1 as shown below.
Src: 01 DVD-ROM
Total: 4213.4MB
Press ENT to see the details of source 2. If the comparison is identical, LCD will
show the message as follows.
Src: 02 DVD-RW
Identical
If comparison fails, LCD will show the failure. By pressing ENT twice, LCD will
show that the contents of source 1 and those of source 2 do not match as follows.
Src: 02 DVD-RW
TOC not match
5.6 Prescan
Function 6 Prescan is to scan if the source DVD can be read correctly, and by the
way to test the reading speed.
Select function 6. Put the source DVD onto DVD-ROM.
6.Prescan
Page 18

Press ENT to prescan. LCD will show the scanning information as follows.
Scaning- DVD 0%
4213.4MB 40:40
When scanning finishes, and the source DVD can be read correctly, LCD will show
the results as follows.
PreScan OK!
5.7 Disc Info
Function 7 Disc Info is to show the basic information of source DVD.
Select function 7. Put the source DVD onto DVD-ROM.
7.Disc Info
Press ENT , and LCD will show the DVD information as follows.
Disc Type: DVD-ROM
Capacity: 4213.4MB
Page 19
Other manuals for Boa K16766
1
This manual suits for next models
1
Table of contents
Other Ezquest Computer Hardware manuals
Popular Computer Hardware manuals by other brands

Net2Phone
Net2Phone Polycom Obihai Wi-Fi SETUP

Wexiodisk
Wexiodisk 61101100 quick guide

Segger
Segger J-Link-OB-STM32F072-128KB user guide

Cypress Semiconductor
Cypress Semiconductor CY7C1217H Specification sheet

Skyworks
Skyworks Si5361 Reference manual

Panasonic
Panasonic Panaboard UB-5310 operating instructions