Ezup Eclipse User manual

INTERNATIONAL E-Z UP, INC.
1900 Second St., Norco, California 92860
800-45-SHADE
The #1 Instant Shelter®Brand in the World
ezup.com
Eclipse Box Includes:
Frame Box: (1) Eclipse™Frame, Allen Wrench, 7/16 Wrench
Top Box: (1) Fabric Top, (1) Cover Bag
ONE-TIME TOP INSTALLATION
SET UP
REFER TO PAGE 2 FOR 10 X 20’ MODEL
Unpack and Open
1. Place your E-Z UP®Frame in the center of the area to be sheltered.
2. With a partner on the opposite side of the Frame, grasp two outer legs, lift the Frame slightly off the ground, and step
backward while pulling the Frame to open.
3. Stop when the Frame is approximately ½ of its fully-opened size. (Fig. A)
4. Set the Frame back on the ground.
Attach Fabric Top
5. Gently unfold the Fabric Top, and place it over the semi-opened Frame.
6. Attach the Fabric Top to the E-Z UP®Frame by matching the Hook and Loop Strips on the inside of the Fabric Top corners with
the Hook and Loop Strips on each Frame corner. (Fig. B)
7. Pull the Fabric Top down over the Frame corners—pushing the Hook and Loop Strips firmly together.
Secure Top to Frame
8. Line up the grommet holes on the sides of the Fabric Top to the frame Top Attachment Points. The Top Attachment Points on the
Frame are denoted by the RED tags. (Fig. C)
9. Using a coin, unscrew the Top Attachment Nut from the frame bolt. (Fig. D)
10. Place Fabric Top grommet on the Frame bolt.
11. Screw on top attachment nut and tighten until snug. Fabric Top should rotate easily. Do Not over-tighten.
12. Repeat this procedure at each of the Top Attachment Points.
Note: Hold the bolt assembly with one hand while tightening the top attachment nut with your other hand.
OPEN E-Z UP®Shelter
1. With a partner on the opposite side, grasp the bottom of the diamond-shaped area of Outer Trusses near the “OPEN HERE”
sticker. (Fig. A)
2. Lift the Frame up slightly and step backward until the shelter is almost fully opened. Gently shake the shelter while opening. Be
careful not to pinch fingers!
For 10’ x 15’ (3.0m x 4.5m) MODEL ONLY:
Complete the above instructions on the 10’ (3.0m) side of the shelter.
Secure Auto-Slider®Pull Pin
3. Fold up the Fabric Top corner to expose the Auto-Slider®Pull Pin. (Fig B)
4. Lift shelter corner slightly off the ground and engage the Auto-Slider®Pull Pin by pushing up on the Frame side trusses with one
hand while holding down the top of the Frame Leg with the other hand. The pins will auto-engage when aligned with the holes on
the Frame Legs.
5. After the Auto-Slider®Pull Pin has locked into place, pull the Fabric Top down over the Frame Leg, making sure to align and
secure the hook and loop strips on the Fabric Top to the Frame.
6. Repeat on all remaining corners.
Extend Frame Legs
7. With a partner, lift the two adjacent outer legs up off the ground simultaneously to about waist height.
8. Slide the lower/inner legs out until the Leg Adjustment Toggle buttons lock at selected height on each leg. (Fig. C)
Note: There are 5 adjustment settings on each leg.
9. Lower middle leg until the toggle button locks.
10. Repeat on the remaining legs.
Note: It is recommended that you use genuine E-Z UP®Deluxe Weight Bags and/or Heavy-Duty Stake Kits to secure
your shelter.
Your E-Z UP®shelter setup is now complete!
Fig. A
Fig. C
Fig. A
Fig. C
(remove tag before attaching top)
8’ x 8’ & 10’ x 10’ shelters have
four attachment points
Fig. B
Fig. D
Fig. B
Hook
and
Loop
8’ x 8’ & 10’ x 10’ shelters have
four attachment points
OPEN HERE
OPEN HERE
Fabric Top Corner
Auto-Slider®Pull Pin
Top of the Frame Leg
INTERNATIONAL E-Z UP, INC.
1900 Second St., Norco, California 92860
800-45-SHADE
The #1 Instant Shelter®Brand in the World
ezup.com
WARNING: Keep all flame and heat sources away from all shelter fabrics. These fabrics meet the flammability requirements of CPAI-84. The fabric
may burn if left in continuous contact with any flame source. The application of any foreign substance to the fabric may render the flame-resistant
properties ineffective.
TAKEDOWN
FOR 10’ X 20’ (3.0m x 6.0m) MODEL ONLY:
Depress the toggle button on one of the middle legs to slide the lower/inner leg section into the upper/outer leg, then proceed
with the instructions below.
Fig. A
Fig. C
Fig. B
Collapse Shelter Legs
1. With a partner, slightly lift two adjacent corner legs simultaneously.
2. Depress the Toggle Button and slide lower/inner legs into upper/outer legs, making sure to do two legs at a time on the same
side. (Fig A)
3. Repeat on remaining legs.
Note: Keep the toggle button depressed while retracting leg.
Release Auto-Slider®Pull Pin
4. With one hand, slightly push up on the truss near the Auto-Slider®Pull Pin to relieve pressure. (Fig B)
5. With the other hand, release the Auto-Slider®Pull Pin by pulling the ring.
6. Repeat on remaining legs.
Closing Shelter
7. Grasp the Frame on the top of the diamond-shaped area of Center Trusses on the opposite sides near the “CLOSE HERE“ sticker.
(Fig C)
8. Lift the shelter up slightly, and shake it while stepping toward your partner until the shelter is approximately ½ closed. Be careful
not to pinch fingers!
9. Grasp the two outer legs, and push the frame together until it is fully closed.
10. Store the shelter in the cover bag provided.
Note: Hug your shelter before placing it in the cover bag.
CARE AND MAINTENANCE
For long lasting durability and the best possible protection for your E-Z UP®Instant Shelter®products, follow these E-Z care and
maintenance instructions:
• Use a mild soap (not detergent) and plenty of water for top cleaning.
• Let the E-Z UP®top and frame dry completely before closing or storing to avoid mildew.
• Frame will operate and look better if occasionally wiped with silicone spray, especially before and after use in damp conditions.
Remove excess silicone residue before applying top.
• Use a seam sealer if top leaks or drips water. Available at most sporting goods and hardware stores.
• Slightly tighten bolts if frame becomes loose.
Replacement Parts
For all shelter sizes: Call 800-45-SHADE or go to ezup.com/parts
Auto-Slider®Pull Pin
CLOSEHERE
CLOSEHERE
Lift fabric top to locate “CLOSE HERE”
stickers on the center trusses.
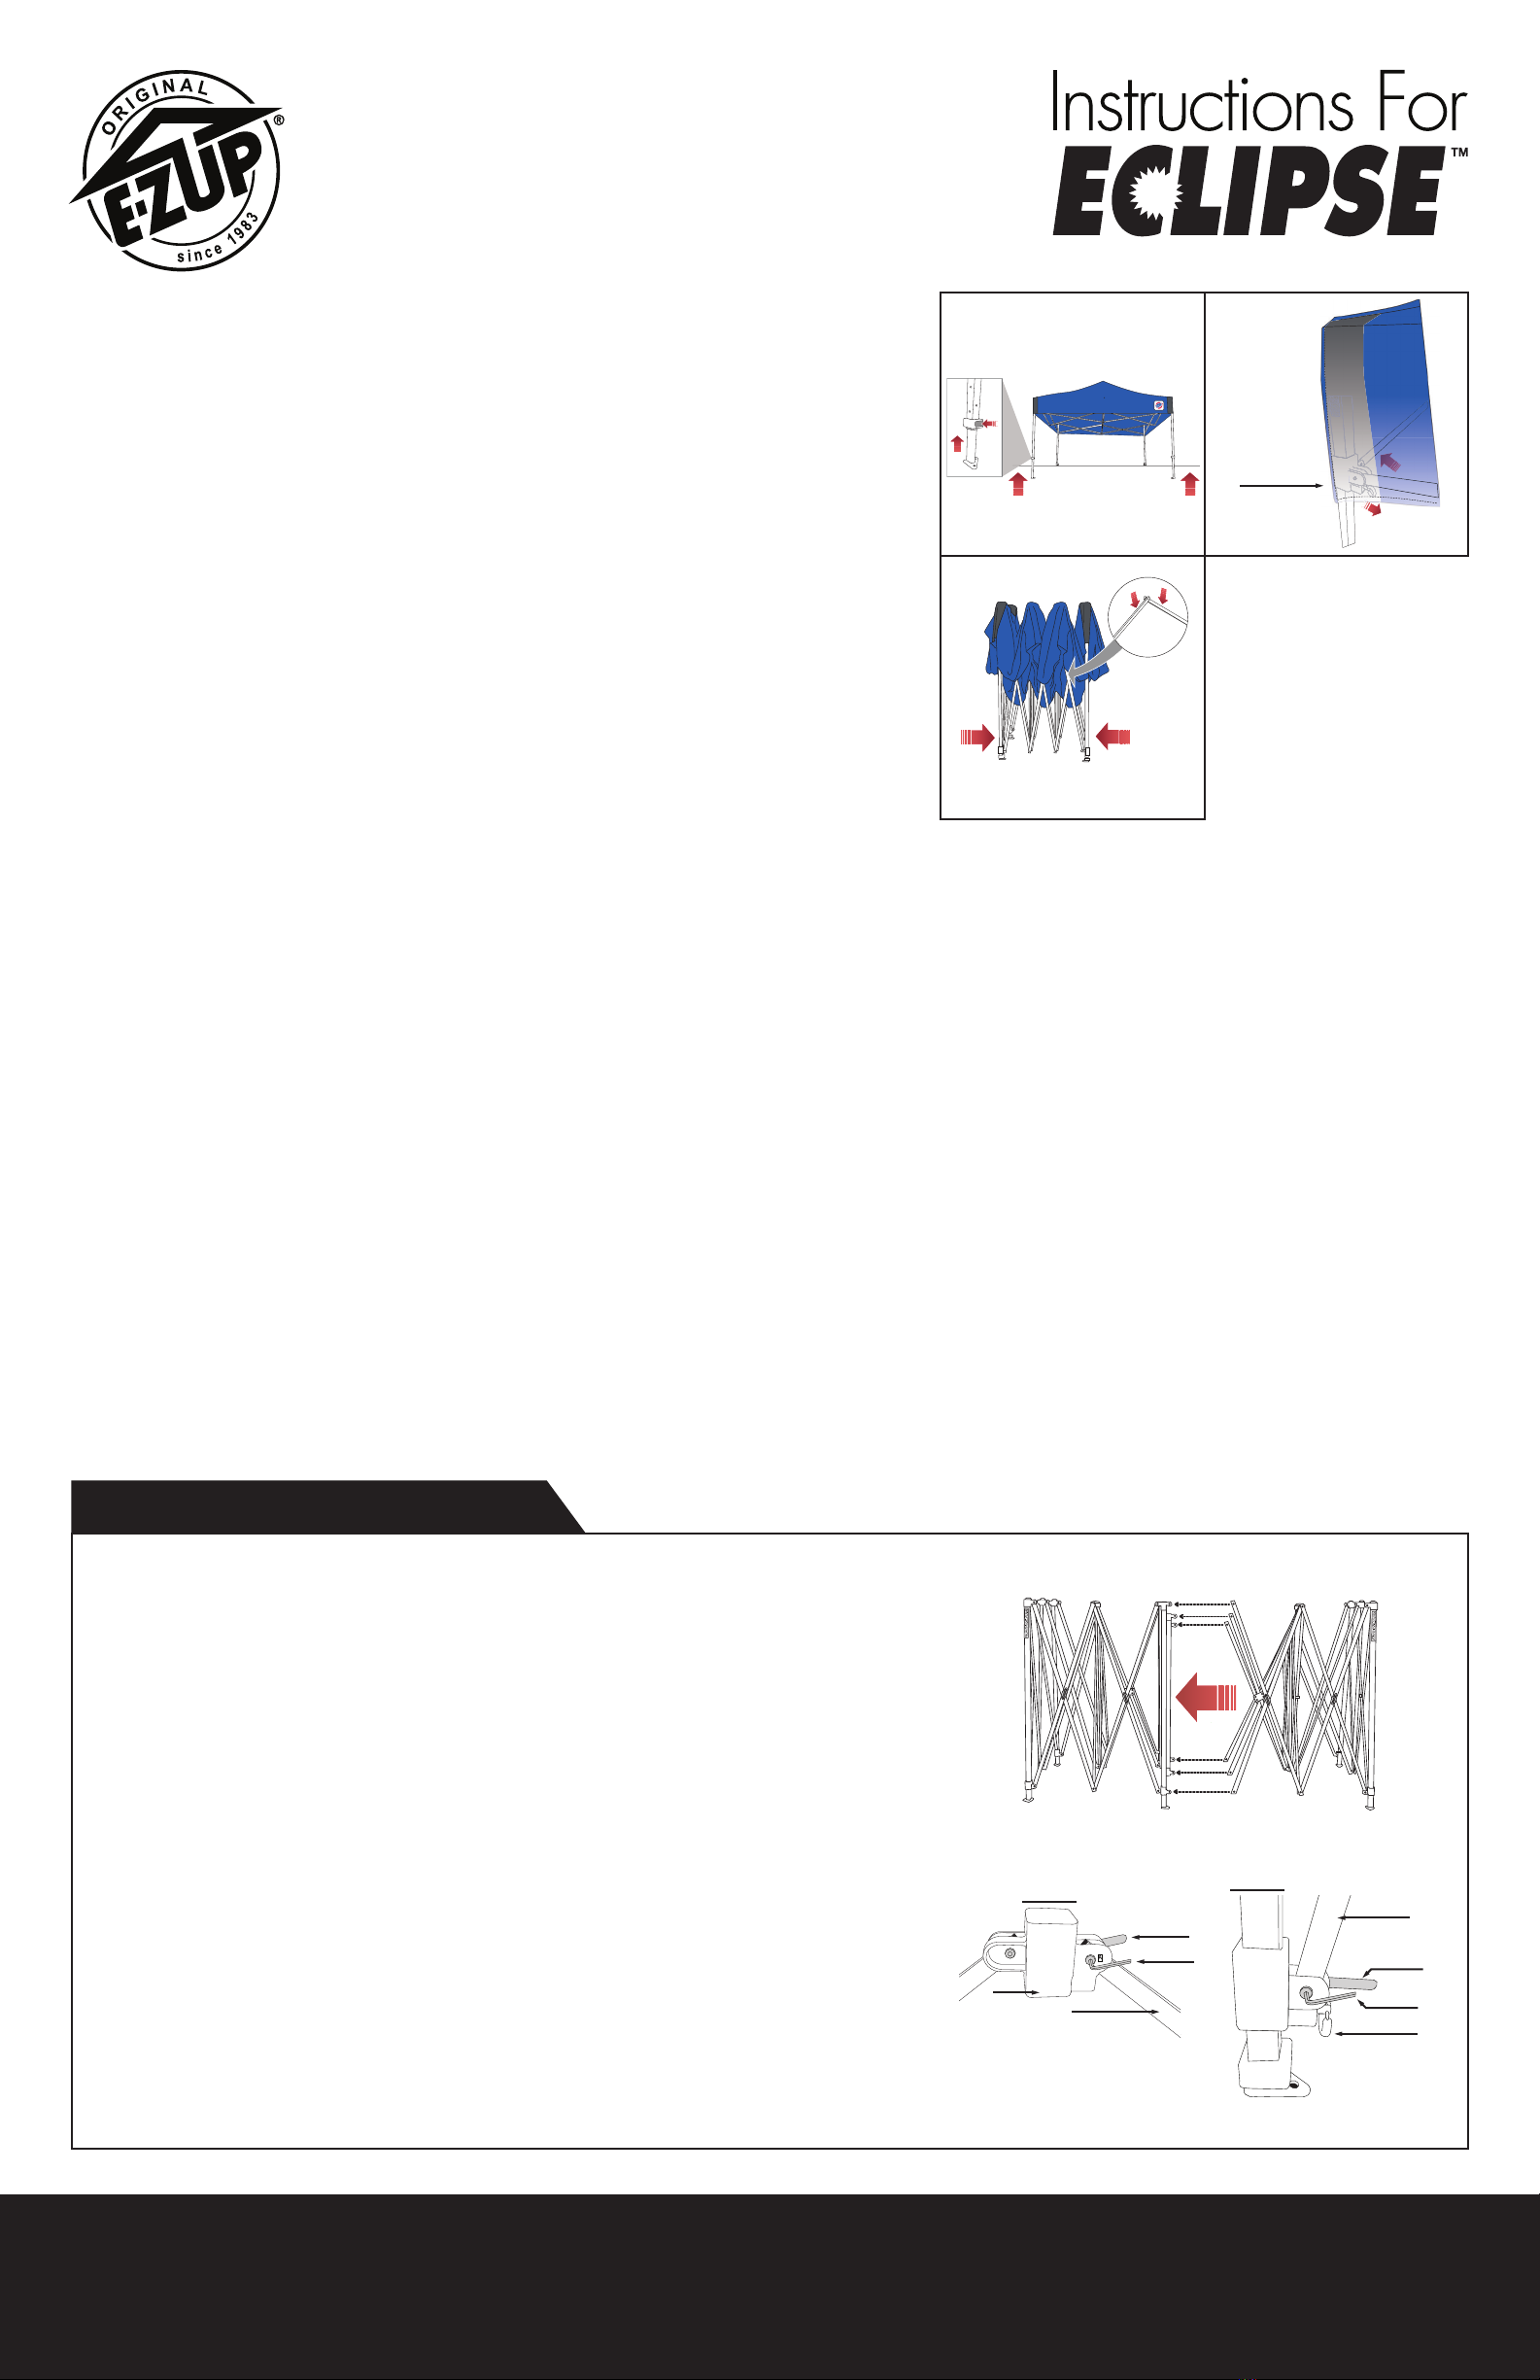
Unpack and Open
1. Place your E-Z UP®Frames in the center of the area to be sheltered.
2. With a partner on the opposite side of the Frame, gently expand both the Main Frame (A) and Sub-Frame (B) to
approximately half of their fully-opened size. (Fig. A)
3. Face open ends of the trusses to align the bracket attachment points on each frame.
Connect Frames
4. Remove bolt assembly (nut and bolt) from each bracket on Main Frame (A).
5. Insert truss end from Sub-Frame (B) (labeled “A” for top and “B” for bottom) into the corresponding attachment point on
the Main Frame (A) and align holes.
6. Use the nut and bolt that was previously removed to secure the truss. Tighten the nut and bolt securely using the enclosed
Allen Wrench and 7/16 wrench. (Fig. B)
Note: Hold the bolt assembly with one hand while tightening the top attachment nut with your other hand.
7. Repeat these steps for all six connection points (3 top points labeled “A” and 3 bottom points labeled “B”).
Fig. A
Fig. B
Auto-Slider®Pull Pin
Main Frame (A)
“A” Labels
“B” Labels
Sub-Frame (B)
7/16 Wrench
Allen Wrench
Sub-Frame (B)
End Cap
Main Frame (A) Main Frame (A)
“A” Label
“B” Label
Allen Wrench
7/16 Wrench
Sub-Frame (B)
FOR 10’ X 20’ MODELS (3.0m x 6.0m)
Other manuals for Eclipse
1
This manual suits for next models
2


