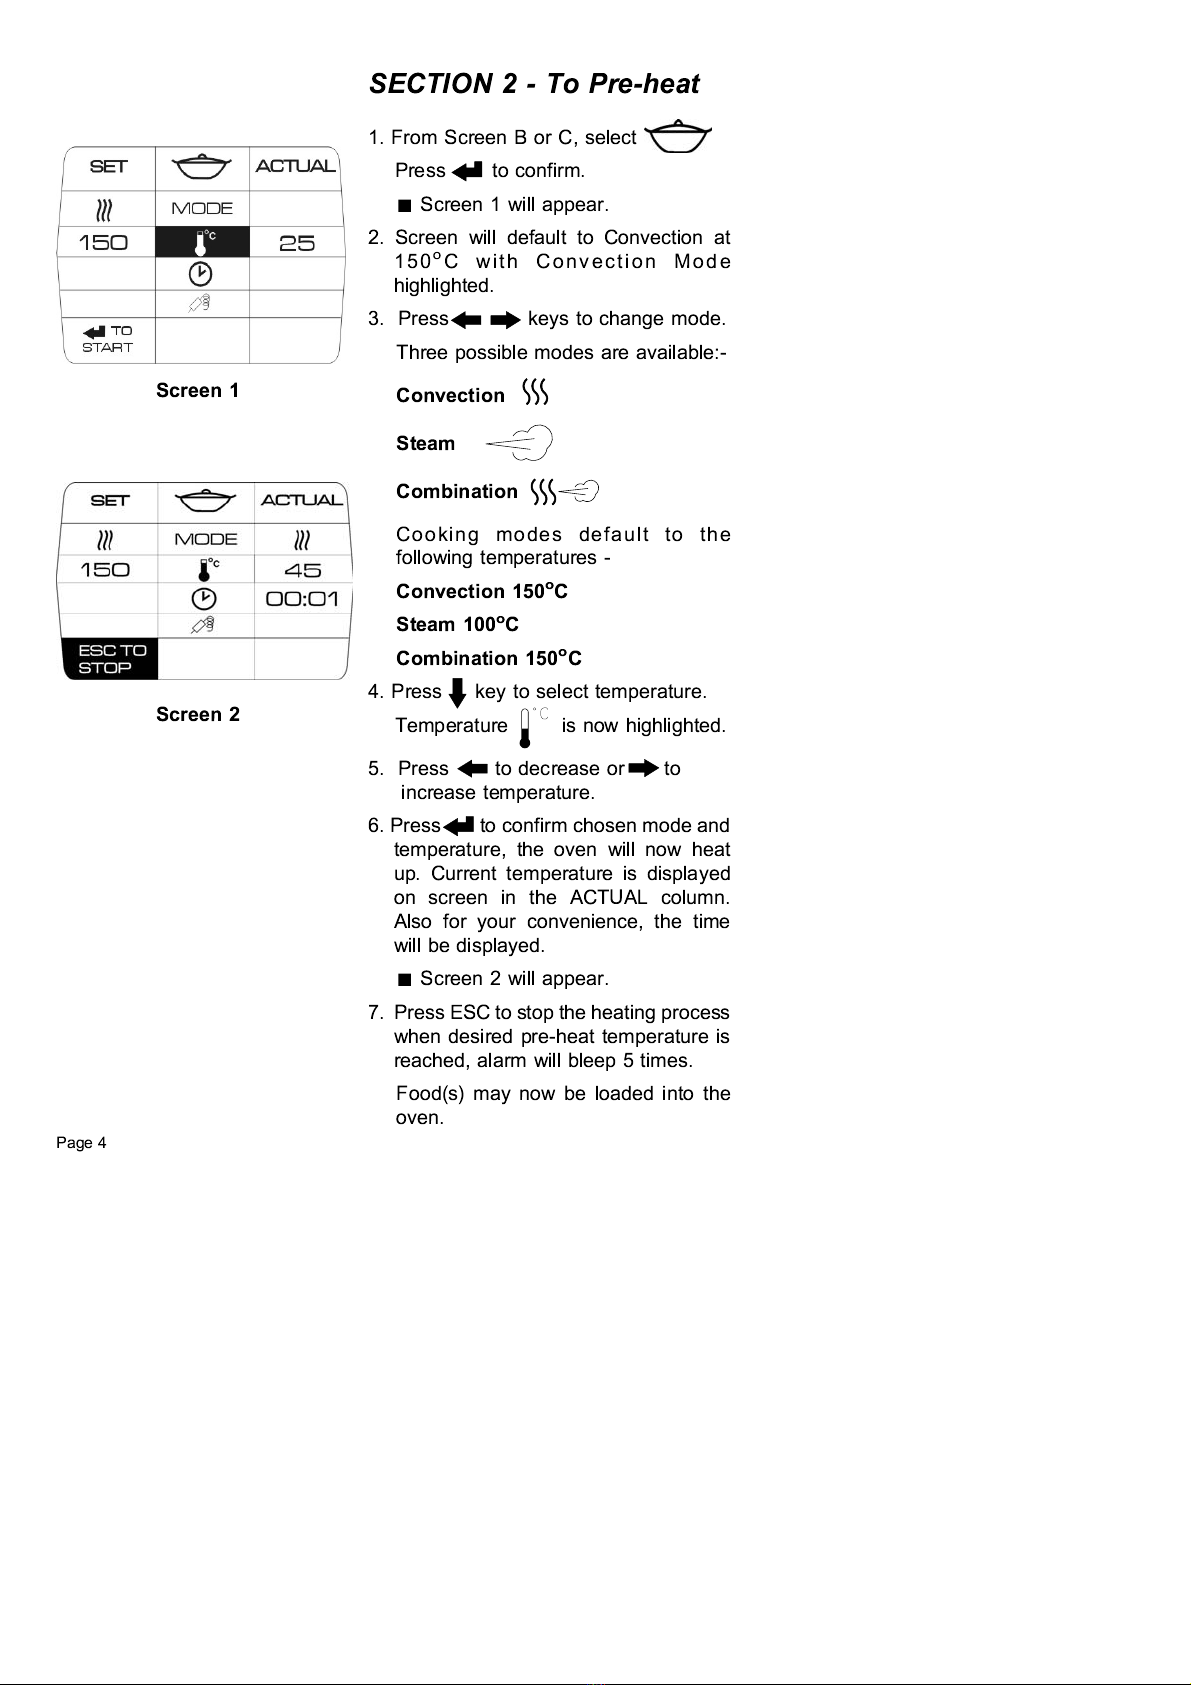
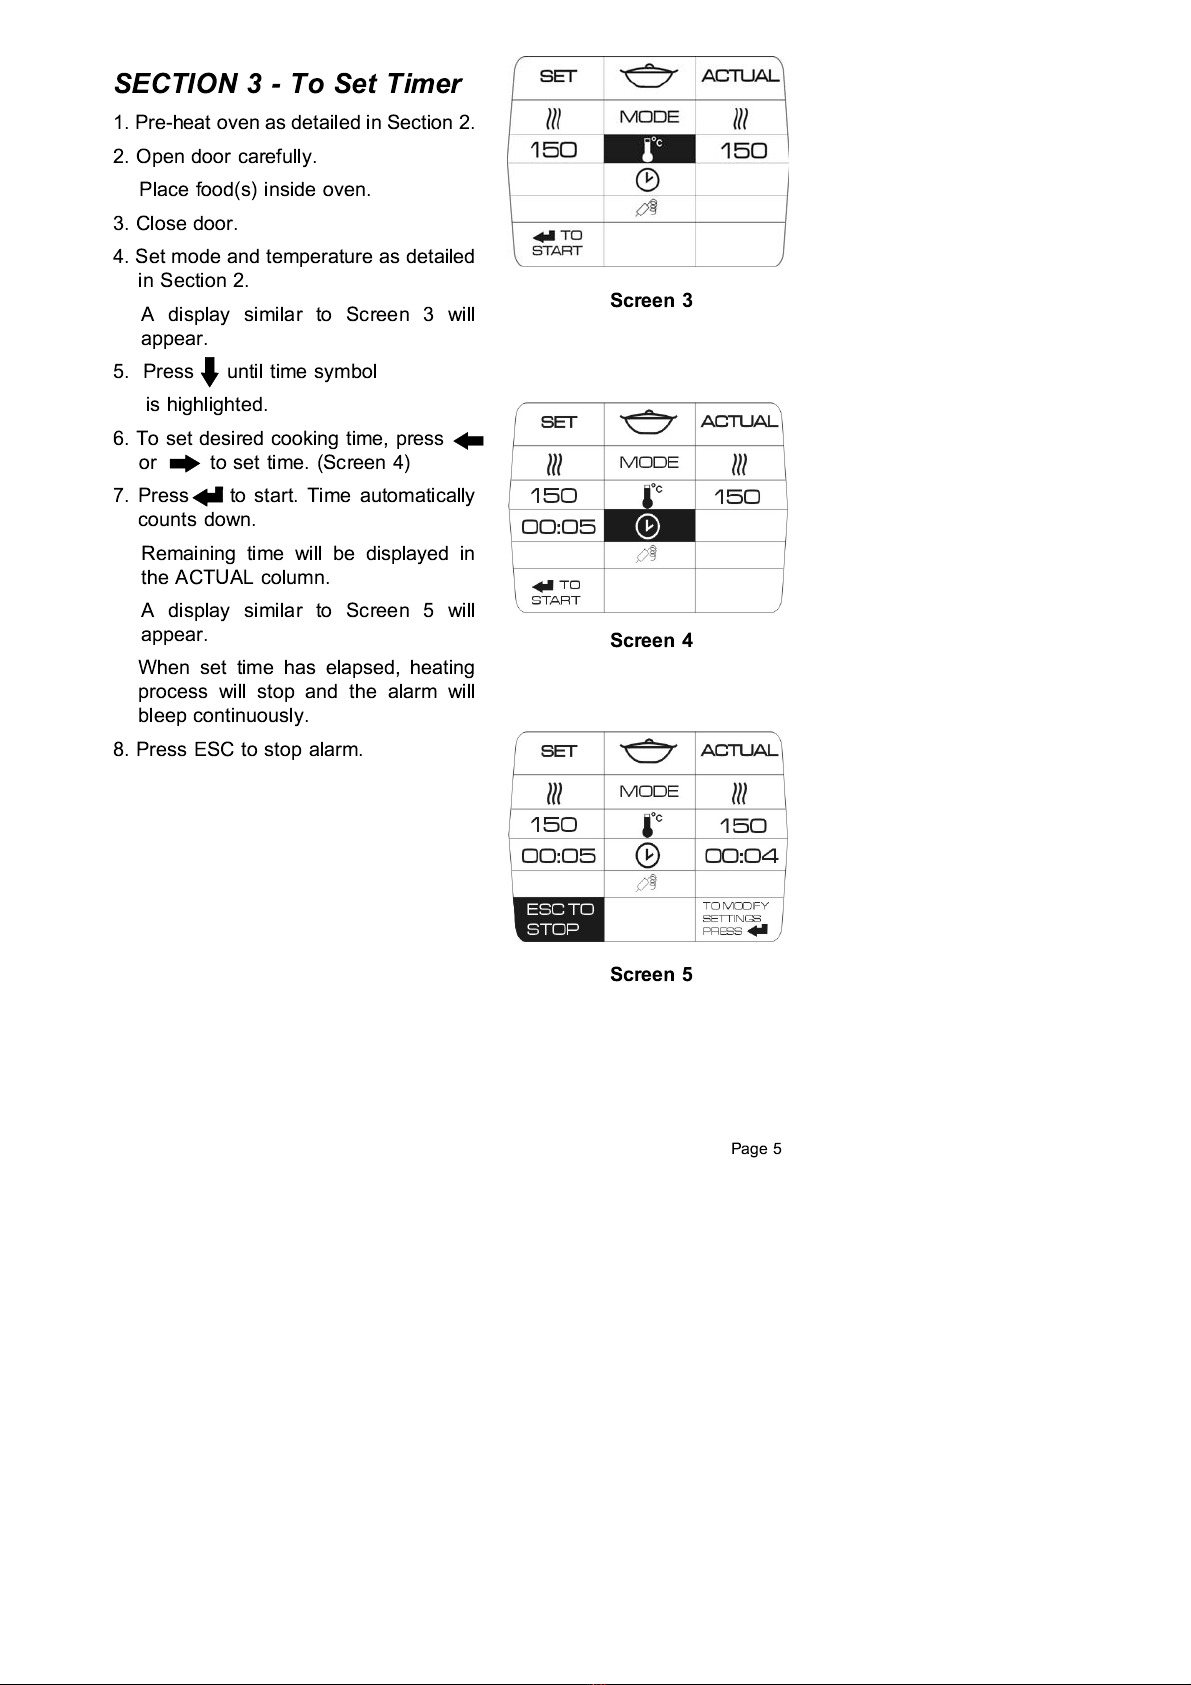
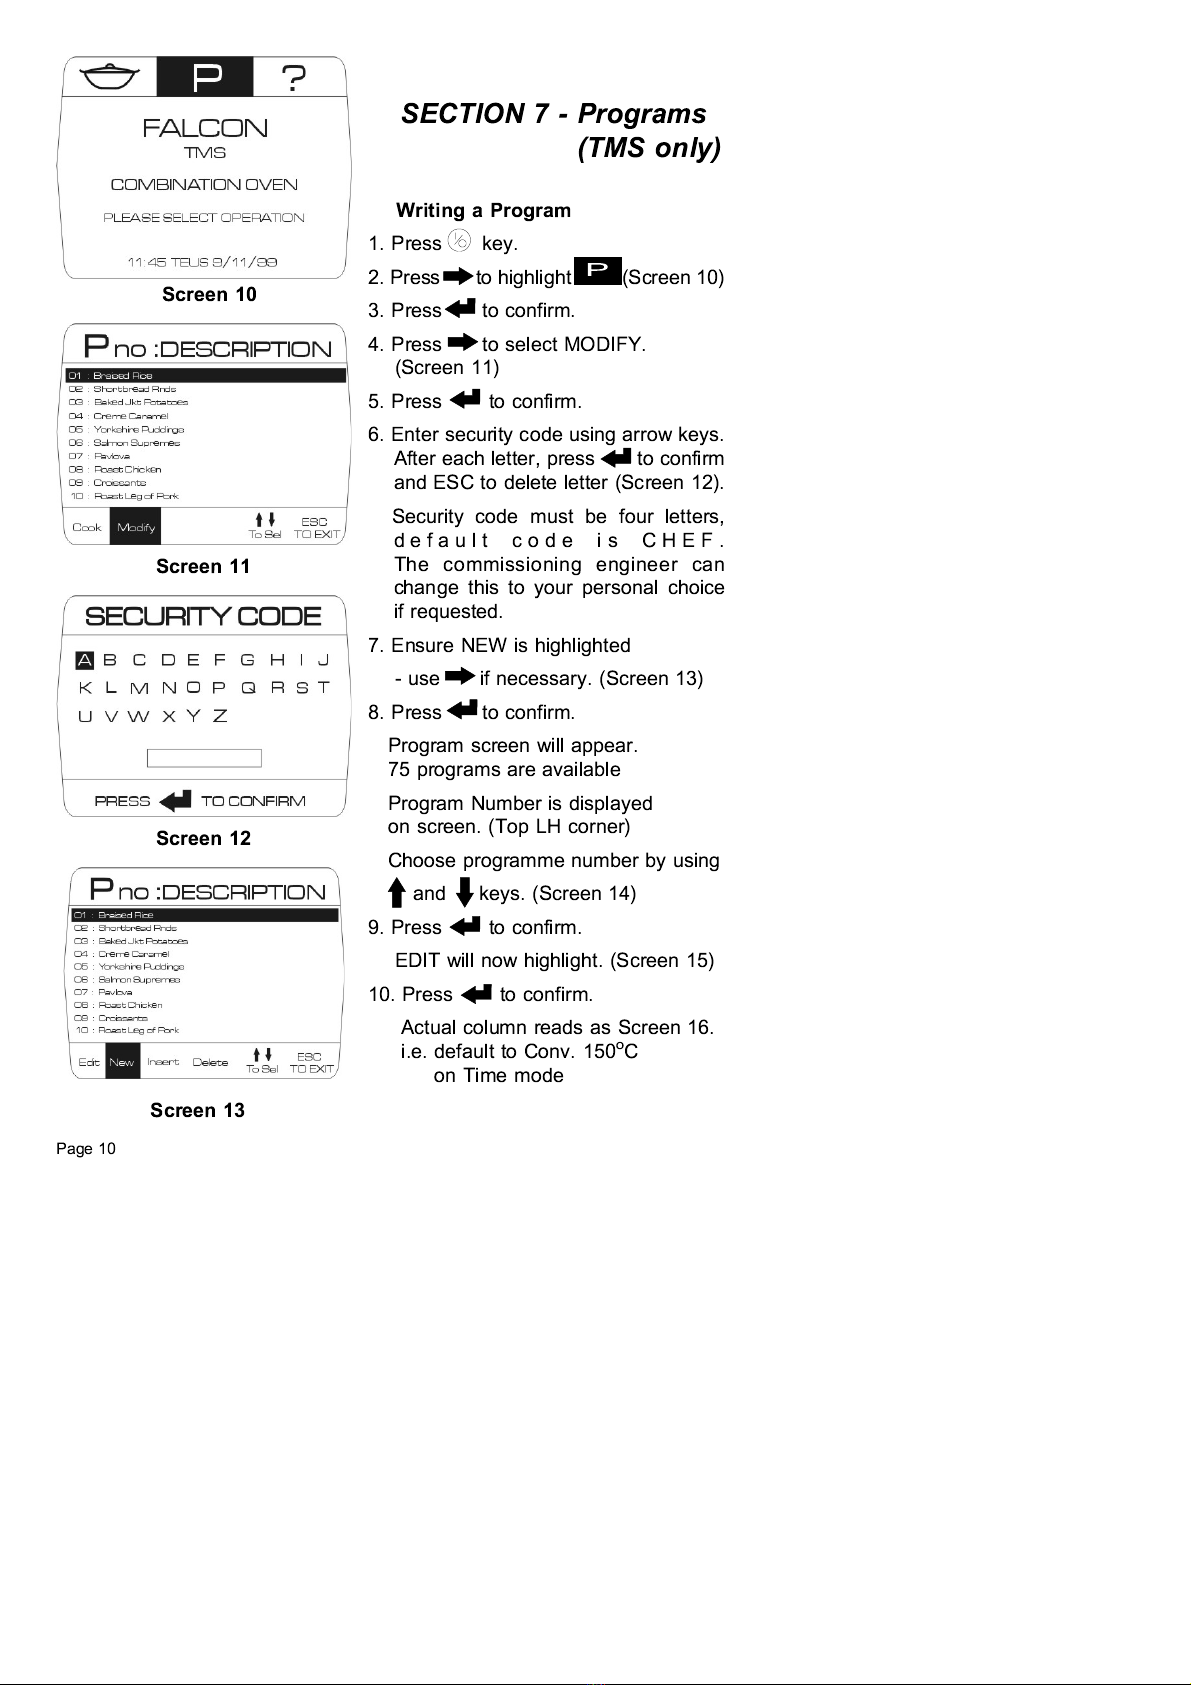
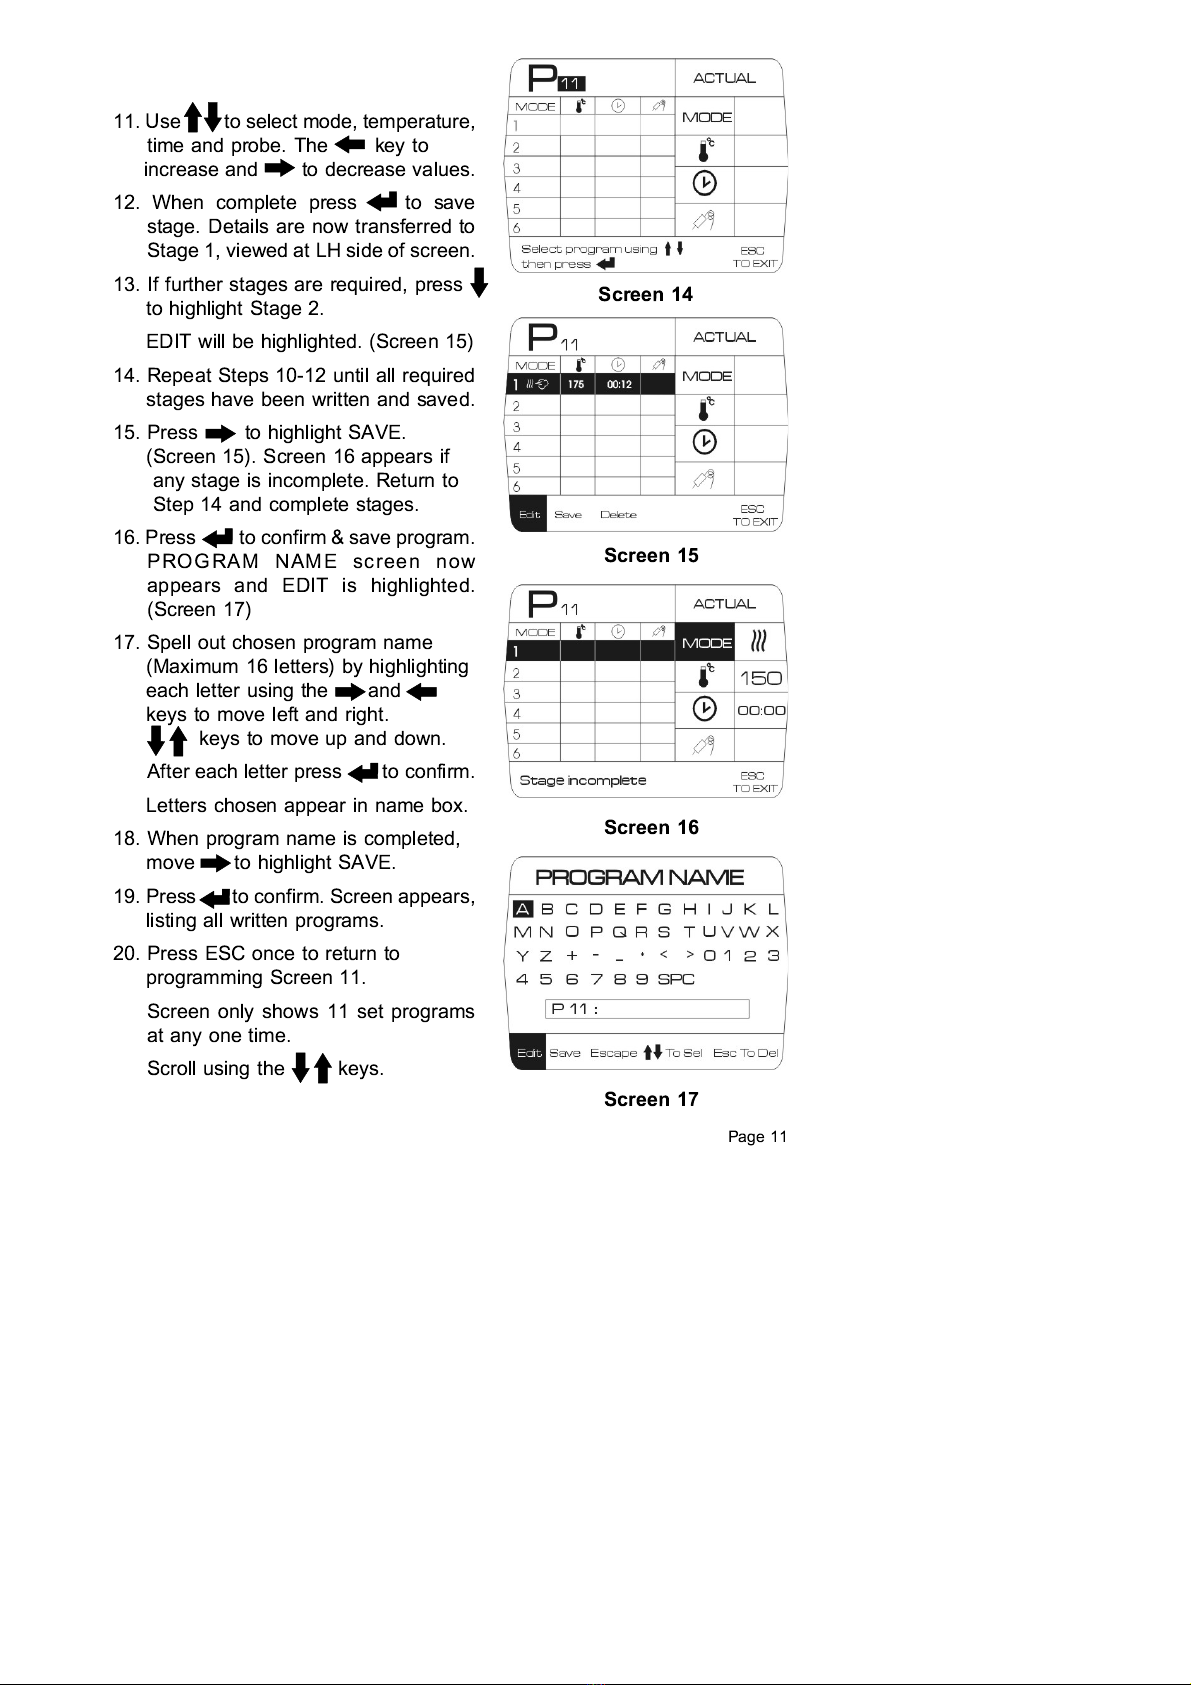
manuals.online logo
Brands
  1. Home
  2. •
  3. Brands
  4. •
  5. Falcon
  6. •
  7. Oven
  8. •
  9. Falcon TC Series User manual

Falcon TC Series User manual

This manual suits for next models

1

Other Falcon Oven manuals

Falcon CHIEFTAIN E1016 User guide

Falcon

Falcon CHIEFTAIN E1016 User guide

Falcon Convectasteam E4069EL User manual

Falcon

Falcon Convectasteam E4069EL User manual

Falcon E3478 User guide

Falcon

Falcon E3478 User guide

Falcon Classic Deluxe 110 Dual Fuel Instruction Manual

Falcon

Falcon Classic Deluxe 110 Dual Fuel Instruction Manual

Falcon DOMINATOR PLUS G3106 Series User guide

Falcon

Falcon DOMINATOR PLUS G3106 Series User guide

Falcon Toledo FS Manual

Falcon

Falcon Toledo FS Manual

Falcon E711 User guide

Falcon

Falcon E711 User guide

Falcon DOMINATOR PLUS E3478 User manual

Falcon

Falcon DOMINATOR PLUS E3478 User manual

Falcon 1000 DF User guide

Falcon

Falcon 1000 DF User guide

Falcon g3478 Supplement

Falcon

Falcon g3478 Supplement

Falcon P Series User manual

Falcon

Falcon P Series User manual

Falcon Elise 90 Dual Fuel Instruction Manual

Falcon

Falcon Elise 90 Dual Fuel Instruction Manual

Falcon 900S Dual Fuel Instruction Manual

Falcon

Falcon 900S Dual Fuel Instruction Manual

Falcon Classic 100 Dual Fuel Instruction Manual

Falcon

Falcon Classic 100 Dual Fuel Instruction Manual

Falcon Classic 110 Dual Fuel Manual

Falcon

Falcon Classic 110 Dual Fuel Manual

Falcon 110 Induction Instruction Manual

Falcon

Falcon 110 Induction Instruction Manual

Falcon Professional + Kitchener 110 User manual

Falcon

Falcon Professional + Kitchener 110 User manual

Falcon 90 Professional Operation manual

Falcon

Falcon 90 Professional Operation manual

Falcon G2101EU OTC User manual

Falcon

Falcon G2101EU OTC User manual

Falcon Genius Touch GET1011 User manual

Falcon

Falcon Genius Touch GET1011 User manual

Falcon 900S Dual Fuel Instruction Manual

Falcon

Falcon 900S Dual Fuel Instruction Manual

Falcon Dominator Plus G3151 User guide

Falcon

Falcon Dominator Plus G3151 User guide

Falcon E3478 User guide

Falcon

Falcon E3478 User guide

Falcon Classic Instruction Manual

Falcon

Falcon Classic Instruction Manual

Popular Oven manuals by other brands

Brandt FC 222 user manual

Brandt

Brandt FC 222 user manual

aumate TOA20M04N-1E instruction manual

aumate

aumate TOA20M04N-1E instruction manual

Maytag CWE4100AC - 24" Single Electric Wall Oven Dimension Guide

Maytag

Maytag CWE4100AC - 24" Single Electric Wall Oven Dimension Guide

Kernau KBO 1076 S PT B instruction manual

Kernau

Kernau KBO 1076 S PT B instruction manual

Bosch HB 37 N Series User manual and installation instructions

Bosch

Bosch HB 37 N Series User manual and installation instructions

Electrolux EOD5420AA user manual

Electrolux

Electrolux EOD5420AA user manual

Mx Onda MX-HC2183 instruction manual

Mx Onda

Mx Onda MX-HC2183 instruction manual

Daewoo F6EV19SM2 Service manual

Daewoo

Daewoo F6EV19SM2 Service manual

Blodgett MT3870 Specifications

Blodgett

Blodgett MT3870 Specifications

GE ZET2F owner's manual

GE

GE ZET2F owner's manual

GE JK3000DF3WW owner's manual

GE

GE JK3000DF3WW owner's manual

eka EKF 523 NT Operating and instruction manual

eka

eka EKF 523 NT Operating and instruction manual

AEG Electrolux E3191-5 user manual

AEG Electrolux

AEG Electrolux E3191-5 user manual

Pratica Rocket Express quick start guide

Pratica

Pratica Rocket Express quick start guide

Viking Professional VGSO260T user guide

Viking

Viking Professional VGSO260T user guide

FM RX203 instruction manual

FM

FM RX203 instruction manual

Bosch HBN331 9B Series instruction manual

Bosch

Bosch HBN331 9B Series instruction manual

NEFF B95M42N0MK Instructions for use

NEFF

NEFF B95M42N0MK Instructions for use

manuals.online logo
manuals.online logoBrands
  • About & Mission
  • Contact us
  • Privacy Policy
  • Terms and Conditions

Copyright 2025 Manuals.Online. All Rights Reserved.

Screen A
Screen B
Screen C
Page 3
SECTION 1 - Switch On
Switch ON (TC Model)
1. Ensure there is an electrical supply to
the unit. Power On will glow red.
2. Press key. Screen illuminates and
unit boiler will fill with clean, cold
water. The welcome screen will
appear followed by main default
display.
See Screens A and B.
A choice of two alternatives will be
made available :-
Cook and Help Line (?)
Screen Defaults to Cook Mode.
Switch ON (TMS Model)
1. Ensure there is an electrical supply to
the unit. Power On will glow red.
2. Press key. Screen illuminates and
unit boiler will fill with clean, cold
water. The welcome screen will
appear followed by main default
display.
See Screens A and C.
A choice of three alternatives will be
made available:-
Cook , Program (P),
and Help Line (?)
Screen Defaults to Cook Mode.
Screen 1
Screen 2
Page 4
SECTION 2 - To Pre-heat
1. From Screen B or C, select
Press to confirm.
Screen 1 will appear.
2. Screen will default to Convection at
150
o
C with Convection Mode
highlighted.
3. Press keys to change mode.
Three possible modes are available:-
Convection
Steam
Combination
Cooking modes default to the
following temperatures -
Convection 150
o
C
Steam 100
o
C
Combination 150
o
C
4. Press key to select temperature.
Temperature is now highlighted.
5. Press to decrease or to
increase temperature.
6. Press to confirm chosen mode and
temperature, the oven will now heat
up. Current temperature is displayed
on screen in the ACTUAL column.
Also for your convenience, the time
will be displayed.
Screen 2 will appear.
7. Press ESC to stop the heating process
when desired pre-heat temperature is
reached, alarm will bleep 5 times.
Food(s) may now be loaded into the
oven.
Screen
Screen 3
Screen 5
Page 5
SECTION 3 - To Set Timer
1. Pre-heat oven as detailed in Section 2.
2. Open door carefully.
Place food(s) inside oven.
3. Close door.
4. Set mode and temperature as detailed
in Section 2.
A display similar to Screen 3 will
appear.
5. Press until time symbol
is highlighted.
6. To set desired cooking time, press
or to set time. (Screen 4)
7. Press to start. Time automatically
counts down.
Remaining time will be displayed in
the ACTUAL column.
A display similar to Screen 5 will
appear.
When set time has elapsed, heating
process will stop and the alarm will
bleep continuously.
8. Press ESC to stop alarm.
Refer to chart on Page 16
Screen 7
Screen 6
Page 6
SECTION 4 - Probe Cookin
TC and TMS ovens are fitted with a core temperature probe to ensure that
food can be cooked to the exact specification of the Chef.
The probe monitors core temperature during cooking to an accuracy of 1
o
C.
Oven will stop automatically when selected core temperature is reached.
The probe should always be handled with an oven glove and requires to be
cleaned prior to insertion and also after completion of the cooking process.
Insert the clean probe into food and ensure the tip reaches the core of the
thickest food section.
1. Pre-heat oven to chosen temperature.
(Refer to Section 2).
2. Place food product in the oven.
3. Remove probe from protective sheath.
Use glove or oven cloth as probe will
be extremely hot.
4. Insert probe in to the food product.
Ensure the tip of the probe is located
in the centre of the food product.
5. Close oven door.
6. Press or until probe sign is
highlighted.
7. Use or to set desired core
temperature as displayed in Screen 6.
9. Press to commence cooking.
Screen 7 will now appear.
Current core temperature can be
viewed on screen When pre-set core
temperature has been reached,
bleeper will sound continuously.
10. Press ESC to stop bleeper.
11. Remove probe from food. Use a
glove or oven cloth as probe will be
extremely hot.
12. Carefully clean probe using a
bacteriacidal wipe and replace into
protective sheath..
Screen 8
Page 7
SECTION 5 - TC/TMS Ovens
Chan in Values whilst Cookin
1. Ensure ESC TO STOP is displayed on
screen. This signifies oven is on.
2. Press and MODE, , or
will highlight and flash.
(Highlighter defaults to box last set.)
3. Press or to highlight box which
registers value you wish to change.
4. Press to decrease or increase
values. Value will now change and can
be viewed in SET column.
5. Press to confirm when choice is complete. Flashing highlighter will
now cease and ESC TO STOP will be highlighted as in Screen 8.
Oven Li ht(s)
The 6 grid oven has one single light and the 10 grid has two. The light(s) are
located at the left hand side of the oven.
Press key to switch the lights on.
The lamps will stay on until key is pressed to turn the lamps off.
Stoppin The Oven
Press ESC to stop the cooking process. The alarm will bleep 5 times.
Screen Contrast
The screen resolution may be controlled by pressing the key.
Openin the Door
When cooking on Steam or Combi mode, please pay particular attention to
safety when opening door.
Open door slowly with due care. Use door as a shield from escaping steam.
Screen 9
Page 8
Cool Down Facility
The oven temperature may be cooled quickly to a lower temperature by using
the cool down facility.
1. Screen display should read TO START, signifying that oven is off.
The actual oven temperature will be displayed at RH side (ACTUAL).
2. Open door fully.
Warnin : Please take care if previous mode was steam or combi as
hot steam will escape.
3. Use to set desired temperature. This will be highlighted in LH column.
4. Press fan key . Current temperature can be viewed in ACTUAL
column. When the desired temperature has been reached, alarm will bleep
5 times and fan will stop.
Help Menu
Move to highlight ?
Press to confirm.
Screen 9 will appear listing several
options.
Chef's Tips/General Guidelines (Option 2)
1.
Chefs Tips
- Ten tips are given over a range of food products.
2.
General Guidelines
Always pre-heat the oven before commencing cooking.
When loading oven with food, keep the door open for as little time as
possible to ensure heat retention within the oven cavity.
When transferring from Convection/Combi modes to Steam Mode, always
use the Cool Down facility. NEVER USE STEAM MODE ABOVE 100
o
C.
Food Items
Beef
Lamb
Chicken, Turkey
Duck
Fish
Gammon
Goose
Pate
Âs/Terrines
Pork
Veal
State
Rare
Medium - Rare
Medium
Medium - Well Done
Well Done
Medium
Well Done
Cooked Through
Cooked Through
Cooked Through
Cooked Through
Cooked Through
Cooked Through
Cooked Through
Medium - Well Done
Core Temp. Range (
o
C)
50 - 55
50 - 60
60 - 65
65 - 75
75 - 85
65 - 75
75 - 85
75 - 80
70 - 75
70 - 75
75 - 80
75 - 80
75 - 80
75 - 85
70 - 75
Page 16
The following chart is offered as a guide.
Page 9
SECTION 6 - Cleanin the Appliance
Oven Interior
1. Ensure screen reads TO START.
2. Cool oven temperature to 50
o
C. See Cool Down Facility (Page 8).
3. Apply a mild detergent spray cleaner to all internal sections of the oven,
i.e. top, base, sides, fan guard, fan, baffle plate, grid supports, grids, glass
door, fat filter, door, drip tray, probe and chain.
4. Leave cleaner on sprayed surfaces for time recommended by
manufacturer.
5. Set oven to steam mode at 100
o
C for 10 minutes as detailed in Section 3.
6. Press . Oven will steam for 10 minutes. This will aid hygienic removal
of food debris and chemical cleaner.
7. Carefully open oven door as detailed on Page 7.
8. Remove grids, grid supports, fat filter and drip tray. Wash by hand in a sink.
9. Use warm water and mild detergent with a soft cloth to wash out interior.
10. Use water hose (if fitted) to spray oven interior with clean cold water.
This will thoroughly rinse away any remaining food debris and cleaner.
11. Use a clean, lint-free tea towel to dry all wet areas.
12. Dry all hand washed components thoroughly and re-assemble.
Oven Exterior - Clean these surfaces at regular intervals as necessary.
Fingermarks of a greasy or floury nature may periodically appear on exterior
surfaces including the control panel. These can be removed by following this
procedure.
Never use excessive water or a scourer
.
Wash with hot, soapy water using a soft cloth.
Rinse away all soapy resdidue using a clean cloth and clean water.
Polish with a dry, lint-free cloth.
Cleaning Recommendations
Falcon recommend that the combi oven be cleaned AT LEAST ONCE A DAY
to maintain acceptable hygiene standards.
We do not recommend the use of abrasive cleaning materials such as wire
brushes or steel wool scourers on any part of the oven.
The oven has been designed to facilitate cleaning and should not require
aggressive detergents if cleaned daily as recommended.
Warning! - This appliance must NEVER be cleaned with a jet of water or
be steam cleaned.
Screen 10
Screen 11
Screen 12
Screen 13
P
Page 10
SECTION 7 - Pro rams
(TMS only)
Writing a Program
1. Press key.
2. Press to highlight (Screen 10)
3. Press to confirm.
4. Press to select MODIFY.
(Screen 11)
5. Press to confirm.
6. Enter security code using arrow keys.
After each letter, press to confirm
and ESC to delete letter (Screen 12).
Security code must be four letters,
default code is CHEF.
The commissioning engineer can
change this to your personal choice
if requested.
7. Ensure NEW is highlighted
- use if necessary. (Screen 13)
8. Press to confirm.
Program screen will appear.
75 programs are available
Program Number is displayed
on screen. (Top LH corner)
Choose programme number by using
and keys. (Screen 14)
9. Press to confirm.
EDIT will now highlight. (Screen 15)
10. Press to confirm.
Actual column reads as Screen 16.
i.e. default to Conv. 150
o
C
on Time mode
Screen 1
Screen 17
Screen 16
Screen 15
Page 11
11. Use to select mode, temperature,
time and probe. The key to
increase and to decrease values.
12. When complete press to save
stage. Details are now transferred to
Stage 1, viewed at LH side of screen.
13. If further stages are required, press
to highlight Stage 2.
EDIT will be highlighted. (Screen 15)
14. Repeat Steps 10-12 until all required
stages have been written and saved.
15. Press to highlight SAVE.
(Screen 15). Screen 16 appears if
any stage is incomplete. Return to
Step 14 and complete stages.
16. Press to confirm & save program.
PROGRAM NAME screen now
appears and EDIT is highlighted.
(Screen 17)
17. Spell out chosen program name
(Maximum 16 letters) by highlighting
each letter using the and
keys to move left and right.
keys to move up and down.
After each letter press to confirm.
Letters chosen appear in name box.
18. When program name is completed,
move to highlight SAVE.
19. Press to confirm. Screen appears,
listing all written programs.
20. Press ESC once to return to
programming Screen 11.
Screen only shows 11 set programs
at any one time.
Scroll using the keys.