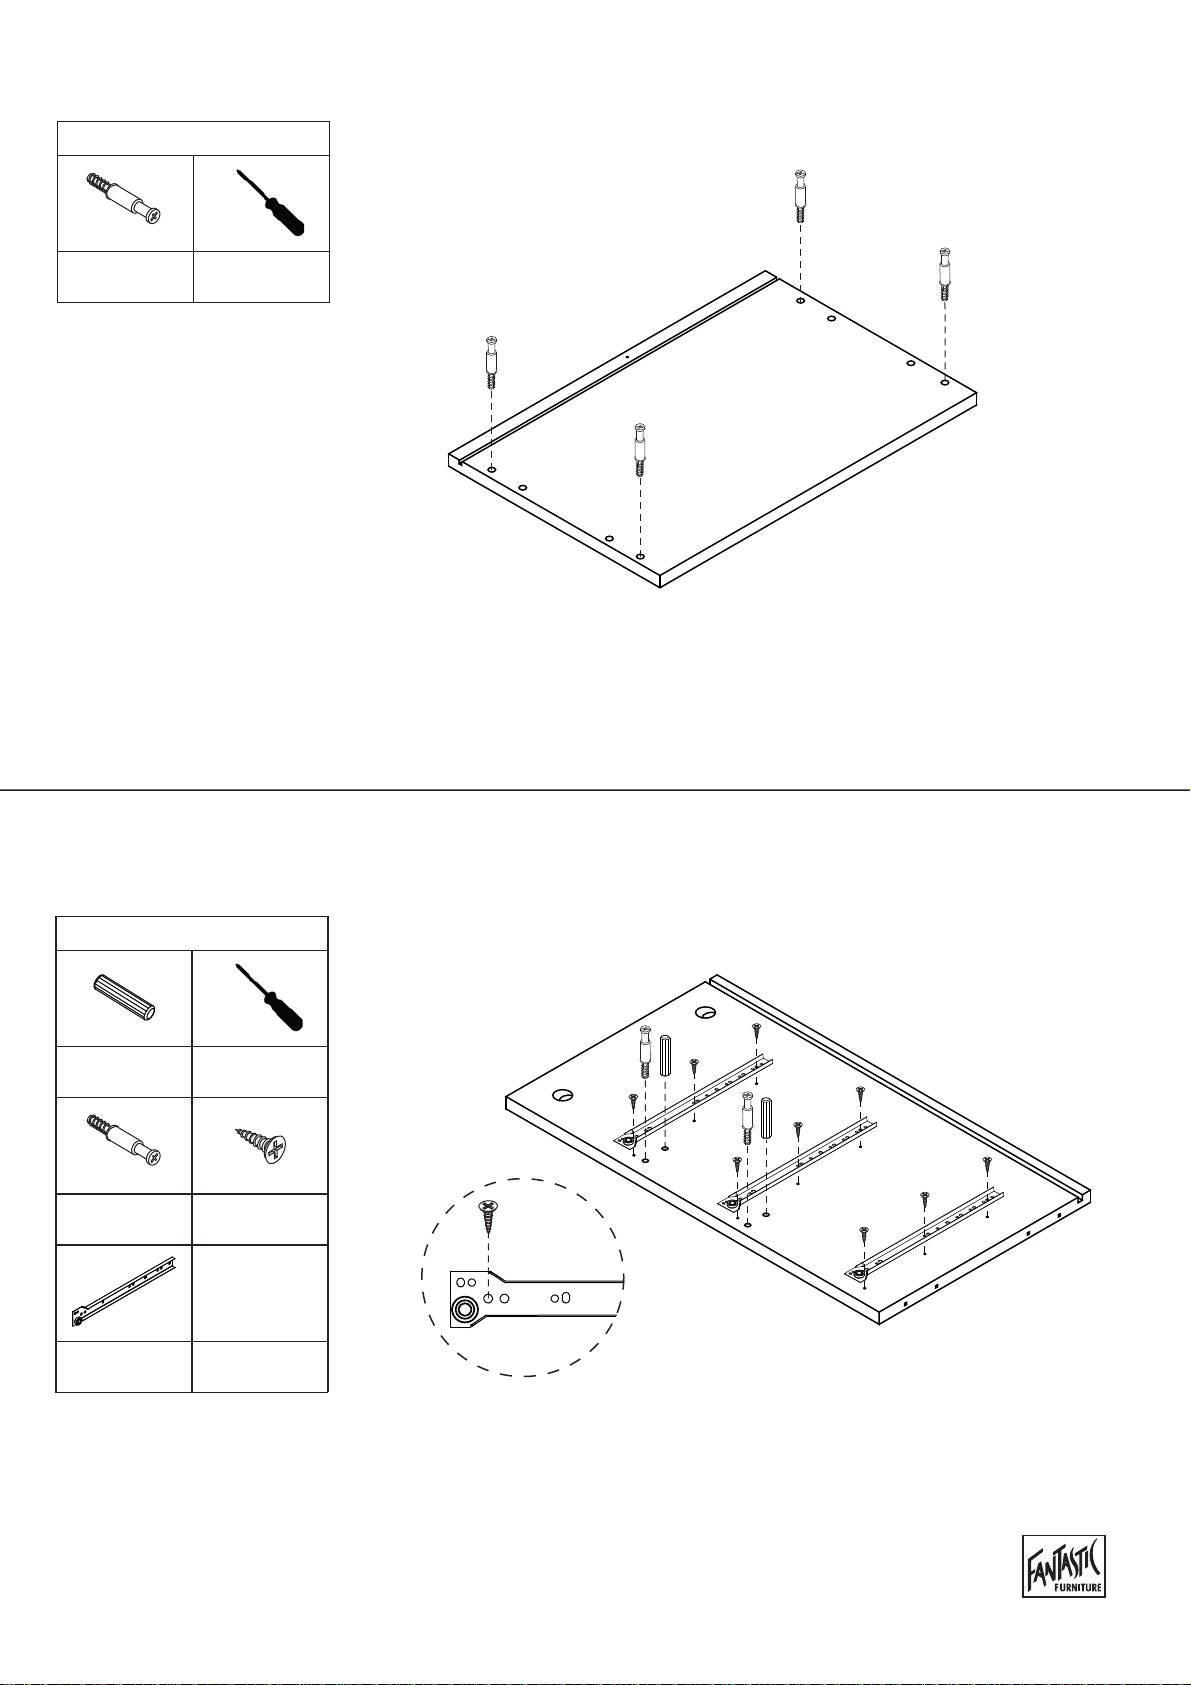
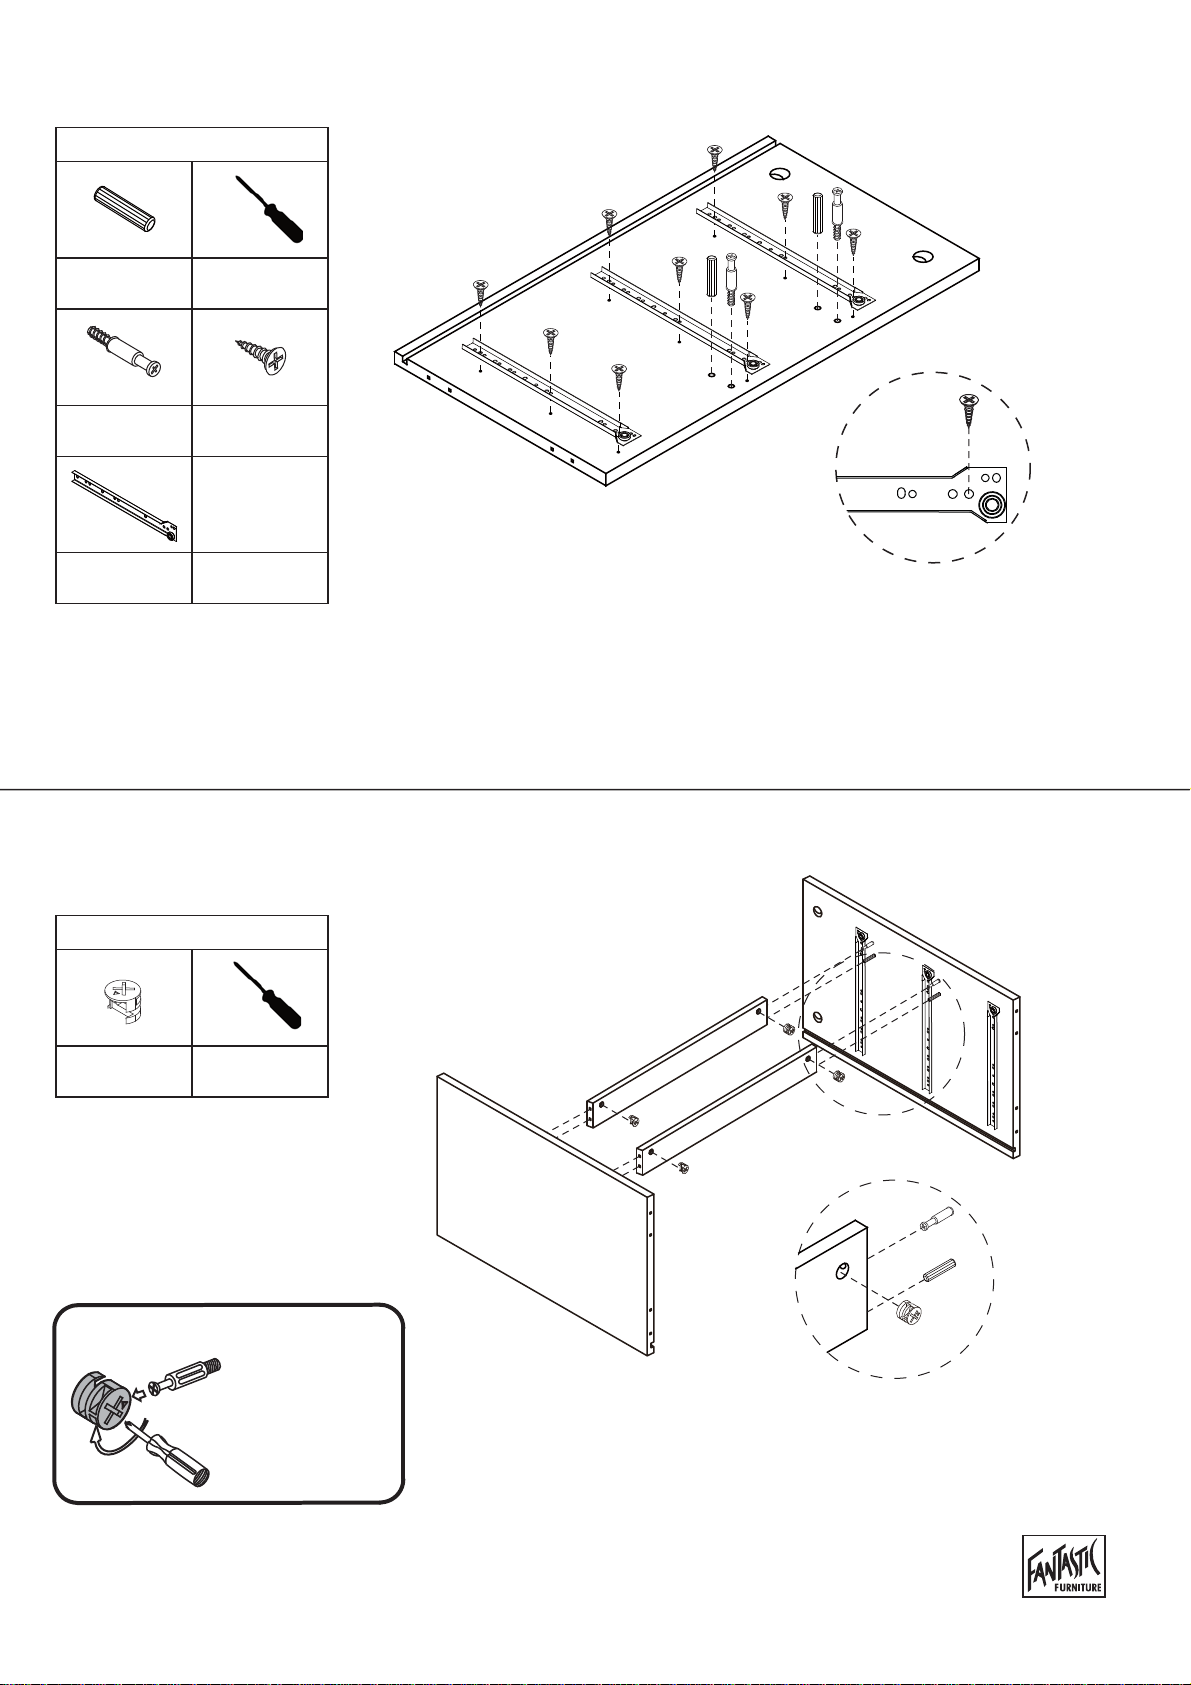
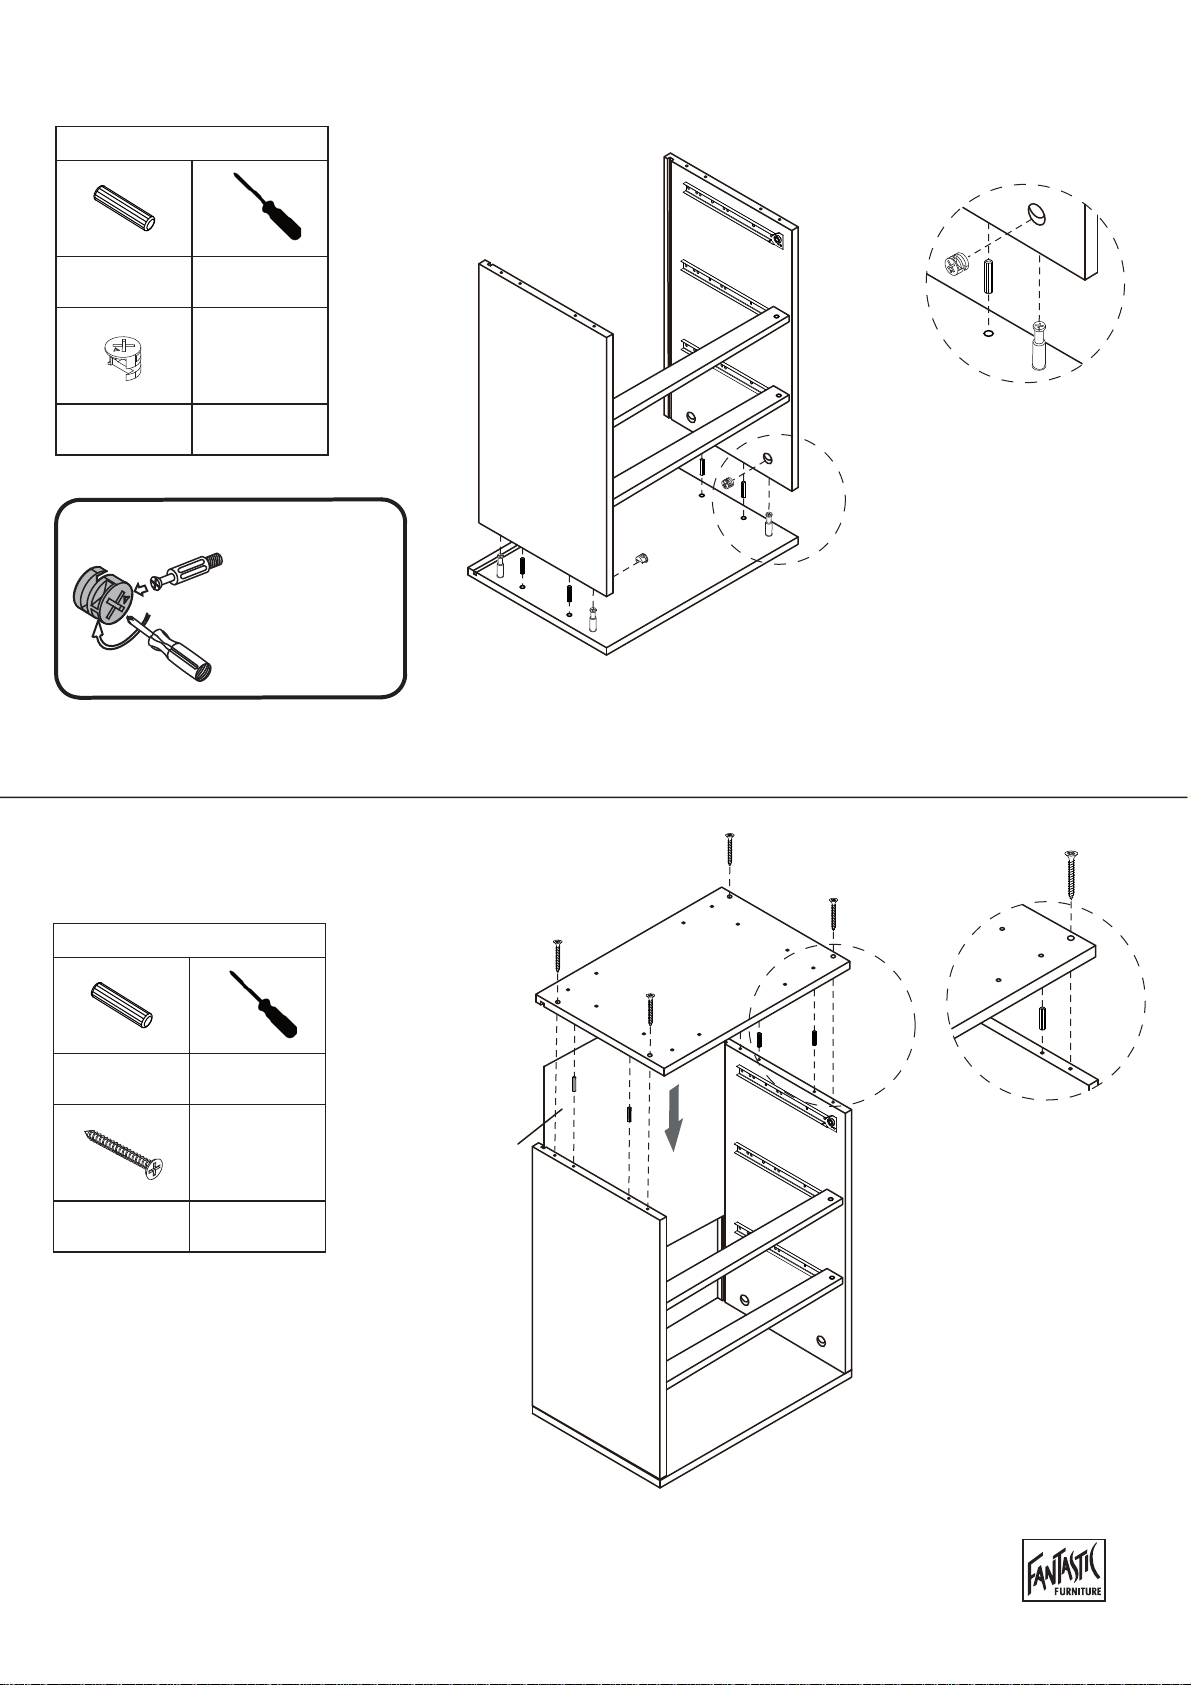
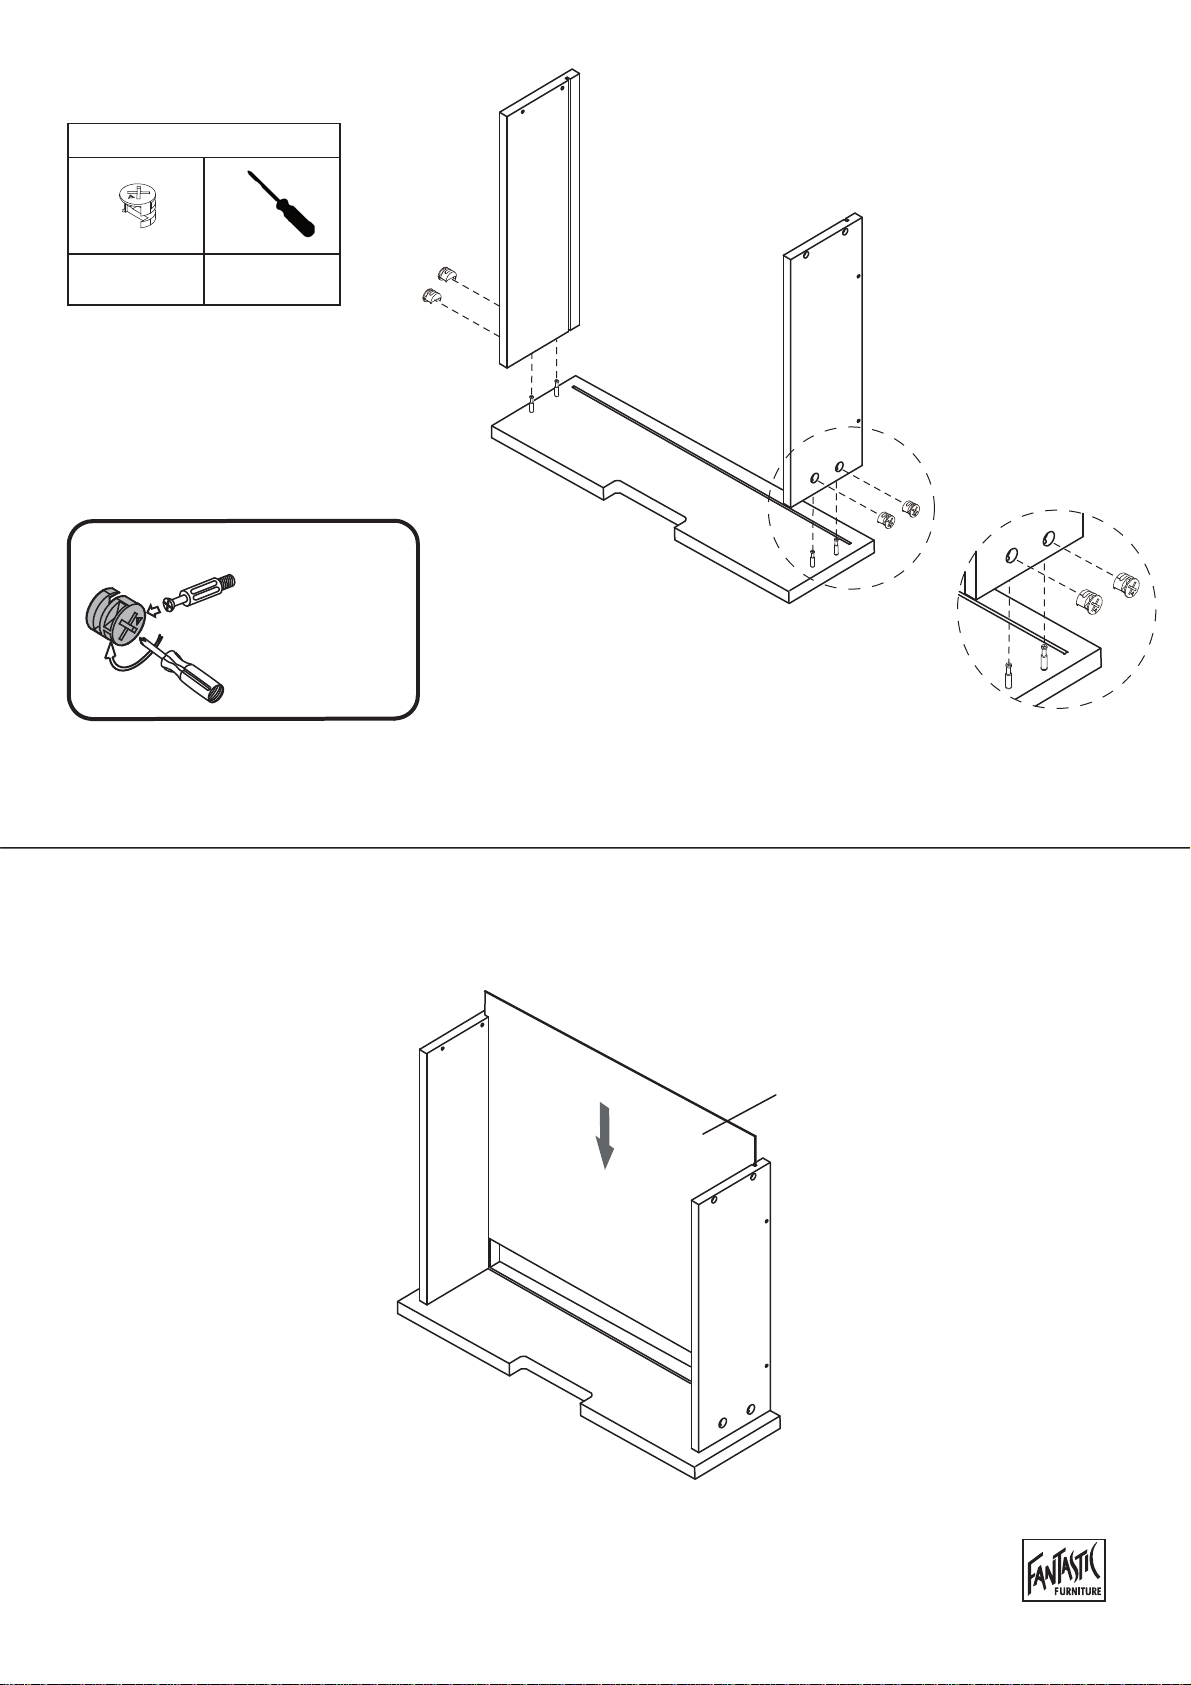
fantastic furniture JUNO UTILITY 3 DRAWER User manual

Version 1.0
JUNO
UTILITY 3 DRAWER
www.fantasticfurniture.com.au

Enjoy
Your purchase from
Australia’s Best Value Furniture Store
www.fantasticfurniture.com.au PAGE 2
Recommended weight capacity : 30KG.
WARNING: ENSURE THE WALL STRAP IS ATTACHED TO
AVOID SERIOUS INJURY.
To avoid any serious or fatal injury, this product has been supplied with a
wall strap to prevent toppling. We strongly recommend that this product is
permanently fixed to the wall or other suitable surface. Connecting
attachments for your wall are not included since different surface materials
require different attachments. Please seek professional advice if you are in
doubt of what wall connections to use.

Assembly checklist
Useful Information
www.fantasticfurniture.com.au PAGE 3
Read through the instructions carefully
before you begin.
Identify and lay out all of the components
before you begin assembly.
! Never use power tools unless specifically instructed. They can damage your components or
hardware if used incorrectly.
! If you are having any difficulties assembling your product, missing any hardware or
components please visit our website Help Centre for further assistance.
! Periodically check and re-tighten all fasteners. Check the product care label or website for
product care instructions.
! Never use any glue until you are certain that the parts belong together.
! Bulky items such as wardrobes and bunk beds should be assembled in the room they will be
used in as they may not fit through a door once assembled.
! Always use a soft surface (such as carpet or cardboard) when assembling your product to
avoid scratching or damaging the surface of the product.
! The most common mistakes made during assembly are using the wrong hardware or getting
components back to front.
Unless instructed, do not fully tighten screws
until the item is fully assembled.
Make sure you have all the required tools.
Never use power tools unless instructed.
! Please see page 2 for any safety requirements or weight restrictions.

16 x Long Screws
(H2) 30 x Small Screws
(H5) 3 x CL Runner
Tracks
(H6)
20 x Cam Bolts
(H3) 20 x Cam Nuts
(H4) 3 x CR Runner
Tracks
(H7)
3 x DL Runners
(H8) 3 x DR Runners
(H9)
What you need
to assemble the product
Other tools you need
Phillips head screwdriver;
www.fantasticfurniture.com.au PAGE 4
DO NOT USE Right
Side
Panel
(P3)
Bottom Panel
(P4)
Rail
(P5)
4 x Legs
(P7)
Left
Side
Panel
(P2)
12 x Dowels
(H1)
12 x Bolts
(H10)
Left Drawer
Side (P10)
Right
Drawer Side
(P11)
x 3
Drawer Back
(P9)
Drawer
Base
(P12)
Drawer Front
(P8)
Top Panel
(P1)
Rail
(P5)
Back
Panel
(P6)
Parts list
Box 1: Top panel (P1);
Left Side Panel(P2);
Right Side Panel (P3);
Bottom Panel (P4);
2 x Rail (P5);
Back Panel (P6);
4 x Leg (P7);
3 x Drawer Front (P8);
3 x Drawer Back (P9);
3 x Left Drawer Side (P10);
3 x Right Drawer Side(P11);
3 xDrawer Base (P12)
Hardware Pack
4 x Wedges
(H14) 4 x Screws
(H15)
1 x Screw
(H12)
1 x Safety
Strap
(H11)
2 x Washers
(H13)
1 x Allen Key
(H16) 4 x Felt Pads
(H17)

www.fantasticfurniture.com.au PAGE 5
Attach 4 x cam bolts (H3) to top panel (P1) as shown.Tighten with a Phillips head screwdriver.
Phillips head
screwdriver
You will need
Step 1
You will need
(P1)
Phillips head
screwdriver
9 x Small
Screws (H5)
3 x CL Runner
Tracks (H6)
2 x Cam
Bolts (H3)
Step 2
4 x Cam
Bolts (H3)
H3
(P2)
H3
H5
H6
Attach 3 x CL runner tracks (H6) to left side panel (P2) with 9 x small screws (H5).
Insert 2 x dowels (H1) and 2 x cam bolts (H3) into left side panel (P2) as shown.
Tighten with a Phillips head screwdriver.
2 x Dowels
(H1)
H1
H6
CL
H5

www.fantasticfurniture.com.au PAGE 6
Attach 3 x CR runner tracks (H7) to right side panel (P3) with 9 x small screws (H5).
Insert 2 x dowels (H1) and 2 x cam bolts (H3) into right side panel (P3) as shown.
Tighten with a Phillips head screwdriver.
Attach rails (P5) to left side panel (P2) and right side panel (P3) with 4x cam nuts (H4).
Tighten with a Phillips head screwdriver.
You will need
Step 3
3 x CR Runner
Tracks (H7)
Step 4
(P3)
H3
H5
H7
(P3)
You will need
4 x Cam
Nuts (H4)
(P5)
(P2)
H4
(P5)
H4
(P5)
Phillips head
screwdriver
9 x Small
Screws (H5)
2 x Cam
Bolts (H3)
2 x Dowels
(H1)
H1
Phillips head
screwdriver
H7
CR
H5
This is how a cam nut works........
The head of the cam
bolt goes into the open
mouth of the cam nut.
You then turn the cam
nut so it tightens over
the bolt.

www.fantasticfurniture.com.au PAGE 7
Attach top panel (P1) to the main unit with 4x dowels (H1), and secure with 4x cam nuts (H4).
Tighten with a Phillips head screwdriver.
You will need
Step 6
4 x Dowels
(H1)
You will need
Step 5
4 x Dowels
(H1)
4 x Cam
Nuts (H4)
(P1)
H1 H4
(P3)
(P2)
(P3)
(P2)
Phillips head
screwdriver
4 x Long
Screws (H2)
H1
H2
(P4)
Slide back panel (P6) into the groove of left side panel (P2) and right side panel (P3).
Attach the bottom panel (P4) as shown using 4x dowels (H1) and 4x long screws (H2).
Tighten with a Phillips head screwdriver.
(P6)
H4
H1
H1
H2
(P4)
(P1)
This is how a cam nut works........
The head of the cam
bolt goes into the open
mouth of the cam nut.
You then turn the cam
nut so it tightens over
the bolt.
Phillips head
screwdriver
Ensure laminated
side of panel is
facing inwards.

www.fantasticfurniture.com.au PAGE 8
Attach 4x legs (P7) to bottom panel (P4) and secure with 12 x bolts (H10).
Tighten with an Allen key (H16).Apply 4 x felt pads (H17) to bottom of legs (P7) as shown.
Screw 4 x cam bolts (H3) into drawer front (P8) with a Phillips head screwdriver.
Repeat for all 3 drawer fronts (P8).
Phillips head
screwdriver
You will need
Step 8
Step 7
12 x Cam
Bolts (H3)
H3
(P8)
x 3
You will need
12 x Bolts
(H10) (P4)
H10
(P7)
(P4)
H10
(P7)
1 x Allen Key
(H16)
H16 H17
H17
4 x Felt Pads
(H17)

You will need
Attach drawer sides (P10, P11) to drawer front (P8). Insert 4 x cam nuts (H4) into the holes of drawer
sides (P10, P11). Make sure the opening on cam nuts point towards the incoming cam bolts.
Tighten the cam nuts using a Phillips head screwdriver.Repeat for all 3 drawers.
Step 9
Slide drawer base (P12) into the groove of drawer sides (P10, P11).
Repeat for all 3 drawers.
Step 10
www.fantasticfurniture.com.au PAGE 9
12 x Cam
Nuts (H4)
H4
x 3
x 3
(P8)
(P10)
(P11)
(P8)
(P10)
(P11)
(P12)
This is how a cam nut works........
The head of the cam
bolt goes into the open
mouth of the cam nut.
You then turn the cam
nut so it tightens over
the bolt.
Phillips head
screwdriver
Ensure laminated
side of panel is
facing inwards.
H4

Phillips head
screwdriver
You will need
Step 11
Attach drawer back (P9) to drawer sides (P10, P11) with 4 x long screws (H2), make sure
that the groove lines up the whole way around the drawer. Tighten screws using a Phillips
head screwdriver.Repeat for all 3 drawers.
Attach 1 x DL runner (H8) to left drawer side (P10) and 1 x DR runner (H9) to right
drawer side (P11) with 4 x small screws (H5). Tighten screws using a Phillips head
screwdriver.Repeat for all 3 drawers.
You will need
Step 12
www.fantasticfurniture.com.au PAGE 10
Phillips head
screwdriver
x 3
H2
(P9)
(P10)
(P11)
H8
H9
x 3
H5
H5
(P8)
(P10)
(P11)
12 x Small
Screws (H5)
3 x DL Runner
(H8) 3 x DR Runner
(H9)
12 x Long
Screws (H2)

Step 13
www.fantasticfurniture.com.au PAGE 11
Carefully turn the unit over to an upright position. Slide all 3 assembled drawers into the unit.
You will need
Step 14
Phillips head
screwdriver
1 x Safety
Strap (H11) 1 x Screw
(H12)
1 x Washer
(H13)
4 x Wedges
(H14) 4 x Screws
(H15)
H11
H12
H13
Use 1 x screw (H12) and 1 x washer (H13) to connect 1 x safety strap (H11) to top panel (P1).
Secure Back Panel (P6) in place with 4 x Wedges (H14) using 4 x Screws (H15).
Tighten with a Phillips head screwdriver.
(P1)
(P6)
H14
H15

www.fantasticfurniture.com.au PAGE 12
Move the unit to the final position, and attach the safety strap to the wall securely.
Make sure it is firmly attached and snug fit.
Step 16
Job Complete!
In the interest of our environment please dispose of all packaging thoughtfully.
Step 15
Phillips head
screwdriver
1 x Washer
(H13)
Screw and Wall Plug
are not provided.
Please use appropriate
fixtures for your wall.
You will need
H13
Screw
Wall
Seek advice from a qualified
trades person on how to
attach this safety strap to
your specific wall.
Table of contents
Popular LCD Drawer manuals by other brands

BATHCO
BATHCO DTC instructions

Novy
Novy 2961 Operating and installation instructions

Vivo
Vivo DESK-AC03W instruction manual

Austin Hughes Electronics
Austin Hughes Electronics Cyberview L-120 Series user manual

Middle Atlantic Products
Middle Atlantic Products L5-SD7 instruction sheet

Acnodes
Acnodes APW4028 user manual

Night & Day Furniture
Night & Day Furniture CAPE COD STORAGE DRAWERS Assembly instructions

Ranger
Ranger 5060-5 quick start guide

Austin Hughes
Austin Hughes CyberView RKP2417K user manual

Mocka
Mocka Axel Locka 4 Drawer Assembly instructions

Ergotron
Ergotron StyleView SV31 Assembly instructions

Acnodes
Acnodes KD 5150N Specifications