manuals.online logo
Brands
  1. Home
  2. •
  3. Brands
  4. •
  5. Farho
  6. •
  7. Control Unit
  8. •
  9. Farho MI Farho VIC User manual

Farho MI Farho VIC User manual

Quick Installation Guide
Technical data - Internet module MI Farho VIC
Consumption: 40mA
RF Band: 433MHz ISM Band
Power Supply: 5VDC 1A
Dimensions (Height x Width x Long): 25mm x 83mm x 110mm
intelligent heating
Please read carefully this guide and keep it for future reference.
The installation must comply with local regulations.
1
Do not expose this device to rain, moisture, dripping, or
splashing.
The installation must comply with local regulations.
The device shall not be used for critical applications, or that
endanger the safety of people, objects or animals.
Important information
Device installation
Use the RJ-45 cable to connect the MI Farho to your router.
To turn on the device, simply connect the power supply using the mini-USB
cable supplied.
When powered, a green light (L1) will appear at the device info bar (5).
If the device has internet access, the red light (L3) will go off after a few
seconds. The red light (L3) means no connection with the server, and
therefore it is not possible to control the system from the outside.
Thank you for purchasing the MI Farho VIC module. This item has been
manufactured following a quality advanced production process complaining
UNE-EN 60950, UNE-EN 301 489, UNE-EN 61000-6 and UNE-EN 300 220
regulations.
Please read carefully this guide and keep it for future reference.
The internet module MI Farho along with Farho-Control application allow you
to control your compatible Farho heating system from your mobile device or
computer.
The Farho-Control application is available for download on the main app
stores.
Visit our web site www.farho.com to check all the supported operating
systems and other information about our range of products.
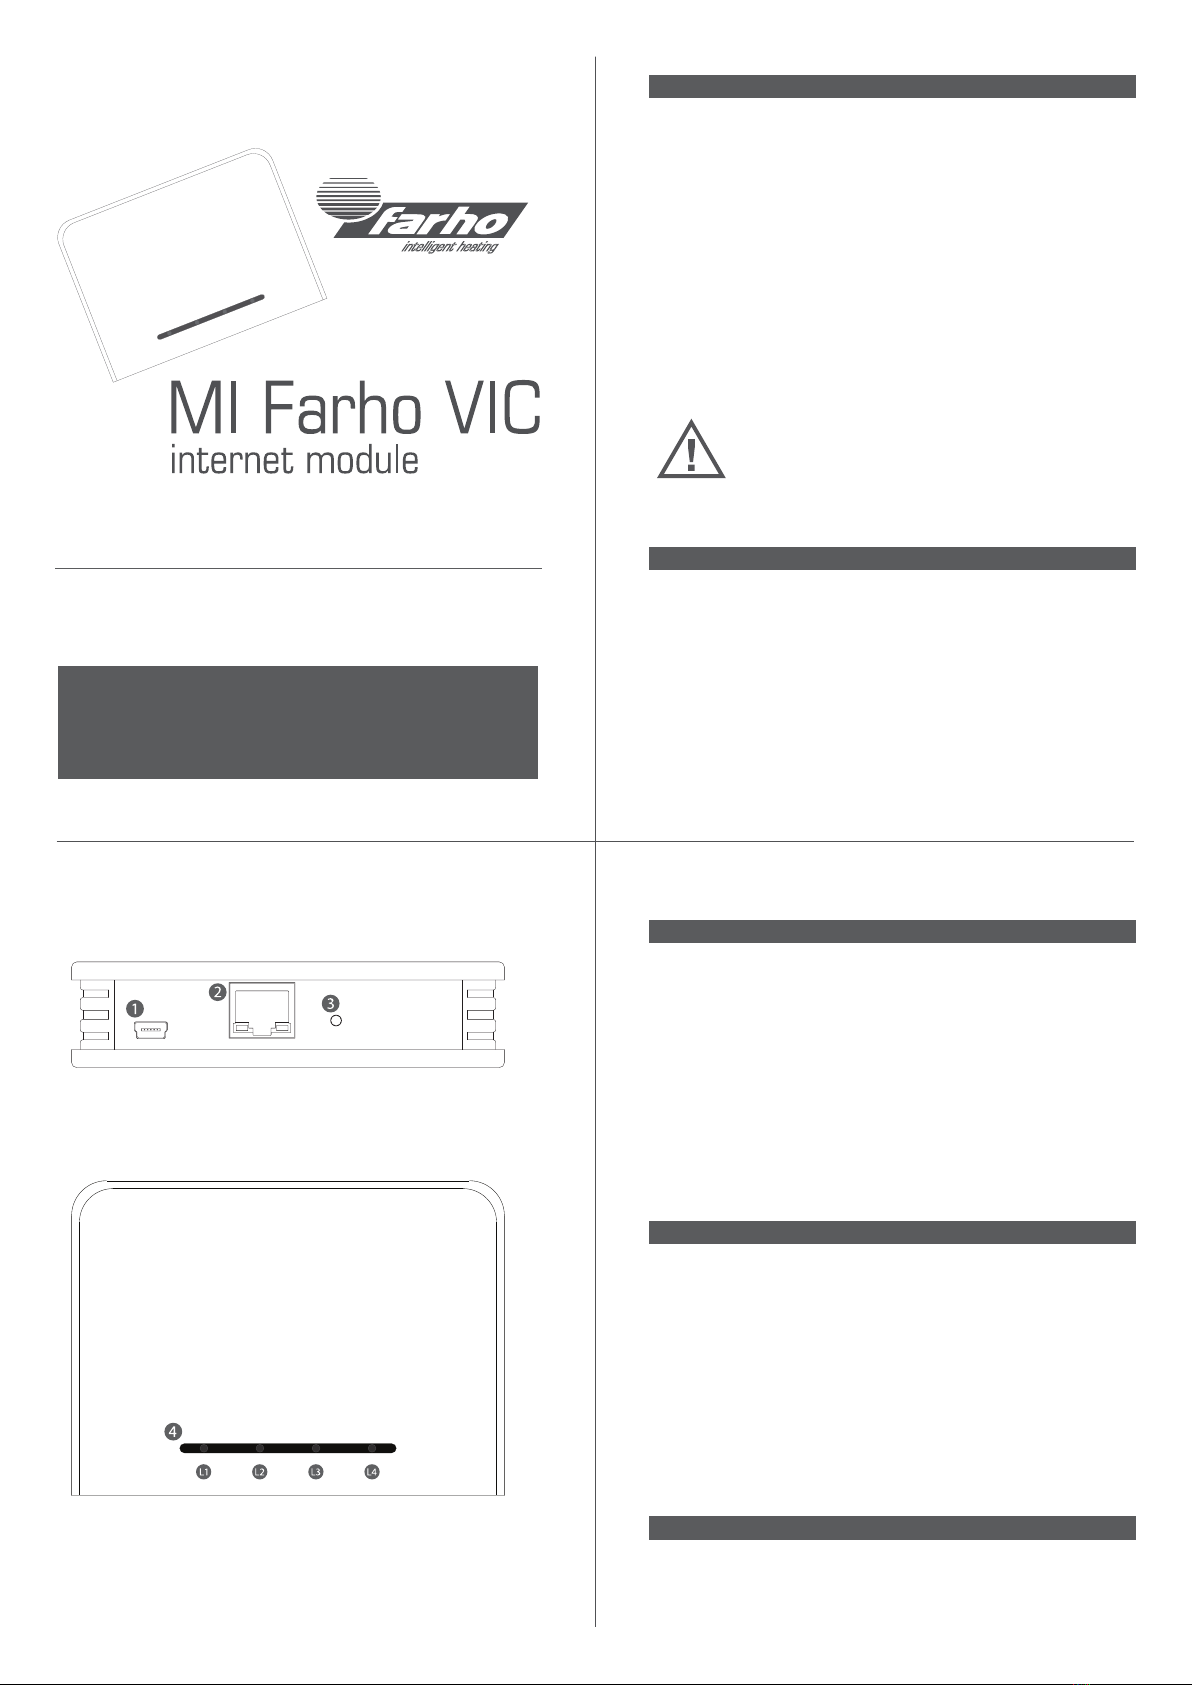
2
1. Mini-USB port (5VDC 1A)
2. Network port (RJ45)
3. Install button / Reset button
5. Info bar: L1 (Green - power supply), L2 (Orange - tasks in progress), L3
(Red - no link with server), L4 (Blue - network tasks in progress)
3
Pairing the device with the applications
Run the Farho-Control app on your control device. Check that this device and
the MI Farho module are connected both to the same router. The app will show
a message indicating that this is the initial installation. Accept the dialog and
go to the back of the MI Farho module. Using a clip or other thin tool make a
click on the installation button (3). The synchronization process will start.
If in the app no changes are observed (the message “Waiting for the module”
does not dissapear), repeat pressing several times. Never keep the installa-
tion button pressed for more than a second.
There is no limit in the number of apps paired with the same MI Farho module.
Just repeat the process in every control device.
Adding heaters to the system
In the app go to “Heating”, and at the tab bar press “Configure”.
Default password is “farho”.
At the “Configure” menu press “Add zone” to install heaters in a new zone or
“Edit zone” to add heaters to an existing zone. If you choose to install in a new
zone, you have to type a name for the zone, and if you choose to add heaters
to an existing zone, you have to select the desired zone.
Once the zone has been created or selected, go near the heater you have to
install (the heater must be turned off, unpowered). In the app press the
button “Add modules”, the app will show a waiting message, then select
“Install” at the heater menu. The app will increment the number of heaters
installed in that zone.
Adding MC Farho modules to the system
In the app go to “Other equipments”, and at the tab bar press “Configure”.
Default password is “farho”.
4
To reset the MI Farho module to factory settings, press and keep pressed the
installation button (3) till the blue light (L4) turns on. Still keep pressed the
button untill the blue light (L4) turns off and the red light (L3) starts to blink.
After that release the installation button (3) and wait until the red light (L3)
stops blinking.
DO NOT TURN OFF the device until the red light stops blinking.
Reset to factory defaults
Go to the configuration menu of the control app and select “Communications”.
Press the “Set the time” button. The app will take the current time and date
from the control device and it will set it in the MI Farho module and the other
elements of the system.
Setting the time of the system
Go to the configuration menu of Farho-Control app in both control devices and
select “Communications”.
At the source device, the one that have the names of the zones, press “Send
data to another application” and at the receiver device press “Receive data
from another applicaton”.
To perform this operation, both control devices and the MI Farho module have
to be connected to the same router.
Sharing zone names between apps
At the “Configure” menu press “Add zone” to install in a new zone or “Edit
zone” to add modules to an existing zone. If you choose to install in a new
zone, you have to type a name for the zone, and if you choose to add modules
to an existing zone, you have to select the desired zone.
Once the zone has been created or selected, go near the module you have to
install. In the app press the button “Add modules”, the app will show a waiting
message, then press the installation button of the MC Farho module. The app
will increment the number of modules installed in that zone.
5
During the first 6 months after the purchase date, the guarantee covers the
repair at Farho installations of any manufacturing flaw or defect and any
damages arising of such defect.
During these 6 months, the client may also ask for a replacement free of
charge without having to run with the carriage charges and the labour costs
involved.
If the repair is not satisfactory for the client, the holder of the guarantee has
the right to have the item changed for a new one or even chose to return the
product and ask for a refund.
During the next 18 months, Farho will cover any replacement without any cost
for the client including carrier and labor costs.
After the second year, any electronic flaw can be repaired in Farho´s Technical
Service Department but carrier and labor costs will be charged to the client.
CAUSES EXCLUDED FROM GUARANTEE:
· Breaks provoked by atmospheric or geological phenomena (frosts, storms,
rains…) as well as those arising from inappropriate voltage.
· Parts or components that have received knocks or bumps during carriage or
the fitting operation.
· Cleaning operations of the appliance or parts of it provoked by dirt, grease or
other circumstances related to the premises where the appliance has been
fitted.
· Modifications to original Farho products without consulting the factory or
using spare parts that have not been recommended by Farho.
Warranty conditions
6
www.farho.com
comercial@farho.com
Tlf. (+34) 985 51 40 82
Fax. (+34) 985 51 41 64
Pol. Industrial Tabaza II, parcelas 9 a 13
33439 Carreño, Asturias, SPAIN
© 2015 Farho Domotica S.L.
intelligent heating
Made in EU

Popular Control Unit manuals by other brands

Metso Jamesbury 7000 Series Installation maintenance and operating instructions

Metso

Metso Jamesbury 7000 Series Installation maintenance and operating instructions

Auta Visualtech ALPHANUMERIC manual

Auta

Auta Visualtech ALPHANUMERIC manual

Pilz PSS CPU Series operating manual

Pilz

Pilz PSS CPU Series operating manual

Lawler 911E Installation & maintenance manual

Lawler

Lawler 911E Installation & maintenance manual

LY International HS-60R user guide

LY International

LY International HS-60R user guide

TechNexion XORE-WIZARD-IMX8M-MINI quick start guide

TechNexion

TechNexion XORE-WIZARD-IMX8M-MINI quick start guide

PDi PD251-047 quick start guide

PDi

PDi PD251-047 quick start guide

Watts LF007 IOT Series INSTRUCTION, INSTALLATION, MAINTENANCE AND REPAIR MANUAL

Watts

Watts LF007 IOT Series INSTRUCTION, INSTALLATION, MAINTENANCE AND REPAIR MANUAL

Ai-Thinker Technology Ai-WB2 Series Programming guide

Ai-Thinker Technology

Ai-Thinker Technology Ai-WB2 Series Programming guide

BENDIX TP-3 TRACTOR PROTECTION VALVE manual

BENDIX

BENDIX TP-3 TRACTOR PROTECTION VALVE manual

Allen-Bradley 1771-IL installation instructions

Allen-Bradley

Allen-Bradley 1771-IL installation instructions

Midland SD-250 user guide

Midland

Midland SD-250 user guide

IRIS Net RCM-810 Engineering Data Sheet

IRIS Net

IRIS Net RCM-810 Engineering Data Sheet

Global Fire Equipment IO-ISO Programming manual

Global Fire Equipment

Global Fire Equipment IO-ISO Programming manual

Drummond Nanoject II instruction manual

Drummond

Drummond Nanoject II instruction manual

Tektronix KEITHLEY 4225-RPM instructions

Tektronix

Tektronix KEITHLEY 4225-RPM instructions

Danfoss ICM Installation, Programming, and Trouble-shooting

Danfoss

Danfoss ICM Installation, Programming, and Trouble-shooting

Hi-Link HLK-LD015-5G user manual

Hi-Link

Hi-Link HLK-LD015-5G user manual

manuals.online logo
manuals.online logoBrands
  • About & Mission
  • Contact us
  • Privacy Policy
  • Terms and Conditions

Copyright 2025 Manuals.Online. All Rights Reserved.