FarmTronics ChickenMaster User manual

1
FarmTronics AUSTRALIA Rev: 05112021-0.2
The Den, 100 Fox Drive, Dandenong South. Victoria. 3175.
www.farmtronics.com.au Phone: 0411 479 411
ChickenMaster User Guide
The ChickenMaster™ is a dedicated microprocessor controller specifically designed for use in Mobile
Chicken Trailers/Caravans or Fixed type Egg Laying sheds.
The ChickenMaster™ offers the following functions and features:
•Automatic Time Switch control for motorised External Doors
•Automatic Time Switch control for motorised Nest Box Gates/Excluders
•Automatic Time switch control of the internal LED lighting with two independent modes;
one for Morning times and one for Evening times
•Two line, 16 Character per line LCD backlit display
•Battery Voltage Display
•Wind Speed Display and Wind Speed monitoring to protect the external doors from
high wind gusts (When used with the optional FarmTronics FT-WS Wind Anemometer)
•Internal Alarm feature which can be used to monitor water tank levels
(When used with an optional Float Switch)
•Manual Control Menu allows the user manual control of the External Doors, Nest Box Gates
and Internal Lights
•Easily scroll through multiple STATUS screens showing the status of all programmed outputs
MAIN HOME SCREEN DISPLAY
12 :43 :16 m: AUTO
W : 0KPH B: 12.8V
Current TIME
MODE Status
WIND Speed
Battery Voltage

2
FarmTronics AUSTRALIA Rev: 05112021-0.2
The Den, 100 Fox Drive, Dandenong South. Victoria. 3175.
www.farmtronics.com.au Phone: 0411 479 411
Menu Structure & Functionality
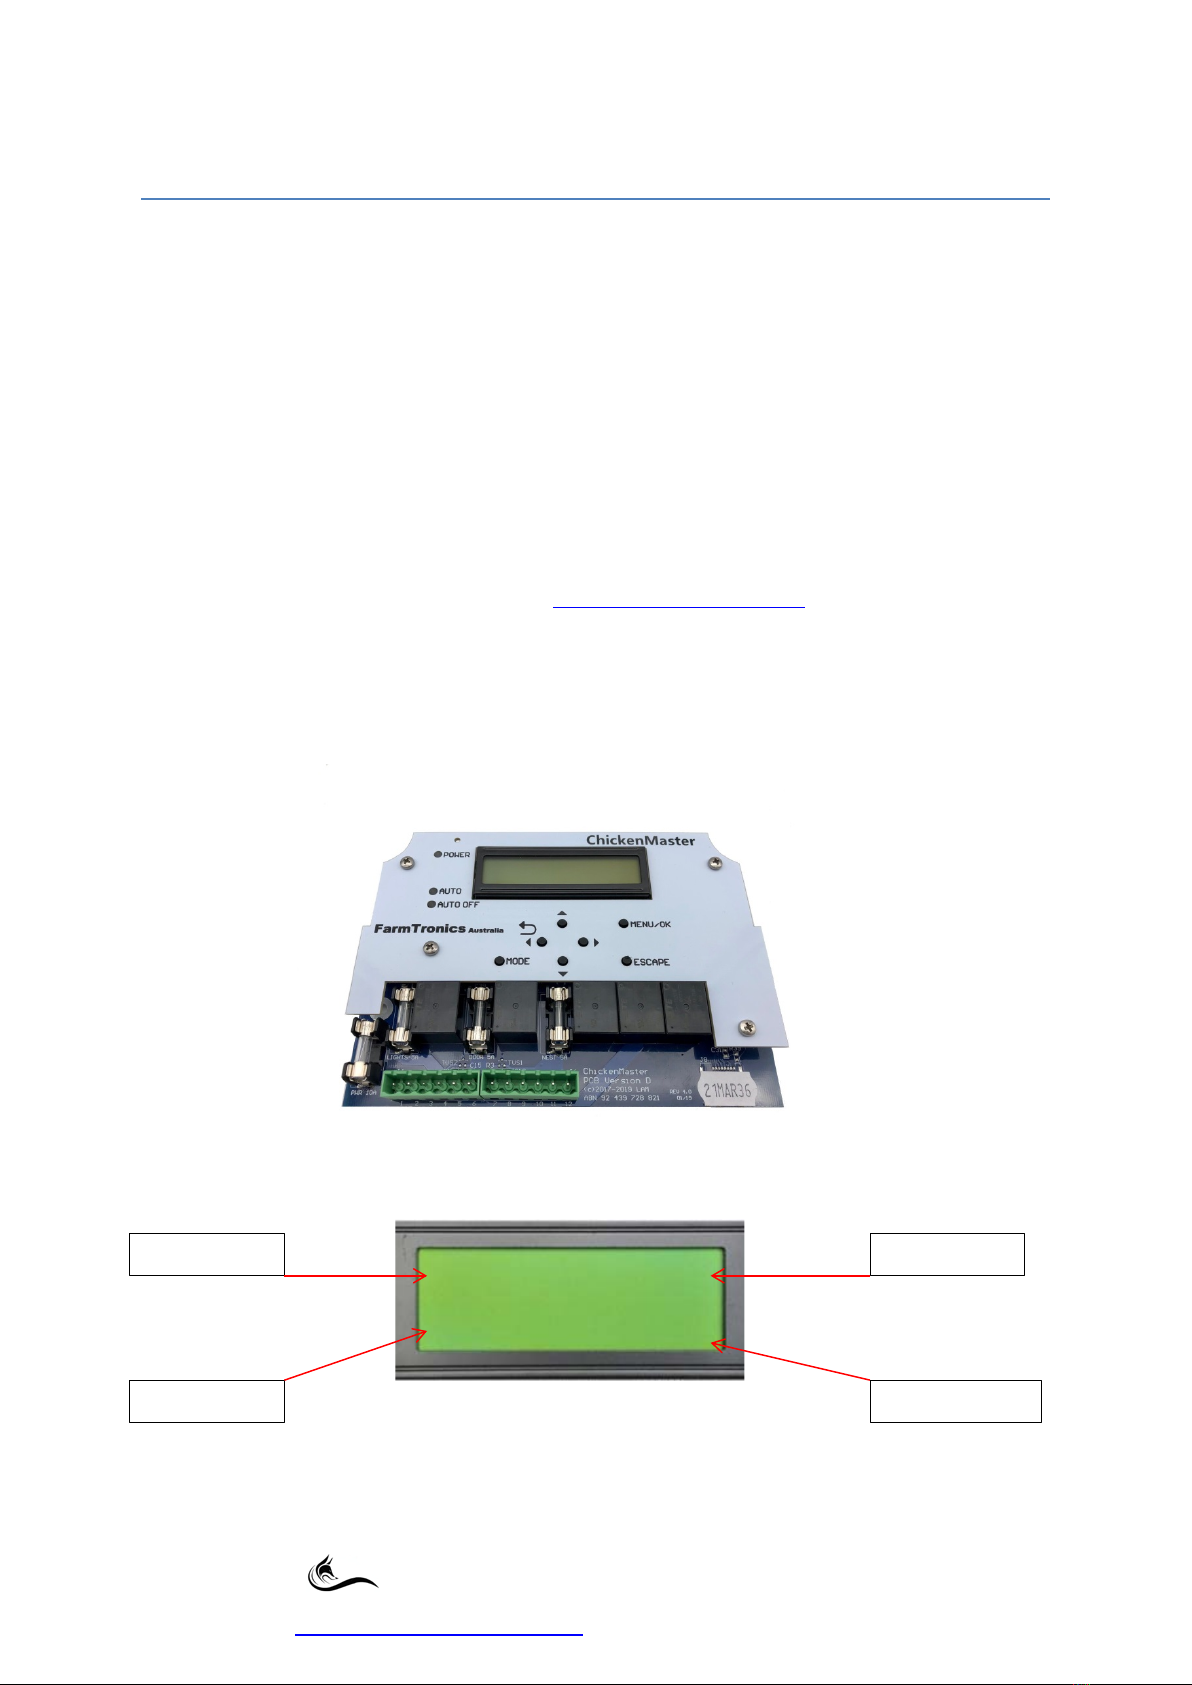
PRESS and hold the MENU/OK button for 5 seconds then release the button, the main programming
HOME Screen will be displayed which has the five sub menus shown below.
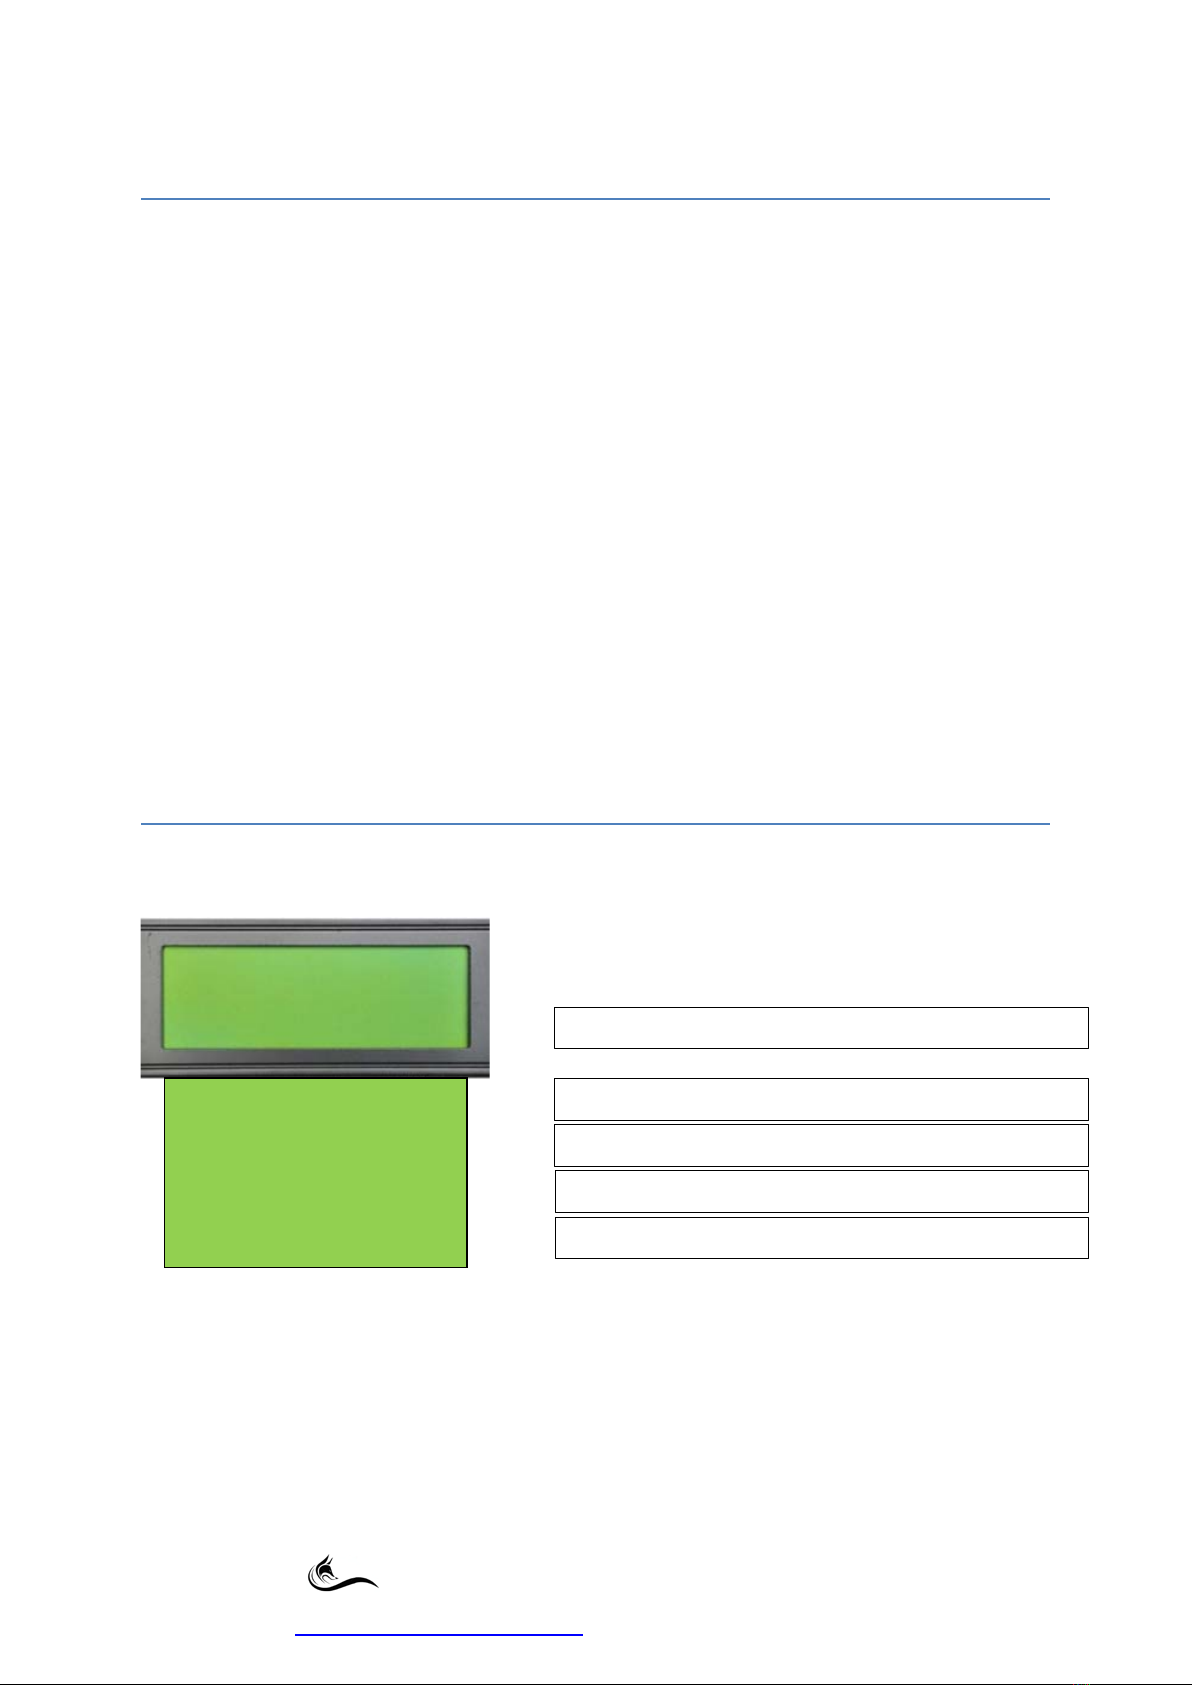
•Using the UP or DOWN arrow buttons will scroll through the HOME Screen Sub Menus.
•Pressing the MENU/OK button will enter the selected sub menu.
•Pressing the ESCAPE button at any time will take you back to the MAIN HOME screen.
•Pressing the RETURN arrow button (Left Arrow Button)will take you back up one level in the
Menu Structure each time it is pressed.
•The MODE button allows the user to quickly override all AUTOMATIC functions and is
indicated by the AUTO or AUTO OFF led lights.
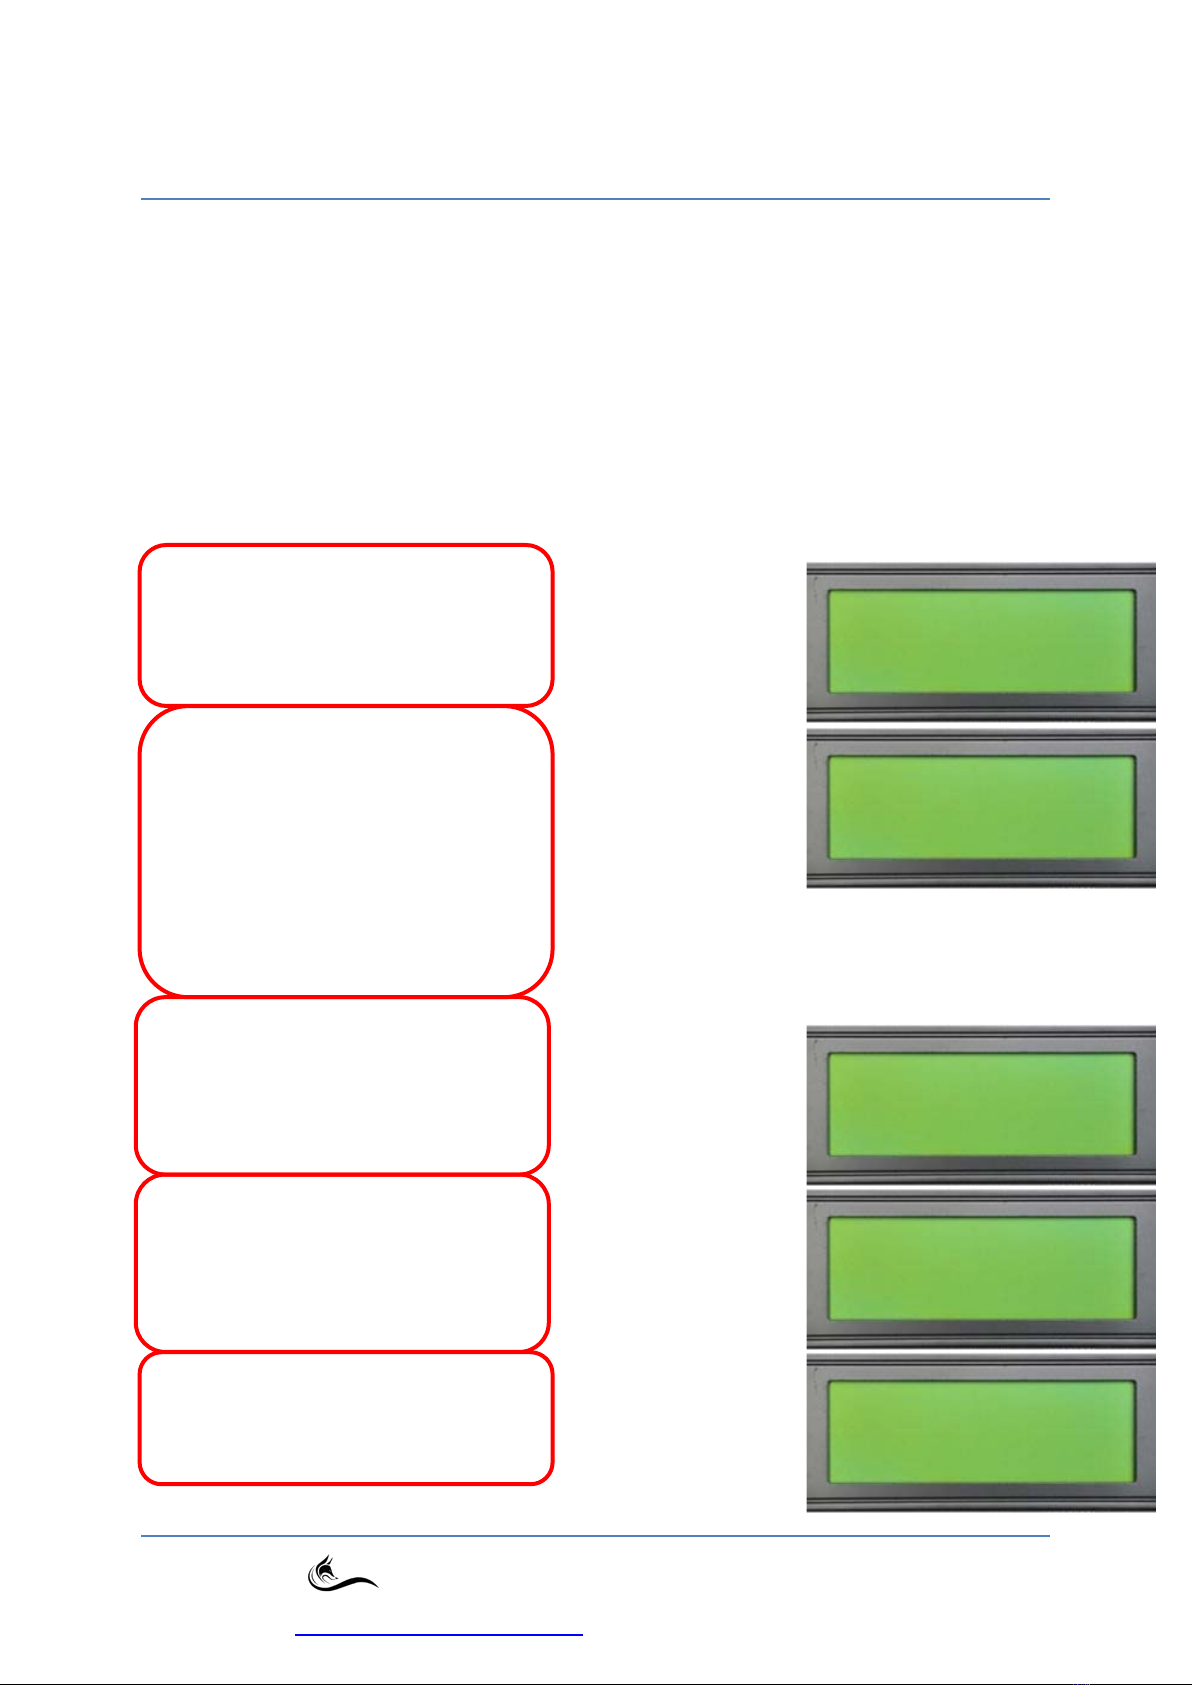
HOME Screen Sub Menus (1 of 5)
* MANUAL CONTROL (Page 3)
* Doors
* Nest Box Gates
* Lights
*SYSTEM CONFIG
* Set Clock (Page 4)
* Adjust DST/DLS (Page 4)
* External Alarm (Page 4)
* WIND SENSOR (Page 5 & 6)
* Restore Defaults (Page 6)
* Reset Controller (Page 7)
* Unit ID (Future Development)
* Network ID (Future Development)
* PWR Failure LOG (Version 0.7 and above)
* DOORS
* Auto Mode (Page 7)
* AUTO TIMES (Page 7)
* Open Interval (Page 8)
* Close Interval (Page 8)
* Voltage Lockout (Page 8)
* NEST BOX GATES
* Auto Mode (Page 8)
* AUTO TIMES (Page 9)
* Open Interval (Page 9)
* Close Interval (Page 9)
* Voltage Lockout (Page 9)
* LIGHTS
* Auto Mode (Page 10)
* AUTO TIMES (Page 10)
* Voltage Lockout (Page 10)
HOME
*MANUAL CONTROL
HOME
*SYSTEM CONFIG
HOME
* NEST BOX GATES
Home
*DOORS
home
*LIGHTS

3
FarmTronics AUSTRALIA Rev: 05112021-0.2
The Den, 100 Fox Drive, Dandenong South. Victoria. 3175.
www.farmtronics.com.au Phone: 0411 479 411
Manual Control Menu
The Manual Control Menu allows the user Manual Control of the Doors, Nest Box Gates and Lights.
Manual Control can still be used even when the ChickenMaster is in the AUTO OFF mode.
*MANUAL CONTROL
* Doors
Open or Close
(Press & HOLD the UP button to OPEN or Down button to CLOSE)
* Nest Box Gates
Open or Close
(Press & HOLD the UP button to OPEN or Down button to CLOSE)
* Lights
On or Off
(Press UP button ONCE to turn ON or DOWN button to turn OFF)
Considerations when using the MANUAL CONTROL mode
Example: If you manually switch the lights OFF while they are in a scheduled ON cycle, then when
the next scheduled cycle that requires the lights to come back ON arrives the lights will switch back
ON overriding your MANUAL OFF intervention.
NOTE: If you are trying to manually control an item and VOLTAGE LOCKOUT is displayed.
This means that the Voltage Lockout feature has come into effect and will not allow the user to
manually control any functions.
The voltage lockouts have the following default settings
DOORS = 0.00 Volts (i.e. NO Voltage Lockout, DEFAULT SETTING)
NEST BOX GATES = 0.00 Volts (i.e. NO Voltage Lockout, DEFAULT SETTING)
LIGHTS = 11.0 Volts (i.e. Lights will be LOCKED OUT when the battery Voltage gets
below 11 Volts, DEFAULT SETTING)
So with the above DEFAULT settings the DOORS and NEST BOX GATES are preferred to always
function regardless of the Battery Voltage, but the LIGHTS will be sacrificed if the VOLTAGE level
drops below 11.0 Volts.
MANUAL CONTROL
* DOORS
* NEST BOX GATES
* LIGHTS

4
FarmTronics AUSTRALIA Rev: 05112021-0.2
The Den, 100 Fox Drive, Dandenong South. Victoria. 3175.
www.farmtronics.com.au Phone: 0411 479 411
System Configuration Menu
The System Configuration Menu allows the user to program most of the fundamental settings
required by the ChickenMaster such as the AUTO TIME parameters, ALARM and WIND sensor
settings.
Please note that most of these settings are FACTORY set and the only requirement is for the User to
enter their Local TIME and any AUTO TIME preferences for the External Doors and Lights.
Most remaining default settings should suffice and there is no need to make further changes.
The System Configuration Menu has the following menu structure as indicated below.
Set Clock
Allows setting of your current time in a 24 Hour Format i.e. HH:MM
Use the arrow keys to scroll to the correct time then press MENU/OK
Adjust DST/DLS
Adjustment for Daylight Saving Time.
All User AUTO TIME scheduled settings will also move forward or back by either One hour or
30 minutes depending on the values selected.
External Alarm (Default = Normally OPEN Contact)
The External Alarm can be programmed to interact with either a Normally Open or Normally Closed
potential free contact.
An example of this would be a float switch in a water tank which can monitor the water level and let
you know when the water level is low.
SYSTEM CONFIG
* SET CLOCK
* ADJUST DST/DLS
* EXTERNAL ALARM
* WIND SENSOR
* RESTORE DEFAULT
* RESET CONTROL
* UNIT ID
* NETWORK ID
* PWR FAILURE LOG
For setting your current time
Restores Factory Default Settings
Reboots the Controller
Future Development
Future Development
Indication & Resetting of the Power Failure Log
Daylight Saving Time Settings - Sub menu
External Alarm Input Settings - Sub Menu
Wind Anemometer Settings - Sub Menu

5
FarmTronics AUSTRALIA Rev: 05112021-0.2
The Den, 100 Fox Drive, Dandenong South. Victoria. 3175.
www.farmtronics.com.au Phone: 0411 479 411
System Configuration Menu (Continued)
Wind Sensor
Wind Sensor (Anemometer) settings menu allows the user to make adjustments to certain
parameters when a Wind Anemometer is being used.
This option is only suitable for use with a FT-WS Wind Sensor available from FarmTronics Australia.
Please NOTE: Making adjustments to any of the following parameters without a complete
understanding of their functions can cause damage to the Automated External Doors.
WARNING
The Automated Doors can close unexpectedly when a wind sensor is connected.
If you are intending to work inside the caravan behind an automated door you must switch the
ChickenMaster to the AUTO OFF Mode.
(Remember to switch it back to the AUTO Mode when you have completed your tasks)
Mode (Default = ENABLED)
Allows the USER to ENABLE or DISABLE the WIND SENSOR Function.
Speed Lockout (Default = 25Km per Hour)
Sets the Wind Speed Trigger point at which the WIND SENSOR would start to close the Automatic
External Doors to the programmed Wind Safe Position.
Lockout Interval (Default = 15 Minutes)
LOCKOUT INTERVAL is programmable between 0-99 Minutes and is used to avoid unnecessary
cycling of the External Doors and conserve battery voltage.
The timer will keep resetting to the Lockout Interval Value whenever a wind gust trigger point is
reached.
If there are ZERO events during the Lockout Interval then the External Doors will revert back to their
normal positions.
Wind sensor
* mode
* speed lockout
* lockout interval
* door position
ENABLES or DISABLES the Wind Sensor feature
Sets the Wind Speed Lockout Value in KPH
Sets the Wind Speed Lockout Interval in Minutes
Sets the DOOR Open & Close Wind Safe Positions

6
FarmTronics AUSTRALIA Rev: 05112021-0.2
The Den, 100 Fox Drive, Dandenong South. Victoria. 3175.
www.farmtronics.com.au Phone: 0411 479 411
System Configuration Menu (Continued)
Wind Sensor (Continued)
Door Position
Adjustments for the Automatic External Doors when a Wind event has been triggered.
Open Run Time (Default = 15 Seconds)
Time period the Automatic External Doors will travel if a Wind event is Triggered during a
morning scheduled OPEN Event.
The ChickenMaster will do a Wind Speed Measurement 15 minutes prior to an AUTO TIME
DOOR OPEN event and if the WIND SPEED Trigger point is reached then it will only open the
doors to the appropriate OPEN RUN TIME value which places them in a Wind Safe Position.
Close Run Time (Default = 15 Seconds)
Time period that the Automatic External Doors will run if a Wind event is Triggered and the
doors are in an already scheduled OPEN state.
In other words the doors will close to the Wind Safe Position.
Things to consider:
1: Most Linear Actuators have a travel time from fully Closed to fully Open of 50 seconds.
So if you set the OPEN RUN TIME to 25 Seconds, this means that the doors will motor to a 1/2 Open
Position.
2: If you manually adjust the Automatic External Doors via the MANUAL MODE menu and a Wind
Event is triggered then the doors will go to the respective Wind Safe Position hence overriding the
MANUAL MODE position.
Restore Defaults
* SYSTEM CONFIG
* Restore Defaults (Restores Factory Default Settings)
Allows the user to restore the ChickenMaster back to Factory Defaults.
The Default Setting is NO changing this to YES and pressing the MENU/OK button will restore the
Factory defaults.
The Local Time is NOT adjusted.
All other previously programmed User settings will be erased and the Factory Defaults will be
installed.

7
FarmTronics AUSTRALIA Rev: 05112021-0.2
The Den, 100 Fox Drive, Dandenong South. Victoria. 3175.
www.farmtronics.com.au Phone: 0411 479 411
System Configuration Menu (Continued)
Reset Controller
* SYSTEM CONFIG
* Reset Controller (Reboots the Controller)
Allows the user to Reboot the ChickenMaster.
The Default Setting is NO changing this to YES and pressing the MENU/OK button will power down
and restart the ChickenMaster.
Please Note: Resetting/Rebooting the ChickenMaster does not erase any of the User Programmed
settings.
Automatic External Doors Menu
The DOORS menu allows the user to program the Auto Times and other parameters for the
Automatic External Doors.
Auto Mode (Default = ENABLED)
Allows the USER to ENABLE or DISABLE the Automatic External Doors feature.
Auto Times
Auto Times have two Settings.
1. Automatic Doors OPEN Time.
2. Automatic Doors CLOSE Time.
* DOORS
* AUTO TIMES
* Door Open 05:00 (Default)
* Door Close 21:00 (Default)
doors
* auto mode
* auto times
* open interval
* close interval
* VOLTAGE LOCKOUT
ENABLES or DISABLES the External DOORS feature
Sets the DOOR OPEN & CLOSE Times
Sets the DOOR Open Interval in Seconds
Sets the DOOR Close Interval in Seconds
Sets the DOOR Voltage Lockout Value

8
FarmTronics AUSTRALIA Rev: 05112021-0.2
The Den, 100 Fox Drive, Dandenong South. Victoria. 3175.
www.farmtronics.com.au Phone: 0411 479 411
Automatic External Doors Menu (Continued)
Open Interval (Default = 60 Seconds)
Time Interval that the Automatic External Doors will run when a scheduled AUTO DOOR OPEN event
is triggered.
Close Interval (Default = 60 Seconds)
Time Interval that the Automatic External Doors will run when a scheduled AUTO DOOR CLOSE event
is triggered.
Voltage Lockout (Default = 0.00 Volts NO Lockout)
VOLTAGE LOCKOUT feature does not allow the Automatic External Doors to move once the Voltage
Lockout trigger point has been reached.
The default setting for this is 0.00 Volts, so NO VOLTAGE LOCKOUT which gives the doors preference
regardless of the battery voltage.
Nest Box Gates Menu
NEST BOX GATES menu allows the user to program the Auto Times and other parameters for the
Nest Box Gates.
Auto Mode (Default = ENABLED)
Allows the User to ENABLE or DISABLE the Nest Box Gates feature.
Nest box gates
* auto mode
* auto times
* open interval
* close interval
* VOLTAGE LOCKOUT
ENABLES or DISABLES the NEST BOX GATES feature
Sets the GATES OPEN & CLOSE Times
Sets the GATES Open Interval in Seconds
Sets the GATES Close Interval in Seconds
Sets the GATES Voltage Lockout Value

9
FarmTronics AUSTRALIA Rev: 05112021-0.2
The Den, 100 Fox Drive, Dandenong South. Victoria. 3175.
www.farmtronics.com.au Phone: 0411 479 411
Nest Box Gates Menu (Continued)
Auto Times
The Auto Time function has two Settings.
1. Nest Box Gates OPENING Time
2. Nest Box Gates CLOSING Time.
* NEST BOX GATES
* AUTO TIMES
* Nest Boxes Open 04:00 (Default)
* Nest Boxes Close 16:00 (Default)
Open Interval (Default = 60 Seconds)
Time Interval that the Nest Box Gates will run when an AUTO NEST BOX OPEN event is Triggered.
Close Interval (Default = 60 Seconds)
Time Interval that the Nest Box Gates will run when an AUTO NEST BOX CLOSE event is Triggered.
Voltage Lockout (Default = 0.00 Volts NO Lockout)
VOLTAGE LOCKOUT feature does not allow the Nest Box Gates to move once the Voltage Lockout
trigger point has been reached.
The default setting for this is 0.00 Volts, so NO VOLTAGE LOCKOUT which gives the Nest Box Gates
preference regardless of battery voltage.
Lights Menu
LIGHTS menu allows the user to program the Auto Times and other parameters for the Lights.
Lights Menu (Continued)
LIGHTS
* auto mode
* auto times
* VOLTAGE LOCKOUT
ENABLES or DISABLES the LIGHTS feature
Sets the AM/PM ON & OFF Times
Sets the LIGHTS Voltage Lockout Value

10
FarmTronics AUSTRALIA Rev: 05112021-0.2
The Den, 100 Fox Drive, Dandenong South. Victoria. 3175.
www.farmtronics.com.au Phone: 0411 479 411
Auto Mode (Default = ENABLED)
Allows the USER to ENABLE or DISABLE this feature.
Auto Times
The Auto Time function has Four Settings.
1. Lights ON in the morning.
2. Lights OFF in the morning.
3. Lights ON in the evening.
4. Lights OFF in the evening.
* LIGHTS
* AUTO TIMES
* Lights AM On 05:00 (Default)
* Lights AM Off 07:30 (Default)
* Lights PM On 17:00 (Default)
* Lights PM Off 20:00 (Default)
Voltage Lockout (Default = 11.0 Volts)
The VOLTAGE LOCKOUT feature does not allow the Lights to switch ON once the Voltage Lockout
trigger point has been reached.
The default setting is 11.00 Volts, when the voltage is below this level the lights will be locked out
and not allowed to operate.
Electrical Connections
Table of contents