Fast XFI eDash User manual

1
Part #???
Revised ??????
Part # FAST4-207
Revised 6/16/14
FAST™
3400 Democrat Rd.
Memphis, TN 38118
Phone: 901.260.3278
Toll Free: 1.877.334.8355
www.fuelairspark.com
XFI eDash
PN 301517
Thank you for choosing FAST™products; we are proud to be your manufacturer of choice. Please
read this instruction sheet carefully before beginning installation, and also take a moment to review the
included limited warranty information. Contact us toll free at 1.877.334.8355 or at
www.fuelairspark.com under Tech Help with any questions.
QTY
PART#
DESCRIPTION
1
301517B
eDash
1
30310
Handheld Cable
1
30319
Handheld Cable to CALPORT Adapter
1
30321
XFI 2nd Comm Port Pigtail
1
30493
Suction Cup Mount
1
170671
USB Cable, A to Mini-B
eDash Notes
•The mini-USB port on the top of the eDash is used to connect the eDash to a computer in the
event that an eDash update becomes available. The supplied USB cable is not used in normal
operation of the eDash.
•Please do not attempt to operate the eDash while driving. For safety, have a passenger monitor
live data or adjust settings as needed if the vehicle is moving.
•The eDash is compatible with mounting brackets that fit a Garmin Nuvi 2455LT GPS unit. A
suction cup mount for the eDash is included in the kit.
•The eDash has a touch screen calibration procedure that can be accessed by pressing and
continuing to hold anywhere on the screen as the eDash is powered on. After about 4 seconds,
the calibration screen will appear and walk you through the short calibration process. The
purpose of this calibration is to sync up the touch sensitive screen with the graphics on the
display so that where you see a “button” on the screen is also where you need to touch to select
INSTRUCTIONS

2
Part #???
Revised ??????
Part # FAST4-207
Revised 6/16/14
FAST™
3400 Democrat Rd.
Memphis, TN 38118
Phone: 901.260.3278
Toll Free: 1.877.334.8355
www.fuelairspark.com
it. This calibration is performed at the factory. It is unlikely that it will ever need to be
repeated.
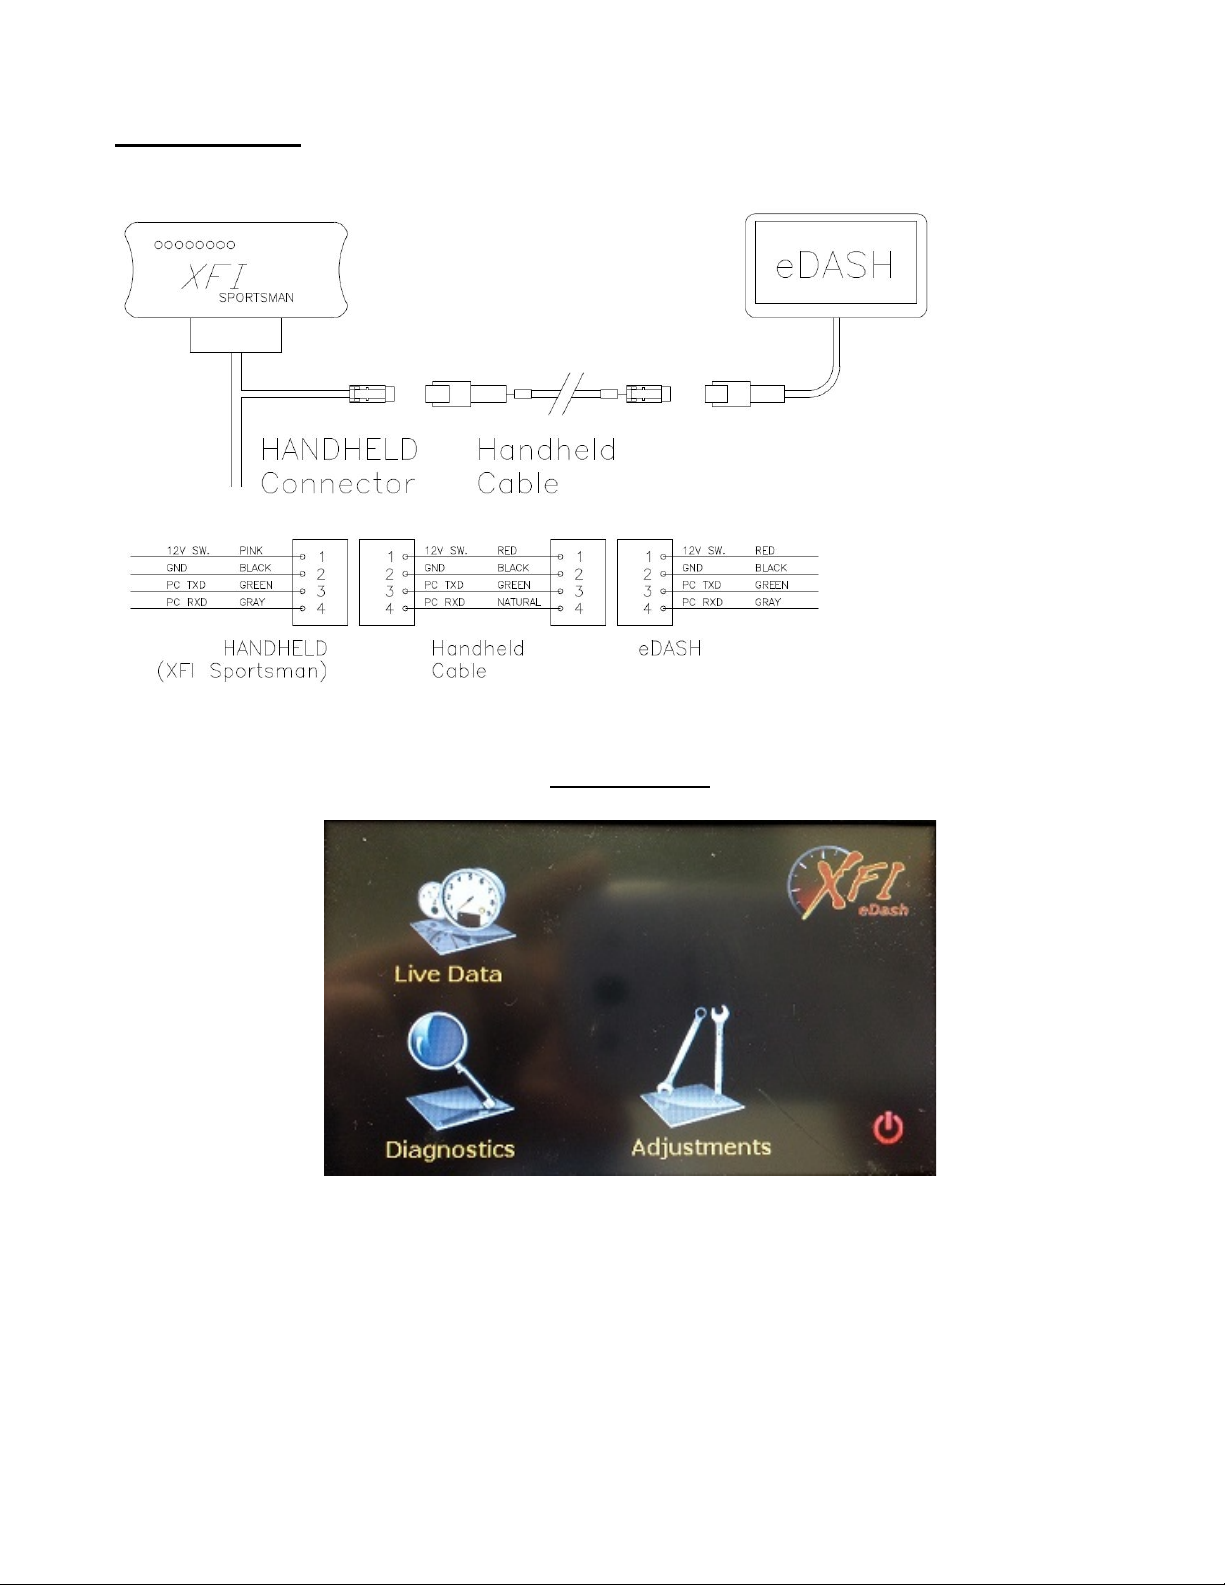
Wiring Connections
A long handheld cable is supplied to connect the eDash to the ECU’s harness.
XFI 2.0
When using an eDash with an XFI 2.0 ECU, there are two options for connecting the handheld cable.
The first is using the supplied adapter to connect the handheld cable to the CALPORT connector on
the ECU harness. The adapter has a loose pink wire that needs to be connected to a switched 12V
source to power the eDash.

3
Part #???
Revised ??????
Part # FAST4-207
Revised 6/16/14
FAST™
3400 Democrat Rd.
Memphis, TN 38118
Phone: 901.260.3278
Toll Free: 1.877.334.8355
www.fuelairspark.com
The second option is to install the supplied pigtail to access the XFI’s 2nd Comm port. The handheld
cable will connect to the installed pigtail. Again, there is a loose pink wire that needs to be connected
to a switched 12V source to power the eDash.
When the 2nd Comm port is used for the eDash, the CALPPORT connector is left available for
connecting to a laptop. This way, both an eDash and a laptop can be connected simultaneously.
XFI firmware “XFI_Flash_B1.xfi” (March 2014) or later is required to enable the XFI’s 2
nd Comm
port.

4
Part #???
Revised ??????
Part # FAST4-207
Revised 6/16/14
FAST™
3400 Democrat Rd.
Memphis, TN 38118
Phone: 901.260.3278
Toll Free: 1.877.334.8355
www.fuelairspark.com
Pigtail installation:
1. Remove the C (31 pin blue) and D (16 pin gray) connectors from the XFI.
2. There are white locks in the connectors that need to be slid out about 1/16” to allow new wires
to be inserted. It is easiest to slide the locks out by pushing down through the top of the
connectors. Pictured below is the bottom side of a connector with the lock slid out and ready to
accept new wires.
3. With the white locks slid out, insert the three wires with XFI terminals into the XFI connectors.
They should lock into place.
•Black – D5
•Green – C30
•Gray – C31
4. After the new wires are inserted, press the white locks on the connectors back into place so that
they are flush with the connector bodies.
5
Part #???
Revised ??????
Part # FAST4-207
Revised 6/16/14
FAST™
3400 Democrat Rd.
Memphis, TN 38118
Phone: 901.260.3278
Toll Free: 1.877.334.8355
www.fuelairspark.com
XFI Sportsman
When using an eDash with an XFI Sportsman ECU, the handheld cable connects directly to the
HANDHELD connector on the ECU harness.
eDash Screens
Home Screen
Live Data
Pressing the Live Data icon navigates to a series of dashes that display live ECU data.
Diagnostics
The Diagnostics area offers access to error codes and other system information and tools.
Adjustments
The Adjustments menu allows access to the adjustments and settings that the eDash provides.

6
Part #???
Revised ??????
Part # FAST4-207
Revised 6/16/14
FAST™
3400 Democrat Rd.
Memphis, TN 38118
Phone: 901.260.3278
Toll Free: 1.877.334.8355
www.fuelairspark.com
Screen Disable
This button turns the screen blank. Touching anywhere on the screen will bring back the normal
display.
Live Data
The Live Data section of the hand-held consists of a series of dashes that display live ECU data.
To switch between dashes or to return to the home screen, use the tabs at the bottom of the screen. The
text will highlight green to indicate the current screen.
Across the top of every dash are 4 LEDs that indicate the following:
LABEL
DESCRIPTION
OFF
ON
Learning
This indicates that all of the enable conditions for
learning are met and that learning is currently
enabled. This can be used as feedback to give the
driver a feel for when the ECU will or will not learn.
Gray
Green
O2 On
The oxygen sensor has been initialized and is
providing feedback to the ECU. This must be ON
before closed loop fuel control is possible.
Gray
Green
Nitrous
The Power Adder Enable input has been
activated.
Gray
Green
Error
The ECU’s on-board diagnostics has detected a
problem. Refer to the Codes screen in the
Diagnostics section of the eDash to determine
what code has been set.
Gray
Red
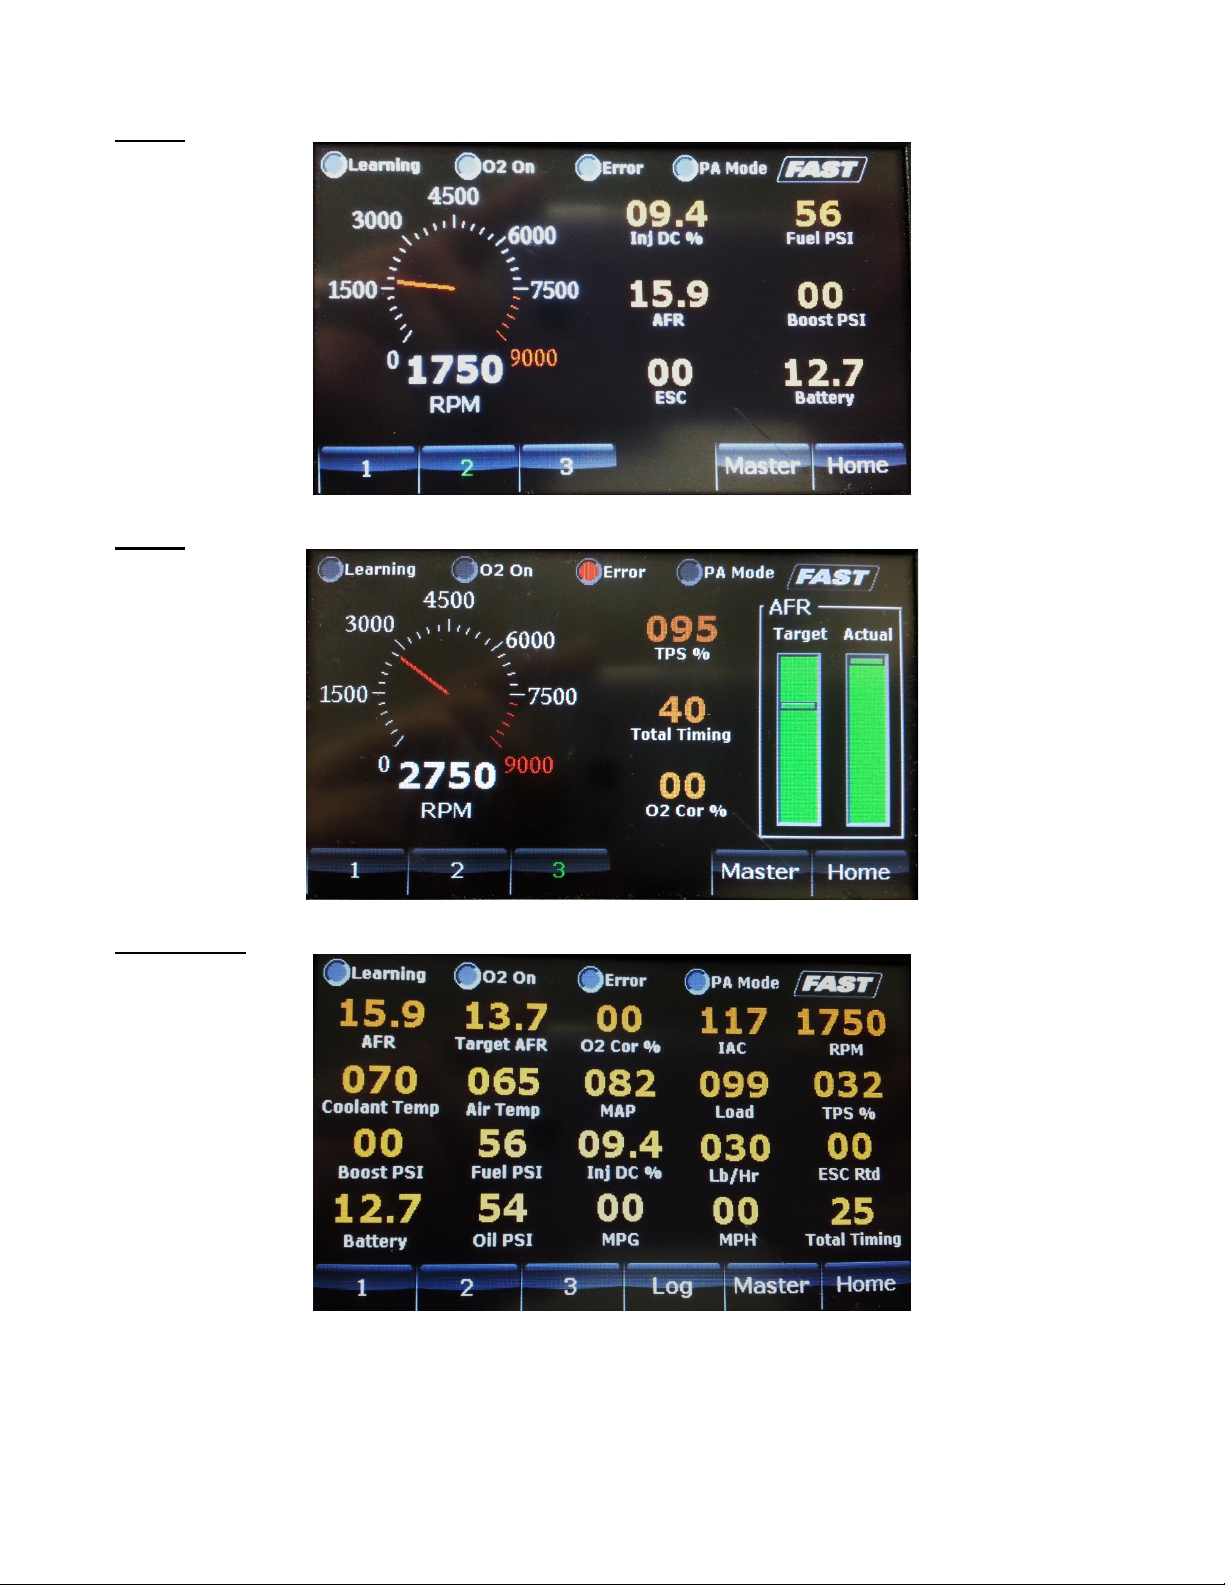
Dash 1
7
Part #???
Revised ??????
Part # FAST4-207
Revised 6/16/14
FAST™
3400 Democrat Rd.
Memphis, TN 38118
Phone: 901.260.3278
Toll Free: 1.877.334.8355
www.fuelairspark.com
Dash 2
Dash 3
Master Dash
The Master Dash is designed for easy viewing of all sensors and user accessible values that the eDash
will view. For example, this dash may be used as an overview to quickly verify that all sensors are
reading expected values.

8
Part #???
Revised ??????
Part # FAST4-207
Revised 6/16/14
FAST™
3400 Democrat Rd.
Memphis, TN 38118
Phone: 901.260.3278
Toll Free: 1.877.334.8355
www.fuelairspark.com
Logging
The eDash is capable of logging. It will log the minimum and maximum values of all of the sensors
displayed on the Master Dash. To operate this feature, press the Log button at the time you wish to
start the logging function. The Master button will now display the text Logging, indicating that it is
recording all minimum and maximum values that are being shown on the dash. There is no time limit
on logging, as it is only keeping track of minimums and maximums. To stop the logging function,
press the Stop button. The Stop button will now indicate if the minimum or maximum values are being
displayed on the screen. To see the next values press the Min or Max button. To clear the log and
prepare for a new logging session, press the Clear button. The Clear button returns the Master button
and you can now start a new log by pressing the Log button.
DATA LABEL
DESCRIPTION
AFR
Air/Fuel Ratio. The reading from the wideband oxygen sensor.
Air Temp
This is the temperature of the air entering the throttle body.
Battery
Battery voltage.
Boost PSI
Displays the Boost reading in pounds for square inch.
Coolant Temp
This is the temperature of the engine.
ESC Rtd
ESC Retard displays the amount of timing in degrees that the XFI is pulling
from the commanded timing value due to knock, if you are using the knock
sensor input.
Fuel PSI
Displays Fuel pressure in PSI, if a fuel pressure sensor is being used on the
pre-setup fuel pressure channel of the XFI.
IAC
Idle Air Control. This is the position of the idle motor. At idle, it will move around
to maintain the target idle speed. Displayed in “counts”. Higher counts mean
the idle motor is open more and allowing more air to bypass the throttle blades.
Its range is from 5 to 180.
Inj DC %
Injector duty cycle. This is a comparison of how long the injectors are open compared
to how much total time is available for them to be open. At higher RPM, there is less
time between injector openings. If this reaches 100%, it means the injectors
physically cannot flow any more fuel. They are already being held wide open.
Lb/Hr
Current total fuel flow rate into the engine. Given in pounds per hour. This can
be used to get a rough approximation of current engine power.
Horsepower = Fuel Flow (lbs/hr) x 2
Load
Calculated Load. A comparison of the current manifold pressure vs. the ambient
atmospheric pressure. Unlike the reading from the MAP sensor –which is affected
by altitude –Load should always be consistent. That is, wide open throttle should
always be around 100% regardless of altitude and ambient atmospheric pressure.
MAP
Manifold Absolute Pressure. This is a measure of the load on the engine. It is
displayed in kPa (kilopascals). With the engine off, this will read around 100
kPa. It will drop down when the engine is started.
MPG
Miles per gallon will be displayed if a speed sensor is being used.
MPH
Miles per hour reading from the XFI, if a speed sensor is being used.
O2 Cor %
Current closed-loop correction based on the reading from the wideband oxygen (O2)
sensor. This is the percent of fuel being added (displays as a positive number) or
removed (displays as a negative number) to achieve the target air/fuel ratio.
Oil PSI
Displays Oil pressure in PSI, if an oil pressure sensor is being used on the pre-
setup oil pressure channel of the XFI
RPM
Engine speed
9
Part #???
Revised ??????
Part # FAST4-207
Revised 6/16/14
FAST™
3400 Democrat Rd.
Memphis, TN 38118
Phone: 901.260.3278
Toll Free: 1.877.334.8355
www.fuelairspark.com
Target AFR
Target Air/Fuel Ratio. The ratio the ECU is working to maintain.
Total Timing
The final timing value the engine sees. A timing light should agree with this value.
TPS %
Throttle Position Sensor. This tells you how far the throttle blade(s) are open.
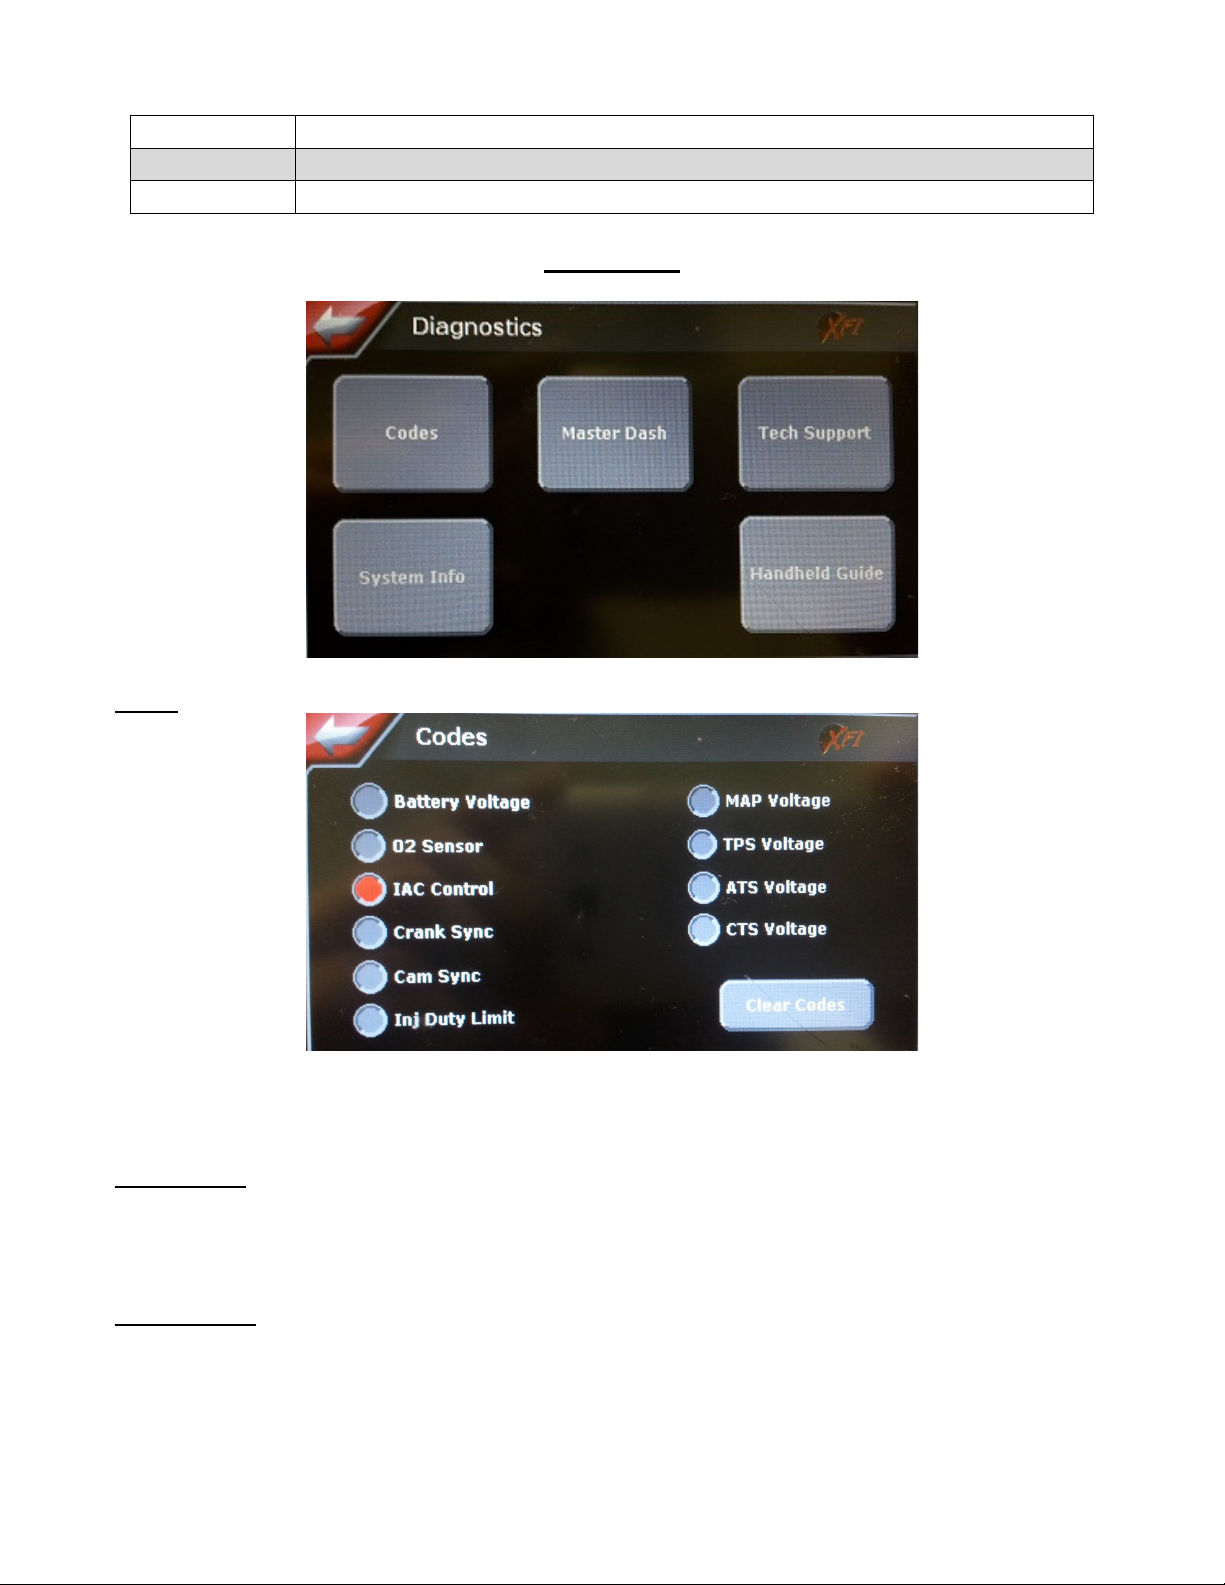
Diagnostics
Codes
When an error code is set, the “Error” LED displayed on the eDash’s Live Dashes will turn on. If that
happens, use this screen to find out which code has been set. Codes can also be cleared here.
Master Dash
Brings up the Master Dash for a quick overview of all available sensor readings. See the Live Data
section for more detail.
Tech Support
Provides a list of resources for getting answers to your questions.
10
Part #???
Revised ??????
Part # FAST4-207
Revised 6/16/14
FAST™
3400 Democrat Rd.
Memphis, TN 38118
Phone: 901.260.3278
Toll Free: 1.877.334.8355
www.fuelairspark.com
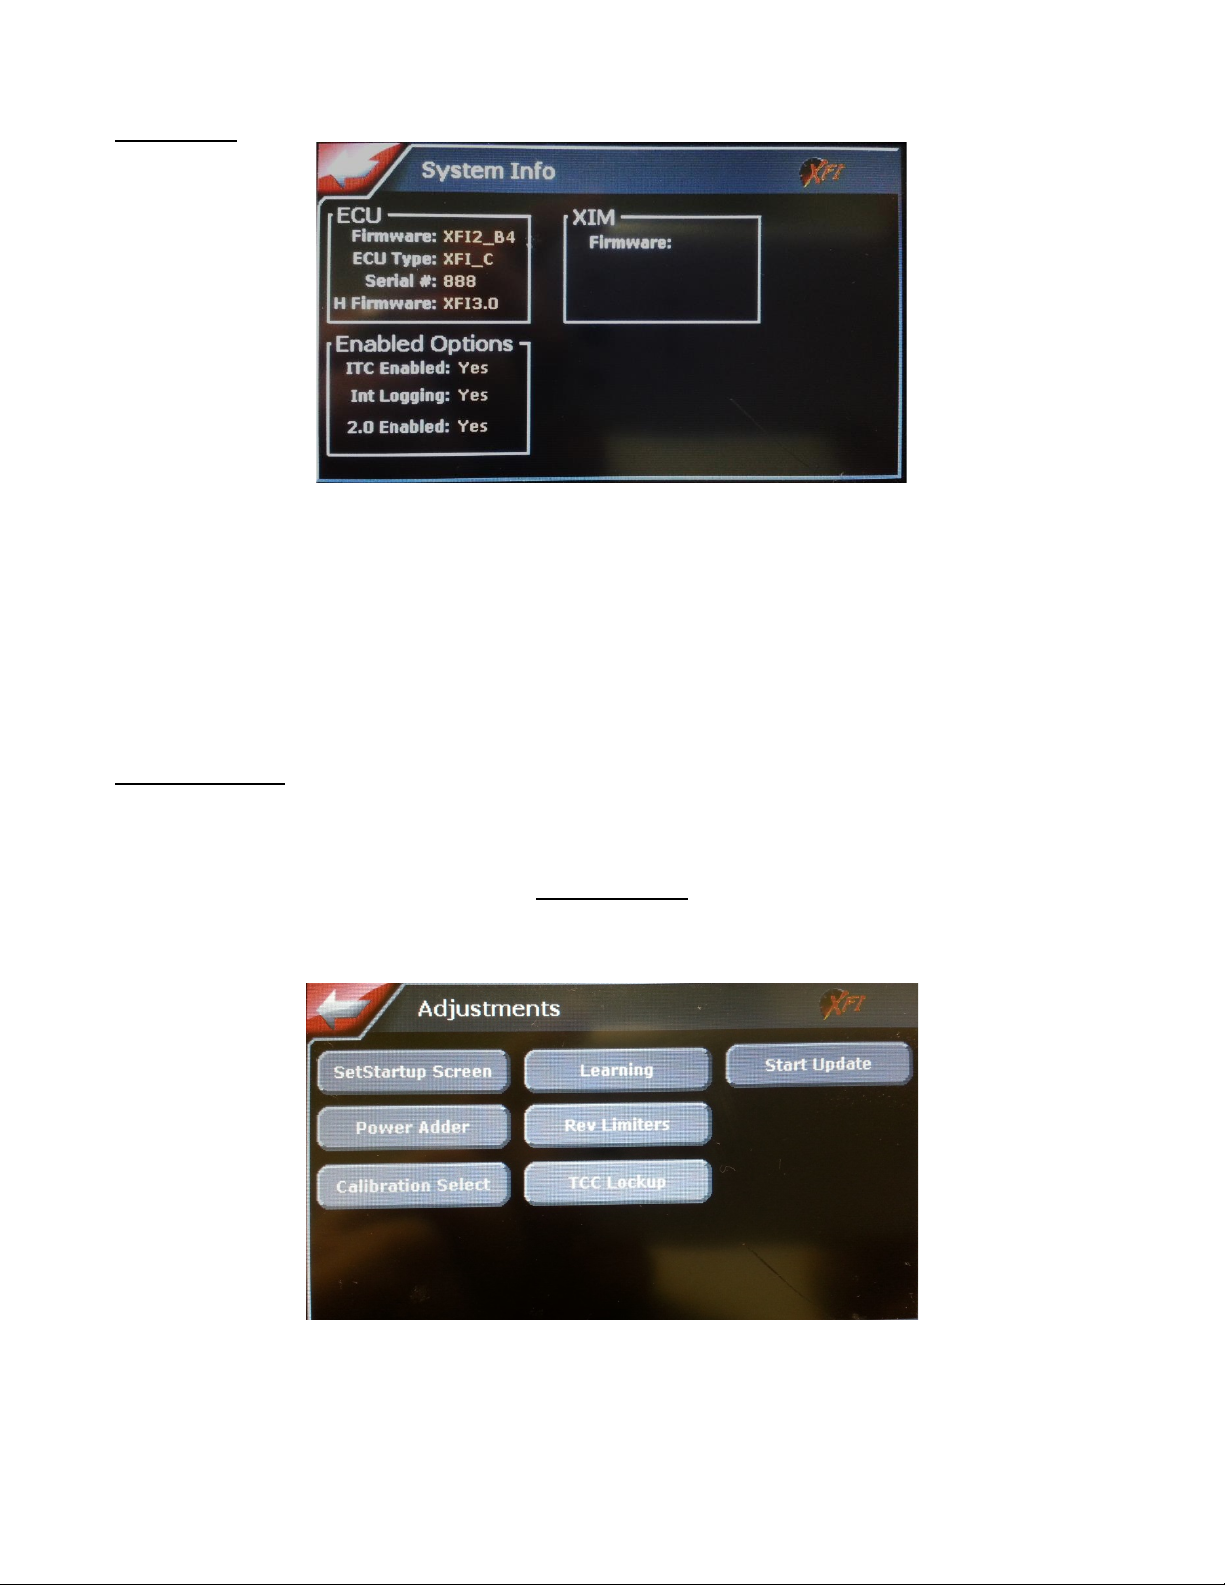
System Info
ECU
This section shows information about the ECU and Handheld.
XIM
This section shows information about the XIM, if being used.
Enabled Options
This section shows what options have been enabled on the XFI.
Hand-Held Help
Provides basic how-to’s related to using the hand-held.
Adjustments
The Adjustments Menu is where you can access the adjustable features in the tune of the ECU.
11
Part #???
Revised ??????
Part # FAST4-207
Revised 6/16/14
FAST™
3400 Democrat Rd.
Memphis, TN 38118
Phone: 901.260.3278
Toll Free: 1.877.334.8355
www.fuelairspark.com
Adjustments Navigation Buttons
“CANCEL”
Discard changes.
Return to
Adjustments
screen.
“CONFIRM”
Save changes.
Return to
Adjustments screen.
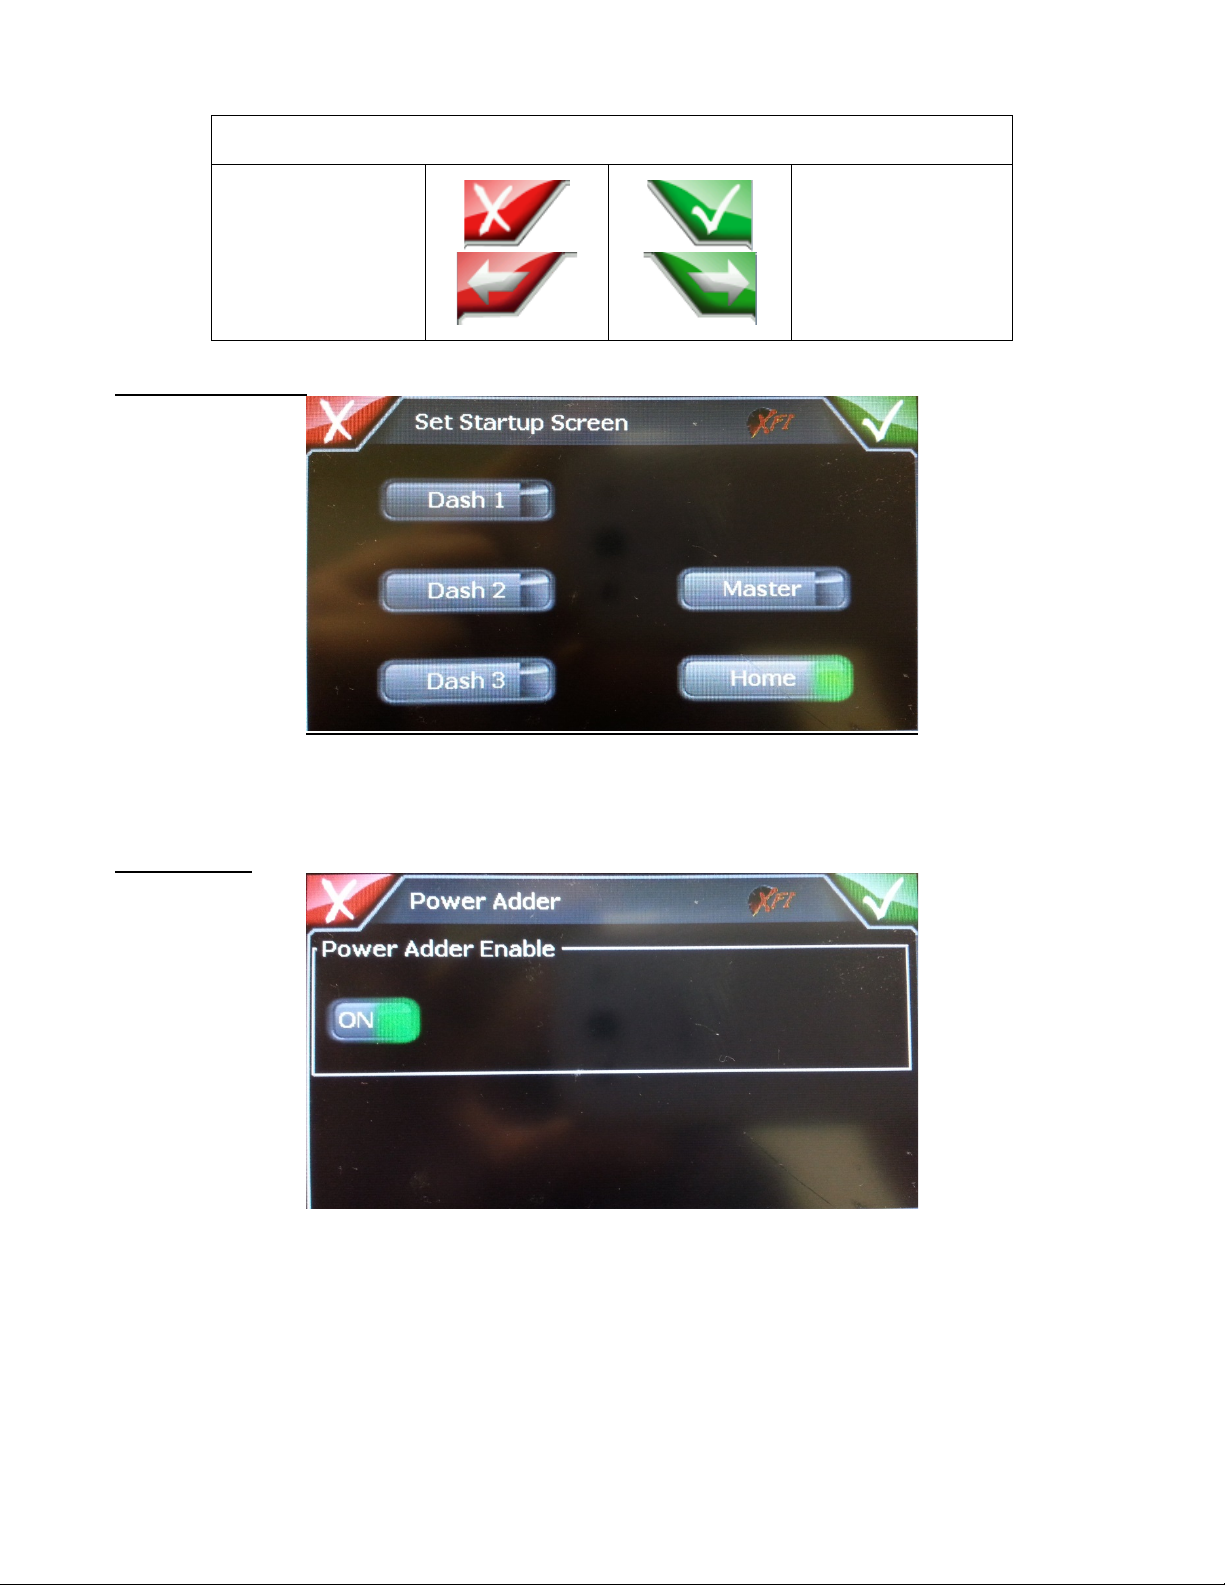
Set Startup Screen
The Set Startup Screen allows you to select the first screen the unit powers up to. The Home screen is
the stock Main Menu screen.
Power Adder
The Power Adder screen will allow the Power Adder Enable to be set to ON or OFF.
12
Part #???
Revised ??????
Part # FAST4-207
Revised 6/16/14
FAST™
3400 Democrat Rd.
Memphis, TN 38118
Phone: 901.260.3278
Toll Free: 1.877.334.8355
www.fuelairspark.com
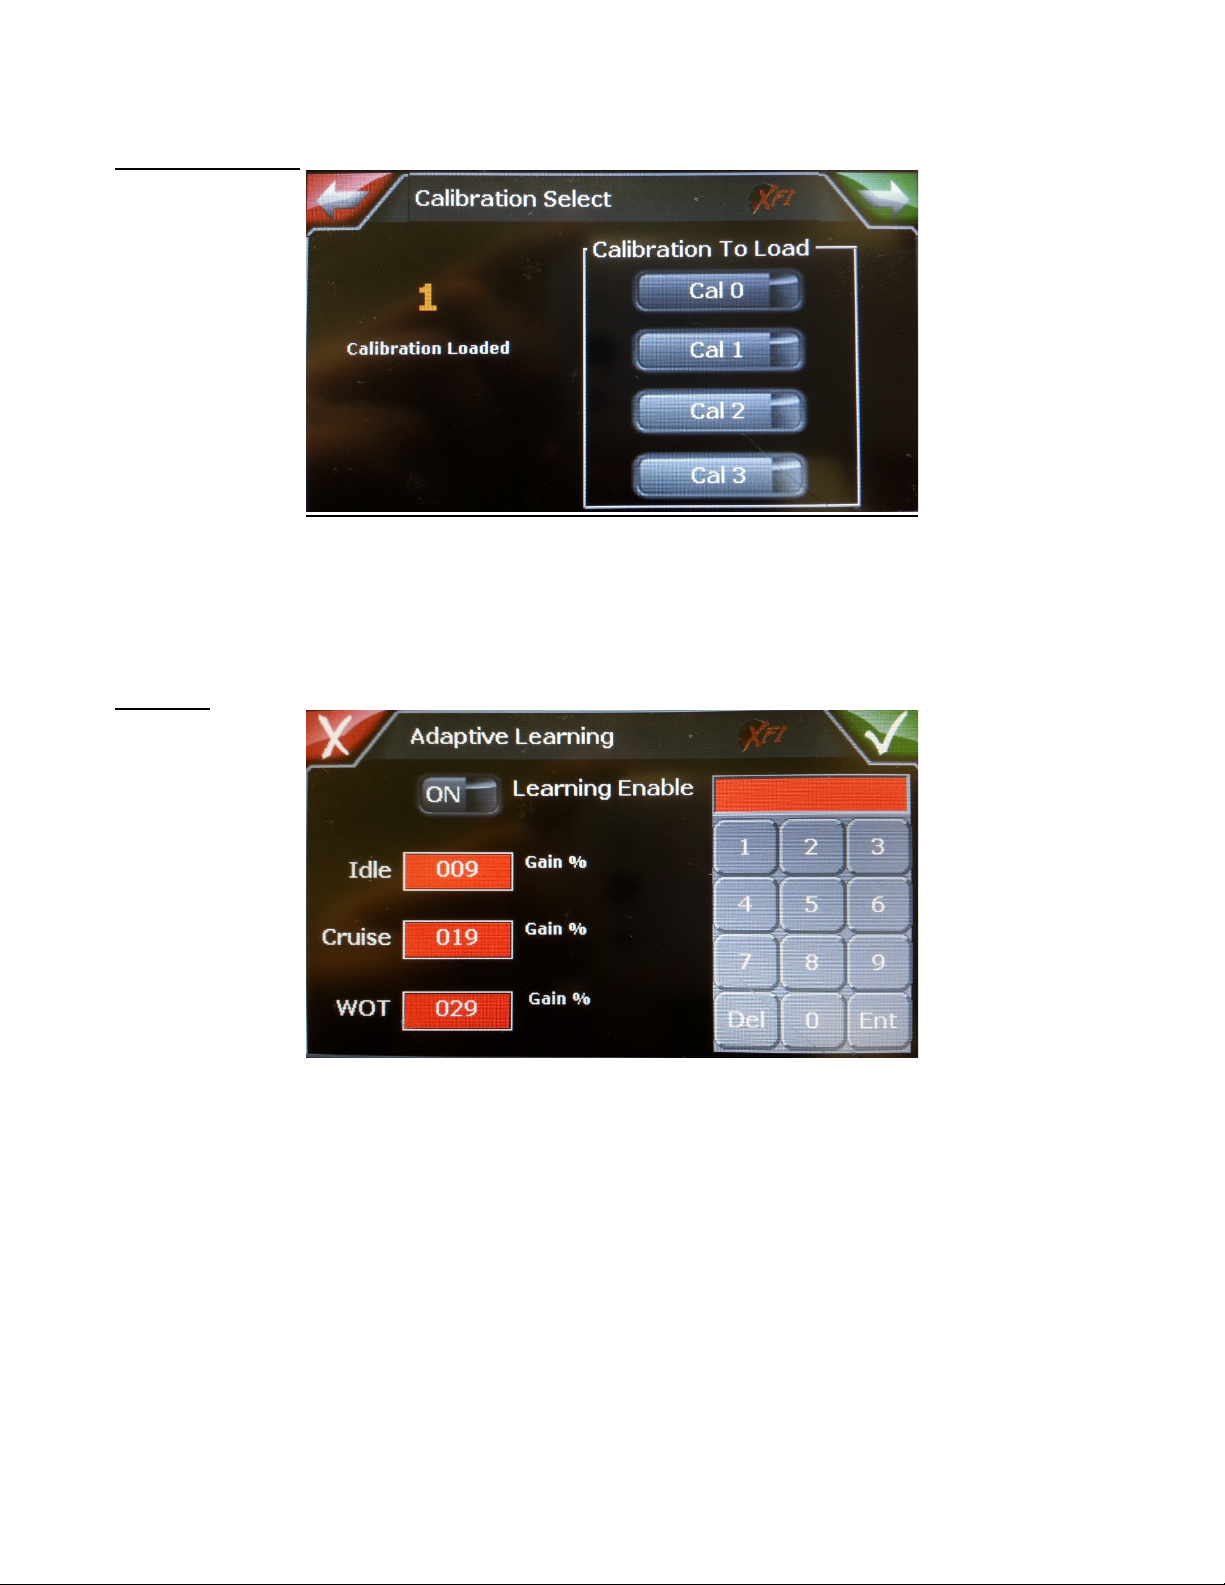
Calibration Select
The Calibration Select screen allows the user to select which calibration the ECU will load, use, and
make changes too. The Calibration Loaded number is the calibration that is currently active. Press the
button indicating the tune you wish to load. WARNING! The new calibration will not be loaded until
the ECU has been powered down (power-cycled).
Learning
The Adaptive Learning screen provides the Adaptive Learning feature to be enabled or disabled. It will
also allow the user to set the learning gain percent by selecting the value to adjust, typing the value on
the keypad, and pressing Enter.
13
Part #???
Revised ??????
Part # FAST4-207
Revised 6/16/14
FAST™
3400 Democrat Rd.
Memphis, TN 38118
Phone: 901.260.3278
Toll Free: 1.877.334.8355
www.fuelairspark.com
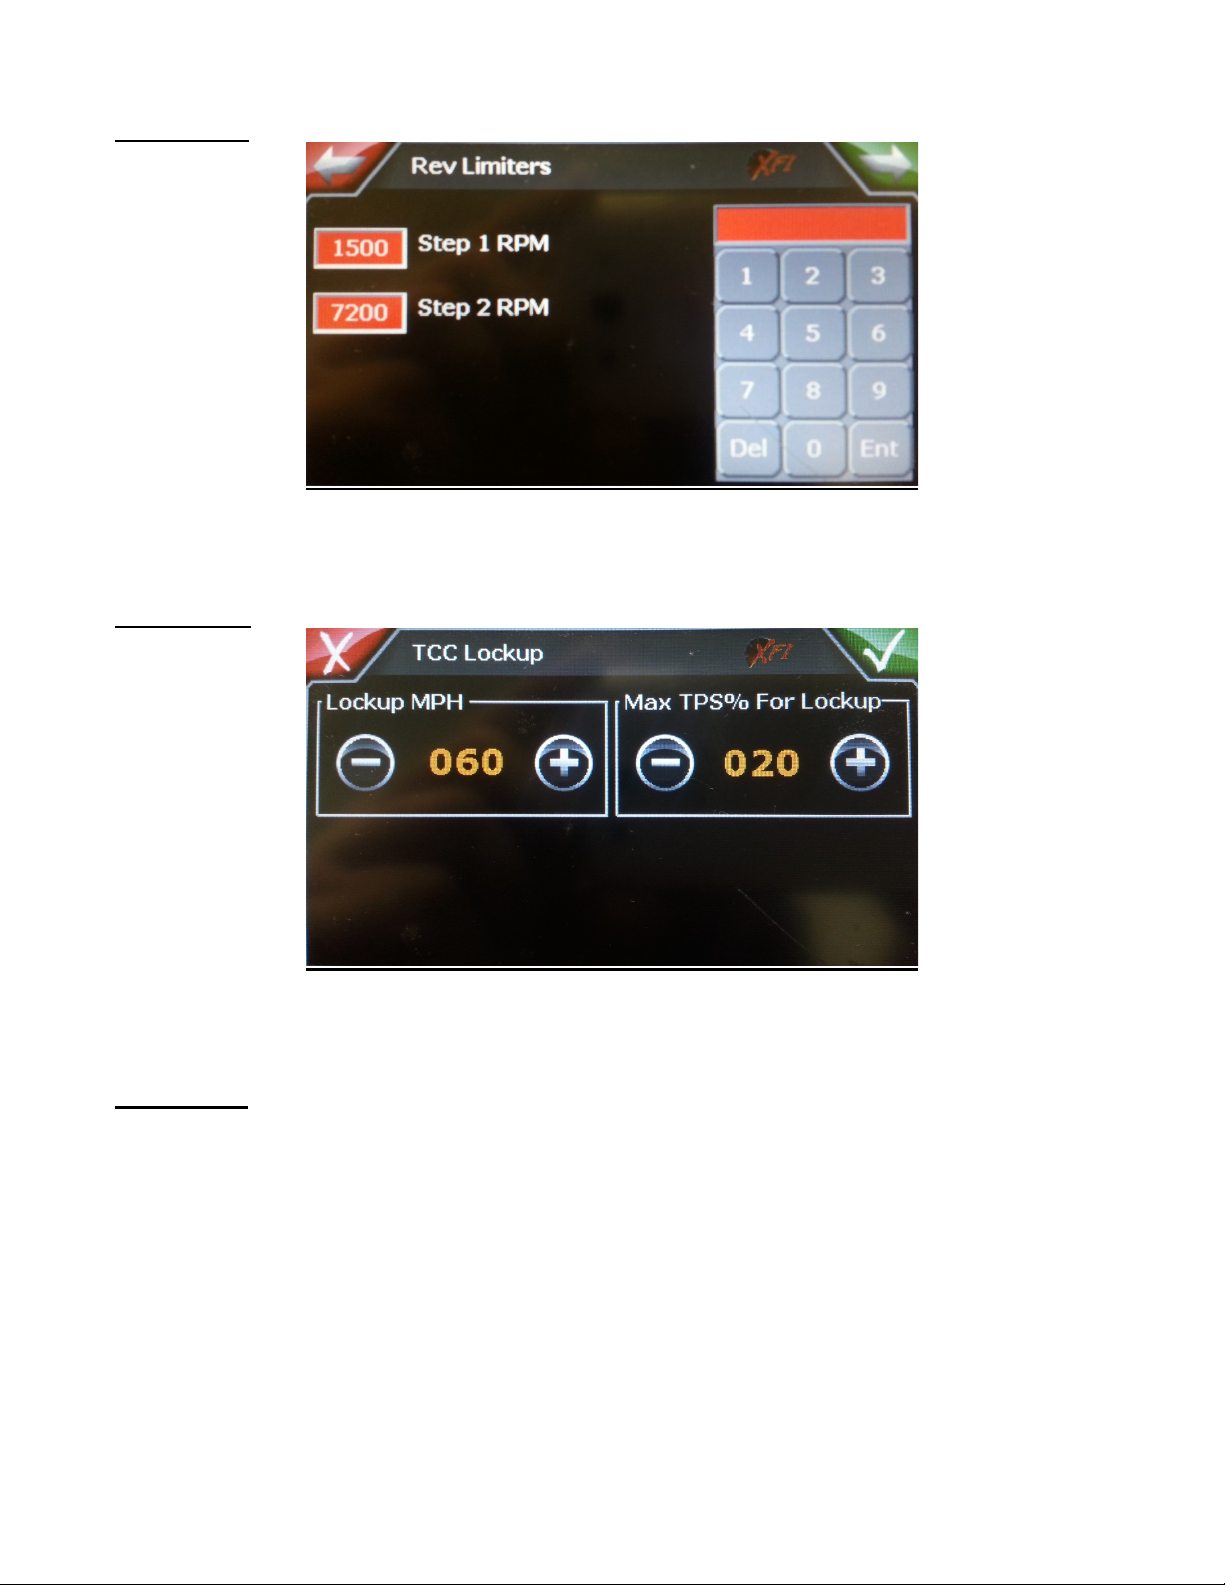
Rev Limiters
The Rev Limiters screen allows for the adjustment of the Rev-limiter 1 and 2. This can be done by
selecting the value to adjust, typing the value on the keypad, and pressing Enter.
TCC Lockup
The TCC Lockup screen sets the minimum MPH required and the Max TPS% allowed for torque
converter lockup.
Start Update
The Start Update button is used when you are updating the handheld’s firmware and graphics with a
new update from FAST.
14
Part #???
Revised ??????
Part # FAST4-207
Revised 6/16/14
FAST™
3400 Democrat Rd.
Memphis, TN 38118
Phone: 901.260.3278
Toll Free: 1.877.334.8355
www.fuelairspark.com
FAST™ LIMITED LIFETIME WARRANTY AND LIMITED WARRANTY
FAST™warrants that its EZ-EFI™products are free from defects in material and workmanship for the lifetime
of the product. This Limited Lifetime Warranty shall cover only the original purchaser. All other FAST™
products are covered by a Limited Warranty which covers defects in material and workmanship for a period of
one year from the date of purchase.
FAST’s obligation under this warranty is limited to the repair or replacement of its product. To make a
warranty claim, the part must be returned directly to FAST™ at the address listed below with a valid Return
Merchant Authorization Number (RMA), freight prepaid. Items covered under warranty will be returned to you
freight collect. To obtain an RMA, call 877-334-8355 to report the issue you are experiencing. At that time,
FAST™will attempt to trouble shoot your issue.
It is the responsibility of the installer to ensure that all of the components are correct before installation.
We assume no liability for any errors made in tolerances, component selection or installation.
There is absolutely no warranty on the following:
A. Any parts used in racing applications or subject to excessive wear;
B. Any product used in marine applications, unless that product is listed by FAST™as a specific
marine product;
C. Any product that has been physically altered improperly installed or maintained;
D. Any product used in improper applications, abused, or not used in conjunction with the proper parts.
There are no implied warranties of merchantability or fitness for a particular purpose. There are no
warranties which extend beyond the description of the face hereof. FAST™will not be responsible for
incidental and consequential damages, property damage or personal injury damages. Where required by
law, implied warranties or merchantability and fitness are limited to terms outline above.
This warranty gives you specific legal rights and you may also have other legal rights which vary from state to
state.
Social Media
Stay up-to-date with the latest FAST™and COMP Performance Group™company and
product information by following us on any of our social media platforms.
This manual suits for next models
1
Table of contents
Other Fast Automobile Accessories manuals


Popular Automobile Accessories manuals by other brands

Philips
Philips 12972ECO Specification sheet

Bilstein
Bilstein E4-WM5-Y592A00 Mounting instruction

Kuda-Phonebase
Kuda-Phonebase 1390 Installation instruction

Atera
Atera SIGNO 044 141 User information

Thule
Thule 1172 RAPID SYSTEM Fitting instructions

Whelen Engineering Company
Whelen Engineering Company 6-button WeCan Configuration guide


Classic Accessories
Classic Accessories Overdrive PolyPro 3 Deluxe manual

AL-KO
AL-KO G&S Chassis Caravan Warranty and Service Hand book

Husky
Husky 31853 Assembly, Installation, Operation and Maintenance Instructions

Warn
Warn 102145 Instruction

Nav TV
Nav TV NTV-KIT724 quick start guide

Fix&Go
Fix&Go AUTOMATIC 30 user guide