E&G Classics 1045-019U-15B Use and care manual

IMP RTANT: PLEASE KEEP THIS INSTRUCTI N MANUAL F R FUTURE REFERENCE !
Copyright © 2015 by E&G Corporation, LLC. All right reserved. The reproduction or uti li za tion of this work in any form or any elec tron ic, me chan i cal, or other means, no known or here af ter in vent ed,
including xe rog ra phy, pho to copy ing, and re cord ing, and in any in for ma tion storage retrieval system is for bid den with out written per mis sion of owners.
Notes to the Technician/Installer:
E&G is proud to present this package to you and reminds you that for technical in for ma tion, contact technical assis-
tance at 410-381-4900. Do not at tempt the in stal la tion of any E&G prod uct without first reading the detailed in struc -
tions. E&G will not war rant
dam aged parts or the ve hi cle due to altered in stal la tion procedures.
04/15/2016
1.
Open the hood and remove the plastic push fasteners securing
the radiator support panel cover and remove the cover.
Copyright 2015 by E&G Corporation, LLC. Visit us online today at www.egclassics.com
2015-16 Ford F-150 Billet Grilles
T LS REQUIRED
Automotive grade masking tape, plastic clip removal tool, 10mm deep, 10mm, 9mm, 8mm & 7mm sockets and
ratchet, large flat blade screwdriver, #2 phillips screwdriver, flat or semi-gloss black paint, glass cleaner and soft,
clean cloths.
Upper Replacement
2.
Use a 10mm socket and ratchet to remove the upper hex screws
securing the top of the factory grille to the support.
3.
Pull the top of the flexible rubber air deflector off the top sides of
the factory grille.
3
2
1
4.
Disconnect the electrical connector at the air flow shutter motor.
Disconnect the air temperature sensor electrical connector at the top
of the factory grille.
4
Upper Black Billet Part #1045-019U-15B
Upper Polished Billet Part #1045-019U-15
Important: Fits F-150 models with air flow shutters only. If the factory grille on the vehicle you are
working does not have air flow shutters, please call technical support at 410-381-4900 before
proceeding. Will not work with vehicles equipped with 360-Degree camera system.
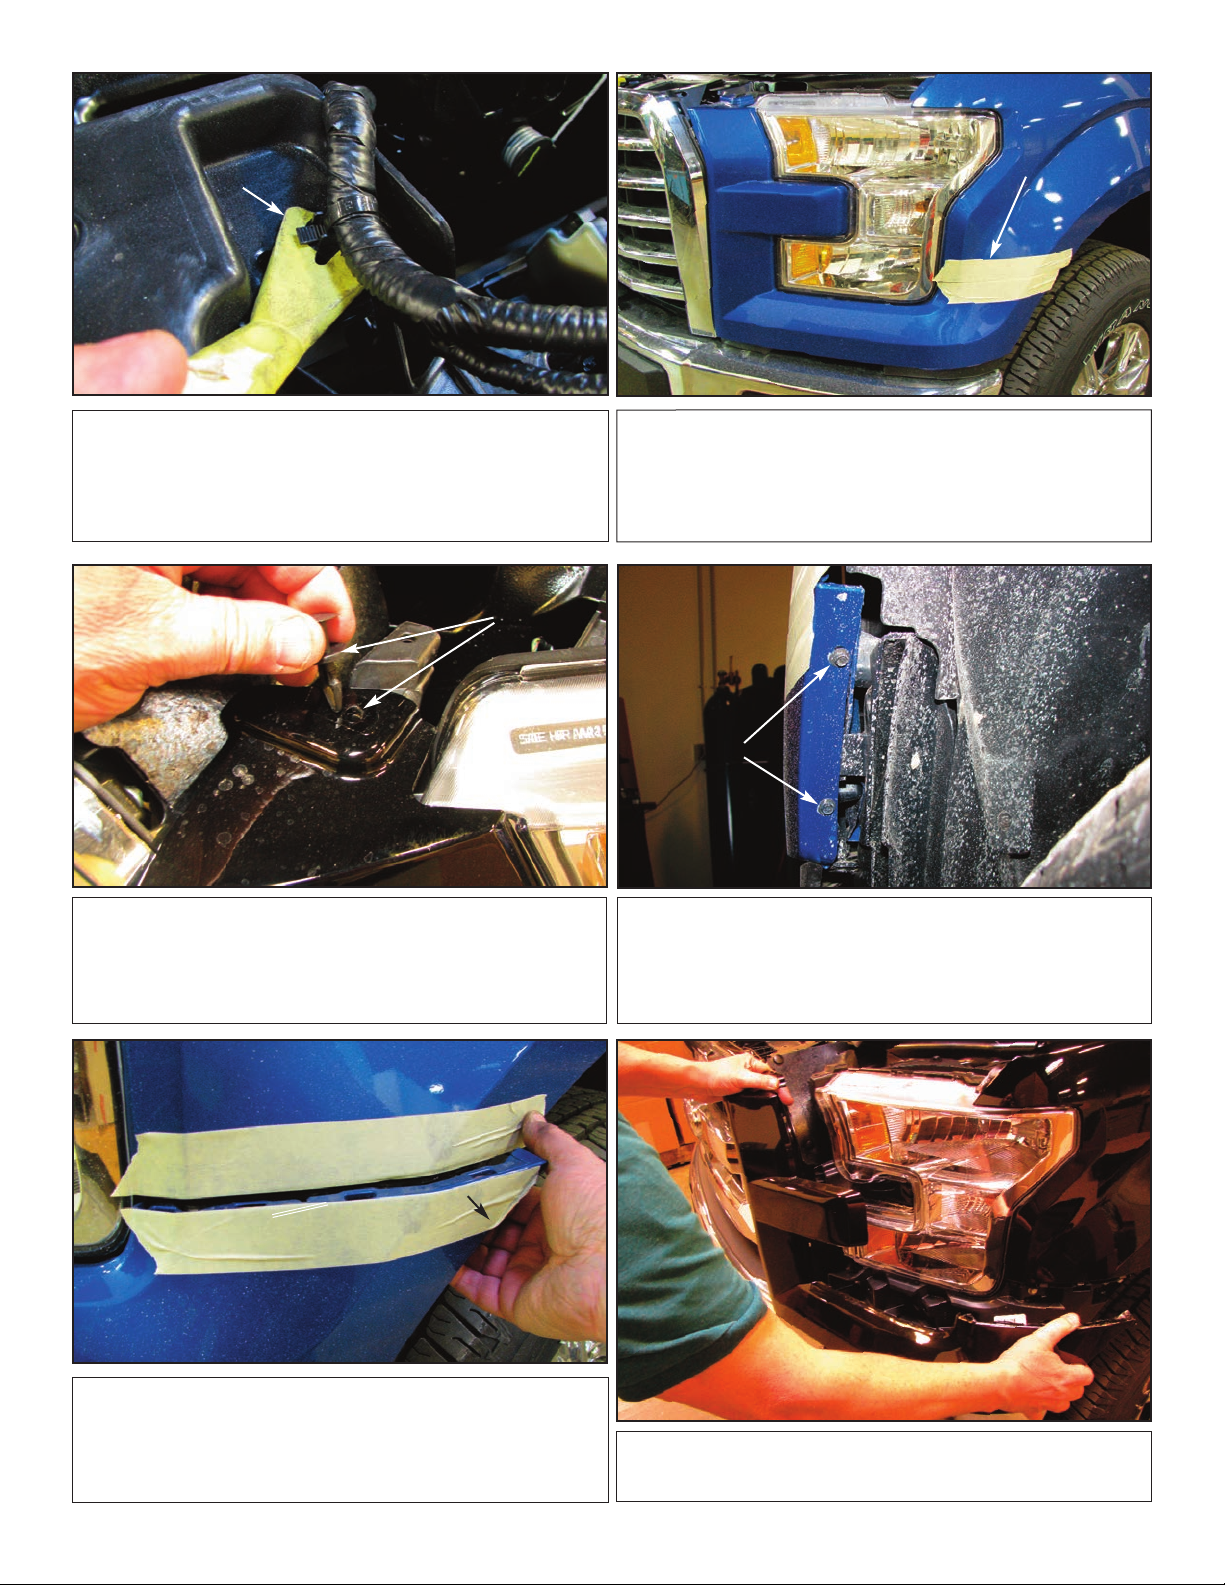
5. Carefully remove the plastic push fastener securing the electrical wire
harness to the core support.
6. Apply masking tape to the fender and front moulding where they
meet. Apply masking tape across the forward edge of the hood at
this time (not shown).
Copyright 2015 by E&G Corporation, LLC. Visit us online today at www.egclassics.com
7. Remove the factory push fastener at the top of the front moulding. 8. Use a 7mm socket to remove the two hex screws from the wheel
opening.
7
8
9. Pull out on the headlight surround to seperate it from the mount-
ing channel of the front fender.
9
56
10.Pull forward on the top of the headlight surround to unclip and re-
move it from the vehicle to expose the factory grille lower mount-
ing hex screws.

Copyright 2015 by E&G Corporation, LLC. Visit us online today at www.egclassics.com
11.Use an 8mm socket to remove the hex screws retaining the lower
sides of the grille to the vehicle.
13.Place the factory grille onto a clean work area and apply protective
masking tape to the factory emblem to protect the finish.
11
12.Remove the plastic push fasteners that attach the rubber sections
to the sides of the grille. Once the rubber sections are free, lift the
grille straight up to remove it from the vehicle.
12
14.Turn the grille face down and remove the factory 10mm lock nuts
retaining the air flow shutters from the sides of the grille. The lock
nuts may come off, or the studs will un-thread from the clips in the
grille base.
14
15.Use a 10mm deep socket to remove the speed nuts across the bot-
tom of the air flow shutters.
15
16.Remove the factory push fasteners across the top of the grille.
16
13

Copyright 2015 by E&G Corporation, LLC. Visit us online today at www.egclassics.com
17.Remove the 8mm hex screw from the center of the factory grille air
flow shutters.
18.Carefully lift off the air flow shutters from the back of the factory
grille and save them for reinstallation.
19.For customers requesting the factory emblem installation: Remove
the 10mm speed nuts securing the factory emblem. Turn the grille
over, untape and remove the emblem for the following emblem in-
stallation procedure.
17
19
20.For customers requesting the factory emblem installation: Align the
powder coated emblem filler over the back of the factory emblem.
20
21.For customers requesting the factory emblem installation: Align the
emblem mounting plate over the back of the factory emblem, mak-
ing sure the stud bases fit through the openings in the plate and
reinstall two of the factory speed nuts.
21
22.For customers requesting the factory emblem installation: Align the
emblem assembly with the notches in the back of the billet grille.
Install the mounting brackets using the supplied s.s. lock washers
and s.s. #8-32 s.s. hex nuts and tighten until the emblem assembly
is snug against the billet grille fins.
22

Copyright 2015 by E&G Corporation, LLC. Visit us online today at www.egclassics.com
25.Install the supplied #10-24 x 3/4” phillips machine screws through
the lower mounting bracket, through the openings in the bottom
of the air flow shutter housing and install the supplied large black
plastic washers and #10-24 E NA nuts. Tighten until the bracket
is tight against the air flow shutter housing.
26.Align the billet grille assembly onto the vehicle and install the
upper 10mm screws removed in tep 2. Leave the screws slightly
loose for adjustment purposes at this time.
26
27.Temporarily realign the headlight surrounds and check the left-to-
right alignment and adjust the grille so that the gap is even on
both sides. Remove the headlight surrounds and reinstall the fac-
tory 8mm hex screws removed in tep 11. Once the bottom of the
grille assembly is tight, reinstall the headlight surrounds.
27
28. Carefully close the hood and check the upper grille surround depth.
Adjust the grille so that it is an parallel with the headlight surrounds
and slightly recessed behind the edge of the hood. Open the hood
and tighten the upper factory 10mm screws. Use a 1/8” drill bit to
drill through the four existing holes in the upper mounting bracket.
28
25
23.Use semi-gloss black paint to conceal anything that will be visible
through the billet grille when the air flow shutters are open.
23
24.Realign the air flow shutters over the billet grille and install the
large push fasteners removed in tep 16 through the holes in the
mounting tabs on billet grille fin #3.
24
This manual suits for next models
1
Other E&G Classics Automobile Accessories manuals


Popular Automobile Accessories manuals by other brands


ULTIMATE SPEED
ULTIMATE SPEED 279746 Assembly and Safety Advice

SSV Works
SSV Works DF-F65 manual

ULTIMATE SPEED
ULTIMATE SPEED CARBON Assembly and Safety Advice

Witter
Witter F174 Fitting instructions

WeatherTech
WeatherTech No-Drill installation instructions

TAUBENREUTHER
TAUBENREUTHER 1-336050 Installation instruction