Fbt MS02-CD3/DG User manual

A U D I O C O N T R A C T O R
MUSIC SOURCES
MS02 CD3 / DG


°When the unit is installed in a rack enclosure, the rack must have all the prerequisites required by the EN 60439-1 standard, in particular the
rear part must be closed by means of suitable panels.
INSTALLATION
GENERAL PRECAUTIONS
All FBT equipment is manufactured in accordance with the most stringent international safety standards and in compliance with European
Community requisites. In order to use the equipment correctly and effectively, it is important to be aware of all its characteristics by reading
these instructions and in particular the safety notes carefully. While the equipment is working, it is necessary to provide adequate
ventilation. The equipment must not be closed indide cabinets without ventilation or kept in the vicinity of sources of heat.
• Installation
TO REDUCE THE RISK OF ELECTRIC SHOCK
DO NOT REMOVE COVER (OR BACK)
NO USER SERVICEABLE PARTS INSIDE
REFER SERVICING TO QUALIFIED SERVICE PERSONNEL
TO REDUCE THE RISK OF FIRE OR ELECTRIC SHOCK
DO NOT EXPOSE THIS EQUIPMENT TO RAIN OR MOISTURE
WHERE MARKED, THIS SYMBOL INDICATES A DANGEROUS NON-ISOLATED
VOLTAGE INSIDE THE LOUDSPEAKER: SUCH VOLTAGE COULD BE
SUFFICIENT TO RESULT IN THE RISK OF ELECTRIC SHOCK
WHERE MARKED, THIS SYMBOL INDICATES IMPORTANT USAGE
AND MAINTENANCE INSTRUCTIONS IN THE ENCLOSED
DOCUMENTS. PLEASE REFER TO THE MANUAL
A U D I O C O N T R A C T O R
This equipment is designed for use with a mains voltage of 230Vac ±10% 50/60Hz. The ON/OFF switch controls the mains voltage. The
equipment is supplied with its own power supply cable, which is equipped with an earthing wire. The earth terminal of the mains plug
should never be removed under any circumstances. Connect the mains plug of the equipment to the power mains using the cable included
in the supply. Make sure that the power outlet is equipped with a connection to earth in accordance with the law. The power-supply circuit of
the equipment is protected by a fuse installed on the mains plug of the equipment.
• Power supply and earthing
Any activities inside the equipment such as maintenance and so on may only be carried out by specialised personnel: when the cover is
removed, parts liable to cause electric shocks are exposed. Before removing the cover always make sure that the power cord has been
disconnected. In the event that liquid is accidentally spilt onto the apparatus, disconnect the mains plug immediately and contact the
nearest Service Centre. The chassis connection may be used to connect other equipment only for the purpose of shielding the low signals:
this socket may not be used to connect the chassis to earth for safety purposes.
• Safety notes
1

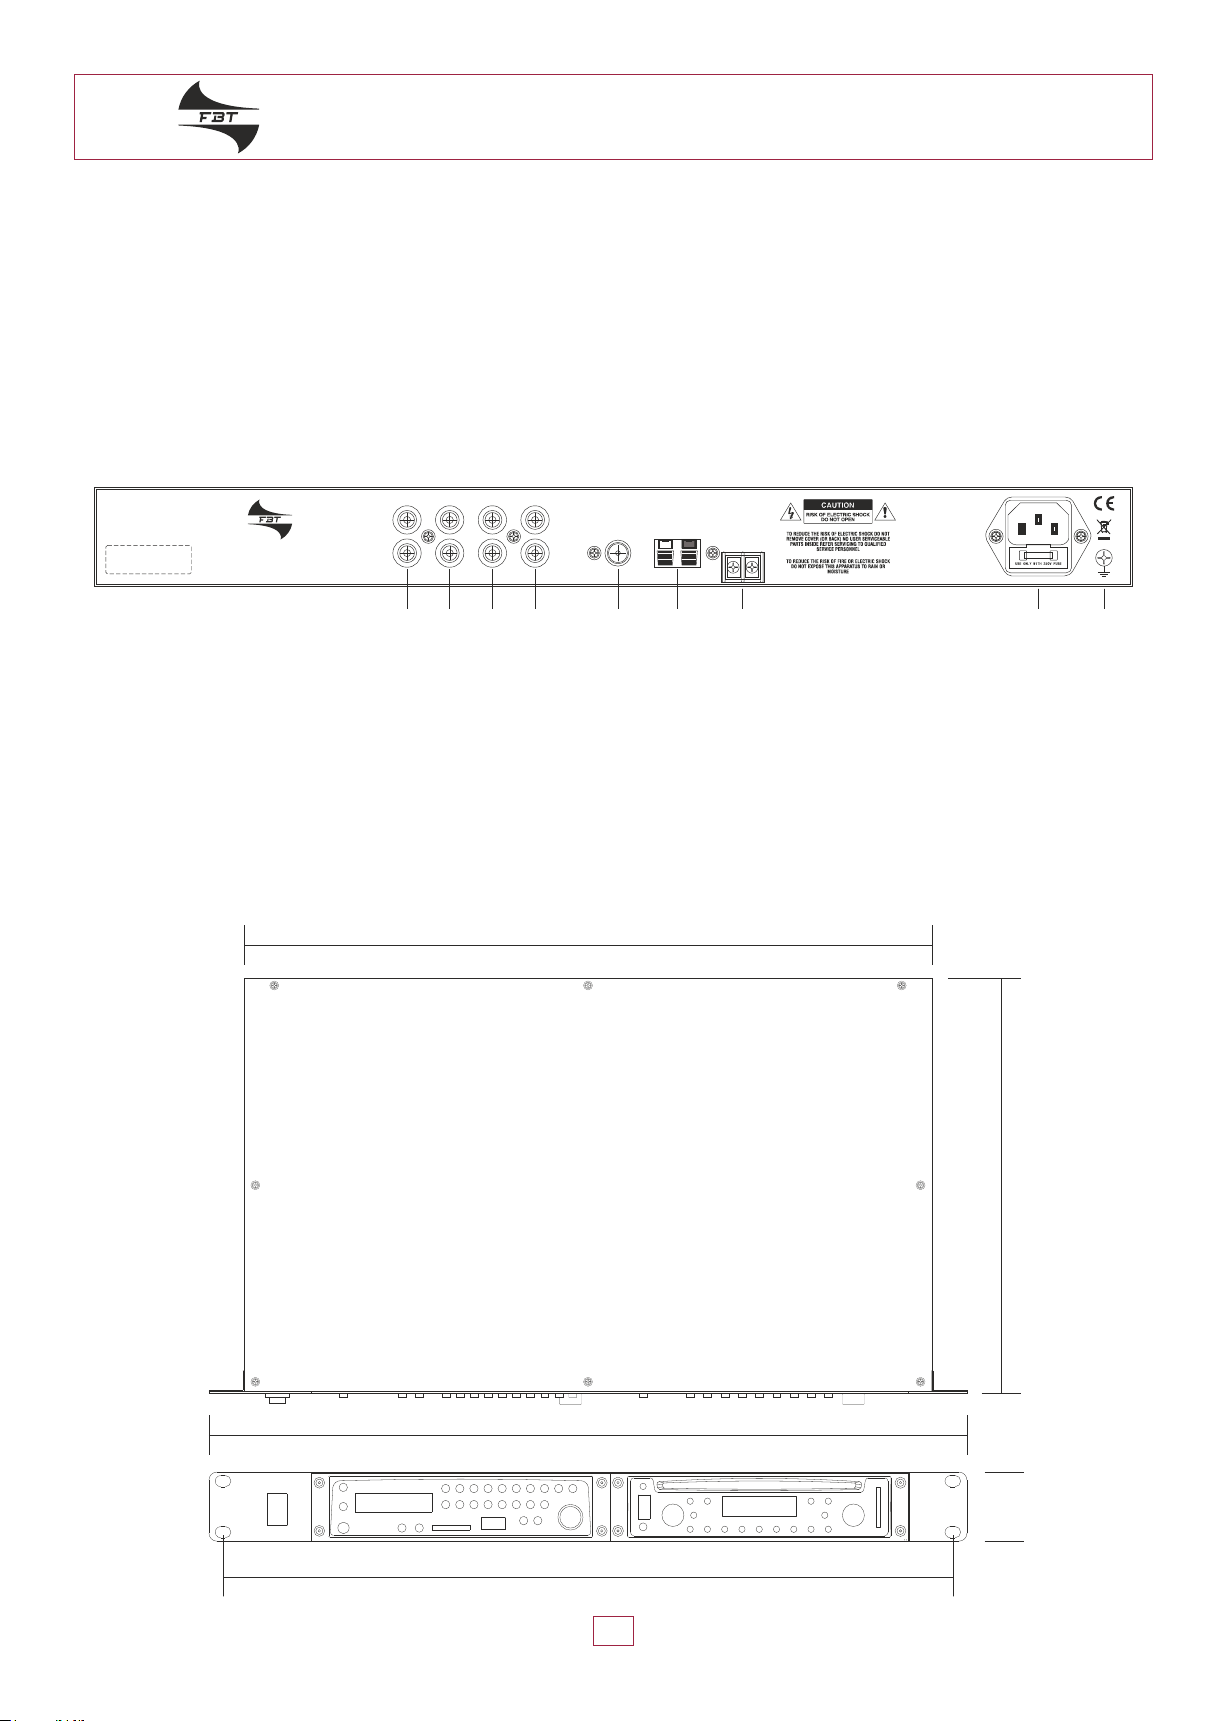
18,97" / 482mm
1,73"
44mm
17,24" / 438mm
10,43" / 265mm
18,34" / 466mm
• Mains power supply: 230Vac ±10% 50/60Hz
• DC external power supply: 24Vdc
• Mains consumption: 45VA
• DC consumption: 700mA (max)
• CD/USB/SD player output level: 450mV
• USB/SD reader & recorder output level: 450mV
• Net weight: 9,92lb
GENERAL CHARACTERISTICS
A U D I O C O N T R A C T O R
OUTPUT PRIORITY
OUTPUT
OUTPUT REC IN
L
R
L
R
AM
LOOP ANT
FM ANT
75 Ohm DC 24V
+ -
FUSE T1A 250V
AC 230V 50Hz 45W
~
MADE IN TAIWAN
DUAL SOUND SOURCE SYSTEM
MS02-CD3/DG
1) Line output module ANTI SHOCK CD
2) Combined line output ( both modules )
3) Line output module CARD READER RECORDER
4) Recorder input
5) Socket for FM antenna
6) Socket for AM antenna
7) Terminal strip for 24 Vdc external power supply
8) Mains plug
9) Frame connection
1 2 3 4 5 67 8 9
REAR PANEL
DIMENSIONS
2

A U D I O C O N T R A C T O R
3
CARD READER / RECORDER
PITCH CONTROL
7
7
:
:
<;
USB & SD CARD READER AND RECORDER
Features
• Recording format: MP3
• Playing format: MP3 / WMA / MP2 / WAV / FLAC / M4A / AAC
• Accept the capacity to 32G USB / SD card / SDHC
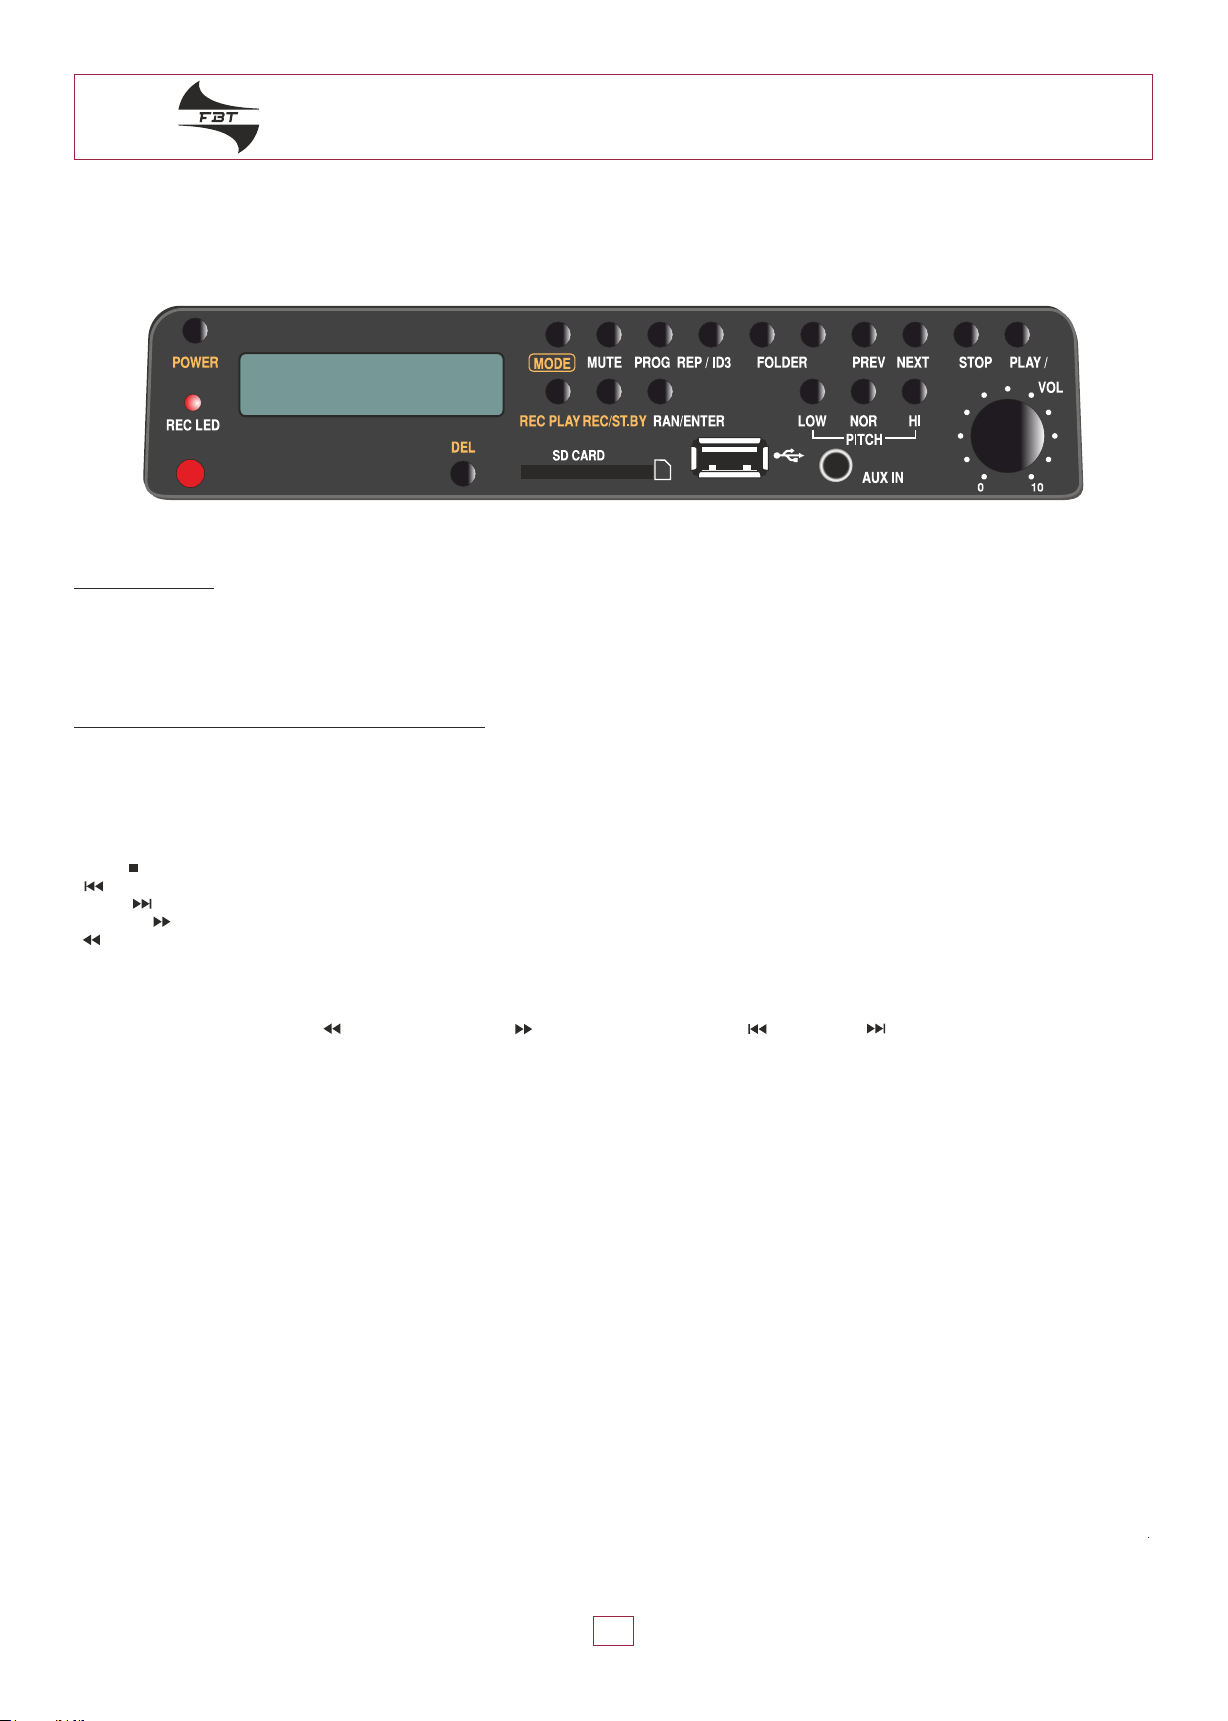
Operation and function of the use of panel description
• • Hold the button for 1 second to turn on/offPOWER
• • Select to use USB or SD CARDMODE
• AUX IN • Connect to other audio source
• USB socket • To insert a USB device
• SD CARD socket • To insert a SD CARD
• PLAY / II • Play and pause; press to play, play again to pause
• STOP • Press to stop playing
• PREV • Backwards; press to backward to last track; long press is reversing fast
• NEXT • Fast forward; press to forward to next track; long press is forwarding fast
• FOLDER • Select forward to next folder
• FOLDER • Select backward to previous folder
• MUTE • Mute function; LCD will flash «MUTE»
• VOLUME • Volume control button; turning to adjust the volume
• RAN / ENTER • Press to play the tracks in a random order. Press again to cancel
• PROG • To memorize the self-set tracks, can only use at «STOP» mode.
- press «PROG» ; then use « FOLDER» or «FOLDER » to select the folder and use « PREV, NEXT » buttons to select the song. Then
press «RAN / ENTER» key to confirm.
- Repeat above step to store more tracks.
- Press «PLAY / II» to play the memory track.
- Press «STOP» to cancel the program function.
• REP / ID3 • Repeating playing function.
Repeat function: need to operate in the playing mode
- Press once, LCD screen displays «REP1", repeat play current track.
- Press twice, LCD screen displays «F», repeat play entire folder.
- Press 3rd times, LCD screen displays «ALL», repeat play all tracks.
- Press 4th times, cancel repeat playback function. The words on LCD screen will be eliminated.
ID3: Hold «ID3" button for 1 second; LCD shows the information such as the title, album, track number, file format. The information to be stored in the
file itself.
• • Delete single track.DEL
Delete current playing track, can be operated under «pause» mode or during «playing» mode
Press «DEL» button, LCD displays flash DEL FILE, reminding you to delete the file, you have 5 seconds to decide delete the file or not, after 5
seconds LCD return to «pause» mode or «playing» mode, then press «DEL» to confirm the deletion.
• PITCH CONTROL• Adjust the tempo of the music quicker or slower.
While adjusting the tempo of the music, the original musical key of the tune can be maintained.
• Low: to adjust slow tempo play; press once, the screen will show "PH01", press one time, it will be +1. It has 10 levels of tempo variation.
• Hi: to adjust fast tempo play; press once, the screen will show "PH -01", press one time, it will be -1. It has 10 levels of tempo variation.
• Nor: press to back to normal tempo.
• RECORDING•
• • Recording function key, need to use this key to record through the Line-in channel.REC / ST.BY
- When only single USB or SD card in the device, can only use record function under "STOP" mode.
- Press "REC / ST.BY", LCD shows "WAIT REC". This is waiting for USB or SD CARD to ready mode; when LCD shows "STAND BY" , press
"REC / ST.BY" again to start to recording, LCD starts to show the current recording time, the REC Led light will turn on.
- During recording press "REC / ST.BY" to pause recording, press "REC / ST.BY" again to continue recording.
- Press "STOP" to finish recording. The LCD will show "REC STOP". It will return to "STOP" mode, the REC Led light will turn off.

A U D I O C O N T R A C T O R
4
- Sound recording through the REC function keys are saved in the directory folder REC
- The track number in the REC folder will start from "R01", and increase gradually. Therefore if want to check the recording file after finish record, the
song will be recorded at the last track in the REC folder.
- To see the record track in computer, the record track will save in REC folder; the track number in the REC folder will start from "REC1" and increase
gradually.
- To play REC track in folder use PREV or NEXT button to select the directory REC, press "PLAY / II" to start playing.
• • This function button particular for playing the first track in REC folder. When press "STOP" to finish recording, then press "REC/PLAY", REC PLAY
will play the last track in REC folder.
LCD DISPLAY:
• : In playing mode
• :Pausing
• M3: When being MP3 mode, the display panel shows M3.
• USB: When use USB function
• SD: When use SD card function.
• REP1: Repeatedly playing the single track.
• F: Repeat specific folder.
• ALL: Repeat all tracks.
• PROG: Program mode.
• RAN: Random mode.
• MUTE: Mute mode, LCD will flashing "MUTE"
• DEL FILE: When using delete function.
• WAIT REC: Preparing the record finction.
• STAND BY: Ready to record.
• REC STOP: Finish the recording.
• : : Under the MP3 mode, it will appear the folder numbers
• 888: Display the current playing track
• 00:00: Display the time for the current playing track
;
X
oX
oX
o

A U D I O C O N T R A C T O R
5
THE FUNCTIONS RESPECTIVELY ON THE REMOTE CONTROLLER
• Hold the button for 1 second to turn on/off
• MODE: Select to use USB or SD CARD
• Play and pause, press to play, play again to pause
• Press to stop playing
• Numeral 0 - 9: Press to select desired track
• REV: Backwards; press to backward to last track. Long press is reversing fast
• F.WD : Fast forward; press to forward to next track. Long press is forwarding
• FOLDER : Select forward to next folder
• FOLDER: Select backward to previous folder
• Mute function, LCD will flash "MUTE"
• RAN ENTER: Press to play the tracks in a random order. Press again to cancel
• PROG: To memorize the self-set tracks, can only use at "STOP" mode
- press "PROG" then use " FOLDER or FOLDER " to select the folder and use " REV, F.WD " buttons to select the song.
Then press " RAN ENTER" key to confirm.
- Repeat above step to store more tracks.
- Press " " to play the memory track.
- Press " " to cancel the program function.
• REP / ID3 • Repeating playing function.
Repeat function: need to operate in the playing mode
- Press once, LCD screen displays «REP1", repeat play current track.
- Press twice, LCD screen displays «F», repeat play entire folder.
- Press 3rd times, LCD screen displays «ALL», repeat play all tracks.
- Press 4th times, cancel repeat playback function. The words on LCD screen will be eliminated.
ID3: Hold «ID3" button for 1 second; LCD shows the information such as the title, album, track number, file format. The information to be stored in the
file itself.
• : Designated area repeating
- press once to start playing the beginning of memory
- press again to stop at the end of memory area. The device repeats to play memory area.
- press it again to stop playing. LCD display will be disappeared.
• • Delete single track. DEL
Delete current playing track, can be operated under «pause» mode or during «playing» mode
Press «DEL» button, LCD displays flash DEL FILE, reminding you to delete the file, you have 5 seconds to decide delete the file or not, after 5
seconds LCD return to «pause» mode or «playing» mode, then press «DEL» to confirm the deletion.
;
;
A B
"A B"

A U D I O C O N T R A C T O R
6
• PITCH CONTROL• Adjust the tempo of the music quicker or slower.
While adjusting the tempo of the music, the original musical key of the tune can be maintained.
• Low: to adjust slow tempo play; press once, the screen will show "PH01", press one time, it will be +1. It has 10 levels of tempo variation.
• Hi: to adjust fast tempo play; press once, the screen will show "PH -01", press one time, it will be -1. It has 10 levels of tempo variation.
• Nor: press to back to normal tempo.
• • Recording function key, need to use this key to record through the line-in channelREC
- When only single USB or SD CARD in the device, can only use record function under "STOP" mode.
- Press "REC", LCD shows "WAIT REC". This is waiting for USB or SD CARD to ready mode. When LCD shows "STAND BY" press "REC" again
to start to recording, LCD starts to show the current recording time, the REC LED light will turn on
- During recording press "REC" to pause recording, press "REC" again to continue recording.
- Press "STOP" to finish recording. The LCD will show "REC STOP". It will return to "STOP" mode, the REC LED light will turn off.
- Sound recording through the REC function keys are saved in the directory folder REC
- The track number in the REC folder will start from "R01", and increase gradually. Therefore if want to check the recording file after finish record,
the song will be recorded at the last track in the REC folder.
- To see the record track in computer, the record track will save in REC folder; the track number in the REC folder will start from "REC1" and
increase gradually.
- To play REC track in folder use PREV or NEXT button to select the directory REC, press "PLAY / II" to start playing.
• • This function button particular for playing the first track in REC folder. When press "STOP" to finish recording, then press "REC/PLAY", REC PLAY
will play the last track in REC folder.
• Remote controller shall appoint to the receiving hole of faceplate.
• Battery installation of the remote controller
1. To open up the battery cover ( on the back side of the remote controller ), press down the cap and slide it from the left to the right, then to pull it out.
2. Place a new battery (battery type CR2025 3V, w/its positive upward)
3. Reverse the actions stated in the statement 1

A U D I O C O N T R A C T O R
7
ANTI SHOCK CD / USB & SD CARD READER
ANTI SHOCK CD
<
7
7
:
:
;
Features
• USB, SD card, CD playing function of each replication
• Playing format: MP3 / WMA
• Accept the capacity of 128 MB to 32G USB or SD card
Operation and function of the use of panel description
• • Press to switch on/off the powerPOWER
• VOLUME • Adjust volume level
• • Press to switch to USB, SD or CD modeMODE
• FOLDER • Select folder. Available for playing MP3 format. Press FOLDER to select desired folder.
• REV •Press once, back to the beginning of current track; press again to desired previous track; press and hold the button for fast backward
• PLAY / II • Press once start to play, press again pause to stop
• F.WD • Press to desired next track; press and hold the button for fast forward
• STOP / EJECT • Press to stop playing and press to disk ejected; press again to insert CD
• MUTE • Mute function
• RAN / ENTER • Randomly play and confirmation bottom
• Press to play all songs in a random order. The LCD display shows "RAN"; press again to cancel random mode
• REP / ID3 • Repeat: repeat play
• To play the ordinary format of music:
1. Press once to repeat current track. The LCD display shows "REP1"
2. Press again to repeat whole CD. The LCD display shows "ALL"
3. Then press again to cancel repeat function
• To play MP3 format of CD, USB, SD card:
1. Press to repeat current track; LCD display shows "REP1"
2. Press again to repeat current folder; LCD display shows "REP1 F"
3. Then press again to repeat whole songs in the file; LCD display shows "ALL"
4. Press again to cancel repeating function
ID3: Press ID3 button for 3 seconds, the LCD shows the information such as the title, album, track number, file format.
The information to be stored in the file itself.
• PROG • To memorize the self-set tracks
- Press "PROG". LCD display shows "PROG" then use FOLDER and SKIP buttons to select desired track. Press RAN/ENTER to stock
the track.
- Repeat above step to store more tracks
- To play the memory track press "PLAY / II", LCD display shows "MEMO" and then start to play
- Press PROG again to cancel the program function
• Infrared window: Pick up signal from the remore controller
• USB connector: Accepts USB
• SD connector: Accepts SD card and MMC card

A U D I O C O N T R A C T O R
8
LCD DISPLAY:
• M3: When being MP3 mode the display panel shows M3
• CD: When being CD mode the display panel shows CD
• When in playing mode it display , when pausing, the panel shows II
• When repeatedly playing the single track it shows REP1
• When all songs at the folders are playing repeatedly it shows ALL
• When it appears REP1 F, it refers to playing the tracks repeatedly froma specific folder
• RAN: When random playback
• PROG: Program mode
• MEMO: When playback memory tracks
• A B: When repeat playing between A and B
• 00: Under the MP3 mode it will appear the folder number
•00: Display the current playing track
• 00:00: Display the time for the current playing track
Note:
• When inserts the disk into CD player or takes out the disk, it is necessary to let CD player insert disk and return automatically. It is prohibited to push or
take out the disk by hand before the disk completely return from CD player, thus will cause the machine to be broken down and unable to operate
normally.
SD / MMC card
• Insert SD card or MMC card into the insert hole of SD/MMC CARD in the face plate. Pull the card to get stuck with the tenon. It then finished
the assembly. When taking out he card, please push the card to the bottom and then release to shout it out. Please don't use the force to pull
it out. If so, it will damage the card and the machine.
• Press SD/USB/CD or SD/USB/CD on the remote controller. Select SD then press PLAY/PAUSE or on the remote controller to playing.
As for other playing operation way, please refer to the operation way in PLAYING and the functions respectively on the remote controller.
USB
• Insert USB into the insert hole of USB in the face plate. If don't need to use USB, may take it off directly.
• Press SD/USB/CD or SD/USB/CD on the remote controller. Select USB then press PLAY/PAUSE or on the remote controller to playing.
As for other playing operation way, please refer to the operation way in PLAYING and the functions respectively on the remote controller.
II
II

A U D I O C O N T R A C T O R
9
THE FUNCTIONS RESPECTIVELY ON THE REMOTE CONTROLLER
• EJECT : Press to stop playing and press to disk ejected gradually
• PROG: To memorize the self-set tracks
- press PROG. LCD display shows "PROGRAM" then use FOLDER and SKIP buttons to select desired track. Press RAN ENTER button
to confirm
- repeat above step to store more tracks
- to play the memory track press , LCD display shows "MEMO" and then start to play
• RAN: Press to select in random order. Press again to cancel random playing function
• REPEAT: Repeat mode:
- press once, LCD shows "ALL", repeat all tracks
- press twice: "REP1 F" ( for MP3 format)
- press 3 time: REP1, repeat current track
- press again to cancel repeating function
• Numeral 0 - 9: Select numerals. Select the track from numerals
• FOLDER: To select the desired folder. Press FOLDER button, each press will go to next folder
• PLAY/PAUSE : Press play or pause playing
• : Stop to play
• : Press to previous track
• : Press to next track
• : Press to fast backward
• : Press to fast forward
• MODE: Selection USB, SD or CD. Then press to start playing
• A B: It is the zone memory function. During playing press A B. A point will start to memorize. Press A B again to memorize B point and
start repeating playing point A - B memory zone. Press again to cancel A B function
• : ON / OFF mute
• : ENTER
• ID3: Press ID3 button for 3 seconds, the LCD shows the information such as the title, album, track number, file format. The informations to be stored
in the file itself
• Remote controller shall appoint to the receiving hole of faceplate.
• Battery installation of the remote controller
1. To open up the battery cover ( on the back side of the remote controller ), press down the cap and slide it from the left to the right, then to pull it out.
2. Place a new battery (battery type CR2025 3V, w/its positive upward)
3. Reverse the actions stated in the statement 1
II
II
II
X
8

A U D I O C O N T R A C T O R
10
SPECIFICATIONS

A U D I O C O N T R A C T O R
11
• Quando l'unità è installata in un armadio rack, il rack deve avere tutti i requisiti richiesti dalla norma EN 60439-1, in particolare la parte
posteriore deve essere chiusa mediante appositi pannelli.
INSTALLAZIONE
AVVERTENZE GENERALI
• Installazione
Tutte le apparecchiature FBT sono fabbricate in conformità con i più severi standard internazionali di sicurezza e in conformità con i
requisiti della Comunità Europea. Per poter utilizzare l'apparecchiatura in modo corretto ed efficace, è importante conoscere tutte le sue
caratteristiche leggendo attentamente queste istruzioni e in particolare le note sulla sicurezza. Mentre il sistema è in funzione, è
necessario fornire un'adeguata ventilazione. L'apparecchiatura non deve essere chiusa in contenitori indipendenti senza ventilazione o
posta in prossimità di fonti di calore.
• Alimentazione elettrica
Questa apparecchiatura è progettata per l'uso con una tensione di rete di 230 V ca ± 10% 50/60 Hz. L'interruttore ON / OFF controlla la
tensione di rete. L'apparecchiatura viene fornita con il proprio cavo di alimentazione, che è dotato di messa a terra. Il terminale di terra
della spina non deve mai essere rimosso in nessun caso. Collegare la spina di alimentazione dell'apparecchiatura alla rete elettrica
utilizzando il cavo incluso nella confezione. Assicurarsi che la presa di corrente sia dotata di una connessione a terra conforme alla legge.
Il circuito di alimentazione è protetto da un fusibile installato sulla spina di alimentazione dell'apparecchiatura.
• Note per la sicurezza
Qualsiasi intervento all'interno dell'apparecchiatura, come la manutenzione, e così via, può essere eseguita solo da personale
specializzato: all'interno dell'apparecchiatura sono presenti parti che possono provocare scosse elettriche. Prima di rimuovere il
coperchio, accertarsi sempre che il cavo di alimentazione sia stato scollegato. Nel caso in cui del liquido venga rovesciato
accidentalmente sull'apparecchio, scollegare immediatamente la spina di alimentazione e contattare il centro di assistenza più vicino.
PER EVITARE IL RISCHIO DI SHOCK ELETTRICO
NON APRIRE IL COPERCHIO
NON USARE UTENSILI MECCANICI ALL'INTERNO
CONTATTARE UN CENTRO DI ASSISTENZA QUALIFICATO
PER EVITARE IL RISCHIO DI INCENDIO O DI SHOCK ELETTRICO
NON ESPORRE L'APPARECCHIATURA ALLA PIOGGIA
O ALL'UMIDITA'
QUESTO SIMBOLO AVVERTE, LADDOVE APPARE, LA PRESENZA DI UNA
T E N S I O N E P E R I C O L O S A N O N I S O L ATA A L L’ I N T E R N O :
IL VOLTAGGIO PUÒ ESSERE SUFFICIENTE PER COSTITUIRE
IL RISCHIO DI SCOSSA ELETTRICA.
QUESTO SIMBOLO AVVERTE, LADDOVE APPARE, DELLA
PRESENZA DI IMPORTANTI ISTRUZIONI PER L’USO E PER
LA MANUTENZIONE NELLA DOCUMENTAZIONE
ALLEGATA. SI PREGA DI CONSULTARE IL MANUALE.
L’APPARECCHIO DEVE ESSERE COLLEGATO ALLA RETE ELETTRICA MEDIANTE UNA PRESA CON UN
COLLEGAMENTO ALLA TERRA DI PROTEZIONE.
18,97" / 482mm
1,73"
44mm
17,24" / 438mm
10,43" / 265mm
18,34" / 466mm
• Alimentazione:: 230Vac ±10% 50/60Hz
• Alimentazione esterna DC
:
24Vdc
• Assorbimento: : 45VA
• Assorbimento DC: : 700mA (max)
• Livello di uscita CD/USB/SD: 450mV
• Livello di uscita USB/SD reader & recorder: 450mV
• Peso netto: 9,92lb
CARATTERISTICHE GENERALI
A U D I O C O N T R A C T O R
OUTPUT PRIORITY
OUTPUT
OUTPUT REC IN
L
R
L
R
AM
LOOP ANT
FM ANT
75 Ohm DC 24V
+ -
FUSE T1A 250V
AC 230V 50Hz 45W
~
MADE IN TAIWAN
DUAL SOUND SOURCE SYSTEM
MS02-CD3/DG
1) Uscita linea modulo ANTI SHOCK CD
2) Uscita linea entrambi i moduli
3) Uscita linea modulo CARD READER RECORDER
4) Ingresso registratore
5) Presa per antenna FM
6) Presa per antenna AM
7) Morsettiera per alimentazione esterna 24 Vdc
8) Vaschetta alimentazione
9) Messa a terra
1 2 3 4 5 67 8 9
PANNELLO POSTERIORE
DIMENSIONI
12
A U D I O C O N T R A C T O R
13
CARD READER / RECORDER
PITCH CONTROL
7
7
:
:
<;
USB & SD CARD READER AND RECORDER
Caratteristiche
• Formato di registrazione: MP3
• Formato di lettura: MP3 / WMA / MP2 / WAV / FLAC / M4A / AAC
• Capacità fino a 32G USB / SD card / SDHC
Funzione dei comandi sul pannello frontale
• • Tenere premuto il pulsante per 1 secondo per accendere / spegnerePOWER
• • Selezionare per l'uso di USB o SD CARDMODE
• AUX IN • Connessione ad un'altra sorgente audio
• USB socket • Per inserire un dispositivo USB
• SD CARD socket • Per inserire una SD CARD
• PLAY / II • Play e pausa; premere per play, premere di nuovo per pausa
• STOP • Premere per interrompere la riproduzione
• PREV • Indietro; premere per tornare all'ultima traccia
• NEXT • Avanti veloce; premere per avanzare alla traccia successiva
• FOLDER • Seleziona la prossima cartella
• FOLDER • Seleziona la cartella precedente
• MUTE • Funzione di Mute; sul display lampeggia «MUTE»
• VOLUME • Pulsante di controllo del volume; ruotare per regolare il volume
• RAN / ENTER • Premere per riprodurre i brani in ordine casuale. Premere di nuovo per annullare
• PROG • Per memorizzare le tracce pre-impostate, è possibile l'utilizzo solo in modalità «STOP».
- premere «PROG» ; utilizzare « FOLDER» o «FOLDER » per selezionare la cartella; « PREV, NEXT » per selezionare il brano. Poi
premere «RAN / ENTER» per confermare.
- ripetere il passaggio sopra per memorizzare più tracce.
- premere «PLAY / II» per riprodurre la traccia memorizzata.
- premere «STOP» per annullare la funzione del programma.
• REP / ID3 • Ripetizione della funzione di riproduzione.
Funzione di ripetizione: è necessario operare nella modalità di riproduzione
- Premere una volta, il display visualizza «REP1", ripete la riproduzione della traccia corrente.
- Premere due volte, il display visualizza «F», ripete la riproduzione dell'intera cartella.
- Premere tre volte, il display visualizza «ALL», ripete l'ascolto di tutte le tracce.
- Premere quattro volte, annulla la funzione di riproduzione ripetuta. Le informazioni sul display vengono cancellate.
ID3: Tenere premuto il pulsante "ID3" per un secondo; il display mostra le informazioni come il titolo, l'album, il numero di traccia, il formato del file.
Le informazioni sono automaticamente memorizzate.
• • Cancella la singola traccia.DEL
Elimina la traccia corrente; può essere utilizzato in modalità «pausa» o durante la modalità «riproduzione»
Premere «DEL», sul display lampeggia "DEL FILE", premere "DEL" per confermare la cancellazione; dopo 5 secondi di inattività il display
ritorna in modalità «pause» o «playing».
• PITCH CONTROL• Regola il tempo della musica più velocemente o più lentamente.
Mentre si regola il tempo della musica, è possibile mantenere la caratteristica del brano originale.
• Low: per regolare la riproduzione in modo lento; premere una volta, sul display appare "PH01", premere un'altra volta, sono
possibili dieci livelli di variazione del tempo.
• Hi: per regolare la riproduzione in modo veloce; premere una volta, sul display appare "PH -01", premere un'altra volta, sono
possibili dieci livelli di variazione del tempo.
• Nor: premere per tornare al tempo normale.
• RECORDING•
• • Tasto funzione di registrazione, è necessario utilizzare questo tasto per registrare attraverso il canale Line-in.REC / ST.BY
- Quando nel dispositivo è presente una sola scheda USB o SD, è possibile utilizzare la funzione di registrazione solo in modalità "STOP".
- Premere "REC / ST.BY", il display visualizza "WAIT REC". Il sistema è in attesa della USB o SD CARD; quando il display visualizza "STAND BY" ,
premere "REC / ST.BY" ancora una volta per far partire la registrazione, il display inizia a mostrare il tempo di registrazione, il led REC si accende.
- Durante la registrazione, premere "REC / ST.BY" per mettere in pausa, premere "REC / ST.BY" di nuovo per continuare.
- Premere "STOP" per terminare la registrazione. Il display visualizza "REC STOP". Ritorna in modalità "STOP" e il led REC si spegne.

A U D I O C O N T R A C T O R
14
- La registrazione tramite la funzione REC viene salvata nella cartella sulla directory REC
- Il numero di traccia nella cartella REC inizierà da "R01" e aumenterà gradualmente. Pertanto, se si desidera controllare la traccia registrata, questa
sarà l'ultima nella cartella REC.
- Per riprodurre la traccia nella cartella usare il tasto PREV o NEXT , premere "PLAY / II" per l'ascolto.
• • Questa funzione è specifica per la riproduzione della prima traccia nella cartella REC. REC PLAY
LCD DISPLAY:
• : Modalità ascolto
• : Pausa
• M3: In modalità MP3, sul display appare M3.
• USB: Funzione USB
• SD: Funzione SD card
• REP1: Riproduzione ripetuta della singola traccia.
• F: Ripete il contenuto della cartella.
• ALL: Ripete tutte le tracce.
• PROG: Programmazione.
• RAN: Modo Random.
• MUTE: Modo Mute
• DEL FILE: Funzione cancella.
• WAIT REC: Attesa della funzione di registrazione.
• STAND BY: Pronto per la registrazione.
• REC STOP: Fine registrazione.
• : : Sotto la modalità MP3, appariranno i numeri delle cartelle
• 888: Mostra la traccia corrente
• 00:00: Mostra il tempo per la traccia corrente
;
X
oX
oX
o

A U D I O C O N T R A C T O R
15
FUNZIONI DEL TELECOMANDO
• Accensione / Spegnimento
• MODE: Tasto di selezione USB o SD CARD
• Play e Pausa, premere per Play, di nuovo per Pausa
• Premere per STOP
• Numeral 0 - 9: Premere per selezionare la traccia
• REV: Indietro; premere per tornare alla traccia precedente; una lunga pressione torna indietro veloce.
• F.WD : Avanti; premere per passare alla traccia seguente; una lunga pressione va avanti veloce.
• FOLDER : Seleziona la cartella seguente
• FOLDER: Seleziona la cartella precedente
• Funzione di Mute.
• RAN ENTER: Seleziona le tracce in modo random. Premere di nuovo per cancellare.
• PROG: Per memorizzare le tracce pre-impostate, è possibile l'utilizzo solo in modalità «STOP».
- Premere "PROG", quindi " FOLDER o FOLDER " per selezionare la cartella : " REV, F.WD " per selezionare il brano.
premere " RAN ENTER" per confermare.
- Ripetere il passaggio sopra per memorizzare più tracce.
- Premere " " per ascoltare la traccia memorizzata.
- Premere " " per cancellare la funzione.
• REP / ID3 • Ripetizione della funzione di riproduzione.
Funzione di ripetizione: è necessario operare nella modalità di riproduzione
- Premere una volta, il display visualizza «REP1", ripete la riproduzione della traccia corrente.
- Premere due volte, il display visualizza «F», ripete l'esecuzione dell'intera cartella.
- Premere tre volte, il display visualizza «ALL», ripete l'ascolto di tutte le tracce.
- Premere quattro volte, annulla la funzione di riproduzione ripetuta.
• ID3: Tenere premuto "ID3" per un secondo; il display mostra le informazioni come il titolo, l'album, il numero di traccia, il formato del file.
Ripetizione dell'area memorizzata
- premere una volta per iniziare a riprodurre l'inizio dell'area memorizzata
- premere nuovamente per fermarsi alla fine dell'area di memoria. Il dispositivo ripete la riproduzione.
- premere nuovamente per fermare.
• • Cancella una singola traccia. DEL
Elimina la traccia corrente, può essere utilizzata in modalità «pausa» o durante la modalità «riproduzione»
Premere il tasto «DEL», sul display LCD lampeggia DEL FILE, che ci ricorda di cancellare il file; sono necessari 5 secondi
per decidere se cancellare il file o meno, dopo 5 secondi il display torna alla modalità «pausa» o «riproduzione»;
quindi premere «CANC» per confermare la cancellazione.
;
;
A B

A U D I O C O N T R A C T O R
16
• PITCH CONTROL• Regola il tempo della musica più velocemente o più lentamente.
• Low: per regolare la riproduzione in modo lento; premere una volta, sul display appare "PH01", premere un'altra volta, sono
possibili dieci livelli di variazione del tempo.
• Hi: per regolare la riproduzione in modo veloce; premere una volta, sul display appare "PH -01", premere un'altra volta, sono
possibili dieci livelli di variazione del tempo.
• Nor: premere per tornare al tempo normale.
• • Tasto funzione di registrazione, attraverso il canale line-inREC
- Quando nel dispositivo è presente una sola scheda USB o SD, è possibile utilizzare la funzione di registrazione solo in modalità "STOP".
- Premere "REC", il display visualizza "WAIT REC". Il sistema è in attesa della USB o della SD CARD. Quando il display visualizza "STAND BY"
premere "REC" di nuovo per far partire la registrazione, il display inizia a mostrare il tempo di registrazione, il led REC si accende.
- Durante la registrazione, premere "REC" per mettere in pausa, premere "REC" di nuovo per continuare.
- Premere "STOP" per terminare la registrazione. Il display visualizza "REC STOP". Ritorna in modalità "STOP" e il led REC si spegne.
- La registrazione tramite i tasti funzione REC viene salvata nella cartella della directory REC
- Il numero della traccia nella cartella REC inizierà da "R01", per aumentare gradualmente.
- Usare il tasto PREV o NEXT per selezionare la traccia nella directory REC, premere "PLAY / II" per riprodurla.
• • Questa funzione è specifica per la riproduzione della prima traccia nella cartella REC. REC PLAY
• Sostituzione della batteria
1. Per aprire il coperchio della batteria (sul retro del telecomando), premere verso il basso il coperchio e farlo scorrere da sinistra a destra.
2. Inserire una nuova batteria (batteria tipo CR2025 3V, con il positivo verso l'alto)

A U D I O C O N T R A C T O R
17
ANTI SHOCK CD / USB & SD CARD READER
ANTI SHOCK CD
<
7
7
:
:
;
Caratteristiche
• USB, SD card, CD
• Formati di lettura: MP3 / WMA
• Capacità da 128 MB a 32G per USB o SD card
Descrizione e funzioni del pannello
• • Accensione / SpegnimentoPOWER
• VOLUME • Livello di volume
• • Seleziona USB, SD o CDMODE
• FOLDER • Per l'ascolto di formati MP3. Premere FOLDER per la selezione della cartella desiderata.
• REV • Premendo una volta ritorna all'inizio della traccia corrente; premere di nuovo per la traccia precedente; tenere premuto il pulsante
per indietro veloce.
• PLAY / II • Premere una volta per ascoltare, di nuovo per pausa.
• F.WD • Premere per la traccia seguente; tenere premuto il pulsante per avanti veloce.
• STOP / EJECT • Premere per interrompere la riproduzione e per espellere il CD.
• MUTE • Funzione di Mute
• RAN / ENTER • Riproduzione casuale e conferma.
• Premere per ascoltare tutte le tracce in modo casuale. Premere di nuovo per cancellare la funzione random.
• REP / ID3 • Repeat:
• Per ascoltare nella normale procedura:
1. Premere una volta per ripetere la traccia corrente. Il display visualizza "REP1"
2. Premere nuovamente per la ripetizione di tutte le tracce. Il display visualizza "ALL"
3. Premere di nuovo per cancellare la funzione
• Ascolto dei formati MP3 con CD, USB, SD card:
1. Premere una volta per ripetere la traccia corrente. Il display visualizza "REP1"
2. Premere nuovamente per la ripetizione del contenuto della cartella corrente; Il display visualizza "REP1 F"
3. Premere nuovamente per la ripetizione di tutte le tracce; Il display visualizza "ALL"
4. Premere di nuovo per cancellare la funzione
ID3: Premere il tasto ID3 per 3 secondi, il display mostra le informazioni come il titolo, l'album, il numero della traccia,
il formato del file.
• PROG • Per memorizzare le tracce pre-impostate:
- Premere "PROG". Il display visualizza "PROG", quindi premere i tasti FOLDER e SKIP per selezionare la traccia desiderata.
Premere RAN/ENTER per memorizzare la traccia.
- Ripetere il passaggio sopra per memorizzare più tracce.
- Per ascoltare la traccia memorizzata premere "PLAY / II", il display visualizza "MEMO" e inizia la riproduzione.
- Per cancellare la funzione premere di nuovo.
• Finestra a infrarossi: rileva il segnale dal telecomando
• Connettore USB: accetta supporto USB
• Connettore SD: accetta SD card e MMC card
A U D I O C O N T R A C T O R
18
LCD DISPLAY:
• M3: Quando si è in modalità MP3, il pannello del display mostra M3
• CD: Quando si è in modalità CD, il pannello del display mostra CD
• Quando si è in modalità di riproduzione, viene visualizzato , in pausa viene visualizzato II
• Quando si riproduce ripetutamente il singolo brano, viene visualizzato REP1
• Quando tutti i brani delle cartelle vengono riprodotti ripetutamente, viene visualizzato ALL
• Quando appare REP1 F, si stanno riproducendo ripetutamente le tracce da una cartella specifica
• RAN: Quando la riproduzione è casuale
• PROG: Modalità programma
• MEMO: Quando si riproducono tracce memorizzate
• A B: Quando si ripete la riproduzione tra A e B
• 00: Sotto la modalità MP3 visualizza il numero della cartella
•00: Visualizza il numero della traccia corrente
• 00:00: Visualizza il tempo della traccia corrente
Table of contents
Languages:


