Feelstorm VB607 User manual

Range
260 m
Screen
3.2
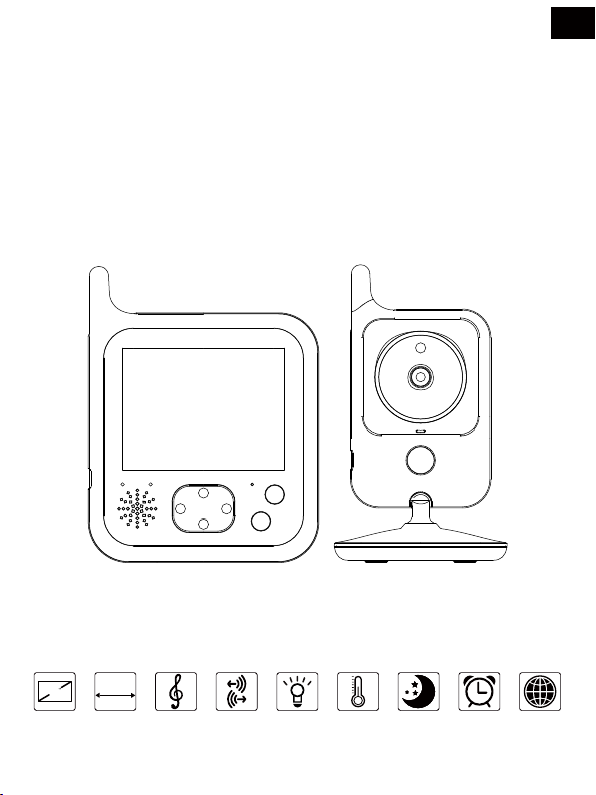
Music Talk back Temperature Night vision Alarm Multi-Languages
VB607 VIDEO BABY MONITOR
User Manual V1.0
1
EN
Night light

2
To your new digital Baby Monitor!
Thank you for purchasing the product. Now you can see and hear your baby
sleeping in the other room or you can monitor your older children in their playroom.
This User's Guide provides you with all the information you need to get the most
from your product.
Before you can use the baby monitor, we recommend you insert and fully charge
the battery in the parent unit, so that it continues to work if you disconnect it from
the mains power to carry it to another location. Please read the Safety Instructions
on page 5 before you install the units.
Got everything?
1 x Parent Unit
1 x Baby Unit
2 x Power adapter
WELCOME…
EN
1. SAFETY INSTRUCTIONS

3
EN
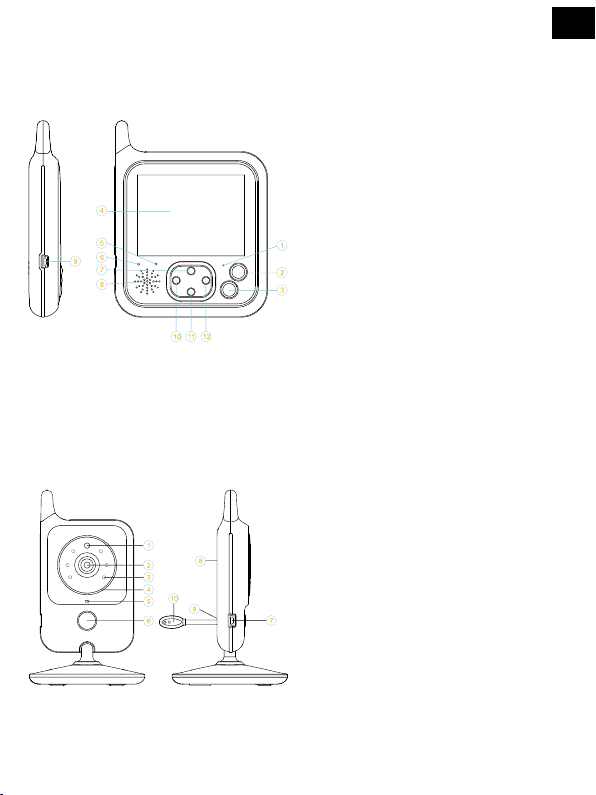
OVERVIEW OF YOUR PARENT UNIT
OVERVIEW OF YOUR BABY UNIT
1. Microphone
2. Power Key/ Return Key
3. OK/ Menu Key
4. LCD Display
5. Power/Charging Indicating LED
6. Signal Indicating LED
7. Up/ Volume +
8. Speaker
9. Power Adapter Connector
10. Music Play ON/OFF Key
11. Down/ Volume –
12. PTT Key
1.Light Sensor
2.Camera Lens
3.Infrared LED
4.Power Indicating LED
5.Microphone
6.Night Light Key
7.Power Adapter Connector
8.Speaker
9.Pair Key
10.Temperature Sensor

TABLE OF CONTENTS
3.5 Talk function
3.6 Adjusting the volume
2.
2.1 Baby unit power supply
3.
2.2 Parent unit power supply
3.1 Setting up
3.2 Pairing camera
3.3 VOX function
3.4 Music player
4
6
6
6
7
7
8
8
8
8
8
9
9
1. 5
6. 14
8
5.7 System info
5.5 VOX
5.6 Languages
5.1 Main menu
5.2 Camera registration
5.3 Alarm
5.4 Settings
5.4.1 Time and date
5.4.2 Temperature unit
5.4.3 Anti-flicker
5.4.4 LCD backlight
9
10
10
11
11
11
11
12
12
13
13
EN
Technical features
5. Menu options
4. Monitoring screen icons
Using the Baby monitor
Safety instructions
Getting started
3.7 Night light function

5
This baby monitor is compliant with all relevant standards regarding electromagnetic
fields and is, when handled as described in the User's Guide, safe to use.
Therefore, always read the instructions in this User's Guide carefully before using
the device.
• Adult assembly is required. Keep small parts away from children when assembling.
• This product is not a toy. Do not allow children to play with it.
• This baby monitor is not a substitute for responsible adult supervision.
• Do not place the baby unit or cables in the cot or within arm's reach of the baby
(at least 1 meter away).
• Keep the cords out of reach of children.
• Do not use the baby monitor near water or a heat source.
• Only use the power adapters provided.
• Do not touch the plug contacts with sharp or metal objects.
SAFETY INSTRUCTIONS
WARNING:
EN

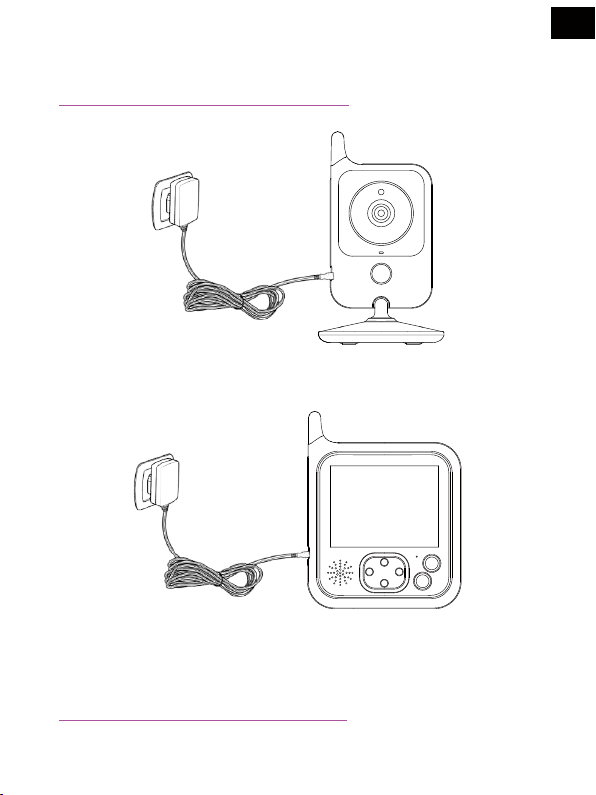
Charging the parent unit fully before use is recommended.
This will allow the unit to operate on battery in the event of a power failure.
2.2.1 Connect the plug of the power adapter to the parent unit and the other end to the mains socket
2.2.2 The charging LED will illuminates means start charging the battery
NOTE: Only use the power adapter provided
2.2.3 Press the power key to turn on the parent unit.
2.2 PARENT UNIT POWER SUPPLY
2.1.1 Connect the small plug of the power adapter to the baby unit and the other end to the mains socket.
NOTE: Only use the power adapter provided
2.1.2 A White light led will display indicate the baby unit is working.
2.1 BABY UNIT POWER SUPPLY
2. GETTING STARTED
6
EN
3. USING THE BABY MONITOR
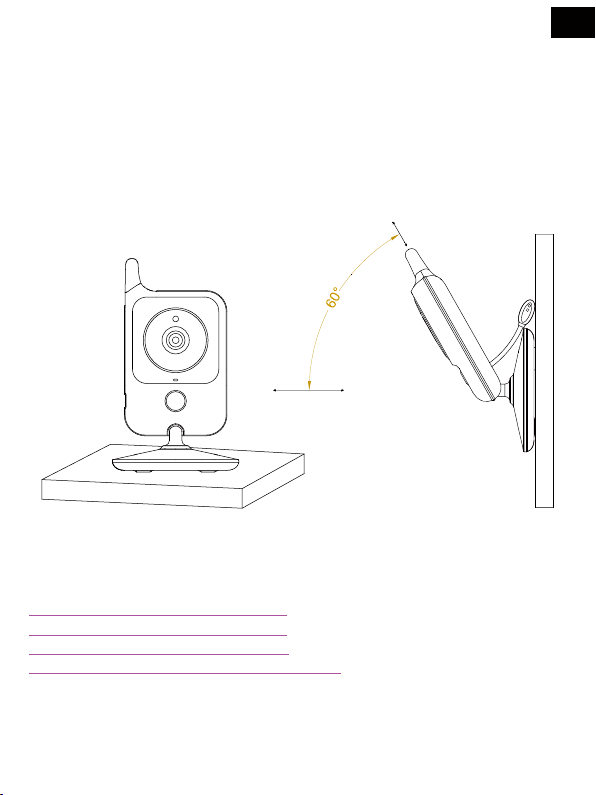
Place the baby unit in a convenient location (e.g. on a table) and point the camera lens towards
the area you want to monitor.
Adjust the baby unit until you are satisfied with the image in the parent unit.
7
3.1 SETTING UP
NOTE:
DO NOT place the baby unit within baby’s reach!
If there is interference on the picture or sound,
try moving the unit to the different locations,
and ensure they are not close to other electrical equipment.
EN

The enclosed baby unit has already been registered ,You do not need to register it again
unless the baby unit loses its link with the parent unit. See section “5.2 Camera Registration”
for more details.
3.3 VOX FUNCTION
Enter VOX menu, choose VOX mode.The VOX mode automatically puts the display in sleep
mode to save battery. It reactivates automatically, when it detects noise in the baby's room.
3.4 MUSIC PLAYER
Press music key will turn on the music player and play lullaby through the baby unit; press
music key again will turn off it.
3.5 TALK FUNCTION
Press and hold PTT key on the parent unit to talk to your baby through the baby unit loudspeaker.
The symbol will be displayed at the bottom of the screen.
3.6 ADJUSTING THE VOLUME
When the video is playing mode, press Volume-key to decrease volume or Volume + key to
increase volume.The display will show the current volume for 5 seconds.
3.7 NIGHT LIGHT FUNCTION
Press the night light key on the baby unit once to enter level one, press two times to enter level 2,
press three times to turn off the night light.
3.2 PAIRING CAMERA
8
EN
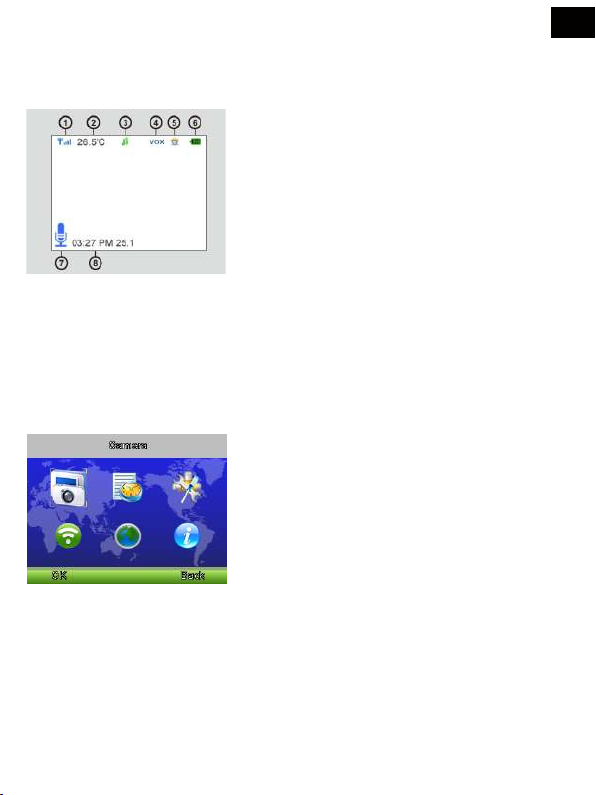
1. Signal strength indicator
2. Temperature of the baby's room
3. Lullaby is playing
4. Vox function activated
5. Alarm activated
6. Battery indicator
7. PTT function activated
8. Date and time ( HH:MM AM/PM DD/MM )
4. MONITORING SCREEN ICONS
5. MENU OPTION
5.1 MAION MENU
Press “OK/Menu” Key at monitoring screen will enter the main menu,
it contains 6 items:
1.Camera
2.Alarm
3.VOX
4.Settings
5. Languages
6. System info
You can press the “up” Key or “down” Key to move the cursor to select an
item and press “Menu” key will enter the sub-menu which you selected.
Press “Power” key will be back to the monitoring screen.
9
EN

Press “OK/Menu” key to enter registering screen, then push the “pair” key on the back of baby unit
within 10 seconds.
5.2 CAMERA REGISTRATION
5.3 ALARM
Press “PTT” key to move the cursor and “up/down” key to change value.
10
EN

5.4 SETTINGS
5.4.1 Time and date
Press“PTT”key to move the cursor and “Up/Down” key to change value.
There are contains 2 items in this menu Set time / date Set format
5.4.2 Temperature unit
Switch the unit to Celsius or Fahrenheit
5.4.3 Anti-flicker
You are able to adjust the frequency of 50 / 60 HZ to suit your lighting for anti-flicker.
11
EN

12
EN
5.4.4 LCD backlight
You are be able to adjust the brightness of the LCD you are viewing and the LCD
backlight active time in menu operation.
5.5 VOX
System mode
This menu allows you to choose the working mode
from the following: Normal mode / VOX mode
VOX Sensitivity
Switch the Vox sensitivity at Low / Medium / High level

5.6 LANGUAGE
Language setting menu allows you to choose your language from the following:
5.7 SYSTEM INFO
There are contains system information such as Project id,Hardware version,
software version ,build date etc.
13
EN

14
Frequency: 2.4GHz digital
Modulation mode: GFSK
Operating temperature: -10 to +45°C
Operating Humidity: <85%
Range: 260m in open field
Monitor
LCD: 3.2-inch TFT LCD
Resolution: 320 x 240
Battery: Li-polymer 1150mAh
Dimensions(W x H x D): 94 x 120 x 20mm
Camera
Sensor: 0.3Mega pix CMOS
Minimum illumination: 0Lux (IR on)
Night vision distance: 15ft (5m)
Lighting sensor
Temperature sensor
Dimensions (W x H x D) : 74 x 125 x 74mm
6. TECHNICAL FEATURES
EN
Manuel de l'utilisateur V1.0
VB60 Moniteur Vidéo Bébé
1
FR
Range
260 m
Screen
3.2
Music Talk back Temperature Night vision Alarm Multi-Languages
Night light

2
TÀ votre nouveau moniteur bébé numérique!
Merci d'avoir acheté le produit. Maintenant, vous pouvez voir et entendre votre
bébé dormir dans l'autre salle ou vous pouvez surveiller vos enfants plus âgés
dans leur salle de jeux.
Ce manuel vous fournit toutes les informations dont vous avez besoin. Avant
d’utiliser le moniteur pour bébé, nous vous recom-mandons d'insérer et de recharger
complètement la batterie dans l'unité parent afin qu'elle continue à fonctionner si
vous la transportez à un autre endroit. Veuillez lire les introductions de sécurité à
la page 5 avant d'installer les appareils.
Emballage inclus?
1 x Moniteur
1 x Caméra
2 x Adaptateur
BIENVENUE…
FR
1. INSTRUCTIONS DE SÉCURITÉ
3
FR
CONTOUR DE VOTRE MONITEUR
VUE D'ENSEMBLE DE VOTRE UNITÉ BÉBÉ
1. Microphone
2. Clé d'alimentation / Clé de retour
3. OK/ Touche Menu
4. Afchage lcd
5. Voyant d’alimentation/ Charge Iduiquant Conduit
6. Signal Indiquant
7. Up/ Volume +
8. Conférencier
9. Connecteur de l'adaptateur d'alimentation
10. Touche musique on / off
11. Down/ Volume –
12. Bouton de PTT
1.Capteur de lumière
2.Objectif de la caméra
3.LED infrarouge
4.LED indiquant la puissance
5.Microphone
6.Bouton de lumière de nuit
7.Connecteur de l'adaptateur d'alimentation
8.Conférencier
9.Clé de paire
10.Capteur de température

TABLE DES MATIÈRES
3.5 Fonction de conversation
3.6 Ajuster le volume
2.
2.1 Alimentation de l'unité bébé
3.
2.2 Alimentation électrique de l'unité parentale
3.1 Confguration
3.2 Jumelage de caméra
3.3 Fonction VOX
3.4 Lecteur de musique
4
6
6
6
7
7
8
8
8
8
8
9
9
1. 5
6. 14
3.7 Fonction lumière de nuit 8
5.5 VOX
5.7 Info système
5.6 langues
5.1 Menu principal
5.2 Enregistrement de la caméra
5.3 Alarme
5.4 Paramètres
5.4.1 Heure et date
5.4.2 Unité de température
5.4.3 Anti-scintillement
5.4.4 Rétroéclairage LCD
9
10
10
11
11
11
11
12
12
13
13
FR
Caractéristiques techniques
5. Options du menu
4. Icônes d'écran de surveillance
Utilisation du moniteur pour bébé
Instructions de sécurité
Commencer

5
Ce moniteur bébé est conforme à toutes les normes relatives aux champs
électromagnétiques et, lorsqu’elles sont traitées comme décrit dans le Guide
de l’utilisateur, peuvent être utilisées en toute sécurité. Par conséquent, lisez
toujours attentivement les instructions du présent Guide de l'utilisateur avant
d'utiliser l'appareil.
• L'assemblage des adultes est requis. Gardez les petites pièces loin des
enfants lors de l'assemblage.
• Ce produit n'est pas un jouet. Ne permettez pas aux enfants de jouer avec.
• Ce moniteur pour bébé ne remplace pas une supervision adulte responsable.
• Ne placez pas l'unité bébé ou les câbles dans le lit ou à portée de main du
bébé (à au moins 1 mètre).
• Gardez les cordons hors de portée des enfants.
• N'utilisez pas le moniteur pour bébé près de l'eau ou d'une source de chaleur
• N'utilisez que les adaptateurs fournis.
• Ne touchez pas les contacts de la fiche avec des objets pointus ou métalliques.
INSTRUCTIONS DE SÉCURITÉ
ATTENTION:
FR
Charger complètement l’unité parent avant de l’utiliser est conseillé.
Cela permettra à l'unité de faire fonctionner la batterie en cas de panne
de courant.
2.2.1 Connectez la fche de l’adaptateur secteur au unité parent et l'autre extrémité à la prise de courant
REMARQUE: N'utilisez que l'adaptateur secteur fourni
2.2.2 La LED de charge s'allume signife que la batterie commence à se charger
2.2.3 Appuyez sur la touche marche / arrêt pour allumer l'unité parent.
2.2 ALIMENTATION DE L'UNITÉ PARENTALE
2.1.1 Connectez la petite fche de l'adaptateur secteur à l'unité bébé et l'autre extrémité à la prise secteur.
REMARQUE: N'utilisez que l'adaptateur secteur fourni
2.1.2 Une lumière blanche indique que l'unité bébé fonctionne.
2.1 ALIMENTATION BÉBÉ UNITÉ
2. COMMENCER
6
FR
Table of contents
Languages:


