Feider Machines Fm20V115 User manual

1
ORIGINAL
INSTRUCTIONS
Instruction Manual
CORDLESS JIG SAW
FSS20V

1
CAUTION: READ THIS INSTRUCTION MANUAL BEFORE USE THIS MACHINE
BUILDER SAS
32, rue Aristide Bergès -ZI 31270 Cugnaux –France
MADE IN PRC 2019

2
1. SAFETY INSTRUCTIONS
WARNING Read all safety warnings and all instructions. Failure to follow the
warnings and instructions may result in electric shock, fire and/or serious injury.
Save all warnings and instructions for future reference. The term "power tool" in the
warnings refers to your mains-operated (corded) power tool or battery-operated (cordless)
power tool.
1) Work area safety
a) Keep work area clean and well lit. Cluttered or dark areas invite accidents.
b) Do not operate power tools in explosive atmospheres, such as in the presence of
flammable liquids, gases or dust. Power tools create sparks which may ignite the dust or
fumes.
c) Keep children and bystanders away while operating a power tool. Distractions can
cause you to lose control.
2) Electrical safety
a) Power tool plugs must match the outlet. Never modify the plug in any way. Do not use
any adapter plugs with earthed (grounded) power tools. Unmodified plugs and matching
outlets will reduce risk of electric shock.
b) Avoid body contact with earthed or grounded surfaces, such as pipes, radiators,
ranges and refrigerators. There is an increased risk of electric shock if your body is earthed
or grounded.
c) Do not expose power tools to rain or wet conditions. Water entering a power tool will
increase the risk of electric shock.
d) Do not abuse the cord. Never use the cord for carrying, pulling or unplugging the
power tool. Keep cord away from heat, oil, sharp edges or moving parts. Damaged or
entangled cords increase the risk of electric shock.
e) When operating a power tool outdoors, use an extension cord suitable for outdoor
use. Use of a cord suitable for outdoor use reduces the risk of electric shock.
f) If operating a power tool in a damp location is unavoidable, use a residual current
device (RCD) protected supply. Use of an RCD reduces the risk of electric shock.
3) Personal safety
a) Stay alert, watch what you are doing and use common sense when operating a power
tool. Do not use a power tool while you are tired or under the influence of drugs, alcohol
or medication. A moment of inattention while operating power tools may result in serious
personal injury.

2
b) Use personal protective equipment. Always wear eye protection. Protective equipment
such as dust mask, non-skid safety shoes, hard hat, or hearing protection used for appropriate
conditions will reduce personal injuries.
c) Prevent unintentional starting. Ensure the switch is in the off-position connecting to
power source and/or battery pack, picking up or carrying the tool. Carrying power tools
with your finger on the switch or energizing power tools that have the switch on invites
accidents.
d) Remove any adjusting key or wrench before turning the power tool on. A wrench or a

3
key left attached to a rotating part of the power tool may result in personal injury.
e) Do not overreach. Keep proper footing and balance at all times. This enables better
control of the power tool in unexpected situations.
f) Dress properly. Do not wear loose clothing or jeweler. Keep your hair, clothing and
gloves away from moving parts. Loose clothes, jeweler or long hair can be caught in moving
parts.
g) If devices are provided for the connection of dust extraction and collection facilities,
ensure these are connected and properly used. Use of dust collection can reduce
dust-related hazards.
4) Power tool use and care
a) Do not force the power tool. Use the correct power tool for your application. The
correct power tool will do the job better and safer at the rate for which it was designed.
b) Do not use the power tool if the switch does not turn it on and off. Any power tool that
cannot be controlled with the switch is dangerous and must be repaired.
c) Disconnect the plug from the power source and/or the battery pack from the power
tool before making any adjustments, changing accessories, or storing power tools.
Such preventive safety measures reduce the risk of starting the power tool accidentally.
d) Store idle power tools out of the reach of children and do not allow persons
unfamiliar with the power tool or these instructions to operate the power tool. Power
tools are dangerous in the hands of untrained users.
e) Maintain power tools. Check for misalignment or binding of moving parts, breakage
of parts and any other condition that may affect the power tool’s operation. If damaged,
have the power tool repaired before use. Many accidents are caused by poorly maintained
power tools.
f) Keep cutting tools sharp and clean. Properly maintained cutting tools with sharp cutting
edges are less likely to bind and are easier to control.
g) Use the power tool, accessories and tool bits etc. in accordance with these
instructions, taking into account the working conditions and the work to be performed.
Use of the power tool for operations different from those intended could result in a hazardous
situation.
5) Battery tool use and care
a) Recharge only with the charger specified by the manufacturer. A charger that is
suitable for one type of battery pack may create a risk of fire when used with another battery
pack.
b) Use power tools only with specifically designated battery packs. Use of any other
battery packs may create a risk of injury and fire.
c) When battery pack is not in use, keep it away from other metal objects, like paper lips,
coins, keys, nails, screws or other small metal objects, that can make a connection from
one terminal to another. Shorting the battery terminals together may cause burns or a fire.

3
d) Under abusive conditions, liquid may be ejected from the battery; avoid contact. If
contact accidentally occurs, flush with water. If liquid contacts eyes, additionally seek
medical help. Liquid ejected from the battery may cause irritation or burns.

4
Hold power tool by insulated gripping surfaces, when performing an operation where
the cutting accessory may contact hidden wiring. Cutting accessory contacting a "live"
wire may make exposed metal parts of the power tool "live" and could give the operator an
electric shock.
Explanations of symbols
Conforms to relevant safety standards
To reduce the risk of injury, the user must read
and understand this manual before using this
Wear ear protectors. Exposure to noise can
Wear eye protection.
Wear respiratory protection.
Do not dispose of old appliances with domestic
Intended Use
This machine is a cuttingtool cuttingmaterialssuchas wood or steel or metalusing a blade. Do
not use this tool for other activities. Use this tool as described in this manual, cutting only the
appropriate materials with the appropriate blades. Misuse can result in accidents and personal
injury.
Residual risks
These residual risks can occur at any time during the operation of the tool:
-Contact and cuts from the blade
-Inhalation of particles from material to be cut
-Projection of the cutting element
-Projection of cut material
-Development of toxic dusts / fumes when used in confined spaces (vomiting / nausea)
-Hearing loss in the absence of good hearing protection
To reduce these residual risks, always wear a full protective gear and always be careful when
using the tool.
5
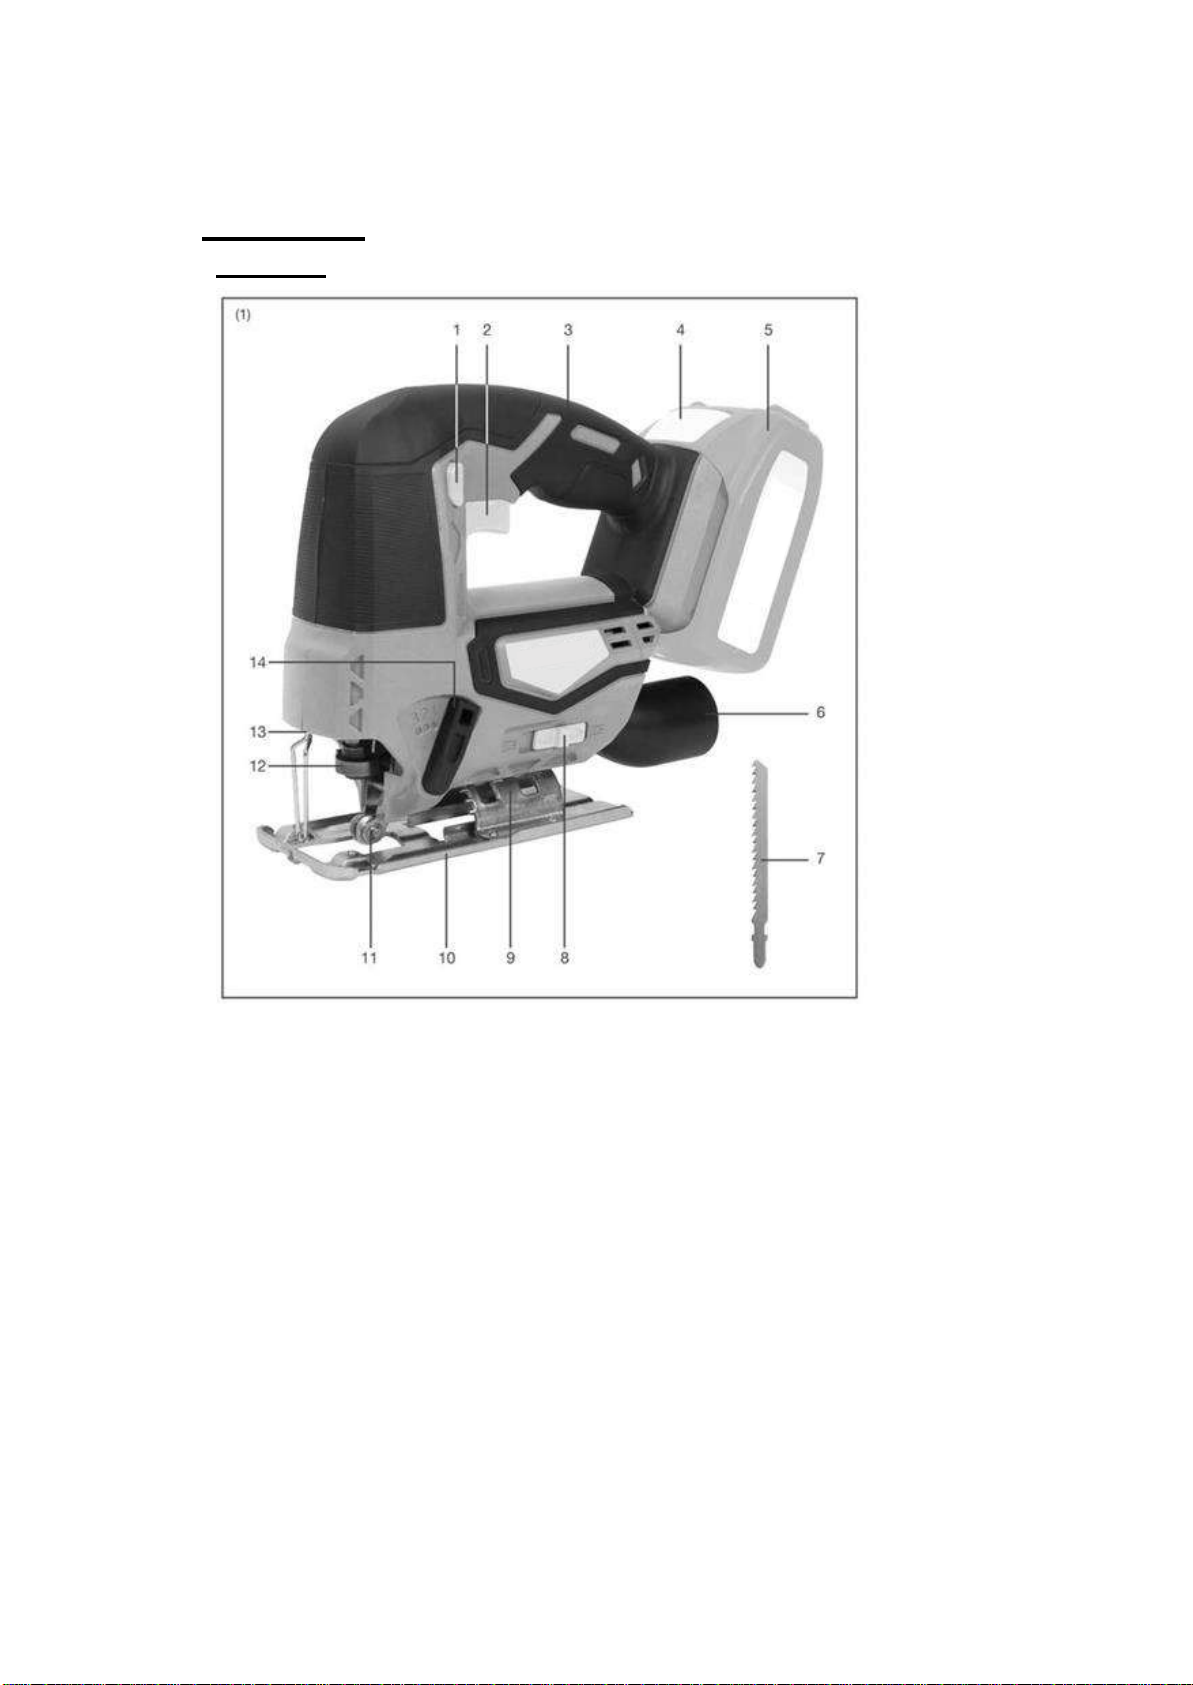
2. YOUR PRODUCT
a. Description

5
1. Lock-off button
2. ON/OFF trigger
3. Handle
4. Battery release catch ( not in package)
5. Li-on battery ( not in package)
6. Dust extraction outlet
7. Wood cutting saw blade
8. Forward/rear air outlet ON/OFF
9. Angle scale
10. Saw base
11. Blade roller support
12. Quick change blade clamp lever
13. Work light
14. Orbital adjustment knob
Ahexagon key is delivered with the tool

6
b. Technical specifications
voltage
20 Vdc
No load speed
0-2500/min
Blade type
T type blade
Max cut in wood (mm)
50
Max cut in steel (mm)
5
Cutting angle
0
o
/15
o/30o/45o
Sound pressure level
LpA=76dB(A),
K=5dB(A)
Sound power level
LwA=87dB(A),
K=5dB(A)
Vibration
Cutting board
6.28m/s2, K=1.5 m/s2
Cutting steel metal
5.78m/s2, K=1.5 m/s2
Information:
The declared vibration total value has been measured in accordance with a standard
test method and may be used for comparing one tool with another;
The declared vibration total value may also be used in a preliminary assessment of
exposure.
Warning:
that the vibration emission during actual use of the power tool can differ from the
declared total value depending on the ways in which the tool is used; and
of the need to identify safety measures to protect the operator that are based on an
estimation of exposure in the actual conditions of use (taking account of all parts of
the operating cycle such as the times when the tool is switched off and when it is
running idle in addition to the trigger time).
Wear hearing protection.

3.UTILISATION

7
8
a. Charging
1). Take the battery pack out of the equipment. Do this by pressing the side pushlock buttons.
2). Check that your mains voltage is the same as that marked on the rating plate of the battery
charger. Insert the power plug of the charger into the socket outlet. The RED LED will then
begin to light.
3). Insert the battery pack into the battery charger .then the red LED on charger will begin to
Green flash light.
4). You will find a label with “Charger indicator” of the LED indicator on the charger.
The battery pack can become a little warm during the charging. This is normal.
If the battery pack fails to charge, check:
⚫Voltage at the power socket
⚫Whether there is good contact at the charging contacts.
⚫Whether the battery pack is warm or not, The battery protection system will not allow the
battery to be charged if the battery temperature is over 40℃after use, allow the battery
pack to cool to room temperature before commencing with the charging.
If the battery pack still fails to charge, send the charging unit and the battery pack to our
customer service center.
To ensure that the battery pack provides long service, you should take care to recharge it
promptly. You must recharge the battery pack when you notice that the power of the cordless
vacuum drops. Never allow the battery pack to become fully discharged. This will cause it to
develop a defect.
Battery capacity indicator
Press the switch for the battery capacity indicator . The battery capacity indicator shows the
charge status of the battery using 4 LEDs as following:

8
All 4 LEDs are lit:
The battery is fully charged.
3 LED(s) are lit:
The battery has approx 75% remaining charge.
2 LED(s) are lit:
The battery has approx 50% remaining charge.
1 LED is lit:
The battery will be empty soon, please recharge the battery.
b. Charge indicator
To display the amount of charge left in the battery, press the charge level indicator button,
Fig.2.
Indicator status
Explanations and actions
Ready for use
The charger is connected to the mains and is ready for use; there is no
battery pack in the charger.
Charging
The charger is charging the battery pack in charge mode.
Battery pack is full of charge.
Charging is finished and battery pack in the charger.
The temperature of battery is too high or too low, the charger is under
protection status. The charging function can be recovered after the
temperature is normal.
Unrecoverable battery malfunction.

8

9
c. INSTALLING JIGSAW
Selecting the correct type of blade is important in order to obtain the best performance
from the saw. Select the blade based on the application and on the material you wish to
cut. Selecting the right blade will give you a smoother, faster cut and prolong the life of the
blade.
Note: Before attaching a blade please ensure that the battery is not connected to the
jigsaw.
To fit the blade, push the quick change blade clamp lever until it stops, Fig 3.
Holding the blade clamp lever in the open position, insert the saw blade as far as possible
into the slot in the saw bar, Fig 4.
Check to make sure the back of the saw blade is centered in the groove of the roller guide.
Release the blade clamp lever. Make sure the blade is securely in place.
Note: During use periodically check the security of the blade.
d. INSTALLING THE BATTERY PACK
Warning! Always remove battery pack from your tool when you are assembling parts,
making adjustments, cleaning, carrying, transporting or when not in use. Removing battery
pack will prevent accidental starting that could cause serious personal injury.
NOTE: To avoid serious personal injury, always remove the battery pack and keep hands
clear of the lock-out button when carrying or transporting the tool.
Slice the battery pack into the tool base, Fig.5. (Note the battery has raised ribs which
allow it to fit into the pole saw only one way). Make sure the battery pack snaps into place
and that battery pack is secured in the tool before beginning operation. Improper
installation of the battery pack can cause damage to internal components.
e.
REMOVING THE BATTERY PACK
Locate the battery release catch on the top of the battery and press downwards, Fig.6.
Whilst holding down the battery release catch slide the battery pack away from the tool.
f. TURNING THE JIGSAW ON & OFF
To turn the jigsaw ON, depress the lock-off safety button, Fig 7 and then depress the
On/Off switch, Fig 8.
Release the On/Off switch to turn the jigsaw OFF.

9
g. VARIABLE SPEED CONTROL
Simply apply light pressure to the trigger to start the jigsaw on a slow speed. Increasing
the pressure on the trigger will increase the speed of the jigsaw.
Note: You might hear a high pitched noise from the trigger during use. Do not be
concerned; this is a normal part of the trigger function.
h. LED WORK LIGHT
Caution: Do not look in the light or see the source of light directly.
Pull the On/Off trigger to light up the lamp. The lamp keeps on lighting while the switch
trigger is being pulled. The lamp goes out immediately after releasing the trigger.

10
i. ORBITAL MOTION
The blade of the jigsaw cuts in an orbital motion. This feature is adjustable and provides
faster, more efficient cutting.
With orbital motion the blade cuts through your work in the upstroke but does not drag
across your work in the down stroke. The higher settings should be used when fast cutting
in soft material is desired. The lower settings should be used when cutting materials with
more resistance. The '0' setting shuts off the orbital motion. Setting *3' offers the maximum
orbital motion, Fig 9.
j. ANGLE CUTTING (BEVEL CUTTING)
Set the cutting angle to one of the preset angles of 0º, 15°, 30*or 45°.
Loosen the two hexagon screws (Fig 10) located on the underside of the machine using
the hexagon key provided.
Slightly raise the base until the base can be moved to one of the preset cutting angles
shown on the angle scale (Fig 11). Finally re-tighten the hex screws.
k. GENERAL CUTTING
Rest the front of the saw base on the workpiece and align cutting edge of the blade with
the tine on your workpiece.
Start your saw and move it forward on the work surface. Press the machine firmly down
onto the workpiece and push slowly forward letting the blade cut freely. Increasing the
pressure will not result in a faster cut.
Note: If the jigsaw base is not held firmly into the workpiece the blade will snag and break.
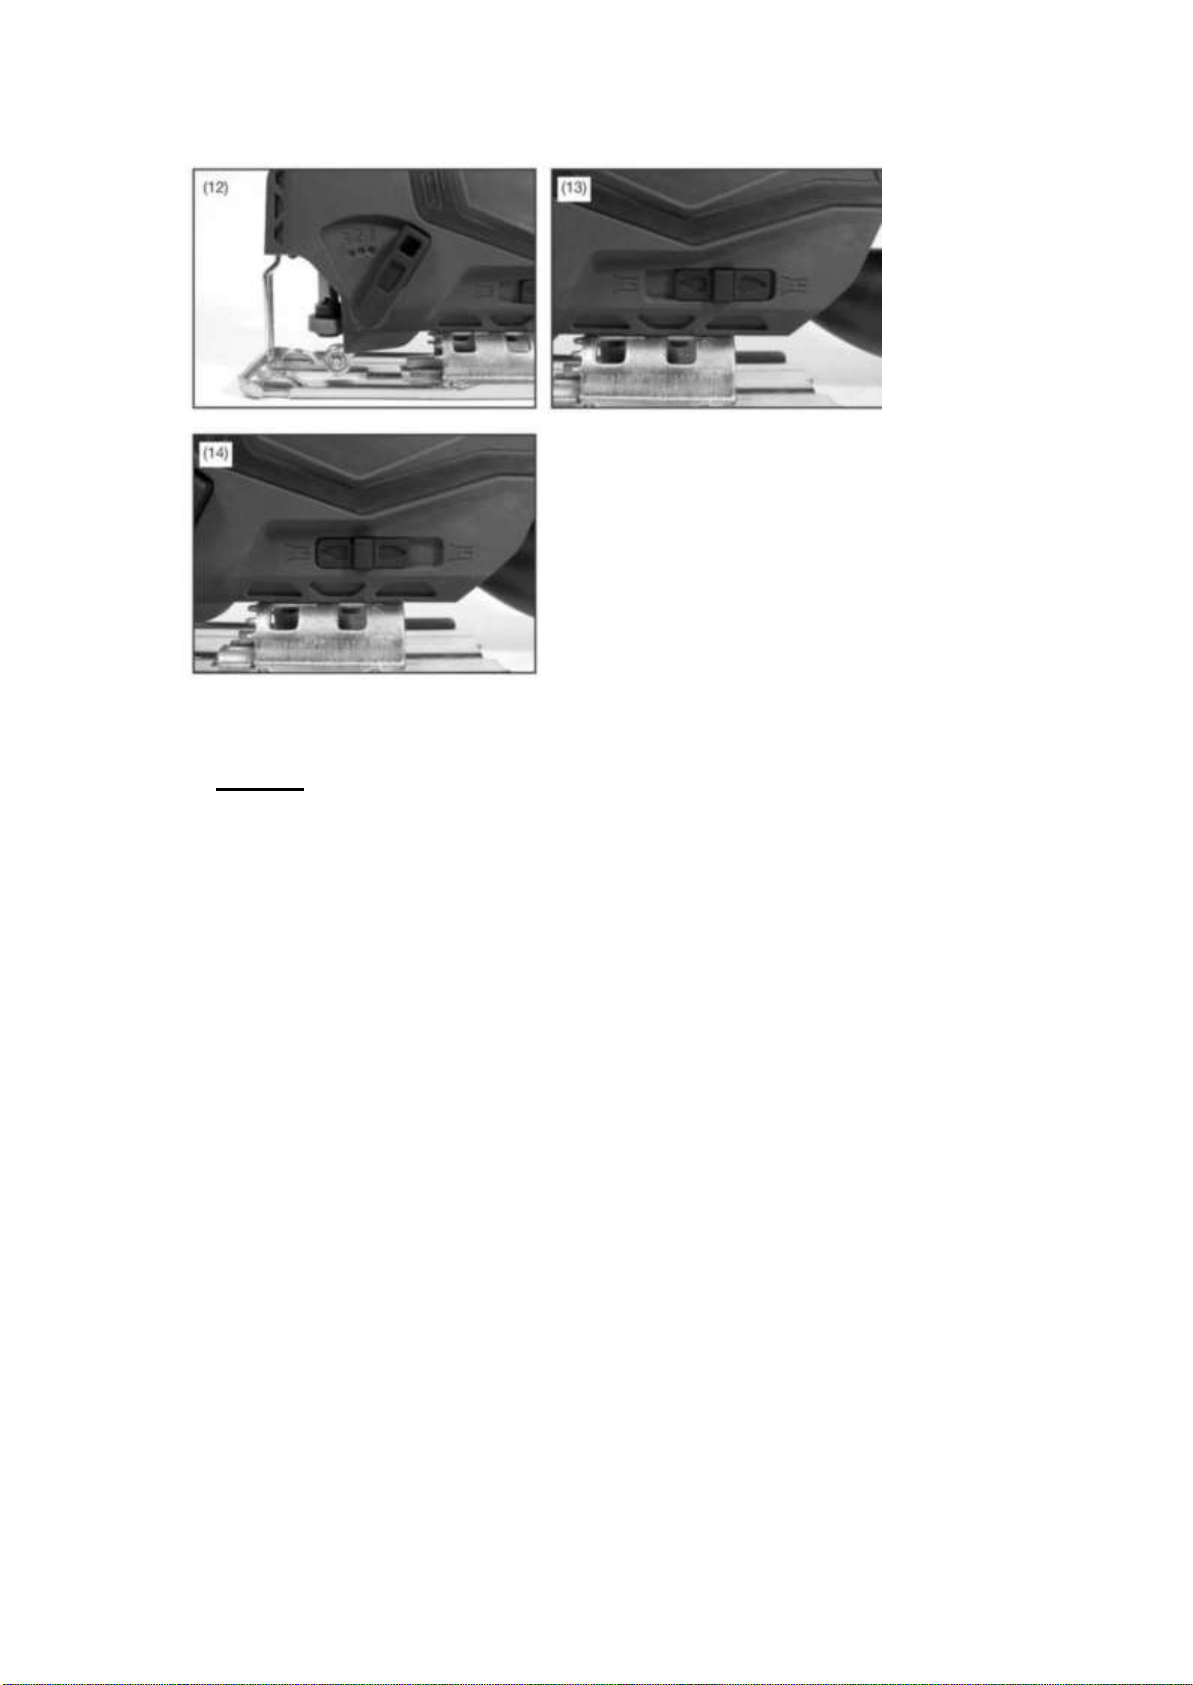
l. METAL CUTTING
NOTE: The jigsaw has to be in the no-orbit mode to cut metals and conduit. Set the orbital
adjustment knob to "0", Fig 12.
When cutting metals a suitable cooling/cutting oil must be used. Simply squirt the lubricant
onto the blade or work piece at regular intervals during cutting to reduce blade wear.
NOTE: Do not immerse the jigsaw in water or allow coolant to enter the casing. A fatal
electric shock could occur.
When cutting conduit, pipe or angle iron, clamp work in a vice if possible and saw close to
the vice. To cut thin sheet materials, "sandwich* the material between hardboard or
plywood and clamp the layers to eliminate vibration and material tearing. By doing this, the
material will be cut smoothly. Lay out your pattern or line of cut on top of the "sandwich."
Note: When cutting metal, keep exposed portion of saw bar clean and free of metal chips

10
by wiping frequently with an oily cloth. Use extreme caution in disposing of oily cloth after
completion of job to prevent potential fire hazard.
m. FORWARD/REARAIR OUTLET
The forward air outlet can be used to either blow debris from the blade during operation or
send the air to the dust extraction outlet. To select air to be blown towards the blade, slide
the switch to the right, Fig 13. To select air to be blown towards the dust extraction outlet

11
slide the switch to the left, Fig 14.
n. CIRCLE CUTTING
When starting a cut from the center of the work piece, drill a 12mm diameter hole to
ensure that there is enough clearance for the blade.
When cutting materials with a decorative or polished finish cover either the base of the
jigsaw or the surface of the material being cut with masking or other suitable tape to
prevent scratching.
3. MAINTENANCE
a. Maintenance
After each use, remove the accumulator from its compartment and check for damage.
Correct maintenance is essential to maintain the original efficiency and safety of the
machine over time.
Keep all nuts, bolts and screws tight to be sure the equipment is in a safe working
condition.
Never use the machine with worn or damaged parts. Damaged parts are to be replaced
and never repaired.
Only use original spare parts. Parts that are not of the same quality van be seriously
damage the equipment and compromise safety.
During maintenance,remove the battery from the tool.
To avoid overheating and damage to the motor, always keep the cooling air vents clean
and free of sawdust and debris.
Clean the housing only with a damp cloth. Do not use solvents! Then wipe thoroughly.
Check the condition of the tool. If the tool is damaged or has malfunction, do not use it and
bring it to a qualified service for inspection or reparation.
To maintain the optimum battery power, we recommendthat the battery be discharged and
recharged every two months.
b. Storage
Remove the battery from the tool.
Put the blade protection on the blade of the tool during transport and storage.
Store the tool in a dry place and protected from freezing, the ambient temperature should
This manual suits for next models
1
Table of contents
Other Feider Machines Cordless Saw manuals


