Feider Machines FCBN20V User manual

1
ORIGINAL INSTRUCTIONS
CORDLESS GRASS TRIMMER
FCBN20V
INSTRUCTIONS MANUAL
WARNING: READ THE FOLLOWING INSTRUCTIONS BEFORE USE THIS
MACHINE
BUILDER SAS
32, rue Aristide Bergès - ZI 31270 Cugnaux – France
MADE IN PRC 2020

2
1.SAFETY WARNINGS
WARNING Read all safety warnings
and all instructions. Failure to follow the
warnings and instructions may result in
electric shock, fire and/or serious injury.
Save all warnings and instructions for
future reference. The term "power tool" in
the warnings refers to your mains-operated
(corded) power tool or battery-operated
(cordless) power tool.
1) Work area safety
a) Keep work area clean and well lit.
Cluttered or dark areas invite accidents.
b) Do not operate power tools in
explosive atmospheres, such as in the
presence of flammable liquids, gases or
dust. Power tools create sparks which may
ignite the dust or fumes.
c) Keep children and bystanders away
while operating a power tool. Distractions
can cause you to lose control.
2) Electrical safety
a) Power tool plugs must match the
outlet. Never modify the plug in any way.
Do not use any adapter plugs with
earthed (grounded) power tools.
Unmodified plugs and matching outlets will

3
reduce risk of electric shock.
b) Avoid body contact with earthed or
grounded surfaces, such as pipes,
radiators, ranges and refrigerators. There
is an increased risk of electric shock if your
body is earthed or grounded.
c) Do not expose power tools to rain or
wet conditions. Water entering a power
tool will increase the risk of electric shock.
d) Do not abuse the cord. Never use the
cord for carrying, pulling or unplugging
the power tool. Keep cord away from
heat, oil, sharp edges or moving parts.
Damaged or entangled cords increase the
risk of electric shock.
e) When operating a power tool outdoors,
use an extension cord suitable for
outdoor use. Use of a cord suitable for
outdoor use reduces the risk of electric
shock.
f) If operating a power tool in a damp
location is unavoidable, use a residual
current device (RCD) protected supply.
Use of an RCD reduces the risk of electric
shock.
3) Personal safety
a) Stay alert, watch what you are doing
and use common sense when operating

4
a power tool. Do not use a power tool
while you are tired or under the influence
of drugs, alcohol or medication. A
moment of inattention while operating power
tools may result in serious personal injury.
b) Use personal protective equipment.
Always wear eye protection. Protective
equipment such as dust mask, non-skid
safety shoes, hard hat, or hearing protection
used for appropriate conditions will reduce
personal injuries.
c) Prevent unintentional starting. Ensure
the switch is in the off-position
connecting to power source and/or
battery pack, picking up or carrying the
tool. Carrying power tools with your finger
on the switch or energizing power tools that
have the switch on invites accidents.
d) Remove any adjusting key or wrench
before turning the power tool on. A
wrench or a key left attached to a rotating
part of the power tool may result in personal
injury.
e) Do not overreach. Keep proper footing
and balance at all times. This enables
better control of the power tool in
unexpected situations.
f) Dress properly. Do not wear loose

5
clothing or jewelry. Keep your hair,
clothing and gloves away from moving
parts. Loose clothes, jewelry or long hair
can be caught in moving parts.
g) If devices are provided for the
connection of dust extraction and
collection facilities, ensure these are
connected and properly used. Use of dust
collection can reduce dust-related hazards.
4) Power tool use and care
a) Do not force the power tool. Use the
correct power tool for your application.
The correct power tool will do the job better
and safer at the rate for which it was
designed.
b) Do not use the power tool if the switch
does not turn it on and off. Any power tool
that cannot be controlled with the switch is
dangerous and must be repaired.
c) Disconnect the plug from the power
source and/or the battery pack from the
power tool before making any
adjustments, changing accessories, or
storing power tools. Such preventive
safety measures reduce the risk of starting
the power tool accidentally.
d) Store idle power tools out of the reach
of children and do not allow persons

6
unfamiliar with the power tool or these
instructions to operate the power tool.
Power tools are dangerous in the hands of
untrained users.
e) Maintain power tools. Check for
misalignment or binding of moving parts,
breakage of parts and any other
condition that may affect the power
tool’s operation. If damaged, have the
power tool repaired before use. Many
accidents are caused by poorly maintained
power tools.
f) Keep cutting tools sharp and clean.
Properly maintained cutting tools with sharp
cutting edges are less likely to bind and are
easier to control.
g) Use the power tool, accessories and
tool bits etc. in accordance with these
instructions, taking into account the
working conditions and the work to be
performed. Use of the power tool for
operations different from those intended
could result in a hazardous situation.
5) Battery tool use and care
a) Recharge only with the charger
specified by the manufacturer.A charger
that is suitable for one type of battery pack

7
may create a risk of fire when used with
another battery pack.
b) Use power tools only with specifically
designated battery packs.Use of any
other battery packs may create a risk of
injury and fire.
c) When battery pack is not in use, keep
it away from other metal objects, like
paper lips, coins, keys, nails, screws or
other small metal objects, that can make
a connection from one terminal to
another.Shorting the battery terminals
together may cause burns or a fire.
d) Under abusive conditions, liquid may
be ejected from the battery; avoid
contact. If contact accidentally occurs,
flush with water. If liquid contacts eyes,
additionally seek medical help.Liquid
ejected from the battery may cause irritation
or burns.
6) Service
a) Have your power tool serviced by a
qualified repair person using only
identical replacement parts.This will
ensure that the safety of the power tool is
maintained

8
ADDITIONAL SAFETY RULES FOR
GRASS TRIMMER
Keep in mind that the operator or user is
responsible for accidents or hazards
occurring to other people or their property.
Danger! The cutting elements continue to
rotate after the motor is switched off
Before use check the tool and battery
about signs of damage or ageing. If there
are damages or ageing, do not use the
tool and bring it to a qualified service for
inspections and reparations.
Read the instruction carefully. Be familiar
with the controls and proper use of the
equipment.
Local regulation may restrict the age of the
operator.
Always wear substantial footwear and long
trousers while operating the machine
Wear ear, eye and dust protection at all
times. Wear also helmet, gloves and
protection clothes.
Warning - never allow children, persons
with reduced physical, sensory or mental
capabilities or lack of experience and
knowledge or people unfamiliar with these
instructions to use the machine.

9
Avoid using the trimmer while people,
especially children, infirm people or pets,
are nearby.
Use the trimmer only in daylight or good
artificial light.
Never operate the trimmer with damaged
guards or shields or without guards or
shields in place.
Switch on the motor only when the hands
and feet are away from the cutting means.
Never fit metal cutting elements.
Use only the manufacturer’s
recommended placement parts and
accessories.
Switch off and remove the battery when
leaving the trimmer unattended.
Switch off and remove the battery before
carrying out maintenance or cleaning work.
Inspect and maintain the trimmer regularly.
Have the trimmer repaired only by an
authorised repairer.
Take care against injury from the cutting
lines. After extending new cutter line or
replacing the spool line. Always return the
trimmer to its normal operating position
before switching on.
When not in use, store the trimmer out of
the reach of children and infirm people.

10
Periodically inspect the condition of the
cutting head. If the spool is damaged,
switch off; replace the spool by a new one.
Do not use the machine to cut grass,
which is not on the ground. For example,
do not cut grass, which is on walls or
rocks.
Do not switch on the machine in enclosed
or poorly ventilated spaces or in the
presence of inflammable and /or explosive
substances such as liquid, gases and
powders.
Always stop the trimmer and remove the
battery when cutting is delayed or when
walking from one cutting location to
another.
Do not cross roads or gravel paths with
machine still running.
Only use the machine according to the
instructions given in this manual.
Do not extend the trimming line beyond
the guard and do not operate the trimmer
without both lines extended and proper
line installed.
Check regularly that the nuts, bolts and
screws are tight.
Switch off the tool and remove the battery
when:

11
owhenever the machine is left by the
user;
obefore clearing a blockage;
obefore checking, cleaning or working
on the machine;
oafter striking a foreign object to inspect
the machine for damage
oif the machine starts to vibrate
abnormally, for immediately check;
Never to replace the non-metallic cutting
means with metallic cutting means.
Do not overreach and to keep the balance
at all times.
Always be sure of the footing on slopes.
Walk, never run.
Warning! Do not touch moving hazardous
parts before the machine is disconnected
from the mains. The moving hazardous
parts have come to a complete stop;
Avoid using the machine in bad weather
conditions especially when there is a risk
of lightning;
In case of abnormal vibration, immediately
stop to use the machine. When the
machine is in a complete stop, inspect the
tool and bring to our service agent if
necessary.

12
Take care against injury to feet and hands
from the cutting means.
Always ensure that the ventilation
openings are kept clear of debris
Disconnect the machine from the power
supply (i.e. remove the plug from the
mains, remove the disabling device or
removable battery) before carrying out
maintenance or cleaning work.
Use only the manufacturer’s
recommended replacement parts and
accessories.
Inspect and maintain the machine
regularly. Have the machine repaired only
by an authorized repairer.
When not in use, store the machine out of
the reach of children.
Intended Use
This tool is designed to cut the grass, as
well as the edges of the flowerbeds. Do not
use it for other activities. Any use of this
product for any purpose other than that
described in this manual may cause
damage to the unit or result in serious injury
to the user. Specially design to work with
Hyundai range of battery and charger.

13
Residual risks
• Cuts from the blade
• Inhalation of particles of material to be cut
• Projection of the parts of the cutting blades
• Contact with uncovered cutting head
(wounds, cuts)
• Contact with tool in operation (injuries, cuts)
• Development of toxic dusts / fumes when
used in confined spaces (vomiting / nausea)
• Hearing loss in the absence of proper
hearing protection
WARNING! This machine generates an
electromagnetic field during its operation.
This field may under certain circumstances
disrupt the functioning of active or passive
medical implants. To reduce the risk of
serious injury or death, people with medical
implants should consult with their physician
and the implant manufacturer before using
this machine.
Symbols
Warning symbol
Read the instructions manual

14
Wear an ocular protection
Wear a hearing protection
Do not expose to rain or humidity
Risk of projections. Keep bystanders away
Remove the battery when the tool is damaged and before maintenance and
servicing. Read the instruction manual
Guarantee sound power level
Do not use metal blades
Wear protection gloves

15
2. YOUR PRODUCT
a. Description
1. ON/OFF trigger lock-out button
2. Battery port
3. ON/OFF trigger
4. Assist handle locking lever
5. Edger adjustment button
6. Edging guide wheel
7. Single line cutting spool
8. Line cutting blade adjustment dial
9. Guide
10. Shaft length adjuster lock
11. Shaft angle adjuster lock
12. Auxiliary assist handle

16
b. Technical data
Voltage
20V d.c.
No load speed
7200/min
Cutting width
250/300 mm
Mass
2,74 kg
Sound Pressure level LpA
85 dB(A)
K=3dB(A)
Measured sound power level
89 dB(A)
K=3dB(A)
Guarantee sound Power level LwA
96dB(A)
Vibration Level
2.5 m/s²
K=1.5m/s²
Information
-The declared vibration total value has been measured in accordance with a
standard test method and may be used for comparing one tool with another;
-The declared vibration total value may also be used in a preliminary assessment of
exposure.
Warning
-That the vibration emission during actual use of the power tool can differ from the
declared total value depending on the ways in which the tool is used;
-the need to identify safety measures to protect the operator that are based on an
estimation of exposure in the actual conditions of use (taking account of all parts
of the operating cycle such as the times when the tool is switched off and when it
is running idle in addition to the trigger time).
Wear hearing protection.

17
3. ASSEMBLY
NOTE: Supplied without battery or charger
18
a. Charging (Charger and battery not included in this model)
1) Take the battery pack out of the equipment. Do this by pressing the push lock button.
2) Check that your mains voltage is the same as that marked on the rating plate of the battery
charger. Insert the power plug of the charger into the socket outlet. The RED LED will then
begin to light.
3) Insert the battery pack into the battery charger .then the red LED on charger will begin to
Green flash light.
4) You will find a label with “Charger indicator” of the LED indicator on the charger.
The battery pack can become a little warm during the charging. This is normal.
If the battery pack fails to charge, check:
Voltage at the power socket
Whether there is good contact at the charging contacts.
Whether the battery pack is warm or not. The battery protection system will not allow the
battery to be charged if the battery temperature is over 40℃after use. Allow the battery
pack to cool to room temperature before commencing with the charging.
(12)

19
If the battery pack still fails to charge, send the charging unit and the battery pack to our
customer service center.
To ensure that the battery pack provides long service, you should take care to recharge it
promptly. You must recharge the battery pack when you notice that the power drops. Never
allow the battery pack to become fully discharged. This will cause it to develop a defect.
Battery capacity indicator
Press the switch for the battery capacity indicator . The battery capacity indicator shows the
charge status of the battery using 4 LEDs as following:
All 4 LEDs are lit:
The battery is fully charged.
3 LED(s) are lit:
The battery has approx. 75% remaining charge.
2 LED(s) are lit:
The battery has approx. 50% remaining charge.
1 LED is lit:
The battery will be empty soon, please recharge the battery.
Charger indicator
Indicator status
Explanations and actions
Ready for use
The charger is connected to the mains and is ready for use; there is no
battery pack in the charger.
Charging
The charger is charging the battery pack in charge mode.
Battery pack is full of charge.
Charging is finished and battery pack in the charger.
The temperature of battery is too high or too low, the charger is under
protection status. The charging function can be recovered after the
temperature is normal.

20
Unrecoverable battery malfunction.
b. ATTACHING THE GUARD
Remove the battery pack. Invert the grass trimmer/edger to access the trimmer head.
Remove the pre-installed screw from the trimmer head.
Place the guard on to the trimmer head so that the large part of the guard sits to the rear,
Fig.3.
Align the screw hole on the guard with the screw hole on the trimmer head. Insert the
screw into the trimmer head, fastening the guard in place. Fig.4.
Remove the protective tape from the line cutting blade, Fig.5.
c. ADJUSTING THE AUXILIARY HANDLE
To avoid injury, adjust the auxiliary handle for optimum control and balance. Do not
overreach when operating grass trimmer/edger. Keep proper balance at all times for
better control of the tool in unexpected situations.
The auxiliary handle can be moved either up and down the shaft, forward and backwards
or rotated 36C0 around the shaft. To find your optimum desired position unlock the assist
handle locking lever by pulling outwards, Fig.6. Once you have the desired position relock
the assist handle locking lever by pushing inwards.
d. ADJUSTING THE SHAFT LENGTH
Loosen the lower part of the centre collar (Fig.7). This will allow the lower part of the
shaft to be extended or retracted. When the shaft is at a comfortable length, retighten the
collar.
e. ROTATING THE SHAFT
The shaft can be rotated to the 0º or 180° position for trimming and edging operations.
Pull the upper part of the centre collar (Fig.8). This will allow the motor to be rotated
between the 0º and 180° position.
Note: The head will only lock in the 0 or 180° position.
f. ROTATING THE TRIMMER HEAD
The trimmer head can be rotated to the 0º or 90° position for trimming and edging
operations.
Press the Edger adjustment button, Fig.9, and the trimmer head will spring around 90o.
Make sure it is locked into place. To move the trimmer head back simply press the Edger
adjustment button again and rotate back to its original position.
g. EXTENDING THE LINE
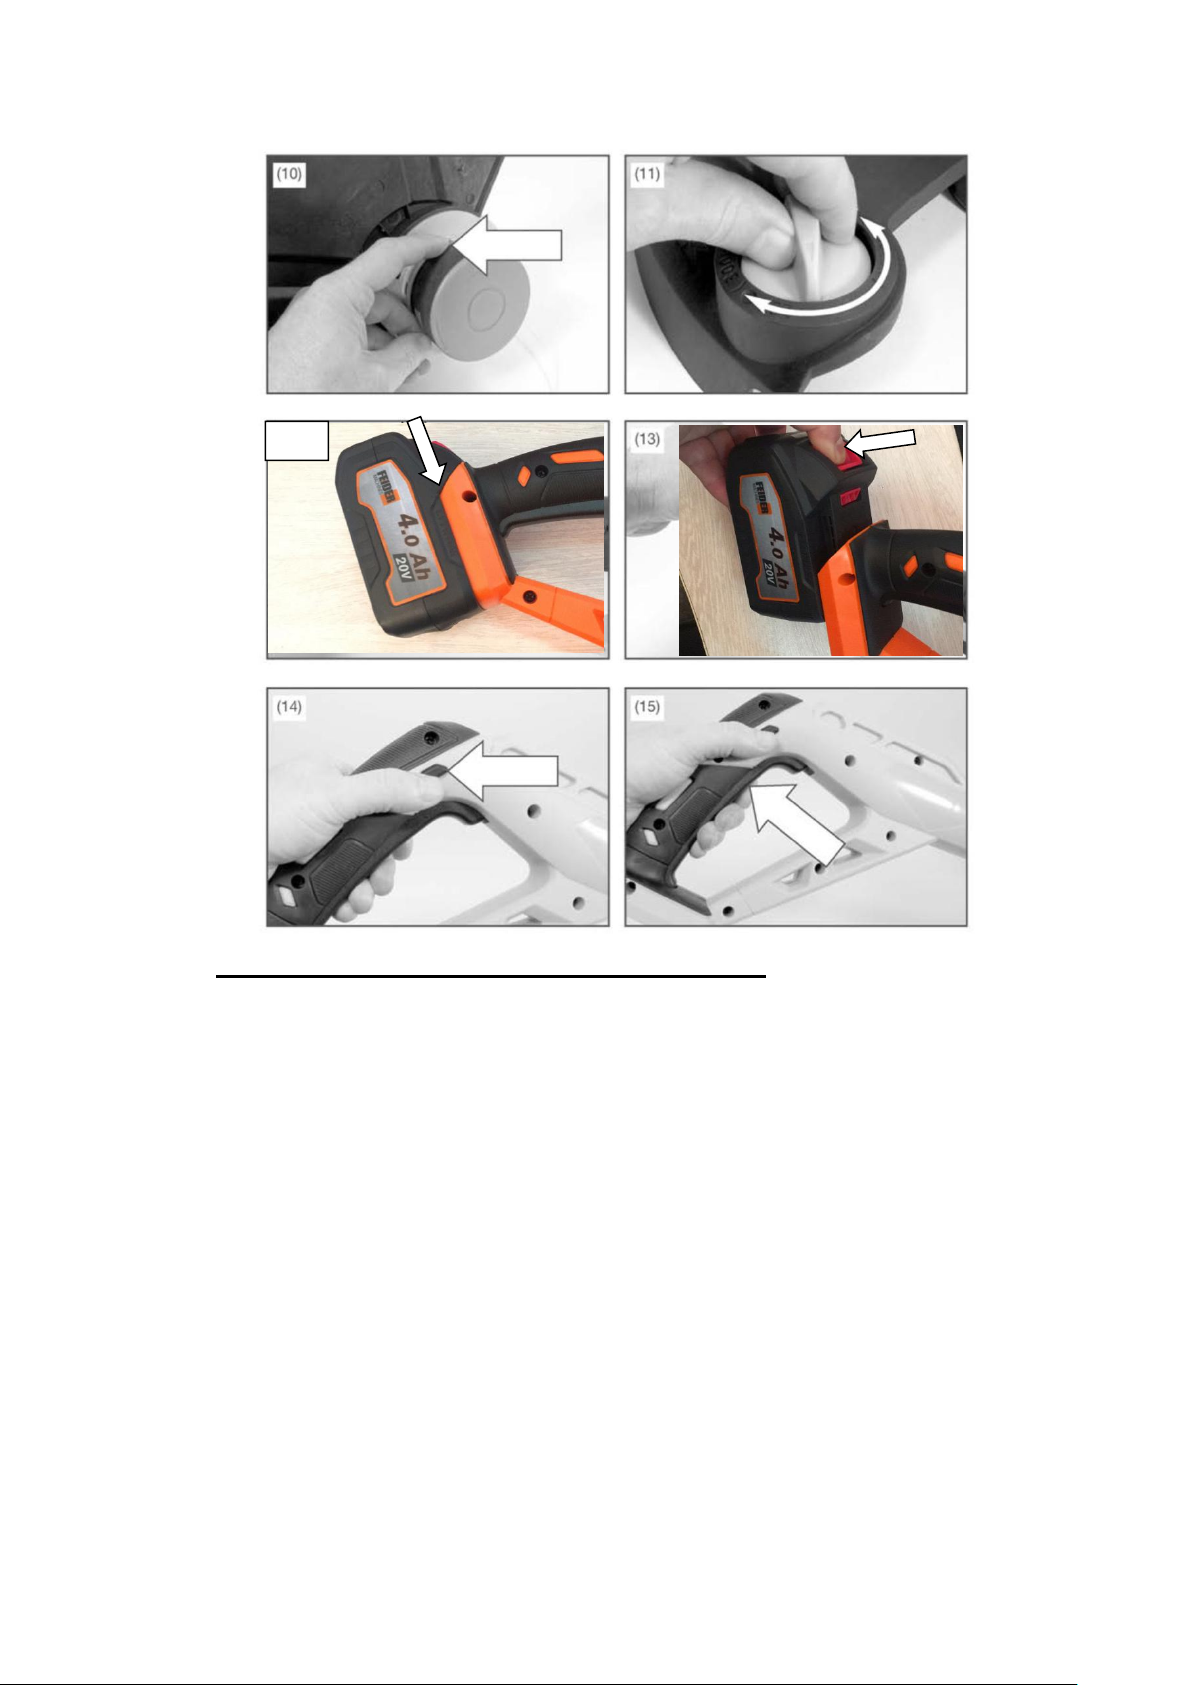
To extend the line press the spool line extension button on the spool, Fig.10.
Warning! To prevent accidental starting that could cause serious personal injury, always
remove the battery pack from the product when extending the line.
h. ADJUSTING THE LINE CUTTING BLADE
The cutting line can be set at two lengths (250 & 300 mm). To adjust the line cutting blade
turn the Line cutting blade adjustment dial by pushing down and rotating 180°, Fig.11.
i. INSTALLING THE BATTERY PACK
Warning! Always remove battery pack from your tool when you are assembling parts,
making adjustments, cleaning, carrying, transporting or when not in use. Removing
battery pack will prevent accidental starting that could cause serious personal injury.
Table of contents
Other Feider Machines Trimmer manuals


Popular Trimmer manuals by other brands


Hyundai power products
Hyundai power products HTHE75DEM instructions
 Spare parts list")
Dolmar
Dolmar MS-330 C (USA) Spare parts list

Black & Decker
Black & Decker GL650 manual

Zenoah
Zenoah eHT600D owner's manual

EINHELL
EINHELL GE-HC 18 Li T Original operating instructions

Wolf Garten
Wolf Garten GTE 850 Original operating manual