Felker Super Tile Master STM-1000 Use and care manual

OPERATING INSTRUCTIONS AND PARTS LIST
INSTRUCCIONES DE OPERACIÓN Y LISTA DE PIEZAS
Super Tile Master
MODELS: STM-1000
STM-1500
STM-2000
CONTENTS / CONTENIDO
ENGLISH ……………………………….……. 2-3
ESPAÑOL ………………………………..….. 4-5
PARTS LISTS/LISTA DE PIEZAS ………… 6-8
WIRING DIAGRAMS…………………………8-9
DIAGRAME DE CABLADO ELÉCTRICO….8-9
WARRANTY/GARANTÍA .……………………11
0AF04023
Copyright © Sept. 17, 2003
Electrolux Professional Outdoor Products, Inc.
Printed in U.S.A.
17400 West 119th Street
Olathe, Kansas 66061
Customer Service ...…….800-365-4003
Corp. Office ............…….913-928-1000
Cust. Service FAX…...….800-825-0028
Corp. Office FAX ....….....913-438-7951

2
ENGLISH
FAILURE TO COMPLY WITH THESE WARNINGS COULD RESULT
IN SERIOUS BODILY INJURY.
SAFETY WARNINGS FOR THE OPERATION OF THE SAW
DO DO NOT
DO
carefully read and understand all the instructions
before operating the saw. DO NOT
allow other persons to be near the saw when
cutting.
DO
always keep guards in place. DO NOT
use damaged equipment or blades.
DO
always wear safety approved hearing, eye, head
and respiratory protection. DO NOT
operate the saw if you are uncertain of how to
run the machine.
DO
keep all parts of our body away from the blade and
all other moving parts. DO NOT
replace the motor with any motor that does
not have a special grounding connection.
DO
inspect the blade, flanges and shafts for damage
before installing the blade. DO NOT
leave the saw unattended while the motor is
running.
DO
use only blades marked with maximum operating
speed greater than the blade shaft speed. DO NOT
operate the saw while under the influence of
drugs or alcohol.
DO
use caution and follow the instructions when
setting up or transporting the saw. DO NOT
operate the saw in areas of combustible
material. Sparks from the saw could cause a
fire or an explosion.
DO NOT
operate the saw without all guards in place.
Symbol Definitions
Read Operating Instructions Before Using Saw
Use in Well Ventilated Area
Do Not Use in Flammable Areas
Machinery Hazard – Keep Hands & Feet Clear
Do Not Operate Without All Guards in Place
Always Wear Approved Equipment
Wear Eye Protection
Wear Hearing Protection
Wear Head Protection
Wear Breathing Protection

3
ASSEMBLY of BASIC & DELUXE MODELS
1. Put the stand on the floor and keep the stand from
rolling with the floor lock.
2. Place the frame on the stand so that the cutting
head support bar is the maximum distance from
the end of the stand with the floor lock.
3. Place the pan on the frame and lock the pan in
place with the four safety locks.
WARNING: Always keep the pan locked in
place because an overhanging load could tilt the
pan.
4. Place one of the conveyor carts on the rails. ONLY
the Deluxe Model includes two carts – the
standard large cart and an additional small cart
(Saw must have Inner Rail kit) for small tiles.
5. Assemble the cutting head on the saw frame. Be
sure the blade will line up with the center of the
slot in the conveyor cart. Next, tighten the
fasteners so that the cutting head is held securely
on the base pivot bar, but can be adjusted up or
down.
6. Adjust the cutting head so the blade-cutting rim is
through the conveyor top, then tighten the
adjustment control knob mounted on the belt
guard. When it is necessary to make cuts in the
center of the tile, the cutting head may be raised,
and operated by hand.
Correct position for a diamond
blade. The blade is positioned so
that it is at least 1/4” below the top
surface of the conveyor cart.
Wrong – The blade is positioned
incorrectly in this illustration, as it is above
the conveyor cart surface. Setting the
blade too shallow may cause it to grab.
Good motor performance depends on proper voltage.
Extension cords that are too long and/or small reduce
voltage to the motor under load. Use extension cords no
smaller than indicated below.
Motor
HP 50’ Cord
115V 230V 75’ Cord
115V 230V 100’ Cord
115V 230V
1-1/2 & 2 #10 #14 #10 #14 #8 #14
OPERATION
1. Be sure you are using the correct blade for the
material. For best results, always use genuine
FELKER diamond blades that have been specially
developed for ceramic wall tile, quarry tile, marble,
granite, slate and many other hard materials.
2. Use a wrench to tighten the flange nut securely,
but first make sure the blade flanges are clean.
Never use wing nuts, and never merely hand-
tighten the hex nut.
3. The water supply should be adequate, with
plentiful supply flow of water at all times.
WARNING: Keep water clean and make
certain the WATER LEVEL IS ALWAYS ABOVE
THE PUMP INTAKE. Wet-cut diamond blades
must be used with a plentiful flow of water at all
times.
4. Keep the V-belt tight for proper power
transmission and longer belt life. Do not over
tighten. Change V-belts in sets only.
5. Keep the conveyor cart clean and free of cuttings.
The small conveyor cart on the Deluxe Model
should be used for tiles up to 12”. The standard
large conveyor cart is to be used for tiles above
12”. The large cart will diagonally cut up to 24” x
24” square tiles or rip 36” tiles. An additional
support is furnished which can be mounted to the
side of the large cart for supporting oversized
materials. The backstop can be lowered if the
material overhangs the cart on the operator’s end.
In addition, an extra support can be mounted on
the operator’s end of the cart, if required.
Felker’s Super Tile Master tile saws feature an
exclusive, patented, adjustable tray that is guided
to maintain squareness accurately. The
adjustable tray permits the operator to adjust the
saw to the most convenient and comfortable
operating position whether the operator is cutting
4” x 4” or 24” x 24” ceramic tile units.
The stop bar on the water tray will automatically
stop the tray when it has reached either the
maximum forward or maximum rear position. The
adjustable water tray is easily removed from the
saw frame for transporting or cleaning.

4
ESPAÑOL
NO RESPETAR ESTAS ADVERTENCIAS PUEDE TENER
RESULTADOS FATALES O GRAVES DAÑOS CORPORALES.
CONSIDERACIONES DE SEGURIDAD PARA EL USO DEL A CORTADORA
HAGA
NO HAGA
Si Lea cuidadosamente y comprenda todas las instrucciones
antes de usar la cortadora. NO permita que otras personas se acerquen al usar la
cortadora.
Si Mantenga siempre las protecciones en su lugar. NO use equipo o discos dañados.
Si Siempre use protecciones de seguridad confirmada para
el oído, vista, cabeza y respiración. NO deje sola una cortadora funcionando.
NO use una cortadora sin estar seguro de cómo utilizarala.
Si Mantenga todas las partes de su cuerpo alejadas del
disco y de otras piezas móviles. NO cambie el motor por ptro que no tenga un conector de
tierra de protección.
Si Verifique que el disco, bridas y eje del siaco no estén
dañados antes de instalar el disco. NO use la cotadora bajo la influencia de drogas o del alcohol.
NO use la cortadora en zonas con material combustible.
Si Use sólo siscos que indiquen una velocidad máxima de
operación mayor que la velocidad del eje del disco. Chispas de la cortadora pueden provocar un incendio o
una explosiõn.
Si Tenga cuidado y siga las instrucciones al preparar o
transportar la cortadora. NO use la cortadora si la protección del disco no está en su
lugar.
Definicións de los símbolos
Lea las instrucciones de operación antes de usar la cortadora
Use en lugar bien ventilado
No use en lugares con productos inflammables
Maquinaria peligrosa – Mantenga alejados y manos
No use sin todas las protecciones en su lugar
Siempre use equipamento aprobado
Use protección visual
Use protección auditiva
Use protección para la cabeza
Use protección respiratoria

5
MONTAJE
1. Ponga el soporte de la cortadora en el suelo bloquee
el soporte con la traba para evitar que se mueva.
2. Ponga el chasís en el soporte de manera que la barra
de fijación del cabezal de corte quede a la mayor
distancia posible del extremo del soporte con la traba.
3. Ponga el depósito de agua en el chasís y asegure el
depósito con las cuatro trabas de seguridad.
PRECAUCIÓN: Siempre mantenga el depósito
con las trabas pues una carga que sobresalga del
chasís puede inclinar o volcar el depósito.
4. Ponga uno de los carros de corte en los rieles. La
cortadora incluye dos carros – uno para baldosas
grandes y el otro para baldosas pequeñas.
5. Monte el cabezal de corte en el chasís de la cortadora.
Asegure que el disco esté en línea con el centro de la
ranua del carro de corte. Enseguida apriete las tuercas
de manera que el cabezal de corte esté sujeto con
firmeza en la barra basculante, pero pueda ser ajustado
hacia arriba o abajo.
6. Ajuste el cabezal de corte de maners que el borde
cortante del disco quede bajo el nivel superior del carro
de corte, luego apriete la perilla de ajuste ubicada en el
protector de correa. Cuando sea necesario hacer cortes
al centro de una baldosa, se puede levantar el cabezal
de corte, y utilizarlo manualmente.
Correcto: esta es la posición del
disco diamantado. El disco se
coloca de manera que entre por lo
menos 1/4” (6mm) bajao el nivel
superior del carro de corte.
Incorrecto: en sata figura aparece el
disco en una ubicación incorrecta,
pues está sobre el nivel del carro de
corte. Un disco muy superficial puede
atascarse.
Unbuen rendimiento del motor depende de un voltaje
adecuado. Cables de extensión demasiado largos o de
un calibre muy pequeño reducen el voltaje en el motor
bajo carga. Use cables de extensión de un calibre no
menor al indicdo en esta talba.
Potencia
del motor Cable 50’ (15m)
115V 230V Cable 75’ (23m)
115V 230V Cable 100’ (30m)
115V 230V
1-1/2 y 2
#10 #14 #10 #14 #8 #14
OPERACIÓN
1. Asegure que se usa el disco adecuado para el
material. Para el mejor resultado., siempre use discos
diamantados auténticos de FELKER que sean
especialmente diseñados para azulejo cerámico mural,
bladosa de cantera, mámol, granito, pizarra y muchos
otros materiales duros.
2. Use una llave para apretat las tuercas de bridas con
firmeza, controlando antes que las bridas de disco
estén limpias. Nunca use tuercas de mariposa, y nunca
apriete solamente a mano la tuerca hexagonal.
3. El suministro de agua debe ser adecuado, con un
caudal abundante en ambos lados del disco.
ADVENTENCIA: Mantenga el agua limpia y
asegure que EL NIVEL DEL AGUA ESTÉ SIEMPRE
SOBRE LA ENTRADA DE LA BOMBA. Los discos
diamantados de corte húmendo deben utilizarse
siempre con un flujo abundante de agua.
4. Mantenga tensa la correa V para tener una transmisión
adecuada de la fuerza y una máxima duración de la
correa. No la apriete demasiado. Cambie las correas V
sólo por juegos completos.
5. Mantenga el carro de corte limpio y libre de rebarbas.
Se debe utilizar el carro de corte peueño para baldosas
hasta 12” (30 cm). Se utiliza el carro de corte grande
en baldosas sobre 12” (30 cm). El carro de corte
grande corta en diagonal baldosas cuadradas de 24” x
24” (60x60 cm) o hiende baldosas hasta 36” (90 cm).
Se suministra un soporte adicional para montar al
costado del carro de corte grande para soportar
materiales de gran tamaño. Se puede bajar el tope
trasero si el material sobresale edl carro al extremo del
operario. Además, se puede montar el soporte
adicional en el costado del operario, si fuera necesario.
Las cortdoras de baldosa Super Tile Master de Felker
ienen una carro de corte ajustable exclusivo, patentado
, con guías para mantener una escuadra precisa. El
carro ajustable permite al operario ajustar la cortadora
a la posición de trabajo más conveniente y cómoda, ya
sea para cortar baldosas cerámicas de 4” x 4” (10x10
cm) o 24” x 24” (60x60 cm).
La barra de tope en el depósito de agua detiene
automáticamente el carro de corte cuando éste llega
a su posición máxima delantera o posterior. El
depósito de agua ajustable se desmonta con
facilidad del chasís de la cortadora para transporte o
limpieza.

6
DIAGRAM 1 – Super Tile MasterMODELS: STM-1500, STM-2000

7
DIAGRAM 1 - PARTS LIST (9/17/03)
DIAG.
LOC. PART
NO. QTY.
REQ. DESCRIPTION DIAG.
LOC. PART
NO. QTY.
REQ. DESCRIPTION
1 161634 1 Stand Weldment 59 161693 1
Rip Guide Assembly
2 161671 2 Rigid Castor 60 020323 1 Capscrew, Hex Hd. 3/8"-16 x 1"
3 161670 2 Swivel Castor 61 169332 1
Blade Guard Assy 10" (Incl. 23-31, 82)
4 021416 16 Capscrew, Hex Hd, 5/16"-18 x 1" 62 169365 1 Guard, Splash
5 020197 16 Locknut, Fiber, 5/16"-18 63 169366 1 Screw, Pan Hd, Self-Tapping, #8 x 3/8"
6 161687 4 Floor Lock 64 020739 1 Washer, Flat #10
7 048740 4 Capscrew, Hex Hd, 3/8"-16x1-1/4" 65 020126 1 Bolt, Carriage, 5/16"-18 x 1-3/4"
8 020199 4 Locknut, Fiber, 3/8"-16 66 020245 1 Locknut, Wing, 5/16"-18
9 161600 1 Frame Weldment 67 169548 1 Blade Guard, 10"
10 161658 2 Pan Stop Assy (Incl.11-12) 68 163248 1 Rubber Strip, Sponge
11 051065 4 Plastic Tabs 69 - - - - - - - - - -
12 197044 4 Latch 70 169564 1
Water Tube Assy, 1/4"Y x 72"
13 020489 2 Screw, Hex Hd, Self-Tapping 1/4"-20x3/4" 71 171032 1 Motor Base
14 161632 1 Lock Bar 72 189661 2 Bearing Cap
15 020373 1 Capscrew, Hex Hd, 5/16"-18 x 1-1/2" 73 020785 4 Lockwasher, Split, 5/16”
16 020197 1 Locknut, Fiber, 5/16"-18 74 020441 4 Capscrew, 5/16"-18 x 1-3/4”
17 161641 1 Wrench, Blade Shaft 15/16" x 9/16" Box 75 052004 1 Blade Shaft Assy (Incl. 58-63)
18 169486 1 Hand Knob, 5/16"-18 x 1" 76 052006 1 Shaft, Blade
19 020763 1 Washer, Flat, SAE 5/16" 77 071110 1 Washer, Spring
20 043260 2 Set Collar 78 071081 2 Bearing, Blade Shaft
21 161661 1 Pan 79 169522 1 Flange, Inner
22 030386 1 Drain Plug 80 169523 1 Flange, Outer
23 161624 2 Rail, Large Outer 81 020176 1 Nut, Thin Hex, 5/8"-18
24 161626 2 Rail, Small Inner (Optional) 82 542000605 1 Motor & Switch Assy, 1.5 HP, 115V-230/60/1
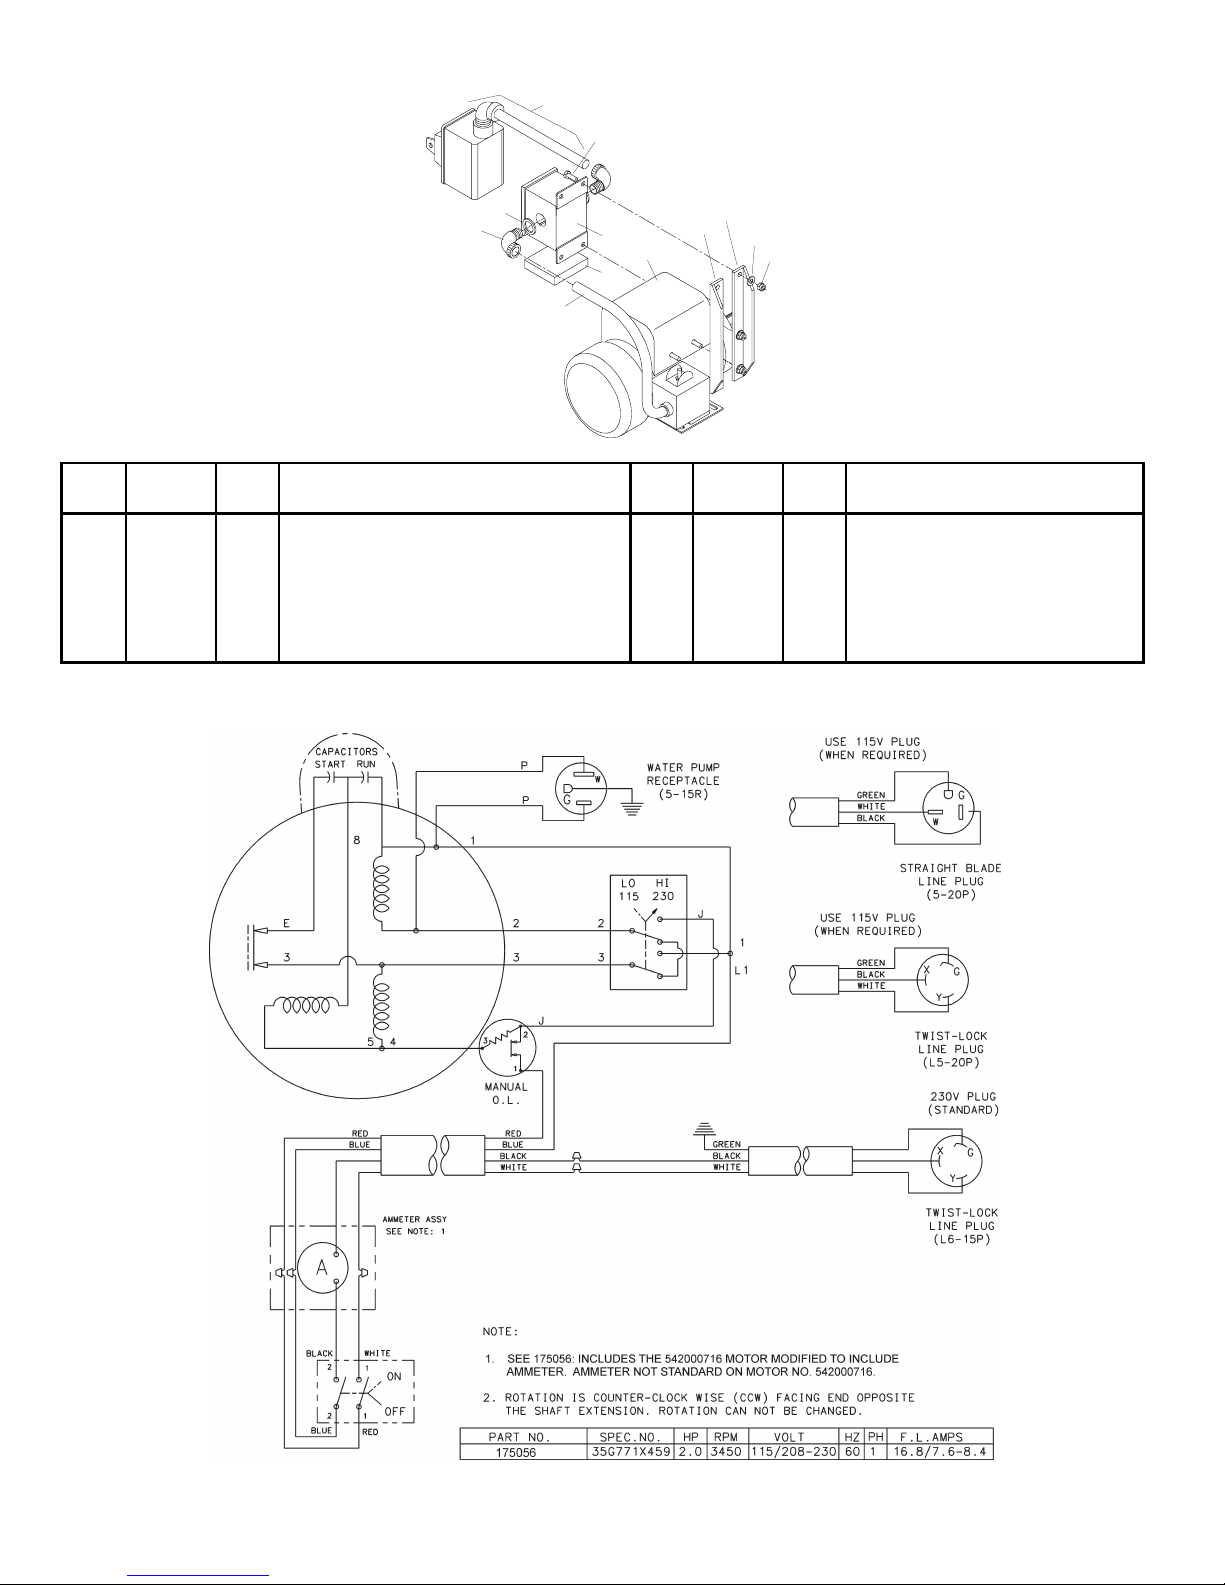
25 020301 16 Capscrew, Hex Hd, .25-20 x 5/8” - - 175056 1 Motor & Switch Assy, 2 HP, 115-230V/60/1
26 020195 16 Locknut, Fiber 1/4"-20 (542000716 Modified w/ Ammeter Assy)
27 169635 2 Support, Inner Rail (Optional) - - 161706 1 Motor & Switch Assy, 2 HP
28 161316 1 Water Pump Assembly, 115V/60/1 240/50/1 (542000607 w/ Decals)
- - 050216 1 Water Pump Assembly, 230V/50/1 83 020741 4 Washer, Flat, 1/4"
29 197237 1 Hose Barb 1/4" NPT x 1/4" OD 84 020489 2 Screw, Hex Washer Hd, 1/4"-20 x 3/4"
30 161134 1 Valve, Flow Control 85 021416 4 Capscrew, Hex Hd, 5/16"-18 x 1"
31 - - - - - - - - - - - - - 86 020742 4 Washer, Flat, 5/16"
32 161663 1 Conveyor Cart Assy (Incl. 33-43) 87 020197 4 Locknut, Fiber, 5/16"-18
33 161751 1 Back Stop 88 020060 2 Key, 3/16" Sq. x 1"
34 048740 2 Capscrew, Hex Hd, 3/8"-16x1-1/4" 89 030906 1 Pulley, 2G3V2.25 - .875 w/SS
35 020743 2 Washer, Flat, 3/8" (For 1-1/2HP & 2HP)
36 161662 1 Cart Weldment 90 161696 1
Pulley, Blade Shaft 2G3V2.00 - .625 w/SS
37 030822 4 Wheel, Cart
(For 1-1/2 HP & 2 HP)
38 020763 4 Washer, Flat, SAE 5/16" 91 058020 2 V-Belt, 3VX280
39 032366 4 Nut, KEPS, 5/16"-18 92 169499 1 Mounting Bracket, Belt Guard
40 161622 2 Cutting Board, Cart 93 020370 4 Capscrew, 1/4”-20 x 3/4”
41 020411 12
Machine Screw, Hex Hd, #10-24 x 3/4" 94 020262 4 Washer, Flat, 1/4”
42 020739 12 Washer, Flat #10 95 020195 4 Locknut, Fiber, 1/4”-20
43 020194 12 Locknut, Fiber, #10-24 - - 1 Belt Guard Assy (Incl. 96-102)
44 161666 1 Extension Cart Assembly 96 171013 1 Belt Guard
45 161667 1 Extension Cart Weldment 97 169343 1 Decal: Warning/Caution
46 161623 1 Cutting Board, Ext. 98 021416 1 Capscrew, Hex Hd, 5/16"-18 x 1"
47 020411 4 Machine Screw, Hex Hd, #10-24 x 3/4" 99 020763 1 Washer, Flat, SAE, 5/16"
48 020739 4 Washer, Flat #10 100 020197 1 Locknut, Fiber, 5/16"-18
49 020194 4 Locknut, Fiber, #10-24 101 021423 2 Capscrew, Hex Hd, 1/4"-20 x 1/2"
50 020323 2 Capscrew, Hex Hd, 3/8"-16 x 1" 102 020762 2 Washer, Flat, 1/4"
51 020743 2 Washer, Flat, 3/8" 103 169573 1 Cart Assy, Conveyor (Incl104-108)
52 161707 1 Miter Guide Assy. (Incl. 53-58) in Optional Deluxe Package
53 161650 1 Miter Guide Weldment 104 169576 1 Cart, Conveyor w/ V-Top
54 161655 1 Locking Bolt - - 030049 1 Wheels-Set of 4 (Incl. Items 105 & 106)
55 050106 1 Spring 105 032366 4 Nut, KEPS, 5/16"-18
56 050105 1 Stop 106 030822 4 Wheel, Cart
57 050103 1 Knob, Metal
58 161043 2 Knob

8
DIAGRAM 2 – STM-2000 2 HP
with Ammeter
(9/17/03)
1
2
3
4
567
8
9
11
1a
1
0
DIAG.
LOC. PART
NO. QTY.
REQ.
DESCRIPTION DIAG.
LOC. PART
NO. QTY.
REQ.
DESCRIPTION
- - 175056 1 2 HP Motor-Ammeter (Incls 1-11) 6 175086 1 Mounting Bar, L.H.
1 542000716 1 2 HP Motor & Switch 115/230V/60/1 7 175087 1 Mounting Bar, R.H.
1a 1 Switch Assy – ONLY 8 020370 6 Capscrew, 1/4”-20 x 3/4”
2 175085 1 Mounting Pad – Foam Rubber 9 020742 6 Washer, Flat 1/4”
3 175079 1 Ammeter & Enclosure 10 020195 6 Locknut, Fiber, 1/4”-20
4 542182212 2 Connector, 90°Strain Relief 11 180817 2 ft Cable, 12-5 SOW-A/SO
5 176953 2 Locknut, 3/4” Conduit
WIRING DIAGRAM STM-2000 with Ammeter (9/17/03)

9
WIRING DIAGRAM STM-1500 (P/N 542000605) (9/17/03)
WIRING DIAGRAM STM-2000 (P/N 542000607) (9/17/03)

10
NOTES:

11
Felker’s New Equipment Warranty
Except as noted below. Felker warrants that its new equipment will be free from manufacturing defects for a
period of two (2) years from date of purchase by the original consumer purchaser.
The above warranty is subject to the following new equipment exceptions:
1. The warranty time period for the following new equipment is limited as follows:
Gas-powered QuickieSuper saws – Three (3) months
Mix Master, Mortar Master, Stone Mate, Land Shark, Power Kat- One (1) year
Tile Mitersaw, Little Jack, Jack Junior and Slammer Jack tools – Six (6) months
FTS-70- Ninety (90) days
2. To the extent the following components are part of any the new equipment, Felker’s warranty on the
component parts is limited to the manufacturer’s warranty period set out below:
Manufacturer.....Warranty Period
GAS and DIESEL ENGINES Manufacturer.....Warranty Period
ELECTRIC MOTORS Manufacturer.....Warranty Period
TRANSMISSIONS
Briggs & Stratton....................2 years
Koler Gas................................2 years
Robin Gas................ 2 yrs./2,000 hrs.
Honda Gas..............................2 years
Wisconsin Gas. .......1 year/2,000 hrs.
Hatz Diesel..............................1 year
Baldor.......................................1 year
Leeson......................................1 year
Bosch...................................6 months
Milwaukee............................Lifetime
Black & Decker........................1 year
DM100................................6 months
AIR MOTORS and VAC. PUMPS
Gast..........................................1 year
Eaton.....................................3 years*
Sunstrand................3 yrs./1,000 hrs.*
(* from date of manufacture)
HYDRAULIC PUMPS
Fenner-Stone............................1 year
John S. Barnes Co....................1 year
WATER PUMPS
Jasbsco.....................................1 year
Beckett.....................................1 year
3. Felker’s obligation under this warranty is expressly limited to the replacement or repair at Felker, Olathe,
KS 66061, or at a service facility designated by Felker, of such parts as inspection shall disclose to have been
defective. This warranty does not cover labor, except for gas powered Quickie Super saws and does not cover
maintenance items such as belts, air filters, bearings and wheels. Purchaser will be responsible for paying for
shipping costs to and from the location where the equipment is to be repaired or replaced. Motors and engines
are to be serviced by the nearest factory authorized service center. These service centers are designated by the
manufacturer of the engine/motor. Under no circumstances will Felker be responsible for incidental or
consequential damages.
4. Felker’s warranty does not apply to defects caused by damage, abuse, modifications, low voltage, acts of
God, unreasonable use, faulty repairs made by others or defects caused by failure to provide reasonable
maintenance. All warranties are void if the equipment or any of its components are altered or modified by the
purchaser, or of the product is used in a manner or with a blade not recommended by the manufacturer.
5. The forgoing express warranties are in lieu of all other warranties. FELKER EXPRESSLY DISCLAIMS
ALL OTHER WARRANTIES, INCLUDING, WITHOUT LIMITATION, THE IMPLIED
WARRANTIES OF MERCHANTABILITY AND FITNESS FOR A PARTICULAR PURPOSE.
Please record the Date of Purchase and the Serial Number of your saw in the space below. (The serial number
is located on the side of the motor.) When ordering service items, please have this information available.
Serial Number:
Date of Purchase:
Model Number:
Where Purchased:

Felker Corporate Office
17400 West 119th Street
Olathe, Kansas 66061
Customer Service ……….……………. 800-365-4003
Corp. Office ...………………………..... 913-928-1000
Cust. Service FAX …………………… 800-825-0028
Corp. Office FAX ..………………….... 913-438-7951
Cust. Service, Int'l. …………………… 913-928-1300
Western Division Center
17311 South Edwards Road
Ceritios, CA 90703-2427
Felker Latin America, Mexico, Caribbean,
Central and South America
17400 West 119th Street
Olathe, Kansas 66061
Phone ……………………………….…. 913-928-1255
FAX ………………………………….…. 913-438-7938
Felker Canada
17400 West 119th Street
Olathe, Kansas 66061
Customer Service …………….…….... 800-365-4003
Felker Hong Kong, China
Diamant Boart Pte Ltd.
Unit E, 13/F., Infotech Centre,
21 Hung To Road, Kwun Tong,
Hong Kong
Phone ……………………..…………. 852-2516-6602
FAX ………………………..…………. 852-2516-6605
E-mail …………………….... Targethk.netvigator.com
Felker Japan, Korea, Taiwan
1803-36 Oyama-Machi
Machida-Shi, Tokyo 194-0212
Japan
Phone ………………………………… 8142-797-0212
FAX …………………………………… 8142-798-7515
Felker Australia, New Zealand/Dembicon Pty. Ltd
29 Kinkaid Avenue
North Plympton, Adelaide SA 5037
Australia
Phone ………………….…………..…... 61-83751000
FAX …………………….………….…… 61-83710990
E-mail ……………….. enquiries@dembicon.com.au
Internet ……………….……. www.dembicon.com.au
Felker Brazil
Pix Do Brasil
Rua José de Oliveira Coutinho
São Paulo, Brazil CEP 01144-020
Phone ………………………………. 55 11 3611-8383
FAX ………………………….……... 55 11 3619-3022
Felker Singapore, Thailand, Vietnam,
Malaysia, Indonesia
Phone ………………………………….. 65-9628-6175
FAX ……………………………………… 65-234-2896
European Headquarters
DB Construction Business Group
Avenue Du Pont De Luttre, 74
1190 Brussels, Belgium
Phone ……………………………….. (32-2) 348-3669
FAX ………………………………….. (32-2) 348-3136
Internet …………………….. www.diamant-boart.com
This manual suits for next models
2
Table of contents
Other Felker Saw manuals

Felker
Felker TM-1HT User manual

Felker
Felker TILE MAGIC TMG-851 Use and care manual

Felker
Felker FTS-150 Use and care manual

Felker
Felker TM-75 Use and care manual

Felker
Felker TM-75 User manual

Felker
Felker Mason Mate II Use and care manual

Felker
Felker PaverMatePM-15HT User manual

Felker
Felker FRS-30 Use and care manual

Felker
Felker TKM-123 Use and care manual

Felker
Felker TILE MASTER XL TM1-XLHT Use and care manual