Felker TILE MAGIC TMG-851 Use and care manual
1
17400 West 119th Street
Olathe, Kansas 66061
Customer Service ...... 800-365-4003
Corp. Office ................ 913-928-1000
Cust. Service FAX ...... 800-825-0028
Corp. Office FAX ........ 913-438-7951
0AF04048
Copyright © October 1999 DBInc.
Printed in U.S.A.
OPERATING INSTRUCTIONS AND PARTS LIST
INSTRUCCIONES DE OPERACIÓN Y LISTA DE PIEZAS
MODEL: TMG-851
TILE MAGIC

2
EVERY MACHINE IS THOROUGHLY TESTED BEFORE LEAVING THE FACTORY. EACH MACHINE IS
SUPPLIED WITHACOPY OF THIS MANUAL. OPERATORS OF THIS EQUIPMENT MUST READ AND BE
FAMILIAR WITH THE SAFETY WARNINGS. FAILURE TO OBEY WARNINGS MAY RESULT IN INJURY
OR DEATH. FOLLOW INSTRUCTIONS STRICTLY TO ENSURE LONG SERVICE IN NORMAL
OPERATION.
CONTENTS
Symbol Definitions...............................................................................................................................3-5
Decal Descriptions and Locations .......................................................................................................6
Safety Warnings - DOs & DO NOTs....................................................................................................8-9
Reference Figures
1 - Features ..........................................................................................................................10
2 - Machine Set Up...............................................................................................................10
3 - Mounting The Blade ........................................................................................................10
4 - Operating Procedures .....................................................................................................10-11
5 - Making Straight Cuts .......................................................................................................11
6 - Making Bevel Cuts ..........................................................................................................11
7 - Maintenance....................................................................................................................11
8 - Thermal Protector - Manual Reset Operation .................................................................11
9 - Repairs............................................................................................................................11
10 - Spare Parts .....................................................................................................................11
Diagrams and Spare Parts ..................................................................................................................16-17
Wiring Diagrams .................................................................................................................................18
Warranty...............................................................................................................................................19
CONTENIDO
Definición De Simbolos .......................................................................................................................3-5
Descripción De Calcamonias y ubicaciones ......................................................................................6
Advertencias De Seguridad HACER & NO HACER............................................................................12-13
Figura De Referencia
1 - Caracteristica ..................................................................................................................14
2 - Instalación De La Cortadora............................................................................................14
3 - Instalación Del Disco.......................................................................................................14
4 - Instrucciones De Operación............................................................................................14-15
5 - Para Hacer Cortes Rectos ..............................................................................................15
6 - Para Hacer Cortes Biselados..........................................................................................15
7 - Instucciones De Mantenimiento ......................................................................................15
8 - Protector Térmico - Rearmado Manual...........................................................................15
9 - Reparaciones ..................................................................................................................15
10 - Piezas De Recambio.......................................................................................................15
Diagrame y Piezas De Recambio .......................................................................................................16-17
Diagrama De Cableado Eléctrico ........................................................................................................18
Garantía..............................................................................................................................................19
ANTES DE SALIR DE NUESTRA FÁBRICA, CADA MÁQUINA ES SOMETIDA A PUREBAS DETENIDAS.
CADA MÁQUINA DE CORTE ES ENTREGADA CON UNA CIPIA DE ESTE MANUAL. LOS OPERARIOS DE
ESTOS EQUIPOS DEBEN LEER Y FAMILIARIZARSE CON LAS INSTRUCCIONES DE SEGURIDAD. EL
NO PRESTAR ATENCIÓN A ESTAS ADVERTENCIAS PUEDE OCASIONAR GRAVES LESIONE. SIGA
ESTRICAMENTE NUESTRAS INSTRUCCIONES Y SU MÁQUINA LE VA A PRESTAR LARGOS AÑOS DE
SERVICIO EN CONDICIONES NORMALES DE UTILIZACIÓN.

3
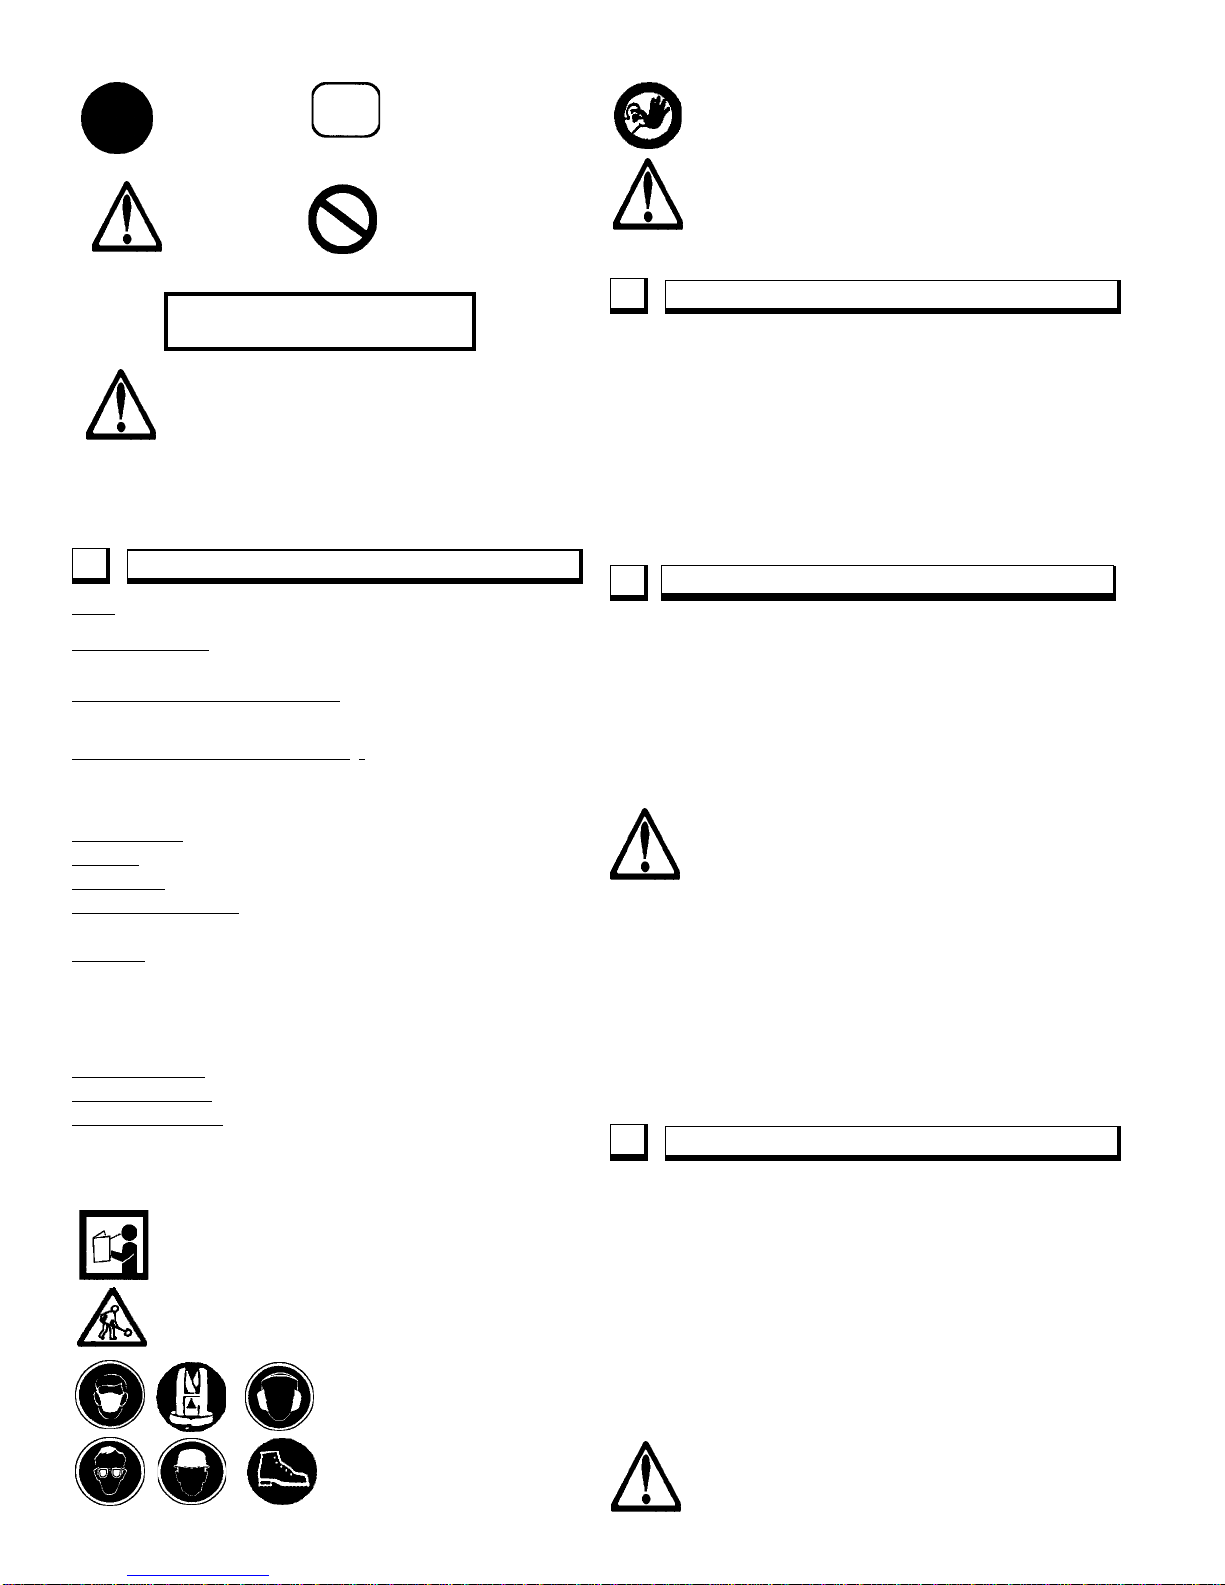
• Please read the instructions for use prior to operating the machine for the first time.
• Antes de la puesta en marcha, lea detenidamente las instrucciones y familiaricese con la máquina.
• Mandatory
• Obligatorio
• Indication
• Indicación
• Prohibition
• Prohibición
• Warning Triangle
• Triángwulo DeAdvertencia
• Wear Eye Protection
• Usar Gafas De Protección
• Wear Head Protection
• Usar Casco De Protección
• Wear Breathing Protection
• Usar Máscara De Protección
• The Use Of Ear Protection Is Mandatory
• Es Obligatorio El Uso De ProtecciónAuditiva
• Wear a Hard Hat
• Usar Casco Duro
• Wear Safety Shoes
• Usar Zapatos De Seguridad
• WearAppropriate Clothing
• Usar RopaAdecuada
• Motor Off
• Parar El Motor
Symbol Definitions
Definición De Los Simbolos

4
• Use In Well VentilatedArea
• Usar En Una Área Bien Ventilada
• Do Not Use In Flammable Areas
• No Usar In Áreas Inflamables
• Machinery Hazard, Keep HandsAnd Feet Clear.
• Máquina Peligrosa - Mantenga Manos YPiesAlejados De La Máquina
• No Non-working Personnel InArea
• Prohibido Para Personas AjenasALa Obra
• No Smoking
• No Fumar
• Do Not Operate Without All Guards In Place
• No Operar Sin Todas Las Protecciones In Su Sitio
• Always Keep the Blade Guards In Place
• Mantenga Siempre Las Protecciones De La Hoja En Su Sitio
• Keep WorkArea Clean/Well Lit, Remove All Safety Hazards
• Mantenga Limpio El Sitio De Trabajo/Bien Iluminado, Elimine Todos Los Riesgos De Seguridad
• Dangerously High Noise Level
• Nivel De Ruido Elevadamente Peligroso
• Pay Extreme Attention To The CareAnd Protection Of The Machine Before Starting Up
• Ponga Extrema AtenciónAl Cuidado Y Preparación De La Máquina Antes De Ponerla En Marcha
• Remove Tools From Area and Machine
• Elimine Las Herramientas Del Área Y De La Máquina
• RepairsAre To Be Done ByAnAuthorized Dealer Only
• Las Reparaciones Deben Ser Efectuadas Únicamente Por Un DistribuidorAutorizado
• Diamond Blade
• Sierra Diamantada
• Blade Diameter
• Diámetro De La Hoja

5
WARNING
HEARING HAZARD
DURING NORMAL USE OF THIS MACHINE, OPERATOR MAY BE EXPOSED TO A NOISE
LEVEL EQUAL OR SUPERIOR TO 85 dB (A)
ATENCION
RIESGO DE DAÑO AUDITIVO
EN CONDICIONES NORMALES DE UTILIZACIÓN, EL OPERADOR DE ESTAMÁQUINAPUEDE
ESTAR EXPUESTO A UN NIVEL DE RUIDO IGUAL O SUPERIOR A 85 dB (A)
• Number of Revolutions Per Minute, Rotational Speed
• N° De Revoluciones Por Minuto, Velocidad De Rotación
• Blade Flange Diameter
• Diámetro De La Brida De La Hoja
• Blade Cutting Depth
• Profundidad De Corte De La Hoja
• Machine Mass (lbs)
• Masa De La Máquina (lbs)
• Electric Motor
• Motor eléctrico

6
DECAL DESCRIPTIONS & LOCATION
DESCRIPCIÓN DE CALCAMONIAS Y UBICACIONES
P/N 171798 - TILE MAGIC™
P/N: 187043 P/N 169345
DECAL: Warning/Caution DECAL: Manual Reset
CALCAMONIA: Precaución CALCAMONIA: Rearmado Manual
P/N 169467 P/N 169466
MOTOR 230V MOTOR: 115V

7

8
SAFETY FIRST!
WARNINGS
DO’s AND DO NOT’s
WARNING: FAILURE TO COMPLY WITH THESE WARNINGS AND OPERATING
INSTRUCTIONS COULD RESULT IN DEATH OR SERIOUS BODILY INJURY.
DO
DO read this entire operator’s manual before operating this machine. Understand all warnings, instruc
tions, and controls.
DO keep all guards in place and in good condition.
DO wear safety approved hearing, eye, head and respiratory protection.
DO read and understand all warnings and instructions on the saw.
DO read and understand the symbol definitions contained in this manual.
DO keep all parts of your body away from the blade and all other moving parts.
DO know how to stop the saw quickly in case of emergency.
DO turn the “ON/OFF” switch to the “OFF” position prior to connecting the machine to the power source.
DO make sure electric powered saws are plugged into a properly grounded circuit
DO turn off the motor and disconnect from the power source prior to working on saw.
DO inspect the blade, flanges and shafts for damage before installing the blade.
DO use only steel center diamond blades manufactured for use on tile saws.
DO use only blades marked with a maximum operating speed greater than the blade shaft speed. Verify
speed by checking bladeshaft RPM.
DO read all safety materials and instructions that accompany any blade used with this saw.
DO inspect each blade carefully before using it. If there are any signs of damage or unusual wear, DO NOT
USE THE BLADE.
DO disconnect the saw from the power source prior to installing, removing or tightening the blade.
DO mount the blade solidly and firmly, Wrench tighten the arbor nut.
DO make sure the blade and flanges are clean and free of dirt and debris before mounting the blade on the
saw.
DO use only the blade flanges supplied with the saw. Never use damaged or worn blade flanges.
DO use the correct blade for the type of work being done. Check with blade manufacturer if you do not know
if blade is correct.
DO use caution and follow the instructions when loading and unloading the saw.
DO operate this machine only in well ventilated areas.
DO instruct bystanders on where to stand while the saw is in operation.
DO establish a training program for all operators of this machine.
DO clear the work area of unnecessary people. Never allow anyone to stand in front of or behind the blade
while the motor is running.
DO make sure the blade is not contacting anything before starting the motor.
DO use cautions when lifting and transporting this machine.
DO clean the water tray frequently.

9
*****************
This saw was designed for certain applications only. DO NOT modify this saw or use for any application other
than for which is it was designed. If you have any questions relative to its application, DO NOT use the saw
until you have written Diamant Boart, Inc. and we have advised you.
Diamant Boart, Inc.
17400 West 119th Street
Olathe, Kansas 66061
In USA: 1-800-365-4003
SAFETY FIRST!
WARNINGS
DO’s AND DO NOT’s
WARNING: FAILURE TO COMPLY WITH THESE WARNINGS AND OPERATING
INSTRUCTIONS COULD RESULT IN DEATH OR SERIOUS BODILY INJURY.
DO NOT
DO NOT operate this machine unless you have read and understood this operator’s manual.
DO NOT operate this machine without the blade guard, or other protective guards in place.
DO NOT stand behind or in front of the blade path while the motor is running.
DO NOT leave this machine unattended while the motor is running.
DO NOT work on this machine while the saw is connected to the power source..
DO NOT operate this machine when you are tired or fatigued.
DO NOT use a wet blade without adequate water level for the blade.
DO NOT use carbide tipped blades.
DO NOT exceed maximum blade speed shown for blade size. Excessive speed could result in blade breakage.
DO NOT use damaged equipment or blades.
DO NOT touch or try to stop a moving blade with your hand.
DO NOT cock, jam, wedge or twist the blade in a cut.
DO NOT use a blade that has been dropped.
DO NOT touch a dry cutting diamond blade immediately after use. These blades require several minutes to cool
after each cut.
DO NOT use damaged or worn blade flanges.
DO NOT allow other persons to be near the machine when starting or when the saw is in operation.
DO NOT operate this machine in an enclosed area unless it is properly vented.
DO NOT operatethismachine in the vicinity of anything that is flammable. Sparkscouldcauseafireoranexplosion.
DO NOT operate this machine while using drugs or alcohol.
10
These signs will give
advice for your safety.
Before leaving our factory every machine is
thoroughly tested.
Follow our instructions strictly and your machine will
give you long service in normal operating conditions.
MANDATORY INDICATION
INFORMATION
INSTRUCTION
WARNING PROHIBITION
1 FEATURES
Use: Water cooled cutting of tile materials.
BladeCapacity: Rim 8” (200 mm) - Bore 5/8” (15.9mm)
Depths of Cut (Maximum): 1” (25mm) @ 90°;
0.7” (17mm) @45°
Cutting Width With Guide At 90°:6” (15 cm)
Length of Cut: Unlimited
Blade RPM: 3400 (6500 maximum, no load)
Power: 3/4 HP (560W)
F.L. Amps: 9A @ 115V and 4.5A@ 230V
Motor Protection: Thermal overload with manual
reset.
Weight: 35 lbs (16 kg)
Dimensions (L x W x H):
14.5” (37 cm) x 13.5” (34 cm) x 10.25” (26 cm)
Cutting Table: 12” x 13” (31 cm x 33 cm)
Tank Capacity: 1.2 Quarts (1 litre)
Blade Cooling: Partial immersion of blade in water
(For information, contact your Felker supplier)
Beforestarting upthe machine,make sure you
read this entire manual and are familiar with
the operation of this machine.
The working area must be completely clear,
well lit and all safety hazards removed.
The operator must wear
protective clothing
appropriate to the work he
is doing.
Any persons not involved in the work should
leave the area.
Use only blades marked with a maximum
operating speed greater than the blade shaft
speed.
2 MACHINE SET-UP PROCEDURES
Your Tile Magic™ tile saw is factory assembled prior to
shipment to ensure accurate cuts when the saw is
delivered. However, since FELKER cannot control
rough handling during shipping, it is suggested that the
following procedures be followed:
· Remove the saw from the shipping carton
· Check the carton and all packing filler for any loose
parts.
3 MOUNTING THE BLADE
1. Disconnect the saw from power source.
2. Remove the splash guard (Item 16) by loosening the
knob (Item 18) and sliding the guard up and off.
3. Loosen the two table locking knobs (Item 24), then
remove the table assembly (Item 19).
4. Before mounting the diamond blade, verify that the
flanges (Item 11) are free from dirt and grease.
IMPORTANT: Make sure the blade is properly
installed. Failure to do so will result in
damage to the blade.
5. Install the blade for counterclockwise (CCW) rotation.
Check the blade for the direction arrow.
6. With the blade properly seated (pushed against the
inner flange), install the outer flange and tighten with a
wrench. Never hand tighten!
7. To reassemble, simply reverse the steps 2 and 3
above.
4 OPERATING PROCEDURE
1. Fill the tank with clean water through the hole in the
cutting table. Check the water level through the
overflow hole in the tank side.
2. During the operation, set the blade guard as close to
the material as possible in order to avoid water
splash.
3. Plug the power cord into the proper current outlet
using as short of a cord as needed to avoid
unnecessary voltage drop. No. 16 gauge or larger is
recommended.
WARNING: Keep the water clean and make
certain the water level is up to the overflow
hole.

11
NOTE: Follow the blade manufacturer’s
recommendations for dry or wet cutting. Only blades
specifically designed for dry cutting can be run without
coolant. Wet cutting blades can be damaged or
destroyed without sufficient water.
5 MAKING STRAIGHT CUTS
1. Loosen the knobs (item 26) and position the rip guide
(item 25) at the distance required. Use the scale on
the front. Retighten the knobs.
2. Position the tile and push it into the cutting blade while
holding it firmly against the guide in order to ensure a
good, clean cut.
3. Pass the material slowly under the splash guard into
the blade, without overly forcing it. This will enhance
the diamond blade lifetime and prevent overheating
the motor. Lighten the cutting pressure when
approaching the end of the cut in order to prevent the
tile from splitting.
4. The new blade needs a chance to “break-in” or “wear-
in” slightly for best cutting. This may take several
cuts. If the blade closes up or “glazes over”, it can be
opened back up with a conditioning stone.
6 MAKING BEVIL CUTS
1. Use the same procedure as for straight cuts, except
position the rip guide about 5/8” back from the blade.
7 MAINTENANCE PROCEDURES
1. Unplug the tile saw before performing any
maintenance.
2. Keep the table top clean and free of cuttings. Flush
with water.
3. Drain, clean and refill the tank frequently. flush with
plenty of water, then drain and refill the tank with
clean water.
4. It is necessary to clean the machine after each day’s
use. Clean out the tank and drain the water.
5. Store your machine in a dry place.
8THERMAL PROTECTOR - MANUAL
RESET OPERATION
The motor has a manual reset thermal protector (Item
37). If the motor overheats, the red button “pops out” to
open the motor circuit. If this occurs, turn the motor
“ON-OFF” switch to “OFF” and after the motor cools,
push in the red button. When the button stays in, the
motor can be restarted.
We carry out all repairs in the shortest possible time and
at the most economical prices. (See front page for
address and phone numbers) Contact your authorized
Felker®dealer concerning maintenance and repairs.
9 REPAIRS
For quick supply of spare parts and to avoid any lost time,
it is essential to quote the data on the manufacturers plate
fixed to the machine and the part number(s) and
description to be replaced with every order.
10 SPARE PARTS
The instructions for use and spare parts found in this
document are for information only and are not binding.
As part of our product quality improvement policy, we
reserve the right to make any and all technical modifica-
tions without prior notice.

12
ADVERTENCIA: EL NO RESPETAR ESTAS ADVERTENCIAS E INSTRUCCIONES DE
OPERACION PUEDE PROVOCAR GRAVES LESIONES O LA MUERTE.
ADVERTENCIAS
HACER y NO HACER
¡SEGURIDAD ANTE TODO!
HACER
SI lea todo el manual antes de manejar esta máquina. Entienda todas las advertencias, instrucciones y controles.
SI mantenga siempre las protecciones en su lugar y en buenas condiciones.
SI siempre use protecciones aprobadas para los oídos, ojos, cabeza y respiración.
SI lea y entienda todas las advertencias e instrucciones sobre la sierra.
SI lea y entienda las definiciones de los símbolos que aparecen en este manual.
SI mantenga todas las partes de su cuerpo alejadas de la hoja y de todas las piezas móviles.
SI aprenda cómo parar la sierra rápidamente en caso de emergencia.
SI ponga el interrumpor en la posición O antes de corectarlo a la fuente de poda.
SI asegúrese de enchufar las sierras eléctricas a un circuito debidamente conectado a tierra.
SI verifique que la hoja, las bridas y los ejes no estén dañados antes de instalar la hoja.
SI utilice hojas abrasivas, o bien, hojas diamantadas con centro de acero fabricadas para utilización en sierras para albañilería.
Verifique la velocidad comprobando las rpm del eje de la hoja y el diámetro de las poleas.
SI verifique la configuración del motor de la sierra, comprobando la velocidad (rpm) del eje de la hoja y los diámetros de las
poleas.
SI lea toda la literatura e instrucciones de seguridad que acompañan a la hoja utilizada con esta sierra.
SI inspeccione cuidadosamente cada hoja antes de usarla. Si se observan señales de daño o desgaste poco común, NO USE LA
HOJA.
SI instale la hoja firmemente. Apriete la tuerca del eje con un aprietatuercas.
SI asegúrese que la hoja y las bridas estén limpias y libres de tierra y suciedad antes de instalar la hoja en la sierra.
SI utilice la hoja correcta para el tipo de trabajo que se vaya a ejecutar. En caso de dudas, consultar con el fabricante de la
hoja.
SI tenga cuidado y siga las instrucciones cuando cargue y descargue la sierra.
SI maneje esta máquina solamente en lugares bien ventilados.
SI indique a las personas dónde situarse mientras la sierra está funcionando.
SI establezca un programa de entrenamiento para todos los operadores de esta máquina.
SI despeje el lugar de trabajo de personas innecesarias. No permita que nadie se sitúe delante o detrás de la hoja mientras el
motor está funcionando.
SI asegúrese que la hoja no esté haciendo contacto con ninguna cosa antes de arrancar el motor.
SI tenga cuidado al levantar y transportar esta máquina.
SI siempre amarre bien la máquina cuando la transporte.
SI deje que todos los trabajos de mantenimiento los haga personal especializado.
SI asegúrese de enchufar las sierras eléctricas a un circuito debidamente conectado a tierra.
SI asegúrese que los cordones eléctricos sean del tamaño correcto y estén en buenas condiciones.
SI sujete bien el material que está cortando.
SI limpie la bandeja de agua frecuentemente.
SI antes de instalar la hoja, verifique que el agujero del eje de la hoja coincida con el eje portaherramienta de la máquina.

13
*****************
Esta sierra fue diseñada para ciertas aplicaciones solamente. NO la modifique ni utilice para ninguna otra
aplicación salvo aquéllas para las cuales fue diseñada. En caso de dudas respecto a su aplicación, NO use la
sierra sin antes haber consultado por escrito a Diamant Boart, nc. y haber recibido nuestras indicaciones.
Diamant Boart, Inc.
17400 West 119th
Olathe, Kansas 66061
USA: 1-800-365-4003
ADVERTENCIA: EL NO RESPETAR ESTAS ADVERTENCIAS E INSTRUCCIONES DE
OPERACION PUEDE PROVOCAR GRAVES LESIONES O LA MUERTE.
ADVERTENCIAS
HACER y NO HACER
¡SEGURIDAD ANTE TODO!
NO HACER
NO haga funcionar esta máquina sin antes haber leído y entendido este manual.
NO maneje esta máquina sin tener la protección de la hoja u otras protecciones instaladas en su lugar.
NO se sitúe detrás del paso de la hoja mientras el motor está funcionando.
NO deje esta máquina desatendida mientras el motor está funcionando.
NO trabaje en esta máquina mientras el motor está funcionando.
NO maneje esta máquina si está cansado o fatigado.
NO utilice una hoja de corte húmedo sin tener el suministro adecuado de agua.
NO use discos con puntas de carburo.
NO sobrepase la velocidad máxima indicada para cada tamaño de hoja. El exceso de velocidad puede causar la rotura de la
hoja.
NO utilice equipos u hojas que estén dañados.
NO toque ni trate de parar con las manos una hoja en movimiento.
NO incline, atasque, encaje o tuerza la hoja en el corte.
NO utilice una hoja abrasiva que haya sufrido una caída.
NO toque una hoja diamantada de corte en seco inmediatamente después de usarla. Estas hojas se demoran varios minutos en
enfriarse después de cada corte.
NO use bridas de hojas que estén dañadas o desgastadas.
NO permita que nadie se acerque a la máquina durante la puesta en marcha o mientras la sierra está funcionando.
NO maneje esta máquina en un lugar encerrado a menos que tenga buena ventilación.
NO maneje esta máquina cerca de ningún objeto que sea inflamable. Las chispas podrían causar un incendio o una explosión.
NO maneje la sierra si está bajo la influencia de drogas o bebidas alcohólicas.

14
4 Instrucciones De Operaci n
Estos avisos le dan consejos
para su seguridad.
Antes de salir de la fábrica, todas las máquina
son probadas extensivamente.
Siga nuestras instrucciones al pie de la letra y su
máquina le brindará muchos años de servicio en
condiciones normales de trabajo.
Toda persona ajena al trabajo debe retirarse
del lugar.
Use solamente hojas marcadas con una
velocidad máxima de funcionamiento mayor
que la velocidad del eje de la hoja.
1 Caracteristica
2 Instalacíon De La Cortadora
Antes de poner en marcha la máquina,
asegúrese de leer todo este manual y
familiarícese con el funcionamiento de esta
máquina.
El lugar de trabajo debe estar totalmente
despejado, bien iluminado y totalmente libre
de riesgos para la seguridad.
El operador debe usar ropa
protectora adecuada para el
trabajo que está realizando.
Uso: Corte en húmedo o en seco de albañilería y refractarios.
Disco Capacidad: Rim 8 (200 mm) - Bore /8 (1 .9mm)
Profundidad del corte (máxima): 1 (2 mm) @ 90°;
0.7 (17mm) @ 4 °
Cortando Ancho Con Guia a 90°: 1 0mm ( 6)
Lon uitad Del Corte: Ilimitado
Eje de la hoja, rpm: 3400 (6 00 maximo, no carga)
Poder: 60W (3/4 HP)
Amperes: 9A (11 V) y 4. A (230V)
Motor Protección: Termal sobrecarga con rearmado
manual.
Peso Normal: 3 lbs (16 kg)
Dimensiones (La x An x Al):
37 cm (14. ) x 34 cm (13. ) x 26 cm (10.2 )
Mesade corte: 31 cm x 33 cm (12 x 13)
Tanque Capacidad: 1 litre (1,2 Quarts)
En Friando la navaja: Parte de la navaja en el aguo
ADVERTENC A PROH B T ON
ND CAC ON
NFORMAC ON
NSTRUCC ONES
OBL GATOR O
(Para información diríjase a su proveedor Felker)
Su cortadora de baldosa T LE MAG C está montada en
fábrica para asegurar cortes precisos al entregar la cortadora.
Sin embargo, dado que FELKER no puede impedir algún
tratamiento violento durante el transporte, sugerimos seguir
los siguientes pasos:
1. Retire la cortadora del cartón de embalaje.
. Verifique que en el cartón o relleno no queden piezas
sueltas.
1. Desenchufe la cortadora antes.
. Saque el protector de disco (Paso 16), soltando la
tuerca mariposa (Item 18) y subiendo el protector
hasta sacarlo.
3. Suelte las dos perillas de fijación (Paso 4), y luego
saque la mesa de corte (Paso 19).
4. Antes de montar el disco diamentado, verifique que
las bridas no tengan suciedad o grasa.
PRECAUCIÓN: Asegúrese que el disco esté
correctamente instalado. En caso contrario, se
dañar el disco
5. Instale el disco para rotación en contra del sentido de
los punteros del reloj. Controle con la flecha de
dirección en al disco.
6. Con el disco correctamente asentado (presionado
contra la brida interior), instale la brida exterior y
apriete con una llave. !Nunca apriete a mano!
7. Para reensamblar, basta con invertir los dos primeros
pasos.
3 Instalaci n Del Disco
1. Llene el depósito con agua limpia a través del orificio
en la mesa de corte. Controle el nivel del agua
mediante la salida de desborde al costado del
depósito.
. Mientras trabaja, mantenga el protector de disco lo
más cerca posible al material para evitar salpicaduras
de agua.
3. Opnecte al cable de alimentación al enchufe
adecuado, usando el menor largo posible para evitar
una innecesaria caída de voltage. Se recomienda
usar cable de calibre 16 o mayor.
4. Arranque la cortadora con el interruptor (Paso 35).

15
PRECAUCIÓN: Mantenga el agua limpia y
controle que el nivel del agua llegue al orificio
de desborde.
NOTA: Siga las recomendaciones del fabricante del disco
para corte en seco o húmedo. Sólo se pueden usar sin
refrigerante los discos específicamente disenados para corte
en seco. Los discos de corte húmedo pueden dañarse o
destruirse sin un flujo suficiente de agua.
5. Para Hacer Cortes Rectos
1. Suelte la perillla (Paso 6) y ponga la guía de corte
(Paso 5) a la distancia requerida. Use la escala
frontal. Apriete la perilla.
. Ponga la baldosa en su lugar y empújela contra el
disco manteniéndola firmemente contra la guía para
asegurar un corte limpio y preciso.
3. Pase el material lentamente bajo el protector hacia el
disco, sin forzarlo. Esto aumentará la duración del
disco diamantado y evitará recalentar del motor.
Disminuya la presión de corte al acercarse al final
para evitar el astillado de la baldosa.
6 Para Hacer Corte Biselados
1. Use la misma técnica de cortes rectos, con la
excepción de fijar la guía unos 15 a 16 mm más atrás
del disco.
7 Instrucciones de Mantenimiento
Antes de efectuar cualquier mantenimiento,
S EMPRE coloque la máquina en una
superficie plana con el motor APAGADO
(OFF) y desconecte la energía eléctrica.
¡Deje que la máquina se enfríe!
1. Desenchufe la cortadora antes de realizar cualquier
mantenimiento.
. Mantenga la mesa limpia y libre de astillas. Barra con
un chorro de agua.
3. Vacie, limpie y rellene el depósito con frecuencia.
Limpie con abundante agua, luego drene y vuelva a
llenar con agua limpia.
4. Es necesario limpiar la máquina al terminar cada
jornada de trabajo. Limpie el depósito y saque el
agua.
5. Guarde su cortadora en un lugar seco.
8 Protector Térmico - Rearmado Manual
El motor tiene un protector térmico de rearmado manual
(Paso 37). Si al motor se recalienta, el botón rojo salta para
abrir el circuito del motor. Si esto ocurriera, gire el interruptor
del motor a la posición OFF y, luego que al motor se haya
enfriado, empuje el botón rojo. Al mantenerse adentro, se
pueded volver a arrancar el motor.
12 Reparaciones
13
Piezas De Repuesto
Las instrucciones de uso y las piezas de recambio
presentadas en este documento son solamente para
información y no constituyen obligación ninguna. Como
parte de nuestra política de mejoramiento de la calidad
de nuestros productos, nos reser amos el derecho de
hacer cualquiera y todas las modificaciones técnicas sin
pre io a iso.
Efectuamos todas las reparaciones en el tiempo más corto
posible y a los precios más económicos. (Ver nuestra
dirección y números telefónicos en la portada).
Para la obtención rápida de piezas de repuesto y evitar
cualquier pérdida de tiempo, es esencial proporcionar con
cada pedido los datos que aparecen en la chapa del
fabricante fijada a la máquina, además de los números de
pieza de la máquina y la descripción de la pieza a ser
reemplazada.
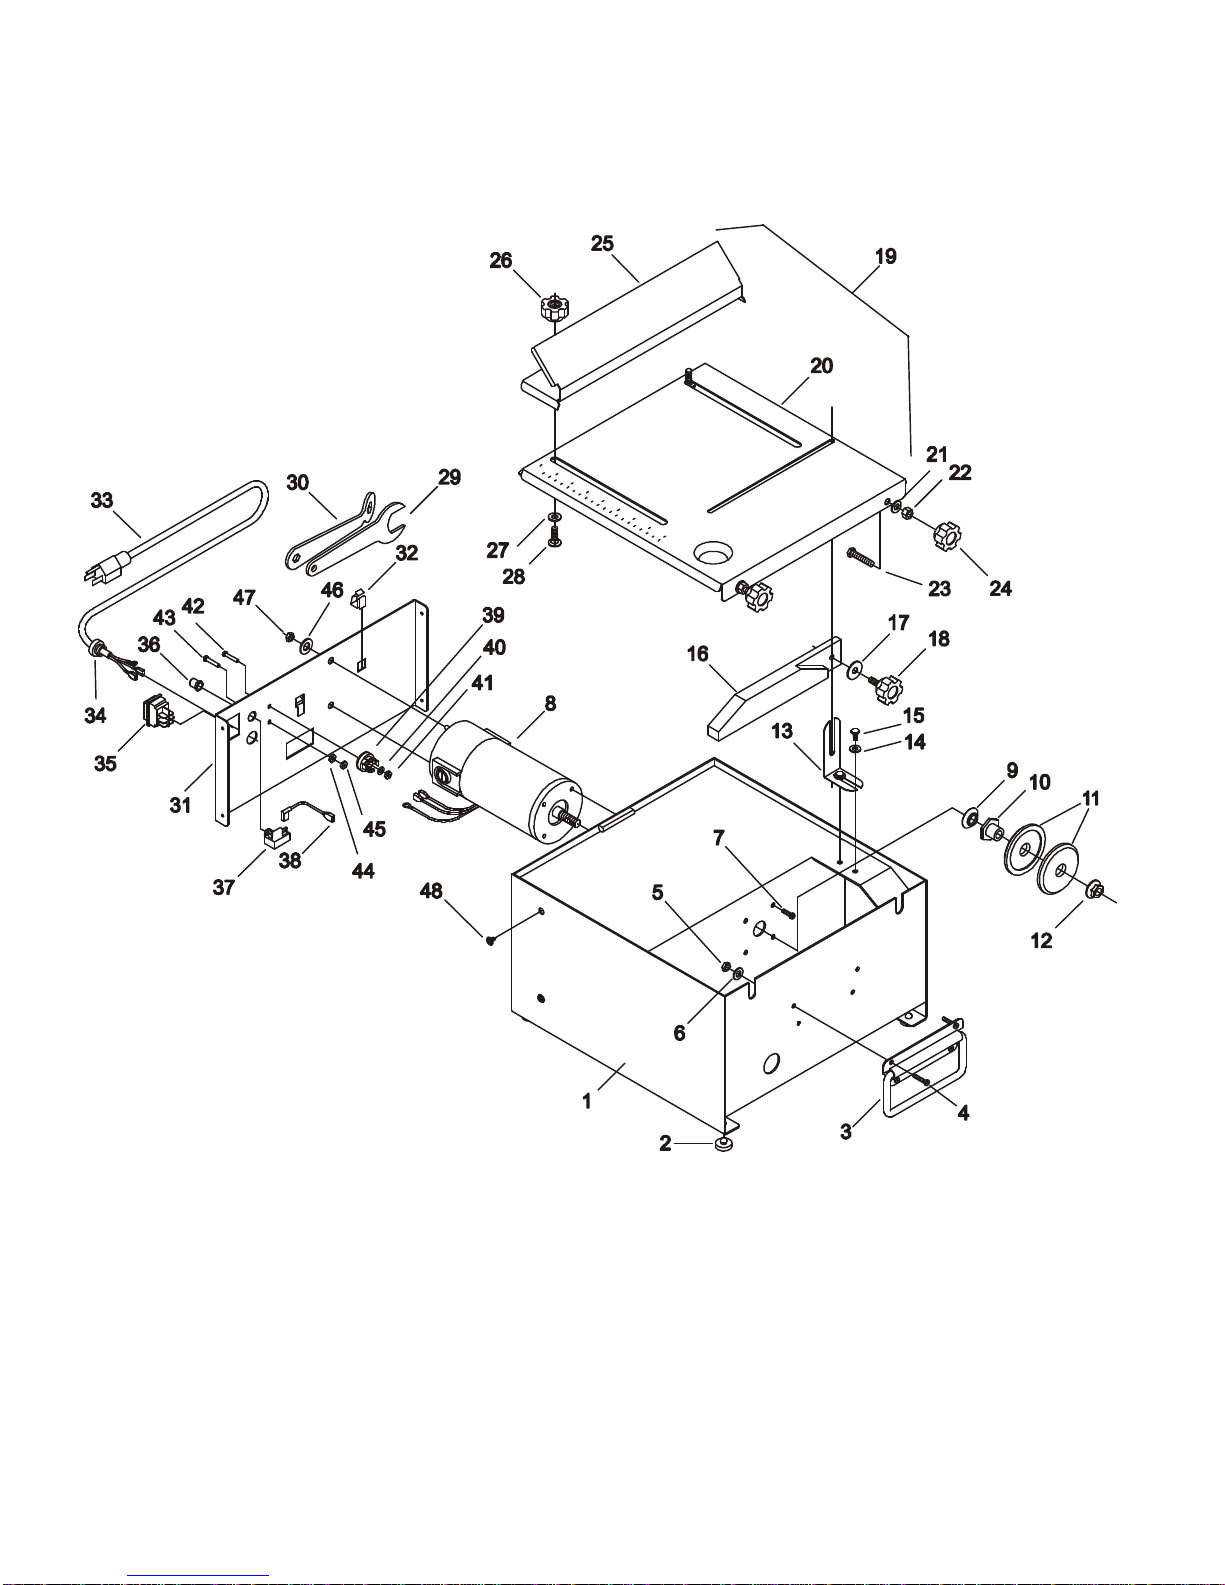
16
FIGURE 1

17
FIGURE 1 -PARTS LIST TILE MAGIC
Item
Paso Part
No. Qty Description Item
Paso Part
No. Qty Description
1169451 1Tank Housing 31 169454 1Cover, Rear
2169675 4Bumper Plug 32 169456 2Clip
3169461 1Handle 33 171742 1Cord w/ 115 V Plug (NEMA 5-15P)
4169587 4Machine Screw, Pan Head, M4 x 16 -171932 1Cord -250 V (No Plug)
5167485 4Locknut, Fiber M4 34 170570 1Relief, Strain
6197290 4Washer, Flat M4 35 169457 1Switch, D.P.S.T.
7170591 4Screw, Self-tapping, Pan Head, 36 197184 1Nut, Hex Boot
#10 -24 x 1/2” 37 171734 1Protector, Thermal -115 V
8171730 1PM Motor –115V FWR -197238 1Protector, Thermal -230V
-171731 1PM Motor –230V FWR 38 171744 3Wire, Jumper
9171796 1Seal, Face 39 169295 1Rectifier (* See note below.)
10 162818 1Bushing, Shaft 40 169485 1Washer, Flat M3
11 169523 2Flange, Blade 41 169484 1Nut, Hex M3
12 171748 1Nut, Large Flange, 3/8” -16 42 169483 1Machine Screw, Pan Head M3 x 16
13 169455 1Bracket, Splash Guard 43 197293 1Machine Screw, Pan Head M4 x 16
14 139746 2Washer, Flat M6 44 197291 1Nut, Hex M4
15 197226 2Capscrew, Hex Head M6 x 10 45 167485 1Locknut, Fiber M4
16 169448 1Guard, Splash 46 020771 2Washer, Flat #10
17 139746 1Washer, Flat M6 47 020131 2Nut, Hex #8 -32
18 169458 1Knob, M6 x 48 189246 4Screw, Hex Washer Hd., Pan Head,
19 169469 1Table Assy (Incl’s items 20 -28) Self-Tapping #10-24 x 1/2”, “D”
20 169450 1Table, Cutting
21 173059 2Washer, Flat M8
22 172027 2Nut, Hex M8
23 197227 2Capscrew, Hex Head M8 x 20
24 169460 2Knob, M8F NOT SHOWN
25 169453 1Rip Guide, 45°171798 2Decal: TILE MAGIC
26 169459 2Knob, M6F 187043 1Decal: Warning/Caution
27 173059 2Washer, Flat M8 169345 1Decal: Manual Reset
28 178030 2Bolt, Carriage M6 x 20 169466 1Decal: Motor 115V
29 172378 1Wrench, 1” Open 169467 1Decal: Motor 230V
30 170562 1Wrench, Hex 9/16” 171795 1Brush Kit -PM Motor
171752 1Thermal Compound –2 Oz. Tube
* Note: Place small amount of Thermal Compound (171752) on bottom surface of Rectifier (169295) during installation.

18

19
Felker’s New Equipment Warranty
Except as noted below. Felker warrants that its new equipment will be free from manufacturing defects for a
period of two (2) years from date of purchase by the original consumer purchaser.
The above warranty is subject to the following new equipment exceptions:
1. The warranty time period for the following new equipment is limited as follows:
Gas-powered QuickieSuper saws –Three (3) months
Mix Master, Mortar Master, Stone Mate, Land Shark, Power Kat-One (1) year
Tile Mitersaw, Little Jack, Jack Junior and Slammer Jack tools –Six (6) months
Tile Mate-Ninety (90) days
2. To the extent the following components are part of any the new equipment, Felker’s warranty on the
component parts is limited to the manufacturer’s warranty period set out below:
Manufacturer.....Warranty Period
GAS and DIESEL ENGINES
Manufacturer.....Warranty Period
ELECTRIC MOTORS
Manufacturer.....Warranty Period
CERAMIC PLUNGER PUMPS
Briggs & Stratton....................2 years
Koler Gas................................2 years
Robin Gas................ 2 yrs./2,000 hrs.
Honda Gas..............................2 years
Wisconsin Gas..........1 year/2,000 hrs.
Hatz Diesel..............................1 year
TRANSMISSIONS
Eaton.....................................3 years*
Sunstrand................3 yrs./1,000 hrs.*
(* from date of manufacture)
Baldor.......................................1 year
Leeson......................................1 year
Bosch...................................6 months
Milwaukee............................Lifetime
Black & Decker........................1 year
DM100................................6 months
AIR MOTORS and VAC. PUMPS
Gast..........................................1 year
General Pump..........................5
years
Cat Pumps................................1 year
HYDRAULIC PUMPS
Fenner-Stone............................1 year
John S. Barnes Co....................1 year
WATER PUMPS
Jasbsco.....................................1 year
Beckett.....................................1 year
3. Felker’s obligation under this warranty is expressly limited to the replacement or repair at Felker, Olathe,
KS 66061, or at a service facility designated by Felker, of such parts as inspection shall disclose to have been
defective. This warranty does not cover labor, except for gas powered Quickie Super saws and does not cover
maintenance items such as belts, air filters, bearings and wheels. Purchaser will be responsible for paying for
shipping costs to and from the location where the equipment is to be repaired or replaced. Motors and
engines are to be serviced by the nearest factory authorized service center. These service centers are
designated by the manufacturer of the engine/motor. Under no circumstances will Felker be responsible
for incidental or consequential damages.
4. Felker’s warranty does not apply to defects caused by damage, abuse, modifications, low voltage, acts of
God, unreasonable use, faulty repairs made by others or defects caused by failure to provide reasonable
maintenance. All warranties are void if the equipment or any of its components are altered or modified by the
purchaser, or of the product is used in a manner or with a blade not recommended by the manufacturer.
5. The forgoing express warranties are in lieu of all other warranties. FELKER EXPRESSLY
DISCLAIMS ALL OTHER WARRANTIES, INCLUDING, WITHOUT LIMITATION, THE
IMPLIED WARRANTIES OF MERCHANTABILITY AND FITNESS FOR A PARTICULAR
PURPOSE.
Please record the Date of Purchase and the Serial Number of your saw in the space below. (The serial number
is located on the side of the motor.) When ordering service items, please have this information available.
Serial Number:
Date of Purchase:
Model Number:
Where Purchased:

20
Table of contents
Languages:
Other Felker Saw manuals

Felker
Felker tr-850 Use and care manual

Felker
Felker FRS-30 Use and care manual

Felker
Felker TM-75 User manual

Felker
Felker TILE MASTER XL TM1-XLHT Use and care manual

Felker
Felker PaverMatePM-15HT User manual

Felker
Felker TM-75 Use and care manual

Felker
Felker FTS-150 Use and care manual

Felker
Felker Mason Mate II Use and care manual

Felker
Felker TM-75 Use and care manual

Felker
Felker TM-1HT User manual


