Felton Digital SMARTFLOW User manual

USER GUIDE
SMARTFLOW
FD-SFCSMC
Digital Thermostatic Shower Mixer

Felton Digital’s Smartow is an entry level digital, thermostatic shower mixer. Utilising Swiss technology, it features three
customisable memory settings for your perfect shower temperature and ow of water.
It saves water and energy because it heats up to your pre-set shower temperature more quickly and eciently than a regular
shower mixer. Its ease of use, ergonomic operation and thermostatic mixer allows for a safer shower for the whole family –
especially children and the elderly.
Regular shower mixers rely on manual control to regulate ow and temperature. When the hot or cold water supply to a manual
shower mixer uctuates, so does the temperature of the shower.
This may cause a sudden, unpleasant cold shock or potentially dangerous hot scald as the user scrambles to adjust the mixer
back to a comfortable shower temperature.
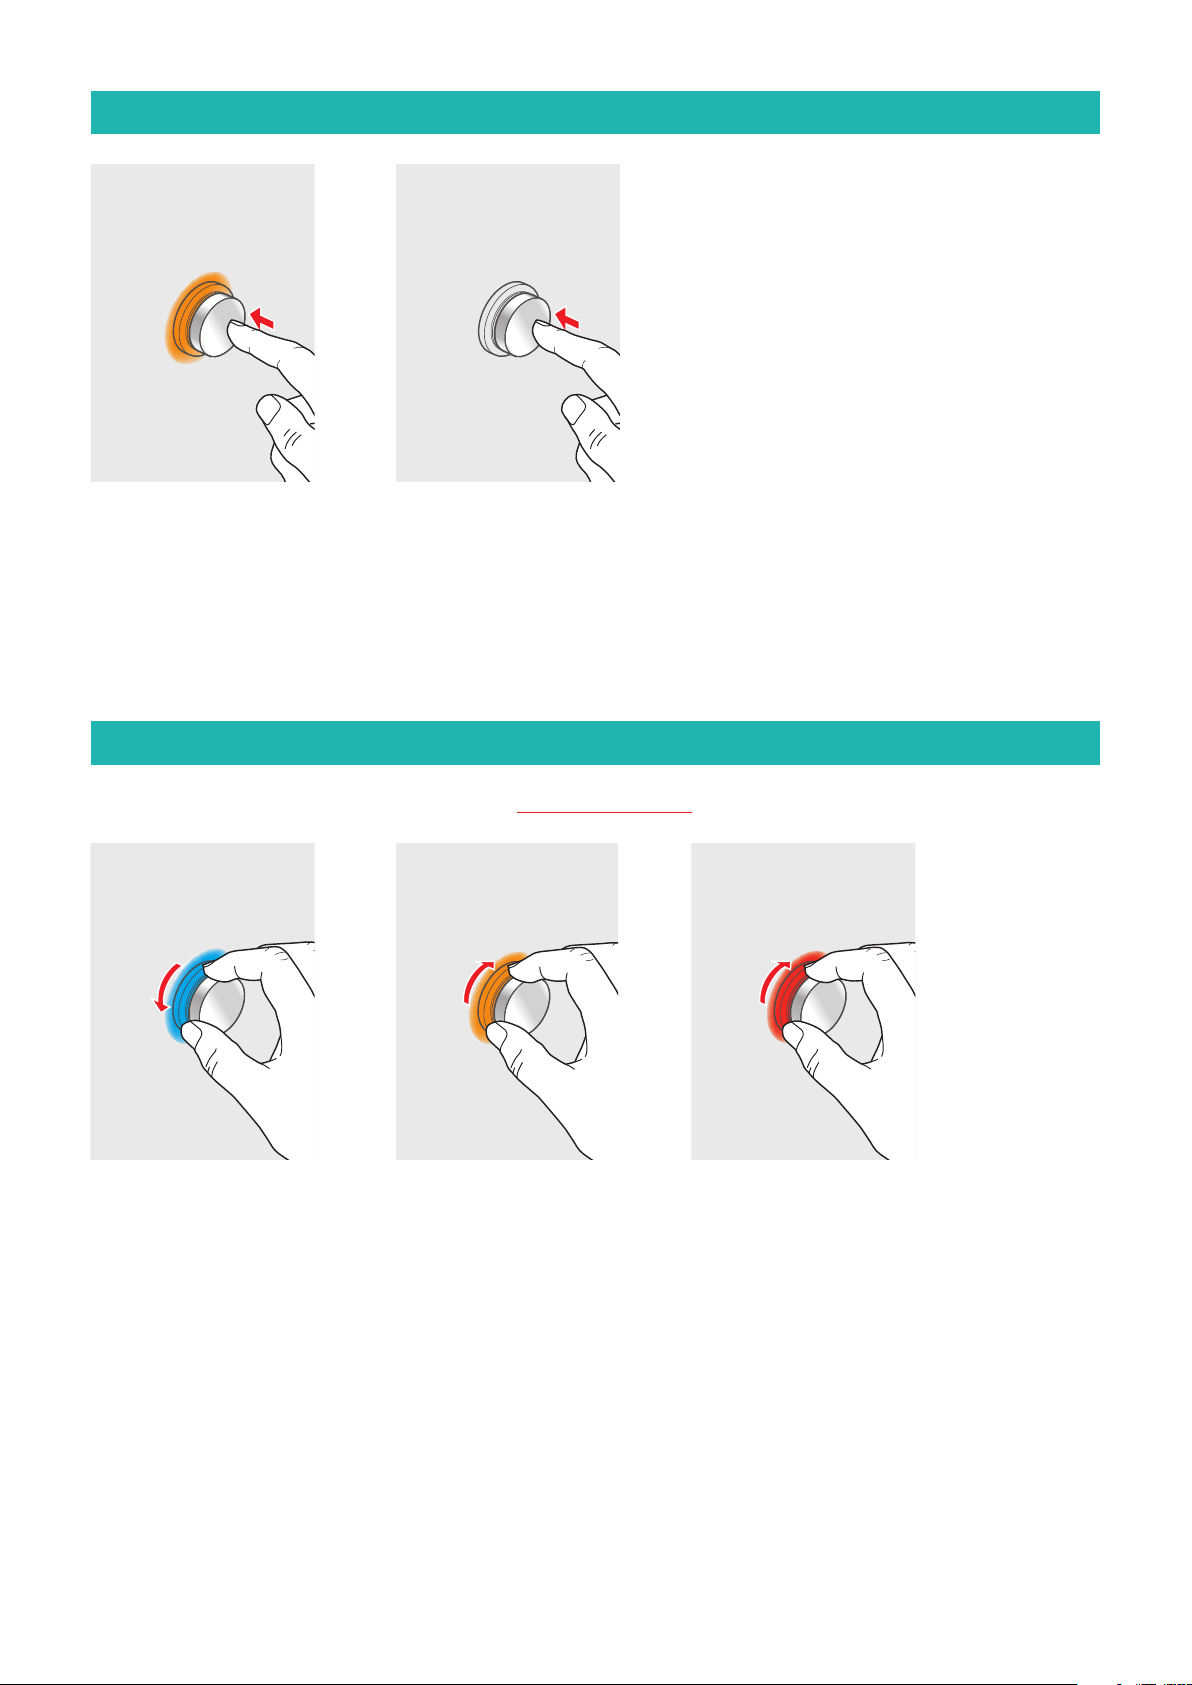
Smartow is a thermostatic shower mixer which automatically adjusts itself to maintain the shower temperature you have set it to
and shows temperature colour visualisation.
The Smartow was built from a Swiss technology which allows you to alter your water temperature and ow comfortably at the
touch of a button. Additional functions can be set on installation, including maximum run time and temperature, diagnostics and
clean mode. A safety stop slows temperature increase after 40 degrees, and it has a maximum temperature setting of 45°C.
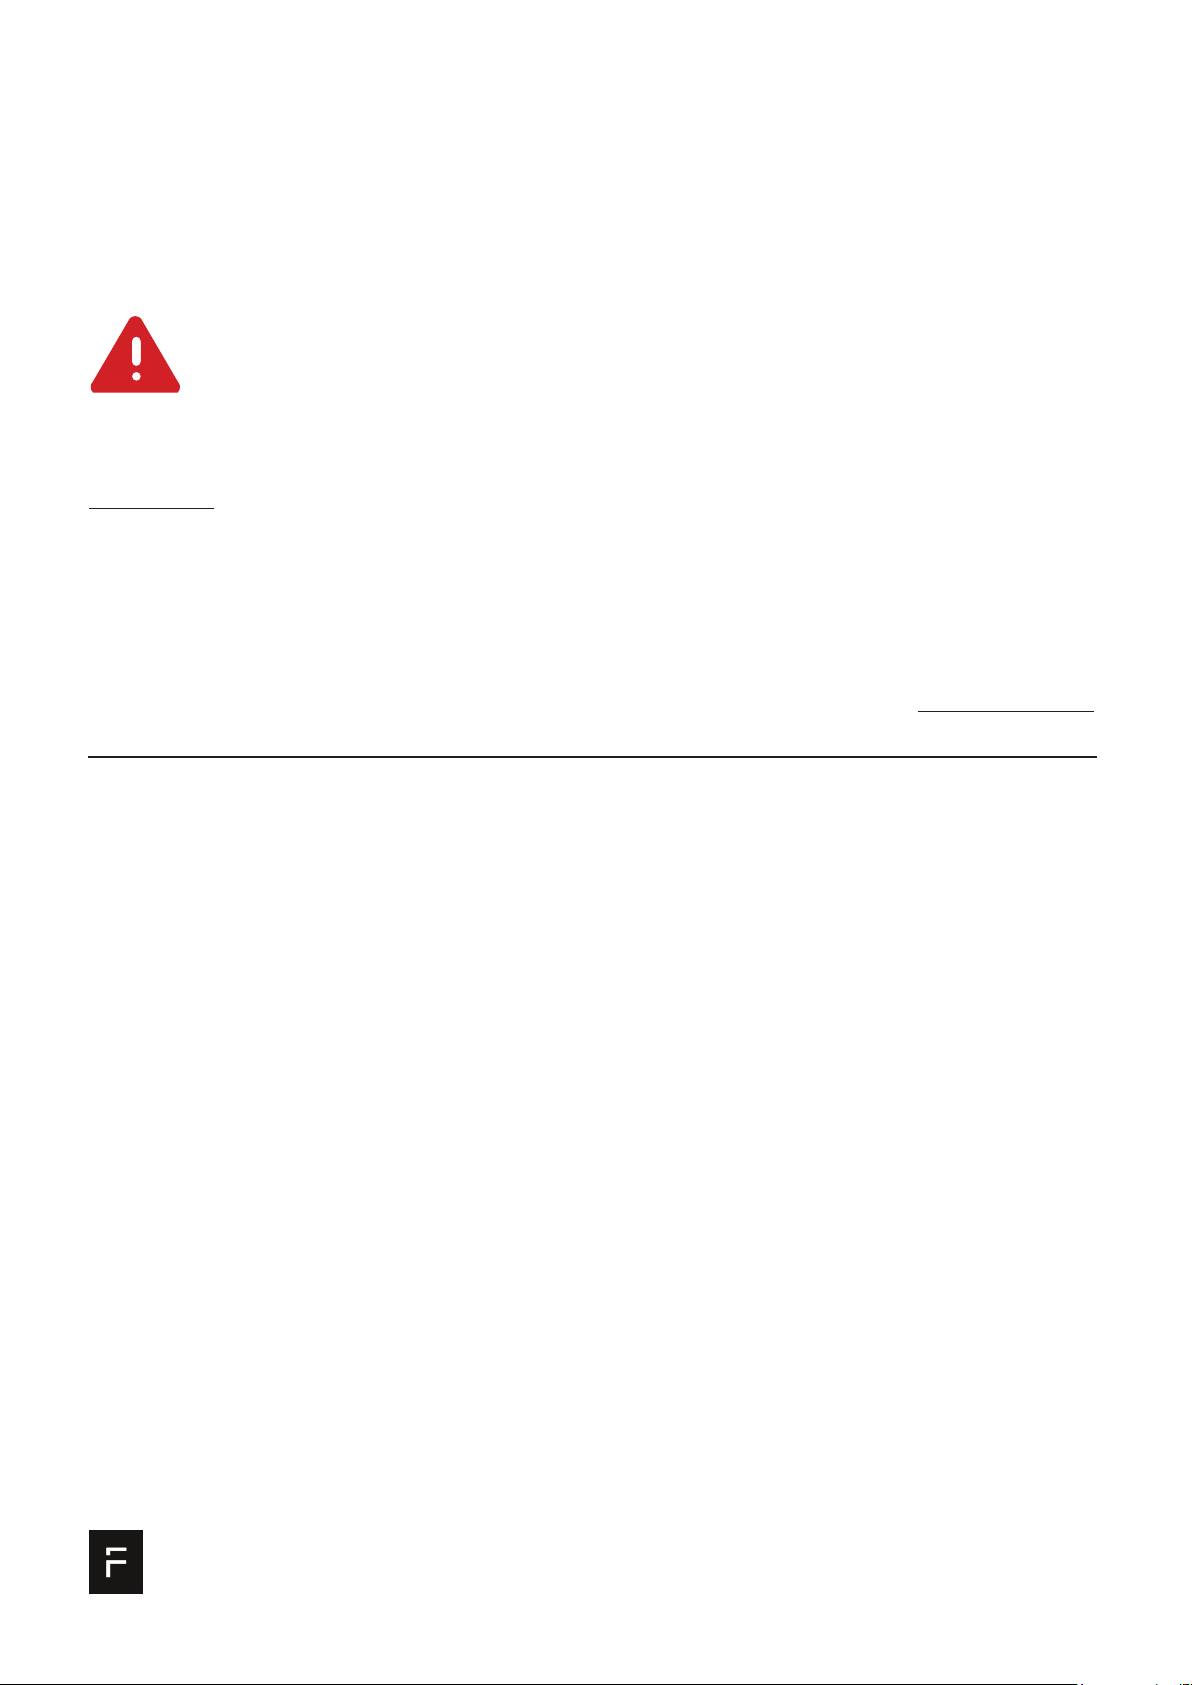
Memory setting
Safe cleaning mode
Eco stop
Anti-scald
Thermal disinfection
Diagnostic
Factory Setting
Three programmable settings for temperature and ow rate
Disabling the unit for 45 sec
The control unit switches o after 30 minutes by default
Slower temperature increase after 40°C
Flushing the outlet with hot water for 2 min
Checking wheel with error indicator
Resetting back to factory settings
FELTON INDUSTRIES LTD
8 Farmhouse Lane, Glen Innes, Auckland 1072
FELTON DIGITAL SMARTFLOW
IMPORTANT SAFETY INFORMATION
Please read these instructions carefully before using this system and keep in a safe place for future reference.
To reduce the risk of electric shock and injury, basic safety precautions, including the following, should always be followed when
using electrical appliances. Children MUST be supervised at all times when using this shower control. Training should be given
to children and vulnerable individuals before permitting them to operate the control. Do not pull on the power cable: this may
damage it and cause electric shock. Never operate any appliance with damaged cable or plug. Do not use an appliance that has
been dropped or damaged or after any malfunctions.
WARNING
Continuously turning the control wheel in the clockwise direction may override the preset maximum
temperature, with consequent risk of scalding. Always take care when operating the control wheel,
and do not leave children unattended whilst the product is in operation.
IMPORTANT: Once powered up, the control must be programmed within one hour, this will set the maximum temperatures,
maximum run time and hygiene intervals.
1. This appliance is not intended for use by persons (including children) with reduced physical, sensory or mental capabilities, or
lack of experience and knowledge, unless they have been given supervision or instruction concerning use of the appliance
by a person responsible for their safety.
2. Children should be supervised to ensure that they do not play with the appliance.
3. If the supply cord is damaged, it must be replaced by the manufacturer, its service agent or similarly qualied persons in order
to avoid a hazard.
4. This appliance contains battery that are only replaceable by skilled persons.
5. An electronic copy of installation and user guides are available on Felton Digital website – please visit www.feltondigital.co.nz
to view le.
PRECAUTIONS

CONTENTS
Operating the water control system
Operating the control 4
Setting the temperature 4
Operating the ow control 5
Setting the temperature and ow memory 5
Advanced activation set up 6 - 7
Troubleshooting 10
Warranty 11

4
OPERATING THE CONTROL SYSTEM
SETTING THE TEMPERATURE
Important: Risk of scalding, please read the Safety Information before using.
Press the control
once, the control will
illuminate and water
will start to ow.
To turn ON
Press the control once,
the water and light will
turn o.
To turn OFF
Turn the control
anti-clockwise,
the control will illuminate
blue and will ash until
the set temperature is
reached.
Turn the control
clockwise, the control
will illuminate Orange,
the light will ash until
the temperature is
reached.
Continue turning the
control clockwise, the
control will illuminate
Red, the light will ash
until the set temperature
is reached.
COLD WARM HOT

5
SET
MEMORY 1
SET
MEMORY 2
SET
MEMORY 3
IN OFF
POSITION
IN OFF
POSITION
IN OFF
POSITION
PRESS 1 x PRESS 2 x PRESS 3 x
OPERATING THE FLOW CONTROL
At the same time,
PRESS & TURN the
control clockwise
to increase ow.
To increase ow
At the same time,
PRESS & TURN the
control anti-clockwise
to decrease ow.
To decrease ow
3.2.
1.
A. B. C.
Congure up to three memory settings on the controller for your desired shower temperature and
ow. You may request a Felton Recommended Installer upon installation to set temperature for you.
The maximum temperature
for memory settings is 40˚C.
SETTING THE TEMPERATURE AND FLOW MEMORY
Hold
Turn to set desired temperature.
Colour should change.
Adjust ow by holding and
turning the knob.
PRESS & HOLD the control to save.
Once purple light ashes, release
immediately.
Default temperature settings
Memory 1 36˚C
Memory 2 37˚C
Memory 3 38˚C

6
Insert lifestyle image

7
Insert lifestyle image

8
COLOUR
INDICATION MENU FEATURE HOW TO ACCESS
SAFE CLEANING
MODE
This feature allows you to clean your control and
shower without turning on your shower during
cleaning.
PRESS & HOLD the control for 5 seconds until the GREEN light appears, then
release.
This will disable the control for 45 seconds to allow the control to be cleaned
without turning on.
To cancel, press the control again.
DIAGNOSTIC TEST
This feature will run a series of diagnostic checks
with lights indicating if your control is OK or
malfunctioning.
Please see Troubleshooting page on the
Smartflow Install Guide booklet if error occurs or
contact Felton Technical Team at 0800 743 358
PRESS & HOLD the control for 18 seconds until ORANGE light appears,
then release.
A series of lights will flash to indicate which stage the diagnostic is checking.
To cancel, press control again.
COLOUR INDICATOR
RED LIGHT Valve is hot
GREEN LIGHT Valve is off
BLUE LIGHT Valve is cold
LIGHT OFF System check complete
THE FUNCTIONS BELOW ARE ONLY ADJUSTABLE FOR 1 HOUR AFTER INITIATION
CONSULT FELTON RECOMMENDED INSTALLER UPON INSTALLATION
MAXIMUM
TEMPERATURE
This feature allows you to adjust to your desired
maximum temperature to avoid accidental scalding
from the elderly and children.
Maximum temperature on default is 45°C
PRESS & HOLD until light starts flashing WHITE.
Release immediately to access.
TURN to adjust desired maximum temperature.
PRESS again to save maximum temperature.
Maximum default temperature is 45ºC.
THERMAL
DISINFECTION
This feature flushes out the pipes at the hottest
temperature your system will allow. this will clean
through any limescale and clear any potential
bacteria.
Note: If your thermal disinfection indicates a red light at the
end of the disinfection, your system has not provided hot
water greater than 55ºC. This can be ignored as it does not
aect the function of the thermal disinfection process.
ATTENTION: RISK OF SCALDING
PRESS & HOLD until for approx 20 sec until light starts ashing RED.
Release immediately to access.
Flashing RED: Thermal disinfection ushes out hot water.
Automatic stop after 2 minutes. RED ashes.
Press again to nish thermal disinfection.
To stop disinfection during cycle: PRESS ONCE.
RESTORE
FACTORY SETTINGS
This restores all factory settings back to its original
default setting except for flow memory.
PRESS & HOLD until light starts ashing BLUE.
Release immediately to access.
Flashing BLUE twice: Factory setting is restored.
MAXIMUM WATER
FLOW TIME
To save water at home, this feature allows you to
switch the unit off after 5 seconds to 30 minutes
during shower.
PRESS & HOLD until light starts ashing PINK.
Release immediately to access.
PRESS to set desired water ow time
Flashing PINK twice: Setting is saved.
HYGIENE
FUNCTION
This feature is used for setting up the shower to
turn on and regularly flush the system through.
The complete flush will automatically stop after 2
minutes.
Note: If your thermal disinfection indicates a red light at the
end of the disinfection, your system has not provided hot
water greater than 55ºC. This can be ignored as it does not
aect the function of the thermal disinfection process.
PRESS & HOLD until light starts ashing YELLOW.
Release immediately to access.
PRESS ONCE to adjust interval ushing at the number of ashes.
Flashing YELLOW twice: Setting is saved.
FLASHING 1 2 3 4 5
TIME 1 day 2 days 3 days 7 days Inactive
IMPORTANT: Once powered up, the control must be programmed within one hour.
If the activation set up is not complete within one hour, power o the unit, leave it for 20 minutes, then restart again.
ADVANCED ACTIVATION SET UP
To access each setting, PRESS & HOLD until colour changes in the order shown, then release to access desired menu setting.
Malfunction of the
temperature sensor.
Please contact Felton
Technical Team at
0800 743 358
3 x ORANGE ashes
2 x ORANGE ashes
The control unit is OK

9
COLOUR
INDICATION MENU FEATURE HOW TO ACCESS
SAFE CLEANING
MODE
This feature allows you to clean your control and
shower without turning on your shower during
cleaning.
PRESS & HOLD the control for 5 seconds until the GREEN light appears, then
release.
This will disable the control for 45 seconds to allow the control to be cleaned
without turning on.
To cancel, press the control again.
DIAGNOSTIC TEST
This feature will run a series of diagnostic checks
with lights indicating if your control is OK or
malfunctioning.
Please see Troubleshooting page on the
Smartflow Install Guide booklet if error occurs or
contact Felton Technical Team at 0800 743 358
PRESS & HOLD the control for 18 seconds until ORANGE light appears,
then release.
A series of lights will flash to indicate which stage the diagnostic is checking.
To cancel, press control again.
COLOUR INDICATOR
RED LIGHT Valve is hot
GREEN LIGHT Valve is off
BLUE LIGHT Valve is cold
LIGHT OFF System check complete
THE FUNCTIONS BELOW ARE ONLY ADJUSTABLE FOR 1 HOUR AFTER INITIATION
CONSULT FELTON RECOMMENDED INSTALLER UPON INSTALLATION
MAXIMUM
TEMPERATURE
This feature allows you to adjust to your desired
maximum temperature to avoid accidental scalding
from the elderly and children.
Maximum temperature on default is 45°C
PRESS & HOLD until light starts flashing WHITE.
Release immediately to access.
TURN to adjust desired maximum temperature.
PRESS again to save maximum temperature.
Maximum default temperature is 45ºC.
THERMAL
DISINFECTION
This feature flushes out the pipes at the hottest
temperature your system will allow. this will clean
through any limescale and clear any potential
bacteria.
Note: If your thermal disinfection indicates a red light at the
end of the disinfection, your system has not provided hot
water greater than 55ºC. This can be ignored as it does not
aect the function of the thermal disinfection process.
ATTENTION: RISK OF SCALDING
PRESS & HOLD until for approx 20 sec until light starts ashing RED.
Release immediately to access.
Flashing RED: Thermal disinfection ushes out hot water.
Automatic stop after 2 minutes. RED ashes.
Press again to nish thermal disinfection.
To stop disinfection during cycle: PRESS ONCE.
RESTORE
FACTORY SETTINGS
This restores all factory settings back to its original
default setting except for flow memory.
PRESS & HOLD until light starts ashing BLUE.
Release immediately to access.
Flashing BLUE twice: Factory setting is restored.
MAXIMUM WATER
FLOW TIME
To save water at home, this feature allows you to
switch the unit off after 5 seconds to 30 minutes
during shower.
PRESS & HOLD until light starts ashing PINK.
Release immediately to access.
PRESS to set desired water ow time
Flashing PINK twice: Setting is saved.
HYGIENE
FUNCTION
This feature is used for setting up the shower to
turn on and regularly flush the system through.
The complete flush will automatically stop after 2
minutes.
Note: If your thermal disinfection indicates a red light at the
end of the disinfection, your system has not provided hot
water greater than 55ºC. This can be ignored as it does not
aect the function of the thermal disinfection process.
PRESS & HOLD until light starts ashing YELLOW.
Release immediately to access.
PRESS ONCE to adjust interval ushing at the number of ashes.
Flashing YELLOW twice: Setting is saved.
FLASHING 1 2 3 4 5
TIME 1 day 2 days 3 days 7 days Inactive
ADVANCED ACTIVATION SET UP
DEFAULT
DEFAULT
FLASHING 1 2 3 4 5 6 7 8 9 10 11 12
TIME 5 sec 8 sec 10sec 15 sec 20 sec 30 sec 45 sec 1 min 5 min 15 min 30 min Open

10
ISSUE PROBLEM TROUBLESHOOT
The device does not function
(i.e. the LED light is not on)
The AC adapter is not connected
to the mains Connect device to the mains power
Mains power failure Check household fuse box
The AC adapter is not connected to the TLC temp
ow Follow Step 12 on Smartow Installation Guide
TLI-W unit is not working Follow Step 19 on Smartow Installation Guide
The water temperature does not match
the indicated display
Hot and cold water connections reversed Check connections are correct
Hot or cold water stop valve closed or only half
opened Fully open both stop valves
Kink in supply hose Check connection hoses
Connecting pipe blocked Flush pipes and clean lter
No hot water Check hot water tank and instantaneous
connections
Temperature sensor defect Carry out function «Diagnosis Test»
on Smartow User Guide
Dierence in supply pressure
between hot and cold water is greater than 100kPa Balance pressure to eliminate dierence
Constant ow of water Unit will not turn o Carry out function «Diagnosis Test»
on Smartow User Guide
The water shuts o before maximum run
time has been reached Flow sensor is defective Carry out function «Diagnosis Test»
on Smartow User Guide
The device is working but has
no water ow
Motors are not calibrated Carry out function «Diagnosis Test»
on Smartow User Guide
Stop valves closed Open stop valves fully
No water supply Restore water supply
Kink in supply hose Check connection hoses
Interface ashes green Cleaning mode active Wait 45 seconds or deactivate
via menu
The TLC Temp Flow is damp or wet Inlet and outlets of TLC temp ow are not properly
sealed Inspect all connections, reseal if necessary
The TLI wheel does not respond to
temperature and ow adjustment
The interface elements
are connected incorrectly Follow Step 19 on Smartow Installation Guide
The interface is defective Carry out function «Diagnosis Test»
on Smartow User Guide
The knob is not running smoothly Remove and clean knob
SMARTFLOW TROUBLESHOOTING
If issue persists or not covered by the above troubleshooting, please contact our
Felton Technical Team on 0800 743 358 or [email protected]

11
WARRANTY, MAINTENANCE & CARE
For technical assistance please ring: 0800 743 358 or (09) 528 0810
8 Farmhouse Lane, Glen Innes, Auckland 1072 New ZealandFelton Industries Limited www.felton.co.nz
5-year warranty applies to all Felton Digital branded products including the electronic hardware and its
components.
Where products are promoted as having a “5-year warranty”, Felton Industries Limited guarantees the electronic
components of these products (excluding batteries) to be free from defects in materials and workmanship under
normal installation, use and service for a period of ve (5) years from the date of purchase. Fair wear and tear is
expressly excluded.
This warranty is eective for ve (5) years from the date of purchase and covers electronic replacement parts
only (excluding batteries) and 2 years from the date of purchase for plumber’s labour relating solely to repairing
or replacing the Hardware, provided the product is installed by a registered plumber. You must retain proof of
purchase of the Hardware (such as an invoice or receipt) and proof of installation by a registered plumber and
provide these to Felton on request.
This warranty is for manufacturing defects only and does not cover any damage to product due to abuse,
negligence or improper installation. This warranty is given on the understanding that the product is installed
by a registered plumber and operated according to Felton’s installation guide and the Australian/New Zealand
standard AS/NZS3500. This warranty is provided to persons who are a “consumer” under the Consumer
Guarantees Act 1993 only and for use in domestic/residential dwellings only (not for commercial use).
This warranty is subject to any other rights or remedies that you may have under the Consumer Guarantees
Act 1993 (or any other applicable legislation) and to Felton’s Terms of Trade.
This 5-year warranty does not cover:
1) any consumable items (e.g. batteries, lters, installation ttings) supplied with the products.
2) damage, problems or unsatisfactory performance caused to the electronic hardware by:
a. Faulty or incorrect electrical wiring, incorrect power supply, voltage uctuations, over voltage
transient spikes or electromagnetic interference not originating within the electronic hardware.
b. Incorrect or poor installation or application
c. Operation at conditions outside the operating conditions specied in the Felton Digital technical
or sales data applicable to that electronic hardware.
d. Reconguration of the digital interface by the user – this is considered a service not a warranty.

/felton-industries-limited/FeltonIndustriesLimited @feltonltd/feltonltd@feltontapware
FELTON INDUSTRIES LTD
8 Farmhouse Lane Glen Innes Auckland 1072
sales@felton.co.nz | Find us on Social Media
050619EI
SERVICING AND CONTACT INFORMATION
CLEANING AND MAINTENANCE
Only clean the control with soapy water, do not use
abrasive cleaners as these could damage the chrome
and would not be covered under any warranty.
Please do not open the processor unit as this will
invalidate your warranty.
In the likely event that you are experiencing diculties
with your Felton Digital product, please contact our Felton
Technical Team on 0800 743 358 or [email protected].nz
Table of contents
Other Felton Digital Plumbing Product manuals
Popular Plumbing Product manuals by other brands

Gainsborough
Gainsborough BERENO user manual

BOSCO
BOSCO 200052 Installation instruction

Kohler
Kohler Coralais K-15186 Installation and care guide

Willoughby
Willoughby Aquafount WAF-5404 Series Installation & operation manual

Harvia
Harvia S1010 Assembly instructions

Hans Grohe
Hans Grohe Uno Tumbler 41534XX1 Specification sheet