Femometer XN/MD-2267R User manual

XN/MD-2267R
ELECTRIC
BREAST PUMP
HANDS FREE, BREASTFEEDING WITH EASE.

femometer
My dear,
This is a very special stage in your life. Maybe
you will experience the pain of breastfeeding,
lack of sleep, lack of freedom, more
pressure, etc., but you will also gain a lot,
such as your little baby's sweet smile,
surprises of growth, and unforgettable
memories. You have to believe you are great.
This is a wearable electric breast pump
designed specifically for you to make
breastfeeding more comfortable. I hope it
can accompany you through this unforgetta-
ble and special life journey easily.
01

Table of Contents
Product
Description
3
Intended
Use
5
Safety
7
Using Wearable
Pump
16
Technical
Specifications
22
Trouble
Shooting
23
Contains
24
Getting
Started
8
PAGE NAME| PAGE NAME|
02

1. PRODUCT DESCRIPTION
1.1 PARTS
03
02
01
0807
04
05
06
11
10
01
02
03
04
05
06
Breast Shield(25mm)
Diaphragm
Pump Motor
Valve
Bottle Connector
180ml Bottle
Tritan
SIL
/
SIL
PP
Tritan
........
.......................
......................
..................................
...............
.......................
07
08
09
10
11
22mm flange
18mm flange
Type-C Charging Cable
Bra Adjuster
Bottle Lid
SIL
SIL
/
/
PP
.....................
....................
....
......................
............................
09
* Spare part: valve
03

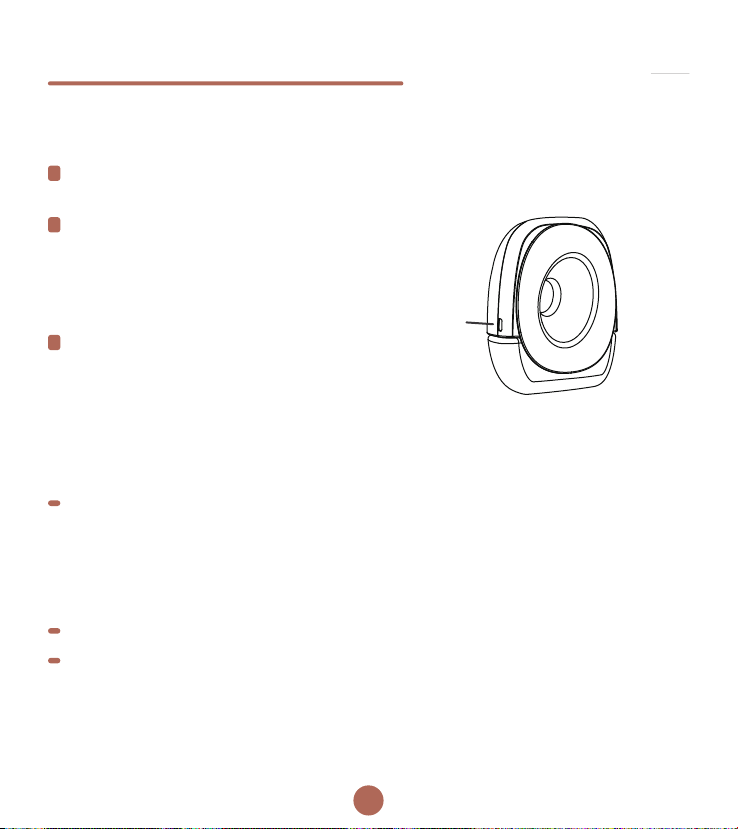
NOTE:
This product has a built-in li-ion battery. When the Battery Indicator light flashes during the
working process, we recommend that you use a certified 5V 1A Power Adapter to charge
the device as soon as possible.
1. PRODUCT DESCRIPTION
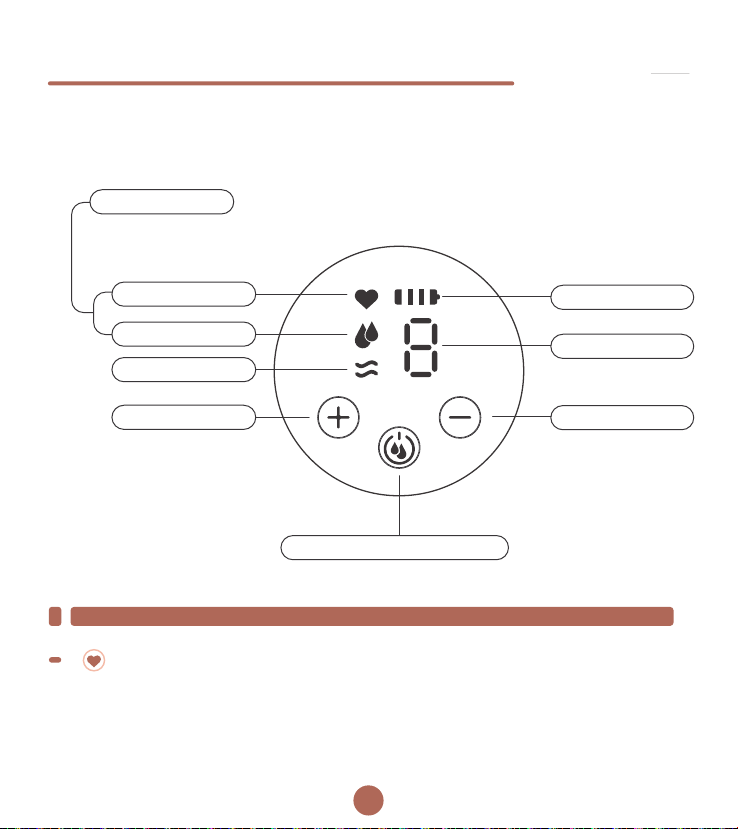
1.2 CONTROLS
Level Indicator
Battery Indicator
Vacuum Down
Massage Mode
Suction Mode
Traction Mode
Vacuum Up
On/off, mode switch
Simulation mode ( The icon of Massage Mode and Suction Mode will light up at
the same time . )
04

2. INTENDED USE
2.1 INDICATIONS FOR USE
Powered breast pump, to express and collect milk from lactating women, to alleviate
engorgement of the breast, maintain the ability of lactation, and provide mother’s milk for future
feedings when separation of mother and baby occurs. The device is intended for a single user.
2.2 OPERATING LIFE
The operating life of the Device is defined to be not less than 500 hours.
The expected operating life of the replaceable washable components is three-six months.
It also depends on how frequently the parts are used and washed.
It’s recommended to replace the washable components after long-term storage or before
pumping for your next child.
05

3. SAFETY
3.1 WARNINGS
This is a single-user product, use by more than one personal may present a health risk and
voids the warranty.
It’s recommended you consult with a licensed healthcare professional before using this
wearable pump if you have an active implanted device that would be affected by a
magnetic field (e.g. pacemaker, implantable cardioverter defibrillator).
Inspect for damage, clean and sterilize washable components that come into contact with
your breast and breast milk prior to first use.
Clean all parts that come into contact with your breast and breast milk, and inspect for
damage after every use.
During normal use, area of the wearable pump may warm up. If your pumping environment
is at the upper operating temperature limit (+30°C / +86°F) for the maximum session time (30
minutes), the temperature of the Cushion may reach up to +45°C / + 113°F.
Do not store wet or damp parts, as mold may develop.
Do not immerse the Pump Motor in water or other liquids. Wipe with a clean, damp cloth.
This product contains small parts and a cable that may present a hazard. Keep out of reach
of children.
Only use the manufactured parts with this wearable pump, including the charging cable, do
not substitute.
It’s recommended to use an adaptor compatible with both IEC60601-1 and your regional
power source.
06

Always inspect all parts before use for damage or cleanliness.
Always ensure all parts are completely dry before assembling.
Do not place the Pump Motor in the fridge or freezer.
This wearable pump and its components are not heat-resistant. Keep away from heat
sources.
Do not use flammable materials while using this wearable pump or connecting this
wearable pump to a charger.
Do not use this wearable pump while sleeping or overly drowsy.
Using a breast pump should not cause pain. Do not try to express with an intensity setting
that is too high or uncomfortable. If excessive discomfort or pain is felt during pumping,
stop pumping, break the Breast Shield around your nipple and discontinue the session.
Contact your healthcare professional if you express minimal or no milk, or if expression is
painful.
For assistance with correct Breast Shield sizing and comfort, pls see section 4.3 or talk to a
lactation consultant or breastfeeding specialist .
Extra care is necessary when using this wearable pump in the vicinity of children.
This wearable pump should not be used while lying down, or engaging in strenuous
exercise or activities with risk of harm.
Always break the cushion around your nipple before removing this wearable pump from
your breast.
Do not expose this wearable pump or components to direct sunlight.
3. SAFETY
3.2 PRECAUTIONS
07

4.GETTING STARTED
4.1 CLEANING AND STERILIZING
For the first time and after each use, you must disassemble, wash and sterilize all the
breast pump parts that come into contact with breast milk.
Disassemble and clean the parts come into contact with breasts and breast milk
immediately after use to avoid residual breast milk that may cause bacteria to grow.
Take care when cleaning the breast shield and diaphragm and valve, if it gets damaged,
your breast pump will not function properly.
Never wash or sterilize the pump motor, this component does not come into contact
with your breast milk. You can wipe this part clean with a soft cloth.
The Pump Motor contains electronics that should be kept dry. A clean, damp cloth can be
used to clean the Pump Motor. Any other cleaning method will be classed as misuse under
the warranty.
Do not get wet!
08

4.GETTING STARTED
Washable components
flange
Bottle Lid
flange
Cleaning washable components that come into contact with milk prevents the build-up
of dry milk residue, which can cause the growth of bacteria that may be harmful to you
and your baby.
Diaphragm
Breast Shield
Valve
Bottle Connector
180ml Bottle
09

4.GETTING STARTED
2. Wash in warm water
( approx +30°C / +86°F) using milk dish
washing soap and wipe afterwards with
a clean cloth.
1. Rinse in cold, clear water
( approx +20°C / +68°F ).
3. Rinse with cold, clear water
( approx +20°C / +68°F ) for 10 to 15 seconds.
Place on the top shelf of the dishwasher
OR
OR
Clean washable components Sterilize washable components
Boil in water for not more than
five minutes
Suitable for steam or cold water
sterilizing methods. We do not
recommend steam sterilizing
for more than five minutes.
Not suitable for sterilizing in a
microwave.
+
Storage Tips:
After cleaning and drying, store in a dry place.
Do not store wet or damp parts.
Do not expose it to direct sunlight.
Do not place the pump motor in a refrigerator or freezer.
10
TIP:
Charge immediately after finishing your pumping session if lower battery is indicated.
After power on,without using any function, the pump will automatic shutdown after 30
mins, if you need to continue using it, you can press the turn on/off button again.
When the battery is low in working process,
the Battery Indicator light will flash.
1
When charging, the indicator will light up
and the pump will not turn on. Use the
charging cable provided to connect the
pump motor to a USB power source (5V 1A),
such as your phone plug.
2
When fully charged, the Battery indicators
all light up. It takes approximately 2 hours
to fully charge the battery, which provides
approximately two hours’ usage time at
standard settings.
3
Please only use the charging cable provided with the wearable pump. Do not use the
wearable pump while charging.
4.GETTING STARTED
4.2 CHARGING
Type_c
11

This wearable pump comes with preassembled breast shield in 25mm and two additional
silicone inserts in size of 22mm and 18mm, so you can find a breast shield fit that is comfortable
for you.
25mm 18mm 22mm
standard shield available accessories included in the box
4.GETTING STARTED
4.3 BREAST SHIELD SIZING
12
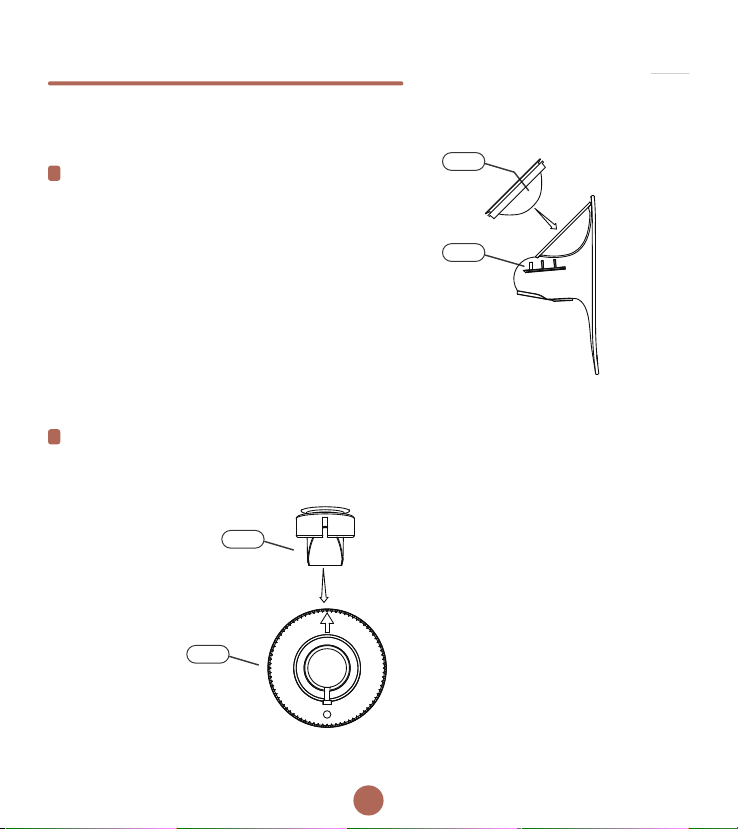
Make sure all parts are dry before putting
them together (after the parts have been
cleaned and sterilized).
Insert the Diaphragm (02) to the upper part of
the breast shield (01), the edge of the
Diaphragm coincides with the edge of the
breast shield, and the gap of the Diaphragm
corresponds to the breast shield.
1
Install the valve (04) into the Bottle Connector (05), the hole of valve should correspond-
ing to the support point of the Bottle Connector.
2
02
04
05
01
4.GETTING STARTED
4.4 ASSEMBLING THE PUMP
13

05
03
01
06
06
Then place the Bottle Connector (05) on the milk bottle (06) and twist it clockwise until
the arrow is aligned with the sign on the milk bottle.
3
Insert the installed breast shield (01) into the Pump Motor (03) first, and then insert the milk
bottle (06) into the bottom of the Pump Motor.
4
4.GETTING STARTED
14

In case that the standard Breast shield in 25mm(01) were too big for you, you may
choose the 18mm(08) or 22mm(07) silicone insert, to be placed in the center of breast
shield(01).
5
08
01
07
4.GETTING STARTED
15

5.1 ALIGNING YOUR NIPPLE
5. USING WEARABLE PUMP
Correct nipple alignment in the Breast Shield is key to comfort, expression and
performance. Your nipple must be positioned correctly in the Breast Shield tunnel
before pumping to avoid discomfort.
16

5. USING WEARABLE PUMP
This Wearable Pump is designed to be worn with your standard nursing bra and you
can use it in either a sitting or standing position.
Getting the right compression could impact milk volumes. This Wearable Pump needs to be
firmly pressed against your breast, there should be no gaps between this wearable pump
and your breast.
Every bra has a different level of support, so make sure to get the compression right before
each session. If you are using a particularly structured and inflexible bra, the included Bra
Adjuster may be used to create more room.
Once the buckle of each end is hung on the nursing bra, adjust the length of bra adjuster to
make more comfortable.
5.2 FINDING THE RIGHT COMPRESSION
17
5.3 STARTING YOUR SESSION
5. USING WEARABLE PUMP
Massage Mode
The Massage Mode mimics a baby's natural sucking pattern at the start of the breastfeeding,
which is quick and light. This pattern is trying to stimulate and initiate the milk ejection reflex.
There are 5 vacuum level settings in the Massage Mode, you can choose different level
according to your needs.
MODE DESCRIPTION
1
Level Indicator
Battery Indicator
Vacuum Down
Massage Mode
Suction Mode
Traction Mode
Vacuum Up
On/off, mode switch
Simulation Mode ( The icon of Massage Mode and Suction Mode will light up at
the same time . )
18
Table of contents


