Ferguson Enterprises PARK HARBOR FOXFIELD PHEL5105BLK User manual

FLUSH MOUNT
PHEL5105BLK
CARE AND MAI N
TENANCE:
To clean, wipe with damp cloth.
Do not use abrasive cleaners or cleaners
that contain alcohol.
CAUTION:
Shut off main power supply before cleaning
product or changing light bulbs.
All glass is fragile. Use care when handling
glass shades and bulbs.
SOINS ET ENTRETIEN :
Pour nettoyer, essuyer avec un chiffon
humide. Ne pas utiliser de produits de
nettoyage abrasifs ou contenant de
l'alcool.
MISE EN GARDE :
Couper l'alimentation électrique
principale avant de nettoyer ce produit
ou de changer une ampoule. Pour
nettoyer, essuyer avec un chiffon
humide. Ne pas utiliser de produits de
nettoyage abrasifs ou contenant de
l'alcool.
CUIDADO Y MANTENIMIENTO:
Use un trapo húmedo para limpiar.
No utilice limpiadores abrasivos o
limpiadores que contengan alcohol.
PRECAUCIÓN:
Corte el suministro principal de
energía antes de limpiar el producto
o cambiar las bombillas. Use un
trapo húmedo para limpiar. No utilice
limpiadores abrasivos o limpiadores
que contengan alcohol.
SAVE THIS MANUAL: RETAIN FOR
CONSU MER’S USE. READ THESE
INSTRUCTIONS COMPLETELY BEFORE
INSTALLING THE PRODUCT: FOR
PRODUCT OR INSTALLATIO
QUESTIONS PLEASE CALL CUSTO MER.
SERVICE AT 1 ‐800‐221‐3379.
GUARDE ESTE MANUAL: CONS ÉRVELO
PARA USO DEL CONSUMIDOR. LEA ESTAS
INSTRUCCIONES POR COMPLETO ANTES DE
INSTALAR EL PRODUCTO: SI TIENE
PREGUNTAS SOBRE EL PRODUCTO O LA
INSTALACI ÓN LLAME AL SERVICIO A A
CLIENTES AL 1 ‐800‐221‐3379.
1
CONSERVEZ CE MANUEL : METTEZ ‐LE À LA
DISPOSITION DES CONSOMMATEURS. LISEZ
COMPL ÈTEMENT CES INSTRUCTIONS AVANT
D'INSTALLER LE PRODUIT : POUR TOUTE
QUESTION CONCERNANT LE PRODUIT OU
SON INSTALLATION, VEUILLEZ APPELER LE
SERVICE À LA CLIENT ÈLE AU 1 ‐800‐221‐3379.
P A R K H A R B O R L IG H T IN G .C O M
ⓒ2018 Ferguson Enterprises, Inc. 00000 Jan/2018
Outils et matériaux recommandés / Herramientas y materiales recomendados
A B C D E
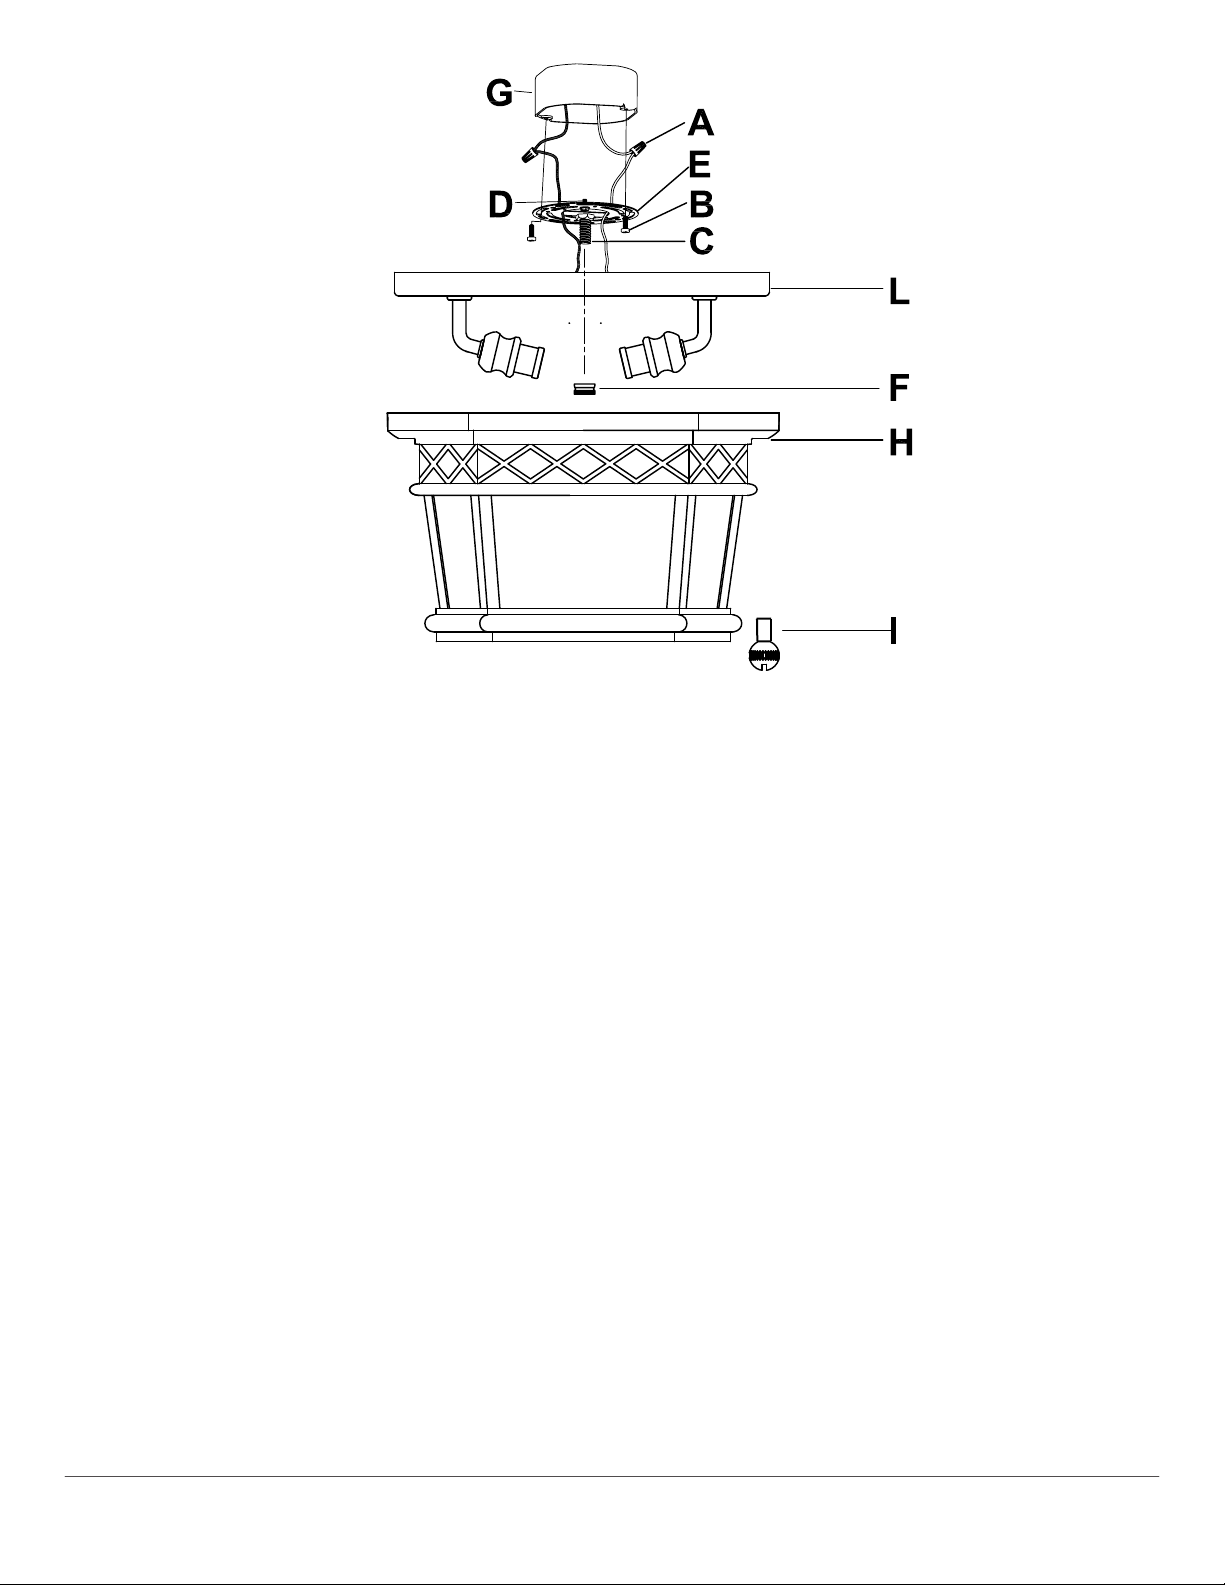
(A) Wire Connectors (3pcs)
(A) Capuchons de connexion (3)
(A) Conectores de cable (3 pzas) (B) Tornillos de caja tomacorrientes (2 pzas)
(D) Ground Screw (1pc)
(D) Vis de borne de terre (1)
(D) Tornillo a tierra (1 pza)
Recommended Tools and Accessories
(B) Outlet Box Screws (2pcs)
(B) Vis pour la boîte à prises (2)
(E) Mounting plate (1pc)
(F) Ball Nuts (1pc)
(E) Plaque de montage (1)
(F)Écrou sphérique (1)
(E) Placa de montaje (1 pza)
(F) Tuerca esférica (1 pza)
I
F
(I) Cap Nuts (1pc)
(I) Écrou borgne (1)
(I) Tuerca de sombrerete (1 pza)
(C) Nipple (1pc)
(C) Embout (1)
(C) Boquilla (1 pza)
FOXFIELD
Installation
1. Shut off the power a t the circuit breaker and
remove old fixture, including the crossba r.
2. Carefully unpack your new fixture and lay out
all the parts on a clear area. Take care not to
lose any small parts necessary for installation.
3. Attach the mounting p late (E) to the outlet box
(G) (not supplied) using the 2 screws (B)
provided with the outlet box (G).
4. CONNECTING THE WIRES
Now connect the electrical wires as follows:
Connect the black wire from the fixture to the
black (hot) house wire. Connect the white wire
from the fixture to the white (neutral) house
wire. Make sure all wire nuts are secured. You
may wrap the connections with electrical tape.
If your outlet has a ground wire (green or bare
copper), connect fixture ’s ground wire to it.
Otherwise, connect fixture ’s ground wire
directly to the mounting plate by using the
green screw provided. Tuck the wire
connections neatly into the junction box.
5. Attach the canopy (L) to the mounting plate
(E) and then secured by the ball nut (F).
6. Attach the cage (H) to canopy (L) and then
secured by the 2 cap nuts (I).
Installation
1. Coupez le courant au niveau du disjoncteur
et retirez l'ancienne lampe, y compris la barre
transversale.
2. Déballez soigneusement votre nouvelle
lampe murale et étalez toutes les pièces sur
une surface dégagée. Faites attention à ne pas
perdre les petites pièces nécessaires pour
l'installation.
3. Fixez la plaque de montage (E) à la boîte à
prises (G) (non fournie) à l'aide des 2 vis (B)
fournies avecla boîteà prises (G).
4. BRANCHEMENTS : Connectez ensuite les fils
électriques comme suit: raccordez le fil noir du
luminaire au fil noir (phase) de la maison.
Raccordez le fil blanc du luminaire au fil blanc
(neutre) de la maison. Veillez à ce que tous les
capuchons de connexion soient bien serrés.
Vous pouvez envelopper les raccordements
avec du ruban isolant. Si votre prise possède un
fil de mise à la terre (vert ou cuivre nu),
raccordez le fil de masse de la lampe à ce fil.
Sinon, raccordez le fil de masse du luminaire
directementà la plaque de montage en utilisant
la vis verte fournie. Rentrez soigneusement les
filsraccordésdansleboîtierélectrique.
5. Fixez lamonture (L) sur la plaque de montage
(E) àl'aidede l'écrousphérique(F).
6. Placez la cage (H) sur la monture (L), puis
fixez‐la àl'aidedel'écrouborgne(I).
2
Instalaci ón
1. Corte la energía desde el disyuntor y quite el
accesorioviejo contodoy la barra.
2. Desempaque cuidadosamente su nuevo
accesorio y extienda las partes en un área libre.
Ponga cuidado en no perder ninguna de las
partespequeñasnecesarias parala instalación.
3. Adjunte la placa de montaje (E) a la caja de
tomacorrientes (G) (no incluida) usando 2
tornillos (B) que se proporcionan con la caja de
tomacorrientes(G).
4. CONECTANDO LOS CABLES Ahora conecte los
cables eléctricos como sigue: Conecte el cable
negro desde el accesorio al cable (corriente) en la
caja negra. Conecte el cable blanco desde el
accesorio al cable de la caja blanca (neutral).
Revise que todos as tuercas de cable estén
aseguradas. Puede envolver las conexiones con
cinta de aislar. Si el tomacorrientes lleva un cable
a tierra (verde o de cobre sin revestimiento),
conecte la tierra del accesorio para cablearlo. En
caso contrario conecte el cable a tierra del
accesorio directamente a la placa de montaje
usando el tornillo verde que se proporciona.
Acomode las conexiones del cable
cuidadosamentedentrodela cajade conexión.
5. Adjunte la jaula (L) a la placa de montaje (E) y
luegoasegureconlas tuercascilíndricas(F).
6. Adjunte el vidrio (H) a la jaula (L) y luego
asegure con la arandela de hule (J ) y la tuerca de
sombrerete (I ).
P A R K H A R B O R L IG H T IN G .C O M
ⓒ2018 Ferguson Enterprises, Inc. 00000 Jan/2018
Other Ferguson Enterprises Outdoor Light manuals


