Ferguson D-680 User manual
ENGLISH
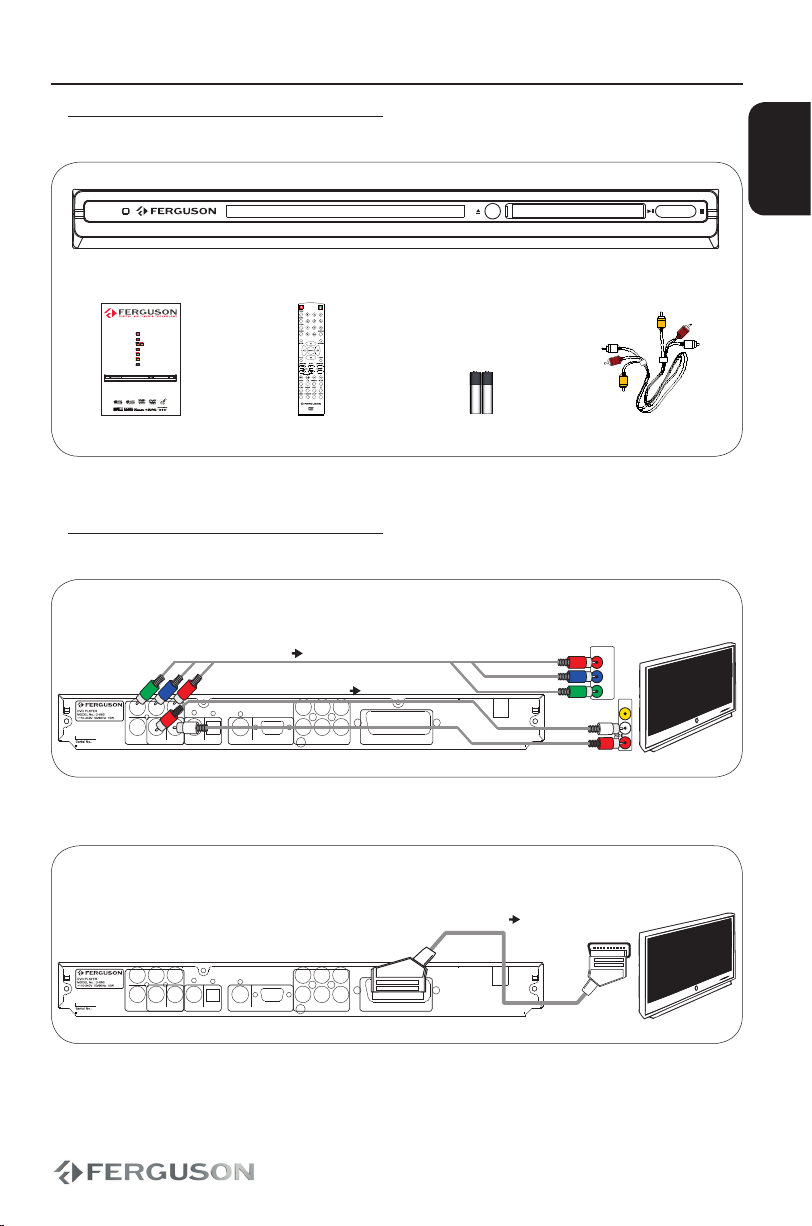
1. What’s in the box?
D-680
DVD player D-680
EN User manual
PL Instrukcja obsługi
DE Handbuch
CZ U ž i va t e l s k á p ř í r u č k a
HU Kézikönyv
ES Manual del usuario
RU Руководство
D-680
DVD player
D-680
User manual Remote Control Unit 2x AAA baterries A/V cable
2. Connect - basic audio/video connections
Component (Better quality, cable not supplied) and stereo audio
VIDEO ANALOG
VGAS-VIDEO
AUDIO DIGITAL
OPTICALCOAXIAL
AUDIO STEREO ANALOG
LR
VIDEO ANALOG
CVBS
PbY Pr
AUDIO 5.1 ANALOG
R
L
SW
C
RS
LS
VIDEO AUDIO ANALOG
SCART
VIDEO IN
(CVBS)
TV OUT
Pr (V)
Pb (U)
Y
COMPONENT
VIDEO IN
video
audio
TV
or
SCART (Good quality, cable not supplied)
VIDEO ANALOG
VGAS-VIDEO
AUDIO DIGITAL
OPTICALCOAXIAL
AUDIO STEREO ANALOG
LR
VIDEO ANALOG
CVBS
PbY Pr
AUDIO 5.1 ANALOG
R
L
SW
C
RS
LS
VIDEO AUDIO ANALOG
SCART
SCART IN
video,audio
TV
or
Qucik Start Guide

ENGLISH
CVBS / Composite (Normal quality) and stereo audio
VIDEO ANALOG
VGAS-VIDEO
AUDIO DIGITAL
OPTICALCOAXIAL
AUDIO STEREO ANALOG
LR
VIDEO ANALOG
CVBS
PbY Pr
AUDIO 5.1 ANALOG
R
L
SW
C
RS
LS
VIDEO AUDIO ANALOG
SCART
video
audio
TV
VIDEO IN
(CVBS)
3. Setup
APress to turn on.
BPress SETUP. The General Setup Page appears.
CPress to select {OSD Language} and press .
DUse keys to select a language option in the menu and press OK to confirm.
EPress SETUP to exit.
4. Use
APlayback may start automatically when a disc has been loaded in the disc tray.
BIf a disc menu appears on the TV, use keys to navigate in the DVD menu.
CPress PLAY to start playback.
DTo stop playback, press STOP.
CAUTION!
Refer to the user manual for more information.
Qucik Start Guide

ENGLISH
Introduction
1 Supplied accessories
1 Cleaning discs
1 Safety Information
1 Setup
Connections
2 Connecting TV
3 Connecting the power cord
4 Optional: Connecting to an Stereo
System
4 Optional: Connecting Digital AV Receiver
Functional Overview
5 Front and Rear Panels
6 Remote Control
Getting Started
7 Step 1: Inserting batteries into the
Remote Control
7 Step 2: Setting up the TV
9 Step 3: Setting language preference
Disc Operation
10 Playable discs
10 Playing discs
11 Basic playback controls
11 Selecting various repeat/shuffle
functions
11 Operation for video playback (DVD/VCD/
SVCD)
12 OSD (On-Screen Display) (DVD/VCD/
SVCD/XviD)
13 Special DVD Features
14 Special .avi (XviD) Features
14 Special VCD&SVCD Features
15 Playing a XviD disc
15 Playing JPEG/Picture CD
DVD Setup Menu Options
17 General Setup Menu
18 Audio Setup Menu
19 Video Setup Menu
19 Preference Page
20 Password Page
21 XviD Subtitle Setup Page
21 Software upgrade
Troubleshooting
Specification
Glossary
Contents

ENGLISH

1
ENGLISH
Introduction
Supplied accessories
Remote Control
and
two AAA batteries
Cleaning discs
To clean a disc ,use a micro fibre cleaning
cloth and wipe the disc from the center to
the edge in a straight line.
CAUTION!
Do not use solvents such as benzene,
thinner, commercially available cleaners,
or anti-static sprays intended for discs.
Since the optical unit(laser)of the DVD
system operates at a higher power than
regular DVD or CD players, cleaning CDs
intended for DVD or CD players may
damage the optical unit (laser). Therefore,
refrain from using a cleaning CD.
Safety Information
DANGER!
High voltage! Do not open the device. You
run the risk of getting an electric shock.
The machine does not contain any
user-serviceable parts. Please leave all
maintenance work to qualified personnel.
Setup
Finding a suitable location
– Place the set on a flat, hard and stable
surface.Do not place the set on a carpet.
– Do not position the set on top of other
equipment that might heat it up (e.g.
reciever or amplifier).
– Do not put anything under the set (e.g.
CDs, magazines).
– Install this system near the AC outlet
and where the AC power plug can be
reached easily.
Space for ventilation
– Place the apparatus in a location
with adequate ventilation to prevent
internal heat buid up.Allow at least 10 cm
clearance from the rear and the top of the
set and 5 cm from the left and right to
prevent overheating.
10cm 10cm
5cm
5cm
Avoid high temperatures, moisture,
water and dust
– Apparatus shall not be exposed to
dripping or splashing.
– Do not place any sources of danger on
the apparatus (e.g., liquid filled objects,
lighted candles).

2
CAUTION!
DO NOT OPEN
RISK OF ELECTRIC SHOCK
ACHTUNG!
NICHT ÖFFNEN
LEBENSGEFAHR
UWAGA!
NIE OTWIERAĆ
RYZYKO PORAŻENIA
VIDEO ANALOG
VGAS-VIDEO
AUDIO DIGITAL
OPTICALCOAXIAL
AUDIO STEREO ANALOG
LR
VIDEO ANALOG
CVBS
PbY Pr
AUDIO 5.1 ANALOG
R
L
SW
C
RS
LS
VIDEO AUDIO ANALOG
SCART
AUDIO
IN
VIDEO IN
TV IN
TV
VIDEO ANALOG
VGAS-VIDEO
AUDIO DIGITAL
OPTICALCOAXIAL
AUDIO STEREO ANALOG
LR
VIDEO ANALOG
CAUTION!
DO NOT OPEN
RISK OF ELECTRIC SHOCK
ACHTUNG!
NICHT ÖFFNEN
LEBENSGEFAHR
UWAGA!
NIE OTWIERAĆ
RYZYKO PORAŻENIA
CVBS
PbY Pr
AUDIO 5.1 ANALOG
R
L
SW
C
RS
LS
VIDEO AUDIO ANALOG
SCART
AUDIO
IN
VIDEO IN
2
1
TV
ENGLISH
IMPORTANT!
– You only need to make one video
connection from the following options,
depending on the capabilities of your
TV system.
– Connect the DVD system directly to
the TV.
– When there is no picture on screen
press reapatedly VIDEO key.
Connection type display
S-Video or SCART - S-Video
component interlaced - YUV
component progressive - YPbPr
VGA - VGA
SCART - RGB
Using SCART Jack
– A SCART connection will let you use
features both Audio and Video on the
DVD Player.
Use the SCART cable (black) to connect the
DVD Player’s SCART jack(TV OUT) to the
corresponding Scart input jacks on the TV.
Using Composite Video Jacks (CVBS)
AUse the composite video cable (yellow) to
connect the DVD player’s CVBS (VIDEO)
jack to the video input jack(or the
labled as A/V in , Video In, Composite or
Baseband ) on the TV.
BTo hear the sound of this DVD Player
through your TV, use the audio cables
(white/red) to connect AUDIO OUT
(L/R) jacks of the DVD player to the
corresponding AUDIO IN jacks on the TV.
Connecting TV
Connections

3
TV
CAUTION!
DO NOT OPEN
RISK OF ELECTRIC SHOCK
ACHTUNG!
NICHT ÖFFNEN
LEBENSGEFAHR
UWAGA!
NIE OTWIERAĆ
RYZYKO PORAŻENIA
AUDIO 5.1 ANALOG
R
L
SW
C
RS
LS
VIDEO AUDIO ANALOG
SCART
VIDEO ANALOG
VGAS-VIDEO
AUDIO DIGITAL
OPTICALCOAXIAL
AUDIO STEREO ANALOG
LR
VIDEO ANALOG
CAUTION!
DO NOT OPEN
RISK OF ELECTRIC SHOCK
ACHTUNG!
NICHT ÖFFNEN
LEBENSGEFAHR
UWAGA!
NIE OTWIERAĆ
RYZYKO PORAŻENIA
CVBS
PbY Pr
AUDIO 5.1 ANALOG
R
L
SW
C
RS
LS
VIDEO AUDIO ANALOG
SCART
AUDIO
IN
V (Pr/Cr)
U (Pb/Cb)
Y
S-VIDEO
IN
VIDEO IN
COMPONENT
VIDEO IN
2
1
TV
ENGLISH
IMPORTANT!
–The progressive scan video quality is
only possible when using Y Pb Pr and a
progressive scan TV is required.
Using Component Video Jacks
(Y Pb Pr)
AUse the component video cables (red/
blue/green) to connect the DVD system’s
Y Pb Pr jacks to the Corresponding
Component video input jacks (or labeled
as Y Pb Pr) on the TV.
BTo hear sound of this DVD player through
your TV, use the audio cables (white/red)
to connect AUDIO OUT (L/R) jacks of the
DVD player to the corresponding AUDIO
IN jacks on the TV.
After everything is connected properly,
plug in the AC power cord to the power
outlet.
Never make or change any connections
with the power switched on.
When no disc is loaded, press POWER
on the DVD player front panel.“NO DISC”
may appear on the display panel.
D-680 NO DISC
Connecting the power cord
Connections
4
CAUTION!
DO NOT OPEN
RISK OF ELECTRIC SHOCK
ACHTUNG!
NICHT ÖFFNEN
LEBENSGEFAHR
UWAGA!
NIE OTWIERAĆ
RYZYKO PORAŻENIA
VIDEO ANALOG
VGAS-VIDEO
AUDIO DIGITAL
OPTICALCOAXIAL
AUDIO STEREO ANALOG
LR
VIDEO ANALOG
CVBS
PbY Pr
AUDIO 5.1 ANALOG
R
L
SW
C
RS
LS
VIDEO AUDIO ANALOG
SCART
AUDIO
IN
DIGITAL
CAUTION!
DO NOT OPEN
RISK OF ELECTRIC SHOCK
ACHTUNG!
NICHT ÖFFNEN
LEBENSGEFAHR
UWAGA!
NIE OTWIERAĆ
RYZYKO PORAŻENIA
VIDEO ANALOG
VGAS-VIDEO
AUDIO DIGITAL
OPTICALCOAXIAL
AUDIO STEREO ANALOG
LR
VIDEO ANALOG
CVBS
PbY Pr
AUDIO 5.1 ANALOG
R
L
SW
C
RS
LS
VIDEO AUDIO ANALOG
SCART
AUDIO
IN
DIGITAL
ENGLISH
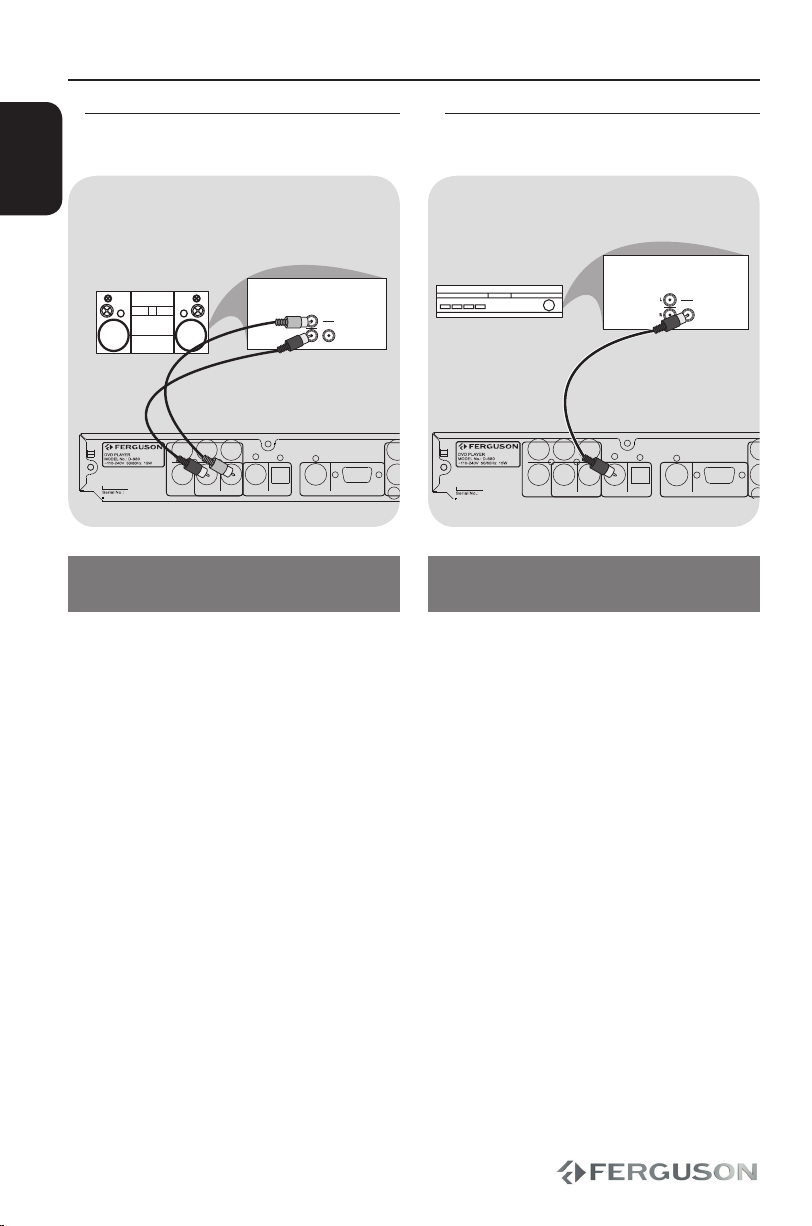
Optional: Connecting to an Stereo
System
Stereo system has Dolby Pro Logic or
Right/Left Audio In Jack
ASelect one of the video connections
(CVBS VIDEO IN, SCART or COMPONENT
VIDEO IN) depending on the options
available on your TV.
BUse the audio cables (white/red) to
connect AUDIO OUT (L/R) jacks of the
DVD Player to the corresponding AUDIO
IN jackts on the stereo system.
Optional: Connecting Digital AV
Receiver
Receiver has a PCM, Dolby Digital, or
MPEG2 decoder
ASelect one of the video connections
(CVBS VIDEO IN, SCART or COMPONENT
VIDEO IN) depending on the options
available on your TV.
BConnect the COAXIAL jack of the DVD
player to the corresponding Digital
Audio In jack on your Receiver (cable not
supplied).
CSet the DVD Player’s Digital Output to
PCM-Only or ALL depending on the
capabilities of your Receiver.
Helpful hint:
– If the audio format of the Digital Output
does not match the capabilities of your
receiver, the receiver will produce a
strong, distorted sound or no sound at all.
AV Receiver
STEREO
Connections

5
5 61 2 3 4 18
16 1314 158 9 10 11 12 7 17
CAUTION!
DO NOT OPEN
RISK OF ELECTRIC SHOCK
ACHTUNG!
NICHT ÖFFNEN
LEBENSGEFAHR
UWAGA!
NIE OTWIERAĆ
RYZYKO PORAŻENIA
VIDEO ANALOG
VGAS-VIDEO
AUDIO DIGITAL
OPTICALCOAXIAL
AUDIO STEREO ANALOG
LR
VIDEO ANALOG
CVBS
PbY Pr
AUDIO 5.1 ANALOG
R
L
SW
C
RS
LS
VIDEO AUDIO ANALOG
SCART
D-680
ENGLISH
Functional Overview
Front and Rear panels
APOWER - Turns the player on
BDisplay - Shows information about
the current status of the DVD Player
CDisc tray
DIR Sensor - Point the remote control
towards this sensor
EEJECT - Open / close the disc tray
FPLAY/PAUSE - Starts or pauses
palyback
GSTOP - Stops playback
AY (Component Video Out) - connect
to Y input of a TV
BPb (Component Video Out) - connect
to Pb input of a TV
CPr (Component Video Out) - connect
to Pr input of a TV
DFL Multichannel Audio Out - connect
to front left input of an amplifier
ELS Multichannel Audio Out - connect
to left surround input of an amplifier
FC Multichannel Audio Out - connect
to center input of an amplifier
GS-Video - connect to S-Video
compatible device
HCVBS (Video Out) - connect to CVBS
video input of a TV
IR Stereo Audio Out - connect to audio
right input of a stereo system
JL Stereo Audio Out - connect to audio
left input of a stereo system
KCOAXIAL (Digital Audio Out)- connect
to coaxial audio input of an amplifier
LOPTICAL (Digital Audio Out) - connect
to coaxial audio input of an amplifier
MFR Multichannel Audio Out - connect
to front right input of an amplifier
NRS Multichannel Audio Out - connect
to right surround input of an amplifier
OSW Multichannel Audio Out - connect
to subwoofer input of an amplifier
PVGA - connect to VGA compatible
device
QSCART - connect to SCART input of a TV
RMain (AC Power Cord) - connect to a
standard AC outlet
6
ENGLISH
Functional Overview
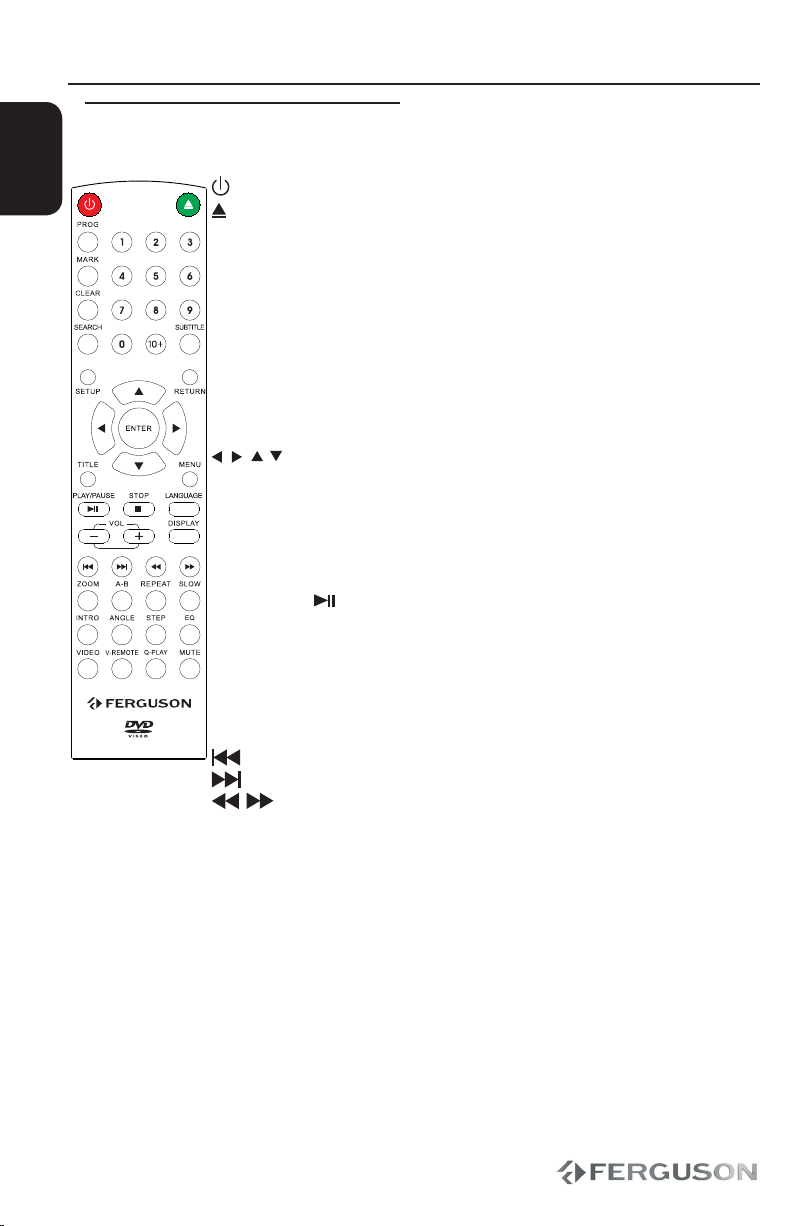
Remote Control
- Turns the player on or switches it to standby mode
- Open / close the disc tray
PROG - Arrange program
MARK - Memory play
CLEAR - Clear function
SEARCH - Start playback from a designated point
Alphanumeric keypad 0-9 - Selects numbered items in a menu
SUBTITLE - Selects a DVD subtitle language
- Selects a XviD subtitle file
SETUP - Enters or exits system setup menu
RETURN - Return to disc menu playback
- Cursor buttons for moving left, right, up, down.
ENTER - Confirms an entry or selection
TITLE - To go back to show title menu
MENU - Switches on or off the playback control mode (VCD 2.0
only)
- Enter or exits the disc menu
PLAY/PAUSE - Starts or pauses playback
STOP - Stops playback
LANGUAGE - Selects an audio language (DVD/VCD) or audio channels
VOL + − - Increase / decrease the volume
DISPLAY - Display information on the screen during playback
- AVIinfo function
- Skips to the previous title/chapter/track
- Skips to the next title/chapter/track
- Fast forward/reverse search or slow forward/reverse search
ZOOM - Enlarge a picture on the TV screen
A-B - Setup repeat play segment
REPEAT - Selects various repeat modes
SLOW - Slow the normal play motion
INTRO - Introduce the digest of the disc.
ANGLE - Switch the camera angle during DVD playback;
- XviD subtitle moving and time adjustment
STEP - Step play
EQ - Select preffered sound mode
VIDEO - Select video output mode.
V-REMOTE- Control the video.
Q-PLAY - DVD QuickPlay function
MUTE - Turn on/off sound
7
30º
IR
D-680
ENGLISH
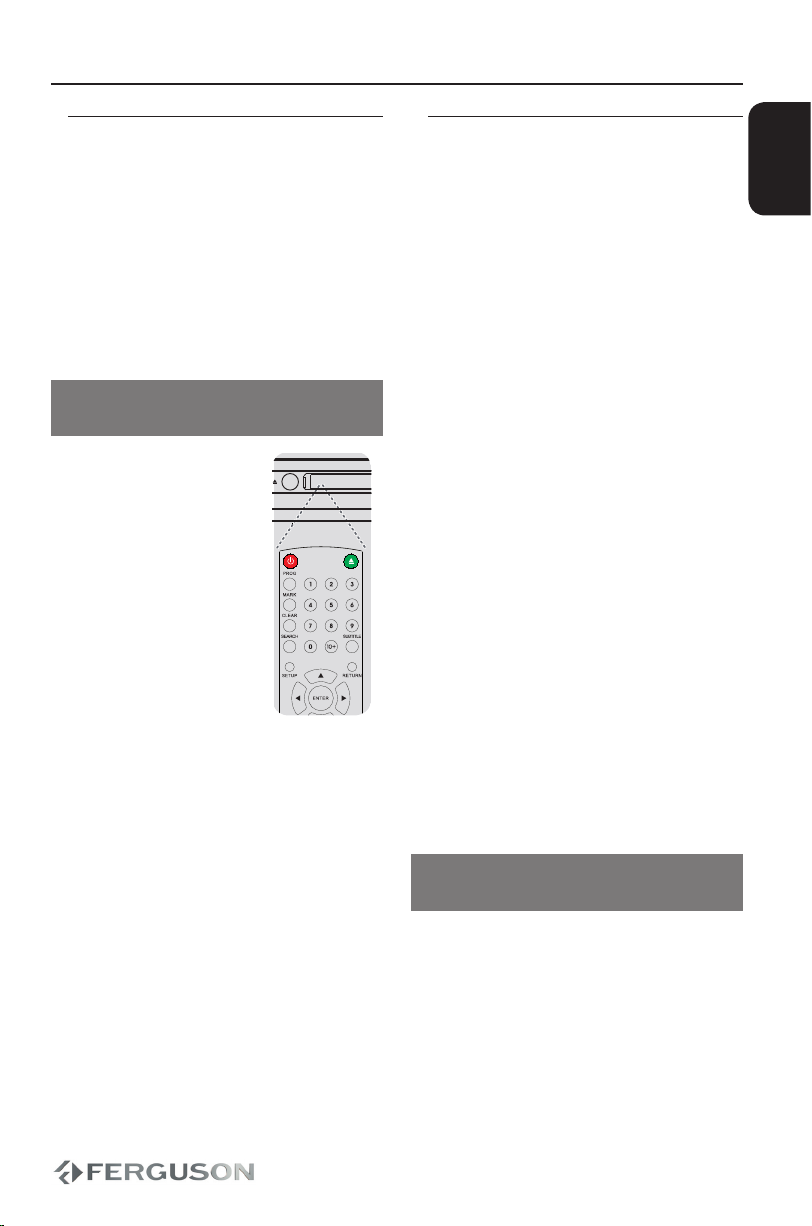
Getting Started
Step 1: Inserting batteries into the
Remote Control
AOpen the battery compartment.
BInsert two batteries type R03 or AAA,
following the indications(+ -) inside the
compartment.
CClose the cover.
Using the Remote Control to operate
the Player
AAim the Remote Control
directly at the remote
sensor (IR) on the front
panel.
BDo not put any objects
between the Remote
Control and DVD Player
while operating the
DVD Player.
CAUTION!
–Remove batteries if they are
exhausted or if the Remote Control is
not being used for a long time.
–Do not use old and new or different
types of batteries in combination.
–Batteries contain chemical
substances, so they should be disposed
properly.
Step 2: Setting up the TV
IMPORTANT!
Make sure you have completed all the
necessary connections.
APress POWER on the DVD player to turn it
on.
BTurn on the TV and set it to the correct
video-in channel. You should see the DVD
background screen.
Usually these channel are between the
lowest and highest channels and may be
called FRONT, A/V IN, VIDEO. See your TV’s
manual for more details.
Or, you may go to channel 1 on your
TV, then press the Channel down button
repeatedly until you see the Video In
channel.
Or, the TV Remote Control may have
a button or switch that chooses different
video modes.
CIf you are using external equipment,
(eg. audio system or receiver), turn it on
and select the appropriate input source
for the DVD player output. Refer to the
equipment owner’s manual for detail.
Setting up Progressive Scan feature
(for Progressive Scan TV only)
The progressive scan display twice the
number of frames per seconds than
interlaced scanning (ordinary normal TV
system). With nearly double the number
of lines, progressive scan offers higher
picture resolution and quality.

8
ENGLISH
Getting Started
IMPORTANT!
Before enabling the progressive scan
feature, you must ensure:
1) Your TV can accept progressive signals,
a progressive scan TV is required.
2) You have connected the DVD player to
your TV using Y Pb Pr.
ATurn on your TV and set to interlace mode
(refer to your TV user manual).
BPress POWER on the remote control to
turn on the DVD player.
CSelect the correct Video Input channel.
The DVD background screen appears
on the TV.
DPress VIDEO button on the remote
control for few seconds.
The DVD background screen appears
on the TV.
ETurn on your TV progressive scan mode
(refer to your TV user manual).
The DVD background screen appears
on the TV.
To deactive Progressive manually:
Press VIDEO button on the remote
control for few seconds.
The DVD background screen appears
on the TV.
Helpful Hint:
– There are some progressive scan TV
and High-Definition TV sets that are not
fully compatible with this DVD system,
resulting in the unnatural picture when
playing back a DVD VIDEO disc in the
progressive scan mode. In such a case,
turn off the progressive scan feature on
both the DVD player and your TV set.
Selecting the colour system that
corresponds to your TV
This DVD Player is compatible with both
NTSC and PAL. In order for a DVD disc
to play on this player, the colour system
of the Disc, the TV and the DVD player
should match.
Video Setup Page
TV Type PAL
TV Display Auto
Brightness NTSC
Contrast
Saturation
Sharpness
Luma Delay
APress SETUP.
BPress to select {Video Setup Page}
CPress to highlight {TV Type}, then
press .
DPress to highlight one of the options
below:
PAL -Select this if the connected TV has
the PAL colour system. It will change the
video signal of an NTSC disc and output it
to PAL format.
NTSC -Select this if the connected TV is
NTSC colour system. It will change the
video signal of a PAL disc and output in
NTSC format.
Auto -Select this if the connected TV
is compatible with both NTSC and PAL
(multi-system). The output format will be
in accordance with the video signal of the
disc.
ESelect a setting and press OK.
Follow the instructions show on the TV
to confi rm the selection.

9
ENGLISH
Getting Started
Step 3: Setting language
preference
The language options are different
depending on your country or region.It
may not correspond to the illustrations
shown on the user manual.
Setting the OSD language
The On-screen language for the system
menu will remain as you set it, regardless
of various disc languages
General Setup Page
OSD Language ENGLISH
Screen Saver DEUTSCH
HUNGARIAN
POLSKI
РУССКИЙ
ESPAÑOL
APress SETUP.
BPress to select {General Setup Page}.
CPress to highlight {OSD Language},
then press .
DPress to select a language and press
OK.
Setting the Audio, Subtitle and Disc
menu language
You can choose your own preferred
language or soundtrack from audio,
subtitles and DVD menu languages. If the
language selected is not available on the
disc, the disc’s default language will be
used instead.
Preference Page
Audio English
Subtitle French
Disc Menu Spanish
Parental Portuguese
File Navigation Polish
XviD Subtitle Italian
Default Turkish
APress STOP twice, then press SETUP.
BPress . to select {Preference Page}.
CPress to highlight one of the options
below at a time, then press .
- ‘Audio’ (disc’s soundtrack)
- ‘Subtitle’ (disc’s subtitles)
- ‘Disc Menu’(disc’s menu)
DPress to select a language and press
OK.
ERepeat steps C~Dfor other language
settings.

10
ENGLISH
Disc operation
Playing discs
AConnect the power cords of the DVD
player and TV(and any option stereo or AV
receiver) to a power outlet.
BTurn on the TV power and set to the
correct Video in channel.
CPress POWER to turn on the DVD player.
The DVD background screen appears
on the TV.
DPress OPEN/CLOSE on the front of the
DVD player or OPEN/CLOSE button on
the remote control.
EPlace a disc into the disc tray with the
lable facing up,then press OPEN/CLOSE.
For double-sided discs, load the side
you want to play facing up.
FPlayback will start automatically.If not
press PLAY/PAUSE .
If a disc menu appears on the TV see
“Using the Disc Menu”.
If the disc is locked by parental control,
you must enter your six-digit password.
IMPORTANT!
– If the inhibit icon (ø) appears on the
TV screen when a button is pressed, it
means the function is not available on the
current disc or at the current time.
Playable Discs
Your DVD Player will play:
– Digital Video Discs (DVDs)
– Video CDs (VCDs)
– Super Video CDs (SVCDs)
– Digital Video Discs +
Recordable[Rewritable] (DVD+R[W])
– Compact Discs (CDs)
– Picture (Kodak, JPEG) files on CD-R(W).
– JPEG/ISO 9660 format
– XviD disc on CD-R[W]/DVD+R[W]:
– Q-pel accurate motion compensation
– Global Motion Compensation (GMC)
playback (1-warp pont only)

11
ENGLISH
Basic playback controls
Unless otherwise stated, all operations
described are based on Remote Control
use.
Pausing playback
ADuring playback , press PLAY/PAUSE to
pause playback and display a still picture.
Sound will be muted.
BTo resume normal playback, press PLAY/
PAUSE again.
Selecting track/chapter
Press PREV / NEXT to go to the previous or
next track/chapter
Stopping playback
Press STOP
Selecting various repeat/shuffle
functions
Repeat play mode
The repeat play options vary depending
on the disc type.
AWhile playing a disc, press REPEAT
continuously to choose a repeat options.
BTo cancel repeat playback, press STOP .
Operations for video playback
(DVD/ VCD/SVCD)
Using the Disc Menu
Depending on the disc, a menu may
appear on the TV screen once you load in
the disc.
To select a playback feature or item
Use keys or numeric keypad
(0-9) on the remote, then press OK to
start playback.
To access or remove the menu
Press MENU on the remote.
Using V-Remote
Press the V-REMOTE key to show
v-remote menu at the left side of the
screen from the bottom. Use
keys to switch the cursor to the desired
mark, and then press the select key to
confirm. The introduction of detailed
functions is as follows:
: Play. When the unit is stepping,
slow, skipping, pause and stop, press this
mark to resume the normal play.
: Step. Every press next is to move the
picture one frame.
/ : Slow. Press it to slow the speed
of the normal play.
/ : Skip. Press skip-forward or skip-
backward to different chapter or title.
Disc operation

12
ENGLISH
/ : Fast foreward/rewerse.
: Pause.
: AUDIO. Refer to the AUDIO key
for detailed information.
: Subtitle.
: Angle.
Slow Motion
APress SLOW during playback to select
the required speed: 1/2, 1/4, 1/8 or 1/16
(forward {DVD/SVCD/VCD} or backward
{DVD}).
Sound will be muted.
BTo return to normal speed, press PLAY/
PAUSE.
Forward/Reverse Searching
APress during playback to select
the required speed: 2X, 4X, 8X, 16X, 32X
(backward or forward)
Sound will be muted(DVD/VCD/XviD)
or intermittent (audio files/CD).
BTo return to normal speed, press PLAY/
PAUSE or OK.
OSD (On -Screen Display) (DVD/
VCD/SVCD/XviD)
Using the OSD menu
OSD menu shows the disc playback
information (for example, title or
chapter number, elapsed playing time,
audio/ subtitle language), a number
of operations can be done without
interrupting disc playback.
During playback, press SEARCH
A list of available disc information
appears on the TV screen.
Title/Chapter/Track selection
APress to highlight {Title} / {Chapter}
or {Track}, then press ENTER to access.
BUse the numeric keypad (0-9) to enter a
valid number (e.g. 04/05).
CPress OK to confirm.
The playback skips to the selected title/
chapter/track.
Disc operation

13
ENGLISH
Audio/Subtitle
APress to highlight {Audio} or
{Subtitle}, then press ENTER to access.
Audio or Subtitle menu appears on
the TV.
BPress to select one language, then
press OK to confirm.
Current audio or subtitle language will
be changed to the selected language.
Angle Function
APress to highlight {Angle}, then press
ENTER to access.
BUse the numeric keypad (0-9) to key in a
valid number.
CPress OK to confirm.
Playback will go to the selected angle.
Special DVD Features
Playing a Title
APress MENU.
The disc title menu appears on the TV
screen.
BUse keys or numeric keypad
(0-9) to select a play option.
CPress OK key to confirm
Changing the Audio Language
For DVD
Press LANGUAGE repeatedly to select
different audio language.
For VCD
Press LANGUAGE to select the available
audio channels provided by the disc
(Mono Left, Mono Right, MIX-Mono,
Stereo).
Subtitles
Press SUBTITLE repeatedly to select
different subtitle languages.
Disc operation
14
ENGLISH
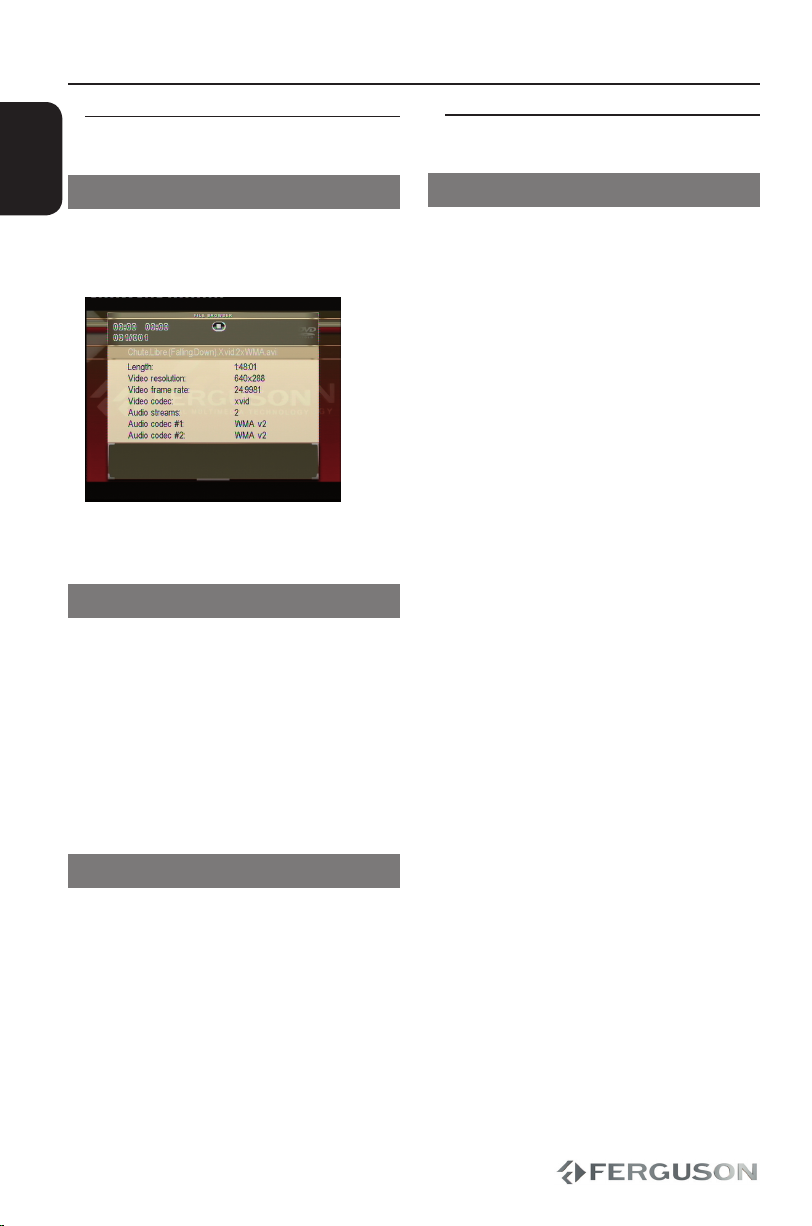
Special .avi (XviD) Features
AVIinfo function
APress DISPLAY button in File Browser on
.avi file to view detailed file information
(AVIInfo function).
BPress DISPLAY key to exit AVIInfo
function
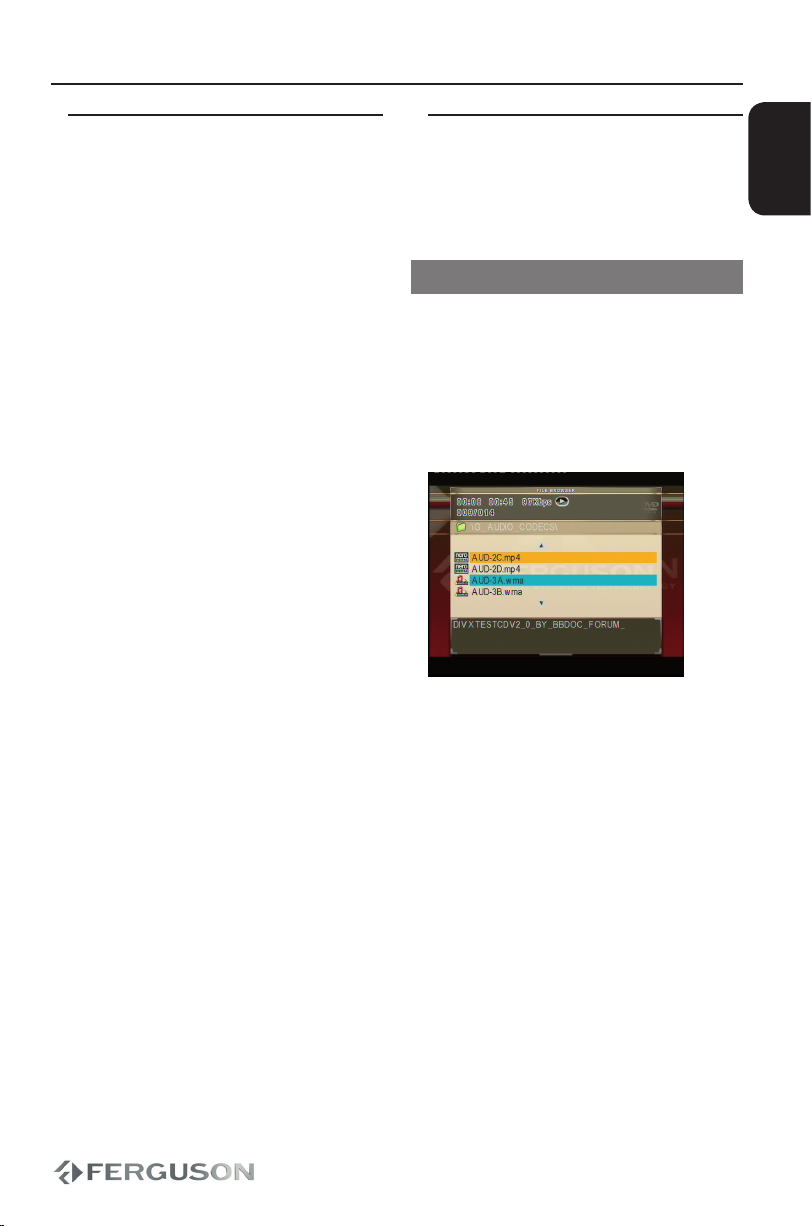
Subtitles loading
AChoose subtitle file from FIle Browse by
pressing OK on that file.
BStart .avi plaback.
or
AStart .avi plaback.
BChoose subtitle by pressing SUBTITLE
button during plaback.
Subtitles position and time shift
ADuring .avi playback, press ANGLE. Use
keys to change subtitle position.
BPress ANGLE again. Use keys to
adjust subtitle time shift.
CPress OK key to confirm
Special VCD&SVCD Features
Playback Control (PBC)
For VCD with Playback Control (PBC)
feature (version 2.0 only)
Press MENU to toggle between‘PBC ON’
and ‘PBC OFF’.
If you select ‘PBC ON’, the disc menu
(if available ) will appear on the TV.
If you select ‘PBC OFF’, use the PREV/
NEXT or the numeric keypad (0-9) to
select a play option.
During playback, pressing TITLE will
return to the menu screen (if PBC is on)
If you want to skip the index menu and
playback directly from the beginning
Press MENU key on the remote control to
switch to PBC off
Disc operation
15
ENGLISH
Playing a XviD disc
This DVD player supports the XviD
movie playback that you download
from your computer onto a CD-R/RW or
DVD±RW
ALoad a XviD disc.
Playbak will start automatically. If not
press PLAY.
BPressing SUBTITLE on the remote control
will turn on or off the subtitles.
If multiligual subtitles are embedded on
the XviD disc , pressing SUBTITLE will
change the subtitle language during
playback.
Helpful Hints:
– Subtitle files with the following filename
extensions (.srt, .smi, .sub, .ssa, .txt)
are supported and appear on the file
navigation menu.
Playing JPEG/Picture CD/audio files
This DVD system can playback music files,
JPEG, VCD & SVCD files on a personally
recorded CD-R/RW disc, commercial CD
General Operation
ALoad a disc.
The disc reading time may exceed 30
seconds due to the complexity of the
directory/file configuration.
The data disc menu appears on the TV
screen
BPress to select the folder and press
OK to open the folder.
CPress to select a track/files.
DPress PREV/NEXT to go to previous/next
page.
EPress OK to confirm.
Disc operation

16
ENGLISH
Zoom picture (JPEG)
During playback, press ZOOM repeatedly
to display the picture with different
scales.
Use to view the zoom in or zoom
out
Use to view the zoomed
picture
Rotating Pictures
During playback, press to
rotate the picture on the TV screen.
: flip the picture verticaly by 180º
: flip the picture horizontally by 180º
: flip the picture anti-clockwise by 90º
: flip the picture clockwise by 90º
Helpful Hints:
- It may not be possible to play certain
JPEG disc due to the configuration and
characteristics of the disc or condition of
the recording.
- For multi-session discs with different
formats, only the first session will be
available.
Preview Function (JPEG)
This function shows the content of the
current folder or the whole disc.
APress STOP during playback.
12 thumbnail pictures will appear on
the TV screen.
BPress PREV/NEXT to display the other
pictures on the previous/next page.
CPress on highlight one of the
picture and press OK to start playback.
DPress MENU to return to Picture CD menu.
Disc operation
Other manuals for D-680
1
Table of contents
Other Ferguson DVD Player manuals


