Ferguson D-990 HX User manual

ENGLISH
1. What’s in the box?
DVD player D-990 HX
EN User manual
PL Instrukcja obsługi
DE Handbuch
CZ Uživatelská příručka
HU Kézikönyv
D-990 HX
DVD player
OK
RCU580
Blu-ray
A B C D
+
VIDEO EQ REPEAT A-B
INPUT OPT ZOOM
BROWSE
MENU TITLE
RETURN
SEARCH
STEP SLOW STOP
PLAY/PAUSE
AUDIO SUBTITLE
SETUP INFO
MUTE
VOL
POWER EJECT
NEXT
PREV
REV FWD
1 32
4 65
7 98
0/10
User manual Remote Control Unit 2x AAA baterries A/V cable
2. Connect - basic audio/video connections
HDMI (Best quality, cable not supplied)
CAUTION!
DO NOT OPEN
RISK OF ELECTRIC SHOCK
ACHTUNG!
NICHT ÖFFNEN
LEBENSGEFAHR
UWAGA!
NIE OTWIERAĆ
RYZYKO PORAŻENIA
D-990 HX
DVD Player
DIGITAL AUDIO OUT / ANALOG VIDEO OUT
S-VIDEOCVBSCOAXIAL
Y Pb Pr
OPTICAL
HDMI
VIDEO AUDIO
DIGITAL OUT
AUDIO5.1 ANALOG OUT
SLFL CENT
SRFR SW
SCART
VIDEO AUDIO ANALOG OUT
AC 110-240V~
50/60 Hz 12W
HDMI IN
video, audio
Power
230V
50Hz
TV
or
Component (Better quality, cable not supplied) and stereo audio
CAUTION!
DO NOT OPEN
RISK OF ELECTRIC SHOCK
ACHTUNG!
NICHT ÖFFNEN
LEBENSGEFAHR
UWAGA!
NIE OTWIERAĆ
RYZYKO PORAŻENIA
D-990 HX
DVD Player
DIGITAL AUDIO OUT / ANALOG VIDEO OUT
S-VIDEOCVBSCOAXIAL
Y Pb Pr
OPTICAL
HDMI
VIDEO AUDIO
DIGITAL OUT
AUDIO5.1 ANALOG OUT
SLFL CENT
SRFR SW
SCART
VIDEO AUDIO ANALOG OUT
AC 110-240V~
50/60 Hz 12W
VIDEO IN
(CVBS)
Pr (V)
Pb (U)
Y
COMPONENT
VIDEO IN
video
audio
Power
230V
50Hz
TV
or
Qucik Start Guide

ENGLISH
SCART (Good quality, cable not supplied)
CAUTION!
DO NOT OPEN
RISK OF ELECTRIC SHOCK
ACHTUNG!
NICHT ÖFFNEN
LEBENSGEFAHR
UWAGA!
NIE OTWIERAĆ
RYZYKO PORAŻENIA
D-990 HX
DVD Player
DIGITAL AUDIO OUT / ANALOG VIDEO OUT
S-VIDEOCVBSCOAXIAL
Y Pb Pr
OPTICAL
HDMI
VIDEO AUDIO
DIGITAL OUT
AUDIO5.1 ANALOG OUT
SLFL CENT
SRFR SW
SCART
VIDEO AUDIO ANALOG OUT
AC 110-240V~
50/60 Hz 12W
SCART IN
video,audio
Power
230V
50Hz
TV
or
CVBS / Composite (Normal quality) and stereo audio
CAUTION!
DO NOT OPEN
RISK OF ELECTRIC SHOCK
ACHTUNG!
NICHT ÖFFNEN
LEBENSGEFAHR
UWAGA!
NIE OTWIERAĆ
RYZYKO PORAŻENIA
D-990 HX
DVD Player
DIGITAL AUDIO OUT / ANALOG VIDEO OUT
S-VIDEOCVBSCOAXIAL
Y Pb Pr
OPTICAL
HDMI
VIDEO AUDIO
DIGITAL OUT
AUDIO5.1 ANALOG OUT
SLFL CENT
SRFR SW
SCART
VIDEO AUDIO ANALOG OUT
AC 110-240V~
50/60 Hz 12W
video
audio
Power
230V
50Hz
TV
VIDEO IN
(CVBS)
3. Setup
APress to turn on.
BSetup wizard (Setup-Assistent) will appear.
CSelect Menu OSD and press .
DUse keys to select a language option in the menu and press OK to conrm.
EAdjust other settings if needed
FPress SETUP to exit.
4. Use
APlayback may start automatically when a disc has been loaded in the disc tray.
BIf a disc menu appears on the TV, use keys to navigate in the DVD menu.
CPress PL AY to start playback.
DTo stop playback, press STOP.
CAUTION!
Refer to the user manual for more information.
Qucik Start Guide

ENGLISH
Introduction
1 Supplied accessories
1 Cleaning discs
2 User manual
2 Software upgrade
3 Symbols used on the device
3 Setup
Connections
4 Connecting to a TV
6 Connecting the power cord
7 Optional: Connecting to an Stereo
System
7 Optional: Connecting to a Multi-channel
Receiver
8 Optional: Connecting Digital AV Receiver
8 Optional: Connecting a supported USB
devices and memory cards
Functional Overview
9 Front and Rear Panels
10 Remote Control Unit (RCU580)
Getting Started
11 Step 1: Inserting batteries into the
Remote Control
11 Step 2: Setting up the TV
12 Step 3: Setting language preference
Disc Operation
14 Upscaling
14 Playable discs
14 Playable Content
16 Playing discs
16 Basic playback controls
17 Selecting various repeat/shue
functions
17 Operation for video playback (DVD/VCD/
SVCD)
18 OSD (On-Screen Display) (DVD/VCD/
SVCD/XviD)
19 Special DVD Features
20 Special .avi (XviD) Features
21 Playing a XviD disc
22 Playing multimedia les from the USB
device or memory card
DVD Setup Menu Options
24 General Setup Menu
24 Audio Setup Menu
26 Dolby Digital Setup Menu
26 Video Setup Menu
28 Preference Page
29 XviD Subtitle Setup Page
Troubleshooting
Specication
Glossary
Contents

10
ENGLISH

1
OK
RCU580
Blu-ray
A B C D
+
VIDEO EQ REPEAT A-B
INPUT OPT ZOOM
BROWSE
MENU TITLE
RETURN
SEARCH
STEP SLOW STOP
PLAY/PAUSE
AUDIO SUBTITLE
SETUP INFO
MUTE
VOL
POWER EJECT
NEXT
PREV
REV FWD
1 32
4 65
7 98
0/10
ENGLISH
Introduction
Supplied accessories
Remote Control
and
two AAA batteries
Cleaning discs
To clean a disc ,use a micro bre cleaning
cloth and wipe the disc from the center to
the edge in a straight line.
CAUTION!
Do not use solvents such as benzene,
thinner, commercially available cleaners,
or anti-static sprays intended for discs.
Since the optical unit(laser)of the DVD
system operates at a higher power than
regular DVD or CD players, cleaning CDs
intended for DVD or CD players may
damage the optical unit (laser). Therefore,
refrain from using a cleaning CD.
Safety Information
Please observe all warnings and
instructions on the equipment and
contained in these operating instructions.
Please carefully read this user’s manual
before using the device.
To avoid electric-shock hazards, do not
open the cabinet, refer servicing to
qualied personnel only. If cabinet is
opened warranty will be invalid.
Please switch o completely the device
during thunder, during abnormal
phenomenon, before cleaning it and in
case it remains out of service for a long
period.
Do not expose the device under the
sunlight. And keep it away from the heat
source or humid environments. Do not
block ventilation holes of the device so
that air can circulate freely.
Please place the device in horizontal and
stable conditions, keeping it away from
vibrating.
If device is moved from warmer place to
a colder one some problem might occur.
Please switch o the device and turn it on
after 1 or 2 hours.
Keep the device away from ower
vases, tubs, sinks, etc., in order to avoid
damaging the equipment. Do not touch
power supply with wet hands.
Don’t put any objects on the device.
Be sure to turn the device o and
disconnect the AC power cord before
cleaning the receiver surface. If the
surface is dirty, wipe clean with a cloth
which has been dipped in a weak soap/
and/water solution and wrung out
thoroughly, and then wipe again with a
dry cloth.
Do not connect cables while power is
plugged.

2
ENGLISH
Do not use damaged cables for
connections: you could cause res.
Please switch o completely the device
while making all connections.
The product purchased is a sophisticated
electronic device which is not suitable for
children under 18 years.
We do not assume responsibility for
damages caused to people or object,
deriving from use of the device made by
people under 18 years.
User manual
Ferguson has used all the available
means to ensure the latest information
regarding its products. Ferguson does not
give a warranty regarding the contents
of this User Manual and waives any
implied warranties regarding market
value or tness for specic purposes. The
information contained herein provide
guidelines allowing the operation and
maintenance of the receiver.
Ferguson reserves the right to make
changes, corrections or to translate
the User Manual without giving prior
notice of such changes. Therefore, it is
recommended that users visit our website
regularly to receive the latest information.
Software upgrade
Periodically Ferguson will issue software
upgrade to enhance your user experience.
To download and install the latest
software to the DVD player
Visit the Ferguson website
www.ferguson-digital.eu to check the
availability of the latest software upgrade.
Introduction
3
ENGLISH
Setup
Finding a suitable location
– Place the set on a at, hard and stable
surface.Do not place the set on a carpet.
– Do not position the set on top of other
equipment that might heat it up (e.g.
reciever or amplier).
– Do not put anything under the set (e.g.
CDs, magazines).
– Install this system near the AC outlet
and where the AC power plug can be
reached easily.
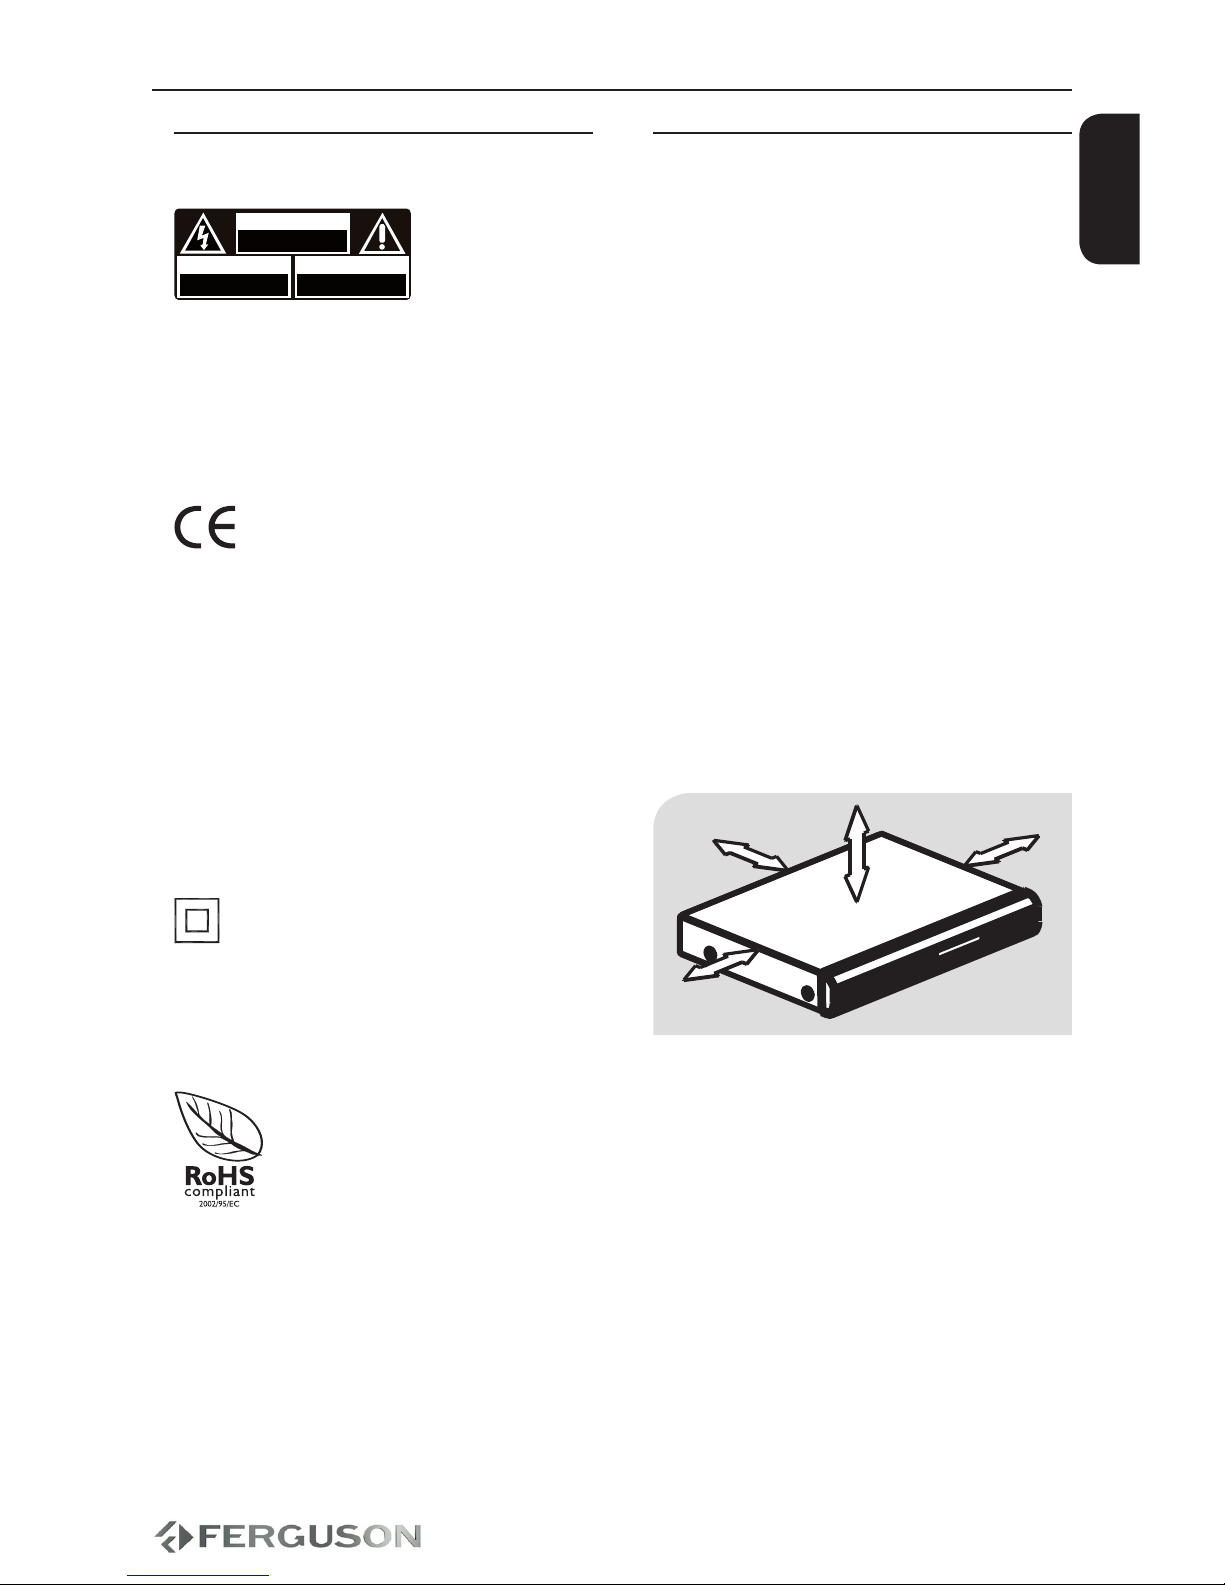
Space for ventilation
– Place the apparatus in a location
with adequate ventilation to prevent
internal heat buid up.Allow at least 10 cm
clearance from the rear and the top of the
set and 5 cm from the left and right to
prevent overheating.
10cm 10cm
5cm
5cm
Avoid high temperatures, moisture,
water and dust
– Apparatus shall not be exposed to
dripping or splashing.
– Do not place any sources of danger on
the apparatus (e.g., liquid lled objects,
lighted candles).
Symbols used on the device
CAUTION!
DO NOT OPEN
RISK OF ELECTRIC SHOCK
ACHTUNG!
NICHT ÖFFNEN
LEBENSGEFAHR
UWAGA!
NIE OTWIERAĆ
RYZYKO PORAŻENIA
The caution risk of electrical shock - do
not open symbol
This symbol tells you that you are
not allowed to open the device. Only
authorized (service) technicians are
allowed to open the box.
The CE mark
This mark tells you that the device is
following the provisions of Council
Directive 2004/108/EC on the
approximation of the laws of the Member
States relating to the electromagnetic
compatibility and the provisions of
Council Directive 2006/95/EC and
93/68/EEC on the approximation of the
laws of the Member States relating to low
voltage and electrical safety.
The double insulation symbol
This symbol tells you that the device is
electrically safe within the normal use of
the device as stated in the safety chapter.
The RoHS mark
This mark tells you that the device is
following The Directive on the Restriction
of the Use of Certain Hazardous
Substances in Electrical and Electronic
Equipment 2002/95/EC (commonly
referred to as the Restriction of Hazardous
Substances Directive or RoHS)
Introduction
4
CAUTION!
DO NOT OPEN
RISK OF ELECTRIC SHOCK
ACHTUNG!
NICHT ÖFFNEN
LEBENSGEFAHR
UWAGA!
NIE OTWIERAĆ
RYZYKO PORAŻENIA
D-990 HX
DVD Player
DIGITAL AUDIO OUT / ANALOG VIDEO OUT
S-VIDEOCVBSCOAXIAL
Y Pb Pr
OPTICAL
HDMI
VIDEO AUDIO
DIGITAL OUT
AUDIO 5.1 ANALOG OUT
SLFL CENT
SRFR SW
SCART
VIDEO AUDIO ANALOG OUT
AC 110-240V~
50/60 Hz 12W
HDMI IN
HD TV
CAUTION!
DO NOT OPEN
RISK OF ELECTRIC SHOCK
ACHTUNG!
NICHT ÖFFNEN
LEBENSGEFAHR
UWAGA!
NIE OTWIERAĆ
RYZYKO PORAŻENIA
D-990 HX
DVD Player
DIGITAL AUDIO OUT / ANALOG VIDEO OUT
S-VIDEOCVBSCOAXIAL
Y Pb Pr
OPTICAL
HDMI
VIDEO AUDIO
DIGITAL OUT
AUDIO 5.1 ANALOG OUT
SLFL CENT
SRFR SW
SCART
VIDEO AUDIO ANALOG OUT
AC 110-240V~
50/60 Hz 12W
HD TV
ENGLISH
IMPORTANT!
You only need to make one video
connection from the following options,
depending on the capabilities of your
TV system.
Connect the DVD system directly to
the TV.
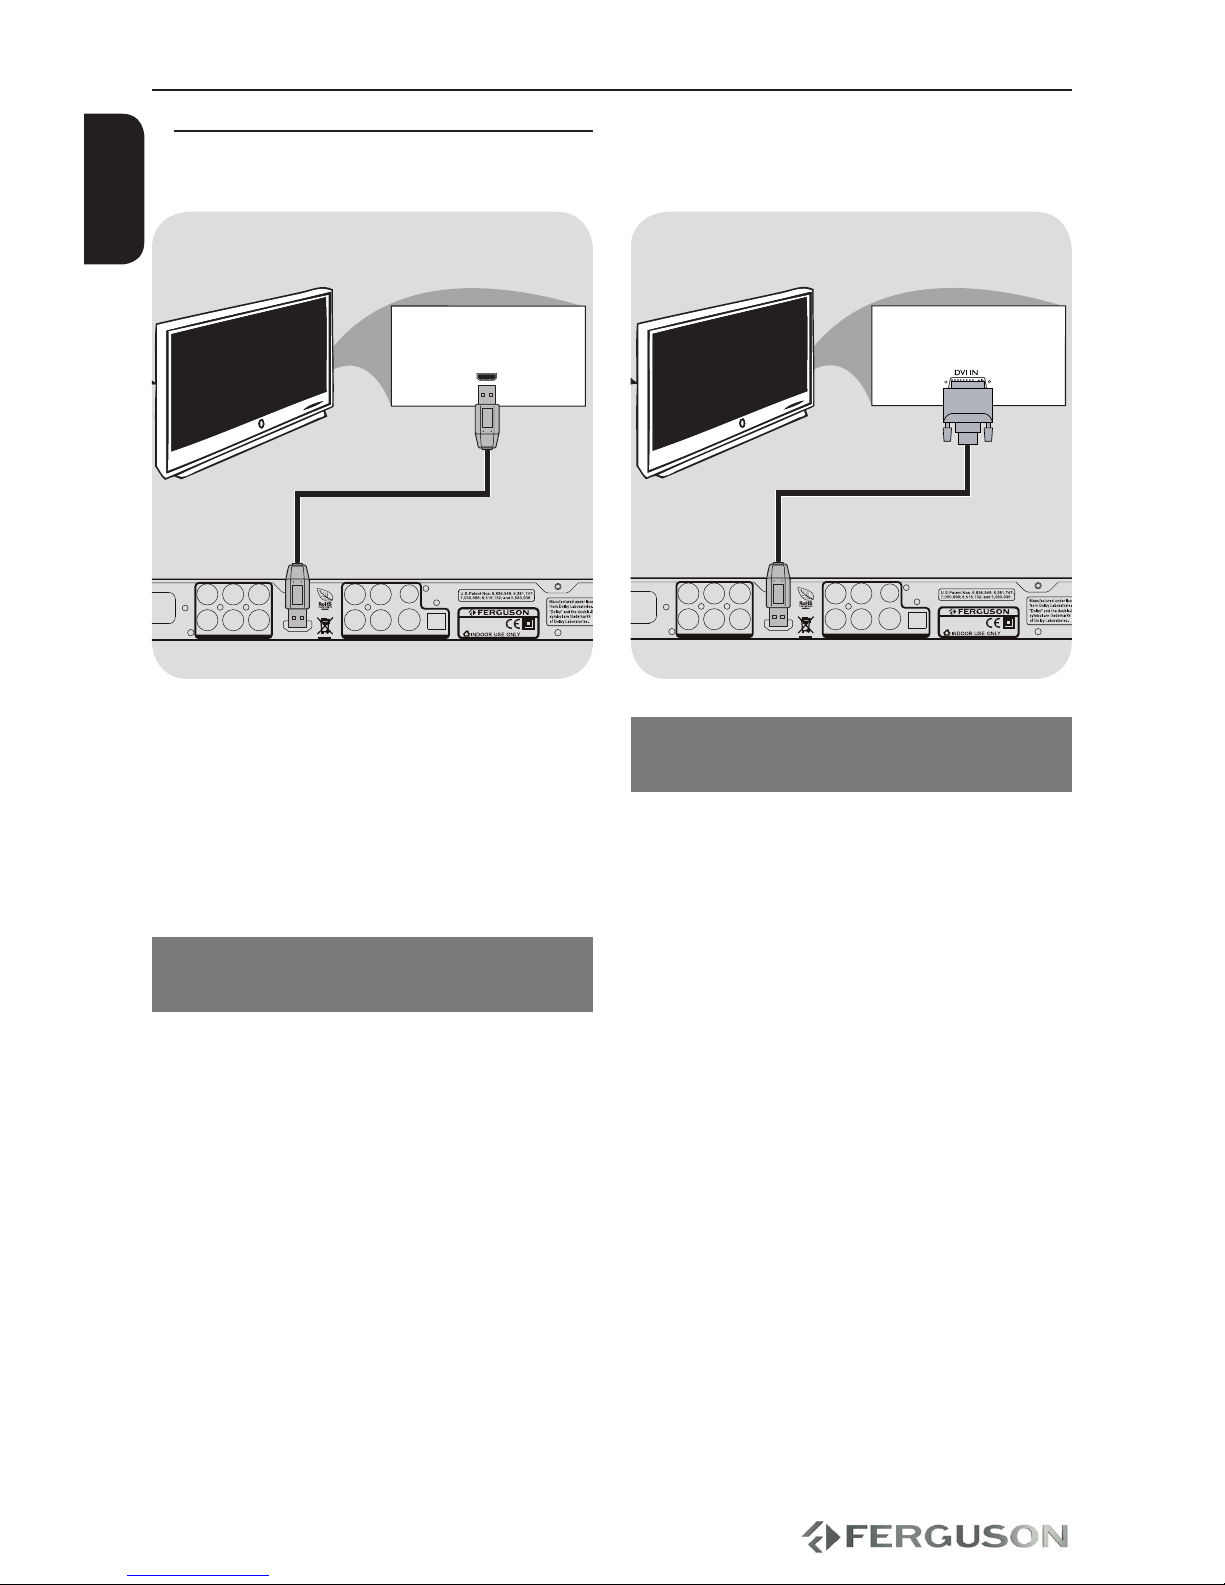
Using HDMI (High Denition
Multimedia Interface) sockets
HDMI transfers an uncompressed digital
signal for the clearest sound/image
quality.
It has plug and play capability using only
one cable for both audio/video output.
AUse a HDMI cable (not supplied) to
connect the DVD player’s HDMI to HDMI
IN on the HDMI TV.
- It may take a while for the DVD player
and input device to communicates and
initialise.
IMPORTANT!
When there is no picture on screen
press repeatedly VIDEO key.
HD Ready/Full HD TV
Connections
Using DVI (Digital Visual Interface)
sockets
If your TV has a DVI IN socket, you need a
HDMI-DVI adapter cable to connect the
HDMI socket on the DVD player.
This HDMI-DVI cable has only video
output capability.
AUse a HDMI-DVI cable (not supplied) to
connect the DVD player’s HDMI to DVI IN
on the DVI TV.
IMPORTANT!
When there is no picture on screen
press repeatedly VIDEO key.
Copy protected content (DVD-Video
discs) require HDCP support.
Helpful hint:
To hear sound from the DVD player, use
one of the audio connections.
Connecting TV

5
CAUTION!
DO NOT OPEN
RISK OF ELECTRIC SHOCK
ACHTUNG!
NICHT ÖFFNEN
LEBENSGEFAHR
UWAGA!
NIE OTWIERAĆ
RYZYKO PORAŻENIA
D-990 HX
DVD Player
DIGITAL AUDIO OUT / ANALOG VIDEO OUT
S-VIDEOCVBSCOAXIAL
Y Pb Pr
OPTICAL
HDMI
VIDEO AUDIO
DIGITAL OUT
AUDIO 5.1 ANALOG OUT
SLFL CENT
SRFR SW
SCART
VIDEO AUDIO ANALOG OUT
AC 110-240V~
50/60 Hz 12W
AU DIO
IN
VID EO IN
TV I N
TV
CAUTION!
DO NOT OPEN
RISK OF ELECTRIC SHOCK
ACHTUNG!
NICHT ÖFFNEN
LEBENSGEFAHR
UWAGA!
NIE OTWIERAĆ
RYZYKO PORAŻENIA
D-990 HX
DVD Player
DIGITAL AUDIO OUT / ANALOG VIDEO OUT
S-VIDEOCVBSCOAXIAL
Y Pb Pr
OPTICAL
HDMI
VIDEO AUDIO
DIGITAL OUT
AUDIO 5.1 ANALOG OUT
SLFL CENT
SRFR SW
SCART
VIDEO AUDIO ANALOG OUT
AC 110-240V~
50/60 Hz 12W
AU DIO
IN
VID EO IN
12
TV
ENGLISH
Using SCART Jack
A SCART connection will let you use
features both Audio and Video on the
DVD Player.
Use the SCART cable (black) to connect
the DVD Player’s SCART jack(TV OUT) to
the corresponding Scart input jacks on
the TV.
IMPORTANT!
When there is no picture on screen
press repeatedly B key.
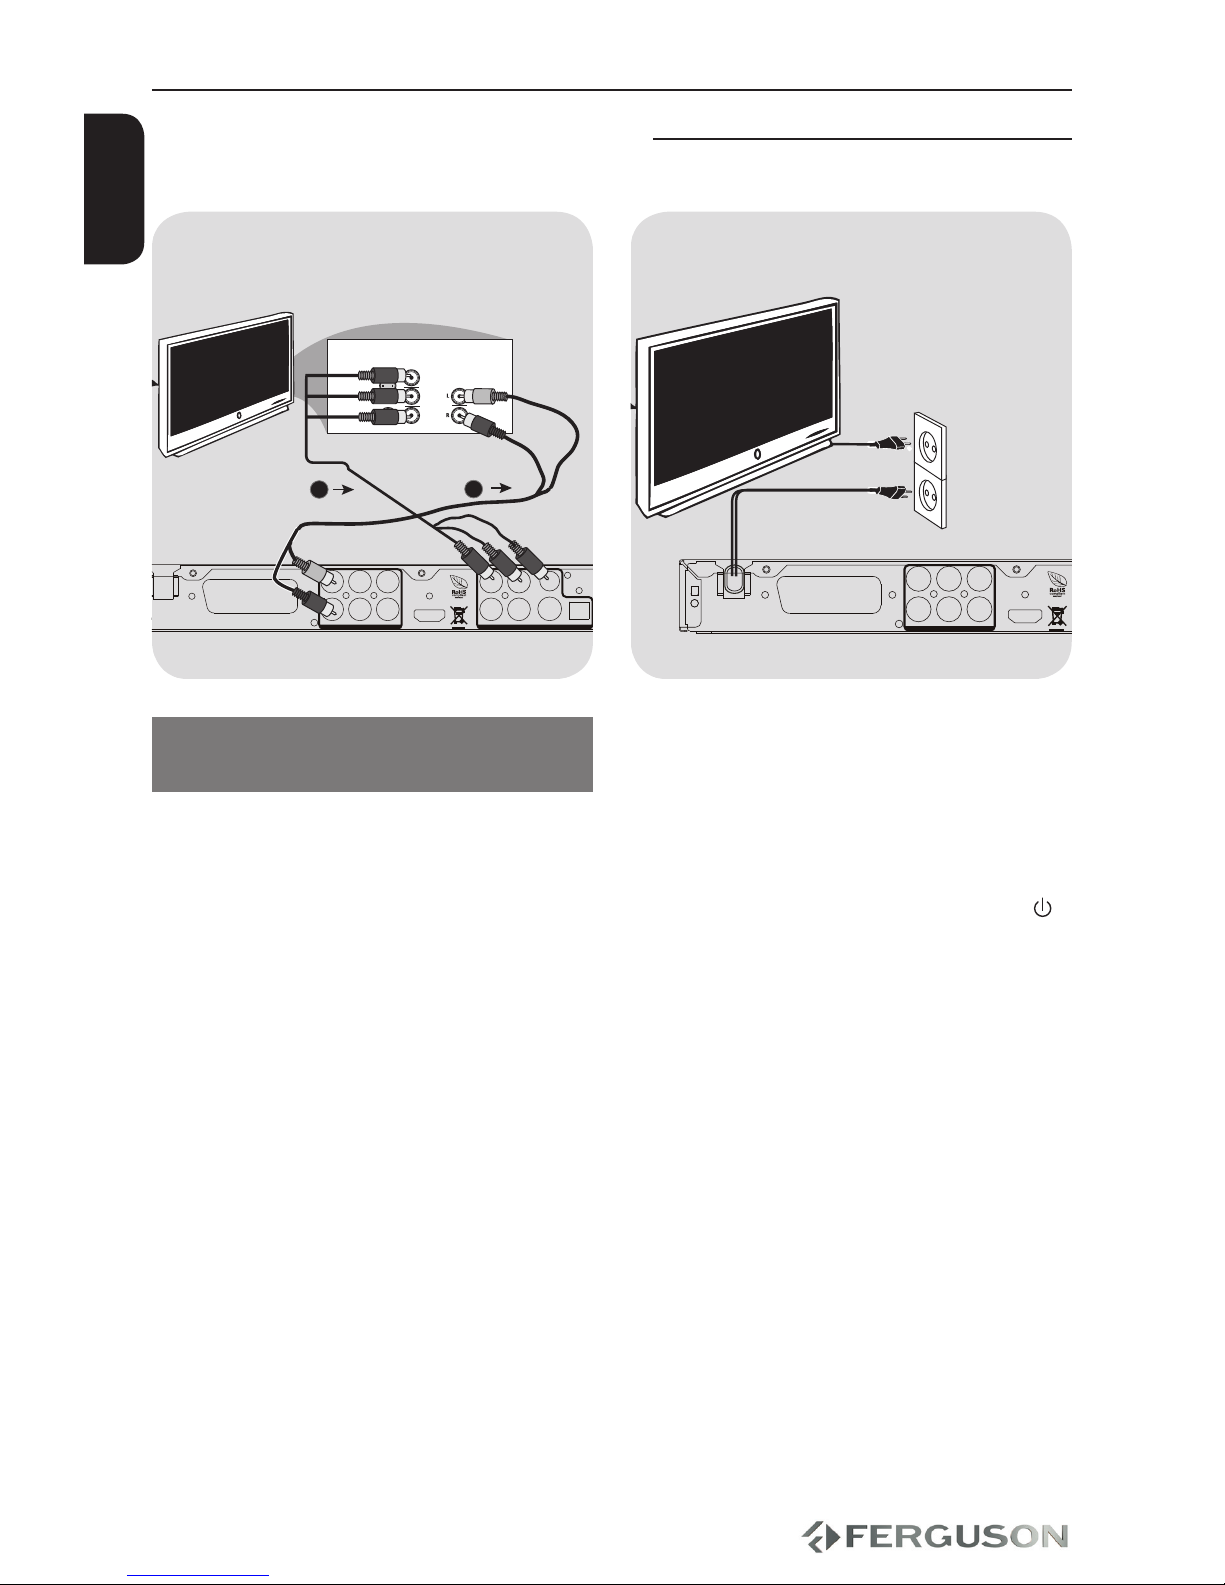
Using Composite Video Jacks (CVBS)
AUse the composite video cable (yellow)
to connect the DVD player’s CVBS(VIDEO)
jack to the video input jack(or the
labled as A/V in , Video In, Composite or
Baseband ) on the TV.
BTo hear the sound of this DVD Player
through your TV, use the audio cables
(white/red) to connect AUDIO OUT
(L/R) jacks of the DVD player to the
corresponding AUDIO IN jacks on the TV.
IMPORTANT!
When there is no picture on screen
press repeatedly B key.
Connections
6
CAUTION!
DO NOT OPEN
RISK OF ELECTRIC SHOCK
ACHTUNG!
NICHT ÖFFNEN
LEBENSGEFAHR
UWAGA!
NIE OTWIERAĆ
RYZYKO PORAŻENIA
D-990 HX
DVD Player
DIGITAL AUDIO OUT / ANALOG VIDEO OUT
S-VIDEOCVBSCOAXIAL
Y Pb Pr
OPTICAL
HDMI
VIDEO AUDIO
DIGITAL OUT
AUDIO 5.1 ANALOG OUT
SLFL CENT
SRFR SW
SCART
VIDEO AUDIO ANALOG OUT
AC 110-240V~
50/60 Hz 12W
TV
CAUTION!
DO NOT OPEN
RISK OF ELECTRIC SHOCK
ACHTUNG!
NICHT ÖFFNEN
LEBENSGEFAHR
UWAGA!
NIE OTWIERAĆ
RYZYKO PORAŻENIA
D-990 HX
DVD Player
DIGITAL AUDIO OUT / ANALOG VIDEO OUT
S-VIDEOCVBSCOAXIAL
Y Pb Pr
OPTICAL
HDMI
VIDEO AUDIO
DIGITAL OUT
AUDIO 5.1 ANALOG OUT
SLFL CENT
SRFR SW
SCART
VIDEO AUDIO ANALOG OUT
AC 110-240V~
50/60 Hz 12W
AU DIO
IN
V (Pr/Cr)
U (Pb/Cb)
Y
S-V ID EO
IN
VID EO IN
CO MPONENT
VID EO IN
2
1
TV
ENGLISH
Using Component Video Jacks
(Y Pb Pr)
AUse the component video cables (red/
blue/green) to connect the DVD system’s
Y Pb Pr jacks to the Corresponding
Component video input jacks (or labeled
as Y Pb Pr) on the TV.
BTo hear sound of this DVD player through
your TV, use the audio cables (white/red)
to connect AUDIO OUT (L/R) jacks of the
DVD player to the corresponding AUDIO
IN jacks on the TV.
IMPORTANT!
When there is no picture on screen
press repeatedly B key.
After everything is connected properly,
plug in the AC power cord to the power
outlet.
Never make or change any connections
with the power switched on.
When no disc is loaded, press POWER
on the DVD player front panel.“NO DS”
may appear on the display panel.
Connecting the power cord
Connections

7
CAUTION!
DO NOT OPEN
RISK OF ELECTRIC SHOCK
ACHTUNG!
NICHT ÖFFNEN
LEBENSGEFAHR
UWAGA!
NIE OTWIERAĆ
RYZYKO PORAŻENIA
D-990 HX
DVD Player
DIGITAL AUDIO OUT / ANALOG VIDEO OUT
S-VIDEOCVBSCOAXIAL
Y Pb Pr
OPTICAL
HDMI
VIDEO AUDIO
DIGITAL OUT
AUDIO 5.1 ANALOG OUT
SLFL CENT
SRFR SW
SCART
VIDEO AUDIO ANALOG OUT
AC 110-240V~
50/60 Hz 12W
AU DIO
IN
DIGITAL
CAUTION!
DO NOT OPEN
RISK OF ELECTRIC SHOCK
ACHTUNG!
NICHT ÖFFNEN
LEBENSGEFAHR
UWAGA!
NIE OTWIERAĆ
RYZYKO PORAŻENIA
D-990 HX
DVD Player
DIGITAL AUDIO OUT / ANALOG VIDEO OUT
S-VIDEOCVBS
COAXIAL
Y
Pb Pr
OPTICAL
HDMI
VIDEO AUDIO
DIGITAL OUT
AUDIO 5.1 ANALOG OUT
SLFL CENT
SRFR SW
SCART
VIDEO AUDIO ANALOG OUT
AC 110-240V~
50/60 Hz 12W
MULTIC HA NNEL A UD IO IN
S U B W.REARFR ONT
CENTERRE ARF RONT
L
R
ENGLISH
Optional: Connecting to an Stereo
System
Stereo system has Dolby Pro Logic or
Right/Left Audio In Jack
ASelect one of the video connections
(CVBS VIDEO IN, SCART or COMPONENT
VIDEO IN) depending on the options
available on your TV.
BUse the audio cables (white/red) to
connect AUDIO OUT (L/R) jacks of the
DVD Player to the corresponding AUDIO
IN jackts on the stereo system.
AV Receiver
STEREO
Connections
Optional: Connecting to a Multi-
channel Receiver
Receiver has multichannel analog
input
ASelect one of the video connections
(CVBS VIDEO, SCART or COMPONENT
VIDEO) depending on the options
available on your TV.
BConnect the Audio Out Left and Right
jack for Front and Rear speakers to the
corresponding input sockets on your
Receiver.
CConnect the Audio Out for center
speaker, surround left, surround right and
subwoofer to the corresponding inputs
on your Receiver (cable not supplied).
DSet the DVD Player’s Analog Output
(menu SPEAKER SETUP > ANALOG
OUTPUT) to ‘5.1 CH’to enable playback of
DVDs recorded in Multi-channel.
Helpful Hint:
If the subwoofer is equipped with its own
amplier, the Subwoofer connection
should be connected directly to the
subwoofer.
8
MOVE
CAUTION!
DO NOT OPEN
RISK OF ELECTRIC SHOCK
ACHTUNG!
NICHT ÖFFNEN
LEBENSGEFAHR
UWAGA!
NIE OTWIERAĆ
RYZYKO PORAŻENIA
D-990 HX
DVD Player
DIGITAL AUDIO OUT / ANALOG VIDEO OUT
S-VIDEOCVBSCOAXIAL
Y Pb Pr
OPTICAL
HDMI
VIDEO AUDIO
DIGITAL OUT
AUDIO 5.1 ANALOG OUT
SLFL CENT
SRFR SW
SCART
VIDEO AUDIO ANALOG OUT
AC 110-240V~
50/60 Hz 12W
AU DIO
IN
DIGITAL
ENGLISH
Connections
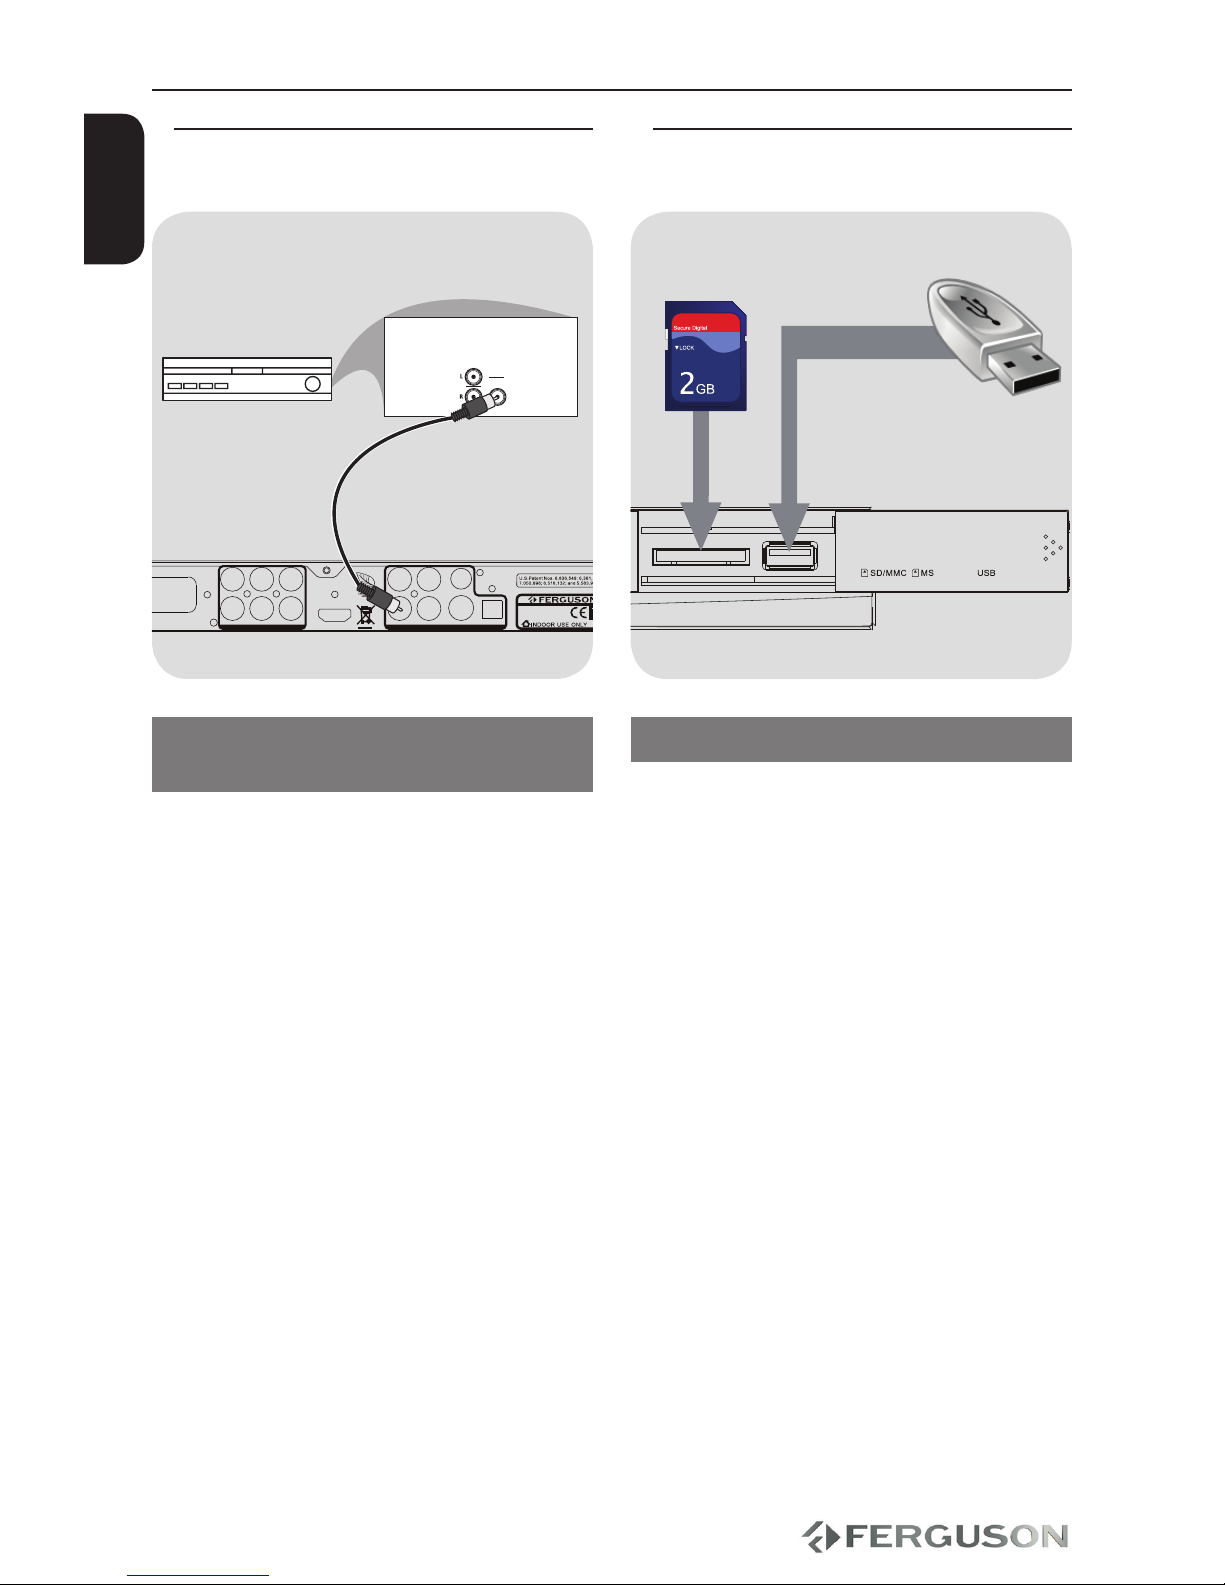
Optional: Connecting a supported
USB devices and memory cards
Using USB port
You can only view the content of supported
USB devices through this DVD system.
AConnect the supported USB device
directly to the USB port on the front panel
(as shown on the above illustration).
BPress INPUT button on the remote
control in order to view the les stored in
the supported USB device.
CYou have to stop playback before
removing the supported USB device from
the USB port.
Helpful hints:
The USB port supports playback of JPEG/
audio les/video les.
Not all portable audio/video players and
digital cameras are supported.
While connected to a card reader, only
one card can be read at the same time.
Only format FAT16, FAT32 partitions are
supported by USB. NTFS is not supported
Part of external hard disk drives without
separate power supply may not work.
If the USB device does not t into the USB
port, a USB extension cable is required.
Optional: Connecting Digital AV
Receiver
Receiver has a PCM, Dolby Digital, or
DTS decoder
ASelect one of the video connections
(CVBS VIDEO IN, SCART or COMPONENT
VIDEO IN) depending on the options
available on your TV.
BConnect the COAXIAL or OPTICAL jack
of the DVD player to the corresponding
Digital Audio In jack on your Receiver
(cable not supplied).
CSet the DVD Player’s Digital Output to
PCM-Only or RAW depending on the
capabilities of your Receiver.
Helpful hint:
If the audio format of the Digital Output
does not match the capabilities of your
receiver, the receiver will produce a
strong, distorted sound or no sound at all.
AV Receiver

9
CAUTION!
DO NOT OPEN
RISK OF ELECTRIC SHOCK
ACHTUNG!
NICHT ÖFFNEN
LEBENSGEFAHR
UWAGA!
NIE OTWIERAĆ
RYZYKO PORAŻENIA
D-990 HX
DVD Player
DIGITAL AUDIO OUT / ANALOG VIDEO OUT
S-VIDEOCVBSCOAXIAL
Y Pb Pr
OPTICAL
HDMI
VIDEO AUDIO
DIGITAL OUT
AUDIO 5.1 ANALOG OUT
SLFL CENT
SRFR SW
SCART
VIDEO AUDIO ANALOG OUT
AC 110-240V~
50/60 Hz 12W
6 7 8
9 10
54321
11 12 13 14 15 16
D-990 HX
7 10
11
5321 64 98
ENGLISH
Functional Overview
Front and Rear panels
APOWER - Turns the player on
BDisc tray
CEJECT - Open / close the disc tray
DIR Sensor - Point the remote control
towards this sensor
EDisplay - Shows information about
the current status of the DVD Player
F- Starts/pauses playback
G- Stops playback
H- Skips to the previous chapter
I- Skips to the next chapter
JSD slot- Input the supported SD card
KUSB port - Input the supported USB
device
AMain (AC Power Cord) - connect to a
standard AC outlet
BSCART - connect to SCART input of a TV
CFL Multichannel Audio Out - connect
to front left input of an amplier
DCENT Multichannel Audio Out -
connect to center input of an amplier
ESL Multichannel Audio Out - connect
to left surround input of an amplier
FY (Component Video Out) - connect
to Y input of a TV
GPb (Component Video Out) - connect
to Pb input of a TV
HPr (Component Video Out) - connect
to Pr input of a TV
IFR Multichannel Audio Out - connect
to front right input of an amplier
JSW Multichannel Audio Out - connect
to subwoofer input of an amplier
KSR Multichannel Audio Out - connect
to right surround input of an amplier
LHDMI - Audio and video output socket
for the high denition television set
MCOAXIAL (Digital Audio Out)- connect
to coaxial audio input of an amplier
NCVBS (Composite Video Out) -
connect to CVBS video input of a TV
OS-Video - connect to S-Video
compatible device
POPTICAL (Digital Audio Out) - connect
to coaxial audio input of an amplier

10
OK
RCU580
Blu-ray
A B C D
+
VIDEO EQ REPEAT A-B
INPUT OPT ZOOM
BROWSE
MENU TITLE
RETURN
SEARCH
STEP SLOW STOP
PLAY/PAUSE
AUDIO SUBTITLE
SETUP INFO
MUTE
VOL
POWER EJECT
NEXT
PREV
REV FWD
1 32
4 65
7 98
0/10
ENGLISH
Functional Overview
Remote Control Unit (RCU580)
POWER - Turns the player on or switches it to standby mode
EJECT - Open / close the disc tray
A (Blu-ray) - PBC menu
B (Blu-ray) - Switch analog video output modes
C (Blu-ray) - Selects dierent channels, when the disc tray is opened,
press the button will enter interlace video output mode
D (Blu-ray) - enters +10 value in a menu
Alphanumeric keypad 0-9 - Selects numbered items in a menu
AUDIO - Selects an audio language (DVD/VCD/avi) and time
adjustment (avi)
SUBTITLE - Selects a DVD subtitle language
- Selects a XviD subtitle le / subtitle moving / font change /
time adjustment
SETUP - Enters or exits system setup menu
INFO - Display information on the screen during playback
- Display information about audio and video les in lebrowser
- Display content of text les (like subtitles) in lebrowser
- Cursor buttons for moving left, right, up, down.
- Fast forward / reverse search
OK - Conrms an entry or selection
VOL + − - Increase / decrease the volume
NEXT / PREV - Skips to the next/ previous title/chapter/track
MUTE - Turn on/o sound
STEP - Step play
SLOW - Slow the normal play motion
STOP - Stops playback
PLAY/PAUSE - Starts or pauses playback
MENU - Enter or exits the disc menu
TITLE - To go back to show title menu
RETURN - Return to disc menu playback
SEARCH - Start playback from a designated point
INPUT - Access the contents of disc or the connected supported
USB device or memory card
OPT - Switch the camera angle during DVD playback
ZOOM - Enlarge a picture on the TV screen
BROWSE - Browse VCD/DVD/JPEG tracks in small-picture screen
VIDEO - Select video output mode (HDMI resolution)
EQ - Select preered sound mode
REPEAT - Selects various repeat modes
A-B - Setup repeat play segment
Due to standardization fact most of Ferguson DVD players are using the same remote
control unit RCU580. That is why NOT all keys are being used by this DVD model!!

11
30º
OK
Blu-ray
A B C D
+
AUDIO SUBTITLE
SETUP INFO
MUTE
VOL
POWER EJECT
NEXT
REV FWD
1 32
4 65
7 98
0/10
ENGLISH
Getting Started
Step 1: Inserting batteries into the
Remote Control
AOpen the battery compartment.
BInsert two batteries type R03 or AAA,
following the indications(+ -) inside the
compartment.
CClose the cover.
Using the Remote Control to operate
the Player
AAim the Remote Control
directly at the remote
sensor (IR) on the front
panel.
BDo not put any objects
between the Remote
Control and DVD Player
while operating the
DVD Player.
CAUTION!
Remove batteries if they are
exhausted or if the Remote Control is
not being used for a long time.
Do not use old and new or dierent
types of batteries in combination.
Batteries contain chemical
substances, so they should be disposed
properly.
Step 2: Setting up the TV
IMPORTANT!
Make sure you have completed all the
necessary connections.
APress POWER on the DVD player to turn
it on.
BTurn on the TV and set it to the correct
video-in channel. You should see the DVD
background screen.
Usually these channel are between the
lowest and highest channels and may be
called FRONT, A/V IN, VIDEO. See your TV’s
manual for more details.
Or, you may go to channel 1 on your
TV, then press the Channel down button
repeatedly until you see the Video In
channel.
Or, the TV Remote Control may have
a button or switch that chooses dierent
video modes.
CIf you are using external equipment,
(eg. audio system or receiver), turn it on
and select the appropriate input source
for the DVD player output. Refer to the
equipment owner’s manual for detail.

12
ENGLISH
Getting Started
Selecting the colour system that
corresponds to your TV
This DVD Player is compatible with both
NTSC and PAL. In order for a DVD disc
to play on this player, the colour system
of the Disc, the TV and the DVD player
should match.
Video Setup Page
TV Type PAL
TV Display Multi
Progressive NTSC
Picture Setting
Component
HD JPEG
HDMI Video Setup
APress SETUP.
BPress to select {Video Setup Page}
CPress to highlight {TV Type}, then
press .
DPress to highlight one of the options
below:
PAL -Select this if the connected TV has
the PAL colour system. It will change the
video signal of an NTSC disc and output it
to PAL format.
NTSC -Select this if the connected TV is
NTSC colour system. It will change the
video signal of a PAL disc and output in
NTSC format.
Multi -Select this if the connected TV
is compatible with both NTSC and PAL
(multi-system). The output format will be
in accordance with the video signal of the
disc.
ESelect a setting and press OK.
Follow the instructions show on the TV
to con rm the selection.
Step 3: Setting language
preference
The language options are dierent
depending on your country or region.It
may not correspond to the illustrations
shown on the user manual.
Setting the OSD language
The On-screen language for the system
menu will remain as you set it, regardless
of various disc languages
General Setup Page
Menu OSD English (EN
Screen Saver Polski (PL)
Sleep timer Español (ES)
Slideshow Русский (RU)
Slideshow delay Deutsch (DE)
AVI Last Memory Magyar (HU)
Zoom Last Memory
APress SETUP.
BPress to select {General Setup Page}.
CPress to highlight {Menu OSD}, then
press .
DPress to select a language and press
OK.

13
ENGLISH
Getting Started
Setting the Audio, Subtitle and Disc
menu language
You can choose your own preferred
language or soundtrack from audio,
subtitles and DVD menu languages. If the
language selected is not available on the
disc, the disc’s default language will be
used instead.
Preference Page
DVD-Video audio English
DVD-Video subtitle French
DVD-Video disc menu Spanish
Parental Portuguese
Password Polish
Default Italin
Turkish
APress STOP twice, then press SETUP.
BPress . to select {Preference Page}.
CPress to highlight one of the options
below at a time, then press .
- ‘DVD-Video Audio’ (disc’s soundtrack)
- ‘DVD-Video Subtitle’ (disc’s subtitles)
- ‘DVD-Video Disc Menu’(disc’s menu)
DPress to select a language and press
OK.
ERepeat steps C~Dfor other language
settings.

14
ENGLISH
Disc operation
Playable Content
File Systems
FAT (FAT16 and FAT32)
ISO-9660 and partly UDF on CD and DVD
discs
Video containers
MPEG-1/2 Program Stream (MPG, MPEG)
MPEG-4 Part 14 (MP4)
VOB
AVI
MOV
OGM
Video codecs:
Most video codecs are supported up to
576p resolution.
XviD (except 3 warp-point GMC)
MPEG-1
MPEG-2 ML@MP
MPEG-4 ASP
Subtitle formats:
SRT (SubRip)
SMI (Sami)
SUB (MicroDVD, SubViewer2)
SSA (SubStationAlpha)
ASS (Advanced Sub Station Alpha)
MPL (MPL2)
TXT (TMplayer, MPL2, SubRip, Sami,
MicroDVD, SubViewer2, SubStationAlpha,
Advanced Sub Station Alpha)
IDX
Some user-created subtitles may not
work properly
Some special characters are not
supported
HTML tags are not supported
A movie le and external subtitle le must
be located in the same folder.
IMPORTANT!
If the inhibit icon (ø) appears on the
TV screen when a button is pressed, it
means the function is not available on the
current disc or at the current time.
Upscaling
Supported Upscaling on Standard
Denition content:
A720p HDTV Progressive Scan -
24/25/30Hz, 720 Lines per Frame,
1280x720 pixel
B1080i HDTV Interlaced - 50/60Hz,
520+520 Lines per Frame, 1920x1080
pixel
C1080p HDTV Progressive Scan -
24/25/30Hz, 1080 Lines per Frame,
1920x1080 pixel
Playable Discs
Your DVD Player will play:
Digital Video Discs (DVDs)
Video CDs (VCDs)
Super Video CDs (SVCDs)
Digital Video Discs +
Recordable[Rewritable] (DVD+R[W])
Compact Discs (CDs)

15
ENGLISH
Photo formats :
JPEG, HD JPEG (baseline)
Audio containers:
M4A
MPEG audio (MP1, MP2, MP3, MPA)
ASF (ASF, WMA)
OGG
and others
Audio codecs:
Dolby Digital (AC3)
WMA (except lossless and WMA Pro)
MP1, MP2, MP3
Vorbis
and others
Extensions recognized in Ferguson le
browser.
List of recognized multimedia le
extensions are listed below. Not all les
with those extensions are playable -
some les may include not supported
codecs and/or settings. Files with other
extensions player will not play.
acc, avi, dat, divx, jpe, jpeg, jpg, m4a, mov,
mp1, mp2, mp3, mp4, mpe, mpeg, mpg,
ogg, ogm, vob, wma
ass, mpl, smi, ssa, srt, sub, txt
CAUTION!
Playback of some les may fail or be
incorrect
Copy protected content is not playable.
Playback may suer temporary
interruptions (image freeze, faster/slower
playback, etc) when the audio language
(audio track) is changed
A damaged movie le may not be played
correctly
Videos with resolution higher than
720x576@25/30P may not work properly
Movies larger than 2 GiB may not be
played correctly
Playing a movie via a USB/memory card
that doesn’t support high speed may not
work properly.
Playback of movie les with video bitrate
over 5 Mbps may be incorrect
Disc operation

16
ENGLISH
Playing discs
AConnect the power cords of the DVD
player and TV(and any option stereo or AV
receiver) to a power outlet.
BTurn on the TV power and set to the
correct Video in channel.
CPress POWER to turn on the DVD
player.
The DVD background screen appears
on the TV.
DPress OPEN/CLOSE on the front of the
DVD player or EJECT button on the
remote control.
EPlace a disc into the disc tray with the
lable facing up,then press EJECT .
For double-sided discs, load the side
you want to play facing up.
FPlayback will start automatically.If not
press PLAY/PAUSE .
If a disc menu appears on the TV see
“Using the Disc Menu”.
If the disc is locked by parental control,
you must enter your six-digit password.
Basic playback controls
Unless otherwise stated, all operations
described are based on Remote Control
use.
Pausing playback
ADuring playback , press PLAY/PAUSE to
pause playback and display a still picture.
Sound will be muted.
BTo resume normal playback, press PLAY/
PAUSE again.
Selecting track/chapter
Press PREV / NEXT to go to the previous
or next track/chapter
Stopping playback
Press STOP
Disc operation
Table of contents
Other Ferguson DVD Player manuals


