Ferguson D-660 User manual
DVD
D-660

1
CONTENT
[TABLE OF CONTENT]
Thank you very much for your purchase of our products. Please read through this manual
in detail before using and keep it for reference.
PRECAUTIONS -----------------------------------------------------------------------------------------
DISC CARE -----------------------------------------------------------------------------------------------
OPERATION GUIDE ---------------------------------------------------------------------------------
INTRODUCTION --------------------------------------------------------------------------------------
NAMES AND FUNCTIONS ------------------------------------------------------------------------
FRONT PANEL --------------------------------------------------------------------------------------
REAR PANEL -------- -------------------------------------------------------------------------------
CONNECTIONS -------------------------------------------------------------------------------------
CONNECTING TO A TV --------------------------------------------------------------------------
CONNECTING TO A 2CH AMPLIFIER -------------------------------------------------------
CONNECTING TO AN AMPLIFIER WITH 5.1CH AUDIO INPUT----------------------
CONNECTING TO AN AMPLIFIER WITH DOLBY PRO LOGIC DECODER -----
CONNECTING TO AN AMPLIFIER WITH DOLBY DIGITAL DECODER ----------
REMOTE CONTROL --------------------------------------------------------------------------------
BASIC OPERATION -------------------------------------------------------------------------------
DVD TITLE & MENU PLAYBACK, VCD MENU PLAYBACK ---------------------------
STEP PLAYBACK, SEQUENTIAL PLAYBACK, PLAY/PAUSE -------------------------
CHAPTER SKIP, ---------------------------------------- -------------------------------------------
FAST FORWARD, FAST REVERSE ---------------------------------------------------------
CHANNEL SELECTING, MUTE, ZOOM ----------------------------------------------------
BROWSE, DISC INFORMATION, 3D, SOUND, SEARCH ----------------------------
SELECTING AN AUDIO LANGUAGE -------------------------------------------------------
2
3
3-4
5
6-7
6
7
8-10
8
8
9
10
10
11
12-15
12
12
12
13
13
14
15
SELECTING AN VIEWING ANGLE ---------------------------------------------------------
SELECTING A SUBTITLE LANGUAGE, REPEAT---------------------------------------
BASIC SETTING ---------------------------------------------------------------------------------
[SETUP MENU] -----------------------------------------------------------------------------------
[GENERAL SETUP] -----------------------------------------------------------------------------
[AUDIO SETUP] -------------------------------------------------------------------------------
ANALOG OUTPUT PAGE -----------------------------------------------------------------
DIGITAL AUDIO SETUP PAGE -------------------------------------------------------
SOUND MODE SETUP PAGE--------------------------------------------------------------
SPEAKER SETUP PAGE----------------------------------------------------------------
NIGHT MODE PAGE -------------------------------------------------------------------------
[VIDEO SETUP] ------------------------------------------------------------------------------
VIDEO SETUP PAGE -------------------------------------------------------------------
PICTURE SETTING SETUP PAGE ------------------------------------------------------
[PREFERENCE SETUP] --------------------------------------------------------------------
CHANGE PASSWORD -------------------------------------------------------------------------
MP3/PICTURE CD PLAYBACK -----------------------------------------------------------------
JPEG PICTURE PLAYBACK ----------------------------------------------------------------
PLAYABLE DISC TYPES/SPECIFICATIOINS -----------------------------------------------
TROUBLESHOOTING ------------------------------------------------------------------------------
ACCESSORIES --------------------------------------------------------------------------------------
15
15
16-23
16
17
18-20
18
18-19
19
19-20
20
21-22
21-22
22
22-23
23
24
24-25
26
27
27

2
PRECAUTIONS
SAFETY PRECAUSTIONS
To prevent fire or shock hazard, do not expose
this appliance to rain or moisture.
This appliance is a Class I laser product. Direct
exposure to beam may cause eyes injury.
Do not open the cabinet by yourself and leave
all servicing to qualified service personnel.
Power requirement for this appliance is AC
110~240V, 50/60 Hz, please ensure the power
supply is in the range before turning on.
OPERATION PRECAUSTIONS
Please use the original packing case and
materials when transporting this DVD player,
and pack the appliance in the original factory
packing style for better protection.
The temperature of the upper cover board
and the rear panel of the player may be high
after a long period of time of playing. This is
not a problem but a normal phenomenon.
When the player is not to be used, please
remove the disc and turn the power off.
Malfunction may be caused when the player
is not used for too long, so please turn it on
occasionally for better maintenance.
Some kinds of discs may cause the
appliance to hang, please restart the
appliance when this occurs.
Interval of restarting should be longer than 10
seconds, which can help to extend the life
expectancy of the appliance.
The moving pictures and played sound may
be affected when the DVD player is placed
close to TV set, radio or VCR, so please keep
them further away.
This DVD player is a device of high
technology and high precision. The image
quality may be impaired when the laser
head or the disc driving parts are dirty or
damaged.
Condensation may cause certain kinds of
damage to the player. It may form because
The player is moved from cold to warm
surroundings;
The player is placed inside a room where
the heater is just on or exposed to the
ventilation hole of an air-conditioner;
The player is moved out from an air-
conditioned room to a place of high
temperature and humidity in summer time.
The player is being used in a surrounding
of high humidity.
Use a soft and dry cloth for cleaning.
For the stains that cannot be removed easily,
apply some diluted neutral detergent to a
cloth, wring the cloth dry and wipe the stains
away, then use a dry cloth to clean. Do not
use any solvents such as thinner or benzine;
otherwise the surface of the player may be
damaged.
When use duster cloth with chemical sub-
stance for leaning, please refer to the using
procedures the product requires.
Manufactured under license from Dolby
Laboratories.
Dolby Pro Logic and double-D
symbols are trademarks of Dolby Laboratories.
Confidential unpublished works. All rights
reserved.
This appliance had better be unplugged
after using each time for better protection.
LOCATION
ACQUIRING CLEAR PICTURES
CONDENSATION PRECAUTIONS
Do not use the player where condensation
may be form easily, otherwise damage may
be caused to the disc and inner parts of the
player. Please take the disc out, plug the
power cord into a wall outlet and turn the
player on. The moisture will disappear when
the temperature rises two or three hours later.
CLEANING PRECAUTIONS

3
This section provides information of using,
cleaning and storing discs.
Do not expose discs to direct sunlight
and heat sources.
Fingerprints or other dirt on the disc
may affect sound and picture quality.
To keep discs clean, use a soft cloth
and wipe from the inside toward the
outer edge.
If soft cloth cannot wipe the dirt
away, use a wet cloth to wipe and
then a dry cloth to clean.
Do not touch the playing surfaces
of discs.
Do not fix labels or stickers to discs.
Keep discs away from moist or dirty
surroundings.
Store discs standing upright in their
jackets. Stacking discs or placing
them outside jackets may cause
them to warp.
This manual only provides basic
explanation for the product.
Some kinds of discs may not be
mentioned or totally the same as
stated in this manual. Please refer
to the TV screen display and disc
specification.
When is displayed on the
screen, the function being used is
not available to this disc.
DISC CARE \ OPERATION GUIDE
[DISC CARE]
CLEANING DISCS
USING DISCS
STORING DISCS
ABOUT THIS MANUAL
DVD is an incredible format that presents the highest
quality digital audio and video available today. It can
contain enormous data, thus provides functions and
features other media cannot reach.
Getting familiar with the DVD player
If you are new to DVD, please first read through
the INTRODUCTION chapter and the NAMES AND
FUNCTIONS chapter, to get familiar with the func-
tions, parts, buttons on the main unit and buttons
on the remote control, which will be referred to
throughout the operation.
Making necessary connection
No entertainment system seems to be set up
exactly the same way. The chapter MAKING CON-
NECTIONS shows how video and audio connec-
tions may be made to suit your home entertainment
system.
Using SETUP menu
If you wish to know about detailed setting of this
appliance, please refer to the BASIC SETTING
chapter, which introduces the various settings and
meanings of the player and helps you to use the
player better.
When all the connection and setups have been
made, you are ready to play a DVD, SVCD, VCD,
DVCD, CD, MP3 disk with this appliance. You can
also enjoy browsing images in a JPEG format
stored in a disc.
Playing discs
[OPERATION GUIDE]
4
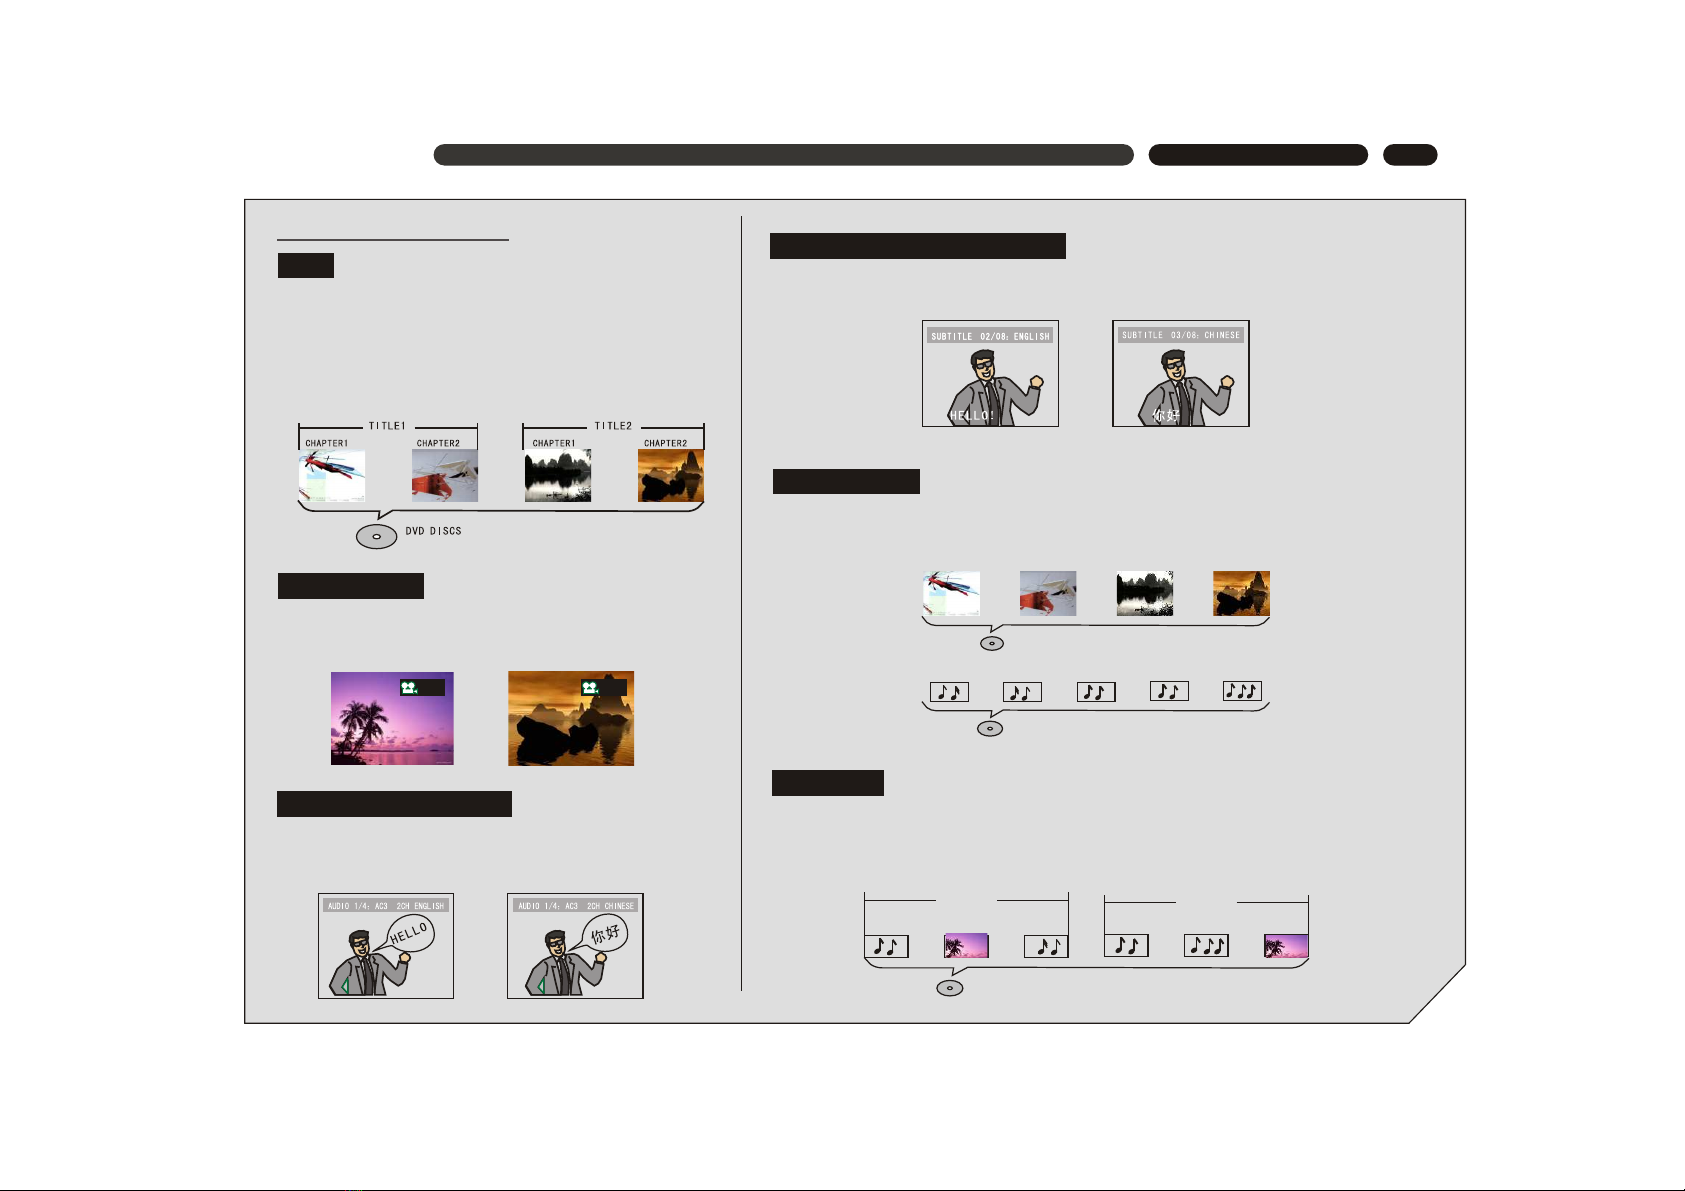
Differences in disc composition
All discs are divided up into smaller, more manageable
sections so that you can find specific content more easily.
DVD discs are divided into one or more titles. Each title
may be further divided into several chapters. Occasionally,
a chapter may contain index points, effectively dividing the
chapter up into several parts, too.
OPERATION GUIDE
You can select the expected subtitle language or turn subtitles off when watching movies
or discs that have multi-language subtitles recorded on them.
SVCD/VCD/CD are divided into a number of tracks. A track may contain a number of
index points occasionally, which effectively divides the track up into several parts.
1/42/4
You can view scenes from different camera angles when
watching movies or other media with multiple angle
playback available.
You can select the expected language on when watching
movies or discs that have multiple languages and/or
audio soundtracks recorded on them.
MP3 (MPEG1 audio layer 3) is a compressed audio file format. Files are recognized by
their file extension ".mp3" or ".MP3". JPEG is a compressed image file format. Files are
recognized by their file extension ".jpg" or ".JPG".
MP3
FOLDER1 FOLDER2
TRACK1 TRACK2PICTURE1 TRACK1 TRACK2 PICTURE1
CD DISCS
SVCD/VCD DISCS
TRACK1 TRACK2 TRACK3 TRACK4
TRACK1 TRACK2 TRACK3 TRACK4 TRACK5
DVD
MULTI-ANGLE
MULTIPLE LANGUAGES
MULTI-LANGUAGE SUBTITLES
SVCD/VCD/CD
MP3/JPEG
5
This appliance adopts Taiwan MediaTeK s latest DVD decoder chip that integrates functions
of decoder and servo. It supports full functional DVD playback modes including 8 languages,
32 subtitles and 9 angels. The appliance can play DVD, Super VCD, VCD, DVCD, CD and
CD-R discs. In addition, MP3 and Picture CD are also playable.
The player has the following features:
INTRODUCTION
INTRODUCTION OF PRODUCT FUNCTIONS
MPEG-4, an extension of MPEG-2 technology ,is
a format with high image quality and low data transmission
rate. With the support of MPEG-4 technology, the image
quality of video files on a CD-ROM, whose capacity is
only 700 MB, can reach or approach the image quality
of DVD. The player identifies this type of file by judging
whether the file extension is ".AVI" or ".avi".
MPEG-4
MPEG-4 decorder
The latest ultra-thin DVD (the thickness of the player is only 38mm).
Build-in DOLBY DIGITAL with 6-channel audio output.
Sanyo s
12-bit/108MHz video D/A converter with up to 500-line horizontal resolution.
24-bit/192KHz audio D/A converter with high-quality DVD audio output.
3D virtual surround sound effect and 8 reverb modes.
Coaxial digital audio out jacks.
Standard video out (AV), S-video out, component video out (Y, Cb/Pb, Pr/Cr)
and SCARTvideo out jacks.
16:9 and 4:3 TV screen aspect ratio support.
Playback functions including Program, Repeat, Slow Forward/Reverse, Fast
Forward/Reverse, Zoom In/Out, Memory, JPEG, etc.
Parental Lock Level control system.
High-reliability power supply switch and wide power requirement range
(AC 100-253V, 50/60Hz).
Screen saver program for screen protection.
Auto STANDBY function for automatic electricity saving.
Super search function, supporting various search modes.
latest laser-head with super error-correction capability.

6
NAMES AND FUNCTIONS
FRONT PANEL
1. POWER button
Press to alternate the player to ON and
OFF repeatedly
2. Disc tray
When loading a disc, place discs in the
disc tray with the label side facing up.
3. (EJECT) button
Press to open and close the disc tray.
4. (PLAY/PAUSE) button
Press for the first time to stop playback,
press for the second time to resume the
playback from the pause point.
12. ECHO control knob
Turn to adjust the echo effect of microphone
input.
11. VOL control knob
Turn to adjust the volume of microphone
input.
10. MIC input jack
Use to connect to a microphone to the
player to use the Karaoke function.
9. Display window
Displays current disc information.
8. Remote sensor
Point the remote control toward the remote
sensor to operate the player.
5. (STOP) button
During DVD playback, press once to stop
and then press PLAY button to resume
playback from the stop point; press this
button twice causes the disc to return to
the beginning of the disc if playback
starts again.
6. (PREV) button
Press to go back to previous chapter/track.
7. (NEXT) button
Press to skip to next chapter/track.
9
1 2 3 4 5 6 7
8
11 1210

7
NAMES AND FUNCTIONS
REAR PANEL
4. 5.1CH AUDIO OUT jacks
Use to output decoded 5.1-channel audio to
multi-channel receiver or amplifier.
6. SCART OUT jack
Connect to the SCART input on a TV or other
devices with progrssive scan SCART input
capability.
2. CVBS / S-VIDEO OUT jack
Connect to the video input on a TV, monitor,
AV amplifier or receiver with video input
capability.
3. COMPONENT VIDEO OUT jacks
If your projective monitor or projector or other
similar devices has component video inputs,
you can produce a higher quality picture on
it by connecting its component video cable
to the Y Pb Pr jacks on this unit.
1. AC IN power cord connection terminal
Use to connect the power cord to the wall
outlet.
5. COAXIAL DIGITAL AUDIO OUT jack
Use to output digital audio recorded on discs
by connecting to the coaxial digital audio
input on an AV amplifier or receiver with digital
audio input capability, but you first need to change
the setting to digital audio output on the SETUP
MENU.

8
CONNECTIONS
Connection Example
To Y
Cb/Pb
Cr/Pr
OUT
jack
To S-VIDEO
OUT jack
To AUDIO
OUT(LEFT
/RIGHT)
jacks
To AUDIO IN (LEFT/RIGHT) jacks
To VIDE O IN jack
To S-VIDEO IN jack
CONNECTING TO A TV
To VIDEO OUT jack
To Y Cb/Pb Cr/Pr IN jack
TV
CONNECTING TO A 2CH AMPLIFIER
To VIDEO/
S-VIDEO IN jack
To VIDEO/
S-VIDEO
OUT jack
To AUDIO IN jacks
To AUDIO OUT
(LEFT/RIGHT)
jacks
TV
FRONT
RIGHT
FRONT
LEFT
2-CH AMPLIFIER
Notes:
If the TV has a S-VIDEO IN jack, connects it to the
S-VIDEO OUT jack on the player.
If the TV has a SCART IN jack, connects it to the
SCART OUT jack on the player.
If the TV has COMPONENT VIDEO IN jacks (Y, Pb,
Pr), connects them to the corresponding Y, Pb,
Pr OUT jacks.
If you'd like to output the audio to the TV, please
connect the Left/Right channel output jack on the
player to the corresponding channel input jack on the
TV by matching the color of the plugs with the color of
the jacks (red for right channel and white for left).
You can enjoy the stereo audio effect by connecting the
player to a two-channel amplifier-and-speakers system.
Please ensure the audio output of the player is set to
STEREO.
note: To enjoy the movie,please do not have the SCART
and Y/Pb/Pc jacks connected at the same time.
To SCART OUT jack

9
CONNECTIONS
CONNECTING TO AN AMPLIFIER WITH 5.1CH AUDIO INPUT
5.1CH AMPLIFIER
To 5.1CH AUDIO IN jacks
To VIDEO/
S-VIDEO
IN jack
CENTER
TV SUBWOOFER
FRONT
RIGHT
FRONT
LEFT
SURROUND RIGHTSURROUND LEFT
To VIDEO/
S-VIDEO
OUT jack To 5.1CH
AUDIO OUT
jacks
Connection Example
You can enjoy the real 5.1-channel Dolby Digital Audio
effect by connecting the player to an amplifier-and-
speakers system with 5.1ch capability.
To DIGITAL
AUDIO
OUT jack
To DIGITAL AUDIO IN jack

10
CONNECTIONS
CONNECTING TO AN AMPLIFIER WITH DOLBY PRO LOGIC DECODER
CENTER
TV
FRONT
RIGHT
FRONT
LEFT
SURROUND RIGHTSURROUND LEFT
To VIDEO/
S-VIDEO IN jack
To VIDEO/
S-VIDEO
OUT jack
AMPLIFIER with
DOLBY PRO LOGIC decoder
To AUDIO IN jacks
To AUDIO OUT
(LEFT/RIGHT)
jacks
Connection Example
CONNECTING TO AN AMPLIFIER WITH DOLBY DIGITAL DECODER
Connection Example
To DIGITAL AUDIO IN jacks
To VIDEO/
S-VIDEO IN jack
To VIDEO/
S-VIDEO
OUT jack
To DIGITAL AUDIO
IN (COAXIAL) jacks
CENTER
TV SUBWOOFER
FRONT
RIGHT
FRONT
LEFT
SURROUND RIGHT
SURROUND LEFT
AMPLIFIER with DOLBY
DIGITAL decoder
You can enjoy the Dolby Surround audio effect by
connecting the player to an amplifier-and-speakers
system with Dolby Pro Logic decoder.
You can enjoy the completely-reproduced 5.1-channel
Digital Theatre Systems audio effect by connecting the
player to an amplifier-and-speakers system with Dolby
Digital decoder via a coaxial cable. Please ensure the
audio output of the player is set to SPDIF/ ALL or
SPDIF/PCM.
11
NAMES AND FUNCTIONS
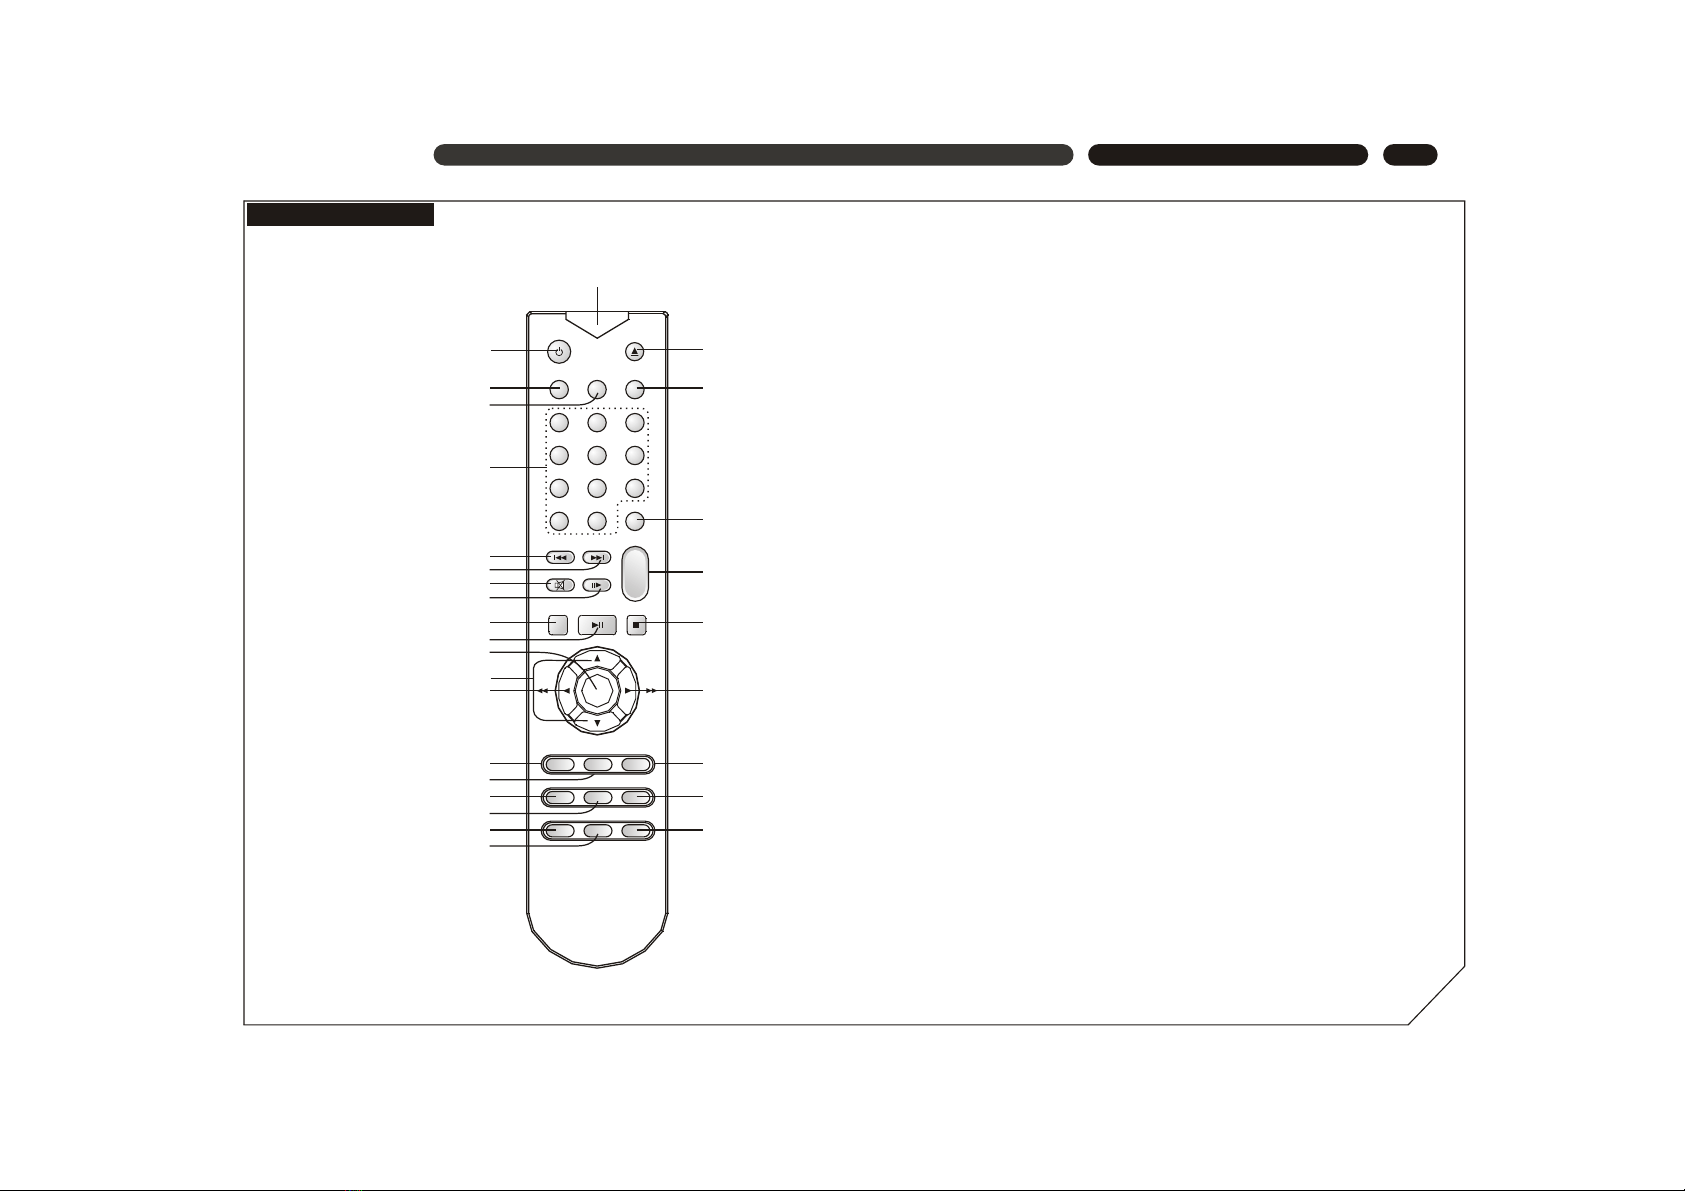
REMOTE CONTROL
1. REMOTE SIGNAL
EMITTER
2. STANDBY
3. ZOOM
4. BROWSE
5. NUMBER
6. PREVIOUS
7. NEXT
8. MUTE
9. STEP
10. SETUP
11. PLAY/ PAUSE
12. OK
13. UP/DOWN
14. LEFT/ FAST
REVERSE
15. MENU
16. TITLE
17. ANGLE
18. AUDIO
19. CHANNEL
20. SOUND
21. EJECT
22. REPEAT
23. SEARCH
24. VOLUME
25.STOP
26. RIGHT/ FAST
FORWARD
27. OSD
28. SUBTITLE
29. 3D
12 3
456
789
+10 0
REPEAT
MENU TITLE OSD
BROWSE
ZOOM
ANGLE
CHANNEL
SETUP
AUDIO
SOUND 3D
SUBTITLE
OK
VOLUME
STOP
F.R. F.F.
10
11
12
13
14
15
16
17
3
1
4
6
8
9
2
7
5
18
19
20
21
22
23
24
25
26
27
28
29
+
-
SEARCH
PLAY/PAUSE
PREV N EXT
STEP

12
BASIC OPERATION
BASIC OPERATION
DVD TITLE & MENU PLAYBACK
1. Press TITLE button to access the title menu of
the disc.
2. Select the item with the CURSOR buttons then
press OK to start playback.
3. Or press the NUMBER buttons to play the cor-
responding chapter directly.
4. Press MENU button and the main menu of the
disc will be displayed on the TV screen. Menu
screen varies with the disc.
Notes:
This operation is only available for DVD discs. Some
discs may directly begin playback after data reading.
1. Press MENU button to switch the PBC mode to
ON. For VCD2.0 and SVCD discs, PBC menu
will be accessed automatically.
2. Press the NUMBER buttons to play the corres-
ponding chapter directly.
3. During playback, press STOP button to stop
playback.
VCD MENU PLAYBACK
1. For VCD2.0 and VCD discs, switch PBC to OFF
and access the sequential playback mode.
2. Under sequential playback mode, you can press
the NUMBER buttons to play the corresponding
chapter directly.
SEQUENTIAL PLAYBACK
Note:
NUMBER buttons are available during playback.
For VCD 1.0 and 1.1 discs, sequential playback
mode will be accessed directly after disc reading.
(only available for sequential playback mode)
PLAY/PAUSE
1. During playback, press the PLAY/PAUSE button on the
remote control or the button on the front panel to
pause playback.
2. When playback paused, press the PLAY/PAUSE button
or button again to resume playback from the pause
point.
1. Press NEXT button on remote control or button on
front panel to skip forward to the next chapter.
2. Press PREVIOUS button on remote control or button
on front panel to skip back to the previous chapter.
CHAPTER SKIP
NUMBER
PREVIOUS
NEXT
OK
PLAY/
PAUSE
MENU
TITLE
STOP
OK
PLAY/PAUSESETU P STOP
VOLU ME
ZOOM B ROWSE R EPEAT
SEAR CH
PREV N EXT
STEP.
MENU T ITLE OSD
ANGL E A UDIO SUBT ITLE
CHAN NEL 3D
F.R. F.F.
SOUN D
STEP PLAYBACK
Each pressing the button advance the disc a frame
ahead. Press the PLAY button to resume normal
playback.
STEP
13
BASIC OPERATION
2X 4X 8X 16X
32X
2X 4X 8X 16X
32X
VCD discs:
VOICE CANCEL
BASIC OPERATION
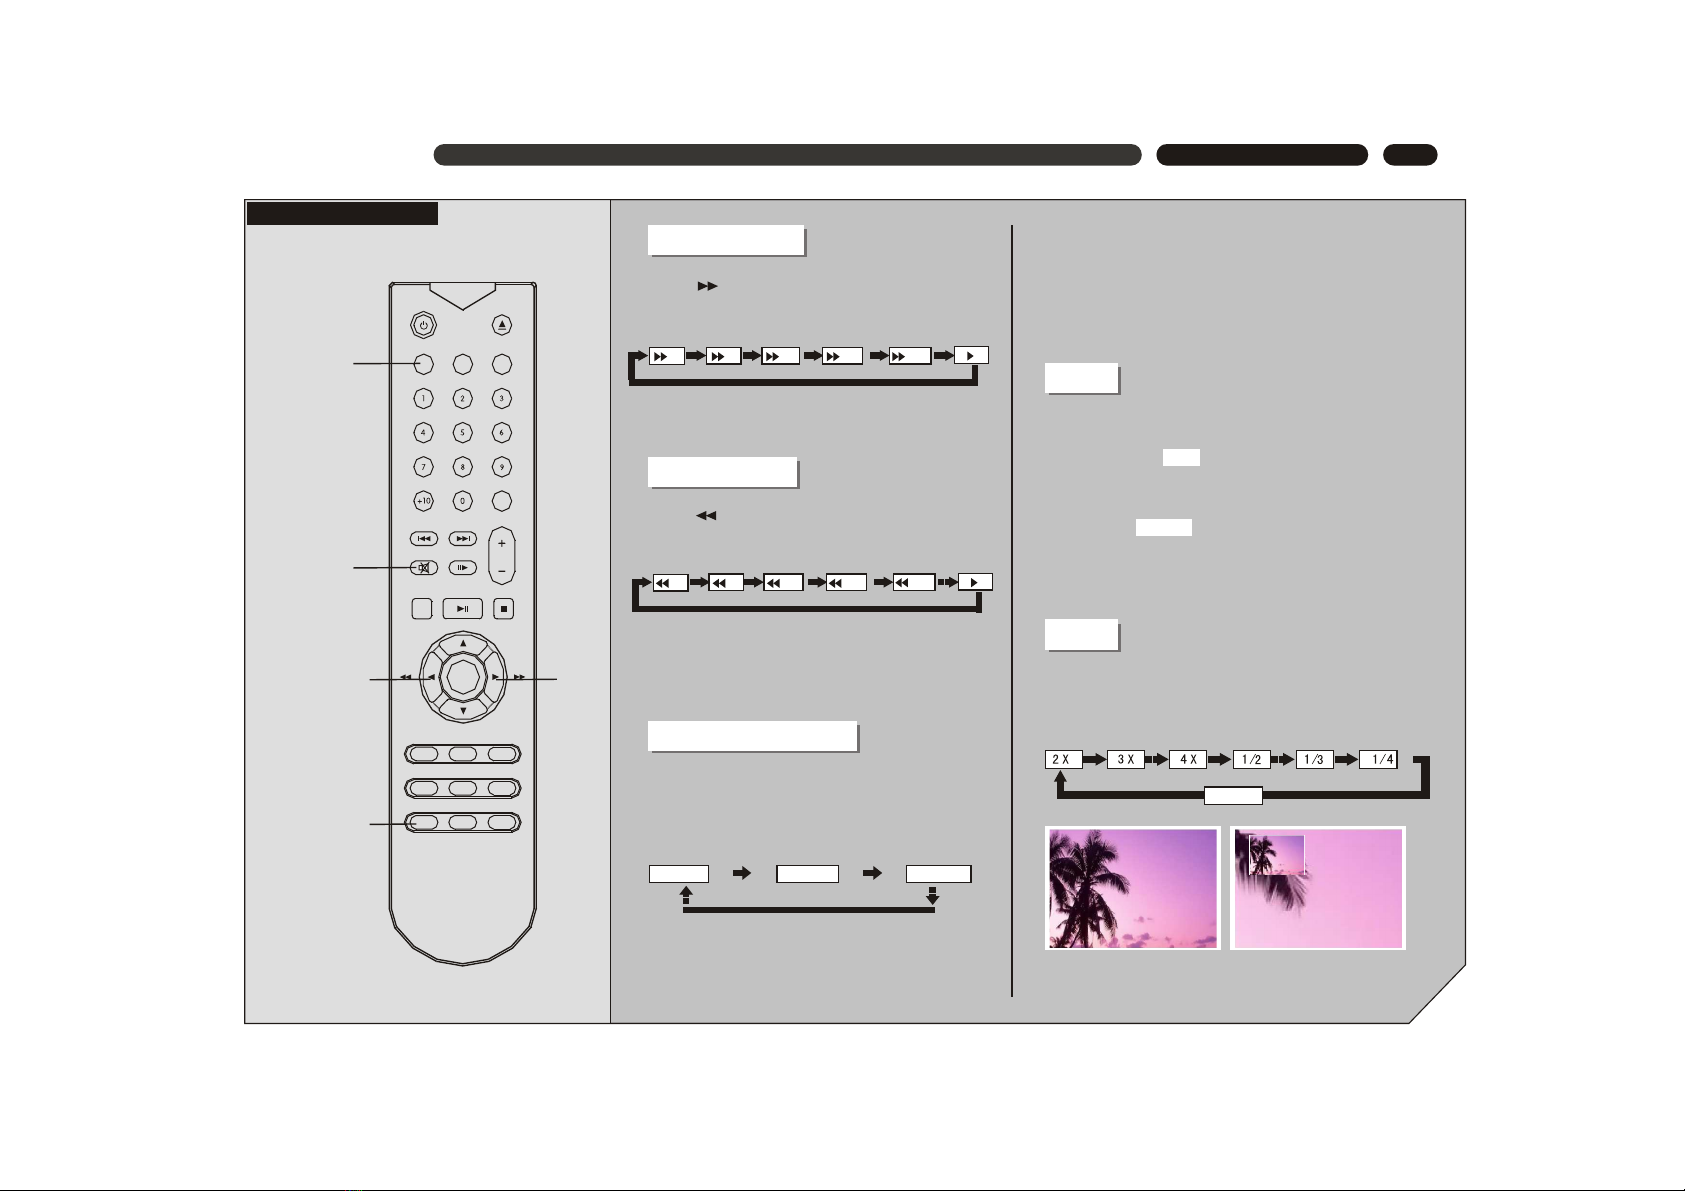
FAST FORWARD
Press button on remote control to fast search
the disc at 5 speeds.
FAST REVERSE
Press button on remote control to fast
reverse the disc at 5 speeds.
Notes:
Press PLAY button to resume normal playback at
any speed of forwarding or reversing.
CHANNEL SELECTING
MUTE
Press CHANNEL button to switch the channel
mode. Each pressing of the button will switch
the mode in below sequence:
Notes:
Press PLAY button to resume normal playback at
any speed of forwarding or reversing.
Notes:
For certain Karaoke discs, vocal and music are stored in
left and right channel separately. Switch to the relevant
channel to play only the music channel when using the
Karaoke function.
Mute off
1. During playback, press MUTE button to turn the sound
off, and the following will appear in the bottom left corner
of the screen.
2. Press MUTE button again to resume the sound, and the
following will appear in the bottom left corner of the TV
screen.
Note: If you find AUDIO OUT doesn't work, please check
if MUTE is on.
Mute
ZOOM
1. Press ZOOM button to zoom in or zoom out the current
picture in below sequence:
Zoom in Zoom out
Normal
Normal picture Enlarged picture
MUTE
ZOOM
OK
PLAY/PAUSESETU P STOP
VOLU ME
ZOOM B ROWSE R EPEAT
SEAR CH
PREV N EXT
STEP
MENU T ITLE OSD
ANGL E A UDIO SUBT ITLE
CHAN NEL 3D
F.R. F.F.
CHANNEL
SOUN D
LEFT VOCAL RIGHT VOCAL
F.R. F.F.
14
BASIC OPERATION
BASIC OPERATION
2. When the picture is large than the TV screen can
display, you can use CURSOR buttons ( )
to move the picture.
3. Press ZOOM repeatedly until the original picture
size is resumed.
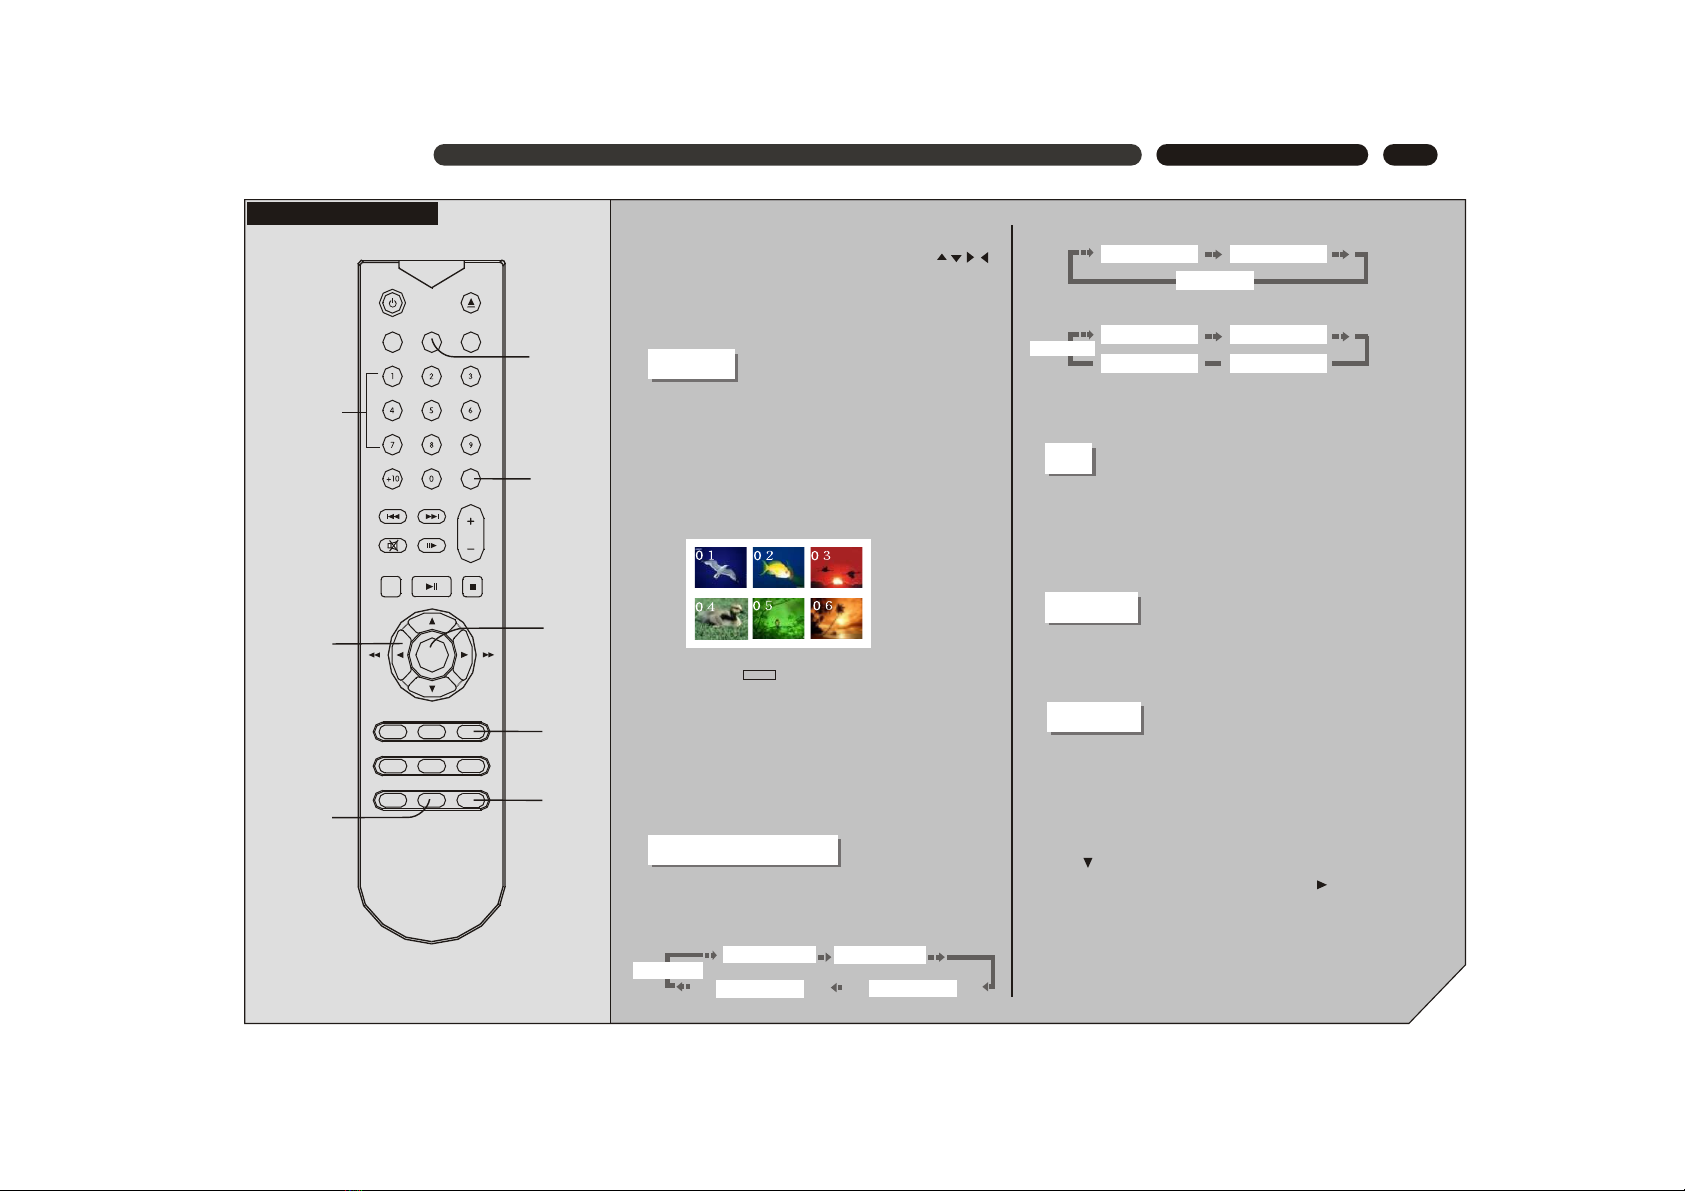
BROWSE
1. Press BROWSE button to access the Select
Digest Type window. For VCD, there are three
options: Track Digest, Disc Interval and Track
Interval. For DVD, there are 4 options: Title
Digest, Chapter Digest, Title Interval and
Chapter Interval.
Example: Track for VCDDigest
Type: Track
Select (01-06):--
Exit Menu
2. Use NUMBER buttons to enter the number of
the desired static picture, then press ENTER to
start playback from that static picture.
3. Or use CURSOR buttons to move cursor to
highlight EXIT and press ENTER to resume
normal playback.
Press OSD button repeatedly and the disc
information will be displayed in below sequence:
DVD discs
Note: The above displayed information is related to the
setting and content of the disc.
TITLE ELAPSED
TITLE REMAIN
CHAPTER ELAPSED
CHAPTER REMAIN
DISC INFORMATION
VCD discs (MENU playback mode)
SINGLE ELAPSEDSINGLE ELAPSED SINGLE REMAIN
DISPLAY OFF
VCD discs (sequential playback mode)
SINGLE ELAPSEDSINGLE ELAPSED SINGLE REMAIN
DISPLAY OFF
SINGLE ELAPSEDTOTAL REMAIN TOTAL ELAPSED
3D
SOUND
SEARCH
Press 3D button repeatedly to toggle between 8 audio
surround modes. You can choose your favourite audio
surround mode according to the disc content and the
surrounding of your audio-visual system.
Press SOUND button repeatedly to toggle between 8
sound modes.
DVD discs
1. Press SEARCH
button to display
the search menu on screen, the video picture is
display above the menu, as illustrated.
2. Use button to select the option item you want to
change the setting, and press OK or button to
access the sub-menu. Then use CURSOR or
NUMBER buttons to enter the value and press
OK to confirm.
CURSOR
NUMBER
OK
OSD
SEARCH
BROWSE
3D
OK
PLAY/PAUSESETU P STOP
VOLU ME
ZOOM B ROWSE R EPEAT
SEAR CH
PREV N EXT
STEP
MENU T ITLE OSD
ANGL E A UDIO SUBT ITLE
CHAN NEL 3D
F.R. F.F.
SOUND
SOUN D
DISPLAY OFF

15
BASIC OPERATION
BASIC OPERATION
SELECTING AN AUDIO LANGUAGE
3. Sub-menus include:
Title Chapter
Audio
01/02 05/10
5.1CH Subtitle EnglishEnglish
Angle 1/1 TT time 00:54:51
CH time 00:14:25 Repeat Chapter
Title
All
Off
Time Disp.
Title Elapsed
Title Remain
Chapter Elapsed
Chapter Remain
01 is the desired title number and 02 is the total title
number. 05 is the desired chapter number and 10 is the
total chapter number. (The exact total number of title or
chapter differs depending on the disc.)
Time format: HOUR:MINUTE:SECOND
Use SEARCH button, similar to the operation of
DVD discs.
VCD discs
4. Press SEARCH to go back to normal playback.
Press AUDIO repeatedly to toggle between up to
8 audio languages or sound when the disc is
recorded with multi-languages.
For DVD karaoke discs, press AUDIO to alternate
between music and artist vocal. Tthis function is only
available for DVD and Super VCD discs.
Example: AUDIO 1/4:AC-3 5.1CH ENGLISH
the first language is English
Totally 4 languages/sound recorded
The first language
SELECTING AN VIEWING ANGLE
Press ANGLE repeatedly to toggle between up to
9 viewing angles when scenes recorded in the
disc was shot with multiple cameras from different
angles.
Note: this function is only available for some DVD discs.
SELECTING A SUBTITLE LANGUAGE
Press SUBTITLE repeatedly to toggle between up to
32 subtitle languages when the disc is recorded with
multi-subtitles.
Note: This function is only available for DVD and Super VCD
discs. Total number of subtitle differs depending on the disc.
Example: SUBTITLE 03/08: ENGLISH
The third subtitle language is English
The third subtitle
Totally 8 subtitles recorded
REPEAT
DVD disc
SVCD VCD discs
Press REPEAT button to switch the repeat mode in below
sequence:
Notes:
Repeat playback is only available in PBC OFF mode for
VCD2.0 and Super VCD discs.
Chapter Title All
Repeat Off
Track All Shuffle
REPEAT
ANGLE
AUDIO
SUBTITLE
OK
PLAY/PAUSESETU P STOP
VOLU ME
ZOOM B ROWSE R EPEAT
SEAR CH
PREV N EXT
STEP
MENU T ITLE OSD
ANGL E A UDIO SUBT ITLE
CHAN NEL 3D
F.R. F.F.
SOUN D Shuffle
Repeat Off

16
BASIC SETTING
[SETUP MENU]
SETUP
CURSOR
OK
To achieve to the best effect of the DVD play-
er, you may need to perform initial setting
according to the content of the disc and peri-
pheral equipment. Details of all the adjustable
functions will be described later in this chapter,
and this section introduce the SETUP MENU.
Press SETUP button to access the initial setup
menu.
Example: SETUP MENU MAIN PAGE
Use CURSOR( \ )buttons to select the
desired setup option.
When selected, the option item is highlighted
and relevant description appears in bottom-
left corner.
Press OK button to access the selected sub-
menu.
-- General Setup Page --
Program
Osd Language
Screen Saver
Go To General Setup Page
-- General Setup Page --
Screen Saver
Example: General Setup Page
First-
level
submenu
Second-
level
submenu
Press OK button to save the new setting.
Changed setting will be kept the next time
you turn on the appliance.
Press OK button again to remove the SETUP
MENU.
Use button ( ) and ( ) to select the desired
setup item on the submenu; and use ( ) and
( ) to toggle between first-level submenu
and second-level submenu.
OK
PLAY/PAUSESETU P STOP
VOLU ME
ZOOM B ROWSE R EPEAT
SEAR CH
PREV N EXT
STEP
MENU T ITLE OSD
ANGL E A UDIO SUBT ITLE
CHAN NEL 3D
F.R. F.F.
SOUN D
Program
OSD Language
Screen Saver On
Off

17
BASIC SETTING
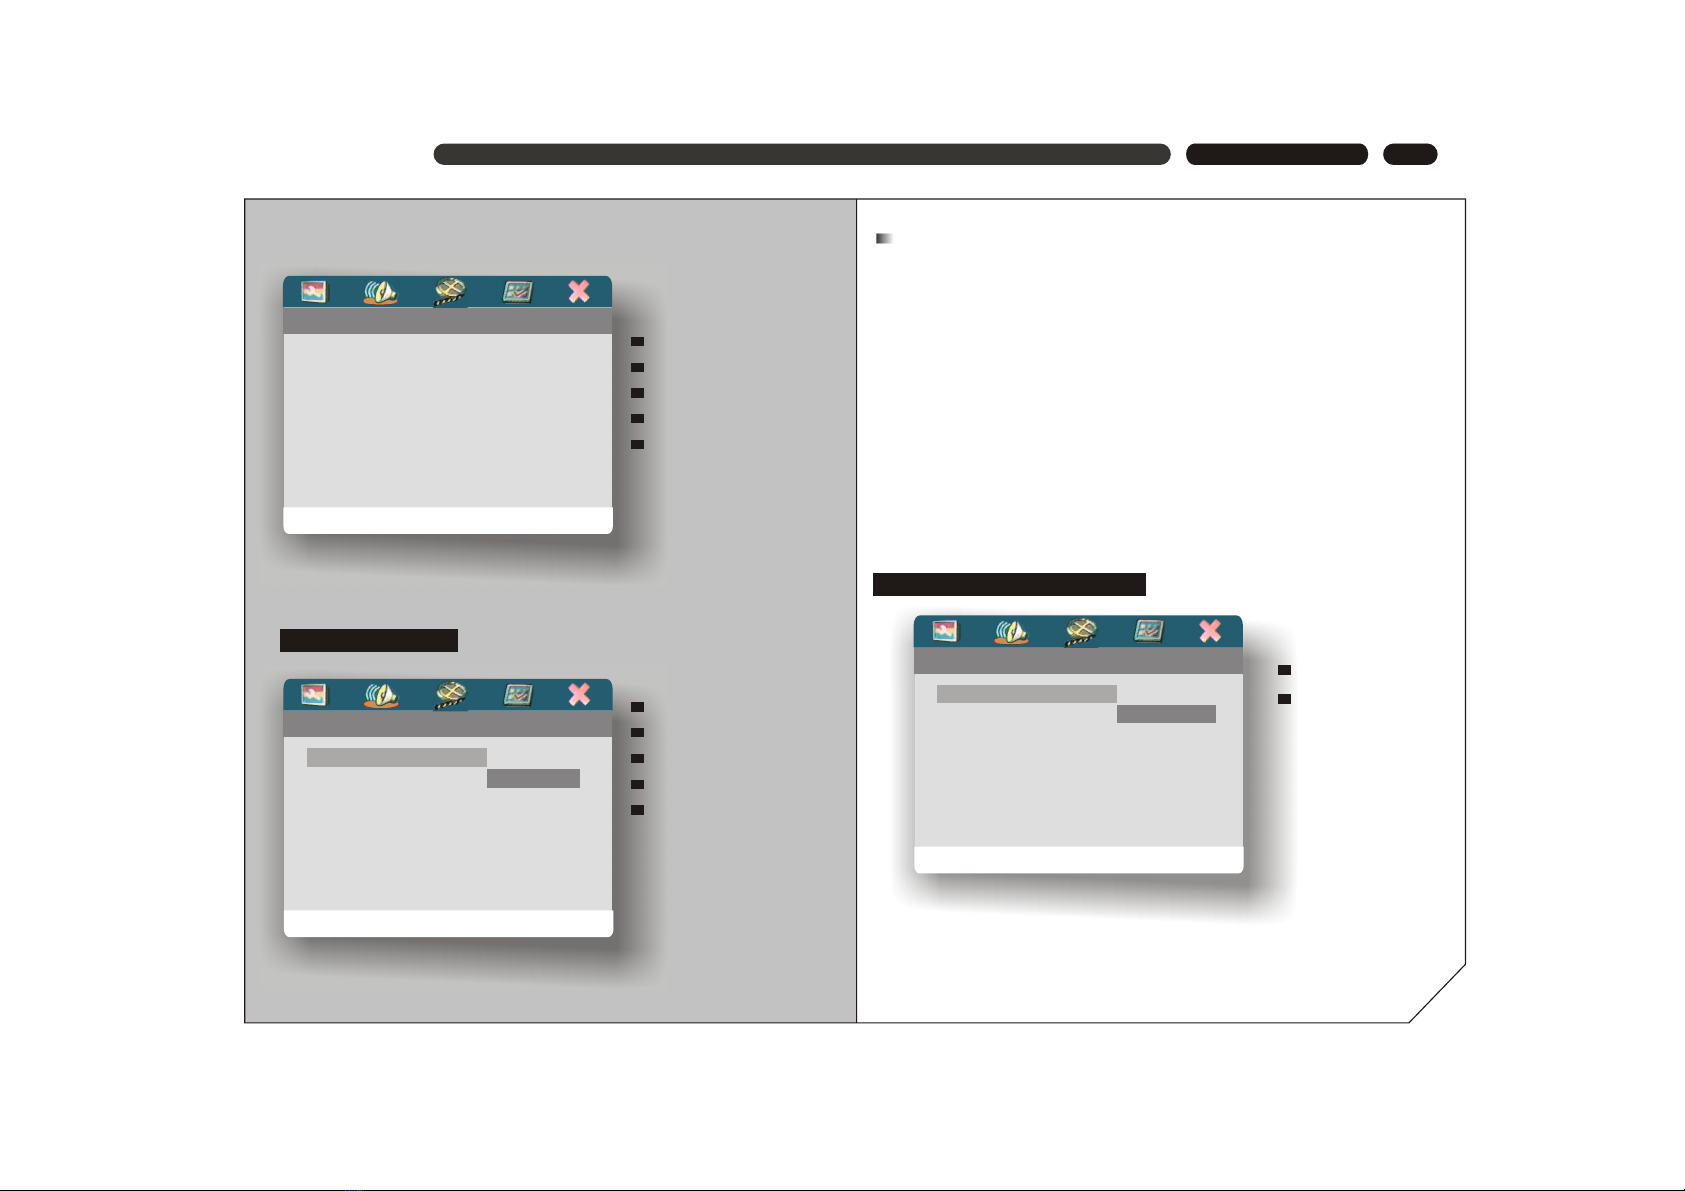
[GENERAL SETUP]
Use CURSOR( )buttons and OK button to make your
selection for each option.
Program
OSD Language
Screen Saver
Program
-- General Setup Page --
Screen Saver
Program
OSD Language
Screen Saver On
Off
Select the "Program" item, the program playback screen displays.
PROGRAM:TT(05)/CH(--)
11
12
13
14
15
16
17
18
19
20
EXIT STARTPREV
PROGRAM:TT(05)/CH(--)
__
__
__
__
__
__
__
__
__
__
__
__
__
__
__
__
__
__
__
__
1
2
3
4
5
6
7
8
9
10
EXIT START NEXT
Use number buttons on the remote control to enter the title or chapter
number you want to add into the program playback playlist. (TT is the
title number, and CH is the chapter number.)
The playlist has two pages. You can add as many as 20 units to the list,
which enables you to arrange your favorite chapters or tracks in the
playlist as you wish. Use cursor buttons to move the cursor onto the
"NEXT" or "PREV" button, and press OK button to navigate between
pages.
After you have finished editing the playlist, use cursor buttons to move
the cursor onto the "START" button, and press OK button to start program
playback.
To exit the program playback screen, use cursor buttons to move the
cursor onto the "EXIT" button and press OK button to exit
OSD LANGUAGE
On-Screen Display Languages is POLAND and ENGLISH.
SCREEN SAVER
ON: When disc playback is stopped or paused or you have not used the
player or its remote, and this idle status lasts for 5 minutes, the TV
screen will be in automatic protection mode, in which a moving DVD
logo appears on a dark screen.
OFF: Turn off the automatic protection function.
18
BASIC SETTING
[AUDIO SETUP]
-- Audio Setup Page --
Go To Audio Setup Page
Analog Output
Digital Audio Setup
Sound Mode
Analog Audio Setup
Night Mode
-- Audio Setup Page --
Set Stereo Downmix
Analog Output Stereo
Digital Audio Setup LT/RT
Sound Mode 3D Surround
Analog Audio Setup Multi Channel
Night Mode
Analog Output Page
Analog Output
Stereo: This is a Dolby Stereo audio effect. Signals of multi-channel
audio are mixed into the left and right channel, so sound from
channels other than left and right can be heard.
LT/RT: Output mixed two-channel audio encoded with Dolby DOWNMIX
method, which can be reverted back to multi-channel audio via an
amplifier with Dolby Pro Logic decoder.
3D Surround: Using two speakers to simulate the surround sound effect
of multi-channel audio.
Multi Channel: The player will output multi-channel audio. Select this when
your playeris connected to a multi-channel amplifier.
Analog Output
Digital Audio Setup
Sound Mode
Analog Audio Setup
Night Mode
Analog Output
Digital Audio Setup
Sound Mode
Analog Audio Setup
Night Mode
DIGITAL AUDIO SETUP PAGE
-- Digital Audio Setup Page --
Digital Output
Digital Output Off
LPCM OUTPUT All
PCM ONLY
digital Output
LPCM OUTPUT

19
BASIC SETTING
Digital Output
SPDIF Off: output analog audio to TV or amplifier.
SPDIF/All: output the original digital audio.
SPDIF/PCM: convert the digital audio into PCM format to output
LPCM OUTPUT
Set the digital audio sampling rate. There are two option items:
48K and 96K.
Note:
.
The configuration of LPCM OUTPUT item can not be changed unless the player
is in "PCM ONLY" status.
-- Sound Mode Setup Page --
3D
EQ
SOUND MODE SETUP PAGE
3D
There areeight options: Off , Concert, Living Room , Hall , Bathroom, Cave,
Arena , Church. Make your preferred selection according to the disc content.
3D
EQ
-- Speaker Setup Page --
Setup Front Speaker
Front Speaker Large
Centre Speaker Small
Rear Speaker
Subwoofer
Speakers Delay
Speaker Setup Page
Front Speaker
Centre Speaker
Rear Speaker
Subwoofer
Speakers Delay
FRONT SPEAKER
Select LARGE or SMALL according to your speaker configuration.
CENTER SPEAKER and REAR SPEAKER
Select LARGE or SMALL or OFF according to your speaker configuration.
SUBWOOFER
Select ON or OFF according to your speaker configuration.
Speakers Delay
Off
Concert
Living Room
Hall
Bathroom
Cave
Arena
Church
EQ
There are eight options: Off , Rock, POP, Live, Dance, Techno, Classic and
Soft. Make your preferred selection according to the disc content.
Table of contents
Other Ferguson DVD Player manuals


 Operation manual")


