FERRANTI LABRADOR User manual

ASSEMBLY MANUAL
DOG KENNEL - LABRADOR MODEL Rel. 08-2022 - Rev. 0
EN - Translation from the original language (Italian)
Ferranti s.r.l. Unipersonale
Via Vicinato n. 43 - Frazione Fratta - 06036 Montefalco (PG) - Italy
ASSEMBLY MANUAL
DOG KENNEL
LABRADOR Model
INTRODUCTION
This assembly manual reects the technique at the time of pur-
chase and the specications in force at the current date of edi-
tion; it contains the information necessary for correct installation,
cleaning and disposal of the product at the end of its life.
FERRANTI S.R.L. reserves the right to make modications,
changes or improvements to the manual or to the product at any
time and without notice.
Use only the original mounting components provided.
ATTENTION
The manufacturer is not liable for damage to
property, persons and animals caused by ac-
cidents due to failure to comply with the in-
structions in this assembly manual.
The images are purely indicative and do not constitute a
commitment for the manufacturer and/or the Distributor.
Any proposal by the Customer regarding improvements to be
made to the product will be welcomed by FERRANTI S.R.L.,
which will evaluate their implementation.
INTENDED USE (PERMITTED USE).
The product in question has been designed for the housing and
keeping of animals.
The inner dog house is suitable for 20-45 kg, 50-70 cm large
dog breeds (such as: German Shepherd, Dalmatian, Female
Dobermann, English Setter) and for 18-40 kg, 50-63 cm medi-
um-sized dog breeds (such as: Golden retriever, Boxer, Collie,
Labrador, Border Collie).
IMPROPER USE (NOT PERMITTED).
Any use other than the permitted one is to be considered “im-
proper use”; the Manufacturer therefore declines all responsibil-
ity for any damage caused to property, animals and/or persons.
GENERAL DESCRIPTION
The dog kennel, mod. Labrador consists of:
- Hot-dip galvanized steel structure, buered with panels in marine
plywood treated with impregnating agent, 1.5 cm thick.
- Inner wooden dog house (from 120x65x82(*)x59(**), with “anti-bite”
entrance from 30x50), that can be inspected by lifting the roof and
complete with bench raised from the ground, removable and wash-
able.
(*) Front Height/ (**) Rear Height
- Front panel of hot galvanized steel, bars diameter of 1.2 cm and
distance of 6.5 (in mesh on request); complete with gates with lock
holder.
- Insulated panel cover, 3.5 cm thick, framed with sheet metal proles.
- Protrusion cover 11 cm on the sides and on the back, while about
3.5 cm on the front.
- By installing the boxes in series, that is, one attached to the other,
there is a saving compared to the standard model for which we rec-
ommend you request a quote by email specifying the structure that
you intend to design.
- On request, with a front fence that can be extended at will with gal-
vanised mesh or bar panels.
Dear Customer,
Thank you for purchasing a FERRANTI product.
OBLIGATION
Please consult this assembly manual carefully
before proceeding with any operation on the
product.

ASSEMBLY MANUAL
DOG KENNEL - LABRADOR MODEL Rel. 08-2022 - Rev. 0
EN - Translation from the original language (Italian)
Ferranti s.r.l. Unipersonale
Via Vicinato n. 43 - Frazione Fratta - 06036 Montefalco (PG) - Italy
OVERALL DIMENSIONS
125 x 240 200 x 240
External (WxDxH)
125 x 240 x 175 cm 206 x 240 x 175 cm
Interior (WxDxH) 120 x 235 x 170 cm 201 x 235 x 170 cm
W = Width / D = Depth / H = Height
UNPACKING
► Place the structure near the nal installation site and on a
stable and horizontal area of the ground.
► Remove the packaging materials taking care not to damage
the components.
ATTENTION
DANGER! Keep out of the reach of chil-
dren and animals.
Packaging materials (plastic bags, straps, etc.)
can be a source of danger to health (e.g. suo-
cation).
► Divide the packaging materials according to their type and
dispose of them in accordance with the provisions in force
regarding the disposal of waste.
RECYCLING
All the packaging materials are recyclable and
must be disposed of in accordance with the lo-
cal legislation.
STANDARD EQUIPMENT
124
6
7
5
3
89
1No. 10 screws M8x30
2No. 6 screws M8x50
3No. 2 hooks M6x150
4
No. 2 shaped hooks
M6x150
5No. 4 self-tapping
screws 4.8x16
6No. 16 M8 nuts
7No. 4 M6 nuts
8N. 4+4 rhomboidal
washers
9N. 2 at washers
EXTENSION OF THE FENCE (optional)
10 12 13
11
10 No. 4 “U” brackets
11 Screws M8x40
12 No. 6 screws M8x60
13 Nuts M8
INSTALLATION
2x The assembly operations must be performed
by at least two persons.
For the assembly of the products, the use of
Personal Protective Equipment is always re-
commended: work gloves to protect the hands
from the danger of being cut.
RECOMMENDED TOOLS
Slotted Screwdriver - Cross Head Screwdriver - Wrench - Cutter.
Note: Tighten the screws completely only at the end and after
checking the square of the structure.
1) Assembling the sides (A1 and A2)
► Remove the screws (1) and nuts (6) from the kit supplied.
● Connect the side wall (A1) to the rear wall (B) and the front
wall (C) using the screws and nuts.
● Proceed in the same way for the side (A2).
1
A1 C
B
A2
16
2) Assembling the mesh panels (D1 and D2)
● Recess the mesh panel (D1) in the side (A1).
● Do the same for the mesh panel (D2).
2D1
D2
A2
A1
ASSEMBLY MANUAL
DOG KENNEL - LABRADOR MODEL Rel. 08-2022 - Rev. 0
EN - Translation from the original language (Italian)
Ferranti s.r.l. Unipersonale
Via Vicinato n. 43 - Frazione Fratta - 06036 Montefalco (PG) - Italy
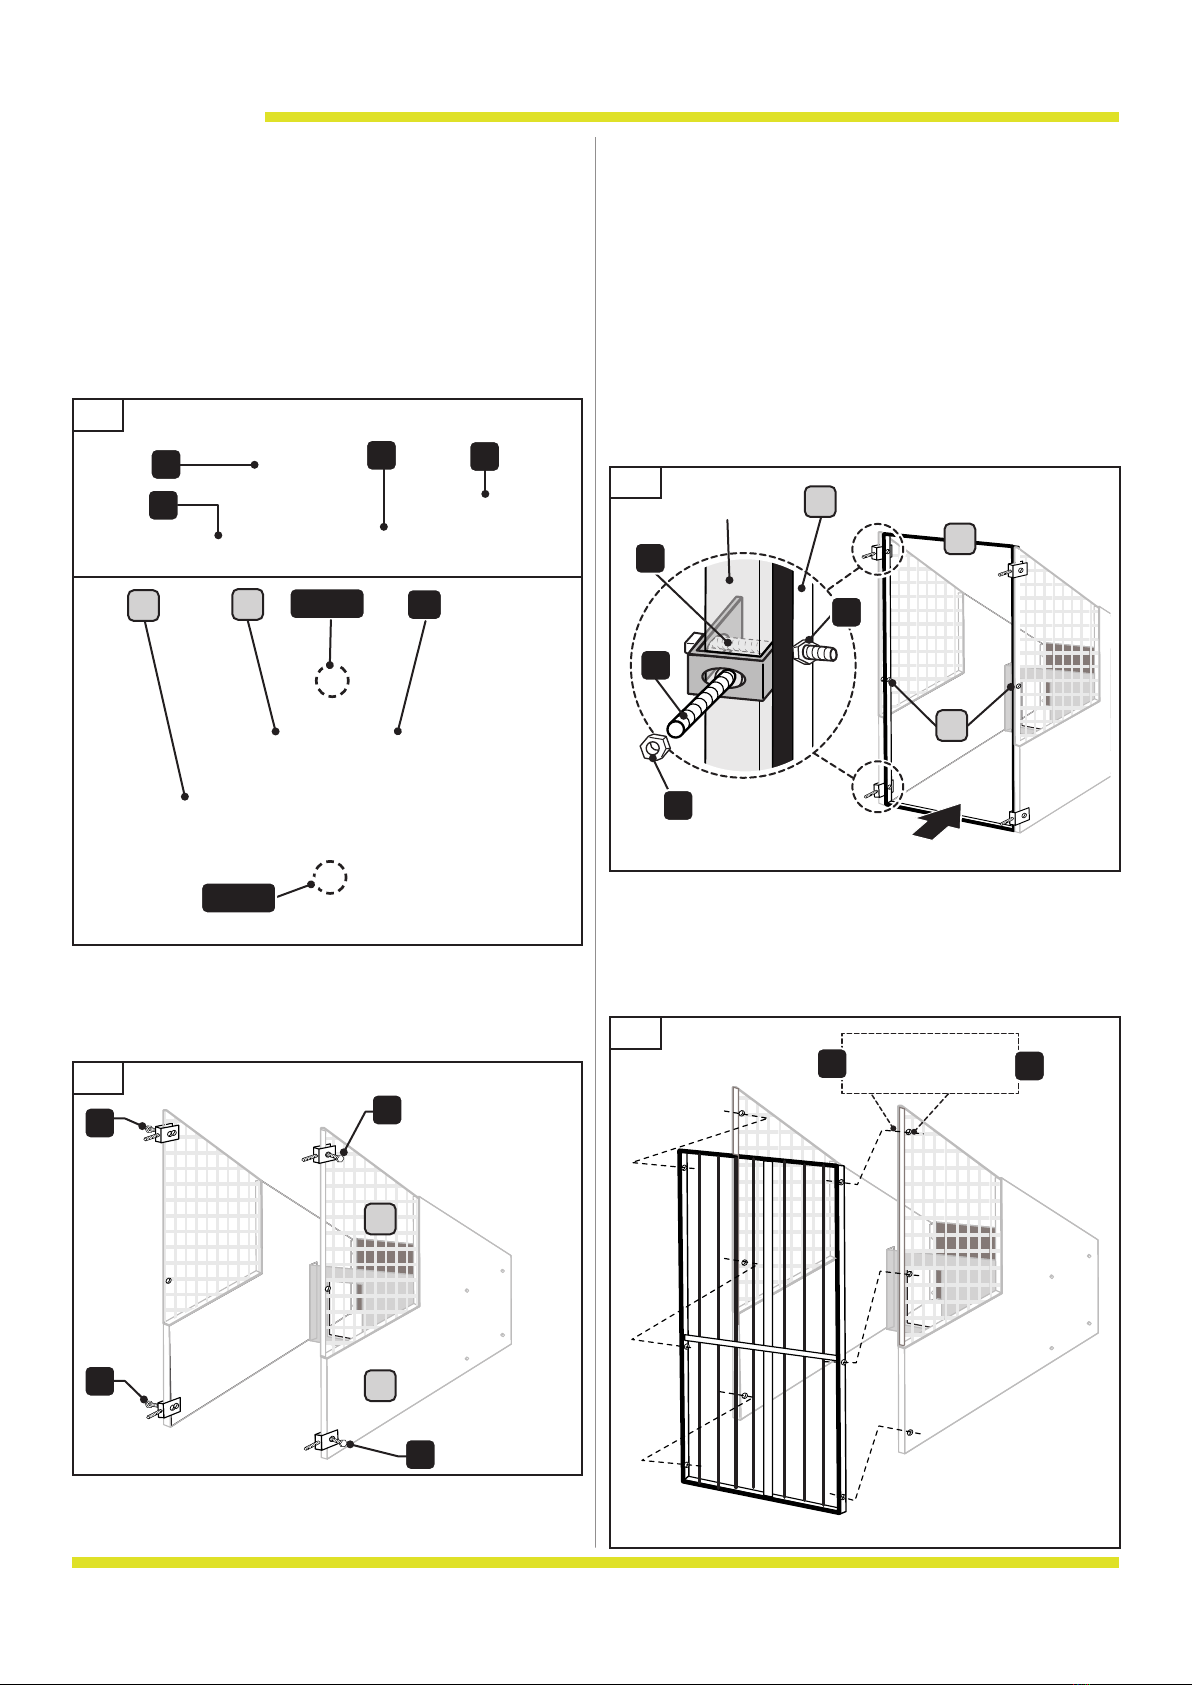
3) Extension of the fence (optional)
In the event that the extension of the fence occurs after the in-
stallation of the box, remove gate E1 (see point 4).
► Take the “U” brackets (10), the screws (11), the screws
(12), and the nuts (13) from the kit supplied.
● Position the “U” brackets (10) together with the screw (11)
at the upper hole of the mesh wall (D1) and the lower hole of
the side wall (A1) (Fig. 3).
3
10 12 13
11
● Tighten the screws (12) enough to hold the brackets to the
structure.
● Do the same for the mesh part (D2) and the side wall (A2).
4
D1
A1
10+11
10+11 14
12
12
12
12 A2
D2
● Recess the frame (E1) inside the edges of the side walls
(Fig. 4) making the holes prepared coincide with those of the
brackets.
● Screw the screws (12) and the nuts (13) so as to x the
frame to the brackets.
● In the same way, proceed in the central holes (F).
● Assembling the mesh walls (ref. 14 - Fig. 3):
- secure the rst mesh in contact with the structure using the
screws (11) and stop with the nuts (13);
- proceed with the assembly of the additional mesh walls (de-
pending on the equipment) xing them with the screws (12)
and nuts (13).
5
4) Assembling the gate (E1)
► Remove the screws (2) and nuts (6) from the kit supplied.
● Secure the gate to the structure using the holes provided.
6
E1
E1
F
Side wall
12
13
11
13
2
6

ASSEMBLY MANUAL
DOG KENNEL - LABRADOR MODEL Rel. 08-2022 - Rev. 0
EN - Translation from the original language (Italian)
Ferranti s.r.l. Unipersonale
Via Vicinato n. 43 - Frazione Fratta - 06036 Montefalco (PG) - Italy
5) Assembling the roof (F1 - F2)
► Take the hooks (4), nuts (7), rhomboidal washers (8), at
washers (9) + gasket and self-tapping screws (5) from the
kit supplied.
● Secure the roof (F1- large part) to the gate with the appro-
priate hooks (4); insert the rhomboidal washers (8), the
at washers (9), the nuts (7) and the gasket.
7
● Slide the other part of the roof (F2) until it is recessed un-
der the roof (F1); secure both roofs with the self-tapping
screws (5).
8
- Unire il frontale ed il retro della cuccia con i pannelli laterali (fig. 1)
- Incassare i pannelli in rete sui pannelli laterali
- Fissare il cancello con le sei viti a testa tonda ; nel caso di un box allungato, fissare il
telaio come da fig. 8, poi proseguire con il montaggio del tetto
- Fissare la parte più grande del tetto al cancello con gli appositi ganci
- Incassare l’altra parte del tetto a quella montata, e fissarla con le viti autofilettanti (fig. 5)
- Inserire i ganci di rinforzo come in fig. 6, e passare le viti nelle pareti laterali
- Nota: stingere completamente le viti solo alla fine e dopo aver controllato lo squadro della
struttura
- Montare il tettino all’interno della cuccia (fig. 7), ed inserire la pedana in legno
- Per l’allungamento del cortile anteriore montare l’apposita staffa in modo da far uscire una
vite (fig. 8), poi su questa proseguire con il montaggio del recinto
(fig. 2)
(fig. 3)
(fig. 4)
- Togliere la plastica trasparente di protezione dai pannelli isolanti (aiutarsi con un taglierino)
- Si consiglia di applicare del silicone sulle giunture del tetto
Ferranti
BOXmodularemod.Labrador
SCHEMA DIMONTAGGIO
FrattadiMontefalco(PG)
5
F2
F1
● In the holes provided on the side walls, insert the screws (1)
with the at washer (9). Secure with the nuts (7).
● Attach the reinforcement hooks (3) to the screws (1), then
secure with the gaskets (8) and nuts (7).
9
- Unire il frontale ed il retro della cuccia con i pannelli laterali (fig. 1)
- Incassare i pannelli in rete sui pannelli laterali
- Fissare il cancello con le sei viti a testa tonda ; nel caso di un box allungato, fissare il
telaio come da fig. 8, poi proseguire con il montaggio del tetto
- Fissare la parte più grande del tetto al cancello con gli appositi ganci
- Incassare l’altra parte del tetto a quella montata, e fissarla con le viti autofilettanti (fig. 5)
- Inserire i ganci di rinforzo come in fig. 6, e passare le viti nelle pareti laterali
- Nota: stingere completamente le viti solo alla fine e dopo aver controllato lo squadro della
struttura
- Montare il tettino all’interno della cuccia (fig. 7), ed inserire la pedana in legno
- Per l’allungamento del cortile anteriore montare l’apposita staffa in modo da far uscire una
vite (fig. 8), poi su questa proseguire con il montaggio del recinto
(fig. 2)
(fig. 3)
(fig. 4)
- Togliere la plastica trasparente di protezione dai pannelli isolanti (aiutarsi con un taglierino)
- Si consiglia di applicare del silicone sulle giunture del tetto
Ferranti
BOXmodularemod.Labrador
SCHEMA DIMONTAGGIO
FrattadiMontefalco(PG)
7
7
81
3
6) Assembling the inner roof (F3) and the bench
● Enter the inside of the box and install the internal roof (F3)
by securing it to the structure with the appropriate hooks (G).
● Insert the wooden bench (H).
10
7) Finishes
● Remove the transparent protective plastic from the insulated
panels (use a cutter).
● It is advisable to apply silicone to the roof joints.
CLEANING
CLEANING
Clean the structure periodically (or in the presen-
ce of obvious dirt). Sanitise, disinfect and clean the
inside of the kennel with suitable products that are not
harmful to the health of the person and the animal.
SCRAPPING AND DISPOSAL
RECYCLING
The materials that compose the structure must be
disposed of according to the type and procedures
provided for by the legislation in force in the country
of installation.
For further detailed information on the disposal of this product,
contact the municipal oce, the local waste disposal service or
the store where it was purchased.
9
F3
G G
H
7
F1
8
4
4
Other FERRANTI Pet Care Product manuals


