Ferrida SC3215 Operating and installation instructions

Electric Lawn Scarifier • Elektrický vertikutátor • Elektrický
vertikutátor • Elektromos gyeplazító • Elektrischer Vertikutierer
Ferrida SC3215
EN Translation of the original instructions for use
CZ Překlad původního návodu na použití
SK Preklad pôvodného návodu na použitie
HU Eredeti felhasználói útmutató fordítása
DE Übersetzung der Original-Gebrauchsanweisung
EN
CZ
SK
HU
DE
2 – 22
23 - 41
42 – 60
61 – 77
78 – 96

2
Dear customer,
Thank you for purchasing our product. Please read the following instructions carefully
before first use and keep this user manual for future reference. Pay particular attention
to the safety instructions. If you have any questions or comments about the device,
please contact the customer line.
✉www.alza.co.uk/kontakt
✆+44 (0)203 514 4411
Importer: Alza.cz a.s., Jankovcova 1522/53, Holešovice, 170 00 Prague 7, www.alza.cz

3
General Safety Instructions
Important safety instructions
•Unpack the product carefully and make sure not to throw away any part of the
packaging material until you have found all the parts of the product.
•Keep the product in a dry place out of the reach of children.
•Read all warnings and instructions. Failure to follow the warnings and instructions
may result in electric shock, fire, and / or serious injury.
Packaging
●The product is placed in a packaging that prevents damage during transport. This
packaging is a raw material and can therefore be recycled.
Instructions
●Before operating the machine, read the following safety regulations and instructions
for use. Familiarize yourself with the controls and proper use of the machine. Keep
these instructions in a safe place for future reference. We recommend that you keep
the original packaging, including the inner packaging material, receipt and warranty
card for at least the warranty period.
●In case of transport, put the machine back in the original box from the manufacturer,
thus ensuring maximum protection during transport (e.g. moving or sending to a
service centre).
Note: If you pass the machine on to others, pass it on together with the
instructions.
Adherence to the enclosed operating instructions is important for proper use of the
machine. The operating instructions also contain instructions for operation,
maintenance and repairs
The manufacturer accepts no liability for accidents or damage resulting from not
complying with these instructions.

4
Symbols
ATTENTION! Read the installation instructions and general safety instructions
before putting the machine into operation!
Do not operate the machine in the rain or in poor weather conditions!
ATENTION! After switching off the scarifier, the cutting blades rotate for a while!
Keep a safe distance!
Attention, rotating blades!
The following
warning symbols are
reminiscent of the
precautionary
principles that must
be observed when
operating the
machine.
Attention! Dangerous
voltage! Risk of electric
shock!
Read the operating
instructions.
Wear eye and ear
protection.
There is a risk of
injury from flying
parts.
Attention! Before
starting maintenance,
check that the moving
parts of the machine
have stopped rotating.
Danger due to
damaged wired
cable. Keep the cable
away from the
cutting blades.
Do not touch the
individual parts of
the machine until
they have come to a
complete stop.
Keep people and
pets at a safe
distance.
Switch off the engine
and remove the plug
from the socket before
trying to repair or
clean the machine or if
the wired cable is
tangled or damaged.
Risk of injury with
rotating parts.
After switching off,
the blades rotate for
a few seconds.

5
Do not use this
machine in the rain
or leave it outside
when it is raining.
Warning: Risk of limb
injuries.
There is a risk of
injury due to a
damaged wired
cable. Keep the cable
away from the
machine and the
cutting blades!
Keep the cable away
from heat, oil,
solvents and sharp
edges. If the cable is
damaged or tangled,
unplug it
immediately.
Voltage
Engine power Max. speed Grip width
Basket volume
Weight
The machine has
class/ level ll
protection against
electric shock.
Degree of protection
Electrical appliances
do not belong in the
household waste.
The product complies
with the relevant EU
standards.
Indication of the
sound power level
LWA in dB.

6
Safety Instructions
Thank you for purchasing this electric scarifier. Before using it, please read these
operating instructions carefully and keep them for future reference.
Check before each use
●Check the scarifier before each use.
●Do not use the scarifier if the safety devices (trigger lever, safety lock, back cover or
protective cover) are damaged or worn.
●Never use the machine with blocked or missing safety devices.
NOTE: Make sure that all nuts and screws are tightened, and that the scarifier
is in good working order.
●Before starting to work, inspect the aerated area. Check the work area for foreign
objects (e.g. stones, branches, ropes) and remove if necessary.
Proper Use / Responsibility
ATTENTION! Danger of injury! The scarifier can cause serious injuries!
●Do not put your hands or feet near the roller.
●You are responsible for safety according to these instructions.
●Only work in good visibility.
●Do not open the back cover during use.
●Get to know the surroundings of your workspace. Check for possible hazards that
may be overheard due to machine noise.
●Wear sturdy shoes and long pants to protect your feet.
●Make sure your feet are at a safe distance from moving parts.
●Make sure that there are no other people (especially children) or animals anywhere
near the work area.
●Always push the scarifier at walking speed.
●Operating position: make sure you have a secure feet position when working.
●Be specifically careful when changing direction on slope.
ATTENTION! Be extremely careful when walking backwards. You could stumble!
●Do not use the scarifier in rain or in humid or wet conditions.
●Do not work with the scarifier near the edges of pools or garden ponds.

7
●Please adhere to all noise restrictions in your area.
Interruption of Work
ATTENTION! Never leave the scarifier unattended in the work area.
●If you interrupt your work, store the machine in a safe place and disconnect it from
the plug! If you interrupt your work so that you can move to another work area,
always turn off the machine during the move. Move the compensation lever to the
transport position.
●If you encounter an obstacle, turn off the scarifier and remove the obstacle. Inspect
the machine for damage and have it repaired if necessary.
Electrical Safety
●Keep the extension cord away from the roller!
●Never use the scarifier in the rain.
●The connecting / extension cable must be checked regularly for damage and signs of
wear.
●If a connected / extension cable is required, first disconnect the machine.
●The extension socket for the extension cable must be waterproof to protect it
against water splashes and it must be made of rubber or have a rubber cover.
●Extension cables must meet the requirements of EN / IEC 60884.
●Use only approved extension cords with the appropriate cross-section cable. Consult
with your electrician.
●Connecting accessories must be used for extension cables.
Electrical Requirements
●Only connect the machine to a circuit that is protected by a fault protection switch (FI
switch) with a rated residual current of 30 mA.
●Use only an extension cord with a sufficient cross-section that is approved for this
purpose. Use cables up to 40 m long.
●Always fully unwind the cable drum before starting work. Check for signs of cable
damage.
DANGER! Do not connect a damaged power cord or touch a damaged cord
until it is disconnected from the plug. A damaged cable can cause electrical
shock. If a motor cable needs to be replaced, have it done by a specialist to
avoid danger.

8
Note: If in doubt, ask your electrician if the electrical installation in your home
meets these requirements.
●Lay the power cord in a way in which the cord cannot be damaged and that it does
not interfere with your work.
●Protect cables from heat, aggressive liquids and sharp edges.
●Use only extension cords that are allowed for outdoor use and have a suitable
diameter.
●Never disconnect the wired connection by pulling the cable.
●If the wired connection is damaged, it must be replaced by a specialist to prevent
damage and injuries.
Residual Risk
Even if the machine is used in accordance with the instructions, it is not possible to rule
out all the risks associated with its use. Following risks may occur:
●Mechanical hazards of cuts caused by ejected parts.
●Electrical hazards due to contact with high voltage parts (direct contact) or due to
equipment failure (indirect contact).
●Thermal hazards caused by operating heat sources can cause burns or scalding and
other injuries that occur when in contact with hot machine parts.
●Risk of noise can lead to loss of hearing (deafness) and other physiological diseases
(e.g. loss of balance, loss of consciousness).
●Danger of vibration (causes vascular and neurological damage to the hands, such as
white finger disease).
●Danger due to neglect of ergonomic principles when assembling the machine, such
as the risk of unhealthy posture or excessive overload and unnatural posture of
hands and arms, due to the position of the handle, which ensures the balance of the
machine.
●Danger from unintentional starting or speeding due to an error or malfunction.
●Danger due to improper parking of the machine in bad weather conditions,
regarding the grip and arrangement of the engine controls.
●Danger due to machine controls failing in terms of strength handling, such as control
settings and markings.
●Danger due to ejected objects or fluid leak.

9
Purpose of Use
Intended use
●Scarifier SC3215 is designed for aeration of lawns in private homes and gardens. It is
not intended for use in public facilities, parks, sports fields, roads, agriculture and
forestry.
ATTENTION! To prevent injury, the scarifier must not be used to prune bushes,
hedges and shrubs. Furthermore, the machine must not be used to level uneven
ground.
10
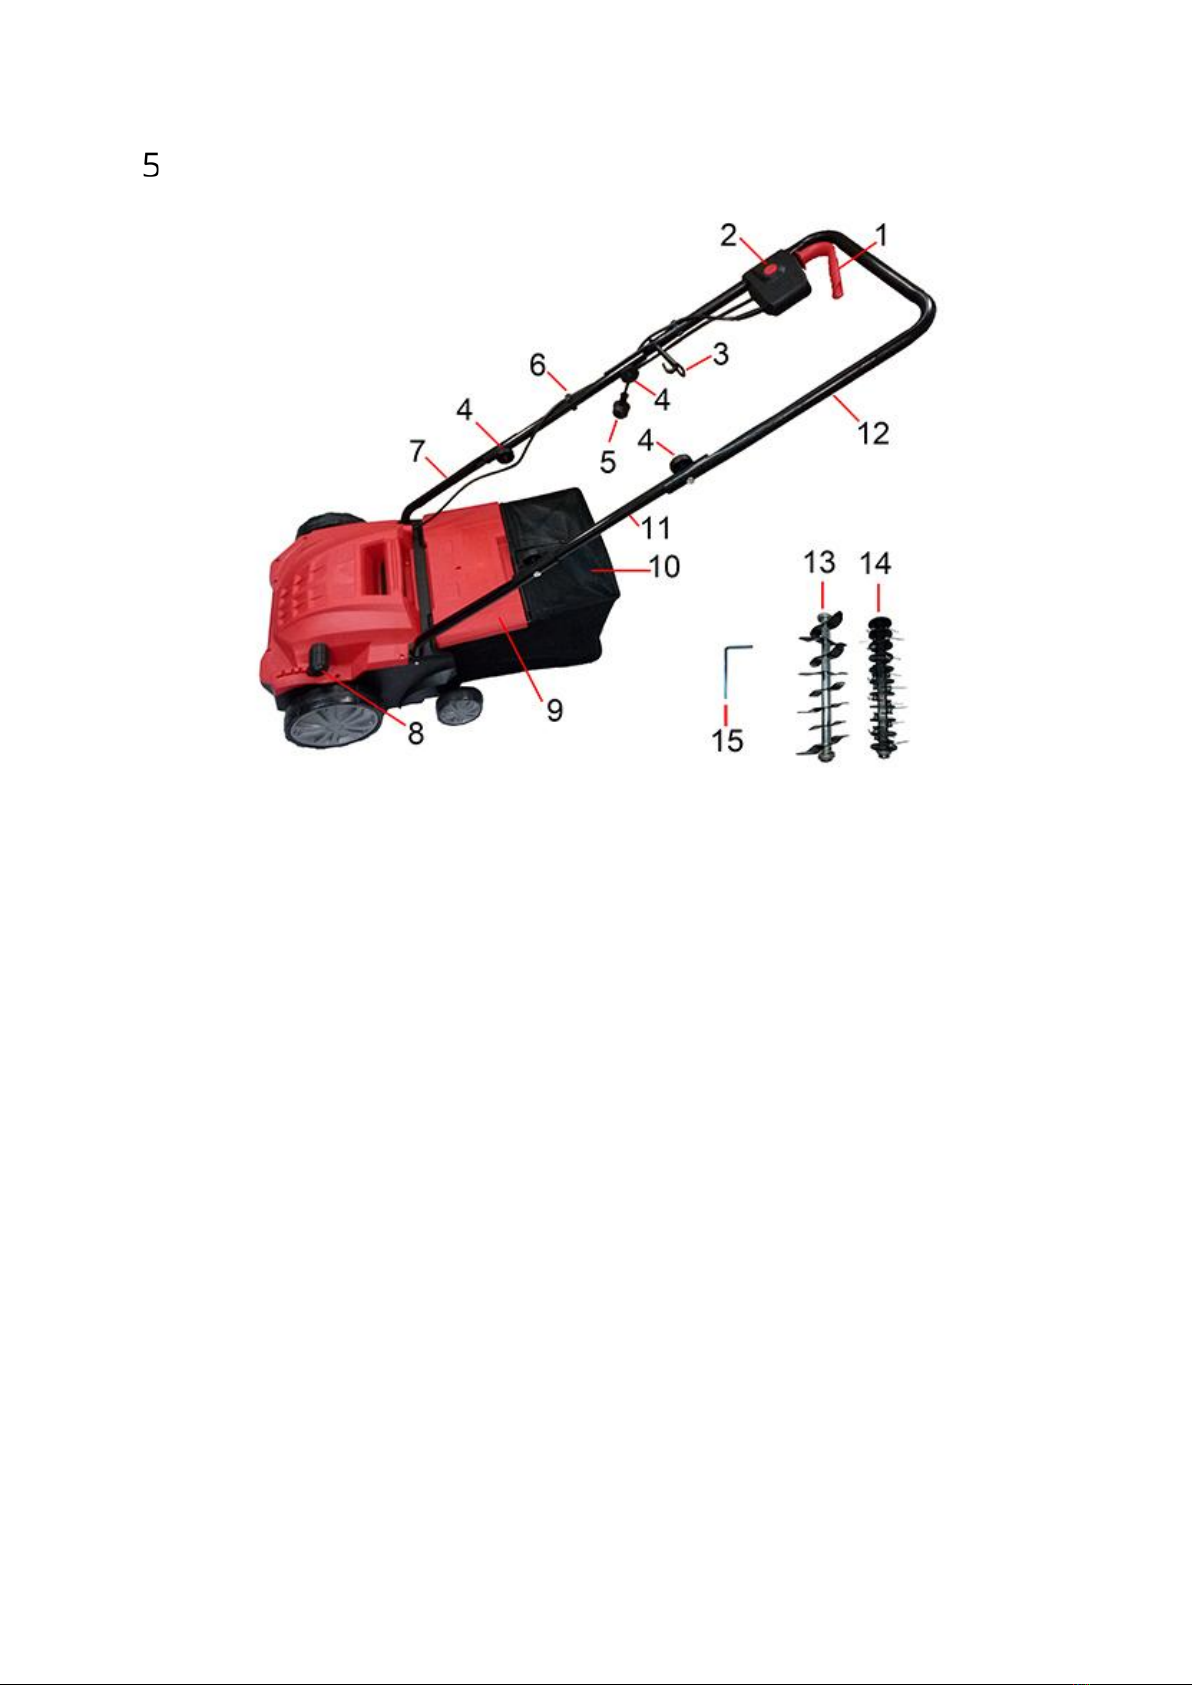
Machine Description
1
Main switch
9
Ejection flap
2
Main switch fuse
10
Basket
3
Cable securing hook
11
The middle part of the handle
4
Quick-release fasteners
12
The upper part of the handle
5
Wired cable
13
Scarifier roller
6
Cable clamps
14
Aeration roller
7
The lower part of the
handle
15
Hex key
8
Depth setting control
11
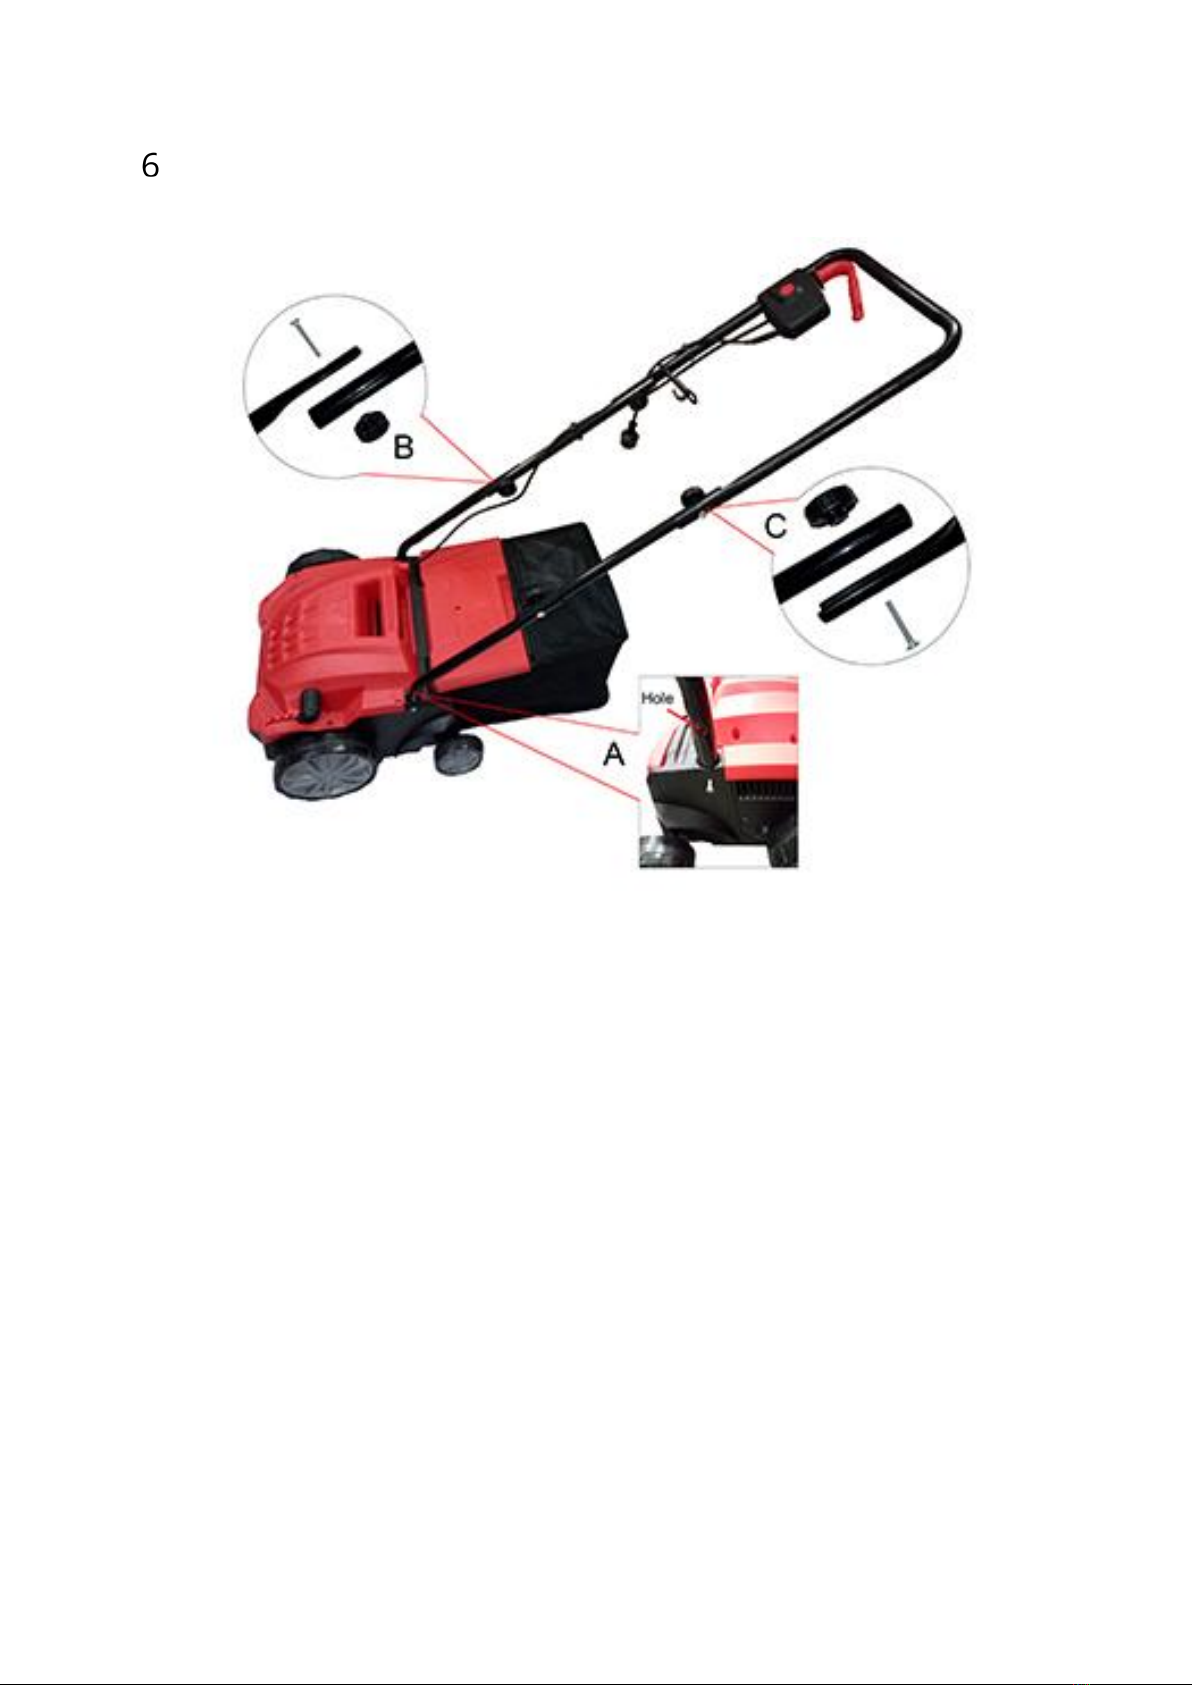
Machine Assembly
The scarifier is delivered disassembled. The basket and the handle must be assembled
and mounted before using the scarifier. Follow the instructions step by step.
Handle assembly
Insert the lower part of the handle [7] into the slot on the body of the machine and
fasten it with the provided screws. Secure the hole on the pipe outwards and adjust it
with the screw (see point A in the figure above).
Attach the middle part of the handle [11] to the lower part of the handle [7] using the
quick-release fasteners [4] and screws (see point B in the figure above).
Position and attach the upper part of the handle [12] onto the middle part of the handle
[11] (see point C of the figure above). Connect the cable using the cable clamps [6].

12
Connecting the cable safety hook
Slide the hooks [3] onto the cable so that the hooks point
upwards towards the upper part of the handle on the right
tube.
Main switch fuse connection
1. Loosen the Phillips screws (A) on the bottom of the
safety box (C) and remove the plate (B).
2. Insert the main switch lock from above and the plate
from below onto the top of the handle (12) and
secure it with two Phillips screws.
Assembling the basket
How to mount the basket step by step:
1. Slide the rubber cover onto the metal structure.
2. Lift the ejection flap (9) with one hand, lift
the basket by the handle with the other hand
and attach it to the scarifier from above (Fig.
6).
WARNING! Make sure the engine is off and the blades do not rotate before
placing the basket on the scarifier.

13
How to Operate the Scarifier
WARNING: To prevent accidental starting of the machine, the handle is equipped
with a main switch lock (2), which must be pressed before pressing the main
switch (1). If the main switch is released, the machine switches off. Repeat this
process several times to make sure that your machine is fully functional.
WARNING: Never open the basket (9) while the engine is running. Rotating
blades can cause injuries.
Always tighten the ejection cover thoroughly. The lid always returns to the closed
position by itself due to the tension in the springs.
Always make sure that you are at a sufficient distance from the moving parts of the
machine.
CAUTION: Be careful when aerating and changing directions.
IMPORTANT: Be sure to empty the basket regularly.
CAUTION: Before removing the basket, be sure to turn off the engine and wait until
the blades stop rotating.
To remove the basket
Lift the lid with one hand and unhook the basket with the other.
How often to aerate your lawn?
It depends on how long it takes for the grass to grow and on the hardness of the soil.
WARNING: Before performing any maintenance or repair, make sure that the blades
do not rotate and that the machine has been disconnected from the power supply.
Depth Adjustment
The depth of aeration is adjustable by the included
mechanism. Pull the depth adjustment lever (8) in the
direction of the arrow and set the desired position
(1/2/3/4). Make sure that the device "snaps".
1 = depth 12 mm
2 = depth 8 mm
3 = depth 4 mm
4 = transport mode
14
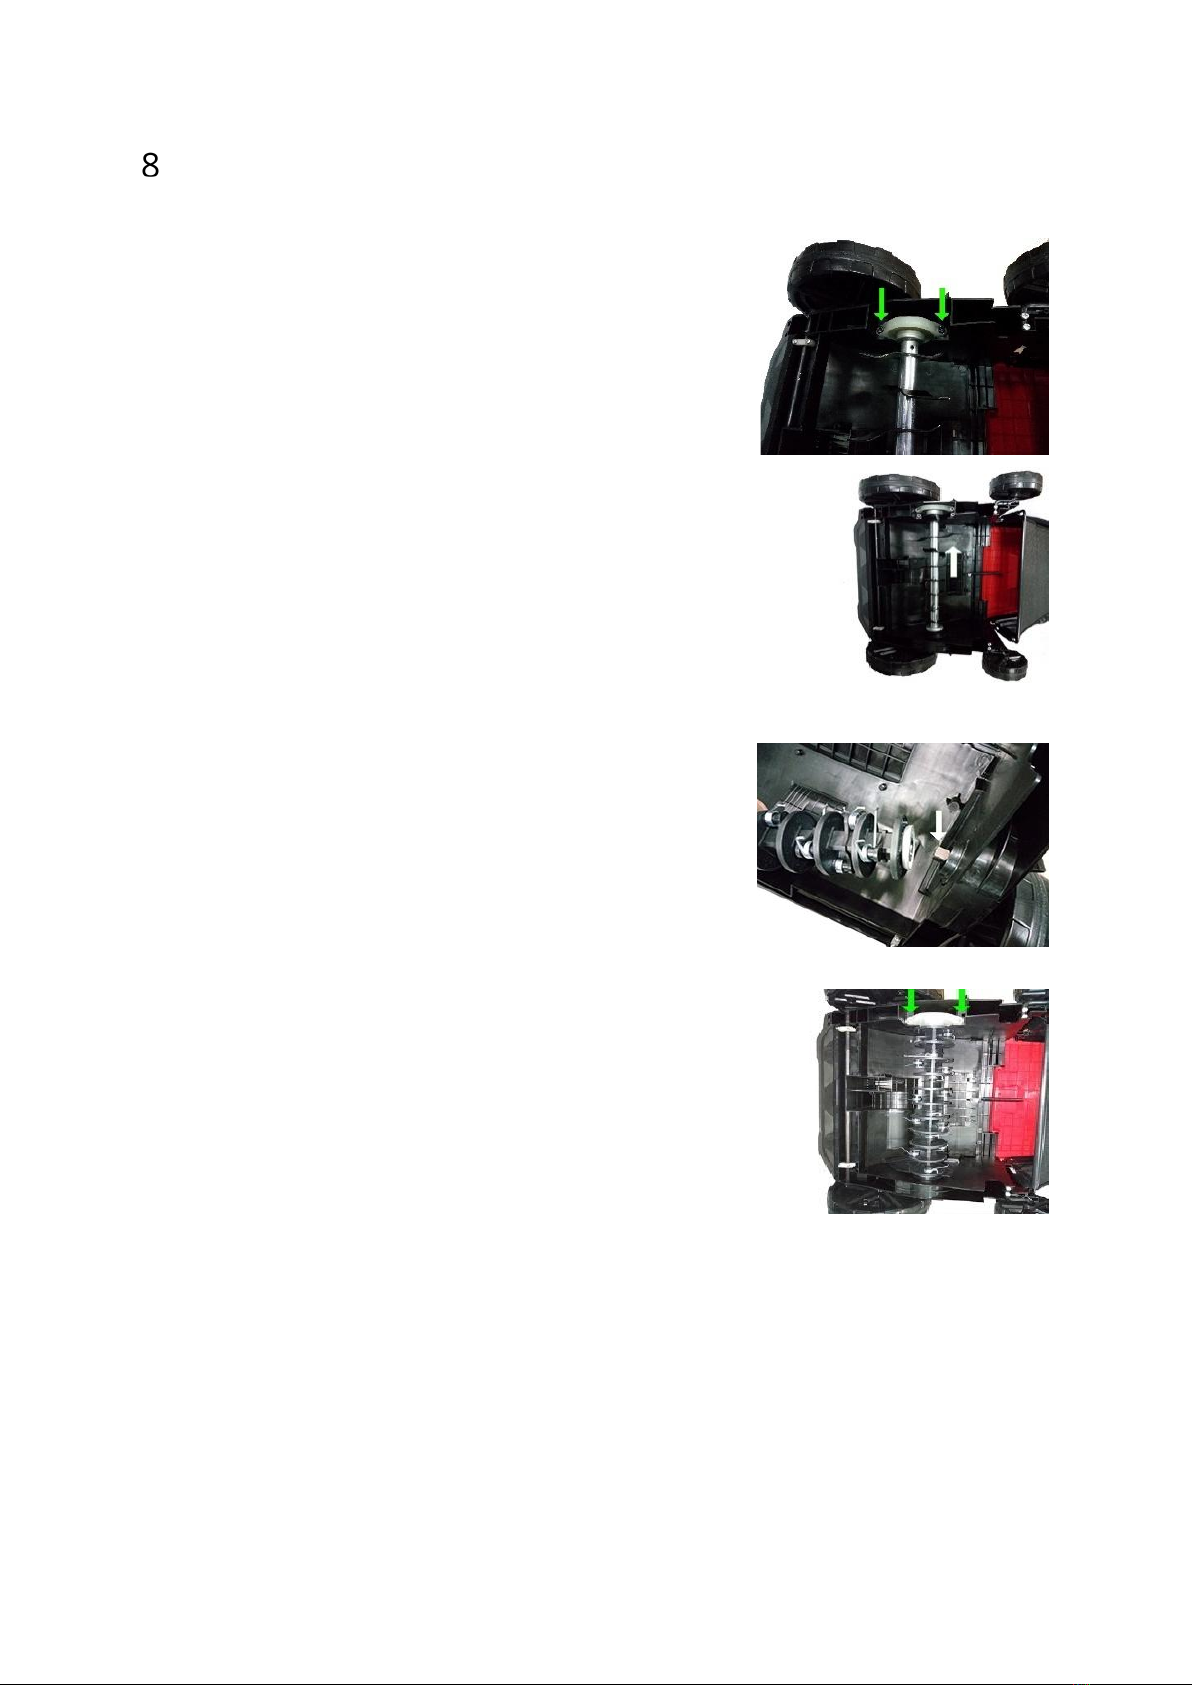
Replacing the Blades
First, make sure that the machine is turned off and
unplugged, and that all moving parts have stopped
rotating. Remove the hex screws using the hex key.
Pull out the blades in the direction of the arrow and remove
them. Remove the holder, clean the blades and save them for
later use.
Replace the blades, insert the holder, then adjust the
exposed pins with the blades to secure them in place.
Attach the blades by re-inserting and securing the hex screws.
Once the blades are firmly in place, you can set up the machine
carefully and use it again.

15
Maintenance
Proper maintenance is important for safe, economical and trouble-free operation of the
machine.
Maintenance work not described here must be done by a specialist.
Danger! Before doing maintenance, turn off the machine and unplug it. Wait
until all moving parts have stopped.
●Careful handling and regular cleaning ensure that the machine remains functional
and effective for a long time.
●Keep the machine in good condition; if necessary, replace the warning and
instruction labels on the machine.
●Check the drum for damage regularly.
●Keep all nuts and screws fastened to ensure safe operation.
●Always make sure that the ventilation openings are not dirty.
●Before use, inspect power and extension cords for signs of damage and aging.
Keep the extension cord away from ventilation elements.
●Check the basket for wear regularly.
●Lubricate the ball bearings (if they are part of the equipment) of each wheel at least
once a season.
●For safety reasons, replace worn or damaged parts. Use only original spare parts.
●Have the machine checked and repaired by a specialist once a season.
Cleaning
WARNING! Do not spray the machine with water. Water can damage switches,
plugs or the electric motor.
Never use aggressive detergents or solvents for cleaning.
●Clean the machine after each use.
●Never spray the machine or expose it to water.
●Never use detergents or solvents. They could damage the machine. Chemicals can
damage the plastic.
●Remove coarse dirt.
●Clean the machine with a slightly damp cloth.
●Empty the basket and clean it of grass clippings and dirt.
●Clean the underside of the undercarriage and used drums.
●Clean the top cover, especially the vents.
●Clean the wheels, dirt can affect the working height.

16
●Do not use solvents (such as benzine, alcohol, etc.) for cleaning, it could damage the
plastic parts.
●Use protective gloves when cleaning the drums.
Storage and Transport
ATTENTION! The engine must be completely cooled down before storing the
machine.
●Unplug the machine from the power socket.
●Replace worn or damaged parts.
●Store the machine in a dry, clean and frost-free place, out of reach of unauthorized
people.
●Clean after each use.
●Clean the machine and accessories thoroughly (see "Maintenance and cleaning").
This will prevent the formation of mold.
●Do not store the machine in direct sunlight for a long time.
●Do not use plastic foil as dust protection. The impermeable cover retains moisture
and leads to corrosion.
●You can fold down the guide rail to make it easier to store. To do this, loosen the
wing nuts until the guide rail is loose enough.
●Be careful not to bend any cables.
NOTE: When storing the machine, make sure that it is free of rust. Wipe the
machine, especially the moving parts, with light oil or silicone.
When moving the machine, the drum must be switched off and the scarifying
plate raised as high as possible.
●Unplug the machine from the power socket before transporting.
●The drum can be damaged during transport, e.g. hard surface, even when the engine
is switched off. Therefore, set the drum to the highest level.
Transport on a Trailer
●Switch off the engine and unplug the machine from the power socket. Protect the
machine from falling and do not place it near other objects. Do not place any other
objects on the machine.

17
Scarification / Aeration
●For comfortable work with the machine, it is best to start working closest to the
power supply and then be slowly moving away from the power supply.
●Aerate the lawn at a right angle to the power supply and place the power cord on the
side that has already been treated.
ATTENTION! Do not subject the engine to excessive stress when working, especially
in difficult conditions. If the engine is stressed, the engine speed will drop, and you
will hear a change in engine sound. When this happens, stop working, release the
switch lever and reduce the scarification / aeration depth. Failure to do so could
damage the machine.
NOTE: The motor is protected by a safety fuse that activates when the leaves are
seized or when the motor is overloaded. When this happens, turn off the machine
and remove it from the power supply. The safety lock will reset only if the switch
lever is released. Remove any obstacles and wait a few minutes for the safety lock to
reset so that you can continue working. Do not operate the switch lever at this time,
as this increases the reset time of the safety fuse. If the machine shuts down again,
increase the scarification / aeration depth again to reduce the engine load.

18
Specifications
Voltage
230-240 V ~/50 Hz
Power consumption
1500 W
No-load speed (rpm)
2984 min-1
Grip width
320 mm
Basket volume
30 l
Weight
9,3 kg
Working depth
-12 to 4 mm
Protection class/ level
class/ level II
Degree of protection
IPX4
Measured level of sound pressure at the
operating location
L
PA
= 84,3 dB (A);
K = 3 dB (A)
Guaranteed sound power level
Max. LWA 98 dB (A)
Handle vibration
4,246 m/s2;
K = 1,5m/s
2
Specifications are subject to change without notice.

19
Warranty Conditions
A new product purchased in the Alza.cz sales network is guaranteed for 2 years. If you
need repair or other services during the warranty period, contact the product seller
directly, you must provide the original proof of purchase with the date of purchase.
Submit the machine complete and properly cleaned for hygienic reasons.
The following are considered to be a conflict with the warranty conditions, for
which the claim may not be recognized:
●Using the product for any purpose other than that for which the product is intended
or failing to follow the instructions for maintenance, operation and service of the
product.
●Damage to the product by a natural disaster, the intervention of an unauthorized
person or mechanically through the fault of the buyer (e.g. during transport, cleaning
by inappropriate means, etc.).
●Natural wear and aging of consumables or components during use (such as
batteries, etc.).
●Exposure to adverse external influences, such as sunlight and other radiation or
electromagnetic fields, fluid intrusion, object intrusion, mains overvoltage,
electrostatic discharge voltage (including lightning), faulty supply or input voltage and
inappropriate polarity of this voltage, chemical processes such as used power
supplies, etc.).
●If anyone has made modifications, modifications, alterations to the design or
adaptation to change or extend the functions of the product compared to the
purchased design or use of non-original components.
●Copies of proof of purchase of the product, altered, supplemented, without the
original data or damaged proof of purchase will not be considered as proof of
purchase of the claimed product.

20
EU Declaration of Conformity
Identification data of the manufacturer's / importer's authorized representative:
Importer: Alza.cz a.s.
Registered office: Jankovcova 1522/53, Holešovice, 170 00 Prague 7
IČO: 27082440
Subject of the declaration:
Title: Electric scarifier
Model/Type: WR6001-1500 / SC3215
The above product has been tested in accordance with the standard (s) used to
demonstrate compliance with the essential requirements laid down in the
Directive (s):
Directive No.2006/42/EU
Directive No. 2014/30/EU
Directive No. 2000/14/ES as amended 2005/88/ES
Directive No. 2011/65/EU as amended 2015/863/EU
This declaration of conformity was issued based on certificates and measurement
protocols of the company:
TÜV Rheinland/CCIC (Ningbo)Co., Ltd., P.R.C.;
TÜV Rheinland LGA Product GmbH, Germany
BUREAU VERITAS Consumer Products Services Division (Shanghai)
Prague, 23.10.2020
WEEE
This product must not be disposed of as normal household waste in accordance with the
EU Directive on Waste Electrical and Electronic Equipment (WEEE - 2012/19 / EU). Instead
it shall be returned to the place of purchase or handed over to a public collection point
for the recyclable waste. By ensuring this product is disposed of correctly, you will help
prevent potential negative consequences for the environment and human
health, which could otherwise be caused by inappropriate waste handling of
this product. Contact your local authority or the nearest collection point for
further details. Improper disposal of this type of waste may result in fines in
accordance with national regulations.
Table of contents
Languages:
Popular Lawn And Garden Equipment manuals by other brands

Black Diamond Equipment
Black Diamond Equipment EVAC Series manual

Martha Stewart
Martha Stewart MTS-CGSH1 Operator's manual

Black & Decker
Black & Decker GS500 instruction manual

AQUAvalve
AQUAvalve easy2grow 100 Simple care guidelines

Lifetime
Lifetime #60078 Assembly instructions

Yardistry
Yardistry G005 installation manual


Toro
Toro Power Shovel 39909 Operator's manual

Scag Power Equipment
Scag Power Equipment RS-ZT Operator's manual

MATALA
MATALA MEA Pro Mini 2000 installation instructions

ALZA
ALZA Ferrida SC4018 Translation of the original instructions for use

GARDEN SECRETS
GARDEN SECRETS GS-502 User instructions

GÜDE
GÜDE 95504 Translation of the original instructions