FIBERNET LADY Operating instructions

Blowing machine
mod. Lady
User & maintenance manual
Ver.2.2 –August 04 2022
Fibernet srl
Connectivity Solutions
www.fibernet.it

INDEX
1. GENERAL ........................................................................................................................................................................ 4
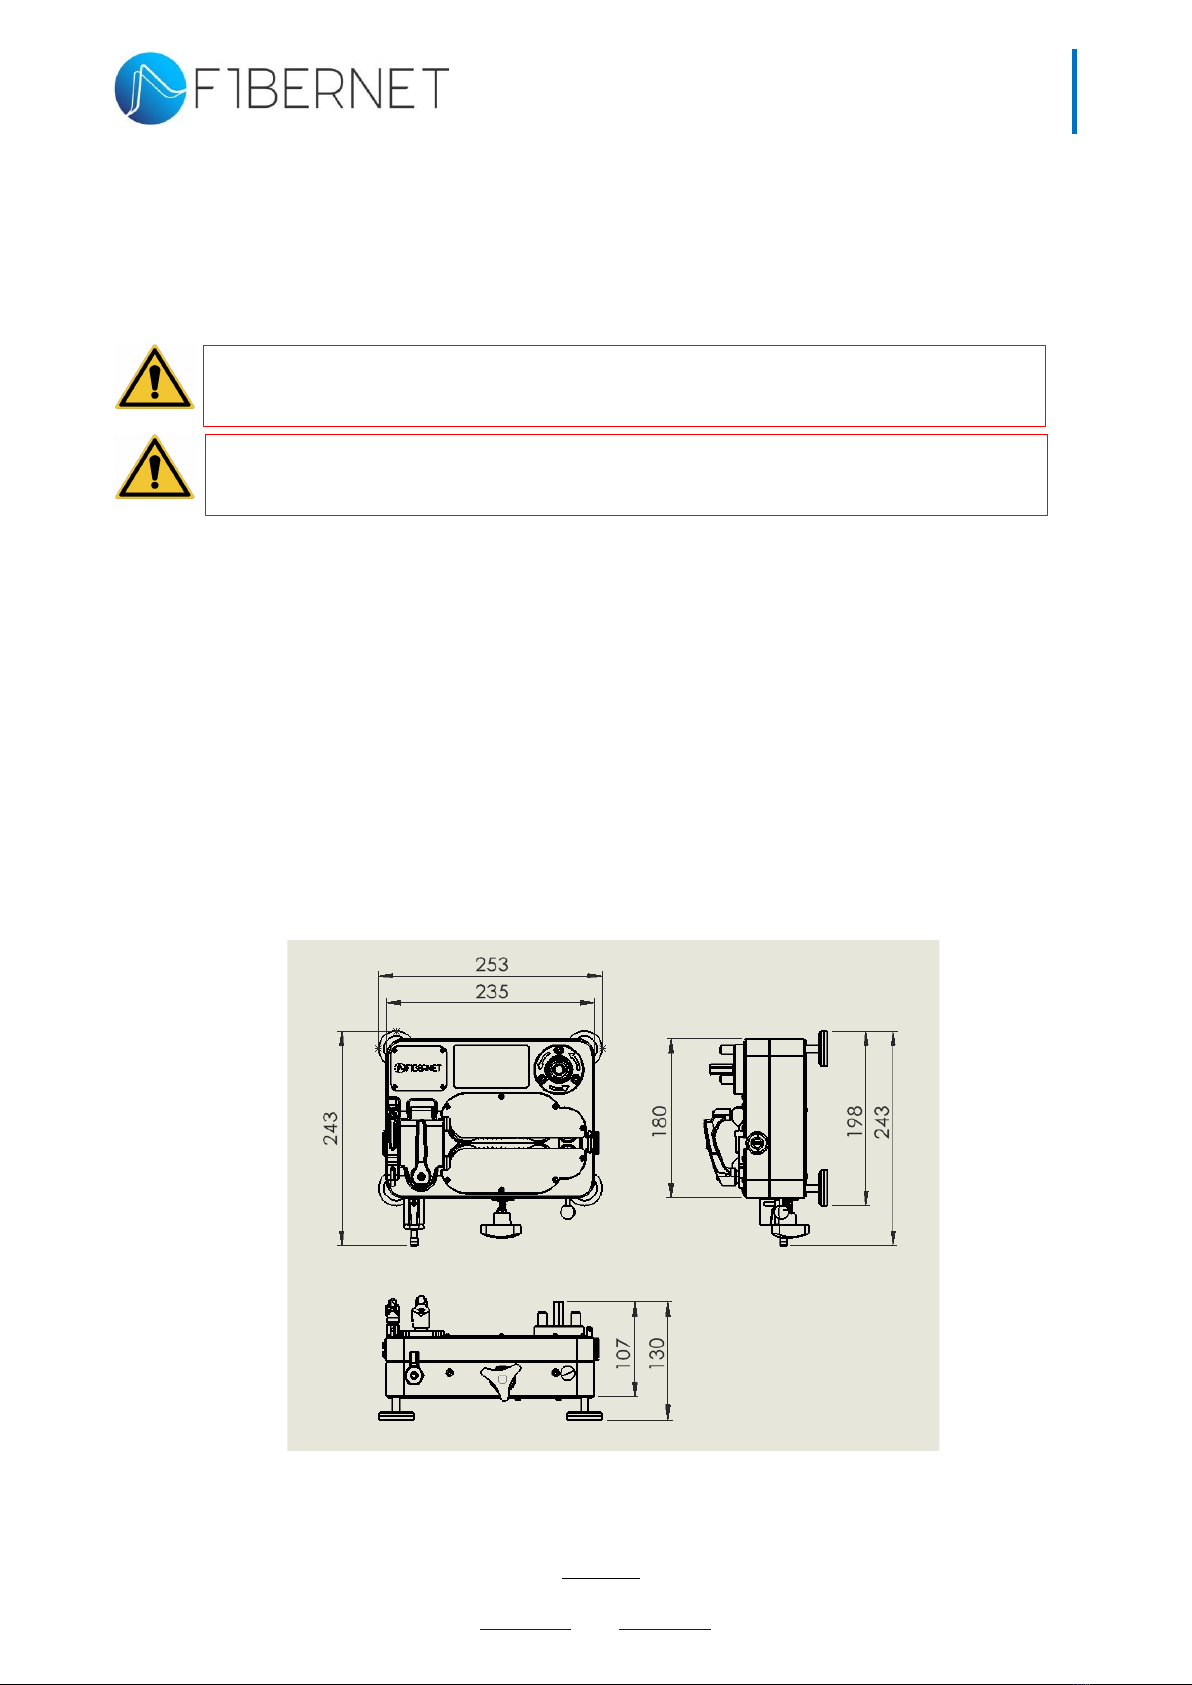
2. TECHNICAL CHARACTERISTICS ............................................................................................................................... 5
2.1. PRODUCT CONFIGURATION .................................................................................................................................6
2.2. ACCESSORY KIT ..........................................................................................................................................................7
3. OPERATING INSTRUCTION ....................................................................................................................................... 9
3.1. PRELIMINARY OPERATIONS ................................................................................................................................... 9
3.2. POSING PROCEDURE WITHOUT COMPRESSED AIR.................................................................................. 10
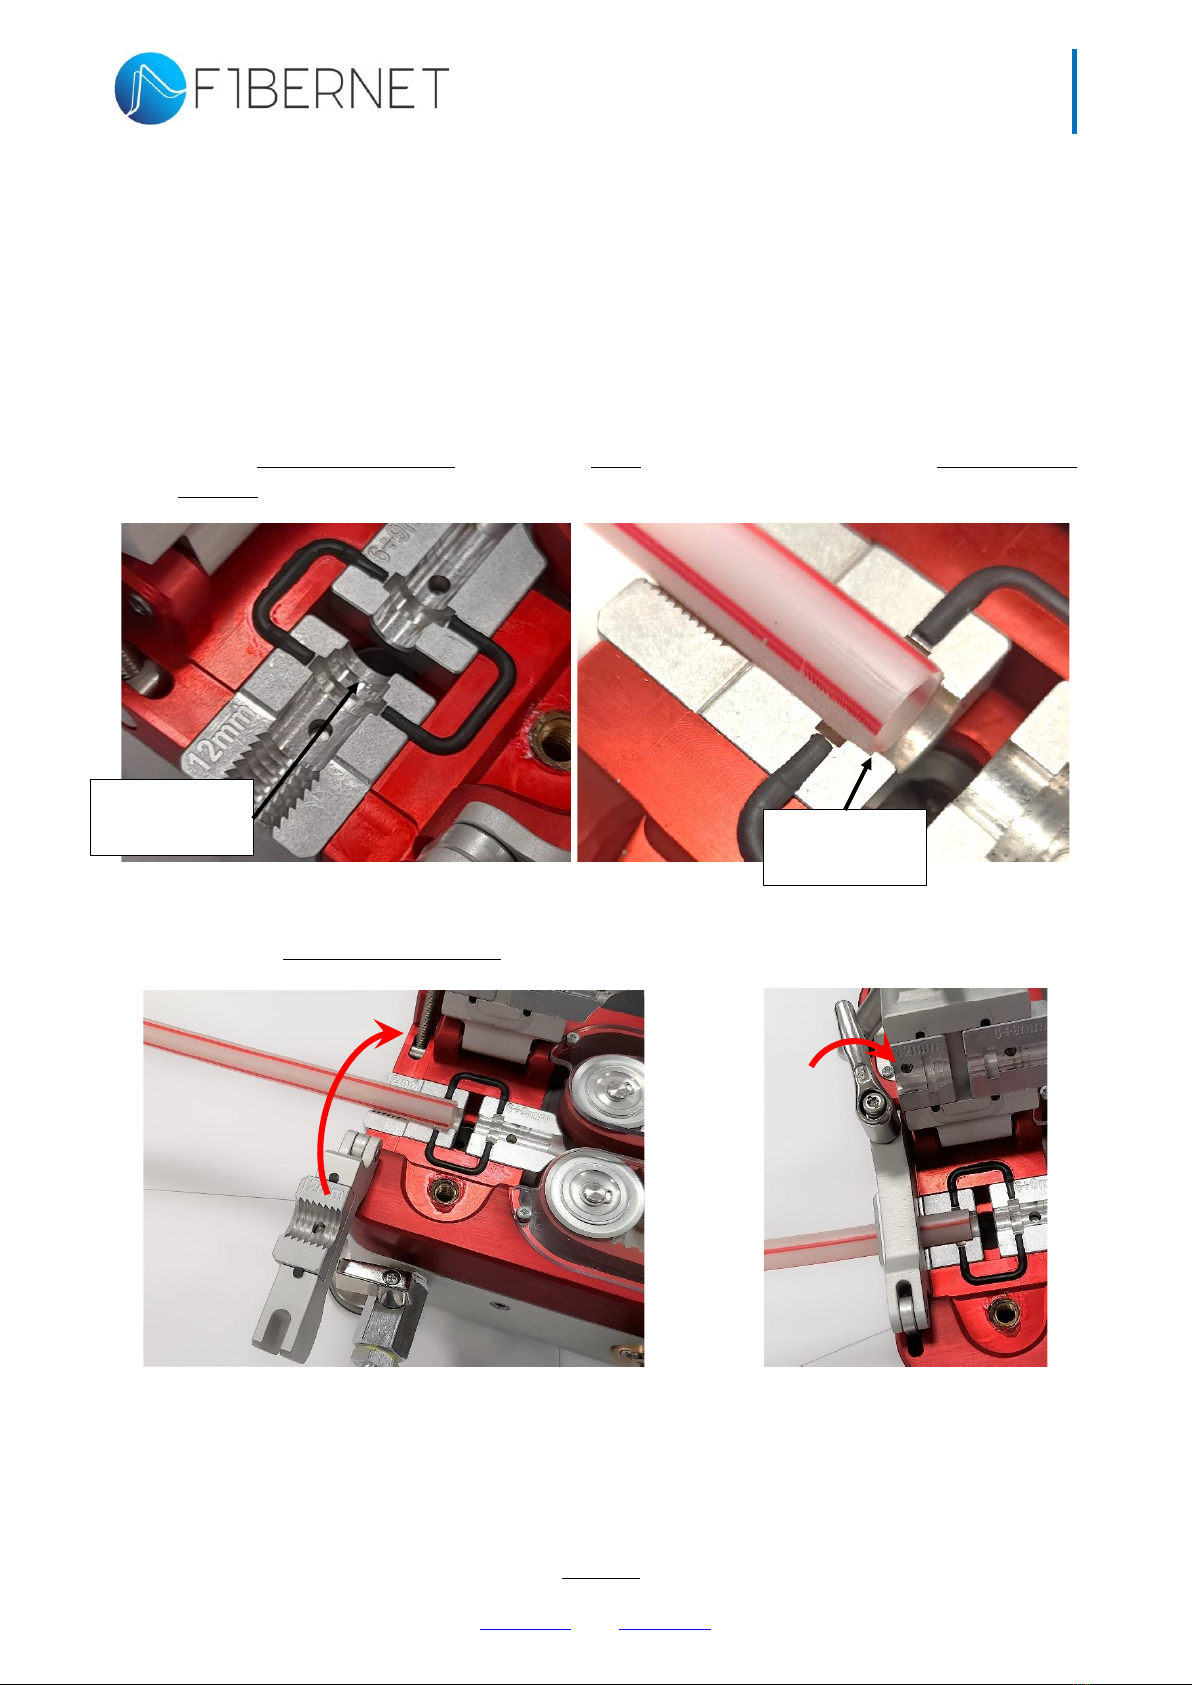
3.2.1. CABLE AND DUCT POSITIONING........................................................................................................... 10
3.3. POSING PROCEDURE WITH COMPRESSED AIR ........................................................................................... 12
3.3.1. CABLE AND DUCT POSITIONING........................................................................................................... 12
3.3.2. AIR COMPRESSOR CONNECTION .......................................................................................................... 15
3.4. CABLE POSING ......................................................................................................................................................... 15
3.5. CABLE POSING IN AN INTERMEDIATE STOP................................................................................................. 17
3.6. DISPLAY INFORMATION ....................................................................................................................................... 21
3.7. DRIVE BELTS HANDLING ...................................................................................................................................... 22
3.8. METER COUNTER PULLEY HANDLING............................................................................................................ 23
4. MAINTENANCE ...........................................................................................................................................................24
4.1. CLEANING .................................................................................................................................................................. 24
4.2. DRIVE BELTS SUBSTITUTION .............................................................................................................................. 24
4.3. SEAL ADAPTER GASKETS SUBSTITUTION ...................................................................................................... 26
4.4. BATTERY RECHARGING ........................................................................................................................................ 29

FIBERNET SRL
Headquarters: Via degli Olmetti,18 –00060 Formello (RM) - Italy
Share Capital € 100.000,00 - P.I. e C.F.: 06557181002 - Tel. +39 06 90405039, +39 06 90400349 –Fax +39 06 90409266
www.fibernet.it; E mail: info@fibernet.it
3
USER MANUAL
LADY
SAFETY RULES
Before operating, make sure to have set and fixed the device on a solid surface.
Check that the blowing machine is correctly connected to the minitube and that
the cable is properly positioned between the two drive belts.
Air pressure shall never exceed the limit indicated in this user manual.
To avoid possible finger injury, make sure not to touch the cable when it is close to
the working device; also ensure that the cable doesn’t tangle up, causing hazard
situations to the personnel involved.
Make sure
Before performing any type of alteration and/or maintenance make sure to have
previously disconnected the machine from all energy sources such as air compressor
and USB port.
Do not remove the plexiglass protections during posing operations (it could cause
injuries to the hands).
Before getting started, ensure that nobody is placed near the cable spools to avoid
possible risks.
Do not open the lids of the blowing machine while operating with air compressor.

FIBERNET SRL
Sede Operativa: Via degli Olmetti,18 –00060 Formello (RM) - Italia
Capitale € 100.000,00 - P.I. e C.F.: 06557181002 - Tel. +39 06 90405039, +39 06 90400349 –Fax +39 06 90409266
www.fibernet.it; E mail: info@fibernet.it
4
USER MANUAL
LADY
1. GENERAL
Lady is a blowing machine entirely designed and developed by Fibernet Srl to blow cables inside
minitubes.
The device is provided with a polypropylene waterproof case for a safe and easy transport and an
accessory kit.
The machine is designed to be actuated by an external electric screwdriver equipped with a clutch (or
an electric battery motor or even a pneumatic motor). To ease the blowing operation, the device can
use the help of compressed air.
Figure 1: Fibernet blowing machine –Lady model.

FIBERNET SRL
Headquarters: Via degli Olmetti,18 –00060 Formello (RM) - Italy
Share Capital € 100.000,00 - P.I. e C.F.: 06557181002 - Tel. +39 06 90405039, +39 06 90400349 –Fax +39 06 90409266
www.fibernet.it; E mail: info@fibernet.it
5
USER MANUAL
LADY
2. TECHNICAL CHARACTERISTICS
Lady blowing machine can be actuated by an external battery screwdriver equipped with a clutch, that
operates the internal rubber belts transmission mechanism (LINATEX) specifically contoured to
increase friction with the cable.
In case of electric, battery or pneumatic motor use, please refer to the specific supplied guides.
The main features of the Lady blowing machine are listed below:
•Weight: approximately 6 kg
•Compact dimensions: 253 x 243 x 130 mm
•Use temperature -10 °C / +60 °C
•Digital display with operative information (blow direction, speed, meter counter, compressed
air pressure)
•Drive belt protection screens
•Cable diameters: 1,2 ÷ 10 mm
•Minitubes diameters: 5 ÷ 16 mm
Figure 2: Lady –External dimensions.
Do not use electric screwdriver at a higher speed of 550 rpm/min.
Do not use drilling machine to operate the machine.

FIBERNET SRL
Sede Operativa: Via degli Olmetti,18 –00060 Formello (RM) - Italia
Capitale € 100.000,00 - P.I. e C.F.: 06557181002 - Tel. +39 06 90405039, +39 06 90400349 –Fax +39 06 90409266
www.fibernet.it; E mail: info@fibernet.it
6
USER MANUAL
LADY
2.1. PRODUCT CONFIGURATION
To ensure greater sturdiness and reliability, the device is made of only two anticorodal aluminum bodies
designed to contain all the mechanic and the electronic parts required for a proper functioning.
Below listed the main blowing machine constituent parts (Figure 3.)
Figure 3: list of parts.
Number
Elements’ name
1
Air lid
2
LCD Display
3
Cable entry adapter fixing lever
4
Cable entry
4.a
Upper cable entry adapter
4.b
Lower cable entry adapter
5
Meter counter wheel opening
knob
6
Drive belts pressure regulation
knob
7
Compressed air connector
8
Electric screwdriver connector
9
USB plug
10
Adjustable pin
11
Minitube adapter kit
11.a
Upper minitube adapter
11.b
Lower minitube adapter
11.c
Minitube fixing adapter
12
Minitube fixing clamp
13
Cable adapter kit
13.a
Upper cable adapter
13.b
Lower cable adapter

FIBERNET SRL
Headquarters: Via degli Olmetti,18 –00060 Formello (RM) - Italy
Share Capital € 100.000,00 - P.I. e C.F.: 06557181002 - Tel. +39 06 90405039, +39 06 90400349 –Fax +39 06 90409266
www.fibernet.it; E mail: info@fibernet.it
7
USER MANUAL
LADY
2.2. ACCESSORY KIT
The device is provided with the following accessories:
Description
Quantity
Pictures
Lubricant for minitubes
1 L
USB cable
1
3 mm and 8 mm hex wrenches
1
½” to 3/8” junction
1
Air hose
1
Microduct cutter
1
Linear gasket Ø 3 mm
0,5 m
Utensil bag
1
Waterproof polipropylene case
1

FIBERNET SRL
Sede Operativa: Via degli Olmetti,18 –00060 Formello (RM) - Italia
Capitale € 100.000,00 - P.I. e C.F.: 06557181002 - Tel. +39 06 90405039, +39 06 90400349 –Fax +39 06 90409266
www.fibernet.it; E mail: info@fibernet.it
8
USER MANUAL
LADY
Adapters kit:
Description
Quantity
Pictures
Duct adapters kit at customer’s choice (included in
Lady’s price)
1+1+1
5 mm duct gasket
7 mm duct gasket
8 mm duct gasket
10 mm duct gasket
12 mm duct gasket
14 mm duct gasket
16 mm duct gasket
1 Set
Cable adapters at customer’s choice
(included in Lady’s price)
1+1
1-10 mm cable gasket
1 Set
Cable entry adapters
1+1
Other adapters kits are to be required separately
See “Accessories list & spare parts”
Table 1: accessories kit.

FIBERNET SRL
Headquarters: Via degli Olmetti,18 –00060 Formello (RM) - Italy
Share Capital € 100.000,00 - P.I. e C.F.: 06557181002 - Tel. +39 06 90405039, +39 06 90400349 –Fax +39 06 90409266
www.fibernet.it; E mail: info@fibernet.it
9
USER MANUAL
LADY
3. OPERATING INSTRUCTION
Listed below procedures to follow for a proper machine use.
They are devided in:
•3.1 Preliminary operations
•3.2 Posing procedure without compressed air
•3.3 Posing procedure with compressed air
•3.4 Cable posing
•3.5 Cable posing in an intermediate stop
3.1. PRELIMINARY OPERATIONS
Before getting started it is recommended to verify that the minitube is clean and dry in the inside
(for this purpose we recommend to use compressed air inside the tube to eliminate any solid or liquid
residues).
To ease the blowing operation, use the lubricant (provided among the accessories kit) following the
amounts listed in Table 2 shown below:
internal diameter of minitube [mm]
Lubricant approximate quantity per 1000 m
Volume [ml]
Minitube filling height [cm]
4
10
78 ÷ 82
8
18
35 ÷ 38
10
23
29 ÷ 32
12
27
24 ÷ 26
Table 2: correspondence between minitube diameter and lubricant quantity
Figure 4: minitube lubricant filling example.
Rubber foam
Minitube filling amount
➢Insert inside the minitube a small piece of rubber foam
(length 1 cm);
➢pour the recommended amount of lubricant depending
on the minitube diameter
➢Insert a second piece of rubber foam (length 1 cm);
➢Use compressed air to move the foams inside the tube
and lubricate it
➢utilizzare l’aria compressa per far scorrere il sistema
all’interno del tubo.

FIBERNET SRL
Sede Operativa: Via degli Olmetti,18 –00060 Formello (RM) - Italia
Capitale € 100.000,00 - P.I. e C.F.: 06557181002 - Tel. +39 06 90405039, +39 06 90400349 –Fax +39 06 90409266
www.fibernet.it; E mail: info@fibernet.it
10
USER MANUAL
LADY
3.2. POSING PROCEDURE WITHOUT COMPRESSED AIR
To blow short length cables, the mechanical drive belts will be sufficient. Cable flow will be easier if
the path doesn’t have curves. To reduce friction, obtain better performances and reach greater
distances, however, it is recommended to use compressed air.
3.2.1. CABLE AND DUCT POSITIONING
Procedure to connect the minitube to the machine:
a. Lift the “minitube fixing clamp” (12) and the “air lid” (1). Set the minitube onto the “lower minitube
adapter”(11.b) making sure that it is properly inserted till the end.
Figure 5: minitube proper positioning.
b. Close the “minitube fixing adapter”(11.c) using the “minitube fixing clamp” (12).
Figure 6: closing the minitube fixing clamp
Minitube
stop
Minitube
stop

FIBERNET SRL
Headquarters: Via degli Olmetti,18 –00060 Formello (RM) - Italy
Share Capital € 100.000,00 - P.I. e C.F.: 06557181002 - Tel. +39 06 90405039, +39 06 90400349 –Fax +39 06 90409266
www.fibernet.it; E mail: info@fibernet.it
11
USER MANUAL
LADY
Round the head of the cable (with a heat source) to avoid catching edges in correspondence of the
minitube joints.
Adjust the belts’distance to ease the cable’s insertion using the “drive belts pressure regulation knob”
(6). Insert the cable into the “cable entry”(4), loosen the meter counter wheels pulling the “meter
counter wheel opening knob” (5) and push the cable up to the “cable adapters ”(13.a e 13.b).
Figure 7: Setting belts distance and cable insertion
c. Close the “air lid”(1) using the specific lever
Figure 8: closing the air lid
d. Set pressure between cable and drive belts using the “drive belts pressure regulation knob” (6) to
have a good grip and avoid cable slipping during blowing operation.
Meter counter wheel
opening knob
drive belts pressure
regulation knob
Air lid closing lever

FIBERNET SRL
Sede Operativa: Via degli Olmetti,18 –00060 Formello (RM) - Italia
Capitale € 100.000,00 - P.I. e C.F.: 06557181002 - Tel. +39 06 90405039, +39 06 90400349 –Fax +39 06 90409266
www.fibernet.it; E mail: info@fibernet.it
12
USER MANUAL
LADY
After you have carried out all these preliminary actions, refer to paragraph 3.4 for cable posing.
3.3. POSING PROCEDURE WITH COMPRESSED AIR
Use Lady with the aid of compressed air to minimize friction between cable and minitube. Air pressure
shall not exceed 16 bar. Below listed the instructions to follow.
3.3.1. CABLE AND DUCT POSITIONING
Connecting the minitube to the device:
a. Choose from the accessory kit the proper duct gasket and insert it on the minitube.
Figure 9: duct gasket insertion.
b. Open the “minitube fixing adapter” (11.c), open the “air lid” (1) set the minitube onto the “lower
minitube adapter” (11.b) making sure that it is inserted till the end and that the duct gasket is
correctly inserted.
Figure 10: minitube proper insertion.
c. Close the “minitube fixing adapter”(11.c) using the “minitube fixing clamp”(12).
Minitube
stop
Duct gasket housing
Minitube
stop

FIBERNET SRL
Headquarters: Via degli Olmetti,18 –00060 Formello (RM) - Italy
Share Capital € 100.000,00 - P.I. e C.F.: 06557181002 - Tel. +39 06 90405039, +39 06 90400349 –Fax +39 06 90409266
www.fibernet.it; E mail: info@fibernet.it
13
USER MANUAL
LADY
Figure 11: closing the minitube fixing clamp
Inserting the fiber optic cable:
d. Set the right cable gasket according to the cable diameter, making sure that the “lip” side is
facing the minitube.
Figure 12: Proper positioning of lip and flat gasket
Round the head of the cable (with a heat source) to avoid catching edges in correspondence of the
minitube joints.
“lip” side of the
gasket
Flat gasket can be placed either way

FIBERNET SRL
Sede Operativa: Via degli Olmetti,18 –00060 Formello (RM) - Italia
Capitale € 100.000,00 - P.I. e C.F.: 06557181002 - Tel. +39 06 90405039, +39 06 90400349 –Fax +39 06 90409266
www.fibernet.it; E mail: info@fibernet.it
14
USER MANUAL
LADY
e. Set pressure between cable and drive belts using the “drive belts pressure regulation knob” (6)
insert the cable inside the “cable entry” (4) and into the lip gasket.
f.
Figure 13: Setting belts distance and cable insertion inside lip gasket
f. Close the “air lid” (1) using the specific lever
Figure 14: closing the air lid
AIR PRESSURE HAZARD: do not open air lid while operating with compressed air
Air lid closing lever
Meter counter wheel
opening knob
Drive belts pressure
regulation knob

FIBERNET SRL
Headquarters: Via degli Olmetti,18 –00060 Formello (RM) - Italy
Share Capital € 100.000,00 - P.I. e C.F.: 06557181002 - Tel. +39 06 90405039, +39 06 90400349 –Fax +39 06 90409266
www.fibernet.it; E mail: info@fibernet.it
15
USER MANUAL
LADY
g. Set pressure between cable and drive belts using the “drive belts pressure regulation knob” (6) to
have a good grip and avoid cable slipping during operation.
3.3.2. AIR COMPRESSOR CONNECTION
After having positioned the minitube, the cable and their gaskets, connect the air hose to the
“compressed air connector” (7).
Figure 15: connecting the air hose to the compressed air connector
3.4. CABLE POSING
After having connected all the above mentioned components, you can proceed by lighting up the
display by pushing the “ON/OFF” button (menu instructions are listed in paragraph 3.6)
To pose the cable:
•Connect the electric screwdriver spindle equipped with a clutch to the “electric screwdriver
connector” (8).
NOTE: Compressed air helps reduce friction inside the minitube. We recommend
to increase pressure gradually once you started the machine.
MAXIMUM AIR PRESSURE SHALL NOT EXCEED 16 BAR

FIBERNET SRL
Sede Operativa: Via degli Olmetti,18 –00060 Formello (RM) - Italia
Capitale € 100.000,00 - P.I. e C.F.: 06557181002 - Tel. +39 06 90405039, +39 06 90400349 –Fax +39 06 90409266
www.fibernet.it; E mail: info@fibernet.it
16
USER MANUAL
LADY
Figure 16: connecting the electric screwdriver.
NOTE: Lady can be actioned by an electric or pneumatic motor. Respective manuals are provided
according to the type of motor chosen.
Figure 17: Direction of rotation of the electric screwdriver spindle
•Start the electric screwdriver keeping an eye contact on the “LCD display” (2) while making sure
that the cable is properly moving between the drive belts.
ATTENTION: MAKE SURE THAT THE DIRECTION OF ROTATION OF THE
ELECTRIC SCREWDRIVER IS SET COUNTER-CLOCKWISE AS SHOWN ON THE
“ELECTRIC SCREWDRIVER CONNECTOR “
Direction of
rotation
ATTENTION: STOP THE DEVICE IF YOU SEE THAT THE CABLE IS NOT MOVING
TO AVOID POSSIBLE DAMAGE TO THE CABLE OR TO THE MACHINE
we recommend inserting a 10 mm male hex
socket in the electric screwdriver

FIBERNET SRL
Headquarters: Via degli Olmetti,18 –00060 Formello (RM) - Italy
Share Capital € 100.000,00 - P.I. e C.F.: 06557181002 - Tel. +39 06 90405039, +39 06 90400349 –Fax +39 06 90409266
www.fibernet.it; E mail: info@fibernet.it
17
USER MANUAL
LADY
3.5. CABLE POSING IN AN INTERMEDIATE STOP
When the blowing operation stops between two cockpits a possible solution is to intervene in an
intermediate cockpit, intercepting the tube without interrupting cable’s continuity.
Figure 18: initial situation.
Lady set in proximity of cockpit A, blows cable toward cockpit C.
Figure 19: cable pose interrupted.
Passed the intermediate cockpit B, blowing operation stops before reaching cockpit C.
Figure 20: Open cockpit B, place lady in this intermediate cockpit and continue operation.
It is possible to resume the operation intercepting the tube and inserting the cable back again assuring
continuity.

FIBERNET SRL
Sede Operativa: Via degli Olmetti,18 –00060 Formello (RM) - Italia
Capitale € 100.000,00 - P.I. e C.F.: 06557181002 - Tel. +39 06 90405039, +39 06 90400349 –Fax +39 06 90409266
www.fibernet.it; E mail: info@fibernet.it
18
USER MANUAL
LADY
Inserting cable in continuity in the blowing machine:
•Extract the “upper cable entry adapter”(4.a) turning the “cable entry adapter fixing lever” (3).
Figure 21:Open the cable entry adapter kit turning the lever outwards
•Open the “air lid”(1) and the “minitube fixing clamp”(12).
•With a pair of scissors cut diagonally both cable and duct gasket.
Figure 22: cut gaskets diagonally.

FIBERNET SRL
Headquarters: Via degli Olmetti,18 –00060 Formello (RM) - Italy
Share Capital € 100.000,00 - P.I. e C.F.: 06557181002 - Tel. +39 06 90405039, +39 06 90400349 –Fax +39 06 90409266
www.fibernet.it; E mail: info@fibernet.it
19
USER MANUAL
LADY
•Now insert both gaskets on the corresponding component
Figure 23: inserting diagonally cut gaskets.
•Set cable and minitube inside the device, positioning the gaskets with cut facing down, for a
better fit, as shown in figure 24.
Figure 24: positioning the gaskets with cut facing down
•Set pressure between cable and drive belts using the “drive belts pressure regulation knob” (6).
•Insert the cable inside the “cable entry” (4) pulling the “meter counter wheel opening lever” (5).

FIBERNET SRL
Sede Operativa: Via degli Olmetti,18 –00060 Formello (RM) - Italia
Capitale € 100.000,00 - P.I. e C.F.: 06557181002 - Tel. +39 06 90405039, +39 06 90400349 –Fax +39 06 90409266
www.fibernet.it; E mail: info@fibernet.it
20
USER MANUAL
LADY
Figure 25: pulling the meter counter wheel opening lever to insert the cable
•Closing the “cable entry kit” (4): set the “upper cable entry adapter” (4.a) and fix it by turning the
“cable entry adapter fixing lever” (3) inward.
Figure 26: cable insetion inside cable adapter kit.
•Finish the operation following the above-mentioned steps.
Figure 27: operation completed.
Other manuals for LADY
1
Table of contents