Fieldmann FZS 5025-B User manual

FZS 5025-B

2
FZS 5025-B
English .................................................................................................................................................................................3–30
Česky ................................................................................................................................................................................ 31–58
Slovensky.........................................................................................................................................................................59–86
Magyar...........................................................................................................................................................................87–114
Polski..............................................................................................................................................................................115–142

EN
PETROL BRUSH CUTTER USER'S MANUAL
3
Table of Contents
Petrol brush cutter
USER’S MANUAL
Thank you for purchasing this petrol brush cutter. Before you start using it, please
carefully read this user’s manual and save it for possible future use.
CONTENTS
1. GENERAL SAFETY INSTRUCTIONS..........................................................................................................................5
Important safety notice ............................................................................................................................................5
Packaging .......................................................................................................................................................................5
User’s Manual.................................................................................................................................................................5
2. EXPLANATION OF INSTRUCTION LABELS ON THE MACHINE...................................................................6
3. OPERATING INSTRUCTIONS......................................................................................................................................7
Safety instructions ........................................................................................................................................................7
Safety instructions ........................................................................................................................................................8
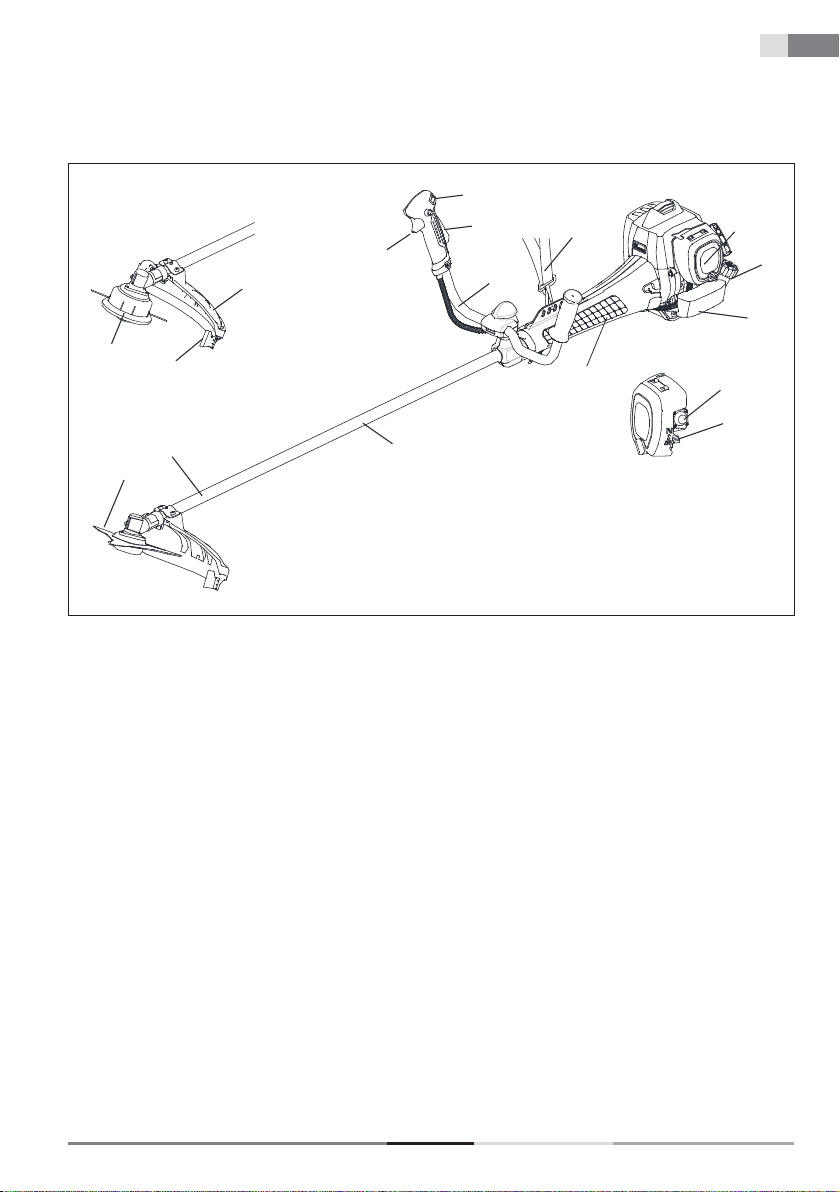
4. Description of the machine ..................................................................................................................................9
Included contents ....................................................................................................................................................10
5. ASSEMBLY........................................................................................................................................................................ 11
6. Mixing the fuel mix ...................................................................................................................................................14
Storing fuel.....................................................................................................................................................................14
7. OPERATION....................................................................................................................................................................14
8. PREPARING FOR OPERATION ...............................................................................................................................16
Points to check before starting work...............................................................................................................16
9. SAFETY WORKING WITH BRUSH CUTTER .........................................................................................................16
10. CUTTING ...........................................................................................................................................................................21
CUTTING WITH THE NYLON STRING TRIMMER HEAD .................................................................................21
Trimming grass.............................................................................................................................................................21
Clearing and trimming edges............................................................................................................................22
CUTTING USING THE BLADE...................................................................................................................................22
Cutting weeds ............................................................................................................................................................22
11. MAINTENANCE.............................................................................................................................................................24
12. TROUBLE SHOOTING GUIDE ..................................................................................................................................26

EN 4
FZS 5025-B
Table of Contents
13. DISPOSAL ........................................................................................................................................................................28
14. DECLARATION OF CONFORMITY ......................................................................................................................29
15. TECHNICAL SPECIFICATIONS.................................................................................................................................30

EN
PETROL BRUSH CUTTER USER'S MANUAL
5
General safety instructions
1. GENERAL SAFETY INSTRUCTIONS
Important safety notice
Carefully unpack the product and take care not to throw away any part of the packaging before you find all
the parts of the product.
Store the product in a dry place out of reach of children.
Read all warnings and instructions. Not following warnings or instructions may lead to injury by electrical
shock, a fire and/or serious injuries.
Packaging
The product is packed in a package that prevents damage during transport. This package is a resource and so
can be handed over for recycling.
User’s Manual
Before you start working with the machine, read the following safety and usage instructions. Acquaint yourself
with the operating elements and the correct use of the machine. Keep the user’s manual in a safe place where
it can be easily retrieved for future use. Save the original packaging, including the internal packing material,
warranty card and proof of purchase receipt at least for the duration of the warranty. If you need to ship this
machine, pack it in the original cardboard box to ensure maximum protection during shipping or transport
(e.g. when moving or when you need to send this product for repair).
Note: If you hand over the machine to somebody else, do so together with the user’s manual.
Following the instructions in the included user’s manual is a prerequisite for the proper use of the machine.
The user’s manual also contains operating, maintenance and repair instructions.
The manufacturer takes no responsibility for accidents or damages resulting from not
following the instructions in this manual.

EN 6
FZS 5025-B
Explanation of instruction labels on the machine
2. EXPLANATION OF INSTRUCTION LABELS ON
THE MACHINE
Carefully read the manual before use
Do not use toothed blade
While working use protective aids
Danger of ricochet of the object during
mowing
Caution, recoil!
Keep other persons (particularly children)
and animals out of range, at least 15 m
from the working area.

EN
PETROL BRUSH CUTTER USER'S MANUAL
7
Operating instructions
3. OPERATING INSTRUCTIONS
Safety instructions
Read carefully!
Always wear a safety helmet, safety gloves, protective clothing (cut-resistant trousers) and safety footwear.
Keep the machine out of children’s reach.
Never run the engine if there is only petrol in the petrol tank.
Never pour in fuel if the engine is running or if it is still hot. Only fill up the engine when it is cold.
Store fuel in a closed container in a dry and cool place.
Adhere to safety directives.
Check the work area prior to every use. Remove items that could be deflected or that could jam in the
machine.
When working, all other persons must be outside the range of at least 15 meters.
Never use the machine without the protective cover (of the cutting blade) installed.
Never fill up the petrol tank so that it is completely full.
The fuel tank cap must be firmly tightened to prevent fuel from leaking out.
Do not permit the machine to run at full speed if the petrol tank is empty.
Never turn off the machine suddenly if it is running at full speed.
Do not use the machine if it is damaged in any way. Contact a qualified service centre.
When carrying, hold the entire machine because holding it only by the fuel tank is dangerous and may result
in damage to the petrol tank and a fire.
Always hold the brush cutter with both hands.
Never place a hot brush cutter on to dry grass.
Smoking is forbidden when working with the machine.
Safety instructions
Fuel
During transport, the fuel tank of the brush cutter must be empty.
Only transport fuel in approved canisters.
Regularly inspect the fuel tank cap. It must be tightened and fuel must not leak out
Protect the environment: take care to avoid a fuel spill and soil contamination.
Start the machine at least 3 metres away from where you filled it up with fuel.
Never fill up fuel in closed rooms. There must be sufficient ventilation in the room, risk of an explosion.
Do not inhale fuel vapours. Wear safety gloves when pouring in fuel.
Regularly replace and clean your protective clothing.

EN 8
FZS 5025-B
Operating instructions
Safety instructions
Cutting tools
When installing the cutting tool, check the condition of the blade. If it is damaged (cracked, bent, broken off,
etc.), replace it.
After installing the blade, check again that the hole in the blade is level with the arm of the blade tang.
Spin the blade, check again that the blade has no tendency to rotate irregularly.
Check that the blade is installed with the sharp edge moving in the direction of rotation. Never install it the
other way around.
Check that the cutting tool is properly assembled by turning it without load (1 minute is enough).
An appropriate blade must be selected for the material that is to be cut.
Never push the blade against objects when in operation. Material must be cut at reasonable speed.
If you hear an unusual noise or the machine vibrates abnormally, stop working and identify the cause.
Do not stop the machine while the blade is cutting a material. There is a danger of damaging the machine.
The cutting tool must be fitted with an appropriate guard.
ATTENTION! If instructions are not followed, there is a danger of a serious or even fatal
Injury to persons!
Acquaint all persons working with this machine with the operation of the machine and the safety
instructions.

EN
PETROL BRUSH CUTTER USER'S MANUAL
9
4. DESCRIPTION OF THE MACHINE
17
1
2
3
4
5
69
78
10
11
12
13
16
14
15
1. BLADE - Circular blade for grass,weed or brush cutting applications. Harness, plastic shield and U-Handles
required for blade operation.
2. DRIVE SHAFT ASSEMBLY - Contains a specially designed inner flexible drive shaft.
3. THROTTLE TRIGGER - Spring loaded to return to idle when released. When accelerating, press trigger
gradually for best operating technique. Do not hold trigger while starting.
4. IGNITION SWITCH - Move switch to position “|” to start, to position “O” to stop.
5. THROTTLE LOCKOUT - Before acceleration, compress it please.
6. U-HANDLE - this handle can be adjusted at your convenience for comfort.
7. HARNESS ASS’Y - an attachment which hang the machine on the operator and adjustable in length.
8. AIR CLEANER COVER - Contains replaceable felt element.
9. FUEL TANK LID.
10. FUEL TANK - Contains fuel and fuel filter.
11. PRIMING BULB - Presing the priming bulb pumps (7 to 10 times before starting), will remove all air and stale
fuel from fuel system and bring fresh fuel to the carburetor.
12. CHOKE - the choke control is located on the side of the filter cover.
COLD STARTS Pull lever up to close choke for cold starts. push lever down for RUN position.
13. DEBRIS SHIELD - Mounted just above the cutting attachment. Helps protect operator by deflecting debris
produced during the trimming operation. Do not operate unit without shield.
Description of the machine

EN 10
FZS 5025-B
Description of the machine
14. CUT-OFF KNIFE - Trims nylon filament to the correct length-8”, head to end of line-when nylon trimming head
is bumped on the ground during the operation of advancing the line. If trimmer is operated without a cut-
off knife the line becomes too long(more than 8”) the operating speed will slow down the engine, this will
overheat or damage the engine.
15. NYLON CUTTER HEAD - Contains replaceable nylon trimming line that advances when the trimmer head is
tapped against the ground while the head is turning at normal operating speed.
16. JOINING ASS’Y.
17. CLUTCH COVER ASS’Y.
Included contents
TWIST & GO trimmer head, metal three tooth blade, shoulder strap, calibrated fuel mixing container, spare spark
plug, hex key 4mm, hex key 5mm, 4x hex screw 5mm, 4x hex screw 4mm with nut (installed on the plastic guard
mount), 2x draw bands, screwdriver, wrench 8/10, tubular wrench with a Philips screwdriver.

EN
PETROL BRUSH CUTTER USER'S MANUAL
11
5. ASSEMBLY
Push the l part of the rod (1) right down until the latch
(2) slots into the hole (3) in the rod. This is easier to
do if you rotate the bottom of the rod (6) slightly in
both directions. The latch (2) is in place when it is
completely lodged in the hole. - Lastly, Press the latch
cover(5) and then tighten the knob (4) securely.
INSTALLING HANDLE (A)
Install handle in bracket. Position handle in
a comfortable operating position and tighten four
M6×30 screws.
INSTALLING HANDLE (B)
Install handle and lower cap on the rubber cover, and
tighten four M5×32 screws.
INSTALLING HANDLE
Install handle in bracket. Position handle in
a comfortable operating position and tighten U Handle
Screw Assy.
ADJUST U Handle
1. Rotate the U Handle Screw Assy counterclockwise
to adjust the U Handle
2. Rotate the U Handle Screw Assy counterclockwise
then Drag U Handle Lock Bar to Rotate the
U Handle.
WARNING CAUTION
Do not attempt to disassemble the two special
screws. The two clamps position has been adjusted
at a suitable place,do not attempt to remove or move
them. Otherwise,it can result in serious personal injury.
Assembly
Fig. 1
Fig. 2
12
Fig. 3
M5×32
SCREWS
HANDLE
CLAMP
LOWER CAP
SPECIAL
SCREWS
M6×30
SCREWS M6×30
SCREWS
CAP, UPPER CAP, UPPER
BRACKET U-HANDLE
U-HANDLE
BRACKET
U Handle Screw Assy
CAP, UPPER
BRACKET
U-HANDLE
U Handle
Screw Assy U Handle
Screw Assy
U Handle Lock Bar U Handle Lock Bar

EN 12
FZS 5025-B
INSTALLING PLASTIC SHIELD
Install the safety cover on the shaft with the safety
cover bracket and the screws provided. Tighten the
screws after setting the safety cover bracket at the
appropriate position.
BLADE INSTALLATION
- Insert the hex key (2) into the specific hole in the
angle transmission (3) and rotate the nut (7)
by hand until the hex key enters the inner hole ,
blocking rotation.
- unscrew the nut (7) in a clockwise direction.
- Pull out blade cover (6) and the blade press
board(5).
- Ensure that the grooves in the key gasket (4)
mach up perfectly with the angle transmisson(3).
- Install the blade (1) and the blade press board(5).
- Refit the blade cover (6) and the nut (7),fully
tightening it in an anticlockwise direction.
- Remove the hex key (2).
WARNING CAUTION
Do not use a steel blade for edging or scalping.
WARNING CAUTION
EXCESSIVE VIBRATION- STOP ENGINE IMMEDIATELY
Excessive vibration of blade means that it is not
properly installed. Stop engine immediately and check
blade.
Blade improperly installed will cause injury. Use only
our company original cutting equipment parts when
servicing and repairing the unit.
HEAD LINE INSTALLATION
Insert the hex key (2) into the specific hole in the angle
transmission (3) and rotate the key gasket (4) by
hand until the hex key enters the inner hole, blocking
rotation.
- Ensure that the grooves in the key gasket (4).
mach up perfectly with the angle transmisson(3).
- Fit the cutting line head (1) screwing it up in an
anticlockwise direction. (see from cutting line
head).
- Remove the hex key (2).
Assembly
Fig. 4
Fig. 5
1
2
3
4
Fig. 6
M6×20 SCREWS
GEAR CASE
BRACKET
SHIELD

EN
PETROL BRUSH CUTTER USER'S MANUAL
13
Assembly
WARNING CAUTION
INSTALLING NYLON LINE CUTTER HEAD
Align hole in adapter plate with hole in shaft and install
locking tool. Thread cutter head onto shaft (turning it
clockwise) until it is tight. Remove locking tool.
Winding string trimer line on the TWIST &
GO trimer head
Fig. 7

EN 14
FZS 5025-B
Mixing the fuel mixture
6. MIXING THE FUEL MIX
WARNING!
Never pour fuel into the fuel tank in a closed and unventilated location.
Do not pour fuel in the vicinity of an open flame or a source of sparks.
Do not overfill the petrol tank. Before starting the engine, make sure that all spilt fuel is wiped away.
If the engine is hot, DO NOT POUR IN FUEL.
For this type of two-stroke engine a mixture of lead-free petrol and two-stroke engine oil is used at a ratio
of 40 : 1.
ATTENTION! A fuel mix that is mixed at a ratio other than 40:1 may damage the engine. Make sure that this
fuel mix is mixed correctly.
When mixing petrol with two-stroke engine oil, use only petrol containing NO ETHANOL or METHANOL (types
of alcohols).
Use quality petrol with an octane number of 95 or higher. This will help prevent possible damage to the fuel
system and other parts of the engine.
We recommend the use of the calibrated container supplied with the brush cutter for mixing the fuel mix.
DO NOT MIX THE PETROL AND OIL DIRECTLY IN THE FUEL TANK.
Storing fuel
Only store fuel in a clear, safe and approved canister. Inform yourself about and adhere to local directives related
to the type and storage of canisters filled with fuel.
IMPORTANT
Fuel for two-stroke engines may separate. Prior to every use, thoroughly shake the canister with fuel.
Stored fuel ages. Do not mix more fuel than you expect to consume within one month.
7. OPERATION
ENGINE STARTING AND STOPPING PROCEDURES STARTING COLD ENGINE
1. Move the ignition switch to START position “|”.
2. Give a gentle push on the primer pump repeatedly (7-10times) until fuel comes into the primer pump.
3. Pull the chock lever up to close choke “ ”.
4. Pull starter handle until engine false fires.
5. Push the chock lever to the run “ ”.
6. Pull starter handle until engine starts.
7. Allow engine to warm up for a few minutes before
using.
40:1
Fig. 9
Ignition switch
START |
STOP 0
Throttle trigger lockout
Throttle trigger

EN
PETROL BRUSH CUTTER USER'S MANUAL
15
Mixing the fuel mixture
STARTING WARM ENGINE
The choke lever to the run “I”.
If fuel tank was not run dry, pull starter one to
three times and engine should start.
If fuel tank was run dry, after refilling repeat steps
1-2-6.
STOPPING THE ENGINE
Release the throttle trigger and allow the engine to
run idle for a few seconds.
Move switch to STOP position “O”.
If the starter rope is pulled repeatedly with the choke
on, it may flood the engine and make starting difficult.
If you have flooded the engine, remove the spark
plug and gently pull the handle on the starter rope
to eliminate any excess fuel; then dry the spark plug
electrodes and replace it on the engine.
Fig. 10
Ignition switch
| START
O STOP
Throttle
trigger Throttle
trigger
Throttle trigger lockout
Ignition switch
the primer pump
the choke lever
choke (close)
run (open)

EN 16
FZS 5025-B
8. PREPARING FOR OPERATION
IMPORTANT:
Follow instructions for preparing the fuel mix! Not following these instruction may damage the engine! Do not
use fuel that has been stored for longer than two months. A fuel mix stored for longer than two months will cause
problems at start up and lower engine performance. If the fuel mix is stored for longer than two months, it should
be removed and new fuel must be used.
Points to check before starting work
1. Check whether any screws, nuts and installation elements are loose. Tighten any loose screws.
2. Check whether the air filter is dirty. Prior to starting work, remove all dirt from the air filter.
3. Make sure that the plastic head guard and the blade is securely fastened in place.
4. Check the fuel tank for leaks.
5. Check the blade or the string trimmer head for damage.
9. SAFETY WORKING WITH BRUSH CUTTER
USING THE SHOULDER HARNESS
1. Assemble and adjust the shoulder harness and belt, as shown.
2. Adjust the shoulder-harness button, and move the hook to your waist, then adjust the belt (If there is a belt).
3. Hang the latch tab on the harness hook.
4. If the brush cutter does’t balance, then adjust the harness hanger, and the handlebar, until it balances.
WARNING CAUTION
The hook is situated at your right hip,and the quick-release latch is situated at the outside.
Fig. 11
SHOULDER
HARNESS
HOOK
HOOK
QUICK-RELEASE
LATCH
SHOULDER
HARNESS
BUTTON
BELT
GROUND TRIMMER
CUTTING
ATTACHMENT
ALUMINIUM
PIPE HARNESS
HANGER
LATCH
TAB
FULL
QUICK-RELEASE LATCH
5. To quickly detach the brush cutter from the harness, pull the quick-release latch tab upward;
6. Insert the latch tongue in the slot of the quick-release latch to reattach the brush cutter to the harness.
WARNING DANGER
Before using, please check the shoulder harness and confirm it is OK. Encounter danger, please stop the brush
cutter immediately,and pull the quick-release latch tab, the brush cutter will be depart from your body.
Preparing for operation | Safety working with brush cutter

EN
PETROL BRUSH CUTTER USER'S MANUAL
17
CUTTING WITH A NYLON HEAD
Line head rotates in a counter CLOCKWISE direction.
The CUT-OFF KNIFE will be on the right side of the
debris shield.
WARNING DANGER
The proper debris shield must be in place on the unit
when nylon cutting line is used. The cutting line can
flap around if too much line is exposed. Always use
the plastic debris shield with cut-off knife when using
nylon cutting heads.
For nearly all cutting, it is good to tilt the line head
so that contact is made on the part of the line circle
where the line is moving away from you and the debris
shield. (See appropraite picture) Thisresults in the
debris being thrown away from you.
WARNING DANGER
Tilting the head to the wrong side will shoot the debris
TOWARDS you.If the line head is held flat to the ground
so that cutting occurs on the whole line circle, debris
will be THROWN at you, drag will slow the engine
down, and you will use up a lot of lines.
WARNING DANGER
Use only quality nylon monofilament line of the
diameter 2.5mm. Never use wire or wire-reinforced
line in place of nylon trimer line. Load your nylon line
cutting head only with nylon trimmer line of the proper
diameter.
WARNING DANGER
Use extreme caution when operating over bare spots
and gravel, because the line can throw small rock
particles at high speeds. Debris shields on the unit
cannot stop objects which bounce or ricochet off hard
surfaces.
Safety working with brush cutter
Fig. 12
Fig. 13
CUT-OFF KNIFE ON LEFT SIDE
COUNTER CLOCK WISE ROTATION
DEBRIS
CUT ON THIS
SIDE

EN 18
FZS 5025-B
Safety working with brush cutter
TRIMMING:
This is feeding the trimmer carefully into the material
you wish to cut. Tilt the head slowly to direct debris
away from you. It’ cutting up to a barrier such as
fence, wall or tree .approach from an angle where
anydebris ricocheting off the barrier will fly away from
you. Move the line head slowly until the grass is cut
right up the barrier, but do not jam(overfeed )the line
into the barrier. If trimming up to a wire mesh or chain
linked fence be careful to feed only up to wire. If you go
to far the line will snap off around the wire. Trimming
can be done to cut through weed stems one at a time.
Place the trimmer line head near the bottom of the
weed-never high up which could cause the weed to
chatter and catch the line. Rather than cut the weed
right through, just use the very end of the line to wear
through the stem slowly.
WARNING DANGER
Do not use a steel blade for edging or scalping
SCALPING AND EDGING:
Both of these are done with the line head tilted at
a steep angle scalping is removing top growth leaving
the earth bear. Edging is trimming the grass back
where it has spread over a sidewalk or drive way.
During both edgingand scalping, hold the unit a steep
angle and in a position where the debris, and any
dislodging dirt and stones, will not come back towards
you even if it ricochets off the hard surface. Although
the picture shows how to edge and scalp every
oprator must find for himself the angles which suits his
body size and cutting situation.
WARNING DANGER
Do not trim in any area where there are strands of
fencing wire, Wear protective safty protecting, Do not
cut where you cannot see what the cutting device is
cutting.
CUTTING WITH A BLADE
There are many different types of blades, however the
two most commonly used are the following.
Fig. 14
TRIMMING DEBRIS
ANGLE TO WALL
ANGLE TO
GROUND
KNIFE SIDE
RAISED
SCALPING
EDGING
AVOID WIRE

EN
PETROL BRUSH CUTTER USER'S MANUAL
19
Safety working with brush cutter
BRUSH BLADE is used for cutting brush and weeds up
to 3/4” in diameter. Only 255mm 3-blade can be used
in this type of brush cutter.
WARNING DANGER
DO NOT USE A BRUSH CUTTER FOR CUTTING TREES.
WARNING DANGER
Do not cut with dull, cracked or damaged metal blade.
Before cutting growth, inspect for obstructions such as
boulders, metal stakes or strands of wire from broken
fences. If an obstruction cannot be removed, mark its
location so that you can avoid it with the blade. Rocks
and metal will dull or damage a blade. Wires can
catch on the blade head and flap around or be thrown
into the air.
Blade thrust is the reaction which may occur when
the spinning blade contacts anything it cannot cut.
This contact may cause the blade to stop for an instant
,and suddenly ‘thrust” the unit away from the object
that was hit.This reaction can be violent enough to
cause the operator to lose control of the unit. Blade
thrust may occur without warning if the blade snags
, stalls or binds.This is more likely to occur in areas
where it is difficult to see the material being cut.For
cutting ease and safely, approach the weeds being cut
from the right to the left,in the event that an unexpected
object or woody stock is encountered,this could
minimise the blade thrust reaction.
SCYTHING WEEDS. This is cutting by swinging the
blade in a level arc. It can quickly clear areas of field
grass and weeds. Scything should not be used to cut
large, tough weeds or woody growths.
NOTE
Do not use a brush blade to cut trees which exceed
a diameter of 1/2 to 3/4 inches.
Fig. 15
Fig. 16
WARNING DANGER
DO NOT TOUCH THESE TYPES OF OBJECTS
WITH BLADE
METAL STAKES
UTILITY WIRES RUBBER
MASONRY
ROCK
FENCES

EN 20
FZS 5025-B
Safety working with brush cutter
Scything can be done in both directions, or just in one
way which results in the debris being thrown away
from you.
Use the side of the blade that it is rotating away from
you. Tilt down the blade slightly on this same side
You will be hit by some debris if you scythe in both
directions.
Do not force the blade to cut. Do not change the angle
of cut after into the wood. Avoid using any pressure or
leverage which could cause the blade to bind or crack.
Fig. 17
Table of contents
Other Fieldmann Brush Cutter manuals

Fieldmann
Fieldmann FZS 5003 B User manual

Fieldmann
Fieldmann FZS 3020-B User manual

Fieldmann
Fieldmann FZS 3005 B User manual

Fieldmann
Fieldmann FZS 3003 B User manual

Fieldmann
Fieldmann FZS 70705-0 User manual

Fieldmann
Fieldmann FZS 3002-B User manual

Fieldmann
Fieldmann FZS 3020-B User manual

Fieldmann
Fieldmann FZS 4004 B User manual