Filter Queen FQSVBO User manual
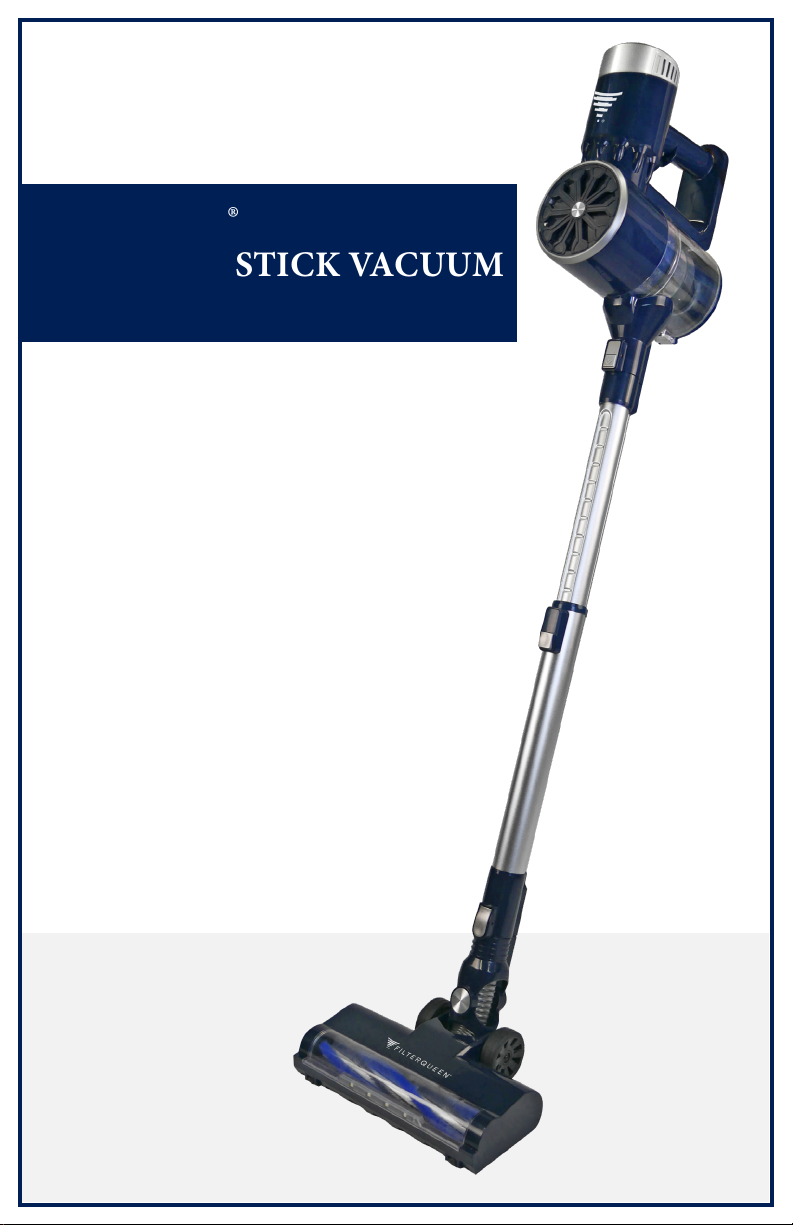
FilterQueen®
CORDLESS STICK VACUUM
FQSVBO

IMPORTANT SAFETY INSTRUCTIONS
READ ALL INSTRUCTIONS PRIOR TO USING THIS APPLIANCE.
WARNING: to reduce the risk of re, electric shock or injury:
• Check that the voltage indicated on the electrical plug corresponds with that of the local network
before connecting the battery to the main power supply.
• is appliance is intended for domestic use only. It should not be used for commercial purposes.
• Children should be supervised to ensure that they do not play with the appliance.
• Do not use the appliance for anything other than its intended use.
• Do not carry the appliance with your nger on the power switch, as to avoid accidents.
• To disconnect the appliance, unplug the electrical cord from the wall outlet. Do not unplug by
pulling on cord. To unplug, grasp the plug, not the cord.
• Do not touch oor nozzle when the vacuum cleaner is on.
• Do not put any object into vacuum cleaner openings. Do not use with any openings blocked; keep
free of dust, lint, hair or anything that may reduce airow.
• Do not use outdoors or on wet surfaces.
• Do not operate the vacuum cleaner or charger if it has been damaged in any way. If vacuum
cleaner is not working as it should, has been dropped, damaged, le outdoors, or dropped into
water, contact Customer Service.
• Avoid excessive heat and damage to the unit or battery.
• Do not pull the charger by cord, use cord as a handle, or cause damage to the cord.
• Do not run appliance over cord. Keep cord away from heated surfaces.
• Do not use extension cords or outlets with inadequate current carrying capacity for the charger.
• Do not handle charger or vacuum cleaner with wet hands.
• Use only with designated battery pack. Other battery pack may create a risk of injury and re.
• Liquid ejected from the battery may cause irritation or burns. If the liquid gets on the skin, (1)
seek medical attention, (2) wash quickly with soap and water, and (3) neutralize with a mild acid
such as lemon juice or vinegar. If the liquid gets into the eyes, ush them immediately with clean
water for a minimum of 10 minutes.
• When battery pack is not in use, keep away from metal objects, like paper clips, coins, keys,
nails, screws, etc., that can make a connection from one terminal to another. Shorting the battery
terminals together may cause burns or a re.
• is product is functioning at a temperature range within 40°F - 104°F.
• Do not use battery/appliance that is damaged/modied, this may result in re, explosion or injury.
• Do not expose a battery pack or appliance to re or excessive temperature. Exposure to re or
temperature above 266°F may cause explosion.
• Do not modify or attempt to repair the appliance or the battery pack except as indicated in the
instructions for use and care.
• Do not pick up anything that is burning or smoking, such as cigarettes, matches, or hot ashes.
• Do not use without lters in place.
• Store vacuum cleaner and charger indoors in a cool, dry area.
• Do not incinerate this appliance even if it is severely damaged.
• Contact local waste facility before discarding in trash.

Main Power Unit
Crevice Nozzle
2-in-1 Brush
Power Adapter
Filter
Wall Bracket
Adjustable Wand
Electric Floor Brush
INPUT 100-240V
OUTPUT 27VDC, 500mA
POWER 180W
BATTERY CAPACITY 2600mAh
PRODUCT PARTS LIST
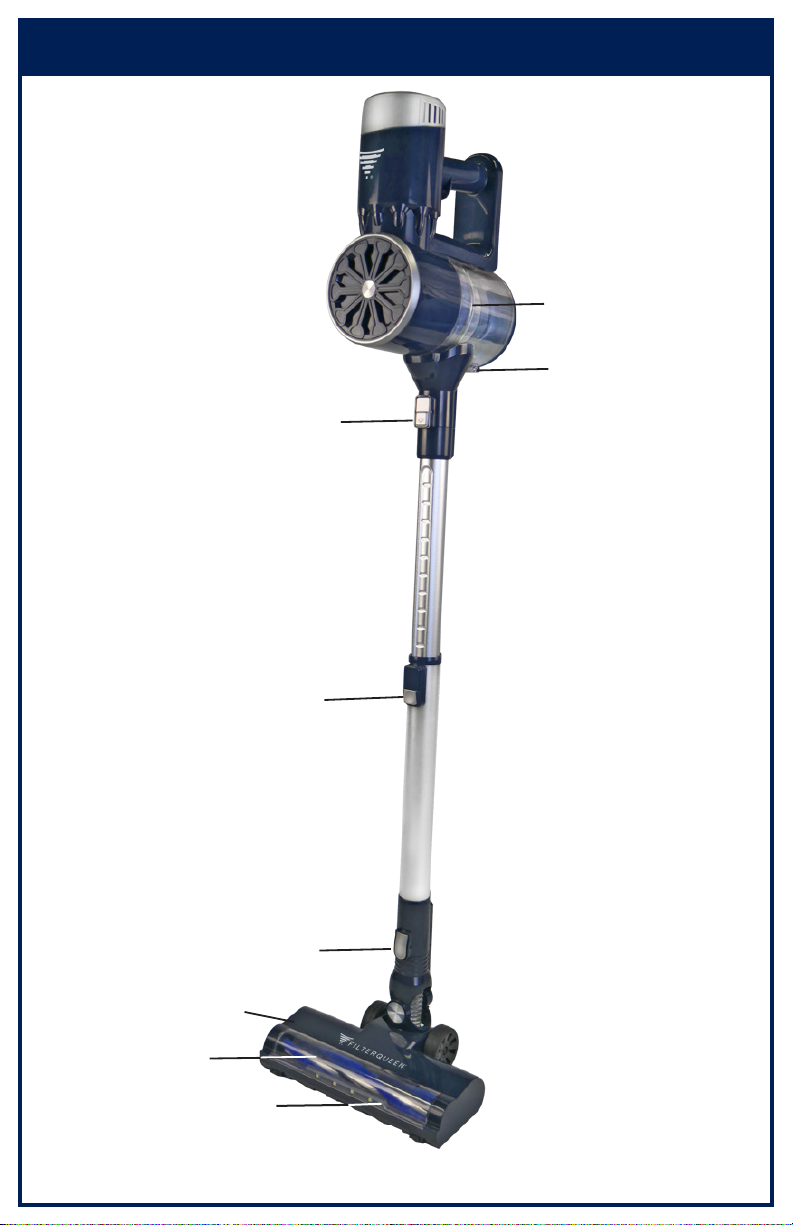
Adjustable Wand
Release Button
Length Adjustment
Button
Attachment Release
Button
LED Headlights
Roller Brush
HEPA and Metal Filter
Dust Collector
Opening Button
Roller Brush
Release Button
GET TO KNOW YOUR STICK VACUUM
GET TO KNOW YOUR STICK VACUUM
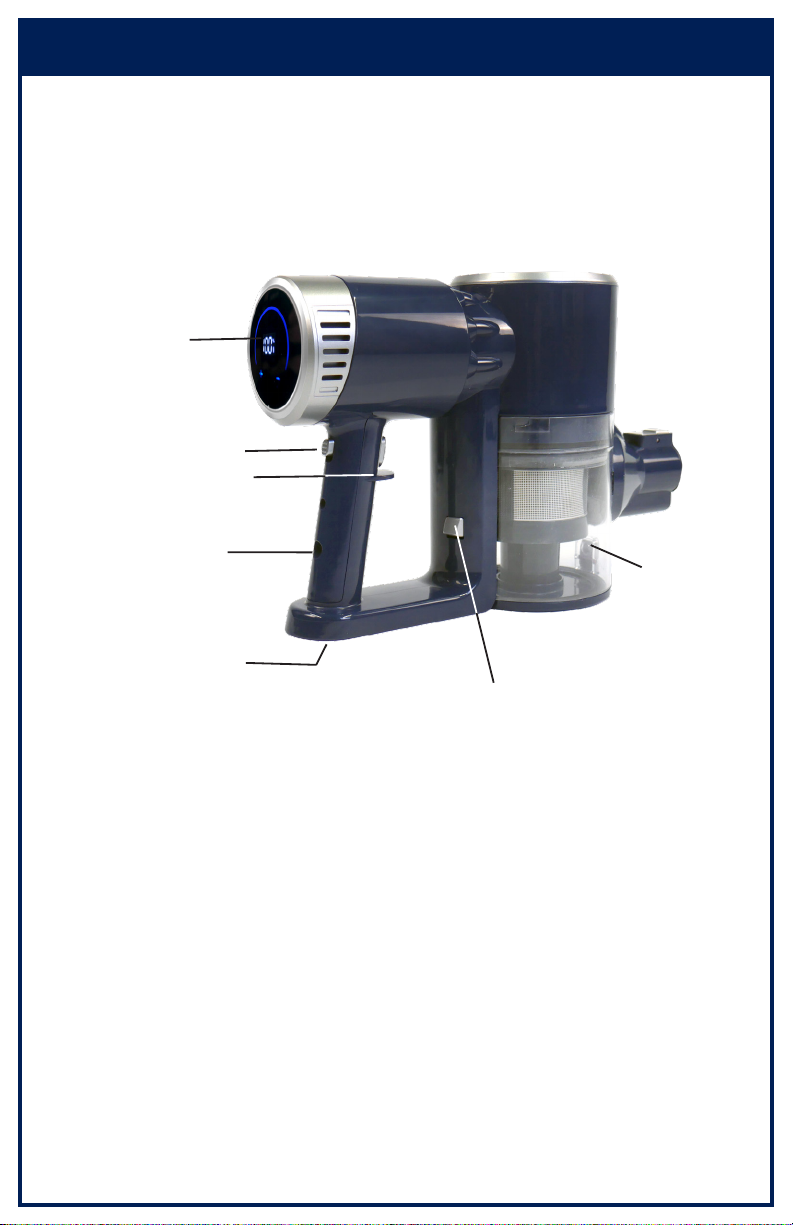
Dust Collector Bin
Release Button
Charging Port
Battery Release Button
LED Display
Power On/O Button
Wall Mount Fixing
Dust Collector
Opening Button
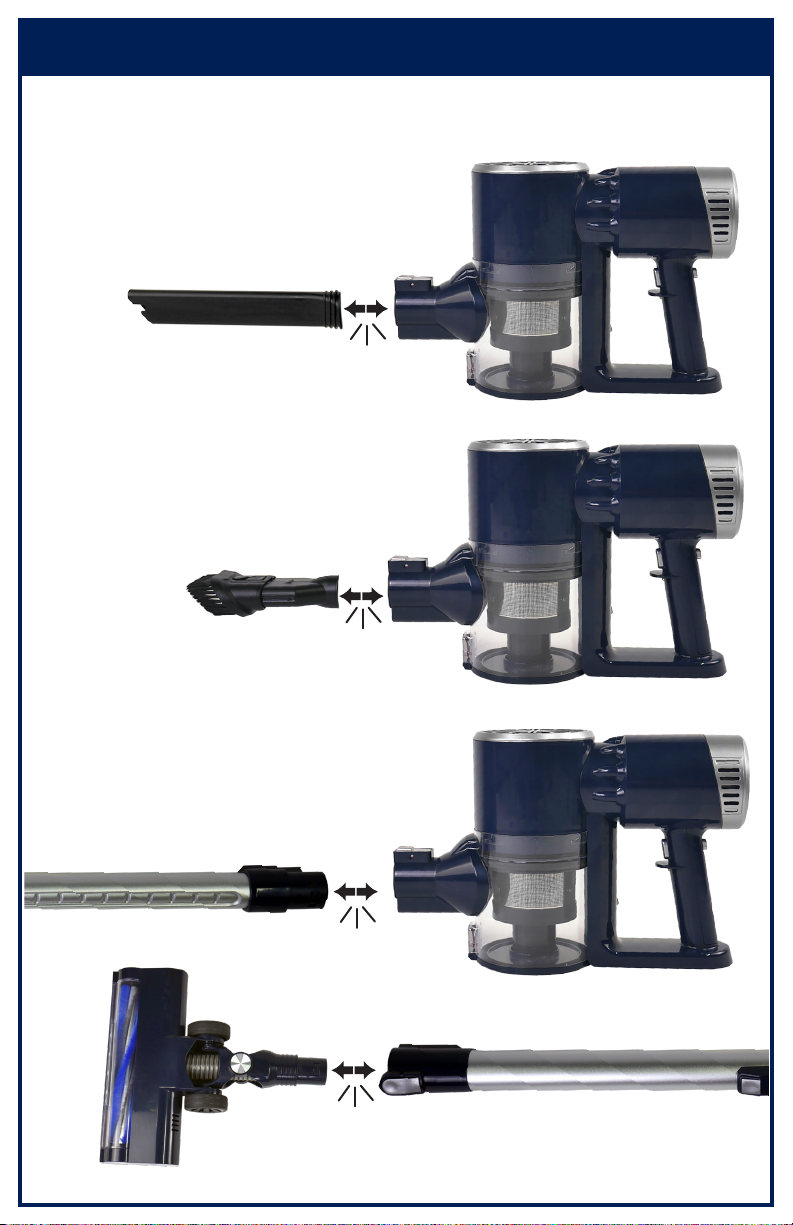
ASSEMBLY
Attach dierent accessories for dierent tasks as illustrated.
click
click
click
click
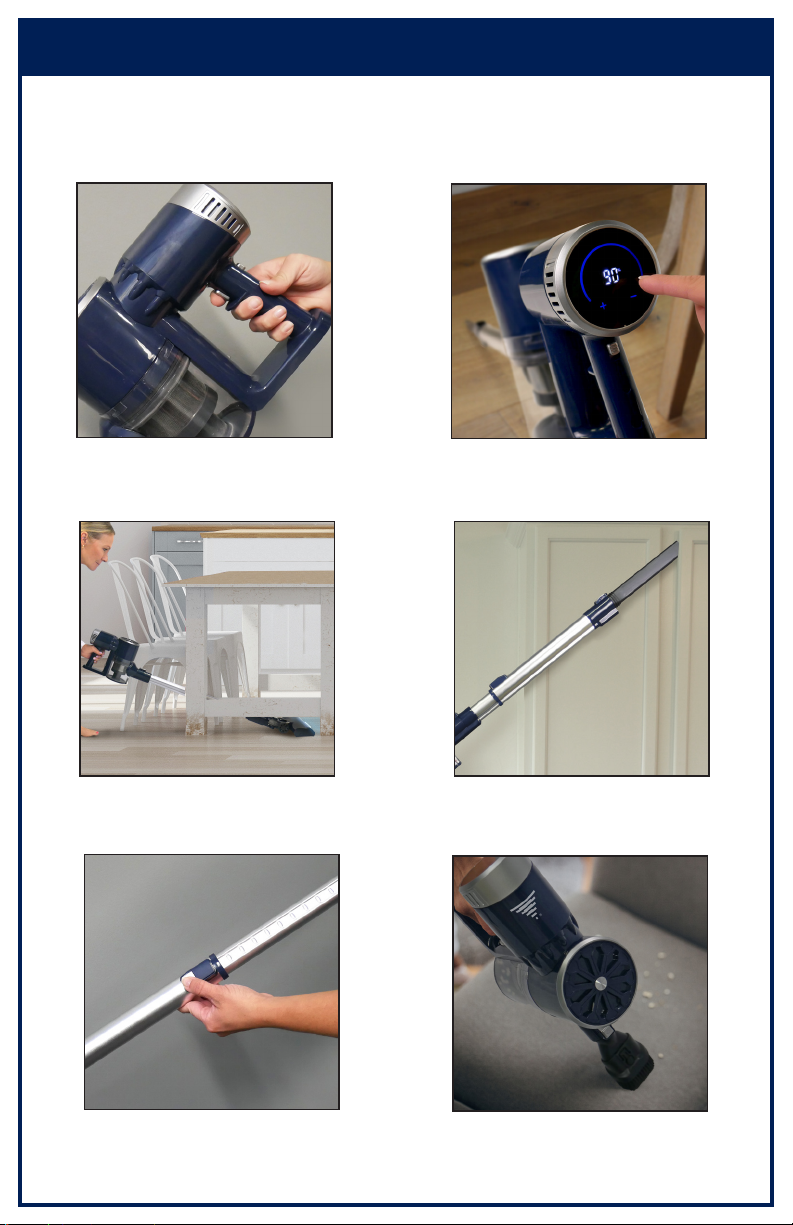
OPERATING
Before use, make sure that:
1. ere is sucient power.
2. e dust collector and lters have been cleaned, dried and are in place.
Press the power button. Press suction strength button to
switch suction level.
Turn vacuum power head for
better reach under furniture.
Adjust the wand for dierent uses
and heights.
Insert the 2-in-1 brush to clean
upholstery or curtains.
Insert the crevice tool to clean in
hard to reach places.
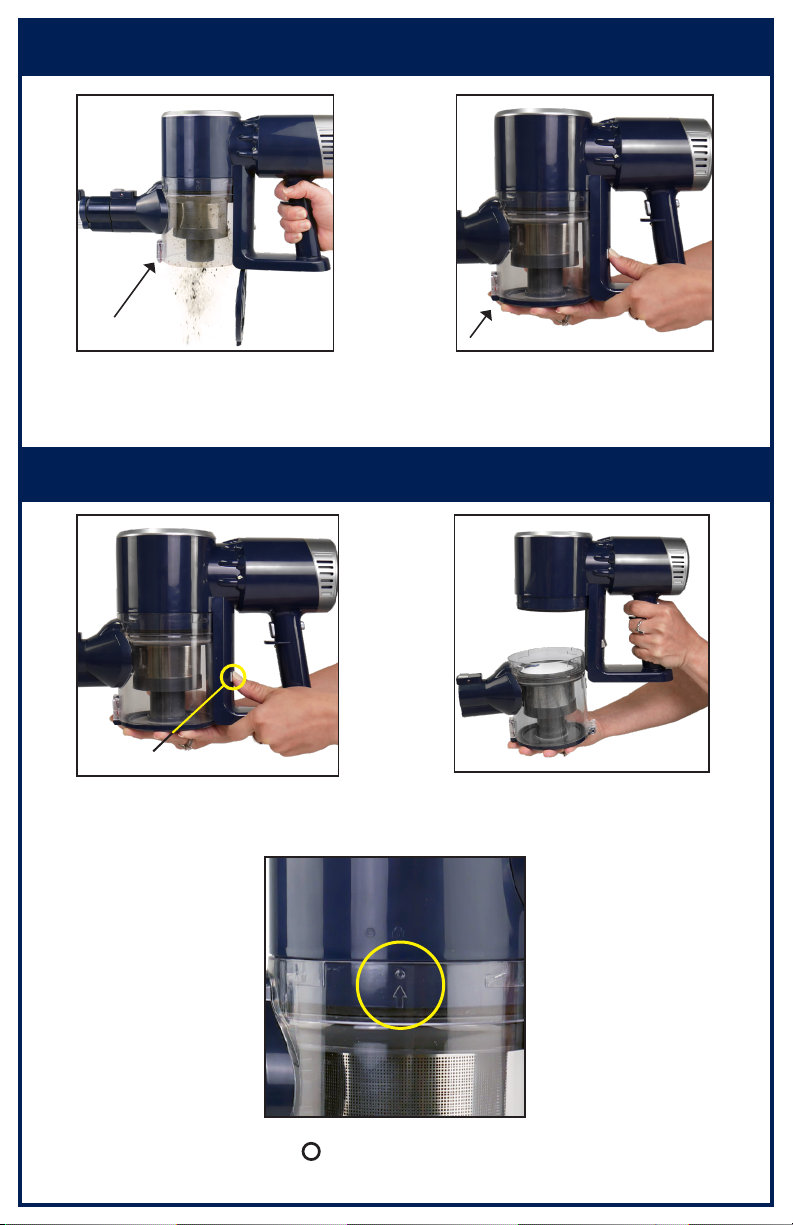
EMPTYING DUST COLLECTOR
1. Hold vacuum base, twist the dust
collector while pressing release
button.
2. Twist dust collector while
pressing button to release.
1. Hold vacuum base, press the
dust collector opening button while
over a garbage can.
2. Click bottom into place once
emptying is complete.
Release button
Opening button
3. Rotate the dust collector so that
the lines up with the to click
the dust collector back into place.
°
REMOVING DUST COLLECTOR
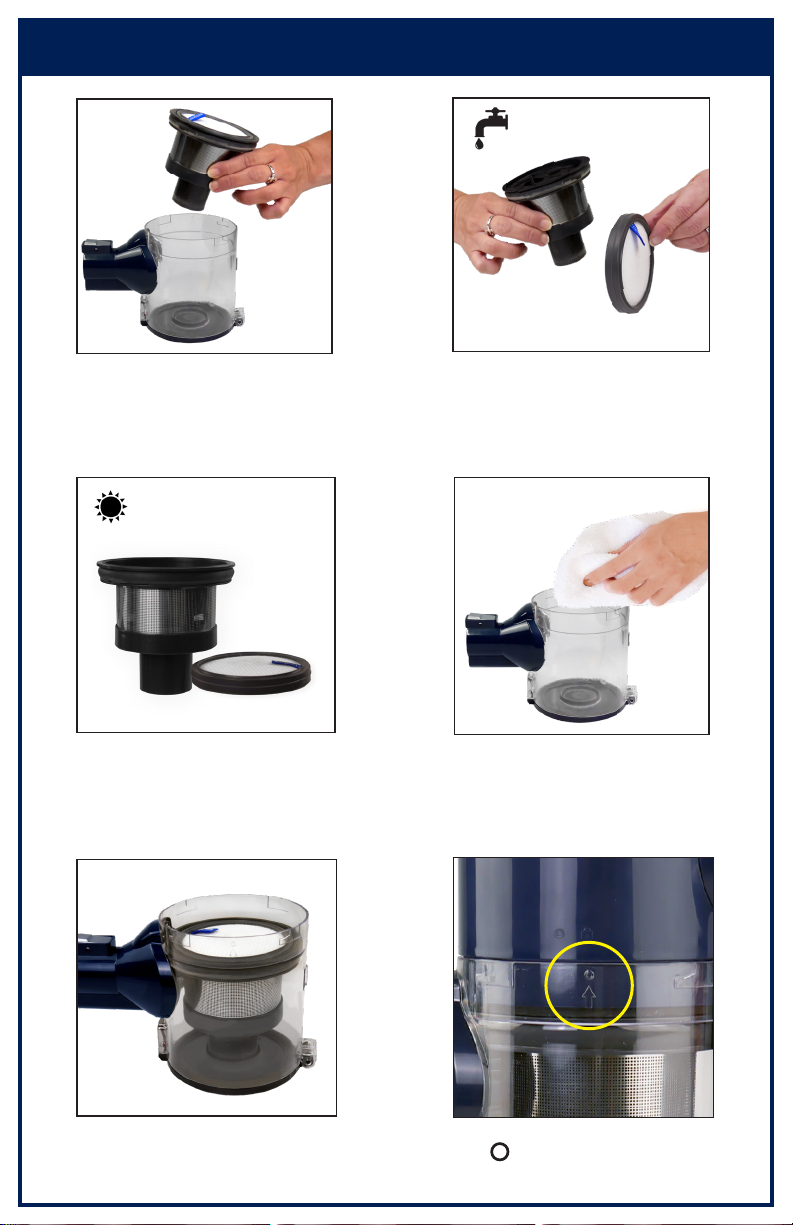
DUST COLLECTOR & FILTER CLEANING
3. Air dry the washable HEPA
lter and metal lter until they are
completely dry.
5. Once lters and dust collector are
dry, place together and lock
into place.
4. Clean dust collector with damp
cloth and mild soap. Let air dry.
1. Take out HEPA washable lter
and the metal lter from the dust
collector.
2. Clean lters with warm water
and mild dish soap.
6. Rotate the dust collector so that
the lines up with the to click
the dust collector back into place.
°
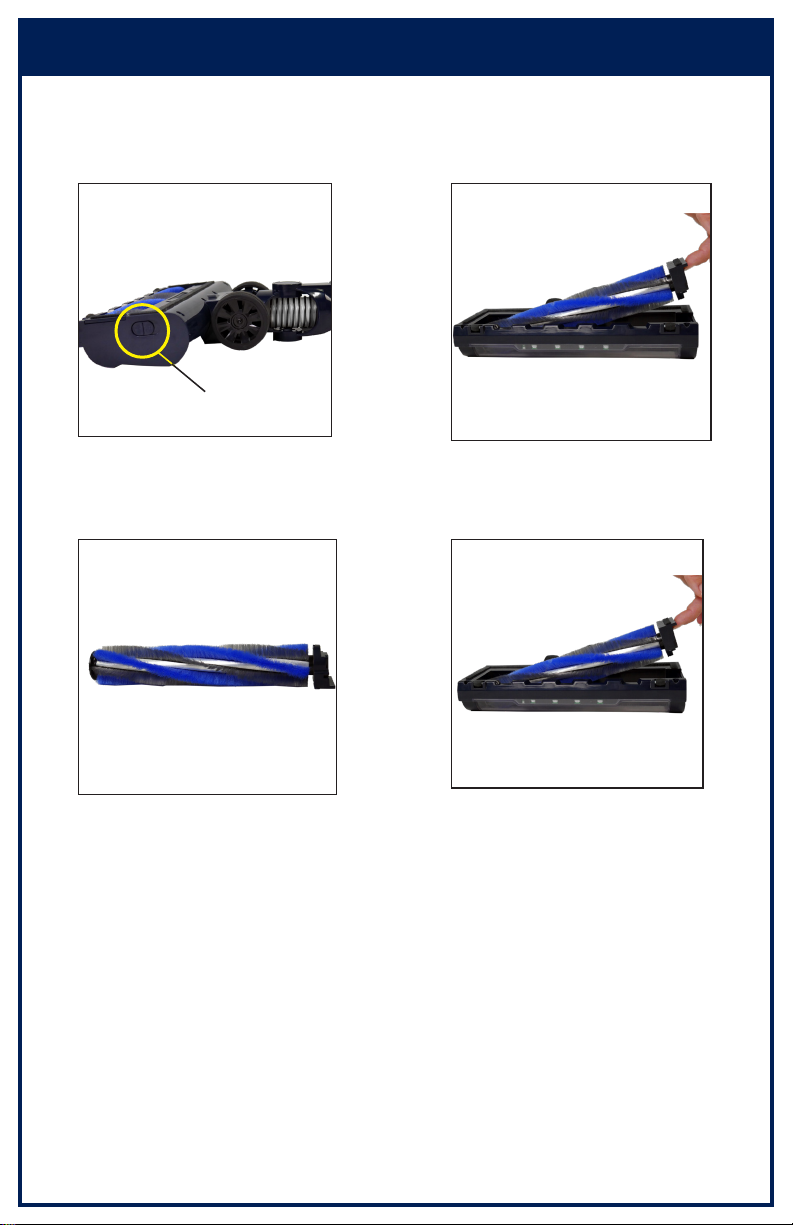
ROLLER BRUSH CLEANING
Make sure electric oor brush attachment is detached from the wand. Do not use
sharp tools when cleaning the roller brush to avoid damage.
1. Press release button on the
side of the electric oor brush to
release rolling brush.
2. Remove the rolling brush.
3. Remove hair, strings, etc. from
the roller brush.
4. Place the rolling brush back into
position and click in.
Release button

WALL MOUNTING
1. Measure the distance between
the bracket holes. 2. Drill two holes as measured into
the wall. Secure the backplate using
the screws provided.
3. Align the vacuum cleaner at
the raised point of the bracket
and hang.
e package contains adhesive pads that can be used to install
the bracket. It is highly recommended to use screws to t the
wall mount more securely.
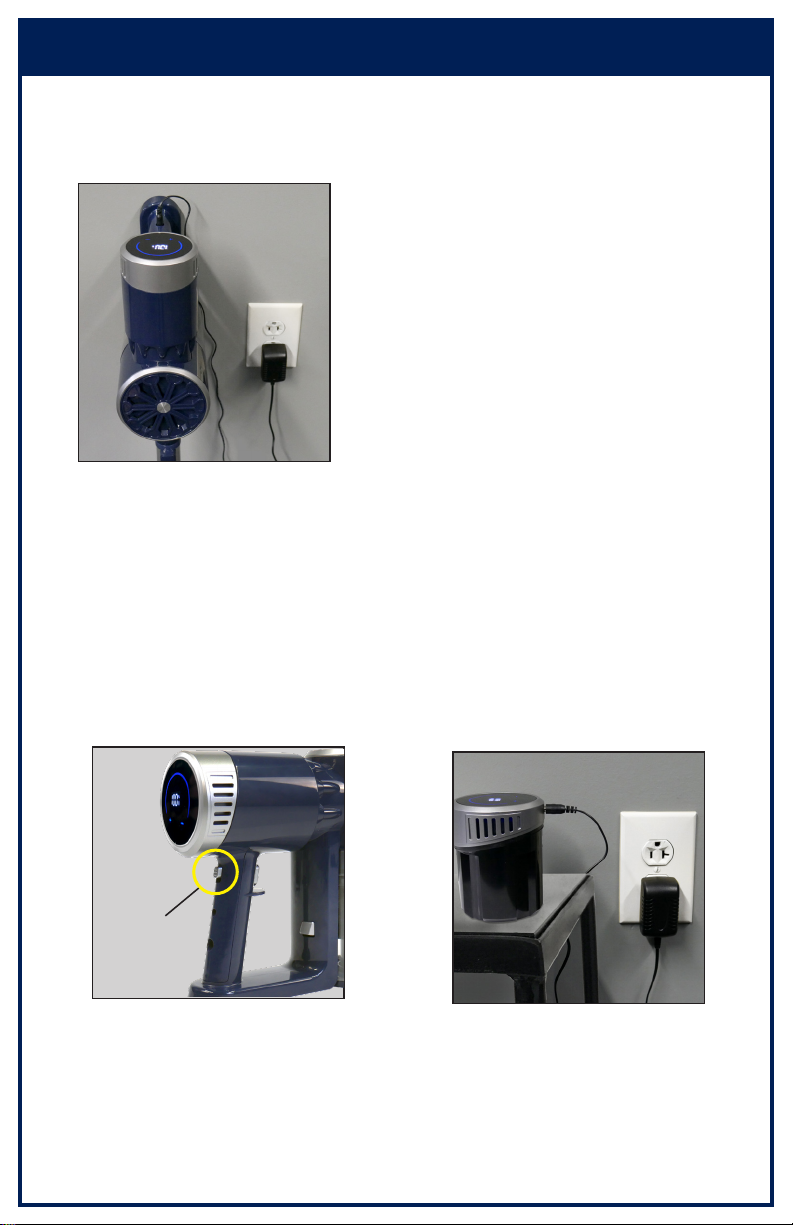
BATTERY CHARGING
Whole Machine Charging
Unplug the power adapter once fully charged.
Plug power adapter into main unit.
Charge Battery Separately
Remove battery and charge.
Unplug the power adapter once fully charged.
2. Plug power adapter into battery.
1. Press battery release button
and pull battery out of main
housing unit.
Battery Release
Button
TROUBLESHOOTING
PROBLEM SOLUTION
Vacuum cleaner
does not work.
Make sure vacuum has power.
Push charger securely into electrical outlet, try
another outlet or check circuit breaker.
Product suction may be blocked - empty dust
collector.
Charging indicator lights are
not lit while charging.
Make sure charger is securely inserted into
electrical outlet.
Make sure charging plug is securely inserted
into the handle.
Indicator lights stop blinking when unit is fully
charged.
Not enough suction power.
Empty dust collector. Clean/change lters.
Remove any clogs restricting airow.
Make sure cleaner is fully powered.
Motor has strange sound when
working.
Empty dust collector. Clean/change lters.
Remove any clogs restricting airow.
Brush roll will not turn/spin.
Clean the roller brush from any hairs or strings.
Make sure roller brush is clicked into place.

WARRANTY
90 DAY LIMITED WARRANTY
• is warranty is for the original purchaser of the FilterQueen® Cordless
Stick Vacuum FQSVBO) and is nontransferable. FilterQueen warrants
that this appliance will have no defects in material and workmanship
under normal household usage for 90 days from the date of purchase.
Keep the original sales receipt for proof of purchase to attain warranty
provisions.
• Up to 90 days from the date of purchase, FilterQueen will repair or
replace, on its own accord, any FilterQueen® Cordless Stick Vacuum or
parts found to be defective. is warranty does not cover any shipping or
handling charges which may incur. is warranty does not include any
damages caused by misuse, accident, neglect, abuse, use with a voltage
higher than what’s marked on the product, or for commercial purposes.
• If your FilterQueen® Cordless Stick Vacuum FQSVBO) is found to be
defective within the time period of this warranty, please contact the
FilterQueen Warranty Department. If this product is discontinued or no
longer available, a replacement may be made with a similar product of
equal or greater value. Any attempt to repair or service this product on
your own will void the warranty.

Health-Mor, Inc.
1 American Road, Suite 1250, Brooklyn, OH 44144
440-846-7800 | www.lterqueen.com
Table of contents
Other Filter Queen Vacuum Cleaner manuals


