Finer Form FF-TB022301 User manual

SKU: FF-TB022301
Indoor Exercise Bike
Please Read User Manual Before
Assembling and Riding

Before we get started, we want to thank you for choosing Finer Form for your new
exercise bike. We know you have many choices for at-home exercise equipment,
so thank you for joining so many others and choosing us!
Customer Service: Contact us First!
- If you have any qustions about assembling the bike, missing parts or pieces, or
you need replacement parts, we want to help you!
- It helps if you can include a picture or video of any issues you may be having
Please include your order ID so that we can help you even more quickly
For exercise instruction videos, please check out our Youtube Channel: Finer Form
Visit finerform.com for savings on more gym-quality fitness equipment.
2
Thank You!

TABLE OF CONTENTS
SAFETY GUIDELINES………………………………………………………………………4
INSPECTION…………………………………………………………………………………5
MAINTENANCE………………………………………………………………………………5
ABOUT THIS BIKE………………………………………………………………………… 6
PARTS DIAGRAM……………………………………………………………………………7
UNPACK THE BIKE………………………………………………………………………… 8
ASSEMBLE IN ORDER …………………………………………………………………… 8
INSTALLATION………………………………………………………………………………9
Step 1: Disassemble Supporting Tubes ………………………………………… 9
Step 2: Assemble Front Base and Rear Base……………………………………9
Step 3: Install Left and Right Pedal……………………………………………… 10
Step 4: Assemble Handlebar Post…………………………………………………10
Step 5: Assemble the Seat Post……………………………………………………11
Step 6: Assemble the Seat………………………………………………………… 11
Step 7: Assemble the Handlebar………………………………………………… 12
Step 8: Install Digital Monitor……………………………………………………… 12
Step 9: Assemble the Tablet Holder……………………………………………… 13
Step 10: Assemble the Bottle Holder………………………………………………13
DIGITAL MONITOR OPERATION………………………………………………………… 14
LIMITED WARRANTY……………………………………………………………………… 15
3

The life of the bike will be prolonged by performing consistent maintenance. Regularly
scheduled maintenance is essential to keeping your bike in top condition. Without
preventative maintenance, normal wear and tear may cause cumulative effects, such
as misalignment or the need for early replacement parts.
1. Once completely assembled, please inspect to make sure all hardware parts such
as bolts, nuts and washers are positioned correctly and tightly connected.
2. Always wear shoes when exercising. Always tighten pedal cage and straps. When
using Spin Shoes, make sure that the buckle is fully inserted. After you hear a click,
do not remove your foot from the pedal while the bike is circling, and do not get off the
bike until the pedal stops circling.
3. Lubricate all moving parts on a monthly basis.
4. Water bottle cages are easily damaged when over-sized bottles are forced to fit
within them. Checking and tightening the screws will help prevent damage.
5. Wipe down the bike at the end of each workout. Consider using mildly alkaline
cleaning or neutral cleaning liquids. Never use water or oil-based cleaning liquids when
wiping down the bike to avoid surface damage.
6. Please keep children away while riding the bike. The bike is designed for adults and
is not suitable for children. Do not let children use the bike.
7. If you have any pain or tightness in your chest, an irregular heartbeat, shortness of
breath, feel faint or have any discomfort while you exercise, STOP immediately and
consult a physician.
8. Do not place fingers or any other objects into moving parts of the exercise equipment.
Do not wear loose clothes that could become tangled in moving parts.
9. Before starting any exercise program, consult with your physician first.
10. After exercising, please turn the adjustment control knob clockwise (+) to increase
tension so the pedals will not rotate freely when not in use.
11. This spin bike has passed the standard test of EN 957-1:2005 and EN 957-10:2005,
and is suitable for light commercial use. The max user weight for this bike is 260 lbs.,
or 120 kg.
SAFETY GUIDELINES
4

INSPECTION
Inspect major moving parts that require proper torque. Ignoring inspection can cause
injury or result in damage to the bike.
Please inspect seat supports, pedal, handlebar, base leveler, belt, tension wheel, and
pedal crank.
Crank: Check the Crank with a 30 to 35 pounds torque wrench regularly to ensure it is
locked.
Pedals: Check the pedal with a pedal wrench regularly to ensure it is locked.
Adjustment Slider: Check the seat adjustment slider and handlebar adjustment slider
regularly to ensure that they are locked and not slipping or shaking.
MAINTENANCE
Wipe down your bike using an absorbent cloth. Focus on all areas where perspiration
can settle. Raise all posts to the highest setting to expose this moisture.
- Handlebar
- Flywheel
- Front leg
- Back leg
- Chain guard
- Brake knob and bolt
- Pop pins
- Base leveler
5

ABOUT THIS BIKE
The unit is designed according to the drive theory of cycling. Adjust the resistance by
turning the Adjusting Knob, and brake by pressing the knob. The equipment is safe
and reliable during exercise. It is suitable for use at home, in the office or other small
places of leisure fitness.
1. Make sure the equipment is flat against the floor and stable before exercising. It can
be leveled to compensate for uneven surfaces through raising or lowering the four Base
Levelers.
2. Adjust Seat to a suitable position by adjusting Seat Support and Seat Post. Please
adjust height of Handlebar Post according to your body size.
3. Set the proper resistance using the Brake Knob. Please set the proper resistance
according to your level of fitness.
4. Please press the Brake-Knob for braking when aggressive exercise is performed.
The bike will stop immediately. Do not leave seat until all parts have come to a complete
stop.
6

PARTS DIAGRAM
TOOLKIT
Main Frame
Handlebar Post Front Base Rear Base
Handlebar
Tablet
Holder
Bottle
Holder
Digital
Monitor
Pedals
Seat Seat Slider Digital
Monitor
Holder
Seat Post
7
ASSEMBLE IN ORDER
Please follow the assembly steps when you install the bike. Do not skip or alter any steps
in this user’s manual, otherwise it might damage the product and void your warranty.
WARNING:
Pay extra attention when this symbol appears. Your safety is invovled
when you see this symbol. Ignoring it could result in personal injury.
NOTE:
Informs you about things we recommend you do or need to be aware of,
before performing the assembly. These notes are placed in the manual to
aid you during specific steps or to make you aware of important actions
or information.
UNPACKING THE BIKE
Carefully remove the bike from the cardboard box. Lay out all the components and
check to assure all parts are present and undamaged. If parts are missing or damaged,
start your assembly. You need an area that is free of dirt, dust or other foreign material
that could impair the assembly of your bike.
NOTE:
The substitution or modification of any part or component, other than what is
approved by Finer Form, will void your warranty.
8
DO NOT:
Insert pedals before reading instructions. The pedals screw in differently. One clockwise,
one counter-clockwise. The threads on the cranks will strip if you force the pedals into
the cranks incorrectly.
- Let’s Get Started

INSTALLATION
Step 2: Assemble Front Base and Rear Base
Place the Front Base (7) and Rear Base (8) under the Main Frame (1), as shown
in below figure. Use 4 pieces of Screws(34) and Washers (33) you take out from Step 1,
and tighten with Tool A.
9
Step 1: Disassemble Supporting Tubes
The bike comes with supporting tubes under front base and rear base in order to reduce
transportation damage. Please use Tool A to take out Screws (34) and Washers (33).
Remove Supporting Tubes and put the supporting tubes aside for now. You don’t need
these tubes to finish assembly. But if you need to return the bike for some reason, please
put the supporting tubes back before you put the bike back in the package.

Step 3: Install Left and Right Pedal - IMPORTANT!
a) Place the Left Pedal (35L) parallel to the ground, 90° vertical to the crank, and turn
counter-clockwise into the left crank. Tighten with Tool B.
b) Place the Right Pedal (35R) parallel to the ground, 90° vertical to the crank, and turn
clockwise into the right crank. Tighten with Tool B
10
WARNING:
1. Make sure there is 90°
angle between crank and
pedal.If it feels stuck when
you turn the pedal in,
unscrew the pedal and try
again. Do not force the
pedal in. It will damage
the thread.
2. Tighten the pedal once
a month.
Step 4: Install Plastic Sleeve and Handlebar Post
a) Insert Plastic Sleeve (63) into Main Frame (1) until you hear a click. Make sure the
plastic sleeve is properly fitted.
b) Slide the Handlebar Post (4) into the Plastic Sleeve (63), and tighten with the L shape
Pop Pin (23).
TOP
Bottom
WARNING:
When you are adjusting the
height of handlebar, always
make sure the L shape Pop
Pin is properly inserted into
the hole。
a
a b
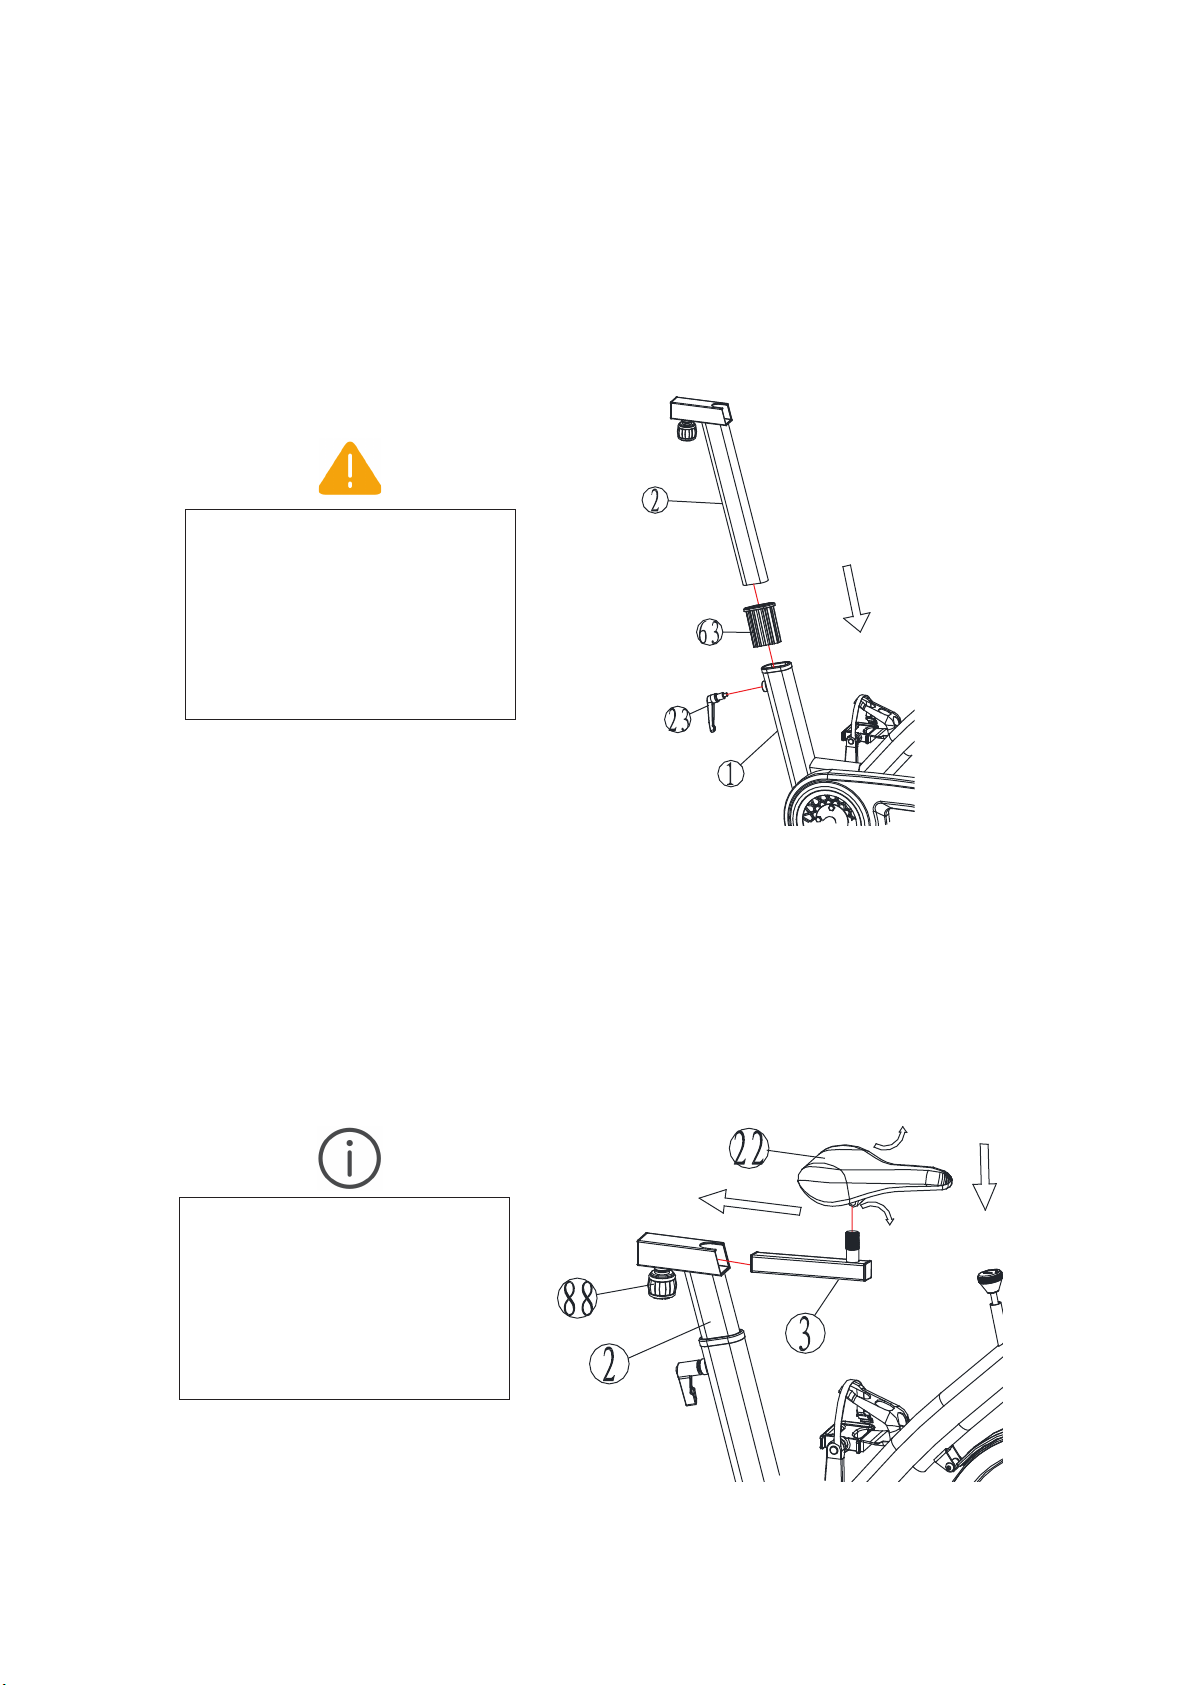
Step 5: Assemble the Seat Post
a) Insert Plastic Sleeve (63) into seat post housing on the Main Frame (1) until you
hear a click. Make sure the plastic sleeve is properly fitted.
b) Slide the Seat Post (2) into the Plastic Sleeve (63), then retighten the Pop Pin (23).
Step 6: Assemble the Seat and Seat Slider
a) Slacken the Pop Pin (88) and slide the Seat Slider (3) into the Seat Post (2), until
you hear a click, then re-tighten the Pop Pin.
b) Insert the Seat (22) onto the Seat Slider (3), tighten locknuts on both sides of the
seat
11
WARNING:
When you are adjusting the
height of seat, always make
sure the L shape Pop Pin is
properly inserted into the
hole.
NOTE:
1. Both locknuts on the two
sides of bike seat need to
be tightened.
2. Adjust the seat angle for
best riding experience.
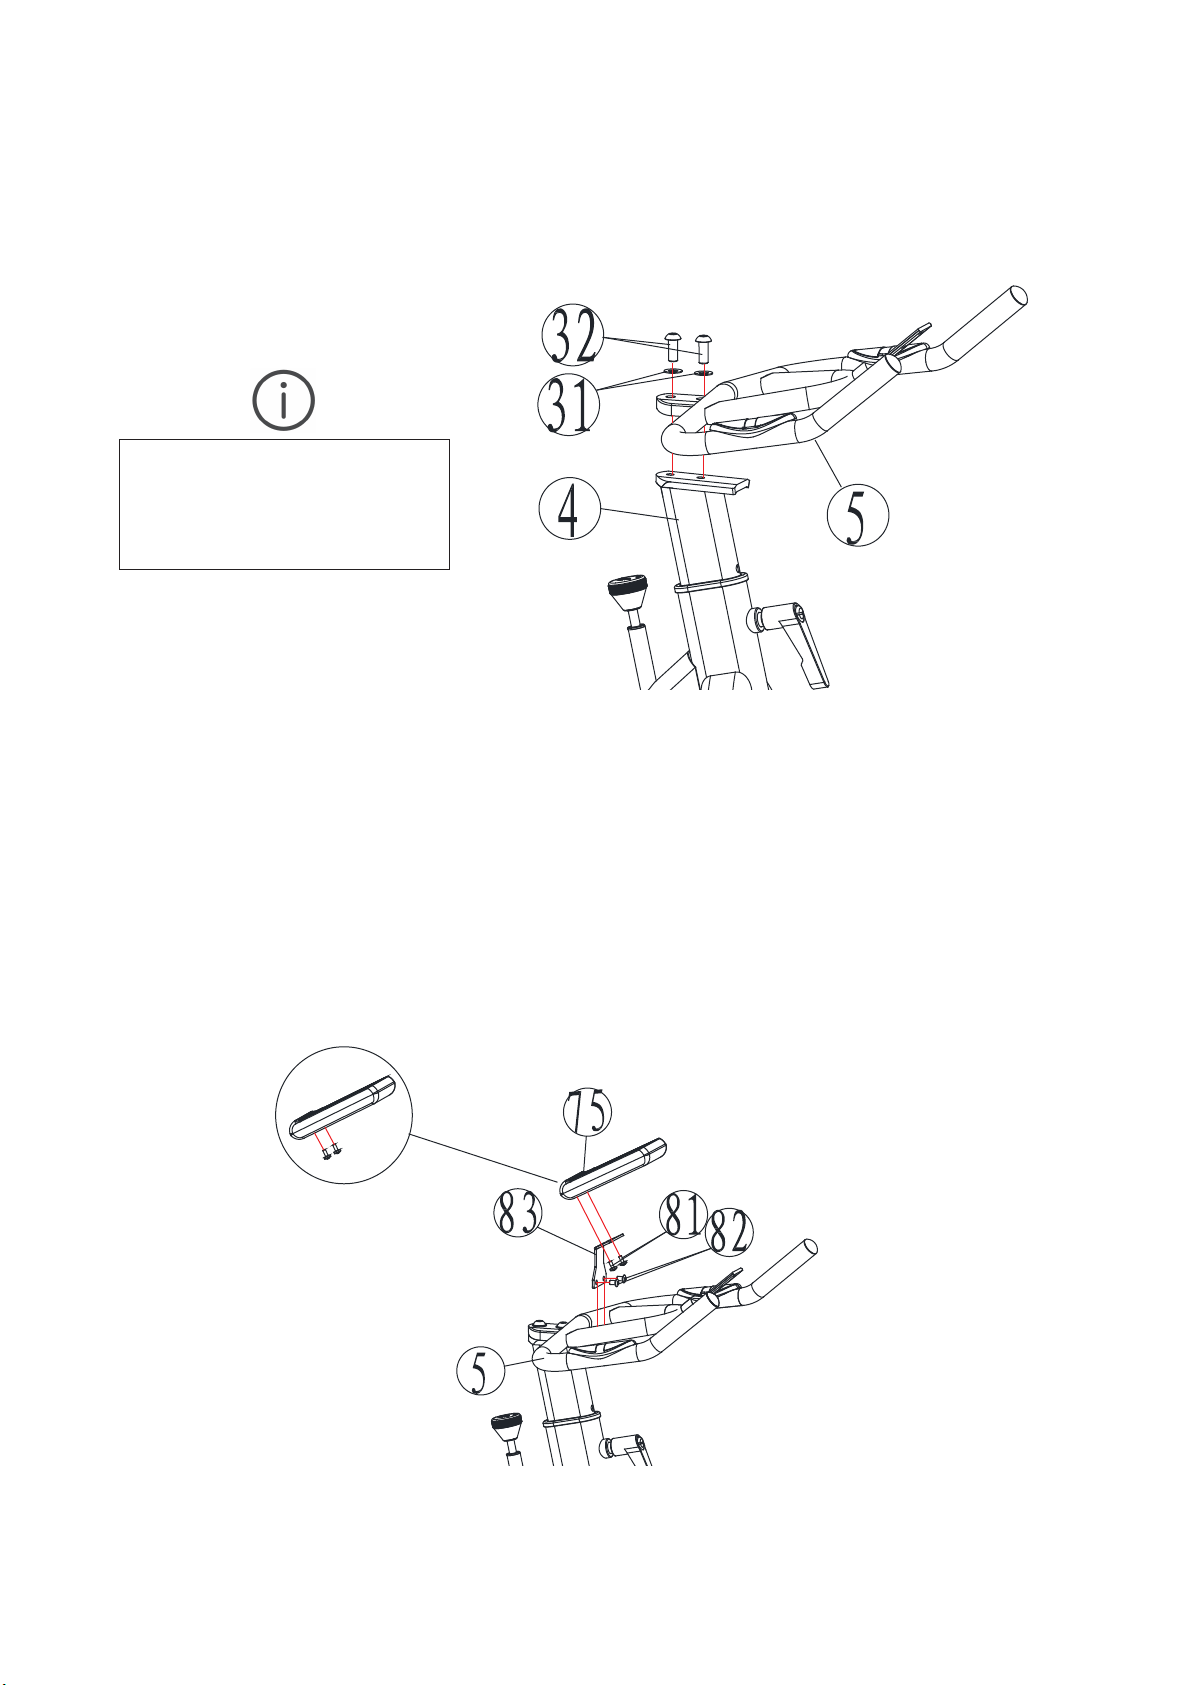
Step 7: Assemble the Handlebar
Place the Handlebar (5) on top of the Handlebar Post (4) and tighten it with Flat Washer
(31) and Bolt M10*25L (32).
12
NOTE:
Tighten bolts (32) during
your monthly maintenance.
Step 8: Install Digital Monitor
a) Fix the Digital Monitor Holder (83) to the Handlebar (5) with Screw (82) and Tool C
b) Take off the two screws (81) behand the Digital Monitor (85) and Fix the Digital Monitor (85)
to the Digital Monitor Holder (83) with these two screws (81).
c) Connect the wires on the Digital Monitor Holder (83) with the wire on the Main Body (1).

Step 9: Install Tablet Holder
a) Take the two screws (87) off from the Tablet Holder (80)
b) Fix the Tablet Holder (80) to the handlebar (5) with these two screws (87)
Step 10: Assemble the Bottle Holder
a) Take the two screws (59) and two washers (59) off from the Bottle Holder (74)
b) Attach the Bottle Holder (74) with the Main Frame (1) with these two screws (59),
two washers (59)
13
You’re Done! Congratulations!
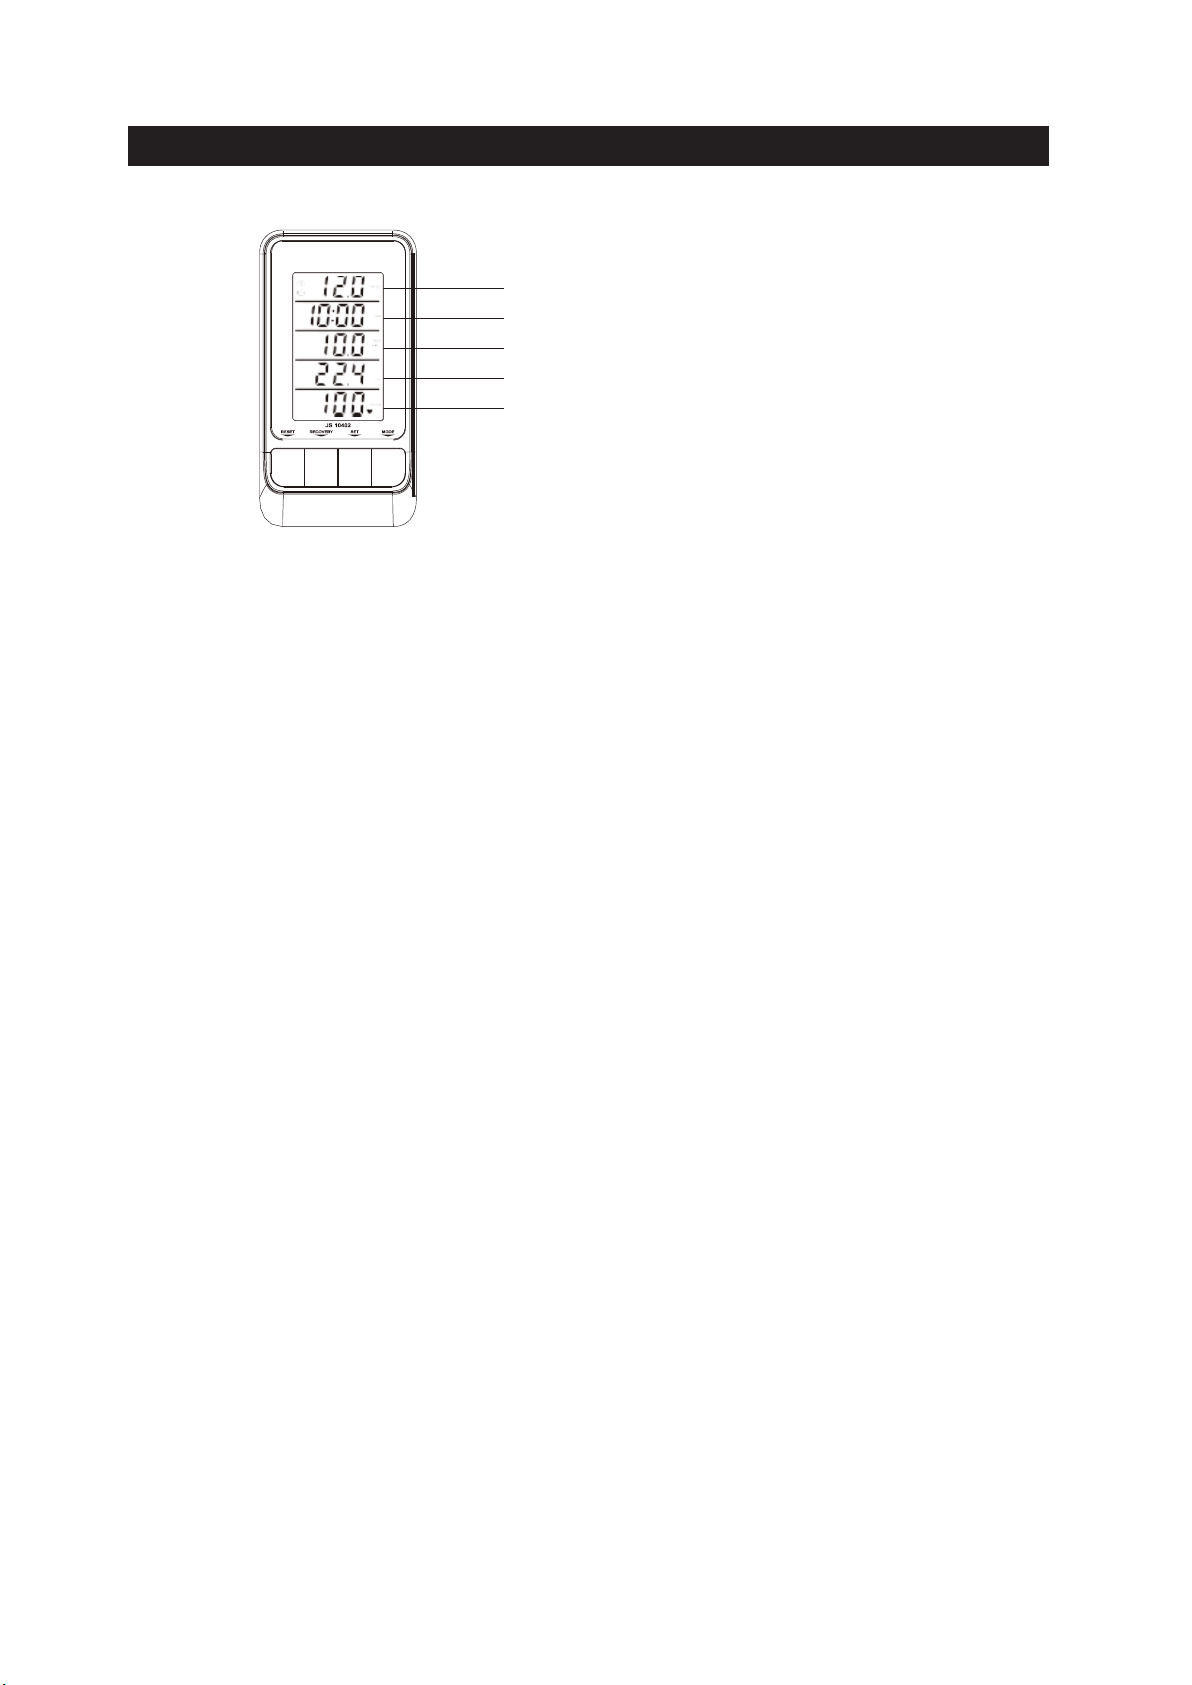
DIGITAL MONITOR OPERATION
14
SPEED / AVG SPEED / MAX SPEED
TIME
DISTANCE
CALORIES / RPM
PULSE / AVG PULSE / MAX PULSE
RESET
Hold MODE button for 2 seconds to reset all the data.
SET THE TARGET PARAMETERS
1. Before exercise, press MODE to choose the window to be set or reset.
2. Press RESET to clear the value, and press SET to set the flashing window’s value.
3. Hold the button to quick increase.
4. Set the value as:TIME→DIST→CAL.
CHECK THE EXERCISE DATA
During exercise, press MODE to check value of each window
PULSE RECOVERY
1. Hold the hand pulse detector for the computer to display your current heart rate.
2. When the pulse window has display, stop exercise, then press RECOVERY to enter
pulse recovery mode.
3. The display will show 1 minute countdown as well as your pulse rate
4. test your pulse until it counts down to zero. Then it will display your pulse recovery
level from F1 to F6.
5. F1 is the fastest recovery, F6 is the slowest recovery.
6. Press RECOVERY again to exit the pulse recovery function.
REPLACE BATTERY
When the display color fades, the batteries need to be replaced. Take off the battery
cover, and use 2 new AAA batteries to replace the old ones.

Finer Form warrants that this product will be free from defects in materials and
workmanship as outlined below:
3 Years: Main Frame
180 Days:
- Left/Right Crank
- L Shape Pop Pin
- Left/Right Pedal
- Flywheel Spindle
- Bearing
- Pedal Feet Sheath
- Pedal Strip
- Handlebar & Seat Post Bushing
- Digital Monitor
- Sensor Bottom Link
- Sensor Mid Link
- Global Pop Pin
This warranty is not transferable.
This warranty is limited to the non-commercial use of Finer Form products purchased
in the United States.
Finer Form will not be liable for any loss or damage, including incidental or consequential
damages of any kind, whether based upon warranty, contract or negligence, and arising in
connection with the sale, use or repair of the product.
This warranty does not cover damage caused by any accident (including in transit), repairs
or attempted repairs by any person not authorized by Finer Form, or by vandalism, misuse,
abuse, or alteration.
In order to obtain service under this warranty, use the following procedure:
2) Be sure to include the order number, name, phone number, and brief statement
concerning the part in question.
@Finer Form. All rights reserved.
LIMITED WARRENTY
15
Table of contents


