Spirit Commercial CR900ENT User manual

CR900ENT FITNESS BIKE
OWNER’S MANUAL

Spirit Fitness

www.spirittness.com
TABLE OF CONTENTS
3 IMPORTANT SAFETY INSTRUCTIONS
3 IMPORTANT ELECTRICAL INSTRUCTIONS
4 PRODUCT REGISTRATION
5 CR900ENT ASSEMBLY INSTRUCTIONS
11 CONSOLE OPERATION
20 TOUCH SCREEN OPERATION
27 PROGRAMMING THE CONSOLE
34 GENERAL MAINTENANCE
35 MANUFACTURER’S LIMITED WARRANTY
Thank you for purchasing our product, please save these instructions. Please do not perform or attempt any
customizing, adjustments, repair or maintenance that is not described in this manual.

2
Spirit Fitness
Congratulations on your new tness bike and welcome to the Spirit Fitness family!
Thank you for your purchase of this quality tness bike from Spirit Fitness. Your new tness bike was
manufactured by one of the leading tness manufacturers in the world and is backed by one of the
most comprehensive warranties available. Through your dealer, Spirit Fitness will do all we can to
make your ownership experience as pleasant as possible for many years to come. If not purchased
directly from Spirit Fitness, the local dealership where you purchased this tness bike is your
administrator for all Spirit Fitness warranty and service needs. Their responsibility is to provide you
with the technical knowledge and service personnel to make your experience more informed and any
difculties easier to remedy.
Please take a moment at this time to record the name of the dealer, their telephone number, and the
date of purchase below to make any future, needed contact easy. We appreciate your support and we
will always remember that you are the reason that we are in business.
Yours in Health,
Spirit Fitness
NAME OF DEALER _____________________________________
DEALER PHONE # _____________________________________
PURCHASE DATE _____________________________________

3
www.spirittness.com
IMPORTANT SAFETY
INSTRUCTIONS
WARNING
• Before beginning this or any exercise program,
consult a physician. This is especially important for
persons over the age of 35 or persons with pre-
existing health conditions.
• Keep children away from the tness bike. There are
obvious pinch points and other caution areas that can
cause harm.
• Keep hands away from all moving parts.
• Never drop or insert any object into any openings.
• Do not use outdoors.
• Do not attempt to use your tness bike for any
purpose other than for the purpose it is intended.
• The hand pulse sensors are not medical devices.
Various factors, including the user’s movement, may
affect the accuracy of heart rate readings. The
pulse sensors are intended only as exercise aids in
determining heart rate trends in general.
• Wear proper shoes. High heels, dress shoes, sandals
or bare feet are not suitable for use on your tness
bike. Quality athletic shoes are recommended to
avoid leg fatigue.
• Maximum User Weight: 450 lbs
• This appliance is not intended for use by persons with
reduced physical, sensory or mental capabilities, or lack
of experience and knowledge, unless they have been
given supervision or instruction concerning use of the
appliance by a person responsible for their safety.
• Keep children under the age of 13 away from this
machine.
SAVE THESE INSTRUCTIONS - THINK SAFETY!
IMPORTANT ELECTRICAL
INSTRUCTIONS
WARNING
NEVER expose this tness bike to rain or moisture. This
product is NOT designed for use outdoors, near a pool
or spa, or in any other high humidity environment. The
operating temperature specication is 40 to 120 degrees
Fahrenheit, and humidity is 95% non-condensing (no
water drops forming on surfaces).

4
Spirit Fitness
IMPORTANT OPERATION INSTRUCTIONS
• NEVER operate this tness bike without reading and completely understanding the results of any operational change
you request from the computer console.
• Understand that changes in resistance do not occur immediately. Set your desired resistance level on the computer
console and release the adjustment button. The computer will obey the command gradually.
• Use caution while participating in other activities while pedaling on your tness bike; such as watching television,
reading, etc. These distractions may cause you to lose balance which may result in serious injury.
• Do not use excessive pressure on console control buttons. They are precision set to function properly with little
nger pressure.
WARNING:
This product may contain a chemical known to the state of California to cause cancer, birth defects, or
other reproductive harm.
RECORD YOUR SERIAL NUMBER
Please record the serial number of this tness product in the space provided below. The serial number is
located at the front of the tness bike.
SERIAL NUMBER:
REGISTER YOUR PURCHASE
The self-addressed product registration card must be completed in full and returned to Spirit Fitness. You can
also go to www.spirittness.com/commercialwarrantyregistration.html under the Support tab to register online.

5
www.spirittness.com
CR900ENT PRE-ASSEMBLY
TOOLS INCLUDED:
13/15mm Wrench
17mm Wrench (2)
Phillips Screwdriver
5mm Allen Wrench
6mm Allen Wrench
PARTS INCLUDED:
1 Main Frame
1 Console Mast
1 Rear Stabilizer
1 Seat Back Frame
1 Front Handle Bar
1 Rear Handle Bar
1 Seat Back Cover
2 Console Mast Covers
1 Console Bracket Cover
2 Rear Stabilizer Covers
1 Console
1 Seat Cushion
2 Cup Holders
1 Rear Handle Bar Cover
2 Pedals
1 Hardware Kit
1 Seat Cover Retaining
Bracket
UNPACKING
1. Cut the straps, then along the dotted line on the bottom of the box; lift the box over
the unit and unpack.
2. Locate the hardware package. The hardware is separated into four steps. Remove
the tools rst. Remove the hardware for each step as needed to avoid confusion.
The numbers in the instructions that are in parenthesis (#) are the item number from
the assembly drawing for reference.
6
Spirit Fitness
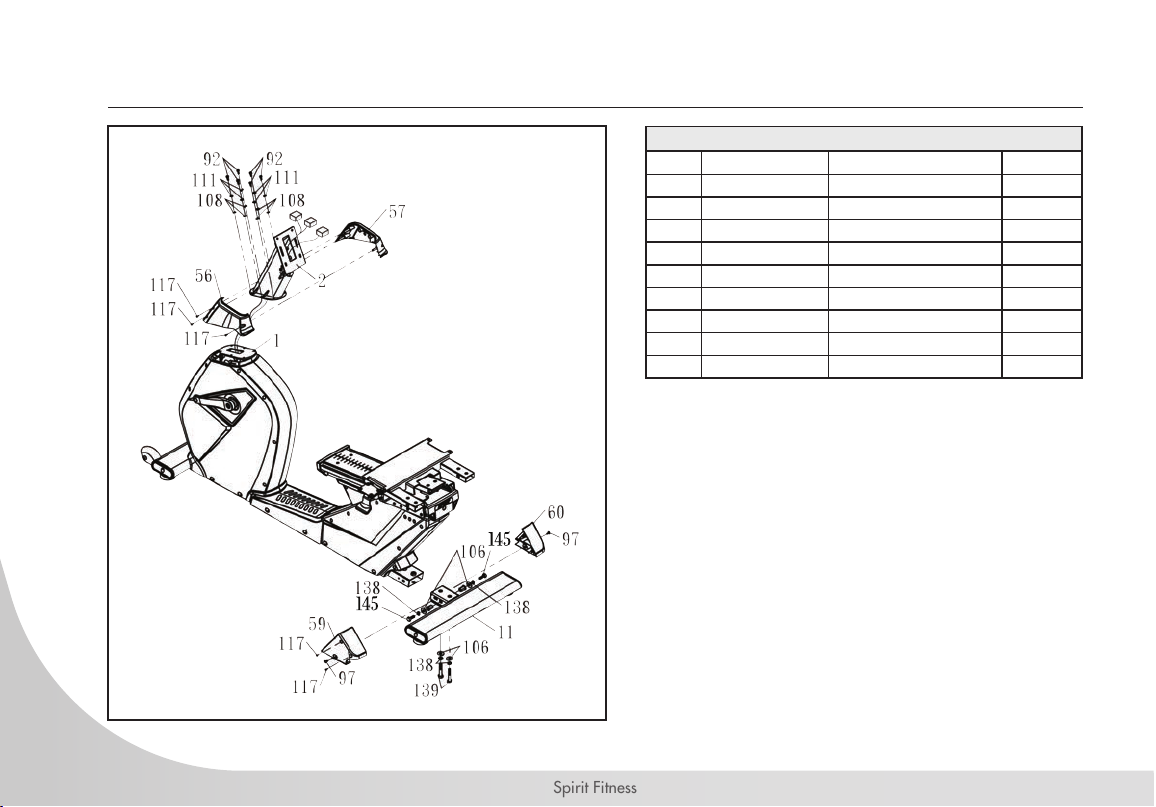
CR900ENT STEP ONE
HARDWARE FOR STEP 1
PART TYPE DESCRIPTION QTY
92 BOLT M6x1.0x12mm 6
97 SCREW M5x0.8x12mm 2
106 WASHER 10x25x2.0 4
108 WASHER 6x13x1.0 6
111 SPLIT WASHER 6 6
117 SCREW 3.5x12mm 5
138 SPLIT WASHER 10x1.5 4
139 BOLT M10x1.5x55mm 2
145 BOLT M10x1.5x30mm 2
1. Install REAR STABILIZER (11) onto MAIN FRAME (1)
with 2 short BOLTS (145), 2 long BOLTS (139), 4
SPLIT WASHERS (138), and 4 WASHERS (106).
2. Attach left and right STABILIZER COVERS (59 &
60) to MAIN FRAME (1) with 2 SCREWS (97). Join
together with 2 SELF TAPPING SCREWS (117).
3. Run the WIRING HARNESS through the CONSOLE
MAST (2) and out the top.
4. Attach CONSOLE MAST (2) to MAIN FRAME (1)
using 6 BOLTS (92), 6 SPLIT WASHERS (111), and 6
WASHERS (108).
5. Place left and right CONSOLE MAST COVERS (56 &
57) around base of CONSOLE MAST (2). Join covers
together with 3 SELF TAPPING SCREWS (117).
145
145

7
www.spirittness.com
CR900ENT STEP TWO
HARDWARE FOR STEP 2
PART TYPE DESCRIPTION QTY
94 BOLT M8x1.25x25mm 2
97 SCREW M5x0.8x12mm 8
105 WASHER 8x18x1.5 2
112 SPLIT WASHER 8x1.5 2
1. Attach FRONT HANDLE BAR (8) to CONSOLE
MAST (2) with 2 BOLTS (94), 2 SPLIT WASHERS
(112) and 2 WASHERS (105).
2. Connect WIRING HARNESS CABLES (74, 131)
to CONSOLE (68).
3. Connect WIRING HARNESS CABLES (74, 127,
128, 129, 131, 132, 137) to CONSOLE (68).
Attach CONSOLE (68) to CONSOLE MAST (2)
with 4 SCREWS (97). Ensure all cables do not
become pinched.
4. Attach CONSOLE BRACKET COVER (64) to
CONSOLE MAST (2) using 4 SCREWS (97).
STEP 3-5 and 3-6
8
Spirit Fitness
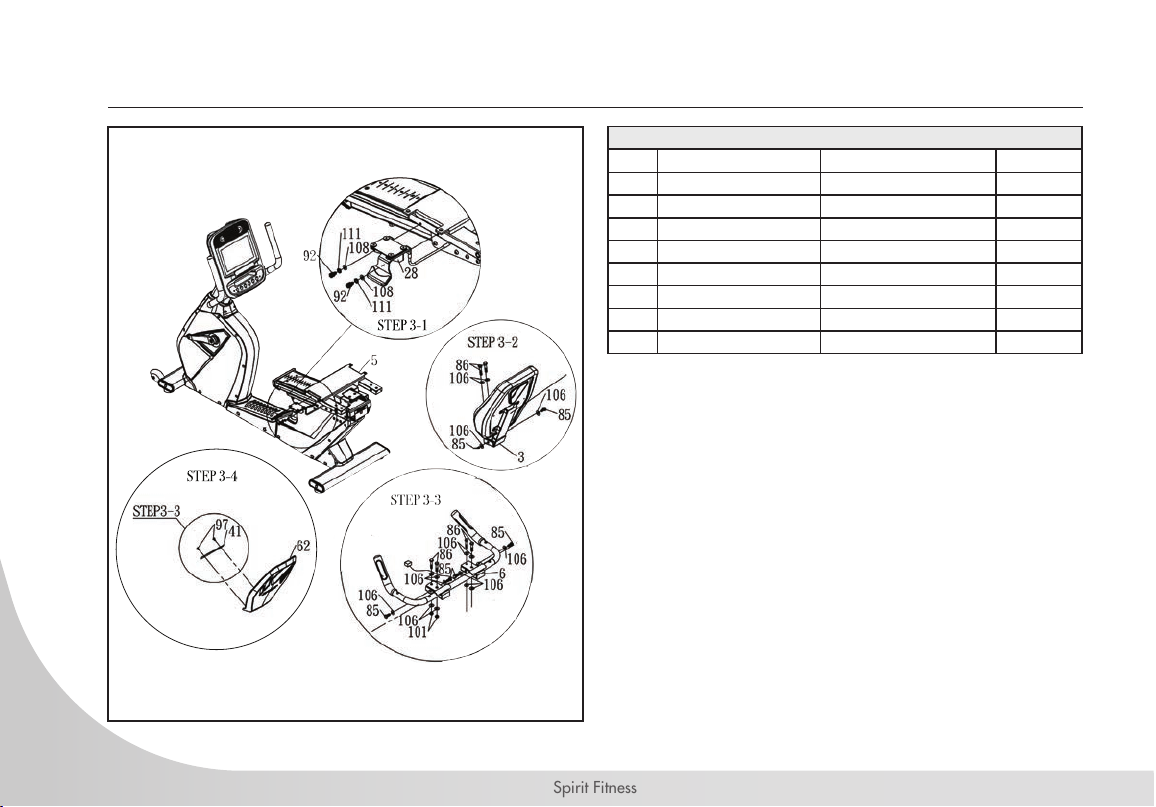
CR900ENT STEP THREE
HARDWARE FOR STEP 3
PART TYPE DESCRIPTION QTY
85 BOLT M10x1.5x25mm 6
86 BOLT M10x1.5x50mm 6
92 BOLT M6x1.0x12mm 2
101 NUT M10xP1.5x8 4
106 WASHER 10x25x2.0 16
108 WASHER 6x13x1.0 2
111 SPLIT WASHER 6 2
116 SELF-TAPPING SCREW 4x12mm 6
1. Install SEAT RELEASE LEVER (28) onto SEAT CARRIAGE
FRAME (5) with 2 BOLTS (92), 2 LOCK WASHERS (111),
and 2 WASHERS (108).
2. Install SEAT BACK FRAME (3) onto SEAT CARRIAGE
FRAME (5) with 2 short BOLTS (85), 2 long BOLTS (86),
and 4 WASHERS (106).
3. Attach REAR HANDLE BAR (6) to SEAT CARRIAGE
FRAME (5) using 4 long BOLTS (86), 4 shot BOLTS (85),
12 WASHERS (106), and 4 NUTS (101). And connect the
WIRING HARNESS CABLES between REAR HANDLE BAR
(6) and SEAT CARRIAGE FRAME (5).
4. Loosen 2 SCREWS (97) to remove SEAT COVER
RETAINING BRACKET (41) from SEAT BACK FRAME (3).
STEP 3-1
STEP 3-4

9
www.spirittness.com
CR900ENT STEP THREE
5. Attach REAR HANDLE BAR COVER (61) to
REAR HANDLE BAR (6) using 2 SELF TAPPING
SCREWS (116).
6. Attach CUP HOLDERS (120 & 121) to REAR
HANDLE BAR (6) using 4 SELF TAPPING
SCREWS (116).
7. Attach SEAT BACK COVER (62) to SEAT BACK
FRAME (3). Install SEAT COVER RETAINING
BRACKET (41) using 2 SCREWS (97).
STEP 3-5 and 3-6
10
Spirit Fitness
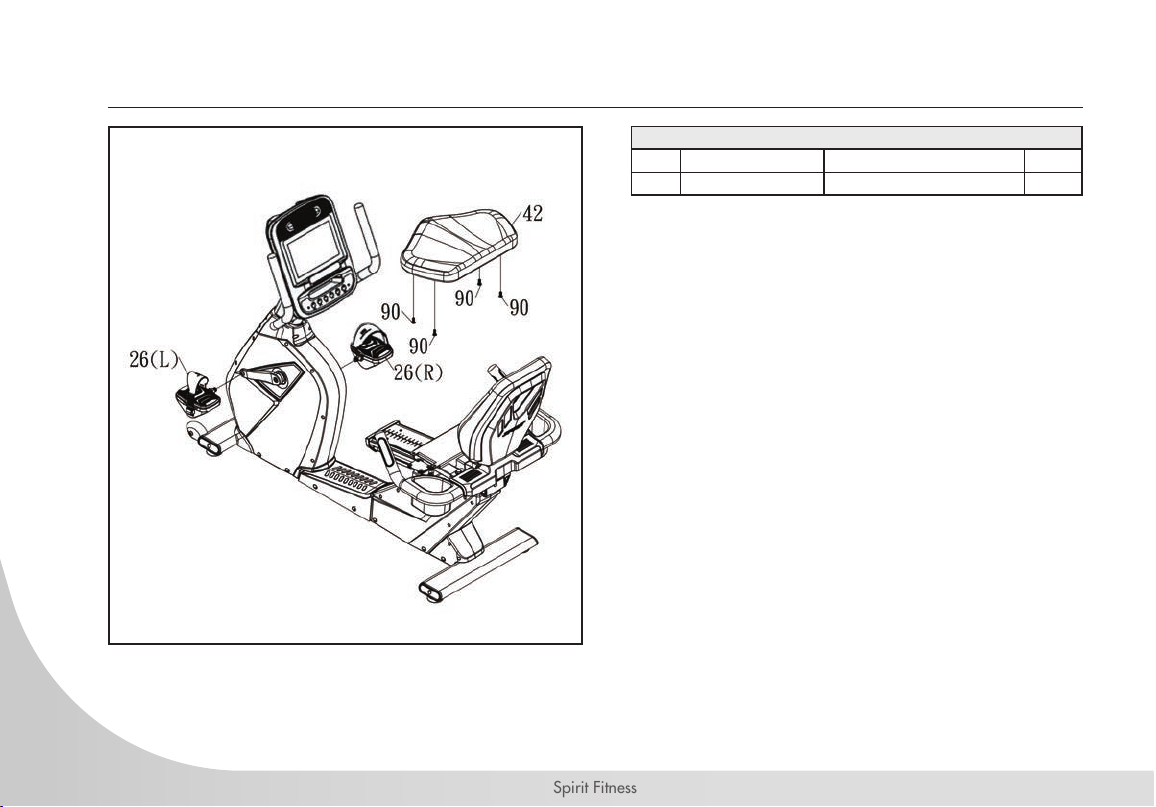
CR900ENT STEP FOUR
HARDWARE FOR STEP 4
PART TYPE DESCRIPTION QTY
85 BOLT M10x1.5x25mm 6
1. Install the PEDALS (26L & 26R) onto the CRANK
ARMS (22 & 23). The left pedal has a reverse
thread and will be screwed in counterclockwise.
Tighten to 300 in-lbs. (34 N•m) of torque.
2. Attach BOTTOM SEAT CUSHION (42) to SEAT
CARRIAGE FRAME (5) with 4 BOLTS (85).

11
www.spirittness.com
CR900ENT CONSOLE OPERATION

12
Spirit Fitness

13
www.spirittness.com
STARTING OPERATION
Plug in the power cord located at the front base of the unit. When the power is turned on, the screen
will show the initial image and then enter the Home screen.
Home screen: Begin operation by touching the icons. Quick operating buttons are convenient for basic
bike functions.

14
Spirit Fitness
SETTINGS
Press the “Home” icon ten consecutive repetitions to enter the Maintenance suite.
The two most commonly used menus for setting up the exercise machine are described below; the TV
Setup and Maintenance menus. For information on other sections of the Maintenance suite refer to the
technical service manual or call Spirit service.

15
www.spirittness.com
TV SETUP
1. Begin by selecting either TV or HDMI as the tuner source.
2. Press OSD Menu. The rst highlighted item on the menu is
Air/Cable and then Cable or Air afterward. Press the
OSD Enter to change the selection between Cable and Air
Signal source, usually Cable).
3. After selecting Cable or Air use the arrows located below
the OSD Exit button to navigate down to Auto Scan
then press OSD Enter. The tuner will now scan for all
available channels. Press OSD Exit when done. You can
modify the channels by pressing the Update Channel List.
4. The OSD Command button is for engineering use only.

16
Spirit Fitness
MAINTENANCE MENU
• The Default language setup allows you to select the main
language that will be shown when the console is turned on.
You are able to select the language in the Home menu, but
once the user nishes using the machine the console will return
to this default language.
• Software Update Manager is used to install new versions of
the application software.
• Internet Manager allows you to modify the internet sites that are
shown in the Internet menu.
• Wi/Ethernet Setup is for selecting a Wi signal or
Ethernet addresses.
• Machine Setup allows you to select whether the Csafe port is
used for Csafe or CAB TV Tuner. This menu also allows you to
set the screen brightness.
• FTP Settings is the Spirit FTP site address where Error logs and
remote troubleshooting can be managed.

17
www.spirittness.com
INTERNET MANAGER
1. Remove a link by pressing the icon of the site you want to
remove for two seconds. A pop-up window will ask you to
conrm the removal.
2. To add a website press the dotted outline box. A pop-up
window will ask you to enter the web address and upload a
picture for the nal button if you wish. You could also just use a
default-look button and type in the name of the site, which will
then be the button icon.

18
Spirit Fitness
WIFI/ETHERNET SETUP
Press the desired button for setting up Wi or Ethernet.
WIFI SETUP
Turn Wi on and press scan for available Wi connections. Press
desired connection and follow the on-screen directions.
ETHERNET SETUP
Select DHCP to search for connection
or Static IP to enter manually
Press Ethernet Conguration to set
up a new connection.
Table of contents
Other Spirit Commercial Exercise Bike manuals

Spirit Commercial
Spirit Commercial CR800 User manual

Spirit Commercial
Spirit Commercial CIC850 User manual

Spirit Commercial
Spirit Commercial CIC800 User manual

Spirit Commercial
Spirit Commercial CIC850 User manual

Spirit Commercial
Spirit Commercial CIC850 User manual

Spirit Commercial
Spirit Commercial CU900ENT User manual

Spirit Commercial
Spirit Commercial CR800ENT User manual

Spirit Commercial
Spirit Commercial CU800ENT User manual

Spirit Commercial
Spirit Commercial CIC850 User manual

Spirit Commercial
Spirit Commercial CU800 User manual


