Finlux 32FLY905UC User manual

väri-tv
colour television
Owner’s manual
K ttöohjeäy
32FLY905UC

English - 1 -
Contents
Features ................................................................. 2
Introduction............................................................. 2
Preparation............................................................. 2
Safety Precautions ................................................. 2
Package Contents.................................................. 4
Environmental Information ..................................... 5
Repair Information.............................................. 5
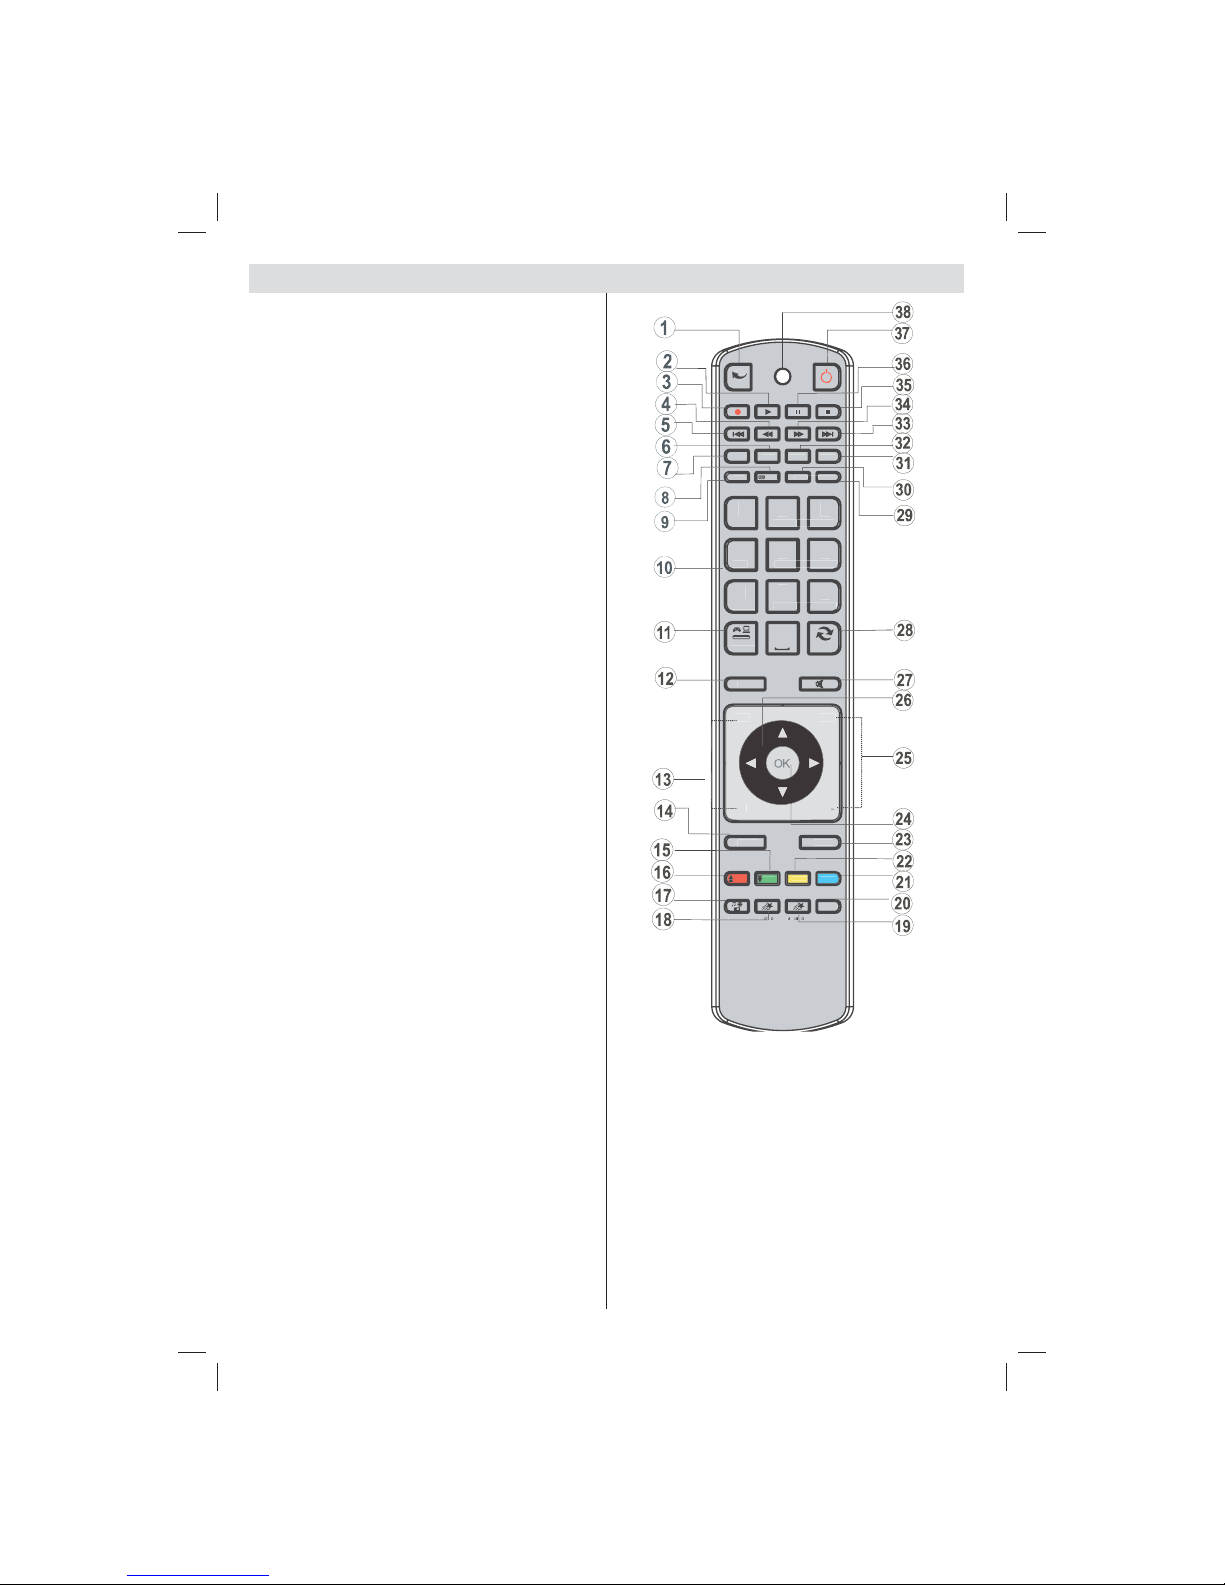
Remote Control Buttons......................................... 6
LCD TV and Operating Buttons.............................. 7
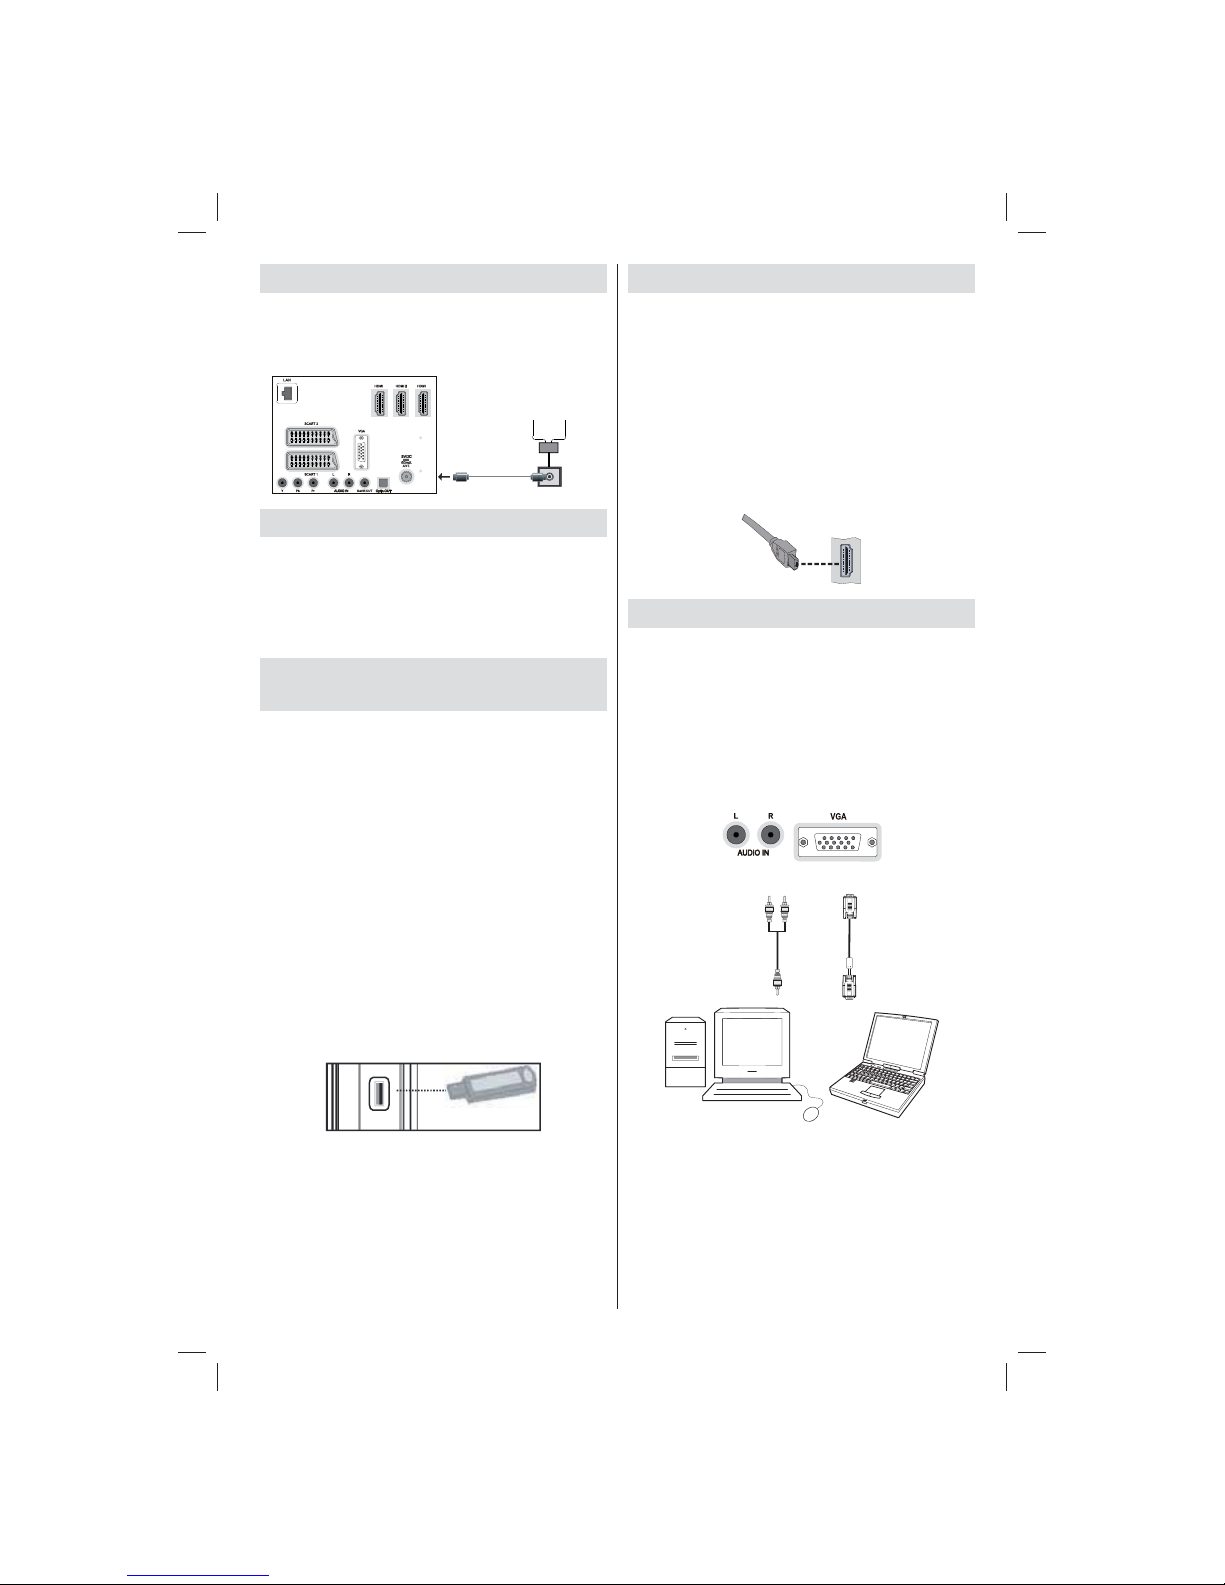
Viewing the Back side Connections ....................... 7
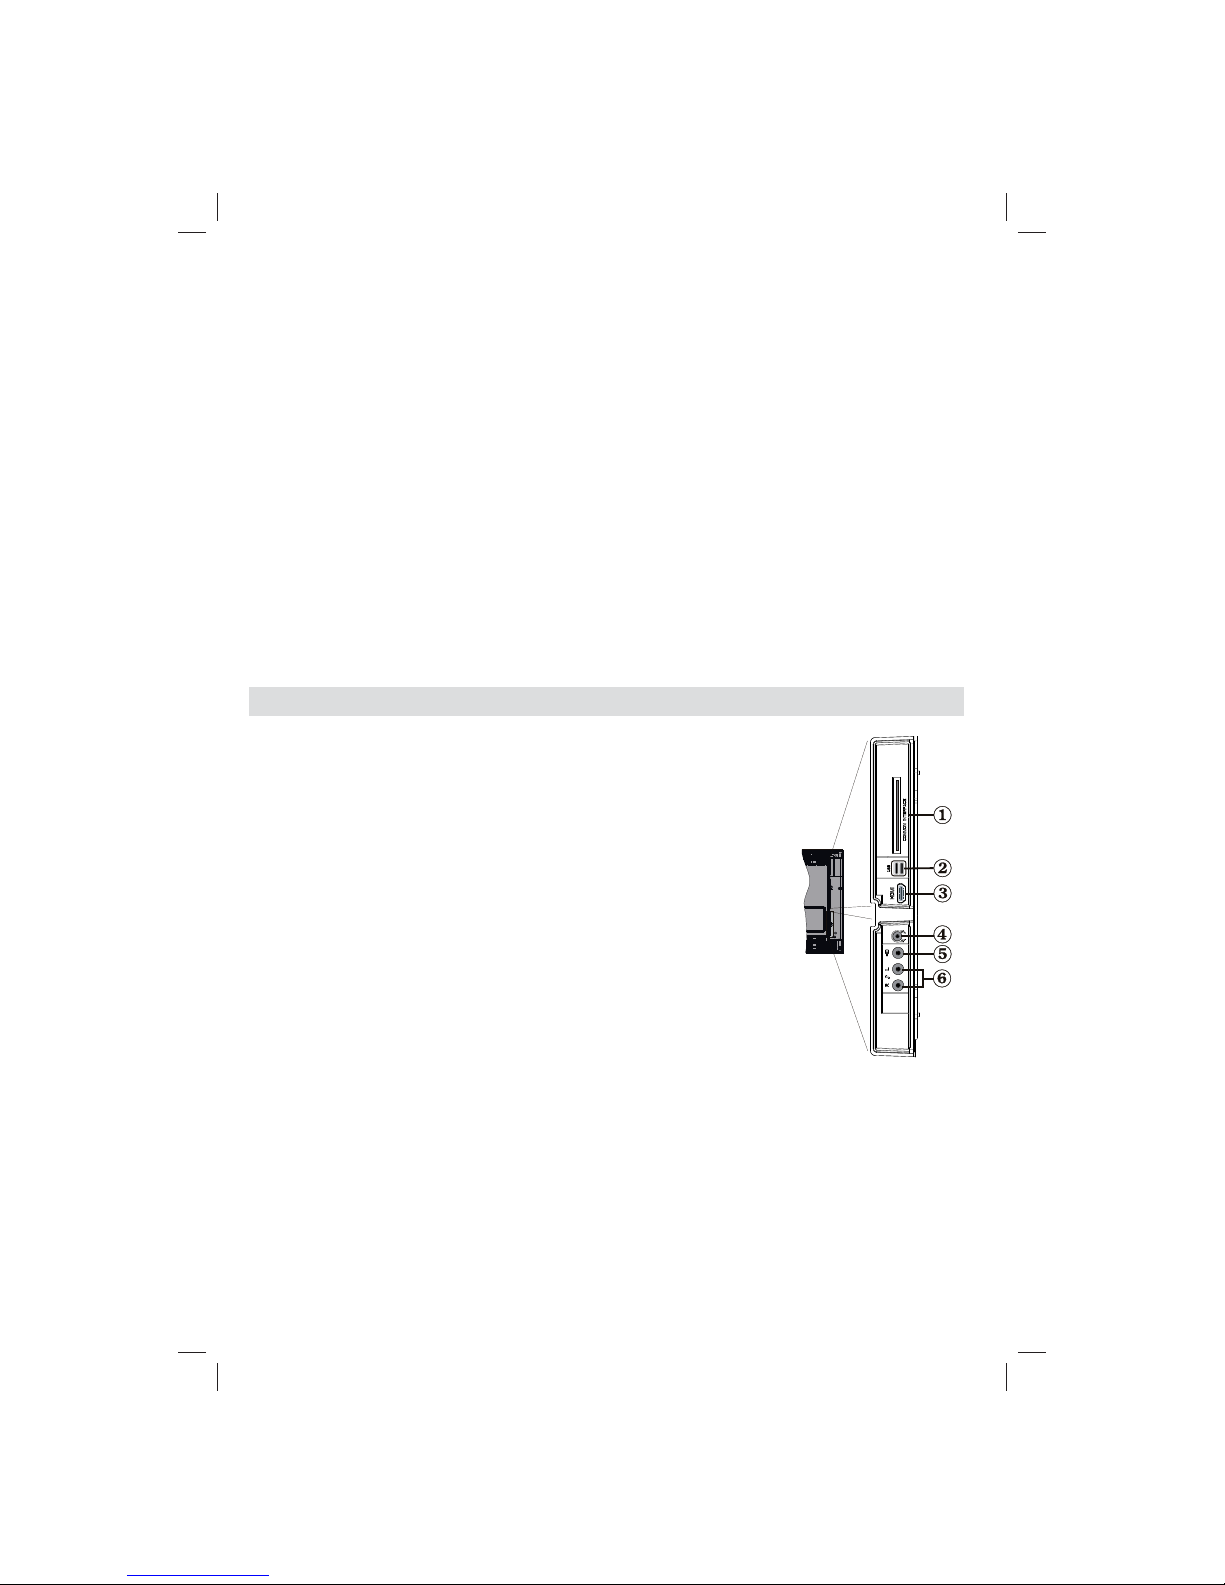
Viewing the Connections - Side Connectors.......... 8
Antenna Connection............................................... 9
Aerial/Cable Connection..................................... 9
Power Connection.................................................. 9
Using Digital Multimedia Connectors...................... 9
USB Memory Connection...................................9
Side HDMI Connection........................................... 9
Connecting the LCD TV to a PC............................. 9
Connecting to a DVD Player................................. 10
Using Side AV Connectors ................................... 10
Using Other Connectors....................................... 10
Connecting to a Wired Network (Optional)............11
Connecting to a Wireless Network (Optional)....... 12
Remote Control Handset...................................... 13
Inserting Batteries............................................. 13
Switching On/Off................................................... 13
To Switch the TV On.........................................13
To Switch the TV Off.........................................13
Digital Teletext (** for UK only) ......................... 13
Analogue Teletext............................................. 13
Input Selection...................................................... 13
Operation with the Buttons on the TV...............14
Operation with the Remote Control..................14
First Time Installation............................................ 14
Cable Installation.............................................. 15
Aerial Installation .............................................. 15
Install and Retune.............................................16
Auto Channel Scan Menu Operation................16
Manual Tuning ..................................................... 16
Network Channel Scan.....................................17
Analog Fine Tune.............................................. 17
First Time Installation........................................ 17
Clear Service List (*).........................................17
Viewing Electronic Programme Guide (EPG)....... 18
—EPG List schedule—.....................................18
—Timeline schedule— ................................... 18
Managing Stations: Channel List.......................... 19
Channel List Types........................................... 19
Operating the Channel List...............................19
Moving a Channel.............................................19
Deleting a Channel...........................................20
Renaming a Channel........................................20
Locking a Channel............................................20
Managing Stations: Favourites............................. 20
Button Functions............................................... 20
Managing Stations: Sorting Channel List ............. 21
On-Screen Information......................................... 21
Media Playback Using Media Browser................. 21
Viewing Videos via USB .................................. 22
Viewing Photos via USB...................................22
Slideshow Options............................................ 22
Playing Music via USB .....................................23
Media Browser Settings....................................23
Using DLNA Network Service............................... 23
Changing Image Size: Picture Formats................ 25
Cinema ............................................................. 26
Configuring Picture Settings................................. 26
Operating Picture Settings Menu Items............26
Picture Settings Menu Items.............................26
PC Picture Settings...........................................27
Configuring Sound Settings.................................. 27
Operating Sound Settings Menu Items.............28
Sound Settings Menu Items..............................28
Configuring Your TV’s Settings............................. 28
Operating Settings Menu Items........................28
Settings Menu Items.........................................28
Using a Conditional Access Module..................... 29
Viewing ConditionalAccess Menu (*)............... 29
Configuring Language Preferences......................29
Parental Control.................................................... 30
Parental Settings Menu Operation (*)...............30
Timers................................................................... 31
Configuring Date/Time Settings............................31
Configuring Source Settings................................. 32
Configuring Network Settings............................... 32
Wi-Fi Settings (Optional) ...................................... 32
Configuring Other Settings................................... 33
Other Features ..................................................... 34
Teletext................................................................. 35
Tips....................................................................... 35
Appendix A: PC Input Typical Display Modes.......36
Appendix B: AV and HDMI Signal
Compatibility (Input Signal Types)........................36
Appendix C: Supported DVI Resolutions..............37
Appendix D: Supported File Formats
for USB Mode....................................................... 37
Appendix E: Software Upgrade............................ 38
Appendix F: Nero MediaHome Installation.......... 39
INTERNET PORTAL............................................. 41
Specifications ....................................................... 42
Digital Reception (DVB-T).................................... 42
Digital Reception (DVB-C).................................... 42
01_MB70_[GB]_DVBTC_GOLD_GOLD11_5112UK_32905W_10075979_50201662.indd 101_MB70_[GB]_DVBTC_GOLD_GOLD11_5112UK_32905W_10075979_50201662.indd 1 02.12.2011 09:33:3302.12.2011 09:33:33

English - 2 -
Features
Remote controlled colour LCD TV.• Fully integrated Terrestrial digital-cable TV (DVB-• T-C- MPEG2) (DVB-T-C MPEG4).
HDMI connectors for digital video and audio. This• connectionisalso designed toaccepthigh definition
signals.
USB input.• 10000 programmes.• OSD menu system.• Integrated tuner DVB-T-C HD, MPEG2 / MPEG4• compatible.
Scart socket for external devices (such as video,• video games, audio set, etc.).
Teletext, Fastext, TOP text.• Headphone connection.• Automatic programming system.• Forward or backward manual tuning.• Sleep timer / Child lock.• Automatic sound mute when no transmission.• NTSC playback.• AVL (Automatic Volume Limiting).• Auto power down.• PLL (Frequency Search).• PC input.• Plug&Play for Windows 98, ME, 2000, XP, Vista,• Windows 7.
Active Antenna Power.• Ethernet (LAN) for Internet connectivity and• service.
Picture Off function.•
• 802.11n WiFi Support.
Introduction
Please read the corresponding instructions of this
handbook prior to the first usage of the device, even
when the usage of electronic devices is familiar
to you. Notice especially the chapter SAFETY
PRECAUTIONS. Carefully keep the handbook as
future reference. When selling the device or giving it
away, absolutely give these directions for use.
Thank you for choosing this product. This manual will
guide you for the proper operation of your TV.
Before operating the TV, please read this
manual thoroughly. Please do keep this
manual in a safe place for future references.
This device is intended to receive and display TV
programs. The different connection options make
an additional expansion of the reception and display
sourcespossible(receiver,DVDplayer,DVDrecorder,
VCR, PC etc.). This device is only suitable for the
operation in dry interiors. This appliance is intended
solely for private domestic use and may not be used
for industrial and commercial purposes. We exclude
liability in principle, if the device is not used as
intended, or unauthorized modifications have been
made. Operating your LCD TV in extreme ambient
conditions may damage the device.
Preparation
For ventilation, leave a free space of at least 10 cm
all around the set. To prevent any fault and unsafe
situations, please do not place any objects on top of
the set. Use this device in moderate climates.
10 cm
10 cm
10 cm
Safety Precautions
Read the following recommended safety
precautions carefully for your safety.
Power Source
The TV set should be operated only from a 220-240V
AC, 50 Hz outlet. Ensure that you select the correct
voltage setting for your convenience.
Power Cord
Do not place the set, a piece of furniture, etc. on the
power cord (mains lead) or pinch the cord. Handle the
power cord by the plug. Do not unplug the appliance by
pulling from the power cord and never touch the power
cordwithwethandsasthiscouldcausea shortcircuitor
01_MB70_[GB]_DVBTC_GOLD_GOLD11_5112UK_32905W_10075979_50201662.indd 201_MB70_[GB]_DVBTC_GOLD_GOLD11_5112UK_32905W_10075979_50201662.indd 2 02.12.2011 09:33:3402.12.2011 09:33:34

English - 3 -
electricshock.Nevermakea knotinthecordor tieitwith
othercords.Thepowercordsshouldbeplacedin sucha
waythattheyarenotlikelytobesteppedon.Adamaged
powercordcan cause fire orgive you anelectric shock.
When itis damaged andneeds to bereplaced, it should
be done by qualified personnel.
Moisture and Water
Do not use this device in a humid and
damp place (avoid the bathroom, the
sinkin thekitchen,and nearthewashing
machine). Do not expose this device to
rain or water, as this may be dangerous
and do not place objects filled with
liquids, such as flower vases, on top.
Avoid from dripping or splashing.
Ifanysolid objectorliquid fallsintothe cabinet, unplug
the TV and have it checked by qualified personnel
before operating it any further.
Cleaning
Before cleaning, unplug the TV set
from the wall outlet. Do not use liquid
or aerosol cleaners. Use soft and dry
cloth.
Ventilation
Theslotsand openings on theTV set areintendedfor
ventilationandto ensurereliableoperation.To prevent
overheating, these openings must not be blocked or
covered in anyway.
Heat and Flames
The set should not be placed near to
open flames and sources of intense heat
such as an electric heater. Ensure that
no open flame sources, such as lighted
candles,areplacedon top of theTV.Batteries should
not be exposed to excessive heat such as sunshine,
fire or the like.
Lightning
In case of storm and lightning or when
going on holiday, disconnect the power
cord from the wall outlet.
Replacement Parts
Whenreplacementparts are required,makesure that
the service technician has used replacement parts,
which are specified by the manufacturer or have the
samespecificationsas the originalone.Unauthorized
substitutions may result in fire, electrical shock or
other hazards.
Servicing
Please refer all servicing to qualified
personnel. Do not remove the cover
yourselfasthismay result in anelectric
shock.
Waste Disposal
Instructions for waste disposal:•
Packaging and packaging aids are recyclable and
should principally be recycled. Packaging materials,
such as foil bag, must be kept away from children.
Batteries,includingthose which areheavymetal-free,
should not be disposed of with household waste.
Please dispose of used battery in an environment
friendly manner. Find out about the legal regulations
which apply in your area.
• Don’t try to recharge batteries. Danger of explosion.
Replace batteries only with the same or equivalent
type.
Thissymbolon the productoron itspackagingmeans
that your electrical and electronic device should be
disposed at the end of its service life
separately from your household wastes.
There are separate collection systems for
recyclinginEU. Formoreinformation, please
contactthelocalauthorityor thedealerwhere
you purchased the product.
Disconnecting the Device
The mains plug is used to disconnect TV set from
the mains and therefore it must remain readily
operable.
Headphone Volume
Excessivesoundpressurefrom earphones
and headphones can cause hearing loss.
Installation
To prevent injury, this device must be securely
attachedtothe wall inaccordancewith the installation
instructions when mounted to the wall (if the option
is available).
LCD Screen
TheLCDpanelis a very hightechnologyproductwith
about a million thin film transistors, giving you fine
picture details. Occasionally, a few non-active pixels
may appear on the screen as a fixed blue, green or
red point. Please note that this does not affect the
performance of your product.
Warning!Donot leave yourTV instandbyor operating
mode when you leave your house.
01_MB70_[GB]_DVBTC_GOLD_GOLD11_5112UK_32905W_10075979_50201662.indd 301_MB70_[GB]_DVBTC_GOLD_GOLD11_5112UK_32905W_10075979_50201662.indd 3 02.12.2011 09:33:3402.12.2011 09:33:34

English - 4 -
Connection to a Television Distribution
System (Cable TV etc.) from Tuner
Device connected to the protective earthing of the
building installation through the mains connection or
throughotherapparatuswithaconnectiontoprotective
earthing-and to a television distribution system using
coaxial cable, may in some circumstances create a
fire hazard.
Connection to a cable distribution system has
therefore to be provided through a device providing
electrical isolation below a certain frequency range
(galvanic isolator, see EN 60728-11).
Licence Notification (optional)
Manufactured under license from Dolby
Laboratories.
TRADEMARK ACKNOWLEDGMENT
“Dolby” and the double-D symbol are trademarks of
Dolby Laboratories.
“DLNA®, the DLNALogo and DLNA CERTIFIED®are
trademarks, service marks, or certification marks of
the Digital Living Network Alliance.”
The Standby/On button doesn´t separate this
device completely from mains. Moreover the device
consumespowerinthe standby operation. Inorderto
separatethedevice completelyfrommains, themains
plughastobe pulled fromthemainssocket. Because
of that the device should be set up in a way, that an
unobstructed access to mains socket is guaranteed,
so that in case of emergency the mains plug can be
pulled immediately.To exclude the danger of fire, the
power cord should principally be separated from the
mains socket prior to a longer period of non-usage,
i.e. during vacations.
Electrical device not in the hands of children
Neverletchildren use electrical deviceunsupervised.
Children can´t always recognize properly the
possible dangers. Batteries / accumulators can be
life threatening when swallowed. Store batteries
unreachable for small children. In case of swallowing
a battery medical aid has to be sought immediately.
Also keep the packaging foils away from children.
There is danger of suffocation.
Package Contents
P -
P +
SOURCE
INTERNET
GHI
PQRS
SCREEN
MENU
EPG
BACK
1
4
7
-
V +
V
SWAP
ABC DEF
JKL MNO
TUV WXYZ
LANG SUBTITLE
INFO
PRESETS
FAV SLEEP
TEXT
EXIT
23
56
89
0
Y B T N 1M UT O Y B T N 2MUTOMULTIMEDIA
Remote Control
LCD TV
Batteries: 2 X AAA
Instruction Book
Nero media home CD
Note: You should check the accessories after
purchasing. Make sure that each accessory is
included.
01_MB70_[GB]_DVBTC_GOLD_GOLD11_5112UK_32905W_10075979_50201662.indd 401_MB70_[GB]_DVBTC_GOLD_GOLD11_5112UK_32905W_10075979_50201662.indd 4 02.12.2011 09:33:3502.12.2011 09:33:35

English - 5 -
Environmental Information
This television is designed to consume less energy to save environment. You not only help to save the• environmentbutalso you cansavemoney by reducingelectricitybills thanks totheenergy efficiency feauture
of this TV. To reduce energy consumption, you should take the following steps:
You can use Power Save Mode setting, located in the Picture Settings menu. If you set Power Save Mode• as Eco, the TV will switch to energy-saving mode and luminance level of TV set will be decreased to
optimum level. Note that some picture settings will be unavailable to be changed when the TV is in Power
Save Mode.
If you set power save mode as Picture off, a message will appear on the screen and backlight will be off• within three seconds. Press any button on the remote controller to activate the picture again.
When the TV is not in use, please switch off or disconnect the TV from the mains plug. This will also reduce• energy consumption.
Disconnect power when going away for longer time.• Itis highlyrecommendedto activatePowerSave Modesettingto reduceyourannual powerconsumption.Also• it is recommended to disconnect the TV from the mains plug to save energy more when you do not use.
Please helps us to save environment by following these steps.•
Repair Information
Please refer all servicing to qualified personnel. Only qualified personnel must repair the TV. Please contact
your local dealer, where you have purchased this TV for further information.
01_MB70_[GB]_DVBTC_GOLD_GOLD11_5112UK_32905W_10075979_50201662.indd 501_MB70_[GB]_DVBTC_GOLD_GOLD11_5112UK_32905W_10075979_50201662.indd 5 02.12.2011 09:33:3502.12.2011 09:33:35

English - 6 -
Remote Control Buttons
Activates Internet Portal Feature (*)1. Play (in Media Browser mode)2. No function3. Fast rewind (in Media Browser mode)4. No function5. Mono/Stereo - Dual I-II / Current Language (*) /6. Play preview (in Media Browser mode)
Image size7. Teletext / Mix8. Electronic Programme Guide9. Numeric buttons10. AV / Source11. Menu on/off12. Programme Down - Page up / Programme Up -13. Page down
Back to previous menu14. Green button15. Red button16. Media Browser17. My Button 1(**)18. My Button 2: Switches between digital cable19. broadcasts (***)
Info / Reveal (in TXT mode)20. Blue button21. Yellow button22. Exit (in DTV mode) / Return / Index page (in23. TXT mode)
OK / Select / Hold (in TXT mode) / Channel List24. Volume up / down25. Navigation buttons26. Mute27. Previous programme / Now (in EPG mode)28. Sleep timer29. Favourite mode selection30. Picture mode selecion / Changes picture mode31. (in Media Browser video mode)
Subtitle on-off / TXT subtitle (analogue TV32. mode) / Subtitle (in Media Browser mode).
No function33. Fast forward (in Media Browser mode)34. Stop (in Media Browser mode)35. Pause36. Standby37. Operation LED light38.
P-
P+
SOU
R
CE
E
I
NT
ER
N
E
T
G
HI
P
QR
S
SC
REEN
M
E
NU
E
P
G
BA
C
K
1
4
7
-
V+
V
SW
A
P
ABC DEF
JKL MNO
MNO
TUV WXYZ
WXYZ
L
A
N
G
SU
BTITLE
INF
O
PRE
S
ET
S
FAV SLEEP
TEXT
T
EXIT
2
3
5
6
8
9
0
TITLE
ROO
T
ZOOM
M
REPEAT
MUTO YBTN2
YB T N1
BTN
YB T
YB T N
MULTIMEDIA
(*)PleaserefertoPortalTVsection tolearnhow touse
remote control while in portal TV function(optional).
(**) MY BUTTON 1: Press for five seconds, until
the “MY BUTTON IS SET” message is displayed
on the screen. This conrms that the selected MY
BUTTONis nowassociated withtheselected function.
(***) MY BUTTON 2: This button’s main function is
to switch between DVB-T and DVB-C broadcasts.
However,if youpressMYBUTTON2 forfive seconds,
you can set a function to it as described in My Button
1.
Note that if you perform first time installation, MY
BUTTON2 will return toitsdefaultfunction, switching
between DVB-T and DVB-C broadcasts.
01_MB70_[GB]_DVBTC_GOLD_GOLD11_5112UK_32905W_10075979_50201662.indd 601_MB70_[GB]_DVBTC_GOLD_GOLD11_5112UK_32905W_10075979_50201662.indd 6 02.12.2011 09:33:3502.12.2011 09:33:35

English - 7 -
LCD TV and Operating Buttons
FRONT and REAR VIEW Control buttons VIEW Control Buttons
1. Standby/On button
2. TV/AV button
3. Programme Up/Down buttons
4. Volume Up/Down buttons
Note:Press “ ” and
buttons at the same time to view
main menu.
Viewing the Back side Connections
12
1 3
SCART 21. inputs or outputs for external devices.
SCART 12. inputs or outputs for external devices. Connect the SCART cable between SCART socket on
the TV and SCART socket on your external device (such as a decoder, a VCR or a DVD player).
Note: If an external device is connected via the SCART socket, the TV will automatically switch to AV
mode.
Component Video Inputs (YPbPr)3. are used for connecting component video.
You can connect the component video and audio sockets with a device that has component output.
Connect the component video cables between the COMPONENT VIDEO INPUTS on the TV and the
component video outputs of your device. While connecting, be sure that the letters on your TV, “Y”,
“Pb”, “Pr” correspond with your device’s connectors.
PC/YPbPr Audio Inputs4. are used for connecting audio signals of a PC or a device that connects to the
TV via YPbPr. Connect the PC audio cable between the AUDIO INPUTS on the TV and audio output of
01_MB70_[GB]_DVBTC_GOLD_GOLD11_5112UK_32905W_10075979_50201662.indd 701_MB70_[GB]_DVBTC_GOLD_GOLD11_5112UK_32905W_10075979_50201662.indd 7 02.12.2011 09:33:3602.12.2011 09:33:36

English - 8 -
your PC to enable PC audio. Connect the audio cable between AUDIO INPUTS on the TV and audio
outputs of your device to enable component audio.
Subwoofer Out5. is for connecting an external, active subwoofer to the set to give a much deeper bass
effect. Use an appropriate RCAcable to connect the set to a subwoofer unit.
S/PDIF Digital Out6. outputs digital audio signals of the currently watched source.
Use a digital optic cable to transfer audio signals to a device that has S/PDIF input.
RF Input7. connects to an aerial and cable antenna system.
Note that if you use a decoder or a media recorder, you should connect the aerial cable through the
device to the television with an appropriate antenna cable, as shown in the illustration in the following
pages.
HDMI 3: HDMI Input.8. HDMI 2: HDMI Input.9. HDMI 1: HDMI Input.10. HDMI Inputs are for connecting a device that has an HDMI socket. Your LCD TV is capable of
displaying High Definition pictures from devices such as a High Definition Satellite Receiver or DVD
Player. These devices must be connected via the HDMI sockets or Component Socket. These sockets
can accept either 720p or 1080p (optional) signals. No sound connection is needed for an HDMI to
HDMI connection.
PC Input11. is for connecting a personal computer to the TV set.
Connect the PC cable between the PC INPUT on the TV and the PC output on your PC.
Ethernet input (for service and Internet connectivity).12.
Viewing the Connections - Side Connectors
CI Slot is used for inserting a CI card. A CI card allows you to view all the1. channels that you subscribe to. For more information, see “Conditional
Access” section.
Side USBs2. Side HDMI Input is for connecting a device that has an HDMI socket.3. Headphone jack is used for connecting an external headphone to the4. system. Connect to the HEADPHONE jack to listen to the TV from
headphones (optional).
VideoInputisusedforconnectingvideosignalsofexternaldevices.Connectthevideo5. cablebetweentheVIDEOINsocketontheTVandtheVIDEOOUTjackonyourdevice.
Audio Inputs are used for connecting audio signals of external6. devices. Connect the audio cable between the AUDIO INPUTS
on the TV and the AUDIO OUTPUT jacks on your device.
Note: If you connect a device to the TV via the VIDEO INPUT, you should also
connect your device with an audio cable to theAUDIO INPUTS of the TV to enable
audio.
5Vdc-Max500mA
01_MB70_[GB]_DVBTC_GOLD_GOLD11_5112UK_32905W_10075979_50201662.indd 801_MB70_[GB]_DVBTC_GOLD_GOLD11_5112UK_32905W_10075979_50201662.indd 8 02.12.2011 09:33:3902.12.2011 09:33:39

English - 9 -
Antenna Connection
Aerial/Cable Connection
Connect the aerial or cable TV plug to the AERIAL• INPUT socket located at the rear of the TV.
1 3
Aerial or Cable
Power Connection
IMPORTANT: The TV set is designed to operate on
220-240V AC, 50 Hz socket.
After unpacking, allow the TV set to reach the• ambient room temperature before you connect the
set to the mains. Plug the power cable to the mains
socket outlet.
Using Digital Multimedia
Connectors
You can connect USB devices to your TV by using• the USB inputs of the TV. This feature allows you
to display/play JPG, MP3 and video files stored in
a USB stick.
It is possible that certain types of USB devices (e.g.• MP3 Players) may not be compatible with this TV.
You may back up your files before making any• connections to the TV set in order to avoid any
possible data loss. Note that manufacturer will not
be responsible for any file damage or data loss.
Do not pull out USB module while playing a file.•
CAUTION: Quickly plugging and unplugging USB
devices, is a very hazardous operation. Especially,
do not quickly plug and unplug the drive repeatedly.
This may cause physical damage to the USB player
and especially the USB device itself.
SIDE VIEW USB MEMORY
5Vdc
Max:500mA
USB
USB Memory Connection
IMPORTANT: The TV should be switched off while
plugging or unplugging a USB device.
Plug your USB device to the USB inputs of the TV.
You can connect two USB device to your TV by using
the USB inputs of the TV at the same time.
Note: It is possible that certain types of hard disk
drives are not supported.
Side HDMI Connection
You can use sideHDMIinputtoconnect a device that
hasan HDMIconnectorto yourTV. Useanappropriate
HDMIcableto make suchaconnection. Note thatyou
should switch to the HDMI source to view the content
fromtheconnected device. Poweroffboth theTV and
thedevicebeforemakingany connections.SideHDMI
Input supports connections between HDMI devices
such as DVD players. You can use side HDMI input
of the TV to connect to an external HDMI device. Use
an HDMI cable to connect.
HDMI DEVICE SIDE VIEW
Connecting the LCD TV to a PC
Fordisplayingyourcomputer’sscreenimage on your
LCDTV,youcanconnect your computerto theTVset.
Power off both computer and display before making
any connections. Use 15-pin D-sub display cable to
connect a PC to the LCD TV. When the connection
is made, switch to PC source. See “Input selection”
section. Set the resolution that suits your viewing
requirements. Resolution information can be found
in the appendix parts.
PC audio cable
(not supplied)
PC VGA cable
(not supplied)
Audio inputs of the TV
PC input of the TV
Audio output of the PC Monitor output of the PC
01_MB70_[GB]_DVBTC_GOLD_GOLD11_5112UK_32905W_10075979_50201662.indd 901_MB70_[GB]_DVBTC_GOLD_GOLD11_5112UK_32905W_10075979_50201662.indd 9 02.12.2011 09:33:4102.12.2011 09:33:41

English - 10 -
Using Side AV Connectors
You can connect a range of optional equipment to
your LCD TV.
For connecting a camcorder, connect to the VIDEO• INsocketand theAUDIO SOCKETS.Donotconnect
the camcoder to VIDEO IN socket at the same time
since it can cause noise in the picture. For selecting
the related source, see the section “Input selection”
in the following parts.
To listen the TV sound from headphones, connect• to the HEADPHONE jack of theTV.
Using Other Connectors
You can connect a range of optional equipment
to your LCD TV. Possible connections are shown
below. Note that cables shown in the illustration are
not supplied.
For connecting to a device that has SPDIF support,• use an appropriate SPDIF cable to enable sound
connection.
External Speakers
A device that
supports
SPDIF signal.
Connecting to a DVD Player
If you want to connect a DVD player to your LCD
TV, you can use connectors of the TV set. DVD
players may have different connectors. Please refer
to your DVD player’s instruction book for additional
information. Power off both the TV and the device
before making any connections.
Note: Cables shown in the illustration are not
supplied.
If your DVD player has an HDMI socket, you can• connect viaHDMI.When youconnectto DVD player
as illustrated below, switch to HDMI source. See,
“Input Selection” section.
Most DVD players are connected through• COMPONENTSOCKETS. Use a component video
cabletoconnect videoinput. Forenablingaudio, use
acomponentaudio cable asillustratedbelow.When
the connection is made, switch to YPbPr source.
See, “Input selection” section.
You may also connect through the SCART 1 or• SCART 2. Use a SCART cable as shown below.
Note:Thesethree methodsofconnection perform the
same function but in different levels of quality. It is not
necessary to connect by all three methods.
HDMI
HDMI
inputs
Scart sockets
Component
video
inputs
Component
audio
inputs
DVD Player
01_MB70_[GB]_DVBTC_GOLD_GOLD11_5112UK_32905W_10075979_50201662.indd 1001_MB70_[GB]_DVBTC_GOLD_GOLD11_5112UK_32905W_10075979_50201662.indd 10 02.12.2011 09:33:4202.12.2011 09:33:42

English - 11 -
Connecting to a Wired Network (Optional)
For connecting to a wired LAN network, you should perform the following steps:
Connect broadband ISP connection ethernet cable to the ETHERNET INPUT of your modem.• Ensure that Nero Media Home software is installed to your PC.(for DLNAfunction) SeeAppendix F for more• information on the installation process.
Afterwards, you should connect your PC to the one of your modem’s LAN connectors (e.g. LAN 1) by using• a proper LAN cable.
Use another LAN output of your modem (e.g. LAN 2) to enable the connection to your TV. You can add• your TV to your LAN by connecting the LAN port at the rear of your TV to your modem’s LAN connector as
illustrated below.
To access and play shared files, you must Select Media Browser. Press Menu button and select Media• Browser by using Left or Right button. Press OK to continue. Select the desired file type and press OK. You
must always use the Media Browser screen to access and play shared network files.
PC/HDD/Media Player or any other devices that are DLNA 1.5 compatible should be used with wired• connection for higher playback quality.
To configure wired settings please refer Network Settings section in Settings menu.
PC with Nero
Media Home
software installed
Lan(Ethernet cable)
Broadband ISP
Connection
Rear of TV
You might be able to connect your TV to your LAN network depending on your network’s configuration. In• such a case, use an ethernet cable to connect your TV directly to the network wall outlet.
Rear of TV
PC with Nero
Media Home
software installed
01_MB70_[GB]_DVBTC_GOLD_GOLD11_5112UK_32905W_10075979_50201662.indd 1101_MB70_[GB]_DVBTC_GOLD_GOLD11_5112UK_32905W_10075979_50201662.indd 11 02.12.2011 09:33:4302.12.2011 09:33:43

English - 12 -
Connecting to a Wireless Network (Optional)
IMPORTANT: “Winstron DNUB-236” USB dongle is required to use wireless network feature.
To use your TV with your wireless network, you need a “Winstron DNUB-236” Wireless USB dongle.
For connecting to a wireless LAN network, you should perform the following steps:
Connect broadband ISP connection ethernet cable to the ETHERNET INPUT of your modem.• Ensure that Nero Media Home software is installed to your PC. (for DLNAfunction)• Afterwards, you should connect wireless adaptor to one of the USB inputs of the TV.•
To configure wireless settings please refer Network Settings section in Settings menu.
Broadband ISP
Connection
Wireless Lan
Adaptor
PC with Nero
Media Home
software installed
USB Inputs (Side of the TV)
A Wireless-N router (IEEE 802.11a/b/g/n) with simultaneous 2.4 and 5 GHz bands designed to increase• bandwidth. Optimized for smoother and faster HD video streaming, file transfers, and wireless gaming.
Use LAN connection for quicker file sharing between other devices like computers.• The frequency and channel differ depending on the area.• The transmission speed differs depending on the distance and number of obstructions between the •• transmission products, the configuration of these products, the radio wave conditions, the line traffic, and
the products that you use. The transmission may also be cut off or get disconnected depending on the radio
wave conditions DECT phones, or any other WiFi 11b appliances. The standard values of the transmission
speed are the theoretical maximum values for the wireless standards. They are not the actual speeds of
data transmission.
The location where the transmission is most effective differs depending on the usage environment.• Wireless LAN adaptor should be connected directly to the TV’s USB port. USB hubs are not supported.• To configure wireless settings please refer wifisection in Settings menu.• It is recommended that you should use IEEE 802.11 a/b/g/n modem in order to avoid any possible problems• while viewing HD videos.
Use the other usb input, if you experience problems with audio/video performance.• Use wired connection instead if you experience problems with wireless connection.•
01_MB70_[GB]_DVBTC_GOLD_GOLD11_5112UK_32905W_10075979_50201662.indd 1201_MB70_[GB]_DVBTC_GOLD_GOLD11_5112UK_32905W_10075979_50201662.indd 12 02.12.2011 09:33:4402.12.2011 09:33:44

English - 13 -
Remote Control Handset
Inserting Batteries
Remove the battery cover located on the back of• the handset by gently pulling backwards from the
indicated part.
Insert two• AAA/R3 or equivalent type batteries
inside. Insert two AAA/R3 or equivalent type
batteries inside. Observe the correct polarity (+/-)
when inserting batteries and replace the battery
cover.
Note: Remove the battery from remote control
handset when it is not to be used for a long period.
Otherwise it can be damaged due to any leakage of
batteries. Remote range is approximately 7m/23ft.
Switching On/Off
To Switch the TV On
Connect the power cord to the 220-240V AC, 50• Hz socket.
Press STANDBY touch button. Then the standby• LED lights up.
To switch on the TV from standby mode either:•
Press the “• ” button, P+ / P- or a numeric button
on the remote control.
Press the• -P/CH or P/CH+ touch button on the TV.
The TV will then switch on.
Note: If you switch on your TV via standby button on the
remotecontrol,the programme/source thatyouwerewatching
last will be reselected.
By either method the TV will switch on.
To Switch the TV Off
Pressthe“• ” button on theremotecontrol or press
theSTANDBY touchbuttononthe TV, so theTV will
switch to standby mode.
To power down the TV completely, unplug the• power cord from the mains socket.
Note: When the TV is switched to standby mode,
standby LED can blink to indicate that features such
as Standby Search, Over Air Download or Timer is
active. The LED can also blink when you switch on
the TV from standby mode.
Digital Teletext (** for UK only)
• Press the “ ” button.
The digital teletext information appears.• Operate it with the coloured buttons, cursor buttons• and OK button.
The operation method may differ depending on the
contents of the digital teletext.
Follow the instructions displayed on digital teletext
screen.
WhenPress “• OK”button orsimilar messageappears
on the screen, press the OK button.
When the “• ” button is pressed, the TV returns to
television broadcasting.
Withdigitalbroadcasting (DVB), inadditionto digital• teletext broadcasting together with the normal
broadcasting,there arealsochannels withjustdigital
teletext broadcasting.
The aspect ratio (picture shape) when watching• a channel with just digital teletext broadcasting is
the same as the aspect ratio of the picture viewed
previously.
When you press the “• ” button again, the digital
teletext screen will be displayed.
Analogue Teletext
Use of teletext and its functions are identical to
the analogue text system. Please do refer to the
“TELETEXT” explanations.
Input Selection
Once you have connected external systems to
your TV, you can switch to different input sources.
Press “SOURCE” button on your remote control
consecutively for directly changing sources.
Youcan operateyourTV usingboth theremotecontrol
and onset buttons.
01_MB70_[GB]_DVBTC_GOLD_GOLD11_5112UK_32905W_10075979_50201662.indd 1301_MB70_[GB]_DVBTC_GOLD_GOLD11_5112UK_32905W_10075979_50201662.indd 13 02.12.2011 09:33:4402.12.2011 09:33:44

English - 14 -
Operation with the Buttons on the TV
Volume Setting
Press“• ”buttonto decrease volumeor
button to increase volume, so a volume level scale
(slider) will be displayed on the screen.
Programme Selection
Press“• P/CH+”buttontoselectthenextprogrammeor
“P/CH -” button to select the previous programme.
Viewing Main Menu
Press the “• ” or “ ” button at the same
time to view main menu. In the Main menu select
the sub-menu using “AV” button and set the sub-
menu using “ ” or “ ” buttons. To learn
the usage of the menus, refer to the menu system
sections.
AV Mode
Press the “• AV” button in the control panel on the TV
to switch between AV modes.
Operation with the Remote Control
Theremotecontrolof yourTVis designed to control• all the functions of the model you selected. The
functions will be described in accordance with the
menu system of your TV.
Volume Setting
Press“• V+”buttonto increase thevolume.Press “V-”
buttontodecrease the volume.Avolumelevel scale
(slider) will be displayed on the screen.
Programme Selection (Previous or Next
Programme)
Press “• P-” button to select the previous
programme.
Press “• P+” button to select the next programme.
Programme Selection (Direct Access)
Pressnumeric buttonson theremote controltoselect• programmes between 0 and 9. The TV will switch
to the selected programme. To select programmes
between, press the numeric buttons consecutively.
When the pressing time is due for the second
numeric button, only the first digit programme will
bedisplayed. Pressdirectly theprogrammenumber
to reselect single digit programmes.
Note:Ifthe backgroundis transparent,onscreen texts
will be slightly transparent as well.
First Time Installation
IMPORTANT: Ensure that the aerial or cable is
connected and a Common Interface module is not
inserted before switching on the TV for the first
time installation.
Do not insert a common interface module during the
search process.
WhentheTVisoperated forthe firsttime,installation• wizard will guide you through the process. First,
language selection screen will be displayed:
Use “• ” or “ ” buttons to select your language
and press OK button to set selected language and
continue.
After selecting the language, “• Welcome!” screen
will be displayed, requiring you to set Country,
Teletext Language, Scan Encrypted and Active
antenna options.
By pressing “• ” or “ ” button, select the Country
you want to set and press “ ” button to highlight
Teletext Language option. Use “ ” or “ ” button
to select desired Teletext Language.
Press “• ” button after setting Teletext Language
option.Scan Encrypted willbe thenhighlighted.You
can set Scan Encrypted as Yes if you want to scan
01_MB70_[GB]_DVBTC_GOLD_GOLD11_5112UK_32905W_10075979_50201662.indd 1401_MB70_[GB]_DVBTC_GOLD_GOLD11_5112UK_32905W_10075979_50201662.indd 14 02.12.2011 09:33:4502.12.2011 09:33:45

English - 15 -
codedstations.After selectingtheScan Encrypted,
selectActive antenna feature by pressing “ ” or “
” button. Use “ ” or “ ” button to set active antenna
mode as on or off. If an active antenna is connected
to your TV, you can select this option as On (5V).
Antenna power should be Off when standard
antenna is used instead of the active antenna.
Press• OK button on the remote control to continue
and the following message will be displayed on the
screen:
Cable Installation
If you select CABLE option and press OK button on
theremotecontrol to continue,thefollowingmessage
will be displayed on the screen:
To continue please select YES and press OK. To
cancel operation, select NO and press OK.
You canselectfrequency ranges fromthisscreen. For
highlighting lines you see, use “ ” or “ ” button. You
can enter the frequency range manually by using the
numeric buttons on the remote control. Set Start and
Stop Frequency as desired by using numeric buttons
ontheremote control.Afterthis operation, youcanset
Search Step as 8000 KHz or 1000 KHz. If you select
1000 KHz, the TV will perform search process in a
detailed way. Searching duration will thus increase
accordingly. When finished, press OK button to start
automatic search.
Aerial Installation
If you select AERIAL option from the Search Type
screen, the television will search for digital terrestrial
and analogue broadcasts.
Note: You can press “MENU” button to cancel.
After all the available stations are stored, Channel• List will be displayed on the screen. If you like the
sort channels, according to the LCN, please select
“Yes” and than press “OK”.
Press• OK button to quit channel list and watch TV.
01_MB70_[GB]_DVBTC_GOLD_GOLD11_5112UK_32905W_10075979_50201662.indd 1501_MB70_[GB]_DVBTC_GOLD_GOLD11_5112UK_32905W_10075979_50201662.indd 15 02.12.2011 09:33:4502.12.2011 09:33:45

English - 16 -
Install and Retune
HINT:Auto tuningfeaturewillhelpyou toretunethe TV
set in order to store new services or stations.
Press “MENU” button on the remote control and
select Install and Retune by using “ ” or “ ” button.
Press OK button and the following menu screen will
be displayed.
SelectAutomaticChannelScan (Retune) byusing“
”/“ ”buttonand press OK button.AutomaticChannel
Scan (Retune) options will be displayed. You can
select options by using “ ”/“ ” and OK buttons.
Auto Channel Scan Menu Operation
Digital Aerial: Searches and stores aerial DVB
stations.
Digital Cable: Searches and stores cable DVB
stations.
Analogue: Searches and stores analogue stations.
DigitalAerial &Analogue: Searchesandstores both
analogue and aerial DVB stations.
Digital Cable &Analogue: Searchesandstores both
analogue and cable DVB stations.
Whenever you select an automatic search type and• press OK button, a confirmation screen will appear
on the screen. To start installation process, select
Yes, to cancel select No by using .“ ” or “ ” and
OK button.
After auto channel scan type is set and selected• and confirmed, installation process will start and
progressbarwill movealong.Press “MENU” button
to cancel process. In such a case, located channels
are not stored.
Manual Tuning
HINT: This feature can be used for direct broadcast
entry.
Select• Manual Channel Scan from the Installation
menu by using “ ”/“ ” and OK buttons. Manual
Scan options screen will be displayed.
Select the desired• Search Type using “ ” or “
” button. Manual search options will change
accordingly.Use “ ”/“ ” buttontohighlightan item
and then press “ ” or “ ” button to set an option.
You can press “MENU” button to cancel.
Digital Aerial Manual Search
In manual channel scan, the number of the multiplex
or frequency are entered manually and only that
multiplexorfrequencyare searched for thechannels.
After selecting search type as DigitalAerial, you can
enter the multiplex or frequency number using the
numeric buttons and press OK button to search.
Digital Cable Manual Search
In cable manual scan, you can enter frequency,
modulation, symbol rate and network channel scan
options. After selecting search type as Digital Cable,
you can set the desired options and press OK button
to search.
01_MB70_[GB]_DVBTC_GOLD_GOLD11_5112UK_32905W_10075979_50201662.indd 1601_MB70_[GB]_DVBTC_GOLD_GOLD11_5112UK_32905W_10075979_50201662.indd 16 02.12.2011 09:33:4602.12.2011 09:33:46

English - 17 -
Analogue Manual Search
After selecting search type as analogue, you can use
“ ”/“ ” button to highlight an item and then press “
” or “ ” button to set an option.
Enter the channel number or frequency using the
numeric buttons. You can then press OK button
to search. When the channel is located, any new
channels that are not on the list will be stored.
Network Channel Scan
Select Network Channel Scan from the installation
menu by using “ ” or “ ” and OK buttons. Network
Channel Scan selection screen will be displayed.
Select Digital Aerial or Digital Cable and press OK
button to continue.
If you start Digital Aerial scan process, automatic
scanning will start. You can press “MENU” button
to cancel.
If you start Digital Cable scan process, the following
screen will be displayed.
You canselectfrequency ranges fromthisscreen. For
highlighting lines you see, use “ ” or “ ” button. You
can enter the frequency range manually by using the
numeric buttons on the remote control. Set Start and
Stop Frequency as desired by using numeric buttons
ontheremote control.Afterthis operation, youcanset
Search Step as 8000 KHz or 1000 KHz. If you select
1000 KHz, the TV will perform search process in a
detailed way. Searching duration will thus increase
accordingly. When finished, press OK button to start
automaticsearch.Automatic searching screen willbe
displayed during the process.
Note: If you select an extended gap between Start
and Stop frequency rate, automatic search duration
will take a longer time.
Analog Fine Tune
Select• Analog Fine Tune fromtheInstallationmenu
by using “ ” or “ ” and OK buttons. Analog Fine
Tune screen will be displayed. Analog Fine Tune
feature will not be available if there are no analog
channels, digital channels and external sources
stored.
Press• OK button to proceed. Use “ ” or “ ” button
to set Fine Tune. When finished, press OK button
again.
First Time Installation
If you want to delete all channels and settings please
select First Time Installation and press OK. The
TV’smemory will bedeletedandinstallation progress
starts.
Clear Service List (*)
(*)Thissettingis visible onlywhentheCountry option
is set to Denmark, Sweden, Norway or Finland.
Use this setting to clear channels stored. Press “
” or “ ” button to select Clear Service List and then
press OK. The following OSD will be displayed on
the screen:
Select YES and press OK to continue or select NO
and press OK button to cancel.
01_MB70_[GB]_DVBTC_GOLD_GOLD11_5112UK_32905W_10075979_50201662.indd 1701_MB70_[GB]_DVBTC_GOLD_GOLD11_5112UK_32905W_10075979_50201662.indd 17 02.12.2011 09:33:4602.12.2011 09:33:46

English - 18 -
Viewing Electronic Programme
Guide (EPG)
You can view the electronic programme guide (EPG)
to view information about available programmes. To
view the EPG menu please press EPG button on the
remote control.
Press “• ”/“ ” buttons to navigate through
channels.
Press “• ”/“ ” buttons to navigate through the
programme list.
EPG• menu displays available information on all
channels.
Please note that event information is updated• automatically. If there are no event information
data available for channels, EPG will be displayed
with blanks.
OK(Options): Displaysprogrammeoptions including
“Select Channel” option.
INFO (Event Details): Displays the programmes in
detail.
Green button: Programme schedule will be listed
Yellow button: DisplayEPGdata in accordance with
timeline schedule
Blue button (Filter): Views filtering options.
—EPG List schedule—
Red button (Prev Time Slice): Displays the
programmes of previous time slice.
Green button (Next Time Slice): Displays the
programmes of the next time slice.
Yellow button (Prev Day): Displaysthe programmes
of previous day.
Blue button (Next day): Displays the programmes
of the next day.
Numeric buttons (Jump): Jumps to the preferred
channel directly via numeric buttons.
OK(Options): Displaysprogrammeoptions including
“Select Channel” option.
Text button (Filter): Views filtering options.
INFO (Event Details): Displays the programmes in
detail.
—Timeline schedule—
Red button (Prev Day): Displays the programmes
of previous day.
Green button (Next day): Displays the programmes
of the next day.
Yellow button (Zoom): Expands programme
information.
01_MB70_[GB]_DVBTC_GOLD_GOLD11_5112UK_32905W_10075979_50201662.indd 1801_MB70_[GB]_DVBTC_GOLD_GOLD11_5112UK_32905W_10075979_50201662.indd 18 02.12.2011 09:33:4702.12.2011 09:33:47

English - 19 -
INFO (Event Details): Displays the programmes in
detail.
(Now) : Shows the current programme.
Numeric buttons (Jump): Jumps to the preferred
channel directly via numeric buttons.
Blue button (Filter): Views filtering options.
OK(Options): Displaysprogrammeoptions including
“Select Channel” option.
Text (Search): Displays “Guide Search” menu.
SUBT.: Press SUBTITLE button to view Select
Genre menu. Using this feature, you can search the
programme guide database in accordance with the
genre. Info available in the programme guide will
be searched and results matching your criteria will
be listed.
Managing Stations: Channel List
The TV sorts all stored stations in the Channel List.
You can edit this channel list, set favourites or set
active stations to be listed by using the Channel List
options.
Press• “MENU” button to view main menu. Select
Channel List item by using “ ” or “ ” button. Press
OK to view menu contents.
Select Edit Channel List to manage all stored
channels. Use “ ” or “ ” and OK buttons to select
Edit Channel List.
Channel List Types
You can set channel list type function to display
desired types of available channels.
OK: Watch selected.
MENU: Exits.
RED: Lists only digital aerial and analogue
broadcasts.
GREEN: Lists only digital cable and analogue
broadcasts.
Blue button (Filter): Views filtering options.
Operating the Channel List
Press “• ” or “ ” button to select the channel that
will be processed. Press “ ” or “ ” button to select
a function on Channel List menu.
Use• P+/P- buttons to move page up or down.
• Press BLUE button to view filtering options.
Press• “MENU” button to exit.
Moving a Channel
Firstselectthe desired channel. SelectMoveoption• in the channel list and press OK button.
Edit Number screen will be displayed. Enter the• desired channel number by using the numeric
buttonsonthe remotecontrol.If there isapreviously
stored channel on that number, a warning screen
01_MB70_[GB]_DVBTC_GOLD_GOLD11_5112UK_32905W_10075979_50201662.indd 1901_MB70_[GB]_DVBTC_GOLD_GOLD11_5112UK_32905W_10075979_50201662.indd 19 02.12.2011 09:33:4702.12.2011 09:33:47
Table of contents
Languages:
Other Finlux LCD TV manuals

Finlux
Finlux 40F6073-D User manual

Finlux
Finlux 40FPD274B-T User manual

Finlux
Finlux 19FLD841UD User manual

Finlux
Finlux 42FME242S-T User manual

Finlux
Finlux 40F6073-D User manual

Finlux
Finlux 65F8200-T User manual

Finlux
Finlux 42F7020-D User manual

Finlux
Finlux 42FLHX880HU User manual

Finlux
Finlux 50F6090-T User manual

Finlux
Finlux FL4023SMART User manual